Jaen Siracusa 15E+ User manual

MANSE+V10 - November 2023


1
CONTENTS
CARE 3 ⚠
MAINTENANCE 5
Tools 5
Changing Strings 5
Adjusting the Bridge Height 6
Adjusting the Compensation 7
Adjusting the Truss Rod Tension 9
Adjusting the Pickup-String Clearance 11
USE 13
Electric Controls 13
Box: Enhanced Single Coil Pickup 15
Box: Mid Pickup 15
Specifications 17

2
Congratulations on your purchase of this Siracusa 15E+ or Siracusa 16E+ guitar!
Your satisfaction is my number one priority. Thank You for choosing my product, and
please consider my guitars for future purchases.

3
CARE
⚠
Siracusa guitars are nothing like conventional archtops with plates that
triple the thickness, virtually indestructible. So, please, read and observe
what follows.
⚠Do not allow the guitar to stay in places where humidity,
temperature or light conditions are extreme. These can affect very
seriously the stability of wood and adhesives. Relative Humidity must
be kept around 50% at all times!
Try not to press excessively on the sides of your instrument. For
example, trying to reach for something on the floor ahead of you
while playing seated.
⚠Oil finishes are soft, so they don’t form a tough coat on top of
the wood. This is really very different from the conventional guitar
finishes that you already know. If your guitar has an oil finish, treat it
very carefully, especially the very soft top. Also, see page 8 for a
special situation where the top can suffer damage.
Protect your instrument from accidents:
Try to keep it in its case, always with the drawbolts closed, when
you are not using it. Do not trust too much in the stability of guitar
stands.
Try not to wear buckles, key holders or zippers that may cause
damage to the instrument while playing.

4
Clean your instrument with well proven products designed
specifically for this job. Avoid abrasive cleaners or those containing
silicone or solvents such as alcohol or acetone.
Do not try to lubricate the machine heads.
Try to clean the strings after use with a dry clean cloth.
Avoid the contact with alcoholic beverages. If it happens sometime,
absorb them with a dry cloth without rubbing.
Connect your instrument only to reliable equipment that have a
ground connection. The power line must have a ground-fault
interrupter. If you do not follow these recommendations, you can
cause damage to the instrument as well as to yourself.
If you are going to modify your instrument, contact me first.
If you are a repairman working on this guitar, please contact me if
you have any doubts on how to perform the repairs. I can also supply
the necessary parts.
Even if you are careful with your instrument, some wear will take
place in normal use:
Frets must be redressed or changed after some time.
The finish and the wood below it can suffer color changes,
usually to a more yellow/orange hue. The high gloss will not last
a lifetime.
The gold or chrome plated pieces may lose their plating.

5
MAINTENANCE
Tools
Your guitar comes with a tool pouch, enough for the most common
operations described below. It contains a small (2 mm) and a large (4 mm)
Hex keys.
Changing Strings
You should do this…
Whenever the strings don’t sound bright, are worn or dirty or have
tuning problems in certain areas of the fretboard.
Necessary tools and materials: Pliers and strings.
Method:
Loosen one string. To untie it from the machines and the tailpiece,
cut it with the pliers. This is the best way to avoid damaging the
string anchors at the tailpiece, your fingers or the finish.
Place the new string in the tailpiece.
Insert the string into the hole in the post and pull until it is around
50 mm high above the fretboard.
Bend the end slightly, just at the exit from the tuner post.
Turn the tuner until the string feels tight, then tune it.
Cut the remaining, leaving about 1 cm out of the post.
Repeat for each string.

6
Adjusting the Bridge Height
You should do this…
Whenever there are buzzes in wide areas of the fretboard. The height
may be lowered if the action is too high and there are no buzzes.
Necessary tools: Small Hex key, supplied with the guitar.
Method:
Depending on the problem affecting
more the bass strings than the treble
strings, you will have to turn the
corresponding adjustment screw to
each side of the bridge saddle.
Clockwise to lower it, and
counterclockwise to raise it. The
adjustment will be finished when the
strings are high enough so that, in
your playing style, there are no
buzzes.
Notes:
I usually set the action very low before delivering my instruments.
You can always raise it if you like it better.
If you use thin plain strings, it is possible to have buzzes because
they don’t have enough tension for straightening out the small
irregularities in the steel caused by playing. Use new strings before
performing any adjustment.
After this adjustment, you should also check the truss rod tension
and compensation adjustments, as explained later.

7
Adjusting the Compensation
This procedure must be performed so that all the notes and their octaves
sound reasonably in unison, independent from their position on the
fretboard. A guitar that is not well compensated can be especially
unpleasant when playing chords that mix notes fingered in high frets with
open strings.
You should do this…
When your new strings are a different gauge, or you plan to use an
alternate tuning permanently.
When the bridge has been moved, usually as a consequence of
removing all the strings (which I don’t recommend).
When the height of the bridge has been modified substantially.
However...
Don’t do this every time that you change the strings, it’s not
necessary.
Don’t do this if you find that your worn strings don’t intonate well.
Instead, change them and check if the new ones are OK.
Necessary tools: Electronic tuner or a good ear.
Method:
Start with new strings, already tuned in the guitar for at least a few
hours.
Check if the natural harmonic for the second string in fret 12 is the
same as the fingered note in that same fret. If the tuner (or your
ear) finds that the fingered note is higher than the harmonic, the

8
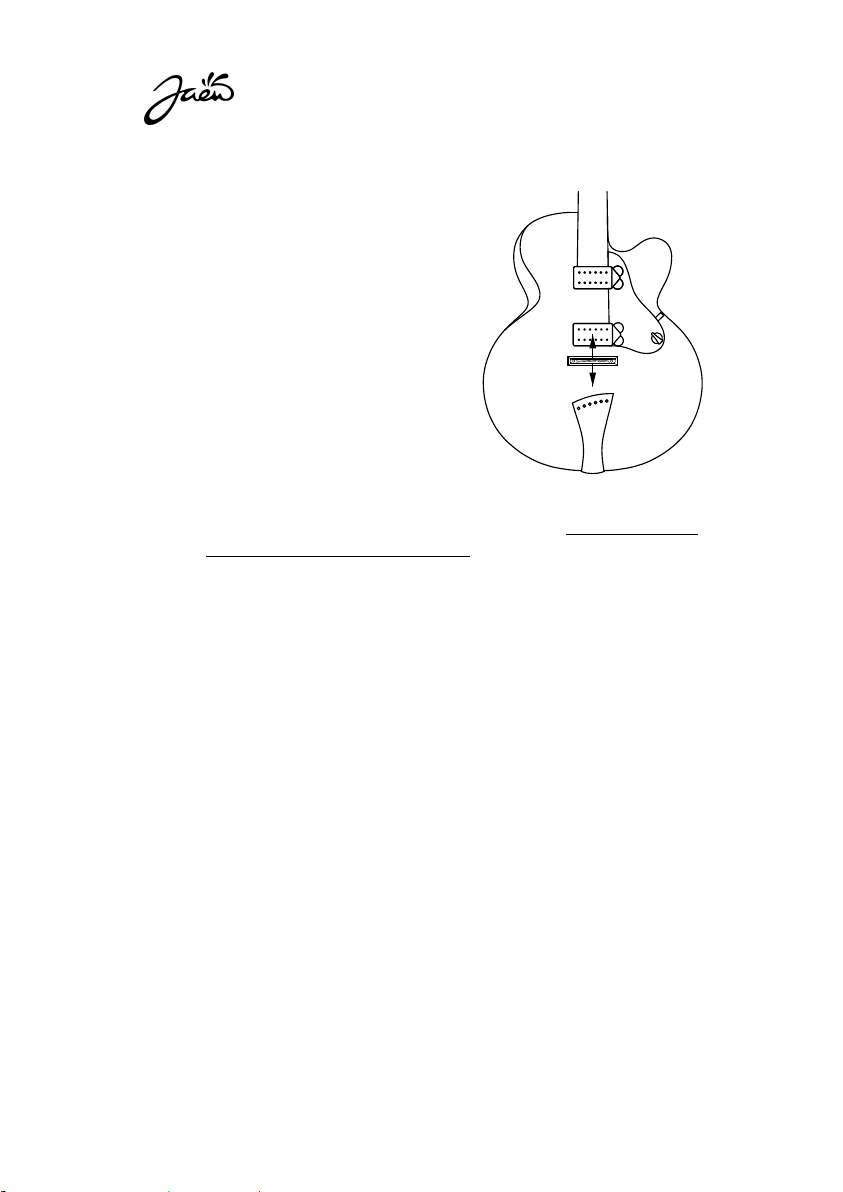
bridge will have to be moved closer to the
tailpiece. Otherwise, move it further
away from the tailpiece (see drawing).
Check the same for the fifth string, but
this time try to move only the bass
side of the bridge, as you should not
modify its position for the string
that you adjusted first.
Notes:
⚠Some bridges may be hard to
move. Don’t force anything, you can damage the top if you press
hard on it. It is better to loosen the strings but, if the finish is oil,
then loosen the strings completely!
Worn strings, deformed from playing or dirty can be impossible to
play in tune—never try to adjust the compensation for old strings,
it’s wasted time.
Some wound strings have defects in the uniformity of their
windings that make them useless. Plain strings have their problems
too: some show a kind of coiling right out of the package that
doesn’t correspond to the curvature that they assumed while in
the package—don’t use these, especially if they are in a low
tension set.
The fixed bridges found in archtop guitars don’t allow a perfect
adjustment for every string, but the discrepancy is usually quite
small.
The saddle in your guitar has been adjusted for string sets that
have a wound third string. If you use a plain third, you may need a
different saddle. Inquire.

9
Adjusting the Truss Rod Tension
You should do this…
When there are buzzes but the action is high. This has three main
probable causes:
- Change of the tension exerted on the neck, usually following the
change of the string gauge or alternate tunings.
- Wood adaptation to the strings/truss rod tension and compression
forces. This is especially important during the first year of life of the
instrument.
- Changes in relative humidity.
Necessary tools: There are two different methods, depending on your
playing style. To perform the “A” method you will need a thin guitar string
(0.010”) and, perhaps, some assistance. For the “B” method, you won’t
need the string. If, after the check, you must make the adjustment, you will
need both the small and the large Hex keys supplied with the guitar.
Method A.- This is the way to adjust your guitar if your style is more limited
to the first frets, including lots of open strings.
Press a string (preferably, the third or fourth) simultaneously on
frets 1 and 15. Check if the 0.010” string, working as a gauge, fits
between the top of the seventh fret and the bottom of the chosen
string. If it fits snugly, then stop here: you won’t need any
adjustments.
Remove the magnetic truss rod access cover: insert the small Hex
key into its hole until you find some resistance, then pull.
If the gauge (the 0.010” string) fits loose (so there is still some
clearance), turn the adjustment nut with the large Hex key,
clockwise as seen from the peghead end, an eighth of a turn or less
(see drawing).

10
If the gauge doesn’t fit, turn the adjustment nut with the large Hex
key, counter-clockwise as seen from the peghead end, an eighth of
a turn or less (see drawing).
Wait until the following day, then adjust the
height of the bridge (Page 6) and repeat the
process.
Put in place the magnetic truss rod access
cover again.
Method B.- This is the way to adjust your guitar if
your style involves all the fretboard.
Press a string (preferably, the third or fourth) simultaneously on
frets 1 and 15. Press it lightly on the seventh fret and check if there
is a gap between the fret and the string. If there is one, but it is
extremely small, close to nothing, then stop here: you won’t need
any adjustments.
Remove the magnetic truss rod access cover: insert the small Hex
key into its hole until you find some resistance, then pull.
If there is a noticeable gap between the fret and the string at fret
#7, then turn the adjustment nut with the large Hex key, clockwise
as seen from the peghead end, an eighth of a turn or less (see
drawing).
If the string is making contact with the seventh fret, turn the
adjustment nut with the large Hex key, counter-clockwise as seen
from the peghead end, an eighth of a turn or less (see drawing).
Wait until the following day, then adjust the height of the bridge
(Page 6) and repeat the process.
Put in place the magnetic truss rod access cover again.
CCW
CW

11
Adjusting the Pickup-String Clearance
You should do this…
When you notice that the amplified sound of a string or group of strings
is louder or weaker than the others, or when the output of a pickup is
too high or too low.
Necessary tools: You will need the small Hex key supplied with the guitar.
Method:
The neck pickup is set at a fixed height, so all the adjustments will be
only on the individual polepieces, two per string. Turn them clockwise to
reduce the output of a string, and counterclockwise to increase it.
The height of the bridge pickup can indeed be modified. This is useful if,
for example, you are trying to balance it with the neck pickup so that
both have a similar maximum output. To do it, loosen the screws S (see
drawing) enough so that you
can raise or lower the
pickguard bracket, and then
tighten them again. After
this coarse adjustment you
can proceed to make fine
adjustments to the
polepieces, the same as you
did for the neck pickup.
Note:
The pickups in your guitar have two rows of polepieces. I favor this
design because it makes possible to use bronze wound strings instead of
the usual steel or nickel wound strings that are used for electric guitars.
Let me explain this.
S

12
Bronze wound strings have a fantastic acoustic tone, but their volume is
quite low when used with magnetic pickups. The plain strings in the set
(usually the first and second) will have a much higher volume, resulting
in a very strong imbalance. The logical way to correct this problem is to
raise the polepieces of the wound strings and lower the polepieces of
the plain strings, trying to equalize their output. However, in my
experience, achieving an acceptable balance is impossible for pickups
that feature adjustable polepieces just for one of their coils, no matter
how extreme the adjustment (even removing the polepieces for the
plain strings). However, it can be done if both coils have them, which is
the way my pickups are made.

13
USE
Electric Controls
All the controls are located at the pickguard:

14
Pickup Selector in the Neck Position.- There are two cases, depending on
the Neck Pickup Mode Switch. If it is in the HB position (toggle towards the
peghead, A in the drawing below) then the selected pickup will be a series
humbucker made up by the two coils closer to the neck. In the SC position
(toggle towards the tailpiece, B in the drawing below) the pickup will be a
special type of single coil that I call Enhanced Single Coil (see the first box in
page 15). The volume and tone knobs are the same in both cases, and are
shaded in the diagram.
Pickup Selector in the Mid Position.- The selected pickup will be a series
humbucker made up by the most extreme coils, the one closer to the neck
and the one closer to the bridge (C in the drawing below, see the second
box in page 15). The volume and tone knobs for this position are shaded in
the diagram; the position of the Neck Pickup Mode Switch is irrelevant.
Pickup Selector in the Bridge Position.- The selected pickup will be a series
humbucker made up by the two coils closer to the bridge (D in the drawing
below). The volume and tone knobs for this position are shaded in the
diagram; the position of the Neck Pickup Mode Switch is irrelevant.
Neck
Mid Bridge
T
V
TT
V
V
HB
HB or SC
(irrelevant)
SC
Neck
T
V
Enhanced SC
HB or SC
(irrelevant)
(A)
(D)
(C)
(B)

15
Enhanced Single Coil Pickup
The Neck Pickup Mode Switch permits to select either a Humbucker or a Single
Coil for the neck pickup. When in Humbucker mode (toggle towards the
peghead, see diagram A on previous page), you’ll have a full tone, almost free
of hum. In the Single Coil position (toggle towards the tailpiece, B on that same
diagram), the tone of the neck pickup will be more clear and bright, although
more prone to being affected by electromagnetic interference.
Single coil pickups obtained by canceling one of the coils of a humbucker (as
done here) are usually disregarded by most players, as they tend to be weaker
than real single coils. Nonetheless, your Siracusa 15E+/16E+ guitar has a very
uncommon neck pickup and circuitry: when in single coil mode, a third coil is
added on top, giving you the tone and punch that you expect from a real single
coil. I like to call this the Enhanced Single Coil mode.
Mid Pickup
Most guitars with two humbuckers use the mid position of the pickup selector
to connect the neck and bridge pickups in parallel. This is a simple wiring
arrangement, but it causes interactions (usually unwanted) between volume
and tone pots, that are also connected in parallel together with the pickups.
Instead, for the mid position of the switch, the Siracusa 15E+/16E+ does as
follows:
It makes up another pickup (the Mid Pickup) by taking a coil from the
neck pickup and another from the bridge pickup, and connecting them in
series. These coils are the one closer to the neck and the one closer to
the bridge, so this new pickup is also a series humbucker, the same as
the other two.
It has its own volume control, independent from the other two.

16

17
Specifications
Variable Materials:
Wood: Usually maple, walnut or sapele for the back and sides, and spruce for
the top; maple for the neck. The fretboard, peghead face, bridge and tailpiece
are usually made of ebony. The pickguard skin is made of ziricote most times (its
core is always carbon), and the pickups are usually made of ziricote or ebony.
The bindings are usually maple, walnut, ovangkol or sapele, and the purfling is
usually fiber.
Most metal parts are gold plated.
Some guitars substitute the mother-of-pearl inlay material for wood.
The finish is either nitrocellulose or epoxy+Tru-oil.
Case: Hiscox or custom made by Artur Benedykt.
Fixed Materials:
Carbon: The truss rod access cover and tuning machines cover are both carbon
with a glued lamination of wood, usually ebony. The peghead has two internal
carbon reinforcements where the tuners are attached. There is also a carbon
skeleton inside the bridge saddle that stiffens it. The bridge feet are hollow,
usually made of ebony, and joined by two carbon fiber rods. The pickguard has a
carbon core hidden below its wooden skin. There are other internal pieces
where carbon is used.
The frets are Jescar FW47104SS, Stainless Steel.
The kerfing is usually made of mahogany. It is installed using a proprietary
method that makes the sides very strong without adding extra mass.
The nut is made of cow bone.
The tuning machines are Schertlers, modified so that their mechanisms are
hidden inside the peghead, usually with ebony knobs.
The tailpiece bracket is made of aluminum covered with a wooden veneer,
usually ebony.
The main pickguard bracket is made of blackened steel. The neck bracket is
made of brass.
Magnetic pickups: Neck PU with 50 mm and Bridge PU with 52 mm polepiece
spread. The neck pickup can work in enhanced single coil mode.
Potentiometers: long rotational life (100.000 cycles), conductive polymer.
Measurements:
Neck: For non-custom instruments, the scale is 25.5” (648 mm), while the nut
width is 1 11/16” (43 mm).
Soundbox depth: usually around 65-70 mm.
Siracusa 15E+: 15 inches at lower bout.
Siracusa 16E+: 16 inches at lower bout

Guitarras Jaén - Fernando A. Jaén
Ctra. De Pozorrubio, 92
16410 Horcajo de Santiago (Cuenca)
SPAIN
www.guitarrasjaen.com
info@guitarrasjaen.com
Tel: +34 620791064
This manual suits for next models
1
Table of contents
Other Jaen Musical Instrument manuals