Jangus JM-WAL35 User manual

Wi AudioLink
USER GUIDEJM-WAL35
Stereo Digital Wireless Audio System
STEREO
DIGITAL WIRELES
TM
TM
TM

CONGRATULATIONS!
Thank You For Choosing Jangus Music!
Congratulations on your purchase of the Wi AudioLink Professional Stereo Digital Wireless Audio System.
In this manual you’ll nd information designed to help you understand the capability of your
Wi AudioLink, as well as step-by-step explanation on how to install and operate your
Wi AudioLink stereo digital wireless audio system.
Wi AudioLink
CONGRATULATIONS

Getting Answers!
We want you to get the most from your new Wi AudioLink stereo digital wireless audio system!
Simply logon to www.jangusmusic.com and access the powerful resources available online including
instructional manuals and frequently asked questions.
Our customer service support staff is ready to assist you with any question you may have.
Your Wi AudioLink comes with 90 days of telephone support and one year of service coverage.
There are may ways to contact Jangus Music customer service support.
Website: http://www.jangusmusic.com/support
Technical support: (877) 526-4874 (877-JANGUSi)
Wi AudioLink
3
TECHNICAL SUPPORT

Making Great Instruments Better!
Jangus Music’s Wi AudioLink world class, linear stereo digital wireless audio solution is the smallest, most
advanced cable replacement technology available today that can t in the palm of your hand! This Patents-
Pending plug-and-play stereo digital wireless audio solution provides an easy and user friendly way to
connect any professional mini condenser microphones or analog audio device to remote and hard to reach
audio equipment.
Automatic, No Hassle Setup!
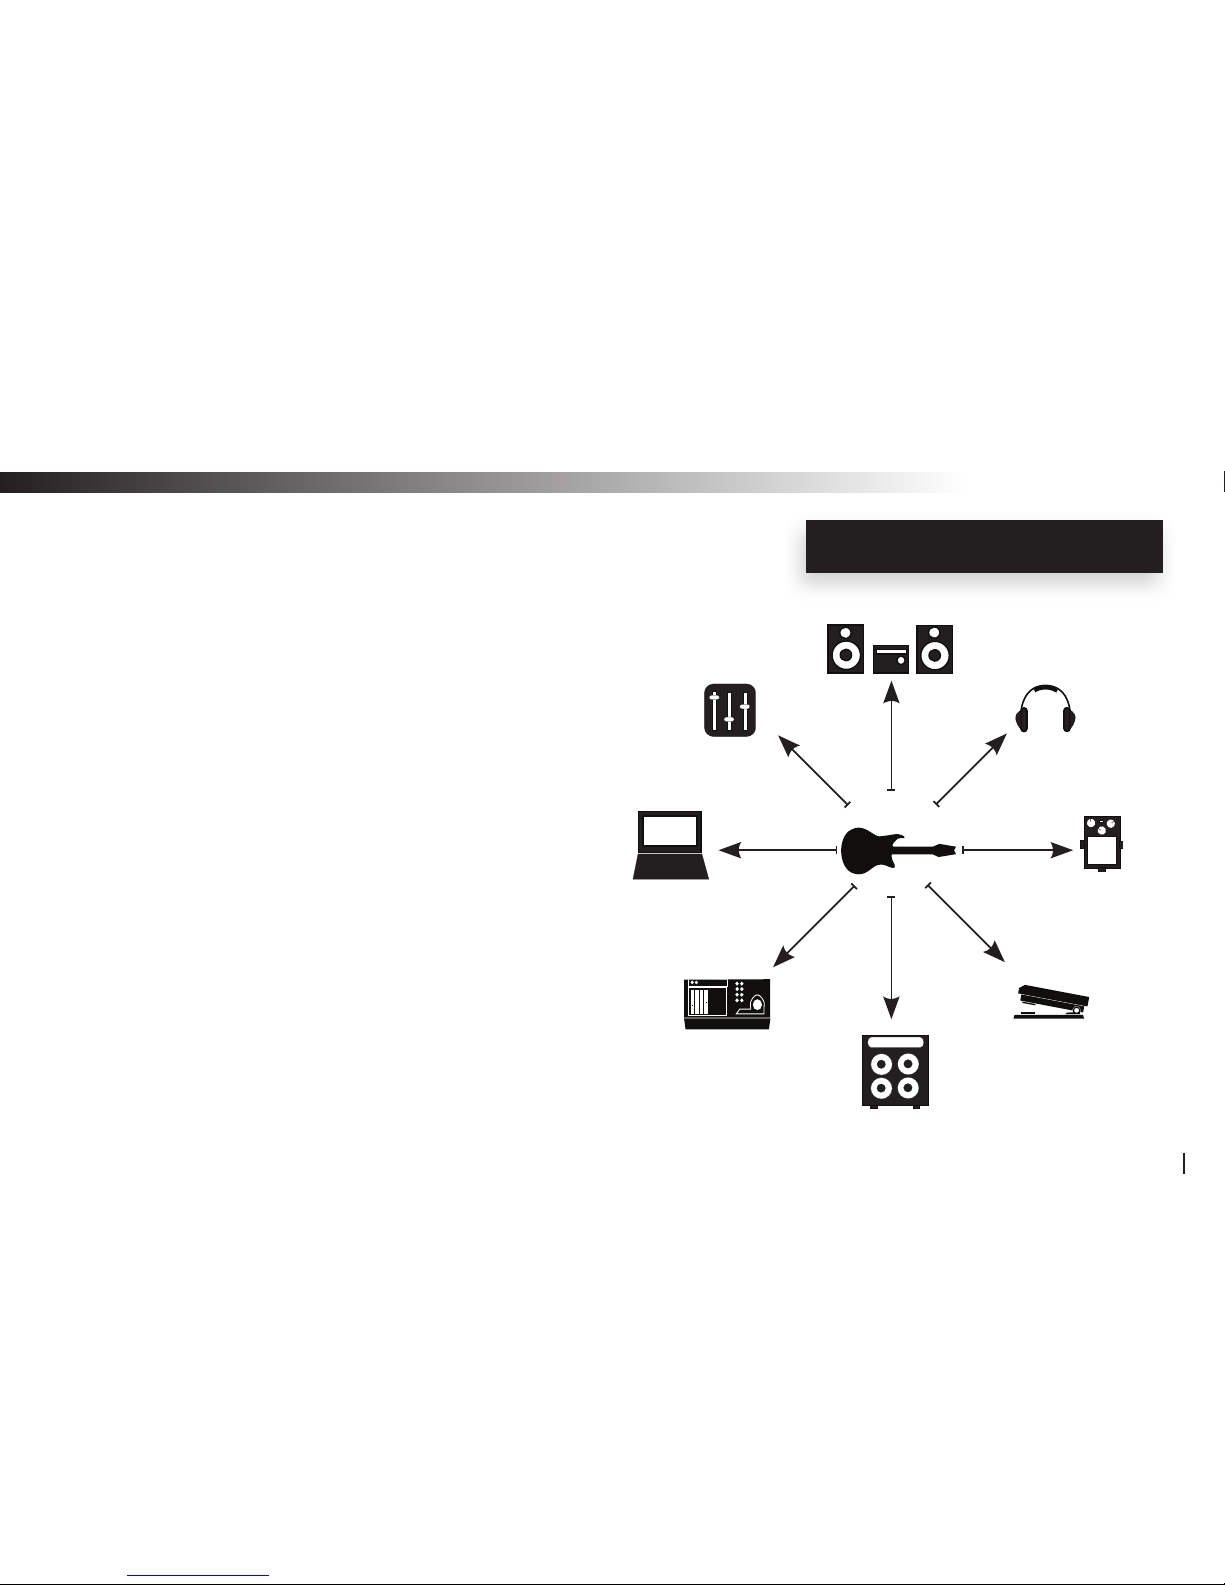
Simply connect the ultra compact sized transmitter to the audio output jacks on the musical instrument and then connect
the ultra compact sized receiver to the mixer, amplier, headphones, in-ear monitors or computer audio input jacks and you
are done!... No knobs to tweak... No antennas to adjust.
Live and Studio Performance!
This full function 2.4GHz point-to-point digital wireless stereo audio solution provides more than 100 feet of secure, simulta-
neous uncompressed 16bit rate at 48kHz CD quality wireless audio connectivity. This high-quality solution operates without
radio frequency (RF) interference inherent in UHF/VHF systems, signal loss, crackle or AC hum, making it the best digital
wireless solution for live performances, personal monitoring and studio recording environments.
INTRODUCTION
Wi AudioLink
4

Crisp Highs and Thundering Low Tones!
The Wi AudioLink 15Hz to 20kHz frequency response range covers the full spectrum of the harmonic frequencies of
music including Keyboards, Singing Voices, Woodwinds, Brass, Percussion and Strings to delivers crisp highs and
thundering low tones to satisfy the most demanding musicians.
Meeting The Specs!
The Wi AudioLink transmitter’s small and rugged design boasts three (3) different power up modes to support
Line-in (Stereo), Active Guitars/Mono Line-in and Passive Guitars /Electric Acoustic instruments connection.
Each of the power up modes is congured to apply the appropriate input impedance and input voltage level to best
match the electrical characteristics of the instrument connected to the transmitter.
In-Ear Monitoring!
The Wi AudioLink provides the freedom and the benet of wireless in-ear monitoring to a wide array of
cost-conscious musicians, houses of worship and installations requiring assistive listening devices.
INTRODUCTION
Wi AudioLink
5

Extreme Flexibility!
The Wi AudioLink power source’s exible design boasts an
internal rechargeable battery for 4~6 hours of battery operation.
The optional ON-THE-GO AA battery power adapter provides
for 10~13 hours of extended battery operations and the AC
power adapter provides continuous operation, so there’s no
need to power down the Wi AudioStream for recharging or
swapping the AA batteries on the optional ON-THE-GO battery
power booster. The JM-WAL45 transmitter and receiver can
also be powered by USB bus power when connected to any
USB host equipped device for continuous power operation you
can count on.
INTRODUCTION
Wi AudioLink
6
XLR Unbalanced
6.3mm TSR Stereo
6.3mm TSR Mono
3.5mm Stereo
3.5mm Mono
2.5mm Stereo
2.5mm Mono
RCA
Charger
USB
Bus Power
3.5mm Stereo
AA Battery
Power Booster
Fast and Easy Setup!
The Wi AudioLink is the rst digital wireless system ever to combine all the features required for professional
Instruments and in-ear monitoring in an ultra small, rugged, light-weight, compact design. This combination of
audio performance, simplied setup and portability lets you set up quickly and easily! No extra gear to haul, No
bulky devices to carry, No heavy cables to hoist or route and No tangle of speaker cables.

Creating Your Audio Matrix!
Jangus Music’s audio routing feature allows users
to send the audio output from their instrument to up
to eight (8) different digital wireless receivers with
a simple press of the Link button. You can send the
audio signal to other receivers as well as the Jangus
Music’s JM-WHM01 digital wireless headphone. No
more removing, swapping or disconnecting cables.
INTRODUCTION
Wi AudioLink
7
Tx 1
Effects Pedals
Rx 1
Headphone
Rx 2
Mixer
Rx 4
Computer
Rx 5
Rx 7
Foot Pedals
Rx 8
Rx 3
Digital Recorder
Rx 6

What is included in the package?
Verify that you have received all of the items listed below.
Please visit our web site at www.jangusmusic.com for additional accessories.
PACKING LIST
Wi AudioLink
8
Wi Transmitter Wi Receiver Universal AC Charger
(QTY 2) 1/4” Mono Male to
1/8” Stereo Male Cable
(QTY 2) 1/4” Stereo Male to
1/8” Stereo Male Y-split Cable Carrying Bag
USB Y-Split Power Cable
User Manual
www.jangusmusic.com

1. Audio OUT Jack
2. Power ON/OFF
3. Power/Status LED
4. Volume UP
5. Volume Down
6. Link/Pairing
7. Next Track
8. Previous Track
9. Mute/Play/Pause
10. USB Charging Port
11. Belt Clip
11
~
s
ABOUT YOUR JM-WAL35
Wi AudioLink
9
1. Audio IN Jack
2. Power ON/OFF
3. Power/Status LED
4. Volume UP
5. Volume Down
6. Mute
7. Link/Pairing
8. Sleep
9. Operation Mode
10. USB Charging Port
11. Belt Clip
11
j
r
o
n
q
p
l
m
k
u
|
}
y
{
z
w
x
v
Wi Transmitter
Wi Receiver

Transmitter Controls and Connections
jAudio IN Jack: Provides a stereo connection for professional musical instruments and more...
kPower ON/OFF: Press and hold the Power button for 2 seconds to turn the transmitter ON or OFF.
lPower/Status LED: The Power/Status LED displays the status of six functions, ON/OFF, Battery
Charging, Low Battery, Pairing, Mute, Operations and Sleep mode.
F
Please refer to the “Tx Button Function Matrix” section of this manual for more details
mVolume UP: Press and hold the Volume UP to automatically increase the volume level.
Press the Volume UP once to increase the volume level one step at a time.
nVolume DOWN: Press and hold the Volume DOWN to automatically decrease the volume level.
Press the Volume DOWN once to decrease the volume level one step at a time.
TRANSMITTER FEATURES
Wi AudioLink
10

oMute: Press and hold the Mute button for 1.5 seconds to mute or unmute the audio.
pLink/Pair: The Link button performs two functions: Pairing and Linking.
The Pairing function allows the transmitter to connect to up to 8 eight different
receivers to create your own wireless audio matrix. Press and hold the Link
button for 3 seconds until the Green LED display fast ashes.
The Link function allows the transmitter to reroute the audio signal connection
from the instrument to up to 8 eight different receivers previously paired with the
transmitter. Press the Link button once and the transmitter will reroute the wire
less connection to the next receiver.
TRANSMITTER FEATURES
Wi AudioLink
11

qSleep: The Sleep function button on the transmitter is designed to prolong the battery
life operation of the transmitter by 50% as well as the receiver battery
life by 35% when not in use. When the Sleep function on the transmitter is
activated, the transmitter sends a signal to the linked receiver to go into a
standby mode while switching to full sleep mode. The Sleep mode preserves
the audio level settings on both units as well as the communications link
between the transmitter and the linked receiver.
Press and hold the Sleep button for 2 seconds to switch the transmitter and
the receiver into standby power save mode.
Press the Sleep button once to wake-up the transmitter and the receiver.
TRANSMITTER FEATURES
Wi AudioLink
12

rMode: The Mode multifunction button allows the user to choose between three different
power up modes to support Passive Guitars, Active Guitars or Stereo Line in
connection to the transmitter. To select the desired operations mode, press
and hold the Mode button for 2 seconds until the blue LED change its ashing
sequence, then release. To cycle between the three modes, simply press and hold
the Mode button and the transmitter will cycle between the three modes along with
the Blue LED ashing sequences for each of the modes. Release the mode button
once the desired mode setting is reached.
F
Please refer to the “Tx Button Function Matrix” section of this manual for detailed instructions .
sCharging Port: The transmitter uses a mini USB connection to power up and charge the internal
batteries. The transmitter can be charged using the supplied universal AC charger,
via an instrument’s built-in USB port or the optional AA battery power booster USB
adapter.
Belt Clip: The transmitter can be attached to the optional Wi FreeBody guitar strap, standard
guitar straps, belts, shirts and pants pockets. The rigid, small sized, light weight
design is easy to wear without impeding your body movement.
TRANSMITTER FEATURES
Wi AudioLink
13
11

Receiver Controls and Connections
uAudio OUT Jack: Provides a stereo connection for professional Sound Systems, Monitors,
Recorders, Headphones and more...
vPower ON/OFF: Press and hold the Power button for 2 seconds to turn the transmitter ON or OFF
wPower/Status LED: The Power/Status LED displays the status of six functions, ON/OFF, Battery,
Charging, Low Battery, Pairing, Mute and Sleep mode.
F
Please refer to the “Rx LED” Indicator Chart” section of this manual for more details
xVolume UP: Press and hold the Volume UP for auto increments of the volume level
Press the Volume UP once for step increments of the volume level
yVolume DOWN: Press and hold the Volume DOWN for auto increments of the volume level
Press the Volume DOWN button once for step increments of the volume level
RECEIVER FEATURES
Wi AudioLink
14

zLink/Pair: The Link function button allows the receiver to be discovered by the transmitter.
Press and hold the Link button for 3 seconds until the Green LED display
fast ashes.
F
Please refer to the “Rx Button Function Matrix” section of this manual for detailed instructions
{Next Track: The Next Track function button is used with the optional Jangus Music PC/MAC
USB transmitter to remotely control jumping to the next track for media players or
sequencing software.
Press the Next Track button once to jump to the next audio track.
RECEIVER FEATURES
Wi AudioLink
15

|Previous Track: The Previous Track function button is used with the optional Jangus Music PC/MAC
USB transmitter to remotely control jumping to the previous track for media players or
sequencing software.
Press the Previous Track button once to jump to the next audio track.
}Mute/Pause/Play: Press and hold the Mute/Pause/Play button for 1.5 seconds to mute/un-mute audio.
When the receiver is used with the optional Jangus Music PC/MAC USB
transmitter, the Mute/Pause/Play function will remotely control the media player or
sequencing software to mute, pause or play the audio track.
Press the Mute/Pause/Play button once to pause or play the audio track.
Press and hold the Mute/Pause/Play button for 1.5 seconds to mute/un-mute audio.
RECEIVER FEATURES
Wi AudioLink
16

~Charging Port: The receiver uses a mini USB connection to power up and charge the
internal batteries. The transmitter can be charged using the supplied universal
AC charger, via the instrument’s built-in USB host port or the optional AA battery
power booster USB adapter.
Belt Clip: The receiver can be attached to belts, shirts and pants pockets when used with
in-ear professional personal monitors. The rigid, small sized, light weight design is
easy to wear without impeding your body movement.
RECEIVER FEATURES
Wi AudioLink
17
11

Ready, Charge, Go!
Before using your new Wi AudioLink digital wireless, you need to
fully charge the batteries for approximately 2 hours.
Charging
1. Plug the AC Charger into a power socket.
2. Connect the USB Y-Split power cable to the USB port on the AC charger.
3. Connect one of the two mini USB connectors into the transmitter USB port.
4. Connect the second mini USB connector to the receiver USB port.
5. The Power/Status LED will turn to solid Red ON.
6. When charging is complete the Red LED will turn OFF.
7. Remove the charging cable and adapter and store in the carrying case.
The battery will last 4 to 6 hours of continuous operation.
POWER
LINK
AC Charger
USB Port
Mini USB
Connector
USB Port
USB Connector
GETTING STARTED
Wi AudioLink
18

Pairing the Wi AudioLink!
Before using the Wi AudioLink with your instruments, you need to pair the transmitter with the receiver.
Pairing will create a connection between the transmitter and receiver.
1. First turn ON the transmitter (Tx) and the receiver (Rx) by pressing and
holding the POWER button , on each of the units for 2 seconds.
2. Press and hold the LINK button on the transmitter (Tx) for 3 seconds.
The Power/Status LED on the transmitter will start ashing. The transmitter
is now in a Pairing mode and ready to search for receivers.
3. Press and hold the LINK button on the receiver (Rx) for 3 seconds.
The Power/Status LED on the receiver will start ashing. The receiver
is now in a Pairing mode and ready to be found by the transmitter.
4. Once the transmitter pairs with receiver, the Power/Status LED on both
devices will turn to solid Green.
5. The Wi AudioStream transmitter and receiver are now ready for use.
PARING
Wi AudioLink
19
p
k
(Tx)
pk
z
v
zv
(Rx)

Connecting Electric Guitars & Electric Acoustic Instruments!
The Wi AudioLink transmitter supports passive and active
guitars including lead, bass and acoustic electric guitars.
1. First locate the 1/4” mono male to 1/8” stereo
male cable supplied with kit.
2. Connect the 1/8” stereo male end of the cable into
the “Audio Input” jack on the transmitter.
3. Route the audio cable beneath the belt clip as shown to
prevent accidental disconnection of the cable.
4. Connect the 1/4” mono male end of the cable to the electric
guitar input.
5. Verify if you are connecting a passive or active electric guitar to the
transmitter. If the electric guitar uses a battery to operate, then
the guitar is an active type. If not then the guitar is a passive type.
TRANSMITTER CONNECTION
Wi AudioLink
20
Audio Input
Jack
1/4” Mono to 1/8’ Stereo Cable
1/4” mono male connector
Electric Guitar input
Belt Clip
Audio Cable
Other manuals for JM-WAL35
1
Table of contents
Other Jangus Stereo System manuals