Javo Plus M2.0 User manual

Nobels BV
Bulb Trade Park 1
2211 SW Noordwijkerhout
The Netherlands
+31 (0) 252 343 121
info@javo.eu
www.javo.eu
A NOBELS GROUP COMPANY
User Manual
Original document
Version 22300779
Javo Plus M2.0
© All rights reserved
No part of this publication may be reproduced and/or published by means of print, photocopy, microlm, electronically on tape or
by whatever other means, for whatever purpose, without express prior written permission from Nobels BV.

User manual for Javo Plus M2.0
Version 22300779
page 1 / 27
Preface
This user manual is intended for all persons who work with or on the machine. You must read this manual before you
start working with or on the machine.
The user manual contains important instructions and information on the safe, expert and economic use of the
machine. The user manual must always be kept available in the vicinity of the machine.
All persons must comply with both the instructions in the user manual and with the provisions of the national
regulations governing accident prevention and environmental protection.
This user manual contains information on the operation of the machine and all the options that are available. Use
only the information of relevance to your machine. This machine may be tted with various options as determined
by the intensity of use and customer requirements. Contact your Sales Consultant about these.
Supplier details (when not supplied directly by Nobels BV).
Dealer stamp:
Nobels BV is not responsible for damage and consequential damage caused by operating errors, lack of expert
maintenance and any use other than described in this manual.
Nobels BV's liability will also expire should you or third parties make any modications or extensions without prior
written consent.
This machine is suitable only for the process and ambient conditions referred to in the “Specications and
Tolerances” Section of this manual. Every other use is not authorized by Nobels BV, and may cause risks to the
operator and/or persons in the area.
Nobels BV
Bulb Trade Park 1
2211 SW Noordwijkerhout
The Netherlands
+31 (0) 252 343 121
info@javo.eu
www.javo.eu
A NOBELS GROUP COMPANY

User manual for Javo Plus M2.0
Version 22300779
page 2 / 27
Index
1. Technicalspecicationsandtolerances 4
1.1. Type plate 4
2. Safety 5
2.1. Instructions 5
2.2. Machine safeguards 6
2.3. Explanation of icons and symbols 6
3. Descriptionofthemachine 7
3.1. Parts of the machine 7
3.2. Outline drawing with main dimensions 7
3.3. Options 8
3.4. Operating principle 8
3.5. Machine workstations 8
3.6. Controls 9
4. Transport 9
5. Assembly,installationandcommissioning 10
5.1. Location 10
5.2. Facilities to be provided by the user 10
5.3. Assembly / connection 10
5.4. Adjustment of the elevator 10
5.4.1. Check elevator's direction of rotation 10
5.4.2. Check tension of the elevator belts 11
5.4.3. Adjust elevator speed 11
5.5. Adjust soil scraper height 11
5.6. Adjust drill 12
5.6.1. Check drill's direction of rotation 12
5.6.2. Select drill size 12
5.6.3. Adjust double drill (optional) 13
5.7. Adjust soil supply 13
5.7.1. Check tension of soil belt 13
5.7.2. Adjust height of soil slide 13
5.7.3. Adjust soil chute 15
5.8. Adjust pot track 15
5.8.1. Adjust pot track 15
5.8.2. Adjust the pot track speed 17
5.9. Relocating the mechanical take-off (optional) 17
5.10. Adjustthenal-llsystem(optional) 18
5.10.1. Final-llsystemwithxeddisk(optional) 18
5.10.2. Final-llsystemwithrotatingdisk(optional) 18
5.11. Adjust pot dispenser (optional) 19
5.11.1. Adjust pneumatic pot dispenser (POP) (optional) 19
5.11.2. Adjust pneumatic pot dispenser (MPO) (optional) 20
5.11.3. Adjust pneumatic pot dispenser (LPO) (optional)
Adjust empty pot buffer belt (optional)

User manual for Javo Plus M2.0
Version 22300779
page 3 / 27
6. Operatingthemachine 21
6.1. Starting the machine 21
6.2. Stopping the machine 21
6.3. Emergency stop 21
7. Maintenance 22
7.1. Maintenance tools and equipment 22
7.2. Preventive maintenance 22
7.3. Emptying soil bin 23
7.4. Lubricating drill unit 23
7.5. Cleaning elevator buckets 23
7.6. Testing safety circuit 23
7.7. Troubleshooting 24
7.8. Adjust (increase) soil supply belt stroke 25
7.9. Drawings and circuit diagrams 25
7.10. Spare parts 26
7.11. JavoNet 26
7.12. Customer service and advice 26
8. Disposalofmachine/partsofthemachine 26
9. ECdeclarationofconformity 27

User manual for Javo Plus M2.0
Version 22300779
page 4 / 27
1. Technicalspecicationsandtolerances
Thismachineisintendedonlyforautomaticallyllingpotswithsubstrate.Aholeisthendrilledinthesubstrate,
readytoreceiveaplantonthetake-offconveyor.Thismachineisintendedonlyfortheprocessingofpots,
substratesandothermaterialsspeciedinthismanual.Themachine'sfunctionisexplainedinthe“Operating
principle” Section.
This machine may be used only within the specications and tolerances laid down in the order, assembly
drawing and this manual. Nobels BV cannot accept any responsibility for this machine when it is used outside
these limits.
This machine is intended only for products as agreed in the order conrmation. To guarantee the correct
functioning of this machine, only products within the specications and tolerances as laid down in the order
conrmation may be used.
Do not use this machine for purposes other than those for which Nobels BV designed the machine. Use for other
purposes may result in damage and in hazards to the operator and the operator's surroundings.
This machine bears CE marking. When several machines are installed in one production line then the entire
production line must bear appropriate CE marking before this machine may be commissioned. This machine
may not be commissioned until CE marking has been applied to the production line.
Specications
Power supply 400 Volt 50Hz 3~+N+ PE / 220 Volt 60Hz (or in consultation)
Connection to power supply 16A 5 pole
Power consumption 5.5kW
Switched plug box 1x 16A 5 pole
Weight Approx. 1750 kg
Height of take-off conveyor 805 mm
Max. speed 3100 pots per hour (50Hz)
Min. speed 1240 pots per hour (15 Hz)
Minimum pot diameter 10 cm
Maximum pot diameter 32 cm (10 liters)
Number of potholders 16
Volume of soil bin 1100 liter (1.1 m³)
Drill holder (Motor shaft 19 mm) Drill shaft 14 mm (through 15 cm drill)
Operating the machine Separate control unit with stop/start/emergency stop/reset
Elevator frequency controller Standard (controls on electrical cabinet)
Pot track frequency controller Standard (controls on electrical cabinet)
Wheels Heavy-dutybearingwheelsatfront,castorsatback
Cuttings plate Standard adjustable in height
Circulation rail Edging and rail at each position removable. Rail divisible
Year of manufacture See type plate.
Type of product Asagreedintheorderconrmation
Compressed air (optional) 6 Bar; 250 nl/min.
1.1. Typeplate
The type plate is mounted on the switchbox door

User manual for Javo Plus M2.0
Version 22300779
page 5 / 27
2. Safety
This machine was built on basis of the state-of-the-art technology and recognized safety regulations.
Nevertheless, the use of the machine can endanger life and limb of the user or of third parties. The use of the
machine can also result in damage to the machine or to other goods.
This machine bears CE marking. When several machines are installed in one production line then the entire
production line must bear appropriate CE marking before this machine may be commissioned. This machine
may not be commissioned until CE marking has been applied to the production line.
2.1. Instructions
1. Thismachinemustbeusedandmaintainedbyqualiedpersonnelincompliancewiththewarningsonthe
machine and in compliance with the user manual. Keep children and other unauthorized persons away from the
machine while it is in use.
2. Thismachineissuitableonlyfortheprocessandambientconditionsreferredtointhe“Specicationsand
Tolerances”Sectionofthismanual.EveryotheruseisnotauthorizedbyNobelsBV,andmaycauseriskstothe
operator and/or persons in the area.
3. ThismachinemaynotbemodiedwithoutpriorwrittenconsentfromNobelsBV.
4. Do not adjust the factory settings of thermal cutouts and torque limiters. Never use the thermal safety switches
to turn the machine on or off.
5. Thismachinemustbeinstalledsothatthereissufcientspacetogiveinstructionsinsafetyand/orcarryout
maintenance and/or inspections. Apply the brakes on the castors before turning the machine on.
6. Keep the work area clean and well lit. An untidy or poorly-lit work area can result in accidents.
7. This machine is not suitable for outdoor use. The electrical components are only splash proof. Protect this
machine from rain and moisture. Use a ground leakage circuit breaker when you have to use the machine in a
moist area.
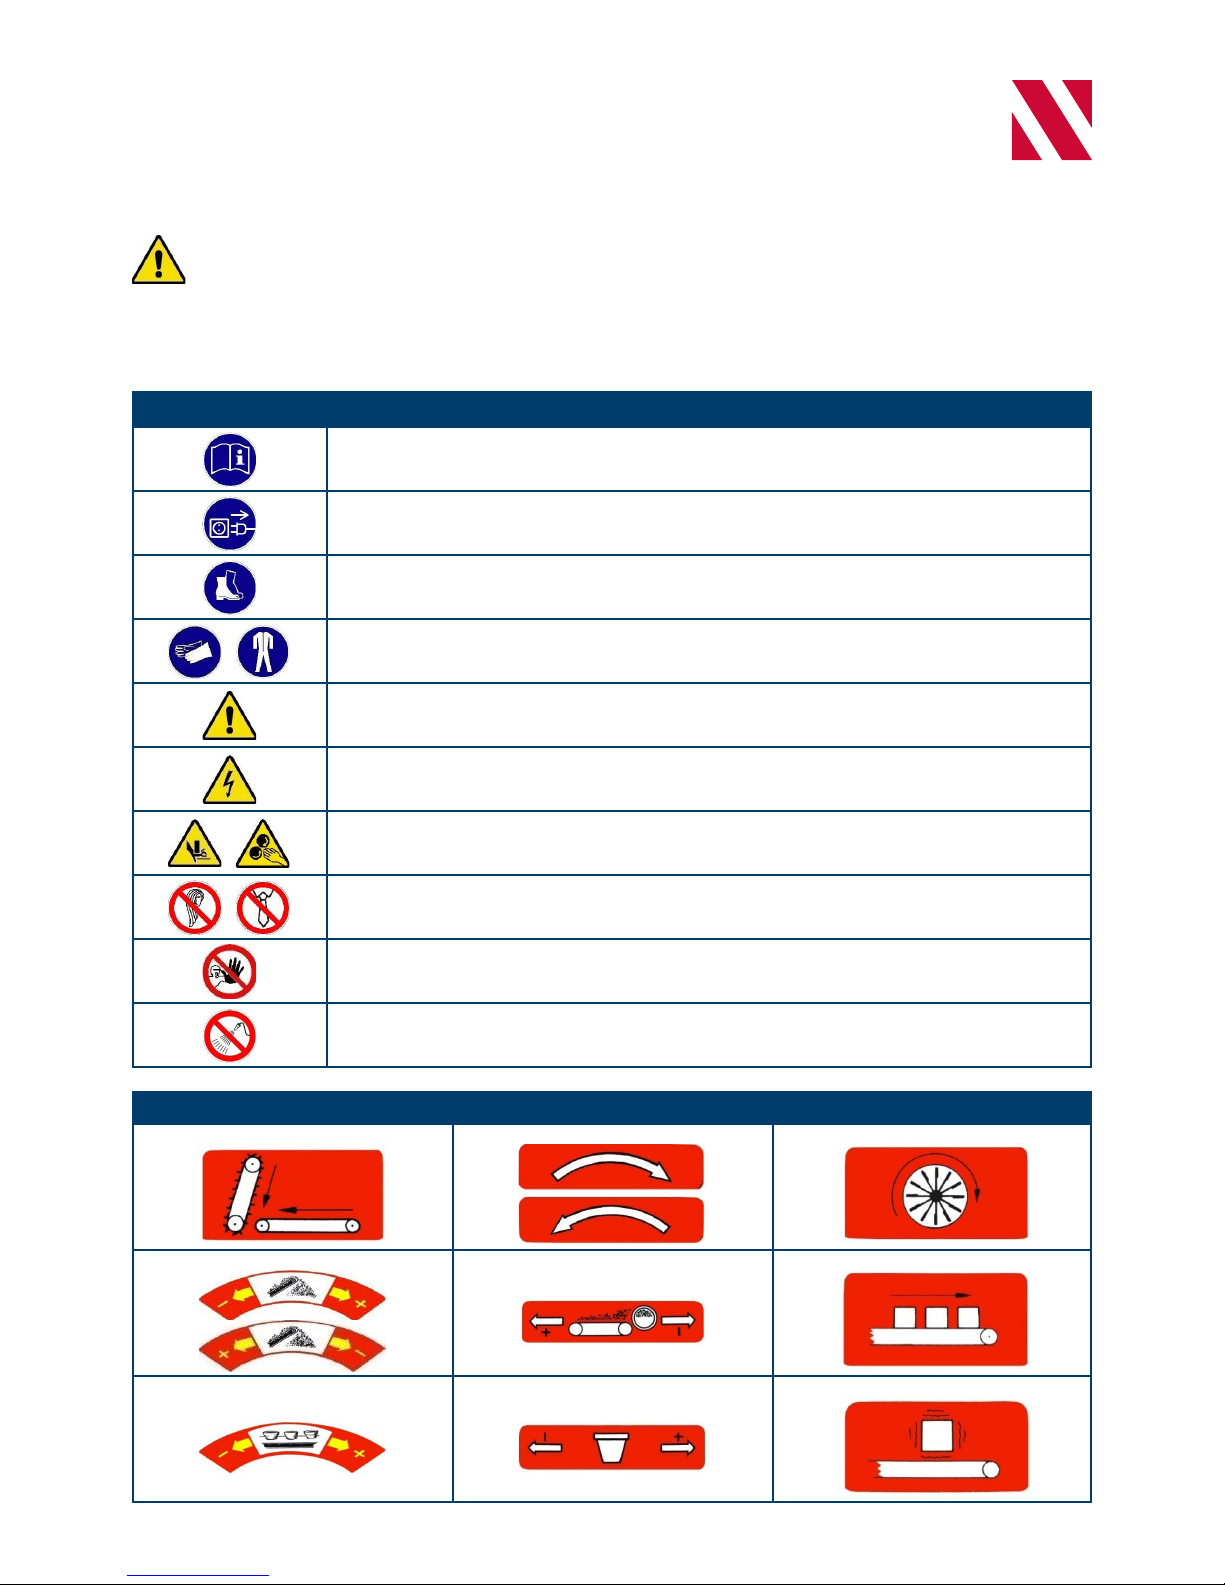
8. Keephands,hair,looseclothingand/orjewelry,etc.,clearofmovingpartsofthemachine.Wearsuitable
garments without loose parts. Wear suitable work shoes.
9. Do not remove any connections or guards while the machine is turned on. The machine may be used only when
allprotectivedevicesandsafeguardsarecorrectlyttedandreadyforuse.
10. Do not stand on the machine while it is running.
11. Always disconnect the power cable and compressed air supply before moving the machine.
12. Alwayscomplywiththeinspectionandmaintenanceintervalsasspeciedorlaiddownintheusermanual.
13. Alwayshavethemachinemaintainedandrepairedbyqualiedexpertpersonnelwhousegenuinespareparts.
14. All persons must comply with both the instructions in the user manual and with the provisions of the general
statutory and other binding regulations governing accident prevention and environmental protection. This
includes,forexample,theregulationsgoverningtheuseofpersonalprotectiveequipment.
15. Warn the operating personnel that maintenance work is going to be carried out before beginning the work.
Interruptthepowersupply,whenpossible,beforeinspectingorcarryingoutmaintenanceonthemachine:turn
thepowerswitchtooff,lockthepowerswitchsothatitcannotbeturnedtoOnandunplugthepowercablefrom
the plug box.
Whenthepowersupplyneedstoremainconnectedtocarryoutspecicworkonthemachinethencallinan
extra person who can operate the emergency stop switch.
16. Halt the work immediately when part of the machine is damaged or is not working properly. The machine may
be restarted only once the machine part has been repaired or replaced and inspected. Consult your supplier if
the machine is not working properly.
17. The machine and/or parts must be disposed of in accordance with the local legislation and regulations.

User manual for Javo Plus M2.0
Version 22300779
page 6 / 27
2.2. Machinesafeguards
Guards and hatches are tted for protection from moving parts. Always put the guards back in place and
close the hatches before turning the machine on. The guards must be in place and the hatches closed while the
machine is in use.
The machine's motors are protected by thermal overload switches. These switches are mounted in the switchbox.
2.3. Explanationoficonsandsymbols
Icon Meaning
Read and make sure that you understand this manual before you begin to work with this
machine and/or carry out maintenance work.
Disconnect power supply (from the grid).
Safety shoes and safety glasses must be worn when working with or on this machine.
Safety gloves and protective clothing must also be worn when cleaning or carrying out
maintenance work on this machine.
Warning. This sign warns of important points for attention and/or instructions relating to
safety and/or the prevention of damage.
Danger,highvoltage.
Live parts enclosed.
Danger,pinchpoint/crushhazard.
Moving and turning parts can pinch or crush.
Donotwearjewelry,looseclothingorlonghairnearmovingpartsofthismachine.
No entry.
Do not clean switchbox with water.
Water could run inside the switchbox and cause hazards.
Symbolsthatmaybeappliedtothismachine
Elevator standard Direction of movement Brushdisc,Rotoll
Soil supply speed (curved) Soil supply speed (straight) Traybelt,Rotoll
Pot track speed (curved) Pot track speed (straight) Rotor,Rotoll

User manual for Javo Plus M2.0
Version 22300779
page 7 / 27
3. Descriptionofthemachine
3.1. Partsofthemachine
A. Soil bin
B. Elevator
C. Drill
D. Pot track
E. Pot dispenser (optional)
3.2. Outlinedrawingwithmaindimensions

User manual for Javo Plus M2.0
Version 22300779
page 8 / 27
3.3. Options
Thismachinemaybettedwithvariousoptionsasdeterminedbytheintensityofuseandcustomerrequirements.
Contact your Sales Consultant about these.
Options Code Specications
Cable,5x1.5,4meters,incl.16Aplug 900965
Continuous plug box 900966 Nonstandard
Height of pot track ex factory Standard 805. Extra heights of 6 x 25
mm
Soil bin extension 223-180 1600 liters extra (1.6m³)
(1800x1660x600)
Pneumatic tires with triangle at back SU1ZL Wheels project outside the machine
Roller with motor 223-500-01-02 With frequency controller
Rotating brush before drill BM 223
Rotating brush after the drill BM 201
3.4. Operatingprinciple
Themachine'ssoilbinislledwithpottingsoil.Thesoilsupplybelttransportsthesoiltotheelevator.
The elevator collects the soil and pours it into pots that the pot dispenser places in the pot track's potholders. The
height and width of the pot track can be adjusted to cater for different pot sizes.
Thepottracktransportsthepotstothedrill,whichmakesholesinthesoil.Thedepthanddiameteroftheholes
made by the drill are adjustable. Once the holes have been made the pot track transports the pots to the take-off
unit that transfers them to a conveyor.
The machine is mounted on wheels for easy mobility.
3.5. Machineworkstations
Thismachinehastwoworkstations:atthepottrackandatthetake-offconveyor.

User manual for Javo Plus M2.0
Version 22300779
page 9 / 27
3.6. Controls
Themotorisoperatedusingthecontrolsonthecontrolpanel,whichareasfollows:
A. Stop button
B. Start button
C. Reset button
D. Emergency stop
Thefollowingbuttonsandconnectionsaremountedon/ttedtotheelectricalcabinet:
A. Drill ON/OFF
B. Pot track ON/OFF
C. Elevator ON/OFF
D. Stopped / error
E. Main switch
F. Pot dispenser continuous / non-continuous
G. Timer ON/OFF
H. Soil supply ON/OFF
I. Main power socket IN
J. Switched power socket OUT
K. Constant power supply socket OUT (optional)
Speedcontrolpotentiometers(optional):
4. Transport
Follow all the instructions given in this manual, in particular the instructions in the Safety Section.
Ondelivery,aJavoengineermustbepresenttounloadthemachinefromthetruckorwagon.
Do not move the machine until the power cable and compressed air line have been disconnected. Make sure that the
hoses and cables are stowed properly.
Check the machine's condition before moving the machine at the company's site (when it does not need to be
lifted). First check that the route is unobstructed so that the machine can be moved to the required position without
problems.
Contactyoursupplierwhenthemachineneedstobeliftedfortransportawayfromthecompanysite,orcalla
professional shipping company.
Do not move the machine until the transport belt (take-off conveyor) has been removed. The machine must
betransportedupright.Therelativehumiditymustnotbetoohigh,sothattherewillbenocondensationinthe
machine.
Report any damage during or immediately after the delivery to the shipping company and to Nobels BV. Take all the
necessary measures to avoid further damage.

User manual for Javo Plus M2.0
Version 22300779
page 10 / 27
5. Assembly,installationandcommissioning
Follow all the instructions given in this manual, in particular the instructions in the Safety Section.
This machine bears CE marking. When several machines are installed in one production line then the entire
production line must bear appropriate CE marking before this machine may be commissioned. This machine
may not be commissioned until CE marking has been applied to the production line.
5.1. Location
Locatethemachineonaatandsolidsurfacewithanadequateload-bearingcapacity.Locatethemachinewhere
thereissufcientspacetogiveinstructionsinsafetyand/orcarryoutmaintenanceand/orinspections.Applythe
brakes on the castors before turning the machine on.
This machine is not suitable for outdoor use. The electrical components are only splash proof. Protect this
machine from rain and moisture. Use a ground leakage circuit breaker when you have to use the machine in a
moist area.
5.2. Facilitiestobeprovidedbytheuser
Atthetimeofdelivery,theusermustmakesurethatthenecessarymaterialsandfacilities(compressedairsupply,
powersupplyandpotting-upmaterials,etc.)areavailablewithin3metersofthemachine.
Powersupplyrequiredforthemachine:400Volt,3phase+Neutral+Ground.(N.America:208/220V,60Hz).
5.3. Assembly/connection
Mountanypartssuppliedwiththemachine,whereapplicable.Makesurethatallmovingpartscanmovefreely.
Oncethemachinehasbeenassembled,anauthorizedpersoncanconnectthepowersupply(plugthepowercable
into a power socket).
Keep hands, hair, loose clothing and/or jewelry, etc., clear of moving parts of the machine. Wear suitable
garments without loose parts. Wear suitable work shoes.
Do not remove any connections or guards while the machine is turned on. The machine may be used only when
all protective devices and safeguards are correctly tted and ready for use.
5.4. Adjustmentoftheelevator
5.4.1. Checkelevator'sdirectionofrotation
Check the elevator's direction of rotation before starting work with the machine.
Procedure:
1. Connect the power cable.
2. Start the elevator.
a. Turn the main switch to on.
b. Press the emergency stop circuit reset button.
c. Press the elevator button to start the elevator.
3. Check the elevator's direction of rotation.
a. The correct direction of rotation is shown in this drawing.
4. Press the elevator button to stop the elevator.
5. Turn the main switch to off.
6. Whenthedirectionofrotationiswrong:
a. Remove the plug from the power socket.
b. Open the plug and interchange 2 of the 3 phase connections in the plug.
Thismayonlybecarriedoutbyproperlyqualiedpersonnel.

User manual for Javo Plus M2.0
Version 22300779
page 11 / 27
5.4.2. Checktensionoftheelevatorbelts
Check the tension of the elevator's belts before starting work with the machine.
Procedure:
1. Check the tension of the elevator belts. The tension is correct when the play
in the middle of the belt is about 20 mm.
2. Adjust the tension of the belts if necessary.
a. The tension can be adjusted with the two tension nuts mounted on each
side of the elevator housing.
3. b. Adjust the nuts (A) on each side of the elevator housing to the same
tension.
The tension of the belts must not be too tight.
5.4.3. Adjustelevatorspeed
Adjust the elevator speed before starting work with the machine.
The speed can be adjusted with the potentiometers mounted on the switchbox or at the workstation (option).
Procedure:
1. Check the elevator's speed. Adjust the soil supply so that the pots contain
enough soil before they reach the soil scraper.
2. Whenthespeedneedstobeadjusted:
a. The speed is adjusted with the potentiometer.
5.5. Adjustsoilscraperheight
Thepotlledwithsoilpassesunderthesoilscraperthatpushestheexcesssoiloffthepottoobtainanattractive,
level surface.
Adjust the soil scraper height before starting work with the machine.
Procedure:
1. Check the height of the soil scraper relative to the pot.
2. Whentheheightiswrong:
a. Loosen clamp lever (B).
b. Turn crank handle (A) to adjust the soil scraper to the correct height.
i. The pressure that the drill's pressure plate puts on the potting soil
in the pot increases with the amount of soil on the pot's rim.
c. Tighten clamp lever (B).

User manual for Javo Plus M2.0
Version 22300779
page 12 / 27
5.6. Adjustdrill
5.6.1. Checkdrill'sdirectionofrotation
Check the drill's direction of rotation before starting work with the machine.
Procedure:
1. Connect the power cable.
2. Turn the drill on.
a. Turn the main switch to on.
b. Press the emergency stop circuit reset button.
c. Press the drill button to start the drill.
3. Check the drill's direction of rotation.
a. The correct direction of rotation is shown in this drawing.
4. Press the drill button to stop the drill.
5. Turn the main switch to off.
6. Whenthedirectionofrotationiswrong:
a. Remove the plug from the power socket.
b. Open the plug and interchange 2 of the 3 phase connections in the plug.
Thismayonlybecarriedoutbyproperlyqualiedpersonnel.
5.6.2. Selectdrillsize
Select the drill size before starting work with the machine.
The drill size depends on the plug size of the plant to be put in the pot.
The drill (B) is fastened in the drill holder mounted on the drill motor by 2 socket-
headscrews(A).Thesescrewsmustbefastenedontheatsideofthedrillbush.
The drill plate (C) has an opening for the drill that has a diameter of about 10 mm
larger than the diameter of the drill. The drill plate is fastened to the bottom of
drill rods (D) with 2 locknuts.
The plant hole is set to the correct depth by adjusting the position of the drill.
Adjust the depth by moving the drill (B) up and down in the drill holder (A).
It is recommended that the tip of the drill projects 1-2 cm below drill plate.
Procedureforheightadjustment:
1. Loosen clamp lever (B).
2. Adjust the height of the drill with handwheel (C).
3. Tighten clamp lever (B).
Procedureforsidewaysadjustment:
1. Loosen clamp lever (A).
2. Adjust the drill in the sideways direction.
3. Tighten clamp lever (A).
Although it is also possible to adjust the height of the drill when clamp lever (A) is
loose, this is not the correct procedure and may never be adjusted in this
manner. Set the height of the drill in accordance with “Procedure for height
adjustment”.
Procedureforcrosswaysadjustment:
1. Loosen clamp lever (D).
2. The drill can now be moved further or less far over the pot track.
3. Tighten clamp lever (D).

User manual for Javo Plus M2.0
Version 22300779
page 13 / 27
5.6.3. Adjustdoubledrill(optional)
Adjust the double drill unit before starting work with the machine.
Procedure:
1. Turn the main switch to off.
2. Adjustthedrillunitasdescribedin“Adjustdrillunit”.
3. Remove the covers (at B)
4. Loosen bolt (A) to adjust the position of the second drill head.
5. Slide drill shaft (B) to the required position.
6. Tighten bolt (A).
7. Fit one of the two covers (at B). Make sure that the rotating shaft does not
contact the plate
Check that the pot track can be started: the pot track must turn freely. Make
sure that the drill unit has not been set too deep.
5.7. Adjustsoilsupply
5.7.1. Checktensionofsoilbelt
Check the tension of the soil belt before starting work with the machine.
Procedure:
1. Check the tension of the soil belt. The tension is correct when the play in the
middle of the belt is about 40 mm.
2. Adjust the tension of the belt if necessary.
a. Loosen the four block bearing bolts (B).
b. Adjust the tension by simultaneously turning nuts (A) on each side of the
soil belt.
c. Tighten the four block bearing bolts (B).
5.7.2. Adjustheightofsoilslide
Adjust the soil slide height before starting work with the machine.
Adjust the height of the soil slide so that the soil supply belt does not deliver too
much soil. Adjust the soil slide to the lowest possible height to avoid accumulation
ofsoilinthemachine.Thesoilslideneedstobesettoalowerheightwhenlling
small pots.

User manual for Javo Plus M2.0
Version 22300779
page 14 / 27
5.7.3. Adjustsoilchute
Adjust the soil chute before starting work with the machine.
The elevator empties the soil onto the soil chute. The soil chute directs the soil to
the pots.
Procedure:
1. Loosen clamp lever (A).
2. Adjust the soil chute.
a. The complete soil chute can be shifted backwards and forwards.
3. Tighten clamp lever (A).
4. Two toothed strips (B) are mounted at the soil chute.
Lift the strip to so that the chute can slide sideways in two directions.
a. This directs the potting soil.
5.8. Adjustpottrack
5.8.1. Adjustpottrack
Adjust the pot track before starting work with the machine.
Twoleversareusedtoadjustthepositionofthepottrackngersintwodirections:
• LeverA:adjustheightofpottrackngers.
• LeverB:adjustpottrackngerstowidthofpot.
The pot track ngers must be adjusted so that they are as high as possible against the rim of the pot. The pot
track ngers must not be adjusted too tightly against the pot: keep a clearance of about 3 mm on both sides.
Procedure:
1. Adjusttheheightofthepottrackngersusinglever(A).
a.Pulltheleveroutandpush/pullonthepottrackngerssothatthe
complete pot track turns.
b.Counterclockwise:thepottrackngersarelowered.
c.Clockwise:thepottrackngersareraised.
d. Adjust the track so that the pot is positioned at the center of the pot
support.
2. Theprocedurefortheoptimumadjustmentofthepottrackngersisas
follows:
a.Pushthepottrackngersasfaropenaspossible.
b.Adjustthengerstothehighestpossibleheight(dependsonpotsize).
c. Hold the pot in the guide rail with a clearance of about 3 mm on both
sides (important for centering the drilled hole).
3. Put the pot in the holder and adjust the width with lever (B).
a.Pulltheleveroutandpush/pullononeoftheshortpottrackngers.
b.Thepottrackngerscannowbeadjustedtothepotsize.
The drill unit + brush + soil scraper must be in the highest position. Check that the pot track can be started: the
pot track must turn freely.

User manual for Javo Plus M2.0
Version 22300779
page 15 / 27
5.8.2. Adjustthepottrackspeed
Adjust the pot track speed before starting work with the machine.
The speed can be adjusted with the potentiometers mounted on the switchbox or at the workstation (option).
Procedure:
1. Check the pot track speed. Adjust the pot track speed so that the pots can
belledpreciselyandprocessed.
2. Whenthespeedneedstobeadjusted:
a. The speed is adjusted with the potentiometer (B).
5.9. Relocatingthemechanicaltake-off(optional)
The machine's mechanical take-off can be relocated at any free position on pot
track (A). This is carried out in a number of steps.
Procedure:
1. Remove the transport belt mounted on the take-off support (B).
2. Loosen the M8 bolts holding two panels (C) so that the panels can be
removed.
a.DonotremovetheM8bolts:leavethemintheframeandliftthepanels
out.
3. Remove take-off support (B) by loosening nut (D).
4. Remove the take-off support.
5. Reassemble the take-off support at the location where you removed the
left of the two panels from the pot track.
6. Fit the take-off.
a.LoosenthetwoM8bolts(G),butleavetheboltsinplace.
7. Press plate (H) downwards and pull the plate backwards at hole (I).
a. The take-off will now spring loose from the frame.
b. The take-off is still attached at one point. This point is on the underside
of the pot track.
8. Detach the take-off completely by lifting rod (J) (on which the plastic tip is
mounted) and sliding it free from the other rod.
9. Relocate the take-off in the position where you removed the panel.
10. Allow the take-off to drop over the two M8 bolts and make sure that the
plate with the spring clicks into place in the pot track frame.
11. TightentheM8boltsandttherod(onwhichtheplastictipismounted)
back into holes (K) in the rod on the underside of the pot track.
12. Fit the two panels (C) back onto the pot track at the original location of the
take-off support and take-off.
13. Tighten the four M8 bolts to fasten the panels in place.

User manual for Javo Plus M2.0
Version 22300779
page 16 / 27
5.10. Adjustthenal-llsystem(optional)
5.10.1. Final-llsystemwithxeddisk(optional)
Adjust the nal-ll system before starting work with the machine.
Procedure:
1. Slide the plates with the grip supplied with the unit down to the pots
2. Turnthecrankhandletoadjusttheheightofthenal-llplate.Setthe
nal-llplatestojustabovethepots.
3. Adjustthesensoruntilthesoilonthenal-llplatesisattherequired
height.
4. Adjust the sensor at about 10 cm from the rim of the rotating disk.
5. Theproportionofthesoilfallingonthenal-llplatetothesoilfalling
directly in the pots can be adjusted in steps of 1/3.
6. Turn the machine on.
7. Setthesoildirectingchutessothatsufcientsoilfallsintothepotsand
ontothenal-lldiskbyadjustingtheleversonthesidesonthesoil
directing chutes.
5.10.2. Final-llsystemwithrotatingdisk(optional)
Adjust the nal-ll system before starting work with the machine.
Theproportionofthenal-llsoilsuppliedfromthenal-llplatetothesoiltothesoilsupplieddirectlytothepots
can be adjusted in steps of 1/3.
Procedure:
1. Slide the plates with the grip supplied with the unit down to the pots
2. Turnthecrankhandletoadjusttheheightofthenal-llplate.Setthe
nal-llplatestojustabovethepots.
3. Adjustthesensoruntilthesoilonthenal-llplatesisattherequired
height.
4. Adjust the sensor at about 10 cm from the rim of the rotating disk.
5. Turn the machine on.
6. Setthesoildirectingchutessothatsufcientsoilfallsintothepotsand
ontothenal-lldiskbyadjustingtheleversonthesidesonthesoil
directing chutes.
7. The speed of the rotating disk can be adjusted so that each operator
receives enough soil.

User manual for Javo Plus M2.0
Version 22300779
page 17 / 27
5.11. Adjustpotdispenser(optional)
5.11.1. Adjustpneumaticpotdispenser(POP)(optional)
Adjust the pot dispenser before starting work with the machine.
Procedure:
1. Turn the machine on and turn it off again when the drill is at the bottom
position.
2. Loosen clamp lever (A) and adjust the diameter with crank handle (B).
3. Oncepotclamper(E)contactsthepotrow,thenturnthecrankhandle
through1extrafullturnsothattherowisrmlyclamped.
4. Tighten clamp lever (A).
5. Move the pot dispenser to the left or the right as required.
6. Turn the machine on and turn it off again when the drill is at the top
position.
7. Allow the pot row to sink into the chute until pot clamper (E) comes
between the rims of the bottom 2 pots.
8. Loosen bolt (F) and adjust peg (G) so that the pot row is at the correct
height.
9. Tighten bolt (F).
10. Loosen nut (I) and slide support (H) so that it is 1 mm from the pot. The pot
row must then lie properly in the chute.
11. Repeat steps 8 through 10 until support (H) is in the correct position.
12. Loosen clamp lever (D) and adjust the height so that the bottom of the pot
row is about 20 mm above the pot in the holder.
13. Tighten clamp lever (D).
14. Loosen clamp lever (C) and center the pot dispenser above the pot holder.
15. Adjust the height of the scraper brush (before the pot dispenser) to the pot
holder.
The pot dispenser is only suitable for new pots. The extent to which the pots
unstack properly depends on how rmly the pots are pressed into each other
and the degree of fouling of their surfaces. The pressure of the compressed
air supplied to the cylinder may be increased slightly if so required, although
never to more than 4 bar.

User manual for Javo Plus M2.0
Version 22300779
page 18 / 27
5.11.2. Adjustpneumaticpotdispenser(MPO)(optional)
Adjust the pot dispenser before starting work with the machine.
Procedure:
1. Turn the machine on and turn it off again when the drill is at the bottom
position.
2. Loosen clamp lever (A) and adjust the diameter with crank handle (B).
3. Turn knob (C) downwards to lower pot clamper (D) until it contacts the pot
rowthenturn1extrafullturnsothattherowisrmlyclamped.
4. Release knob (C).
5. Tighten clamp lever (A).
6. Movethepotdispensertotheleftortheright,ifnecessary,usingadjuster
(H).
7. Allow the pot row to sink into the chute until pot clamper (D) comes
between the rims of the bottom 2 pots.
8. Adjust the height of pot holder (F) with screw (E) so that the pot row is at
the correct height. If the pot holder cannot be adjusted enough then loosen
pot holder (F) and turn it over.
9. Make sure that the rim of the lowest pot rests on pot holder (F). If the rim of
the pot drops over the pot holder then adjust the bolts (I) so that the rim of
the pot rests precisely on the pot holder.
10. Loosen clamp lever (G) and adjust the height so that the bottom of the pot
row is about 20 mm above the pot in the holder.
11. Tighten clamp lever (G).
A special square pot clamp is available for square pots.
The pot dispenser is only suitable for new pots. The extent to which the pots
unstack properly depends on how rmly the pots are pressed into each other
and the degree of fouling of their surfaces.

User manual for Javo Plus M2.0
Version 22300779
page 19 / 27
5.11.3. Adjustpneumaticpotdispenser(LPO)(optional)
Adjust the pot dispenser before starting work with the machine.
Procedure:
1. Turn the machine on and turn it off again when the drill is at the bottom
position.
2. Adjust the diameter of pot clamp (G) with crank handle (A). Turn crank handle
(C) to lower pot clamper (G) until it contacts the pot row then turn 1 extra full
turnsothattherowisrmlyclamped.
3. Adjust the diameter of pot holder (H) with crank handle (B).
4. Adjust the length of the pot dispenser by loosening the 2 star knobs (C) (left
and right) and shifting the unit as required.
5. Tighten star knobs (C).
6. Adjust the height of pot holder (H) by turning the star knob on screw (E) so that
the pot row is at the correct height.
7. Loosen clamp lever (E) and adjust the height with crank handle (D) so that the
bottom of the pot row is about 20 mm above the pot in the holder.
8. Tighten clamp lever (E).
When you are unable to adjust the pot dispenser to the correct setting then the
advanced settings can be adjusted to set the pot dispenser correctly (preferably by a
Javoengineer):
9. Check that the pot dispenser is perpendicular to the frame. If the pot dispenser
isnotperpendiculartotheframe:
a. Loosen cylinder nut (L).
b. Turn the cylinder shaft until the pot dispenser is perpendicular to the frame.
c. Tighten cylinder nut (L).
10. Measure the distance between pot clamp (G) and pot holder (H). The distance
mustbethesameonleftandright.Whenthedistanceisnotthesame:
a. Loosen M10 bolt (J).
b. Turn tapered shaft (K) until the pot dispenser is perpendicular to the frame.
c. Tighten M10 bolt (J).
d. Check that the right and left jaws are vertically above the lower jaws.
Ifnecessary,adjustaforkofthecylindersoftheupperjawssothatthe
distance is equal.
11. Check that the pot clamp closes properly when the cylinder is actuated. When
thepotclampdoesnotcloseproperly:
a. Release the air pressure from the cylinder by disconnecting the compressed
air line from the machine.
b. Close the pot clamp by hand.
c. Loosen nut (M).
d. Turn the cylinder shaft out of the cylinder until it extends about 1 mm from
the cylinder.
e. Tighten nut (M).
f. Reconnect the compressed air line.
The following need to be checked for pot dispensers that dispense two pot rows after
eachother:
12. Measure the distance between the pot holder at front and back. The distance
mustbethesameatbackandfront.Whenthedistanceisnotthesame:
a. Bend the pot holder horizontally so that the distance at front and back is the
same.
13. Measure the distance between pot clamp (G) and pot holder (H). The distance
mustbethesame.Whenthedistanceisnotthesame:
a. Loosen bolt (N) and bolt (O).
b. Adjust pot clamp (G) with adjustment bolts (P) and (Q).
c. Tighten bolt (N) and bolt (O).
A special square pot clamp is available for square pots.
The pot dispenser is only suitable for new pots. The extent to which the pots unstack properly depends on how rmly
the pots are pressed into each other and the degree of fouling of their surfaces. The pressure of the compressed air
supplied to the cylinder may be increased slightly if so required, although never to more than 6 bar.
Table of contents
Other Javo Lawn And Garden Equipment manuals
Popular Lawn And Garden Equipment manuals by other brands

DAB
DAB DAB E.SYBOX Important information

Grizzly
Grizzly ERV 1400-35 ZV Translation of the original instructions for use

Toro
Toro Groundsmaster 4000 Series installation instructions

Volpi
Volpi Kamikaze KV 100 user manual

Northern Tool + Equipment
Northern Tool + Equipment 188243 owner's manual

Allied
Allied 495 Operator and parts manual