JBL MR-5 User manual

MR-5
MOD
IEQ
PWR 2INT 3RPT 4RDM
156
COMPACT DISC PLAYER DETACHABLE SYSTEM
4 45WATTSMR-5
VOL
LOUD
LOC
DSP
CLS
FM3 I07.502
SEL
This product is sold and serviced exclusively by PROSPEC Electronics Inc. and
must be returned to PROSPEC for in and out of warranty repairs. It can not
be serviced under warranty by other JBL service centers.
All products sold and serviced exclusively by PROSPEC Electronics Inc.
For service contact us : 3325 South Morgans Point Rd, Mt Pleasant SC 29466
Tel : 843-849-9037 Fax : 843-849-9054
MARINE
COMPACT
DIGITAL AUDIO
Operation Manual
SCN
BD/LD
MUT
A.PS
T/F
REL
MARINE


CONTENTS
Wiring 2
Removing or Detaching the Front Panel 3
Important Notes 4
Installation 5
Supporting the Unit 6
Identification of Control Functions 7
Controls 8
Operating the Radio 11
Operating the CD Player 12
Precautions and Maintenance 13
Trouble Shooting Guide, Specifications 14
Identification
1

WIRING IDENTIFICATION
OPTIONAL HARD
WIRED REMOTE
CONNECTOR
ANT. SOCKET
12P
CONNECTOR
AUTO
ANT
BACK-UP B+
FUSE
1A
GROUND
10A
FUSE
IGNITION B+
BLUE
YELLOW
BLACK
RED
RED
GRAY WHITE REAR
LINE OUT
FRONT
LINE OUT
RED
WHITE
BLACK
GRAY
GRAY/BLACK
VIOLET
VIOLET/BLACK
FRONT
RIGHT
REAR
RIGHT
GREEN
GREEN/BLACK
WHITE
WHITE/BLACK
FRONT
LEFT
REAR
LEFT
AUX IN
RED
WHITE
BLACK
Installation Notes
This radio contains four separate power amplifiers, to prevent possible
damage to these amplifiers please ensure.
(Applicable to both 2 and 4 speaker connection)
i) The boat chassis is not used as a loudspeaker ground(-).
ii) Front and Rear loudspeaker connecting wires are not joined together.
iii)
Iv) The memory wire (yellow) is connected to a permanent + 12V supply.
v) The power wire (Red) is connected via the ignition switch of the boat.
Any wires not used when completing a two speaker installation are fully insulated.
2

INTERFERENCE ON RADIO
TROUBLE SHOOTING GUIDE
Poor atmospheric conditions - Try again later in the day.
Antenna / lead broken or damaged.
Check loudspeaker wiring.
This product contains a biamp. It is vitally important not to connect
the front loudspeaker ground to the rear speaker ground.
Faulty loudspeaker.
Distortion at highest volume levels may be normal, as amplifier has
reached maximum power output.
Otherwise the power and ground wire might be too small of a gauge.
(Use 10amp cable or more.)
Reduce the bass effect or switch off the loudness mode.
Boat battery and or charging circuit may be faulty.
SPECIFICATION
4 x 45 watts
DC + 12V
Negative Ground
4 - 8Ohm
Power Output :
Power Supply :
Speaker Impedance:
530 -1710KHz(USA)
522 -1620KHz(EUR)
35dB / uV
Tuning Range :
Sensitivity :
87.5 -107.9MHz(USA)
87.5 -108MHz(EUR)
10dB / uV
30dB
Tuning Range :
Sensitivity :
Separation :
FM TUNER AM TUNER (OPTION)
COMPACT DISC AUDIO AMP & GENERAL
20 Hz-20 KHz
0.8%
65 dB
90 dB
Freq. Response :
Total Harmonic Distortion :
Signal - Noise Ratio :
Dynamic Range :
DISTORTED AUDIO
REMOVING or DETACHING THE FRONT PANEL
Carrying Case
Front Panel
1. Release ButtonPress to remove front panel.
Keep the detachable front panel to the protective case provided.2.
3. Detaching the Front Panel
Position the left side of the front panel into the locking tabs; then press
the right side of the front panel until it locks into position.
4 Attach the Trim Ring.
Attach the Trim Ring to the Radio if needed or desired by snapping
the four locking tabs into place.
Front Panel
14 3
Release Button
SCN
BD/LD
MUT
A.PS
56
T/F
REL
DETACHABLE SYSTEM
4 45WATTS
DSP
C
LS
5
02
MARINE

Prior to the final installation, perform a sound check. If high distortion or
intermittent sound is experienced, it is possible that the wiring from unit to
the boat’s electrical system is poor, or that the battery needs recharging.
If the battery and its charging circuit are OK, then rewire the red fused wire
of the CD player directly to the positive terminal (+) of the battery.
Boat accessory shops stock the connector blocks and the 5 Amp cable may
be necessary for extending the fuse wire connection.
IMPORTANT NOTES
POSITIVE
CHASSIS
NEGATIVE
CHASSIS
Make sure that the black wire on the wiring harness is connected
to a good grounding point on the boat or preferably,
If a direct connection to the negative (-) battery terminal is not possible,
make sure that any paint present is scraped clean from the point of
ground before attaching the ground wire.
directly to the negative
(-) terminal of the battery.
WARNING: POLARITY...
This model is only suitable for use in vehicles which have a negative
ground system.
GROUNDING
Connecting The Speakers And Power Cables
Before you wire your system, disconnect your boat battery's positive (+)
cable. This helps prevent damage in case of a short. When you complete
the wiring, reconnect the battery cable and test your stereo.
When connecting your stereo's black ground wire, be sure to connect
the wire to a good grounding point or preferably to the Negative (-)
terminal of the car battery.
A microprocessor reset button has been provided to facilitate manual
resetting of the internal microprocessor in the unlikely event that the player
fails to operate correctly. Should it be necessary to reset the microprocessor,
simply turn off the ignition key for about 30 seconds.
It will be necessary to re-enter the radio preset memories as these
will have been erased when the processor is reset.
After resetting the player, ensure all functions are operating correctly.
If the unit has become extremely hot we strongly recommend that you
allow it to cool down before using. Take care of your CD DISC to preserve
the quality of the recording. Do not allow them to be exposed to direct
sunlight. Store them to place protected from dirt and dust and avoid
handling them with oily, grease or wet hands.
Be sure the CD is put into the CD slot label side up.
1. Reset Function
2. General Precautions
Note:
PRECAUTIONS AND MAINTENANCE
413

1. Select the RADIO/CDP/AUX by pressing the
in sequence.
"MOD"
Button(5)
OPERATING THE CD PLAYER
3. Play / Pause(11)
Push to pause and push again to resume play.
4. Track Tuning(10)
Choose the desired track on the DISC using the , buttons. If you press
or buttons continuously, the track will fast Forward or Rewind .
5. Intro Scan(12)
Press this button to hear the first 10seconds of each track on the disc.
Press this button again to restore the player to its normal play mode.
6. Repeat Play button(13)
While playing a desired track, press the RPT button to play the track
repeatedly. Press the RPT button again to return back to normal play mode.
7. Random play button(14)
Press the RDM button to play all tracks on a CD disc in a random sequence.
Press RDM again to return the player to normal mode.
SCN
BD/LD
MOD
IEQ
PWR
MUT
A.PS
2INT 3RPT 4RDM
156
T/F
REL
COMPACT DISC PLAYER DETACHABLE SYSTEM
4 45WATTSMR-5
VOL
LOUD
LOC
DSP
CLS
FM3 I07.502
MARINE
5
11 12 13 14 15 16
SEL
10
1. Precautions
2. Mounting angle adjustment
INSTALLATION
12
4
Release Key Half Sleeve
Tap
Bend these claws, if necessary.
3
Choose the mounting location carefully so that the unit will not interfere
with the normal driving functions of the boat.
Avoid installing the unit where it would be subject to high temperature,
such as from direct sunlight or hot, or where it could be subject to dust,
dirt or excessive vibration.
Use only the supplied mounting hardware for a safe and secure
installation. Be sure to remove the front panel before installing the unit.
Adjust the mounting angle to less than 20 from the horizontal.
3. Mounting example
<< Installation in the dashboard >>
Note: Keep the release key in a safe place as you may need it
in future to remove the unit from the boat.
12 5

1.UNIT
2.RELEASE CASE
3.DASH - BOARD
4.HEX NUT
5.LOCK WASHER
6.PLAIN WASHER
7.CAR BODY
8.REAR SUPPORT STRAP
9.TAPPING SCREW
10.M5 X 20 HEX BOLT
SUPPORTING THE UNIT
HEX
Lock Washer
Plain Washer
Dashboard
3
5
2
10
1
4
4
6
8
8
7
9
Subject to changes for the accessories without notice.
1. Fuse replacement
If the fuse blows, check the power connection and replace the fuse.
If the fuse blows again after the replacement, there may be an
internal malfunction. In this case, consult your nearest dealer.
2. Warning
Use the specified amperage fuse for each lead.
Use of a higher amperage fuse may cause serious damage.
OPERATING THE RADIO
Press the to select the desired band FM1,
FM2, FM3, AM1, Am2.
1. Band (BD/LD) button (9)
2. Manual / Seek tuning buttons (10) : Press this button quickly to
activate the Seek mode. Then the Seek mode will automatically seek up
or down the wave band and stop at the next station of sufficient signal
strength. Press this button (10) for longer than 2 seconds to advance
the tuning up or down the wave band.
3. Manual Station store: Select the desired band and tune to a radio
station to be memorized. Choose the preset button memory location1-6
into which the station is to be stored and press and hold that preset button
for 2 seconds. The station will now be entered into the preset memory.
6 stations can be memorized on each of the FM1, FM2, FM3, AM1, AM2.
4. APS. Auto store function. (19)
Depress and hold button (19) for approximately 2 seconds until you hear
a signal. Which confirms the memory function is complete and the display
shows"SEARCH". Automatically six strong stations are stored on the
station buttons 1 - 6. You can override the preset station on any button
by manually setting a new frequency.
5.SCAN(13)
To search the Frequency which is set to the strong / Regulated broad
casting, press "SCAN(8)" button in sequence.
6.Program Memory Scan
Just press the preset button among 1-6 to find the memorized radio frequency.
SCN
BD/LD
MOD
IEQ
PWR
MUT
A.PS
2INT 3RPT 4RDM
156
T/F
REL
COMPACT DISC PLAYER DETACHABLE SYSTEM
4 45WATTSMR-5
VOL
LOUD
LOC
DSP
CLS
FM3 I07.502
MARINE
89
19
SEL
10
Preset button
611

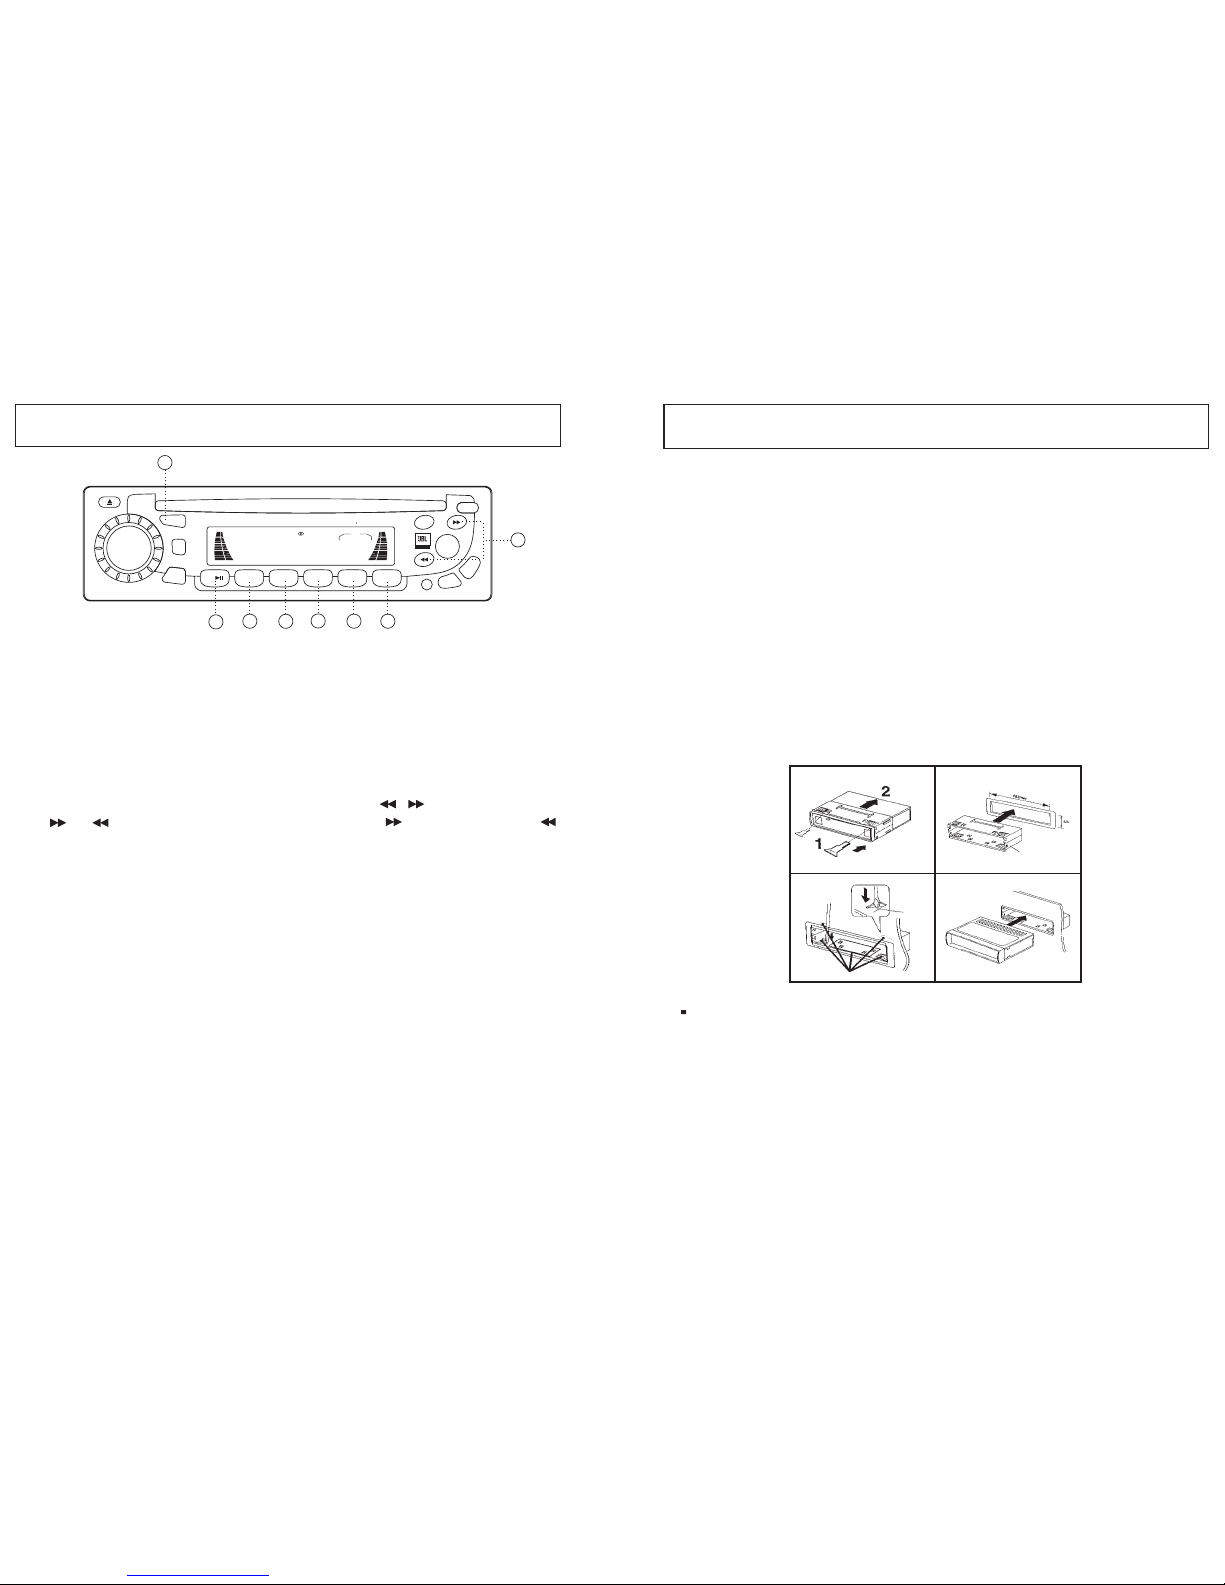
IDENTIFICATION OF CONTROLS AND FUNCTIONS
1. CDP Eject Button
2. Spindle Knob ( Adjustment - Audio Control Knob )
3. Electronic function SELECT Button
4. Front Panel Release Button
5. MOD Button ( Radio CDP AUX )
6. IEQ Button ( FLAT - CLASSIC -POP-ROCK )
7. POWER ON/OFF Button
8. SCN ( SCAN ) Button
9. Band button ( FM1, FM2, FM3, AM1, AM2) / LOUD Button
10. Radio Tune UP/DOWN, CD Track UP/DOWN
11. CD Play / Pause, Radio preset 1 Button
12. CD Intro Scan Button, Radio preset 2 Button
13. CD Repeat track Button, Radio preset 3 Button
14. CD Random play Button, Radio preset 4 Button
15. Radio preset 5 Button
16. Radio preset 6 Button
17. MUTE Button
18. T/F( Time / Frequency )Button
19. A.PS Button
SCN
BD/LD
MOD
IEQ
PWR
MUT
A.PS
2INT 3RPT 4RDM
156
T/F
REL
COMPACT DISC PLAYER DETACHABLE SYSTEM
4 45WATTSMR-5
VOL
LOUD
LOC
DSP
CLS
FM3 I07.502
MARINE
4
28
59
319
17
11 12 13 14 15 16
718
1
6
SEL
10
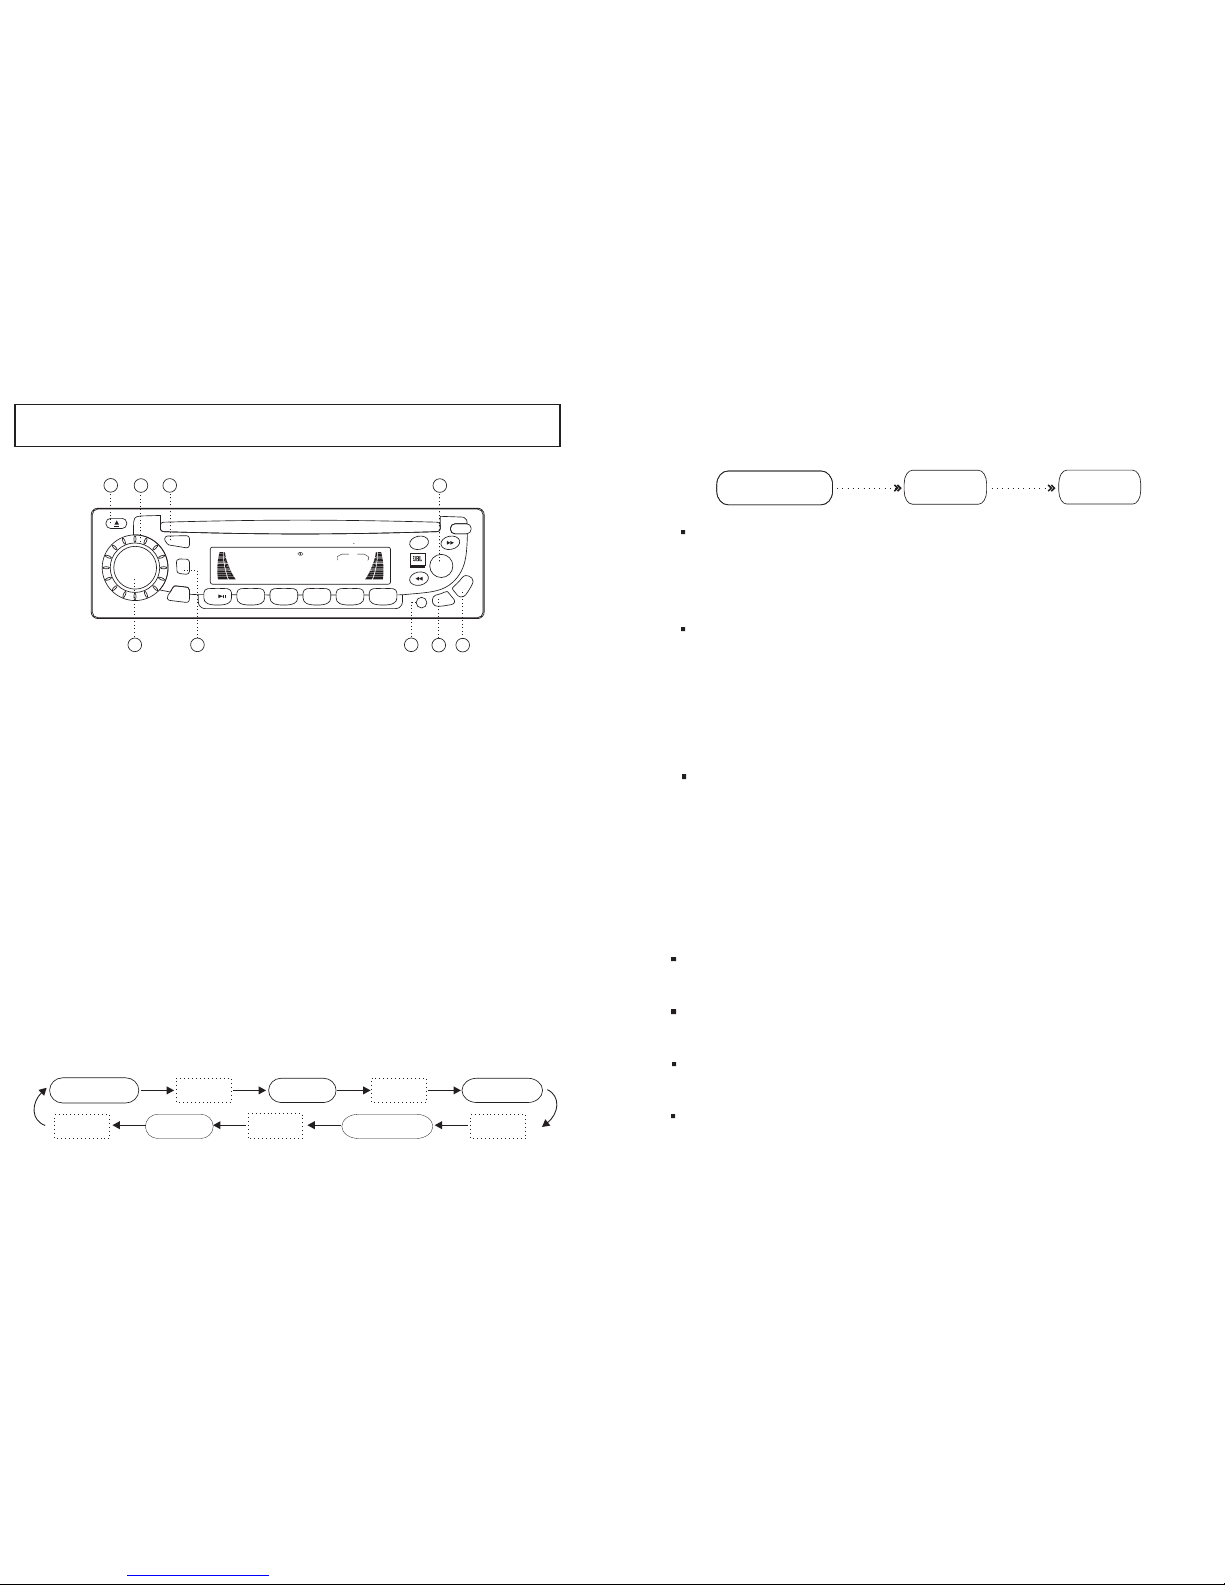
Press this button to select Radio, CD, or AUX.
4."MOD"Button(5)
8.TIME/FREQUENCY (T/F)Button(18)
1) After your unit has been installed in the boat, turn power on.
Radio frequency will appear on the display.
2) Press button once momentarily to display Time mode Immediately.
Press button once again(within 5sec)and hold depressed until displayed
time begins to blink.
3) Turn left the spindle knob to set the Minutes.
4) Turn right the spindle knob to set the Hour.
5) Once adjustment is completed, press button (T/F) once again to keep
what you memorise.
Displayed time will stop blinking and within 5 seconds, it reverts to
Radio Frequency.
9. Audio MUTE(17)Button
Press MUTE (17) Button to mute the sound, press again to restore volume
to its previous setting.
5. Loudness function(9)
In order to emphasize the bass and the treble at low volume, press and hold
key for 1 second. The display "LOUD ON"comes up for a short time and then
reverts to displaying the frequency or the name of the station. The confirmation
"LOUD"is indicated on the display "LOUD OFF"comes up for a short time and
then reverts to displaying the frequency or the name of the station.
6. Band Function(9)
Press the (BD/LD) button shortly to select the desired band " FM1, FM2,
FM3, (AM)". Note, this button works 2 functions, Band and LOUDNESS
(pressed longer than 1 second).
7. IEQ Function (6)
The IEQ feature creates a realistic atmosphere for the style of music.
You select using the latest digital sound technology
Quite pressing of the key
¡
allows you to select following features :
-
-
-
-
-
¡¡
¡¡
¡¡
¡¡
¡¡
FLAT
CLASSICS
POP M
ROCK M
IEQ OFF
display - > press key
display - for the dramatic depth of classical music in an auditorium >
display - f > press key
display - > press key
display - cancel the sound feature
normal operation mode
or the electric excitement of stadium pop
for the subtle extension of the music's dimensions
press key
10 7

3.Volume control
Turn left or right the spindle knob (2) to decrease or increase the volume
level. Switching on your radio automatically allows you to set the volume
level without having to select it first. After quickly pressing the SEL key, simply
turn the spindle knob to set the required level of the following:
Turn left to lower the bass.
Turn right to higher the bass.
Turn left to lower the treble.
Turn right to higher the treble.
Turn left to decrease the right speaker volume.
Turn right to increase the left speaker volume.
Bass control
Treble control
Balance control
Fader control
Turn left to decrease the volume level of any loud speakers connected rear to radio.
Turn left to increase the volume level of any loud speakers connected front to radio.
When SEL (3) is pressed over 2secs, the unit will be operated as below;
2) Beep 2nd , I-Vol , Area Selection
Beep 2nd I-Vol Area
Press Press
(subject to option)
After the pressing SEL key over 2 secs, select Area (USA / EUR) using the
VOL knob. Press Band button(9) over 2secs to accept.
Area Selection
Press the SEL button again to access the I- VOL menu.
(Initial Volume Level Adjustment)
You can adjust the I-Vol as desired by turning around the spindle knob.
After the setting of Initial Level, when the unit is powered on, the unit
will revert to the I-Vol setting if the unit was set to a higher volume before
last turning it off.
I-Vol
Adjusting this option will control the initial volume level heard
upon turning the unit on avoiding unpleasant or overly loud volume levels.
Beep 2nd
-
-
On the beep 2nd, You Can select the Beep on or Beep 2nd by turning
the spindle knob.
Beep on : You can hear "Beep" sound when you press any button.
Beep 2nd :You can hear "Beep" sound when you press a button over 1.5 secs.
CONTROLS
1. POWER ON/OFF
Press SEL key quickly to select the following features;
"VOL" display - volume control > press key (3)>
"BAS" display - bass tone control >press key (3)>
"TRB" display - treble tone control > press key (3)>
"BAL" display - balance control > press key (3)>
"FAD" display - fader control > press key (3)>
use the VOL knob to adjust. If no adjustment is made or feature is
selected within 5 seconds, the radio automatically switches into volume
level control mode.
These settings are indicated on the display window.
2. SELECT Button (3)
Push the button(7) to turn on the unit. Push the button again to turn off
the unit.
1) Audio control ( VOLUME / BASS / TREBLE / BALANCE / FADER )
VOLUME BASS TREBLE
FADER BALANCE
Select Select
Select Select Select
SCN
BD/LD
MOD
IEQ
PWR
MUT
A.PS
2INT 3RPT 4RDM
156
T/F
COMPACT DISC PLAYER DETACHABLE SYSTEM
4 45WATTSMR-5
VOL
LOUD
LOC
DSP
CLS
FM3 I07.502
MARINE
259
319
17 18
1
6
SEL
89
Other manuals for MR-5
1
Table of contents
Other JBL CD Player manuals