JDE EXCELLENCE COMPACT TOUCH User manual

EXCELLENCE COMPACT TOUCH
User Manual
PN: 6165394_05
Date: 2019-02-11

2
User manual
Content
1- Safety instructions .......................................................................................................................................4
2- Technical specifications...............................................................................................................................6
2.1 Specifications..................................................................................................................................................................................... 6
2.2 Dimensions......................................................................................................................................................................................... 7
3- Part overview description ...........................................................................................................................8
3.1 Front view ........................................................................................................................................................................................... 8
3.2 Interior view ....................................................................................................................................................................................... 8
3.3 Button functions............................................................................................................................................................................... 9
3.4 Display overview .............................................................................................................................................................................. 9
4- Dispenser start up & storage.....................................................................................................................10
4.1 Dispenser start-up..........................................................................................................................................................................10
4.2 Dispenser storage ..........................................................................................................................................................................10
5- Ingredient pack handling ..........................................................................................................................11
6- Daily operation...........................................................................................................................................12
6.1 Dispensing a cup of coffee or hot water................................................................................................................................12
6.2 Dispensing a pot of coffee (some options not available in all markets) ....................................................................12
6.3 Drink delivery with pre-selections (some options not available in all markets)......................................................13
6.4 Ingredient pack replacement ....................................................................................................................................................14
6.5 Filling the ingredient canister....................................................................................................................................................14
6.6 Filling water tank............................................................................................................................................................................15
6.7 Payment handling..........................................................................................................................................................................16
6.71 How to use the coin payment system..................................................................................................................................16
7- Cleaning ......................................................................................................................................................17
7.1 Start the cleaning program ........................................................................................................................................................17
7.2 Cleaning procedures.....................................................................................................................................................................17
7.3 Exterior cleaning.............................................................................................................................................................................17
7.11 How to use the coin payment system..................................................................................................................................17
7.4 Flushing .............................................................................................................................................................................................18
7.5 Cleaning the doser openings and cooler box......................................................................................................................19
7.6 Removing and cleaning the mixing tray................................................................................................................................20
7.7 Disassembling the mixing system ...........................................................................................................................................21
7.8 Cleaning the mixing system parts............................................................................................................................................22
7.9 Reassembling the mixing system ............................................................................................................................................22
7.10 Replacing product packs and flushing the outlets..........................................................................................................23
7.11 Cleaning the foam air filter.......................................................................................................................................................24
7.12 Cleaning the water tank............................................................................................................................................................25

3
User manual
Content
8- User Programming .....................................................................................................................................26
8.1 Activating the operator mode ..................................................................................................................................................26
8.2 Operator mode controls .............................................................................................................................................................26
8.4 Locked mode functions ...............................................................................................................................................................27
8.4 Drink Settings ..................................................................................................................................................................................28
8.5 Resettable Counters......................................................................................................................................................................29
8.6 Fixed Counters ................................................................................................................................................................................30
8.7 Filter Counter...................................................................................................................................................................................31
8.8 Date / Time .......................................................................................................................................................................................32
8.9 Cleaning Day....................................................................................................................................................................................33
8.10 ECO Settings ..................................................................................................................................................................................34
8.11 Contact Info ...................................................................................................................................................................................35
8.12 Accountancy..................................................................................................................................................................................36
8.13 Happy Hour....................................................................................................................................................................................37
9- Troubleshooting.........................................................................................................................................38

4
User manual
1- Safety instructions
The following general safety precautions apply to the operation and maintenance of the dispenser and must
always be observed. Non-compliance with these instructions or any other safety precautions mentioned in
this manual could impair the dispenser’s safety features and lead to potentially dangerous situations and
dispenser damage for which the manufacturer cannot be held responsible.
Installation, service and programming of the dispenser is restricted to authorized and trained service
technicians.
Hazard intensity levels-
There are three different levels of hazard intensity, identified by the signal words DANGER, WARNING and
CAUTION. Observe these statements to ensure safety and prevent injury and product damage.
The level of hazard is determined by the following definitions:
Caution:
Alerts against unsafe practices. Observe these warnings to ensure food safety, to prevent minor
personal injury, and/or damage to the dispenser.
Warning:
Indicates a potentially hazardous situation which, if not avoided, could result in serious injury or even
death.
Danger:
INDICATES AN IMMINENTLY HAZARDOUS SITUATION WHICH, IF NOT AVOIDED, WILL RESULT
IN SERIOUS INJURY OR EVEN DEATH.
Note:
Gives additional information which may be helpful during the service procedures or operation of the
dispenser.
i
1.1 Introduction
1.2 General
• Operation, filling and cleaning of the dispenser is restricted to authorized and trained persons. Take care
that new staff reads the operator manual carefully before operating the dispenser, and understands the
safety and hygiene aspects involved. For quick reference a printed cleaning instruction label or quick
reference guide is included.
• You may only use the dispenser according to the instructions in this operator manual for the delivery
of drinks. The manufacturer is not liable for any damage or injury resulting from improper use of the
dispenser or from non-compliance with the procedures described in this operator manual.
• This dispenser can be used by children aged 8 years and above and persons with reduced physical,
sensory or mental capabilities, or lack of experience and knowledge, if they have been given supervision
or instruction concerning use of the appliance in a safe way and understand the hazards involved.
• Children should be supervised to ensure they do not play with the dispenser.
• Cleaning and user maintenance shall not be made by children.
• Installation, relocation (fixed water/drain version), service and programming of the dispenser is restricted
to authorized service technicians. The service area is restricted to persons having knowledge and practical

5
User manual
experience of the appliance; in particular as far as safety and hygiene are concerned.
• This dispenser is not suitable for installation where a pressure washer may be used.
• This dispenser must not be cleaned by a pressure washer.
• This dispenser is not suitable for outdoor use.
• Protect the dispenser against running water, splashes, spray or steam, heat and heavy dust.
• The liquids delivered by the dispenser are hot!
• Avoid scalding!
• Keep hands and other body parts away from the dispenser while drinks are being dispensed and during
the rinsing program.
• Do not place cups, pots, or containers filled with hot liquids on top of the dispenser.
• There is a risk of being scalded if the cups/pots/containers fall over, take care when handling them.
• Keep sufficient space around the dispenser to get away easily in case of hot liquid splashes.
• Never touch the power supply or power supply plug when your hands and/or the power cord or plug are
wet.
• If the power cord of the dispenser is damaged, unplug the power cord and contact your system supplier
for replacement.
• The dispenser is designed for indoor installation on a stable flat surface such as a table or a counter. Shield
the dispenser from direct sunlight, frost and rain.
• Make sure that there is sufficient space around the dispenser for ventilation, and the front/back/sides are
accessible for service.
• Only use water hoses and connections in compliance with local regulations.
• Connect the dispenser to the drinking water line in compliance with local regulations. In case of cold
drink options, test the quality of the water supply to ensure delivery of safe cold drinks according to local
regulations.
• When connected to a wall outlet power supply, use a grounded safety plug socket in compliance with
local regulations. Ensure that the electric circuit is protected by means of a ground fault current safety
switch and that the power supply plug remains accessible after installation.
• Always store and transport the dispenser in the original packaging.
• Before storing or transporting the dispenser, remove the product packs and place them in a refrigerator,
and empty powdered product container and clean (if so equipped)
• Do not leave product packs in the dispenser if you plan to store the dispenser.
• Clean the dispenser.
• Contact your supplier so that an authorized and trained service technician can drain the water from the
boiler and protect the dispenser against freezing damage.
Caution:
The dispenser must not be subjected to freezing temperatures during operation, storage or
transport.
1.3 Transport and storage
1- Safety instruction
6
User manual
2- Technical specifications
2.1 Specifications
Facts Description
Weight 22 Kg (Empty) - 24Kg (Operational, non-water tank version)
27Kg (Operational with filled water tank)
Cup Volume: Factory setting = 125ml adjustable ±10%
Pot
Factory Setting = 900ml adjustable ±10%
Dispensing time: 110 seconds ±10%
Max height: 160ml
Interval between pots 160 seconds (230 V)
Power supply 230V, 50/60Hz
Power consumption 2.1kW - 230V
Capacity 150 cups per hour (±18.75L per hour)
Storage and operating environment Temperature: 1 - 34ºC
Humidity: Up to 80%
Cooling compartment Capacity: 2 x 1.25L packs
Temperature : 2ºC – 5ºC
Canister capacity
Chocolate: 1.2Kg (~55 cups)
Topping: 1.1Kg (~80 cups)
Tea: 1.2Kg (~1700 cups)
Sugar: 0.8Kg (~230 cups)
Instant coffee: 0.7Kg (~350 cups)
Boiler Volume: 1.2L
Temperature: Adjustable from 83 – 97 ºC
Standard water connection
1/2” or 3/8” supply line with 3/4” BSP connection,
potable water supply line with stop valve.
Removable water tank volume: 3L
Dynamic water pressure Min.: 0.08 MPa at 10L/min
Static water Pressure Max: 1.0 MPa
Maximum noise level < 49 dB(A)

7
User manual
2- Technical specifications
2.2 Dimensions
Position Description Millimeters
A Dispenser height 562
B Distance from top of dispenser to front of open door 193
C Dispenser width 390
D Dispenser depth 426
E Dispenser height with door open 755
F Dispenser depth with door open 500
G Clearance with drip tray in place 130
H Clearance with drip tray removed 165
A
C
B
D
E
F
GH
8
User manual
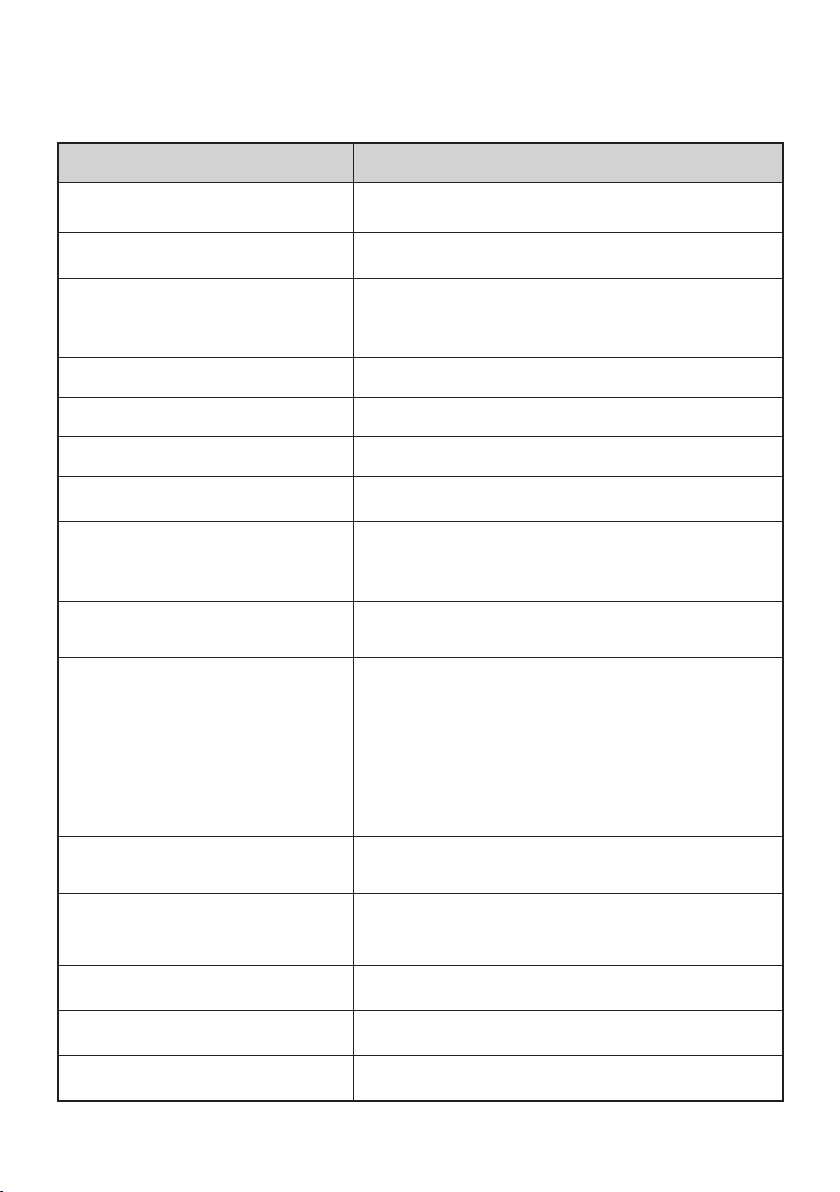
3- Part overview description
3.1 Front view
Drink buttons
Display
Removable ventilation
cover
Air ventilation
Air ventilation
Main power socket
Water connection 3/4” BSP
Hot water outlet
Drink outlets
Cup tray
Drip tray
3.2 Interior view
Standby /
Lock dispenser button
Dispenser door
Cooling compartment
Ingredient canister
Mixing bowl
Water treatment panel
Mixing tray
9
User manual
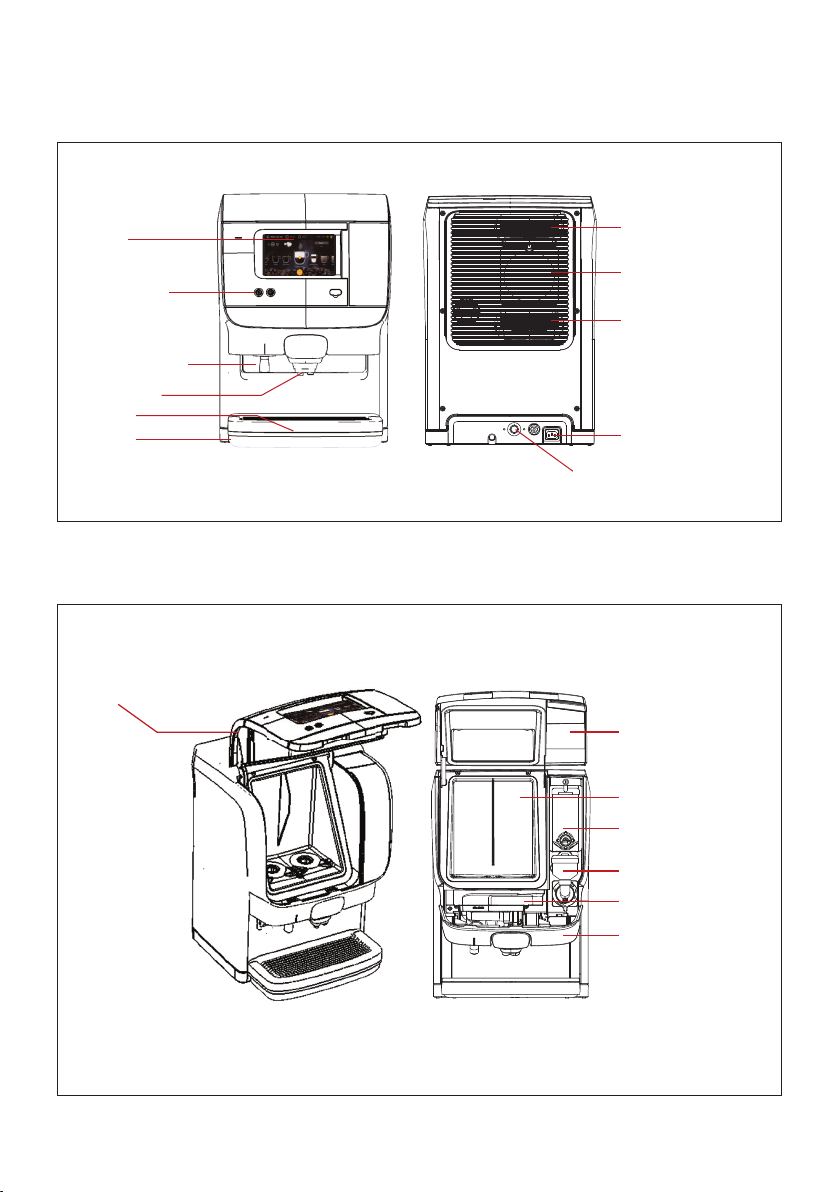
3- Part overview description
3.3 Button functions
USB key port
(for service personal)
3.4 Display overview
Icon Area (C) Legend
Water tank empty
No milk, external milk
system
Boiler heating up
Descaling required
Cleaning required
Filter exchange required
Note:
Some options are not available in all markets.
i
Cold water
Hot water
A
B
C
Message area (A) – display messages*, dispensing not possible
Message area (B) – display messages*, dispensing still possible
Icon area (C) – click on any icon to open message area (B)
*See Troubleshooting section for message details.
10
User manual
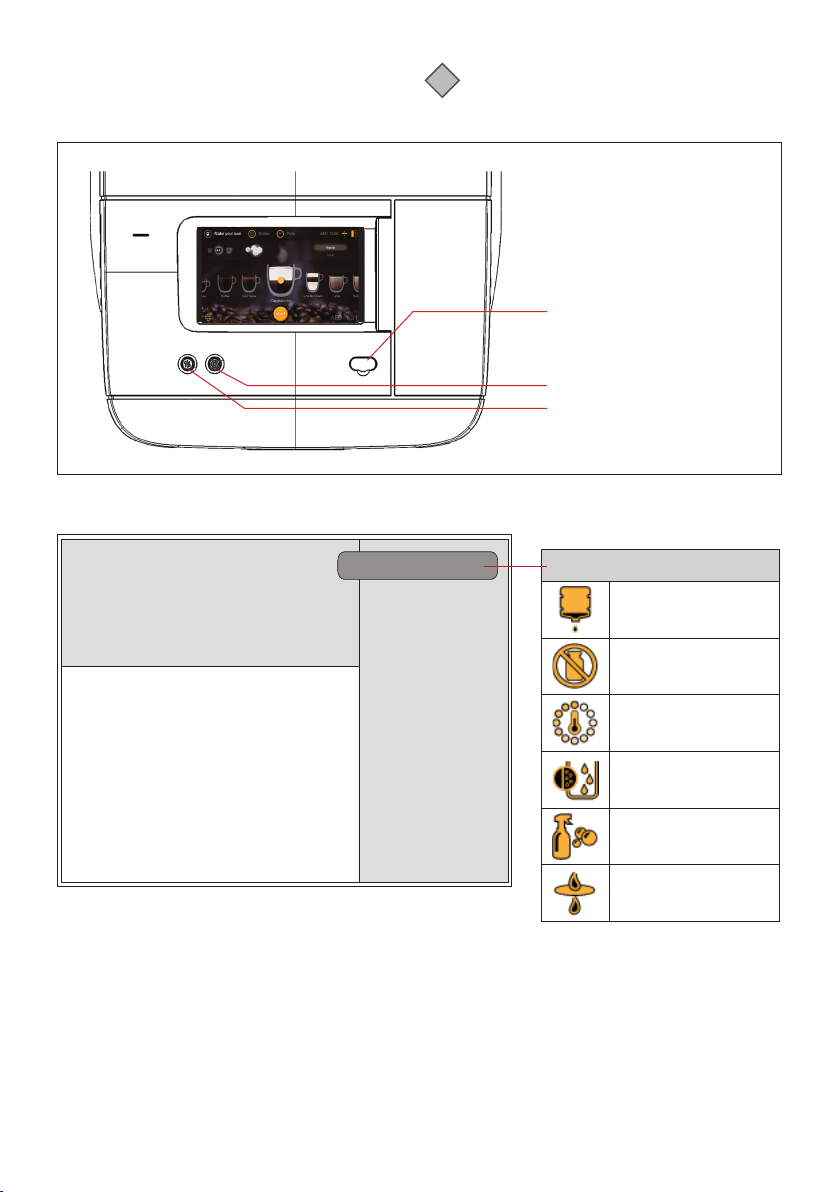
4- Dispenser start up & storage
4.1 Dispenser start-up
4.2 Dispenser storage
A
A
B
BD
C
• Place the dispenser on a flat horizontal surface designed to support the operational weight of the
dispenser.
• Connect the water inlet hose (A to A), and then open the water tap/filter (B to B). Check for leaks.
• Connect the power cord (C to C), and insert the power plug in the wall socket (D to D), the dispenser will
start automatically, fill up and heat the boiler, and begin to chill the cooling compartment. Drink delivery
will be blocked until the water in the boiler has reached the correct temperature.
Take the following preparations when the dispenser will not to be used for a long period (e.g.- holidays):
• Remove the product packs and check the expiry date, if they will soon expire they should be disposed of.
• Store opened product packs in a refrigerator until you switch the dispenser back on and it has cooled
down again. If the expiry date has passed, the packs should be disposed of.
• Empty powder ingredients and clean the mixer components.
• Clean and flush the dispenser.
• Disconnect the power plug from the socket.
• Close the water tap.
Note:
It may take 24 hours or more for the cooling compartment to cool down completely.
Note:
If the dispenser has been shut down for a longer period, the date and time must be reset so the
programmed cleaning cycles and ECO settings are reactivated.
i
i
D
C
Table of contents
Popular Dispenser manuals by other brands

Silver King
Silver King Majestic SK12MAJ Technical manual and replacement parts list

Franke
Franke F3Dn Twin Service manual

STIEBEL ELTRON
STIEBEL ELTRON UltraHot Plus Operation and installation instructions

DAN DRYER
DAN DRYER 282 installation guide

Essity
Essity Tork 473208 manual

CBS
CBS SD300BU-88 COMPONENT MAINTENANCE MANUAL WITH ILLUSTRATED PARTS LIST


