Jean Louis David INFINITE STYLER User manual

MODEL JLD-2104
221017_REV0
ESITNLENFR PL DE GR
INFINITE STYLER
ToNdEuSE PRoFESSIoNNELLE 4 EN 1
ChEvEux - BaRBE - NEz - oREILLES

FR 3
EN 8
PL 12
NL 16
IT 21
ES 25
DE 29
34
GR 37
guarantee 42
FR INFoRMaTIoNS À CoNSERvER PouR CoNSuLTaTIoN uLTÉRIEuRE.
À LIRE aTTENTIvEMENT avaNT d’uTILISER L’aPPaREIL.
AVERTISSEMENTS
Cet appareil peut être utilisé par des enfants âgés d’au moins
trois ans sous surveillance. Cet appareil peut être utilisé par
des enfants âgés d’au moins 8 ans et des personnes dont les
capacités physiques, sensorielles ou mentales sont réduites, ou
des personnes dénuées d’expérience et de connaissance si
elles ont pu bénéficier d’une surveillance ou d’instructions
concernant l’utilisation de l’appareil en toute sécurité et
qu’elles comprennent les dangers encourus. Les enfants ne
doivent pas jouer avec l’appareil. Le nettoyage et l’entretien
par l’usager ne doivent pas être eectués par des enfants sans
surveillance. Cet appareil peut être nettoyé à l’eau courante
d’un robinet. Cet appareil ne se prête pas à une
utilisation dans une baignoire ou sous une douche.
Cet appareil ne doit être utilisé qu’avec le chargeur
fourni. L’appareil doit être alimenté uniquement
sous SELV (très basse tension). MISE EN GARDE
!Enlever la partie tenue à la main du câble
d’alimentation avant de la nettoyer sous l’eau. Tenez l’huile de graissage
fournie à l’écart des sources de chaleur et hors de portée des enfants. Évitez tout contact de l’huile de graissage
avec les yeux. En cas de contact, rincez délicatement les yeux à l’eau froide pendant 15 minutes, puis consultez
un médecin.
Adaptateur de charge
MISE EN GARDE ! Pour recharger la batterie, utilisez
uniquement l’adaptateur de charge amovible fourni avec cet
appareil (Modèle n° : SW-050100EUL). Unité
d’alimentation amovible. Le câble souple externe de ce transformateur ne peut pas être
remplacé; en cas d’endommagement du cordon, le transformateur doit être mis au rebut. Débranchez
3

4
l’adaptateur de charge de la source d’alimentation et laissez-le refroidir avant tout nettoyage, entretien,
stockage et transport. Assurez-vous que la tension indiquée sur la plaque signalétique correspond à celle de
la prise secteur utilisée. Ne touchez pas l’adaptateur de charge avec les mains mouillées. Protégez
l’adaptateur de charge contre les dommages. Ne laissez pas le cordon d’alimentation de l’adaptateur de charge
pendre au-dessus de bords tranchants, ne le serrez pas ou ne le tordez pas et tenez-le à l’écart des surfaces
chaudes. Disposez le cordon d’alimentation de l’adaptateur de charge de telle sorte qu’aucune traction
involontaire ou aucun trébuchement ne soit possible. AVERTISSEMENT - RISQUE DE DÉCHARGE
ÉLECTRIQUE ! Gardez l’adaptateur de charge à l’abri de l’eau et de l’humidité. Chargez la batterie à une
température ambiante de 18 à 24 °C pour assurer la durée de vie de la batterie la plus longue et les meilleures
performances de l’appareil. Ne chargez pas la batterie à des températures inférieures à 0 °C et supérieures à
45 °C. Ne chargez la batterie qu’à l’intérieur, car l’adaptateur de charge est destiné à l’usage intérieur
exclusivement. Ne placez jamais un objet sur l’adaptateur de charge, car cela peut le faire surchauer. Ne
placez jamais l’adaptateur de charge à proximité d’une source de chaleur. N’utilisez une rallonge qu’en cas
de nécessité absolue. L’utilisation d’une rallonge inappropriée peut provoquer un risque d’incendie ou de
décharge électrique. N’utilisez jamais un adaptateur de charge qui a subi un choc violent, est tombé ou a
été endommagé de quelque manière que ce soit. Faites examiner et réparer l’adaptateur de charge
dans un centre de dépannage agréé avant de l’utiliser à nouveau. Si les broches de la partie fiche
sont endommagées, la prise dans le bloc d’alimentation doit être mise au rebut.
Batterie
Cet appareil contient une batterie non remplaçable. Évitez le
contact de l’acide de la batterie avec la peau et les yeux. Si de l’acide de batterie entre en contact avec vos yeux
ou votre bouche, rincez-les soigneusement et abondamment à l’eau et consultez un médecin immédiatement.
Si de l’acide de batterie entre en contact avec votre peau, lavez la zone de peau aectée abondamment à l’eau
savonneuse. La batterie doit être retirée de l’appareil par une personne qualifiée avant sa mise au rebut. La
batterie doit être éliminée en toute sécurité. N’essayez jamais de retirer la batterie vous-même ! L’appareil
doit être débranché du secteur (par exemple éteint) lors du retrait de la batterie.
DESCRIPTION
Cet appareil est destiné à couper et à tailler les cheveux secs, la barbe et la moustache, à tailler les poils de
nez et d’oreille qui dépassent à l’aide de l’accessoire correspondant. Ne l’utilisez pas pour couper des cheveux
mouillés ou synthétiques et ne l’utilisez pas sur les animaux domestiques.
L’appareil est exclusivement destiné à un usage ménager intérieur.
N’utilisez pas l’appareil à d’autres fins. Toute autre utilisation peut entraîner des dommages à l’appareil ou aux
biens ainsi que des blessures.
Le fabricant décline toute responsabilité en cas de dommages ou de blessures résultant d’une mauvaise
utilisation ou d’un non-respect de ce mode d’emploi.
AVANT D’UTILISER L’APPAREIL
AVERTISSEMENT ! Vérifiez le contenu de l’emballage pour vous assurer qu’aucun article ne manque ou n’a
été endommagé lors du transport. Si l’appareil est endommagé ou certaines pièces manquent, ne l’utilisez pas
et rapportez-le à votre fournisseur.

5
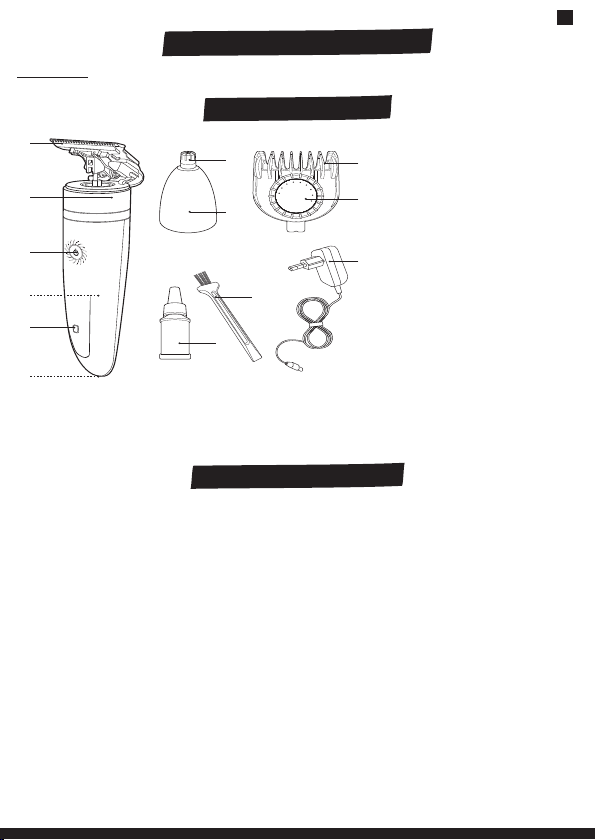
APERÇU DU PRODUIT
1
2
79
10
8
11
1
2
3
4
5
6
7
8
9
10
mm
3
5
4
6
12
13
1. Lames de coupe
2. Tête de coupe (pour cheveux,
barbes et moustaches)
3. Bouton Marche/Arrêt
4. Batterie (intégrée)
5. Voyant d’alimentation
6. Prise de charge
7. Embouts de coupe
8. Tête de coupe (pour poils de
narines et d’oreilles)
9. Peigne de coupe
10. Molette de réglage de la longueur
de coupe (1 à 10 mm)
11. Huile de graissage
12. Brosse de nettoyage
13. Adaptateur de charge
MODE D’EMPLOI
— L’utilisation de l’appareil avec un peigne de coupe ou un accessoire endommagé peut entraîner des blessures.
Avant chaque utilisation, assurez-vous que les embouts et les lames de coupe sont correctement huilés,
éventuellement, et qu’ils ne sont pas endommagés.
— Pendant l’utilisation, secouez ou souez les cheveux du peigne de coupe et de l’accessoire en cas
d’accumulation excessive de cheveux.
— Éteignez toujours l’appareil avant de fixer ou de retirer le peigne de coupe ou de remplacer l’accessoire.
— Par mesure d’hygiène, cet appareil ne doit être utilisé que par une seule personne.
— Afin d’éviter la surchaue de la batterie et de prolonger le temps de charge, il est déconseillé de faire
fonctionner l’appareil pendant la charge de la batterie, s’il est connecté à l’adaptateur de charge ou à
l’alimentation électrique.
— Le bouton Marche/Arrêt se verrouille lorsque vous appuyez dessus pendant 3 secondes (le voyant
d’alimentation blanc clignotera 3 fois au même moment). L’appareil ne fonctionne pas (le bouton marche/
Arrêt est verrouillé) lorsque vous appuyez sur le bouton Marche/Arrêt. Vous ne pourrez pas l’utiliser tant que
vous ne l’aurez pas déverrouillé en appuyant à nouveau dessus pendant 3 secondes.
Charge de la batterie
— Avant la première utilisation de l’appareil, chargez l’appareil / la batterie pendant environ 2 heures.
— Une fois la batterie entièrement chargée, l’appareil peut fonctionner en continu pendant environ 60 minutes.
— Appuyez sur le bouton Marche/Arrêt pour éteindre l’appareil.
— Connectez l’adaptateur de charge à la prise de charge sur l’appareil et branchez-le sur une prise électrique
appropriée.
— Pendant la charge, le voyant d’alimentation est constamment blanc.
— Une fois la batterie entièrement chargée, le voyant d’alimentation clignote en blanc.
— Débranchez l’adaptateur de charge de l’appareil et de l’alimentation électrique.

6
Remplacement de la tête de coupe
— Éteignez toujours l’appareil avant de remplacer la tête de
coupe.
— Tournez légèrement la tête de coupe dans le sens inverse des
aiguilles d’une montre pour la dégager et la retirer de l’appareil.
— Fixez la tête de coupe souhaitée sur l’appareil et tournez-la
dans le sens des aiguilles d’une montre pour la mettre en place.
1.
2. 2.
1.
Utilisation du peigne de coupe
— Éteignez toujours l’appareil lorsque vous fixez, réglez ou
retirez le peigne de coupe.
— Fixez le peigne de coupe sur l’appareil et tournez la
molette de réglage de la longueur de coupe pour régler la
longueur de coupe souhaitée (1 à 10 mm).
Couper / tailler les cheveux, la barbe et la moustache
REMARQUE : Avant d’utiliser l’appareil, assurez-vous toujours que vos cheveux / barbe / moustache sont
propres, bien peignés, non emmêlés et secs. N’utilisez pas de sprays pour cheveux, de vaporisateurs d’eau, de
crème à raser, de gel à raser ou tout autre vaporisateur lorsque vous utilisez l’appareil.
REMARQUE : Si vous n’avez pas l’habitude de couper ou de tailler des cheveux / barbes / moustaches,
commencez par utiliser le peigne de coupe pour une longueur de cheveux / barbe / moustache plus importante,
puis réduisez-le, pour éviter de couper plus de cheveux / barbe / moustache que souhaité.
REMARQUE : Lorsque vous utilisez l’appareil pour la première fois, essayez-le d’abord sur une partie où les
poils / la barbe / la moustache poussent peu.
REMARQUE : Eectuez des mouvements lents et contrôlés. Ne forcez pas l’appareil dans les cheveux / la
barbe / la moustache plus vite qu’il ne peut les couper / tailler. Pour contrôler le résultat pendant la coupe ou la
taille, peignez régulièrement les cheveux / la barbe / la moustache en fonction du style souhaité.
Tailler les barbes / moustaches
— Appuyez sur le bouton marche/arrêt pour allumer l’appareil.
— Peignez votre barbe / moustache dans le sens de sa poussée.
— Veillez à ce que les lames de coupe / le peigne de coupe soient toujours à plat et parallèles à la peau et ne
soient pas inclinés.
— Déplacez lentement et avec précaution l’appareil dans le sens de la pousse de la barbe / moustache.
— Lorsque vous utilisez le peigne de coupe, appuyez le peigne de coupe contre votre visage / votre joue,
commencez par tailler les côtés de votre barbe / moustache. Déplacez lentement l’appareil vers le milieu, en
taillant de petites quantités à la fois.
— Pour couper les contours, positionnez les lames de coupe à un angle de 90° par rapport à la peau.
— Ne passez pas d’une position parallèle à une position à 90° lors du contact avec la peau.
— Évitez les mouvements saccadés pendant la taille.
— Une fois que vous avez terminé, appuyez sur le bouton marche/arrêt pour éteindre l’appareil.
Coupe de cheveux
— Appuyez sur le bouton marche/arrêt pour allumer l’appareil.
— Peignez vos cheveux dans le sens de leur pousse.
— Posez et appuyez le sabot sur votre tête, commencez par couper les cheveux situés sur les côtés de votre
tête, en eectuant un mouvement de bas en haut. Déplacez lentement l’appareil vers le haut de votre tête,
en coupant de petites quantités de cheveux.
— Faites la même chose sur l’arrière de votre tête.
— Coupez les cheveux qui se trouvent sur le dessus de votre tête, depuis l’avant vers l’arrière.
— Une fois que vous avez terminé, appuyez sur le bouton marche/arrêt pour éteindre l’appareil.

7
Rafraîchir la nuque et couper les cheveux derrière les oreilles
— AVERTISSEMENT ! Attention, les lames de la tondeuse sont très tranchantes, et enlèvent tout poil avec
lequel elles entrent en contact lorsque le peigne de coupe est retiré.
— Placez l’appareil de sorte qu’un seul bord touche les cheveux.
— Formez lentement les cheveux autour des oreilles et anez le tour de cou en positionnant les lames de
coupe contre le cou et en les déplaçant vers le bas. Pour terminer de rafraîchir la nuque, utilisez des ciseaux
adaptés (non inclus).
— Une fois que vous avez terminé, appuyez sur le bouton marche/arrêt pour éteindre l’appareil.
Tailler les poils des narines et des oreilles
— Appuyez sur le bouton marche/arrêt pour allumer l’appareil.
— Placez les embouts de coupe contre les poils dépassant des narines / oreilles.
— Eectuez toujours des mouvements lents et contrôlés.
— Utilisez les embouts de coupe uniquement pour retirer les poils des zones mentionnées. N’insérez pas les
embouts de coupe à plus de 5 mm dans les narines/oreilles.
— Une fois que vous avez terminé, appuyez sur le bouton marche/arrêt pour éteindre l’appareil.
NETTOYAGE
— Avant de nettoyer l’appareil, assurez-vous qu’il est débranché de l’adaptateur de charge, ensuite éteignez-le
et laissez-le refroidir complètement.
— Ne nettoyez pas l’appareil et l’adaptateur de charge avec de la laine d’acier, des produits chimiques forts,
des produits alcalins, des produits abrasifs ou des produits désinfectants, car ils pourraient endommager leur
surface.
— Ne plongez pas l’appareil et l’adaptateur de charge dans l’eau ou dans d’autres liquides pour les nettoyer.
Assurez-vous que les parties électriques ne sont pas mouillées ou exposées à l’humidité.
— Après chaque utilisation, détachez le peigne de coupe de la tête de coupe.
— Retirez les poils restants sur l’appareil et la tête de coupe. Utilisez la brosse de nettoyage si nécessaire.
— Détachez la tête de coupe de l’appareil si nécessaire ; ne plongez pas la tête de coupe dans l’eau ou dans
d’autres liquides pour la nettoyer. Nettoyez la tête de coupe et l’intérieur avec un chion doux et sec ou avec
la brosse de nettoyage fournie. Replacez ensuite la tête de coupe sur l’appareil et assurez-vous qu’elle est
bien fixée avant d’utiliser à nouveau l’appareil.
— Huilez les lames et les pointes de coupe avec l’huile de graissage (fournie) à chaque fois que vous eectuez
quelques coupes.
— Nettoyez le sabot avec de l’eau propre et séchez-le ensuite. Assurez-vous que le peigne de coupe est
complètement sec avant de le fixer à la tête de coupe et d’utiliser à nouveau l’appareil.
— Nettoyez l’appareil et l’adaptateur de charge avec un chion doux et humide et, si nécessaire, un peu de
détergent doux. Essuyez avec un chion doux et sec.
— L’appareil et l’adaptateur de charge ne doivent être réutilisés qu’après séchage complet.
ENTREPOSAGE
— Avant de ranger l’appareil et l’adaptateur de charge, assurez-vous toujours qu’ils sont complètement secs et
refroidis.
— Rangez l’appareil et l’adaptateur de charge dans un endroit frais et sec, à l’abri de l’humidité et hors de portée
des enfants.
Ce symbole, apposé sur le produit ou son emballage, indique que ce produit est conforme à la
directive européenne 2012/19/UE et qu’il ne doit pas être traité avec les déchets ménagers.
Il doit être remis à un point de collecte approprié pour le recyclage des équipements électriques et
électroniques.

8
En s’assurant que ce produit est bien mis au rebus de manière appropriée, vous aiderez à prévenir les
conséquences négatives potentielles pour l’environnement et la santé humaine.
Le recyclage des matériaux aidera à conserver les ressources naturelles.
IMPORTANT : Lors du remplacement de vos piles usagées, nous vous demandons de suivre la
réglementation en vigueur quant à leur élimination. Nous vous remercions de les déposer à un
endroit prévu à cet eet afin d’en assurer leur élimination de façon sûre et dans le respect de
l’environnement.
EN PLEaSE KEEP ThIS INFoRMaTIoN FoR FuTuRE REFERENCE.
PLEaSE REad CaREFuLLY BEFoRE uSING ThE dEvICE.
WARNINGS
This appliance can be used by children aged from 3 years
under supervision. This appliance can be used by children
aged from 8 years and above and persons with reduced
physical, sensory or mental capabilities or lack of experience
and knowledge if they have been given supervision or
instruction concerning use of the appliance in a safe way and
understand the hazards involved. Children shall not play
with the appliance. Cleaning and user maintenance shall
not be made by children without supervision. / This appliance
is not intended for use by persons (including children) with
reduced physical, sensory or mental capabilities, or lack of
experience and knowledge, unless they have been given
supervision or instruction concerning use of the appliance by a
person responsible for their safety. Children should be
supervised to ensure that they do not play with the appliance.
This appliance is suitable for cleaning under an open
water tap. This appliance is not suitable for use in a
bath or shower. This appliance is only to be used
with the provided charging device. The appliance is
only to be supplied at SELV. WARNING! Detach
the hand-held part from the supply cord before

9
cleaning it in water. The included lubrication oil must be placed away from fire sources and
out of the reach of children. Avoid contact of eyes with the lubrication oil. In case of contact with it, gently
wash the eyes with cold water for 15 minutes, then seek medical help.
Charging adapter
WARNING! For the purposes of recharging the battery, only
use the detachable charging adapter provided with this
appliance (Model no.: SW-050100EUL).
Detachable supply unit. The external flexible cable or cord of this transformer cannot
be replaced; if the cord is damaged, the transformer shall be scrapped. Disconnect the charging adapter
from the power supply and allow it to cool down before cleaning, maintenance, storage and transportation.
Ensure the rated voltage shown on the rating label corresponds with the voltage of the power supply. Do
not touch the charging adapter with wet hands. Protect the charging adapter against damages. Do not let
the power cord of the charging adapter hang over sharp edges, do not squeeze or bend it, and keep it away
from hot surfaces. Lay out the power cord of the charging adapter in such a way that no unintentional
pulling or tripping over is possible. WARNING - RISK OF ELECTRIC SHOCK! Protect the charging
adapter against moisture and wet conditions. Charge the battery in an ambient temperature of 18 - 24 °C
to ensure the longest battery life and best performance of the appliance. Do not charge the battery in
temperatures below 0 °C and above 45 °C. Charge the battery indoors only, as the charging adapter is
designed for indoor use only. Do not place any object on top of the charging adapter as it could cause
overheating. Do not place the charging adapter near any heat source. Do not use an extension cord unless
it is absolutely necessary. The use of an improper extension cord could cause the risk of fire or electric shock.
Do not use the charging adapter if it has been subjected to a heavy knock, dropped or otherwise
damaged in any way. Have the charging adapter checked and repaired by an authorised service
centre before using it again. If the pins of the plug parts are damaged, the plug-in power supply
shall be scrapped.
Battery
This appliance contains a battery that is non-replaceable.
Prevent battery acid from coming into contact with skin and eyes. If you do get battery acid in your eyes or
mouth, flush them thoroughly with lots of water and seek medical advice immediately. If battery acid comes
into contact with your skin, wash the aected area with lots of water and soap. The battery must be
removed from the appliance by a skilled person before it is scrapped. The battery is to be disposed of safely.
Never try to remove the battery yourself! The appliance must be disconnected from the supply mains (e.
g. switching o) when removing the battery.
DESCRIPTION
This appliance is intended for cutting and trimming dry hair, beards and moustaches, trimming protruding
nostril and ear hair with respective attachment. Do not use it for cutting wet or artificial hair, and do not use it
on pets.
The appliance is only intended for household indoor use.
Do not use the appliance for other purposes. Any other use might lead to damage of the appliance, property
or personal injury.
The manufacturer will accept no liability for damage or injuries resulting from improper use or non-compliance
with this manual.
10
BEFORE USING THE APPLIANCE
WARNING! Check the delivery contents for any missing items or any possible transport damage. If the
appliance is damaged or some parts are missing, do not use it and bring it back to your dealer.
PRODUCT OVERVIEW
1
2
79
10
8
11
1
2
3
4
5
6
7
8
9
10
mm
3
5
4
6
12
13
1. Trimming blades
2. Trimming head (for hair, beards
and moustaches)
3. On/o button
4. Battery (built-in)
5. Power indicator
6. Charging jack
7. Trimming tips
8. Trimming head (for nostril and
ear hair)
9. Cut comb
10. Cutting-length adjustment
wheel (1 – 10 mm)
11. Lubrication oil
12. Cleaning brush
13. Charging adapter
INSTRUCTIONS FOR USE
— Using the appliance with damaged cut comb or attachment may cause personal injury. Before each use,
ensure the trimming tips and trimming blades are properly oiled, if necessary, and free of damage.
— During the operation, shake or blow o the hair from the cut comb and attachment, if too much hair is
caught in them.
— Always switch o the appliance before attaching / removing the cut comb or replacing the attachment.
— For hygiene reasons, this appliance shall be used by one person only.
— It is not recommended to operate the appliance while charging the battery, if it is connected to the charging
adapter / power supply, to avoid the battery from overheating and extending charging time.
— The on/o button will be locked by keeping it pressed for 3 seconds (at the same time the white power
indicator flashes 3 times); the appliance does not operate (the on/o button is locked) while the on/o
button is pressed, unless keep pressing the on/o button again for 3 seconds to unlock it.
Charging the battery
— Before using the appliance for the first time, charge the appliance / battery for approx. 2 hours.
— After the battery is fully charged, the appliance can be operated continuously for approx. 60 minutes.
— Press the on/o button to switch o the appliance.
— Connect the charging adapter with the charging jack on the appliance and plug it into a suitable power
socket.
— The power indicator lights up constantly white during charging.
— After the battery is fully charged, the power indicator flashes white.
— Disconnect the charging adapter from the appliance and the power supply.

11
Replacing the trimming head
— Always switch o the appliance when replacing the
trimming head.
— Rotate the trimming head slightly counterclockwise to
disengage and remove it from the appliance.
— Attach the desired trimming head onto the appliance
and rotate it clockwise to engage it in position.
1.
2. 2.
1.
Using the cut comb
— Always switch o the appliance when attaching,
adjusting or removing the cut comb.
— Attach the cut comb onto the appliance and rotate the
cutting-length adjustment wheel to adjust the desired
cutting-length (1 - 10 mm).
Cutting / trimming hair, beards and moustaches
NOTE: Always ensure your hair / beard / moustache is clean, well combed, tangle-free and dry before using
the appliance. Do not use hair sprays, water vaporizers, shaving cream, shaving gel or any other vaporizers,
when operating the appliance.
NOTE: If you are not used to cutting or trimming hair / beards / moustaches, begin with the cut comb for a
longer hair / beard / moustache length and then reduce it, to avoid cutting more hair / beard / moustache than
desired.
NOTE: When using the appliance for the first time, first try it on an area with light hair / beard / moustache
growth.
NOTE: Use a slow and controlled movement. Do not force the appliance through the hair / beard / moustache
faster than it can cut / trim it. To control the result during cutting or trimming, regularly comb the hair / beard /
moustache in the desired style.
Trimming beards / moustaches
— Press the on/o button to switch on the appliance.
— Comb your beard / moustache in the direction of its growth.
— Make sure the trimming blades / cut comb are / is always sitting flat and parallel to the skin and not tilted.
— Slowly and carefully move the appliance against the direction of the beard / moustache growth.
— When using the cut comb, press the cut comb against your face / cheek, start by trimming the sides of your
beard / moustache. Slowly move the appliance towards the middle, trimming small amounts at a time.
— When cutting contours, position the trimming blades in a 90° angle to the skin.
— Do not switch from a parallel to a 90° position while contacting the skin.
— Avoid jerky movements while trimming.
— After the operation, press the on/o button to switch o the appliance.
Cutting hair
— Press the on/o button to switch on the appliance.
— Comb your hair in the direction of its growth.
— Press the cut comb against your head, start by cutting the sides of your hair from the bottom of the head
upwards. Slowly move the appliance up towards the top of the head, cutting small amounts at a time.
— Repeat at the back of the head.
— Cut the hair at the top of your head from front to back.
— After the operation, press the on/o button to switch o the appliance.

12
Trimming neckline and ear area
— WARNING! Be aware that the trimming blades are very sharp, and remove any hair they come into
contact with when the cut comb is removed.
— Position the appliance so that only one edge contacts the hair.
— Slowly shape the hair around the ears and trim the neckline by positioning the trimming blades against the
neck and moving downwards. For final trimming, use suitable scissors (not included).
— After the operation, press the on/o button to switch o the appliance.
Trimming the hair of nostrils and ears
— Press the on/o button to switch on the appliance.
— Place the trimming tips against the protruding hair of the nostrils / ears.
— Always use a slow and controlled movement.
— Only use the trimming tips to remove hair from the mentioned areas. Do not insert the trimming tips more
than 5 mm into the nostrils / ears.
— After the operation, press the on/o button to switch o the appliance.
CLEANING
— Before cleaning, ensure the appliance is unplugged from the charging adapter, and then switch o the
appliance and let it cool down completely.
— Do not clean the appliance and charging adapter with steel wool, strong chemicals, alkali, abrasive or
disinfecting agents as they may damage their surface.
— Do not immerse the appliance and charging adapter in water or other liquids to clean them. Make sure that
the electrical parts do not become wet or damp.
— Detach the cut comb from the trimming head after each use.
— Remove any hair left on the appliance and trimming head. Use the cleaning brush if necessary.
— Detach the trimming head from the appliance if required; do not immerse the trimming head in water or
other liquids to clean it. Clean the trimming head and inside with a dry soft cloth or the included cleaning
brush. Refit the trimming head onto the appliance afterward and ensure it is engaged properly in place
before using the appliance again.
— Oil the trimming blades and trimming tips with the lubrication oil (included) once every few cuts.
— Clean the cut comb with clean water and dry it afterward. Ensure the cut comb is completely dry before
attaching it to the trimming head and using the appliance again.
— Clean the appliance and charging adapter with a soft damp cloth and, if necessary, a little mild detergent.
Wipe with a dry soft cloth.
— The appliance and charging adapter may only be used again after they are dried completely.
STORAGE
— Before storage, always make sure that the appliance and charging adapter are completely dry and cooled
down.
— Store the appliance and charging adapter in a cool, dry place, protected from moisture and out of the reach
of children.
This symbol, displayed on the product or on its packaging, indicates that this product complies with
the European Directive 2012/19/EU and must not be disposed of with household waste.
It must be taken to an appropriate collection point for recycling electrical and electronic equipment.
By ensuring that this product is disposed of in an appropriate way, you will be helping to prevent potential
harmful consequences for the environment and human health.
Recycling materials will help to conserve natural resources.
13
IMPORTANT: When replacing your used batteries, we ask you to follow current regulations
regarding their disposal. Please dispose of them appropriately to guarantee their safe and
environmentally-friendly destruction.
PL zaChoWaĆ NINIEJSzE INFoRMaCJE Na PRzYSzŁoŚĆ.
doKŁadNIE PRzECzYTaĆ PRzEd SKoRzYSTaNIEM z uRzĄdzENIa.
OSTRZEŻENIA
Urządzenie może być używane przez dzieci w wieku od 3 lat
pod nadzorem. Urządzenie może być użytkowane przez
dzieci od 8 roku życia oraz osoby o ograniczonych
zdolnościach psychicznych, sensorycznych, umysłowych lub
nieposiadające wiedzy i doświadczenia, o ile pozostają pod
nadzorem lub otrzymały instrukcje dotyczące bezpiecznego
użytkowania urządzenia oraz rozumieją potencjalne zagrożenia.
Dzieci nie powinny bawić się urządzeniem. Czyszczenie i
konserwacja nie powinny być wykonywane przez dzieci
pozostające bez nadzoru. Urządzenie nadaje się do
czyszczenia pod kranem. Urządzenie nie nadaje się
do używania w wannie ani pod prysznicem.
Urządzenia należy używać wyłącznie z dostarczoną
ładowarką. Urządzenie może być zasilane wyłącznie
za pośrednictwem zabezpieczonego obwodu
niskonapięciowego. OSTRZEŻENIE! Przed czyszczeniem
przy użyciu wody należy odłączyć urządzenie od zasilania.
Dołączony smar należy trzymać z dala od źródła ognia oraz zasięgu dzieci. Unikaj kontaktu smaru z oczami. W
przypadku dostania się smaru do oka należy przepłukiwać je przy użyciu zimnej wody przez 15 minut, a następnie
zasięgnąć porady lekarza.
Ładowarka
OSTRZEŻENIE! Do ładowania akumulatora używaj
wyłącznie ładowarki dołączonej do urządzenia (Nr modelu:
SW-050100EUL). Wyjmowany zasilacz. Zewnętrznego
kabla elastycznego ani przewodu tego transformatora nie można wymienić. W przypadku uszkodzenia przewodu

14
transformator należy zutylizować. Ładowarkę należy odłączyć od zasilania i odstawić do schłodzenia przed
rozpoczęciem czyszczenia, konserwacji, przechowywania i transportu. Przed podłączeniem do sieci
elektrycznej upewnij się, że napięcie sieciowe podane na tabliczce znamionowej jest zgodne z napięciem
zasilającym. Nie dotykaj ładowarki mokrymi dłońmi. Chroń ładowarkę przed uszkodzeniami. Nie
przewieszaj kabla ładowarki przez ostre krawędzie, nie ściskaj ani nie załamuj, i trzymaj z dala od gorących
powierzchni. Ułóż kabel ładowarki w taki sposób, aby nie było możliwe niezamierzone pociągnięcie lub
potknięcie się. OSTRZEŻENIE - NIEBEZPIECZEŃSTWO PORAŻENIA PRĄDEM! Ładowarkę należy
chronić przed wilgocią i wodą. Aby maksymalnie wydłużyć trwałość i zapewnić optymalne działanie
urządzenia, baterię ładuj w temperaturze otoczenia 18 - 24°C. Nie ładuj baterii w temperaturach poniżej 0°C
ani powyżej 45°C. Akumulator należy ładować tylko w pomieszczeniu, ponieważ ładowarka jest
przeznaczona do pracy wyłącznie w pomieszczeniach. Nie umieszczać żadnych przedmiotów na górze
ładowarki ze względu na możliwość wywołania przegrzania. Nie umieszczać ładowarki w pobliżu źródeł ciepła.
Nie stosować przedłużacza, chyba że jest to absolutnie niezbędne. Zastosowanie nieprawidłowego kabla może
spowodować zagrożenie wybuchu pożaru lub porażenia prądem. Nie używać ładowarki, jeśli została mocno
uderzona, upadła lub uległa innemu uszkodzeniu. W takim przypadku należy oddać ładowarkę do
sprawdzenia i naprawy przez autoryzowane centrum serwisowe. W przypadku uszkodzenia styków
części wtyczki zasilacz należy zutylizować.
Bateria
Urządzenie ma wbudowany akumulator, który nie podlega
wymianie. Zapobiegaj kontaktowi kwasu akumulatorowego ze skórą i oczami. Jeśli do oczu lub ust
dostanie się kwas foliowy, dokładnie przepłucz je dużą ilością wody i natychmiast skonsultuj się z lekarzem. Jeśli
dojdzie do kontaktu kwasu akumulatorowego ze skórą, przemyj dotknięty obszar dużą ilością wody i mydła.
Przed utylizacją bateria powinna zostać wyjęta z urządzenia przez wykwalifikowaną osobę. Baterię utylizuj w
bezpieczny sposób. Nie próbuj samodzielnie wyjmować baterii! Przed wyjęciem baterii odłącz urządzenie od
zasilania (np. wyłącz je).
OPIS
Urządzenie jest przeznaczone do cięcia i przycinania suchych włosów, brody i wąsów oraz włosów wystających
z nosa i uszu za pomocą odpowiedniego akcesorium. Urządzenie nie służy do obcinania włosów mokrych,
sztucznych ani zwierzęcych.
Urządzenie nadaje się jedynie do stosowania w gospodarstwach domowych i w pomieszczeniach.
Nie używaj urządzenia do innych celów. Wszelkie inne użycie może prowadzić do uszkodzenia urządzenia,
własności lub obrażeń ciała.
Producent nie ponosi żadnej odpowiedzialności za uszkodzenia lub obrażenia wynikające z niewłaściwego
użytkowania lub nieprzestrzegania niniejszych instrukcji.
PRZED UŻYCIEM URZĄDZENIA
OSTRZEŻENIE! Sprawdź zawartość przesyłki pod kątem braków lub uszkodzeń transportowych. Jeśli
urządzenie jest uszkodzone lub brakuje niektórych części, nie używaj go i zwróć sprzedawcy.
OPIS PRODUKTU
1. Ostrza przycinające 8. Głowica przycinająca (do włosów w nosie i uszach)
2. Głowica przycinająca (do włosów, brody i wąsów) 9. Nasadka tnąca
3. Przycisk włączania/wyłączania 10. Pokrętło regulacji długości cięcia (1–10 mm)

15
4. Bateria (wbudowana) 11. Smar
5. Sygnalizator zasilania 12. Szczoteczka do czyszczenia
6. Złącze ładowania 13. Ładowarka
7. Końcówki do przycinania
INSTRUKCJA UŻYCIA
— Użytkowanie urządzenia z uszkodzoną nasadką tnącą lub akcesorium może spowodować obrażenia ciała.
Przed każdym użyciem upewnij się, że końcówki i ostrza przycinające są odpowiednio nasmarowane i
nieuszkodzone.
— Podczas przycinania strząsaj lub zdmuchuj włosy z nasadki tnącej i akcesorium, gdy jest ich tam zbyt dużo.
— Przy montażu / demontażu nasadki tnącej lub zmianie akcesorium wyłączaj urządzenie.
— Ze względów higienicznych urządzenia powinna używać tylko jedna osoba.
— Nie zaleca się używania urządzenia podczas ładowania akumulatora, podłączenia do ładowarki / źródła
zasilania, w celu uniknięcia przegrzania baterii oraz wydłużenia czasu ładowania.
— Włącznik można zablokować przytrzymując go przez 3 sekundy (biały wskaźnik zasilania zamiga 3 razy).
Wówczas przy wciskaniu włącznika urządzenie nie zadziała (włącznik jest zablokowany), chyba że ponownie
przytrzyma się go przez 3 sekundy do odblokowania.
Ładowanie baterii
— Przed pierwszym użyciem urządzenia, ładuj urządzenie / akumulator przez ok. 2 godz.
— Po całkowitym naładowaniu urządzenie może pracować w sposób ciągły przez ok. 60 min.
— Aby wyłączyć urządzenie, naciśnij przycisk włączania/wyłączania.
— Podłącz ładowarkę do złącza ładowania znajdującego się u dołu urządzenia, a następnie podłącz do kontaktu.
— Podczas ładowania sygnalizator zasilania świeci ciągle.
— Po całkowitym naładowaniu sygnalizator zasilania miga na biało.
— Odłącz ładowarkę od urządzenia oraz źródła zasilania.
Wymiana głowicy przycinającej
— Przy zmianie głowicy przycinającej wyłączaj urządzenie.
— Delikatnie obróć głowicę przycinającą w lewo, aby ją odłączyć, i zdejmij ją z urządzenia.
— Zamocuj wybraną głowicę przycinającą na urządzeniu i obróć ją w prawo, aby zablokować ją w miejscu.
Stosowanie nasadki tnącej
— Przy montażu, regulacji lub demontażu nasadki tnącej wyłączaj urządzenie.
— Zamontuj nasadkę tnącą na urządzeniu i obróć pokrętło regulacji długości cięcia, aby ustawić wybraną
długość cięcia (1–10 mm).
Cięcie / przycinanie włosów, brody i wąsów
UWAGA: Przed użyciem urządzenia upewnij się, że włosy / broda / wąsy są czyste, dobrze wyczesane,
nieplączące się i suche. Podczas użytkowania urządzenia nie należy rozpylać lakierów do włosów, korzystać ze
spryskiwaczy, kremu do golenia, żelu do golenia ani innych kosmetyków w formie mgiełki.
UWAGA: Jeśli nie jesteś przyzwyczajony do cięcia / przycinania włosów / brody / wąsów, aby uniknąć przycięcia
zbytniej długości, zacznij od nasadki tnącej do dłuższych włosów, a następnie wybierz krótszą.
UWAGA: Gdy używasz urządzenia po raz pierwszy, najpierw wypróbuj je w miejscu, gdzie rosną krótkie włosy /
broda / wąsy.
UWAGA: Stosuj powolne i kontrolowane ruchy. Nie przesuwaj urządzenia po włosach / brodzie / wąsach
szybciej niż przebiega cięcie / przycinanie. Aby kontrolować efekt podczas cięcia lub przycinania, regularnie
czesz włosy / brodę / wąsy w wybranym stylu.
Przycinanie brody / wąsów
— Aby włączyć urządzenie, naciśnij włącznik/wyłącznik.
— Rozczesuj brodę / wąsy zgodnie z ich kierunkiem wzrostu.
— Upewnij się, że ostrza przycinające / nasadka tnąca jest ułożona płasko, równolegle do skóry i nieprzechylona.

16
— Powoli i ostrożnie przesuwaj urządzenie pod włos zarostu / wąsów.
— Używając nasadki tnącej, przyciskaj ją do twarzy / policzka. Zacznij od przycięcia boków brody / wąsów. Powoli
przesuwaj urządzenie do środka, przycinając małe ilości na raz.
— Podczas przycinania kształtów ostrza przycinające ustaw pod kątem 90° do skóry.
— Podczas kontaktu ze skórą nie zmieniaj pozycji z równoległej na prostopadłą.
— Podczas przycinania unikaj gwałtownych ruchów.
— Aby po użyciu wyłączyć urządzenie, naciśnij włącznik/wyłącznik.
Przycinanie włosów
— Aby włączyć urządzenie, naciśnij włącznik/wyłącznik.
— Rozczesuj włosy zgodnie z ich kierunkiem wzrostu.
— Przyciśnij nasadkę tnącą do głowy. Zacznij od przycięcia włosów z boku, tnąc od dołu głowy w górę. Powoli
przesuwaj urządzenie w górę, w kierunku czubka głowy, przycinając małe ilości na raz.
— Powtórz z tyłu głowy.
— Przycinaj włosy na czubku głowy, tnąc od przodu do tyłu.
— Aby po użyciu wyłączyć urządzenie, naciśnij włącznik/wyłącznik.
Przycinanie przy szyi i w okolicach uszu
— OSTRZEŻENIE! Pamiętaj, że ostrza przycinające są bardzo ostre i po zdjęciu nasadki tnącej usuwają wszelkie
włosy, z którymi się zetkną.
— Ustaw urządzenie tak, aby tylko jedna krawędź dotykała włosów.
— Powoli uformuj włosy wokół uszu i przytnij je przy szyi, przykładając ostrza przycinające do szyi i przesuwając
je w dół. Do końcowego przycięcia użyj odpowiednich nożyczek (brak w zestawie).
— Aby po użyciu wyłączyć urządzenie, naciśnij włącznik/wyłącznik.
Przycinanie włosów w nosie i uszach
— Aby włączyć urządzenie, naciśnij włącznik/wyłącznik.
— Umieść końcówki do przycinania przy włosach wystających z nosa / uszu.
— Wykonuj łagodne, spokojne ruchy ręką.
— Końcówek do przycinania używaj tylko do usuwania włosów z tych miejsc. Nie wkładaj końcówek do
przycinania do otworów nosowych / uszu głębiej niż na 5 mm.
— Aby po użyciu wyłączyć urządzenie, naciśnij włącznik/wyłącznik.
CZYSZCZENIE
— Przed czyszczeniem upewnić się, że urządzenie jest odłączone od ładowarki, a następnie wyłączyć urządzenie i
pozwolić mu całkowicie ostygnąć.
— Nie czyść urządzenia wełną stalową, silnymi środkami chemicznymi, alkalicznymi, ściernymi lub
dezynfekującymi, gdyż mogą one uszkodzić powierzchnię.
— Podczas czyszczenia nie zanurzaj urządzenia oraz ładowarki w wodzie ani żadnych innych płynach. Upewnij
się, że elementy elektryczne nie zostają zamoczone ani zawilgocone.
— Po każdym użyciu zdemontuj nasadkę tnącą z głowicy przycinającej.
— Usuń wszelkie włosy pozostawione na urządzeniu i głowicy przycinającej. W razie potrzeby użyj szczoteczki
do czyszczenia.
— W razie potrzeby odłącz głowicę przycinającą od urządzenia. Podczas czyszczenia nie zanurzaj głowicy
przycinającej w wodzie ani żadnych innych płynach. Wyczyść głowicę przycinającą i wnętrze za pomocą
suchej, miękkiej szmatki lub dołączonej szczoteczki do czyszczenia. Przed ponownym użyciem ponownie
umieść głowicę przycinającą na urządzeniu i upewnij się, że jest dobrze osadzona.
— Co kilka przycięć ostrza przycinające i końcówki do przycinania należy posmarować (dołączonym smarem).
— Wyczyść nasadkę tnącą czystą wodą, a następnie wysusz ją. Przed montażem nasadki tnącej na głowicę
przycinającą i ponownym użyciem urządzenia upewnij się, że nasadka jest całkowicie sucha.
— Oczyść urządzenie i ładowarkę miękką wilgotną ściereczką oraz, jeśli to konieczne, niewielką ilością łagodnego
detergentu. Wytrzyj miękką, suchą ściereczką.
— Urządzenie i ładowarka mogą być używane wyłącznie po całkowitym wyschnięciu.

17
PRZECHOWYWANIE
— Przed ich schowaniem upewnij się, że urządzenie i ładowarka są czyste, suche i wystygnięte.
— Przechowuj urządzenie i ładowarkę w chłodnym, suchym miejscu, w którym są chronione przed wilgocią,
poza zasięgiem dzieci.
Symbol ten widniejący na produkcie lub na jego opakowaniu wskazuje, że produkt spełnia wymogi
dyrektywy unijnej 2012/19/UE i że nie może być utylizowany jako odpad gospodarstwa domowego.
Należy oddać go do odpowiedniego punktu zbiórki sprzętu elektrycznego i elektronicznego do
powtórnego przetworzenia.
Utylizacja tego produktu w odpowiedni sposób pomoże w zapobieganiu potencjalnym szkodliwym
konsekwencjom dla środowiska i zdrowia ludzi.
Oddawanie materiałów do recyclingu pomaga chronić zasoby naturalne.
WAŻNE: Wymieniając zużyte baterie, należy przestrzegać obowiązujących praw dotyczących ich
usuwania. Należy je oddać do odpowiedniego punktu zbiórki, aby zapewnić ich bezpieczną eliminację
w celu ochrony środowiska.
NL zaChoWaĆ NINIEJSzE INFoRMaCJE Na PRzYSzŁoŚĆ.
doKŁadNIE PRzECzYTaĆ PRzEd SKoRzYSTaNIEM z uRzĄdzENIa.
WAARSCHUWINGEN
Dit apparaat kan worden gebruikt onder toezicht door
kinderen vanaf 3 jaar. Dit apparaat kan door kinderen vanaf
8 jaar en ouder worden gebruikt, als zij onder toezicht staan of
ingelicht werden over de veilige omgang met het apparaat en
de hieruit voortvloeiende gevaren hebben begrepen.
Kinderen mogen niet met het apparaat spelen.
Schoonmaak- en onderhoudswerkzaamheden mogen niet
worden uitgevoerd door kinderen zonder toezicht. Dit
apparaat is geschikt om te reinigen onder een openstaande
kraan. Dit apparaat is niet geschikt voor gebruik in een bad
of onder de douche. Dit apparaat mag alleen
worden gebruikt met het bijgeleverde oplaadapparaat.
Het apparaat mag alleen met extra lage spanning
worden gevoed. WAARSCHUWING! Maak het
handvat los van het netsnoer voordat u het in water

18
reinigt. De meegeleverde smeerolie moet uit de buurt van vuurbronnen en buiten het bereik van
kinderen worden geplaatst. Vermijd contact van de ogen met de smeerolie. Indien er toch contact plaats vindt
met de ogen, spoel de ogen dan voorzichtig gedurende 15 minuten met koud water uit en roep vervolgens
medische hulp in.
Oplaadadapter
WAARSCHUWING! Als u de batterijen opnieuw wilt
opladen, gebruikt u uitsluitend de afneembare oplaadadapter
geleverd bij dit apparaat (Model nr.: SW-050100EUL).
Afneembare voedingseenheid. De externe flexibele kabel of snoer
van deze transformator kan niet worden vervangen. Als het snoer is beschadigd moet de transformator
vernietigd worden. Koppel de oplaadadapter los van de stroomvoorziening en geef deze de tijd om af te
koelen vóór het reinigen,, onderhoud, opslag en transport. Controleer of de op het typeplaatje vermelde
netspanning overeenkomt met die van uw stopcontact. Raak de oplaadadapter niet aan met natte handen.
Bescherm de oplaadadapter tegen schade. Laat het netsnoer van de oplaadadapter niet over scherpe
randen hangen, knik of buig het niet, en houd het uit de buurt van hete oppervlakken. Rol het netsnoer van
de oplaadadapter zodanig uit dat het niet mogelijk is er onbedoeld aan te trekken of over te struikelen.
WAARSCHUWING - GEVAAR OP ELEKTRISCHE SCHOK! Bescherm de oplaadadapter tegen vocht en
natte omstandigheden. Laad de batterij op bij een omgevingstemperatuur van 18 - 24 °C om te zorgen
voor de langst mogelijke levensduur en beste prestaties van het apparaat. Laad de batterij niet op bij
temperaturen onder 0 °C of boven 45 °C. Laad de batterij uitsluitend binnenshuis op, omdat de
oplaadadapter uitsluitend voor gebruik binnenshuis is ontworpen. Plaats geen enkel voorwerp op de
oplaadadapter omdat dit oververhitting kan veroorzaken. Plaats de oplaadadapter niet in de buurt van enige
warmtebron. Gebruik geen verlengsnoer, tenzij het absoluut noodzakelijk is. Het gebruik van een onjuist
verlengsnoer kan een risico op brand of elektrische schok veroorzaken. Gebruik de oplaadadapter niet als
deze blootgesteld is geweest aan een zware klap, is gevallen, of op andere wijze beschadigd is. Zorg dat de
oplaadadapter wordt gecontroleerd en gerepareerd door een erkend service-centrum voordat u deze
weer gebruikt. Als de pinnen van de stekker beschadigd zijn, moet de stekker vernietigd worden.
Accu
Dit apparaat bevat een accu die niet kan worden vervangen.
Vermijd huid- en oogcontact met batterijzuur. Spoel grondig met veel water als u batterijzuur in uw
ogen of mond krijgt en zoek onmiddellijk medisch advies. Was het getroen gebied met veel water en zeep
als batterijzuur in contact komt met uw huid. De batterij moet worden verwijderd uit het apparaat door
een getrainde persoon voordat deze wordt versnipperd. De accu moet veilig worden afgedankt. Probeer de
batterij nooit zelf te verwijderen! Het apparaat moet worden afgesloten van de stroomvoorziening (bijv.
uitschakelen) wanneer de batterij wordt verwijderd.
BESCHRIJVING
Dit apparaat is bedoeld voor het knippen en trimmen van droog haar, baarden en snorren alsmede het trimmen
van uitstekende neus- en oorhaar met het bijbehorende hulpstuk. Gebruik het niet voor het knippen van nat of
kunsthaar en gebruik het niet op huisdieren.
Het apparaat is uitsluitend bedoeld voor huishoudelijk gebruik .binnenshuis.
Gebruik het apparaat niet voor andere doeleinden. Enig ander gebruik kan leiden tot schade aan het apparaat,
eigendom of tot persoonlijk letsel.

19
De fabrikant accepteert geen aansprakelijkheid voor schade of letsel als gevolg van onjuist gebruik of het niet
naleven van deze gebruiksaanwijzing.
VOORDAT U HET APPARAAT GEBRUIKT
WAARSCHUWING! Controleer de inhoud van de levering op eventueel ontbrekende items of enige
transportschade. Als het apparaat is beschadigd of er sommige onderdelen ontbreken, gebruik het dan niet en
breng het terug bij uw dealer.
PRODUCTOVERZICHT
1. Trimmessen 8. Trimkop (voor neus- en oorhaar)
2. Trimkop (voor haar, baarden en snorren) 9. Opzetkam
3. Aan/uit-knop 10. Instelwiel voor de snijlengte (1-10 mm)
4. Batterij (ingebouwd) 11. Smeerolie
5. Stroomindicator 12. Reinigingsborstel
6. Oplaadplug 13. Oplaadadapter
7. Trimpunten
GEBRUIKSINSTRUCTIES
— Gebruik van het apparaat met beschadigde opzetkam of hulpstuk kan leiden tot persoonlijk letsel.
Controleer voor elke gebruik voor dat de trimpunten en trimmessen niet beschadigd zijn en goed geolied zijn.
Smeer ze indien noodzakelijk.
— Schud of blaas tijdens het gebruik het haar van de opzetkam en hulpstuk als er teveel haar tussen zit geklemd.
— Schakel het apparaat altijd uit voordat u de opzetkam bevestigt/verwijdert of het hulpstuk vervangt.
— Om hygiënische redenen mag dit apparaat slechts door één persoon worden gebruikt.
— Het wordt niet aanbevolen het apparaat te bedienen tijdens het opladen van de batterij, als deze is
aangesloten op de oplaadadapter/stroomvoorziening, om te voorkomen dat de batterij oververhit raakt en de
oplaadtijd verlengd wordt.
— De aan/uit-knop wordt vergrendeld door deze 3 seconden ingedrukt te houden (tegelijkertijd knippert de
witte aan/uit-indicator 3 keer). Het apparaat werkt niet (de aan/uit-knop is vergrendeld) terwijl de aan/
uit-knop wordt ingedrukt, tenzij u de aan/uit-knop nogmaals 3 seconden ingedrukt houdt om deze te
ontgrendelen.
De batterij opladen
— Laad het apparaat/de batterij gedurende ca. 2 uur op voordat u het voor de eerste keer gebruikt.
— Het apparaat kan gedurende ca. 60 minuten continu worden gebruikt met een volle batterij.
— Druk op de knop aan/uit om het apparaat uit te schakelen.
— Sluit de oplaadadapter aan met de oplaadstekker op het apparaat en steek deze in een geschikt stopcontact.
— De stroomindicator licht constant wit op tijdens het opladen.
— Nadat de batterij volledig is opgeladen knippert de stroomindicator wit.
— Ontkoppel de oplaadadapter van het apparaat en de stroomvoorziening.
De trimkop vervangen
— Schakel het apparaat altijd uit als u de trimkop vervangt.
— Draai de trimkop linksom om deze los te maken en van het apparaat te verwijderen.
— Bevestig de trimkop op het apparaat en draai deze rechtsom om in positie brengen.
De opzetkam gebruiken
— Schakel het apparaat altijd uit als u de opzetkam bevestigt, verstelt of verwijdert.
— Bevestig de opzetkam op het apparaat en draai aan het instelwiel voor de snijlengte om de gewenste
snijlengte in te stellen (1-10 mm).

20
Knippen/trimmen van haar, baarden en snorren
OPMERKING: Zorg er altijd voor dat uw haar/baard/snor schoon, goed gekamd, klitvrij en droog is voordat
u het apparaat gebruikt. Gebruik tijdens het gebruik van het apparaat geen haarlak, waterverdampers,
scheerschuim, scheergel of andere verdampers.
OPMERKING: Als u niet gewend bent om haar/een baard/een snor te knippen of te trimmen, begin dat met
een opzetkam voor een langere haar-/baard/snorlengte en verminder dit vervolgens, om te voorkomen dat u
het haar/de baard/de snor te kort knipt.
OPMERKING: Als u het apparaat voor het eerst gebruikt, probeer het dan eerst op een plek met lichte haar-/
baard-/snorgroei.
OPMERKING: Gebruik een langzame en gecontroleerde beweging. Forceer het apparaat niet sneller door
het haar/de baard/de snor dan het deze kan knippen/trimmen. Om het resultaat tijdens het knippen of
trimmen te bekijken, kamt u het haar/de baard/de snor regelmatig in de gewenste stijl.
Baarden/snorren trimmen
— Druk op de aan/uit-knop om het apparaat in te schakelen.
— Kam uw baard/snor in de groeirichting.
— Zorg ervoor dat de trimmessen/opzetkam altijd plat en parallel aan de huid zit en niet gekanteld is/zijn.
— Beweeg het apparaat langzaam en voorzichtig tegen de richting van de baard-/snorgroei in.
— Wanneer u de opzetkam gebruikt, drukt u de opzetkam tegen uw gezicht/wang en begint u met het
trimmen van de zijkanten van uw baard/snor. Beweeg het apparaat langzaam naar het midden en trim kleine
hoeveelheden per keer.
— Bij het knippen van contouren plaats u de trimmessen in een hoek van 90° ten opzichte van de huid.
— Schakel niet van een parallelle naar een 90°-stand terwijl er contact is met de huid.
— Voorkom schokkende bewegingen tijdens het trimmen.
— Druk na gebruik op de aan/uit-knop om het apparaat uit te schakelen.
Haar knippen
— Druk op de aan/uit-knop om het apparaat in te schakelen.
— Kam uw haar in de groeirichting.
— Druk de opzetkam tegen het hoofd en begin met het knippen van de zijkanten van uw haar, vanaf de
onderkant van het hoofd naar boven. Beweeg het apparaat langzaam omhoog naar de bovenkant van het
hoofd en knip kleine hoeveelheden per keer.
— Herhaal dit voor de achterkant van het hoofd.
— Knip het haar aan de bovenkant van het hoofd van voor naar achter.
— Druk na gebruik op de aan/uit-knop om het apparaat uit te schakelen.
De halslijn en het oorgebied knippen
— WAARSCHUWING! Houd er rekening mee dat de trimmessen zeer scherp zijn. Verwijder de haren
waarmee ze in contact komen als de opzetkam is verwijderd.
— Plaats het apparaat zo dat slechts één rand in contact komt met het haar.
— Breng het haar langzaam in vorm rond de oren en knip de halslijn door de trimmessen tegen de hals te
plaatsen en naar beneden te bewegen. Gebruik een geschikte schaar (niet inbegrepen) om het laatste stuk
te knippen.
— Druk na gebruik op de aan/uit-knop om het apparaat uit te schakelen.
Neus- en oorhaar trimmen
— Druk op de aan/uit-knop om het apparaat in te schakelen.
— Plaats de trimpunten tegen het de uitstekende neus-/oorhaar.
— Gebruik altijd een langzame en gecontroleerde beweging.
— Gebruik alleen de trimpunten om het haar in de genoemde gebieden te verwijderen. Steek de trimpunten
maximaal 5 mm in de neusgaten/oren.
— Druk na gebruik op de aan/uit-knop om het apparaat uit te schakelen.
This manual suits for next models
1
Table of contents
Languages:
Other Jean Louis David Hair Styler manuals


Popular Hair Styler manuals by other brands


Morphy Richards
Morphy Richards IBHA4009 Instruction & styling guide

OBH Nordica
OBH Nordica ARTIST CONICAL TONG instruction manual

Clatronic
Clatronic HAS 2542 DS Instruction manual & guarantee

Remington
Remington PROtect S8700 user manual

Panasonic
Panasonic EH-KA81 operating instructions

Grundig
Grundig HS 6031 user guide


