Jedmed S-II Service manual

Operating / Service
Manual
An Employee-Owned Company
S-II & J-II Chairs
IMPORTANT: Read all instructions before assembling or using this device.

S-II & J-II Chairs Operating / Service Manual
2
S-II & J-II Chairs Operating / Service Manual
3
JEDMED Instrument Company has been in business since
1978 and is entirely employee-owned (ESOP). Our goal is to
provide the best overall equipment to the medical disciplines
we serve. Thank you for your support and we hope that your
experience with this product will be a rewarding one which will
result in a lasting relationship with JEDMED.
Your suggestions on how we can improve our products and
services are always greatly appreciated. Please feel free to
contact us with your thoughts. We listen.
Sincerely,
pmnl084
Rev. 0
10-2005
COPYRIGHT © 2005 JEDMED Instrument Company
All Rights Reserved
S-II & J-II Chairs Operating / Service Manual
2
S-II & J-II Chairs Operating / Service Manual
3
Precautions Key.........................................4
Description.................................................5
Unpacking / Assembly...........................6 - 7
Identication / Operation.......................8-13
Cleaning / Disinfection.............................14
Maintenance.............................................15
Dimensions........................................16 - 17
Reorder Items..........................................18
Specications............................................19
Section Page
CONTENTS
OPERATION
SERVICE
OPERATING
Troubleshooting.......................................24
Parts Diagrams...................back of manual
Service Procedures.............back of manual
Note: Specications subject to change without notice.
S-II & J-II Chairs Operating / Service Manual
4
S-II & J-II Chairs Operating / Service Manual
5
PRECAUTIONS KEY
ALERTS user to the possibility of PERSONAL INJURY.
WARNING
!
The following conventions are used throughout this manual:
ALERTS user to the possibility of
DAMAGE to the EQUIPMENT.
CAUTION
ALERTS user to PERTINENT
FACTS or CONDITIONS.
NOTE

S-II & J-II Chairs Operating / Service Manual
4
S-II & J-II Chairs Operating / Service Manual
5
DESCRIPTION
JEDMED S-II & J-II ENT Chairs offer exibility and performance and
were designed specically with the otolaryngic specialist in mind. For
routine examination and minor treatment in the ofce, these chairs
are unsurpassed for integrating features, cost, and quality.
The timeless look and feel of these chairs will enhance the
appearance of any exam room. Versatile color choices are available
making them easy to coordinate with most any decor.
S-II chairs offer manual recline of the backrest and footrest together
("s"ynchronized movement), which lays the chair out into a table.
J-II chairs offer manual backrest recline only with a xed position
footrest.
Both chairs include synchronized armrests which lay out at as
backrest is reclined. When entering or exiting the chairs, these
armrests can be conveniently rotated up and out of the way. Both
chairs are available with manual or powered hydraulic lift bases
which contain an integrated rotation lock.
Optional examination lights are available, as well as a pediatric
booster seat, and various headrests.
S-II and J-II ENT Chairs are quality-designed and manufactured
medical devices. Given reasonable care, these products will provide
many years of trouble-free service.
NOTE
Photos throughout this manual typically depict the S-II chair only,
for consistency. The J-II version of the chair is similar except as
indicated.

S-II & J-II Chairs Operating / Service Manual
6
S-II & J-II Chairs Operating / Service Manual
7
UNPACKING
SHIPPED VIA MOVING COMPANY:
Typically, chair is shipped blanket-wrapped and set up by the
shipping crew.
1.
IN CARTON:
Remove any bands and screws securing carton to skid.
Slowly remove carton.
Carefully cut stretch-wrap away from chair. Use extreme care
not to damage the chair upholstery or nish. Preferably, use
scissors in lieu of razor knife.
Unbolt chair base from skid.
Remove chair from skid.
1.
2.
3.
4.
5.
OR
Use care not to cut upholstery or scratch chair with
sharp tools.
CAUTION
NOTE
Any shipping damage should be documented and
reported immediately to the carrier or JEDMED.

S-II & J-II Chairs Operating / Service Manual
6
S-II & J-II Chairs Operating / Service Manual
7
ASSEMBLY INSTRUCTIONS
Typically, all chairs arrive fully assembled. No on-site assembly is required other
than mounting base to the oor.
ASSEMBLY:
Options are normally supplied fully assembled and installed at the factory.
If options are ordered after initial purchase, follow instructions received
with each option.
INSTALL OPTIONS:
All lift bases must be bolted to oor to protect against
accidental tipping.
WARNING
!
S-II & J-II Chairs Operating / Service Manual
8
S-II & J-II Chairs Operating / Service Manual
9
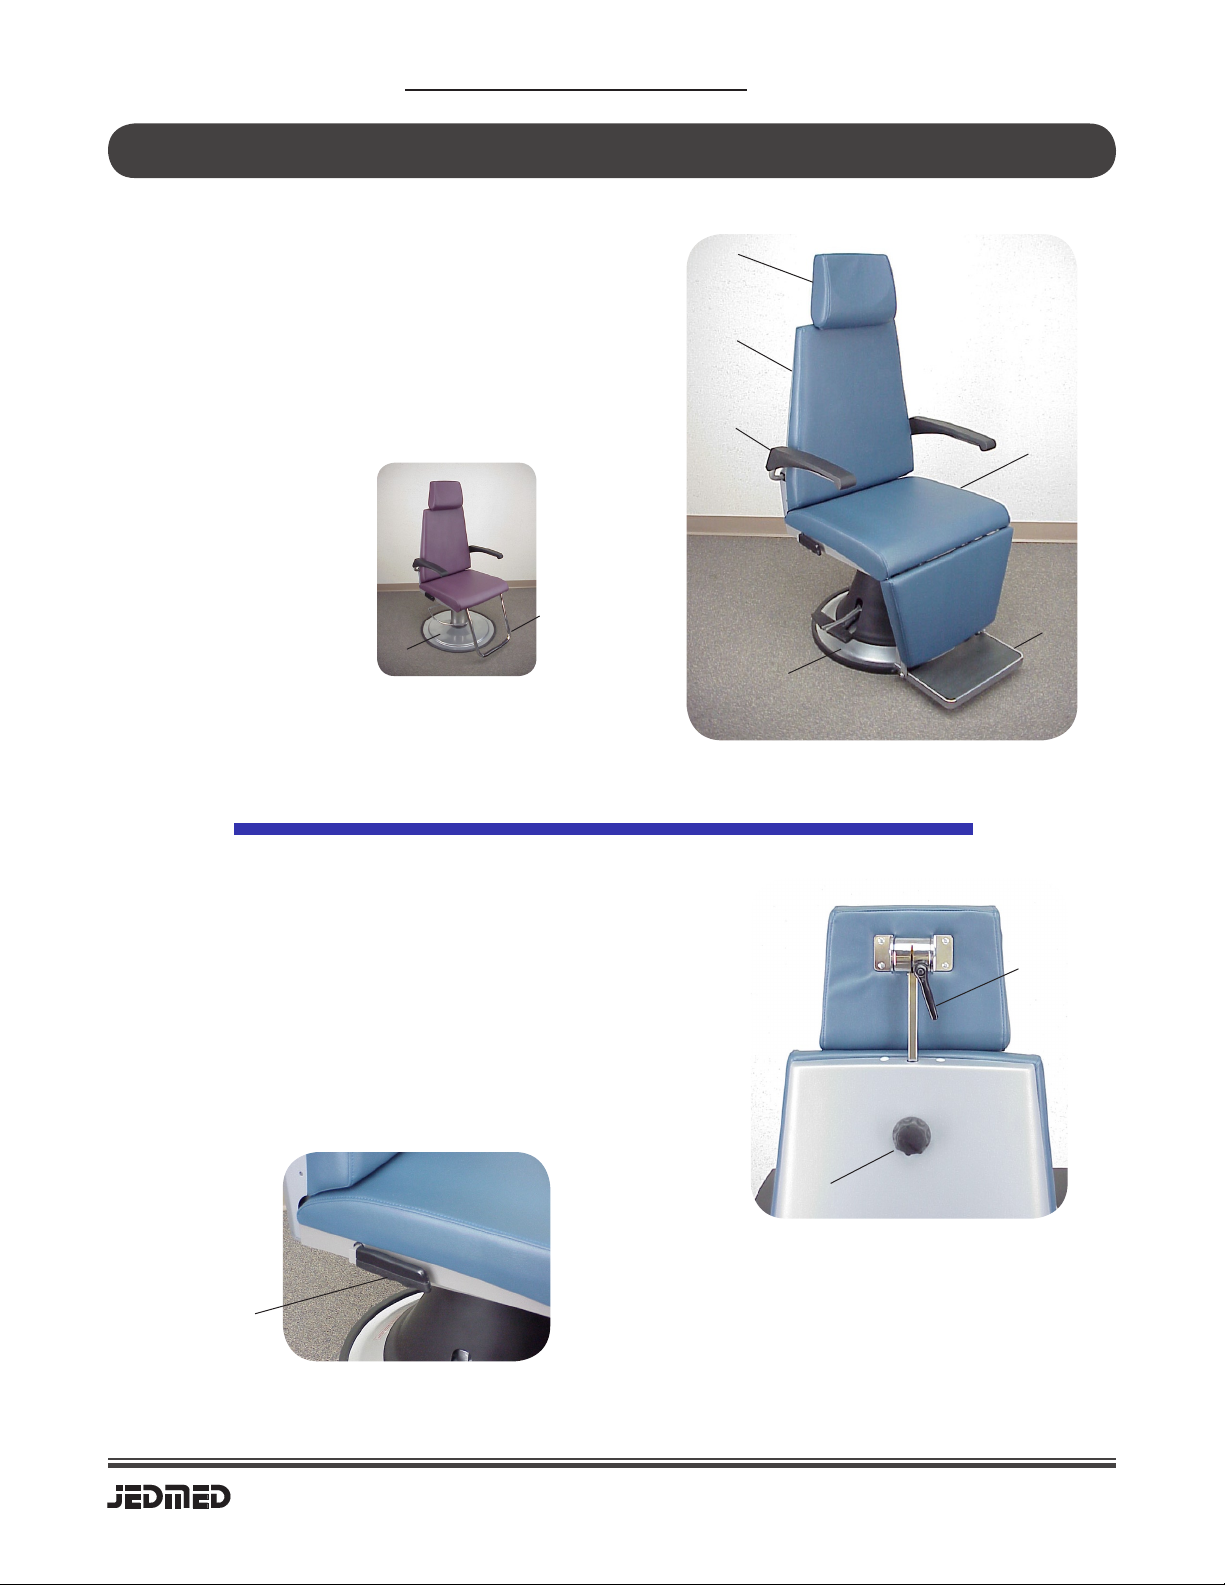
IDENTIFICATION / OPERATION
Headrest
Backrest
Armrest
Seat
Footrest
Lift base
A.
B.
C.
D.
E.
F.
Main Parts
Headrest height adjustment handwheel
Headrest tilt adjustment lever
Recline lever
1.
2.
3.
Chair Controls
J-II Chair
A
B
C
D
E
F
E
F
S-II Chair
Rear View
Recline Lever on both sides of seat
1
2
3

S-II & J-II Chairs Operating / Service Manual
8
S-II & J-II Chairs Operating / Service Manual
9
1. Headrest Height Adjustment
*Unlock position by rotating handwheel counter-clockwise.
*Raise or lower headrest to new desired position.
*Lock position by rotating handwheel rmly clockwise.
2. Headrest Tilt Adjustment
*Loosen by rotating lever counter-clockwise
*Tilt headrest to desired position.
*Tighten by rotating lever clockwise.
Once tight, lever may be rotated to a new position by pulling directly
outward on lever near center hub. Rotate to new position and release to
lock.
IDENTIFICATION / OPERATION
3. Recline Lever
*Place hand behind backrest cushion to support patient in chair.
*Using other hand, push down on Recline Lever.
*Move chair backrest to desired recline position.
*Release Recline Lever to lock backrest position.
Note: To raise a reclined patient, weight must be removed from the backrest.
The gas-spring will return the backrest to the upright position.
Do not tighten handwheel if
headrest is completely removed
from chair. Damage to lock
mechanism may result.
CAUTION
4. Armrests
*Armrests are designed to lower automatically as
chair is reclined.
*Armrests may be rotated out of the way for ease
of patient entry, by simply raising upward.
Rotated Armrest
WARNING
!
Do not release Recline Lever unless backrest is
supported. Patient and/or user injury may result.

S-II & J-II Chairs Operating / Service Manual
10
S-II & J-II Chairs Operating / Service Manual
11
"Up" pedal
"Down" pedal
Rotation lock (lift both pedals)
Floor mounting holes
1.
2.
3.
4.
Lift Base Controls
(Electric Base)
Pump bar
(Raise / Lower / Rotation lock)
Floor mounting holes
1.
2.
Lift Base Controls
(Manual Base)
All lift bases must be bolted to oor to protect against
accidental tipping of chair.
WARNING
!
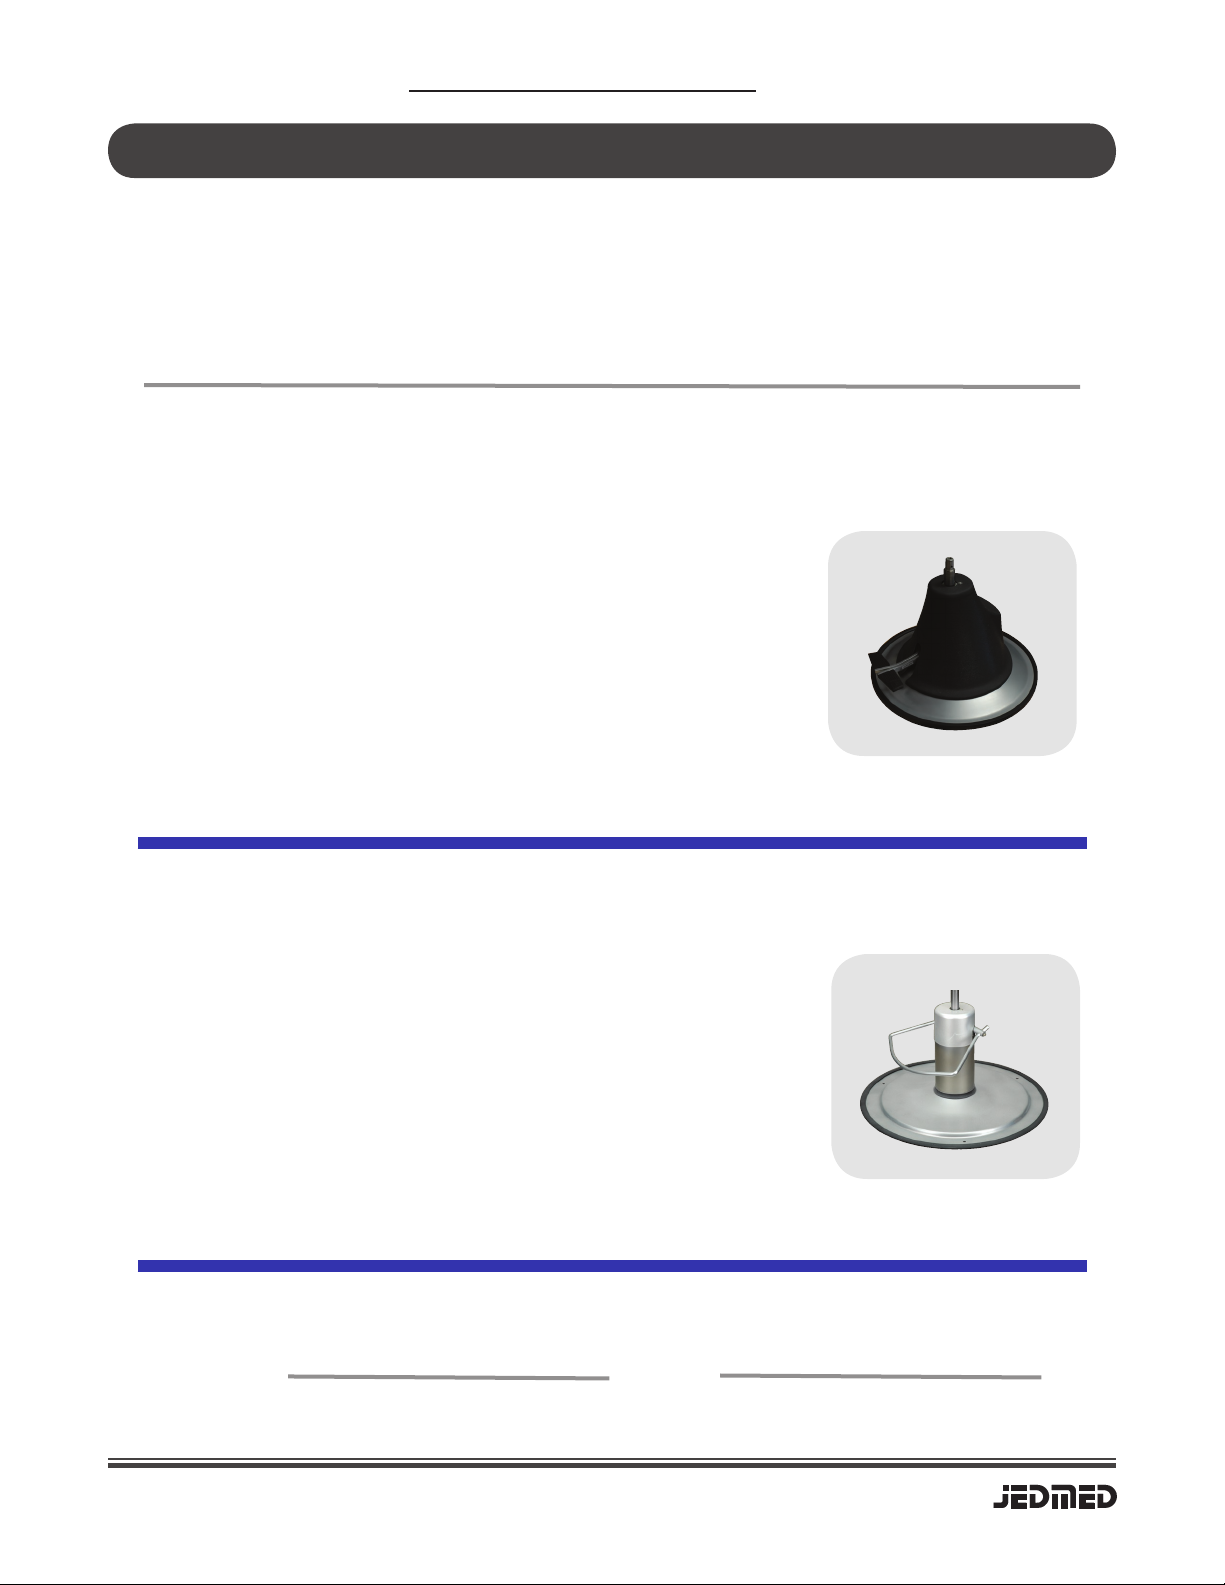
Electric Lift Base
Manual Lift Base
3
2
1
4
1
2
IDENTIFICATION / OPERATION

S-II & J-II Chairs Operating / Service Manual
10
S-II & J-II Chairs Operating / Service Manual
11
IDENTIFICATION / OPERATION
Electric Lift Base Operation
*Raise base by depressing "Up" pedal.
*Lower base by depressing "Down" pedal.
*Lock chair rotation by rmly lifting with top of foot on both pedals simultaneously.
*Unlock chair rotation by pressing down on one or both pedals.
Do not lift chair top or move chair
unless rotation lock is rmly locked.
Doing so may lift shaft introducing
air into the hydraulic lines. See
Troubleshooting.
CAUTION
Manual Lift Base Operation
*Raise base by repeatedly pumping downward on pump bar.
When pumping, pump each downward stroke only to the rst feel of resistance.
Pumping past the rst stop point will open the valve to lower the chair.
*Lower base by rmly depressing (and holding) pump bar in its lowest position.
To reach lowest position, press rmly on pump bar to pass beyond the rst
point of resistance.
*Lock chair rotation by rmly lifting with top of foot on pump bar.
*Unlock chair rotation by pressing down pump bar.
Possible explosion hazard if used in the presence of
ammable anesthetics.
WARNING
!
Before allowing anyone to enter or exit
chair, assure chair is returned to its
lowest and most-upright position, and
base rotation is rmly locked.
WARNING
!

S-II & J-II Chairs Operating / Service Manual
12
S-II & J-II Chairs Operating / Service Manual
13
Light Installed
OPTIONS
Booster In Place
Examination Light
Pediatric Booster Seat
Headrests
Exam Light Kit
Standard Headrest Double-articulating Headrest
IDENTIFICATION / OPERATION

S-II & J-II Chairs Operating / Service Manual
12
S-II & J-II Chairs Operating / Service Manual
13
Blank

S-II & J-II Chairs Operating / Service Manual
14
S-II & J-II Chairs Operating / Service Manual
15
CLEANING & DISINFECTING
Cleaning
Chairs and bases may be wiped clean using a soft cloth moistened with water and a mild
detergent. Do not use excessive amounts of liquids or allow liquids to enter upholstery,
lift bases, or any electrical connections. Check that system is thoroughly dry before
reconnecting power.
Disinfecting
Patient contact areas should be wiped down with a cold disinfecting solution and a
disposable cloth. Do not allow solution to remain on product any longer than is necessary
to ensure sufcient disinfecting. Test any new disinfectants on an inconspicuous surface
to check for adverse results. Follow manufacturer’s instructions for use.
ALWAYS unplug unit from main power outlet before
cleaning, disinfecting, maintenance, or service.
WARNING
!
ALWAYS observe “Universal Precautions” when handling and
disposing of cleaning/disinfecting supplies used on patient contact
areas.
WARNING
!

S-II & J-II Chairs Operating / Service Manual
14
S-II & J-II Chairs Operating / Service Manual
15
MAINTENANCE
Scheduled Maintenance
All chairs (motorized and manual) should be cycled fully up and down 8-10 times every
60 days. Even if chair is used regularly, often the working height is within a limited range.
Cycling the chair through its full range will insure proper lubrication of the hydraulic piston
and seals, thus maximizing the life of the base.
Moving the Chair
Never lift or move any chair (motorized or manual) without rst lifting rmly on the pedals
or lever to lock base rotation. Locking base rotation also locks the lift piston from moving.
If chair is lifted when hydraulic piston is not locked, air may be introduced into the hydraulic
lines. If so, the chair may slowly drift downward or feel "spongy" when returned to service.
Should this occur, bleed air from the hydraulic system as described below.
Bleeding Air from Hydraulic System
1. Raise chair to its highest position.
2. Continue pumping for 10-15 seconds.
This cycles the hydraulic pump and works the air out of the system.
3. Lower chair completely.
4. Raise chair to intermediate height and test.
5. If air persists, repeat steps 1-4, as needed.
Grounding continuity should be checked periodically to
insure patient and user safety.
WARNING
!
S-II & J-II Chairs Operating / Service Manual
16
S-II & J-II Chairs Operating / Service Manual
17
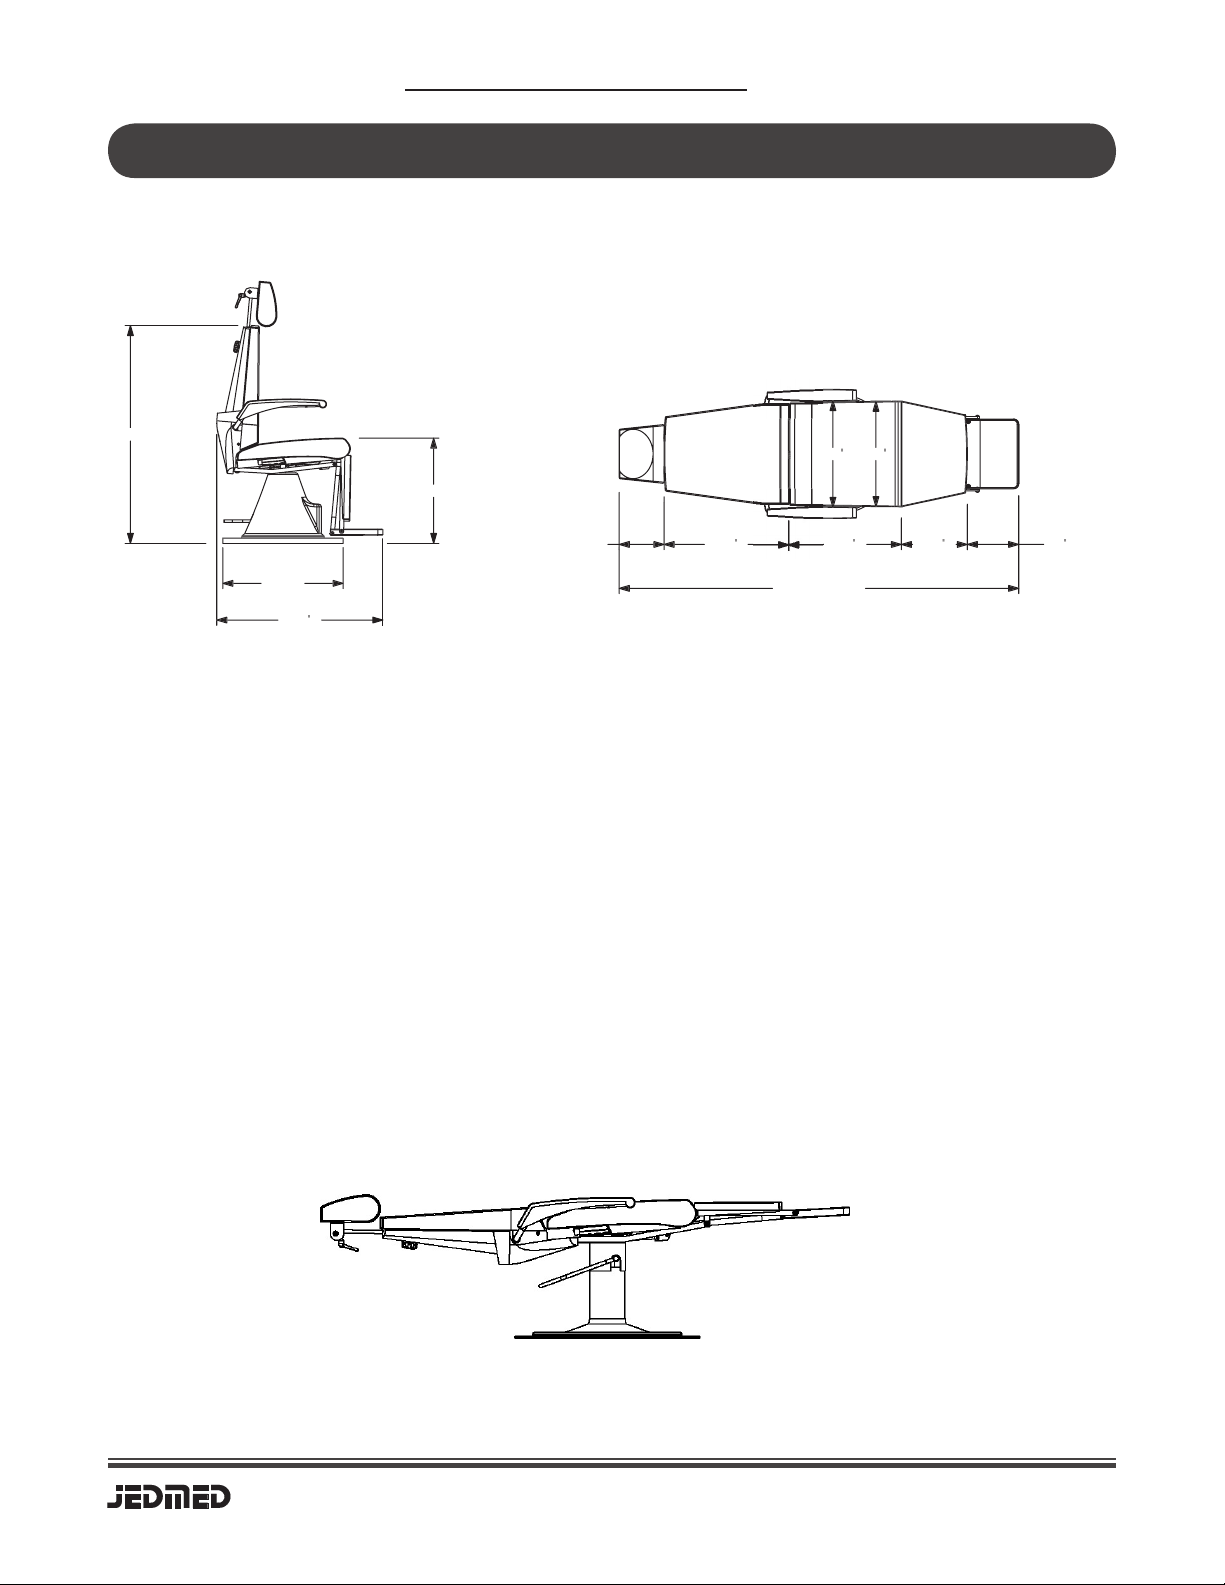
DIMENSIONS
04-1540
JEDMED S-II Chair
with Manual Pump Base
A=19.5” to 27” B=26.75” C=41.25”
04-1545
JEDMED S-II Chair
with Motorized Lift Base, 110V
A=20” to 28” B=23.00” C=41.50”
04-1547
JEDMED S-II Chair
with Motorized Lift Base, 220V
A=20” to 28” B=23.00” C=41.50”
7
6
.2
5
" to
80
.
50"
21.
50
"
1
3
.
00
"
9
.
50
"
2
3
.
50
"
8
.7
5
" t
o
1
3
.
00"
2
0
.
00
"
2
0
.2
5
"
41.
50
"
3
2.
00
"
2
3
.
00
"
2
0
.
00
" to 2
8
.
00"
7
6
.2
5
" to
80
.
50"
21.
50
"
1
3
.
00
"
9
.
50
"
2
3
.
50
"
8
.7
5
" t
o
1
3
.
00"
2
0
.
00
"
2
0
.2
5
"
41.
50
"
3
2.
00
"
2
3
.
00
"
2
0
.
00
" to 2
8
.
00"
C
B
A
S-II Chair
Reclined Position (S-II)

S-II & J-II Chairs Operating / Service Manual
16
S-II & J-II Chairs Operating / Service Manual
17
DIMENSIONS
41.2
5
"
2
6
.7
5
"
3
2.
00
"
1
9
.
50
" to 27.
00"
8
.7
5
" t
o
1
3
.
00"
2
3
.
50
"
22.
50
"
6
.
00
"
60.7
5
"
to 65.00
"
2
0.
2
0
.2
5
"
41.2
5
"
2
6
.7
5
"
3
2.
00
"
1
9
.
50
" to 27.
00"
8
.7
5
" t
o
1
3
.
00"
2
3
.
50
"
22.
50
"
6
.
00
"
60.7
5
"
to 65.00
"
2
0.
2
0
.2
5
"
04-1550
JEDMED J-II Chair
with Manual Pump Base
A=19.5” to 27” B=26.75” C=41.25”
04-1555
JEDMED J-II Chair
with Motorized Lift Base, 110V
A=20” to 28” B=23.00” C=41.50”
04-1557
JEDMED J-II Chair
with Motorized Lift Base, 220V
A=20” to 28” B=23.00” C=41.50”
C
B
A
J-II Chair
Reclined Position (J-II)

S-II & J-II Chairs Operating / Service Manual
18
S-II & J-II Chairs Operating / Service Manual
19
REORDER ITEMS
To order consumable or replacement parts contact your Regional Sales
Representative or JEDMED Customer Service at:
Item
Bulb (for exam light)
Replacement Parts
99-4160
Catalog #
5416 JEDMED Court
St. Louis, MO 63129
(314) 845-3770 phone
(314) 845-3771 fax
e-mail: [email protected]
website: www.JEDMED.com
For additional replacement parts refer to the “Exploded View”
drawings in this manual or call JEDMED.
NOTE
Contact Information
S-II & J-II Chairs Operating / Service Manual
18
S-II & J-II Chairs Operating / Service Manual
19
SPECIFICATIONS
Motorized Hydraulic Base
Volts Max. Frequency Power
Item # (Vac) (Amps) (Hz) Input Notes
04-1332 115 5.4 50/60 0.2kW Standard
04-1333 230 2.1 50/60 0.2kW Special Order
-- 100 4.7 50/60 0.2kW Special Order
Lifting Capacity 350 lbs
Base Diameter 23 inches
Lifting Stroke 20 - 28.5 inches (from oor)
Manual Lift Base
Motorized Lift Base
Manual Hydraulic Base
Lifting Capacity 350 lbs
Base Diameter 26.75 inches
Lifting Stroke 20 - 28.5 inches (from oor)
Weight (nished chair)
S-II Motorized
S-II Manual
175
147
Chair Weight (lbs)
J-II Motorized
J-II Manual
160
132
Chair Weight (lbs)

S-II & J-II Chairs Operating / Service Manual
20
Blank
This manual suits for next models
1
Table of contents
Popular Indoor Furnishing manuals by other brands


Ameriwood HOME
Ameriwood HOME Systembuild Evolution 8847408COM manual

Forte
Forte JLTL3161 Assembling Instruction

Furniture of America
Furniture of America Anya CM3476T-7PK Assembly instructions

Tuft & Needle
Tuft & Needle Frame quick start guide

Livarno Living
Livarno Living 283347 Assembly instruction

bathstore
bathstore Atmos installation instructions


