manuals.online logo
Brands
  1. Home
  2. •
  3. Brands
  4. •
  5. bathstore
  6. •
  7. Indoor Furnishing
  8. •
  9. bathstore Atmos User manual

bathstore Atmos User manual

This manual suits for next models

1

Other bathstore Indoor Furnishing manuals

bathstore Mino 500 User manual

bathstore

bathstore Mino 500 User manual

bathstore 531240 Installation guide

bathstore

bathstore 531240 Installation guide

bathstore 41405010750 User manual

bathstore

bathstore 41405010750 User manual

bathstore myplan 600 User manual

bathstore

bathstore myplan 600 User manual

bathstore 41800180840 Service manual

bathstore

bathstore 41800180840 Service manual

bathstore Hartley 657671 User manual

bathstore

bathstore Hartley 657671 User manual

Popular Indoor Furnishing manuals by other brands

Regency LWMS3015 Assembly instructions

Regency

Regency LWMS3015 Assembly instructions

Furniture of America CM7751C Assembly instructions

Furniture of America

Furniture of America CM7751C Assembly instructions

Safavieh Furniture Estella CNS5731 manual

Safavieh Furniture

Safavieh Furniture Estella CNS5731 manual

PLACES OF STYLE Ovalfuss Assembly instruction

PLACES OF STYLE

PLACES OF STYLE Ovalfuss Assembly instruction

Trasman 1138 Bo1 Assembly manual

Trasman

Trasman 1138 Bo1 Assembly manual

Costway JV10856 manual

Costway

Costway JV10856 manual

moss DESIGN Caisson Credenza Assembly instructions

moss DESIGN

moss DESIGN Caisson Credenza Assembly instructions

Aquaglide FULL DECK 15.0 owner's manual

Aquaglide

Aquaglide FULL DECK 15.0 owner's manual

AREBOS AR-HE-SW30 user manual

AREBOS

AREBOS AR-HE-SW30 user manual

Till-Hilft Fulda 87005.330 Assembly instructions

Till-Hilft

Till-Hilft Fulda 87005.330 Assembly instructions

Twoey Outside 2010 quick start guide

Twoey Outside

Twoey Outside 2010 quick start guide

Hettich Easys 200 operating instructions

Hettich

Hettich Easys 200 operating instructions

The bedboss RELAX 404 Series owner's manual

The bedboss

The bedboss RELAX 404 Series owner's manual

Oeseder Möbelindustrie Bern 991 720 Assembly instructions

Oeseder Möbelindustrie

Oeseder Möbelindustrie Bern 991 720 Assembly instructions

Costway HW68469 user manual

Costway

Costway HW68469 user manual

Next ALIX A27743 Assembly instructions

Next

Next ALIX A27743 Assembly instructions

BROSA Hans Assembly guide

BROSA

BROSA Hans Assembly guide

Prodigg MINIKA PBA015T-FUR installation manual

Prodigg

Prodigg MINIKA PBA015T-FUR installation manual

manuals.online logo
manuals.online logoBrands
  • About & Mission
  • Contact us
  • Privacy Policy
  • Terms and Conditions

Copyright 2025 Manuals.Online. All Rights Reserved.

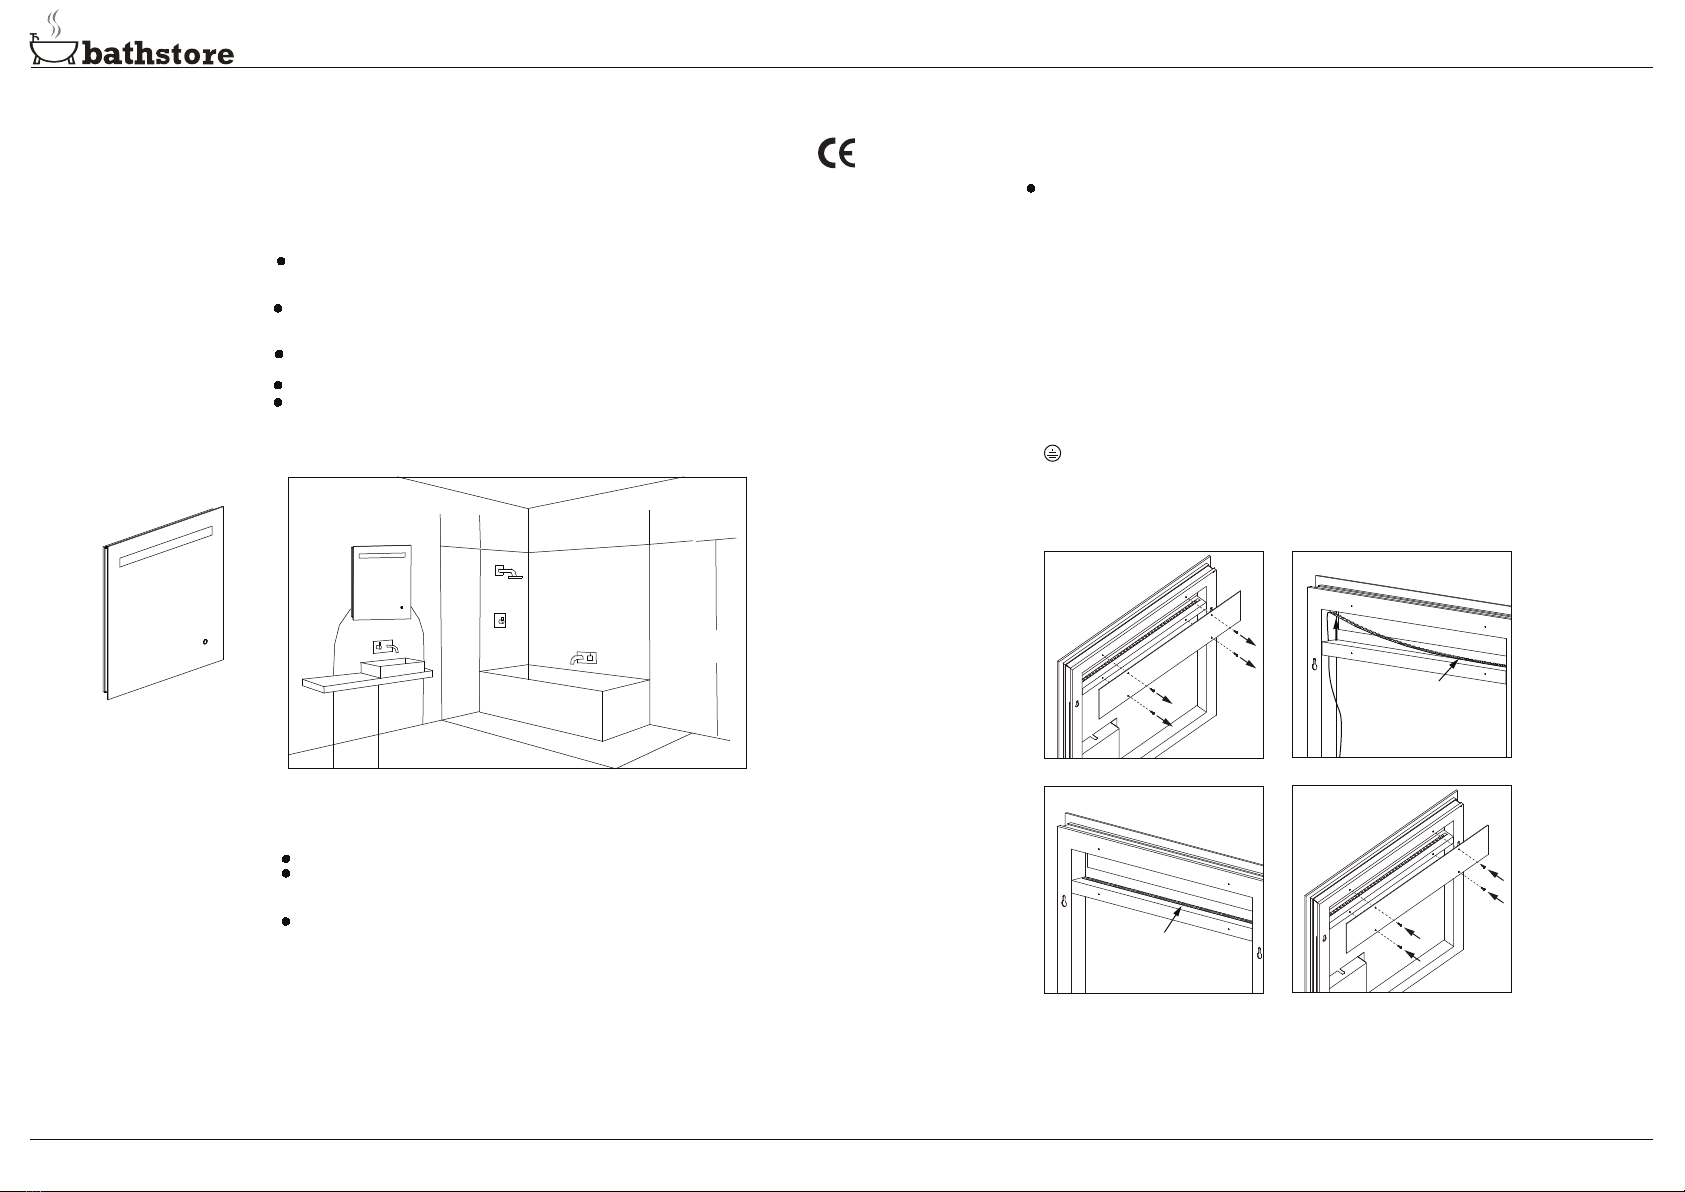
When replacing an LED strip please follow the steps illustrated below to remove
the old LED strip.
This product is manufactured to class I category and requires
an earth connection
This product complies with the following safety standards:
BS EN 60598-1: 2008+A11: 2009, EN60598-2-1: 1989
Do NOT strike mirror glass with hard or pointed items. It is
recommended that the product is cleaned with a soft, dry,
non abrasive cloth. Do NOT use cleaning agents or abrasive
materials on any type of finished surface. Do NOT allow
moisture to come into contact with the electrical components.
OUTSIDE ZONES
IEE Bathro m Zones Diagram wolleY
&
neer
G
=htraE-
eulB=lartueN-N
nworB=eviL-L
:
G
NID
OC
RU
O
L
OC
Please read these instructions carefully before installation.
Installation should be carried out by a qualified electrician.
Please leave a copy for the user/maintenance engineer for future reference.
IMPORTANT
When working at heights, please use a suitable platform to work from.
Please note: For new installations, check for any electrical cables or pipe
work (gas/water) in the vicinity of the intended mounting point before proceeding
with the installation.
Ensure that the fixing location is able to take the weight of the complete fitting.
Wear suitable eye protection when drilling. Be careful when using power tools near water.
ATMOS AMBIENT COLOUR CHANGE LED MIRROR INSTALLATION INSTRUCTIONS
225cm
radius
60CM
60CM
60CM
zone
1zone
2
zone
2
zone
2
GENERAL
THIS PRODUCT CONFORMS TO UK SAFETY STANDARDS AND MUST BE INSTALLED IN
ACCORDANCE WITH CURRENT IEE WIRING REGULATIONS AND BUILDING REGULATIONS
(PART P).
THIS PRODUCT MUST BE EARTHED, AND SHOULD NOT BE CONNECTED TO AN UNEARTHED
CIRCUIT. IF THERE ARE ONLY TWO WIRES COMING FROM YOUR POWER SUPPLY IT MEANS
THAT THIS FITTING BE WIRED TO AN UNEARTHED CIRCUIT.
ENSURE THAT CONNECTIONS ARE TURNED OFF AT THE CONSUMER UNIT OR FUSE BOARD
BEFORE INSTALLING OR CARRYING OUT ANY MAINTENANCE.
THIS PRODUCT IS FOR IN DOOR USE ONLY.
THIS PRODUCT IS IP44 RATED AND CAN BE INSTALLED IN THE ZONE 2 (AS DEFINED BY THE
IEE WIRING REGULATIONS) AND BEYOND. SEE THE DIAGRAM BELOW.
- turn off at consumer unit or fuse board before accessing wiring.
WARNING
1 - 2 B
COMPLIANCE
WIRING
REPLACEMENT OF LED STRIPS
o
Any Queries Call : 08000 23 23 23
1.
4.
Old LED
2.
3.
New LED
41800181100
2nd Floor, 69-71 Clarendon Road
Watford, Hertfordshire
WD17 1DS
ATMOS AMBIENT COLOUR CHANGE LED MIRROR INSTALLATION INSTRUCTIONS
Any Queries Call : 08000 23 23 23
B
2 - 2
Installation procedure
1 5.Hang the mirror onto the wall.
7.Fix the bracket.
.Open the carton and make sure all the parts listed below are present
4.Make the electrical connections ensuring first that the electrical supply has been turned off.
This mirror is a class 1 product and requires an earth connection. It should be installed in
accordance with the latest IEE regulations.
2.Mark a desired height of the mirror. Drill the required holes and insert the wall plugs.
Note: Wall plugs supplied are only suitable for solid stone/brick walls. Please ensure
the screws are fully tight.
3.Hang the mirror onto the wall. Then drill the holes for the bracket, Please make sure the
bracket is centerde on the top side of mirror.
Neutral Terminal Connection
Earth Terminal
Connection
Live Terminal
Connection
Output Wires
1x
4x
4x
FLOOR
FROM
HEIGHT
DESIRED
CHOOSE
CENTERS OF BRACKETS
DISTANCE
A
BETWEEN
6.Press the icon to control on/off the lighting,
Press 2 seconds the icon for warm white or cool
white color changing.
2nd Floor, 69-71 Clarendon Road
Watford, Hertfordshire
WD17 1DS
1x
A
Waste Electrical & Electronic Equipment Regulations (WEEE) requires that any of our
products showing this mark (left) must not be disposed of with other household or commercial
waste. Bathstore does not levy any WEEE disposal charges to its customers for affected
WEEE related products. To prevent possible harm to the environment or human health from
uncontrolled waste disposal, please separate any such product from other waste types and
recycle it responsibly at your local facilities. Check with your Local Authority, Recycling Center
or retailer for recycling advice.
GUARANTEE
This product is guaranteed in the UK for a period of 2 year from the date of purchase. The
guarantee is invalid in the case of improper use, installation or tampering. Should this product
fail during the guarantee period it will be replaced free of charge, subject to correct installation
and return of the faulty unit. Bathstore does not accept responsibility for any installation costs
associated with the replacement of this product. Your statutory rights are not affected.
Bathstore reserve the right to alter specifications without prior notice.
The top center