JEHNERT SOUND DESIGN VW T5 User manual

Jehnert Sound Design I Im Michelreis 14 I 72124 Pliezhausen I Tel.: 07127-93457-0 I [email protected] I www.jehnert.de
Montageanleitung
Assembly instructions
Stand /Status: 21.03.2022
VW Bus T5 / T6 /T6.1
2-oder 3-Wege Rearsystem,
2- or 3-way rear system Art. Nr. 67200
Packliste:
2x XE 26 - Neodym-Hochtöner ø 26mm
2x XE 55 - Neodym-Mitteltöner, ø 55mm
2x Mittelhochton-Modul VW T6 Rearsystem, Akustikstoff blende lichtgrau
2x XM 165 - Tief-Mitteltöner »Power-Woofer« ø 165mm
2x Adapterring für XM 165
2x 3-Wege Frequenzweiche VW T6 - Art.-Nr. 67200
1x Jehnert Signet (einzeln in Tüte)
1x Montageschablone
Packing List:
2x XE 26 - neodymium tweeter, ø 26mm
2x XE 55 - neodymium midrange driver, ø 55mm
2x midrange / tweeter module VW T6 rear system, acoustic fabric screen
light grey
2x XM 165 - low-midrange driver "Power-Woofer" ø 165mm
2x adapter ring for XM 165
2x 3-way crossover VW T6 - art. no. 67200
1x Jehnert Signet (separately in a bag)
1x Mounting template
Technische Informationen:
Einstellhinweis: um das beste Klangbild zu erreichen, sollten
alle Einstellungen am Radio (Bass, Höhen, Lautstärke usw.)
auf null bzw. neutral gestellt sein.
Technical information:
Adjustment note: in order to achieve the best sound image, all
all settings on the radio (bass, treble, volume, etc.) should be
should be set to zero or neutral.
1x Montagesatz Tieftöner: 8x Spax-Schraube 3,5 x 30
1x Montagesatz Mittel-Hochton: 8x Spax-Schraube 3 x 25
1x bass driver mounting kit: 8x Spax screw 3.5 x 30
1x midrange-tweeter mounting kit: 8x Spax screw 3 x 25
Garantie:
Als Hersteller übernehmen wir für diese Soundsysteme eine Garantie von 2 Jahren, gerechnet ab dem Kaufdatum beim Fachhändler.
Innerhalb dieser Garantiezeit beheben wir nach unserer Wahl durch Reparatur oder Austausch unentgeltlich alle Mängel, die auf Material-
oder Herstellungsfehlern beruhen. Von der Garantie ausgenommen sind Schäden, die auf unsachgemäßen Gebrauch oder Einbau, auf Verschleiß
oder auf Eingrie durch Dritte zurückzuführen sind. Die Garantie umfasst keine Folgeschäden und auch nicht diejenigen Mängel, die den Wert oder
die Gebrauchstauglichkeit der Soundsysteme nur unerheblich beeinträchtigen. Eine Garantiepicht wird nicht ausgelöst bei Schäden, die durch äußere
Einwirkungen verursacht wurden. Vom Umtausch ausgeschlossen sind Systeme mit zusätzlichen oder falschen Montagebohrlöchern.
Dies sind Beschädigungen der Komponeneten, die nicht wieder Instand gesetzt werden können.
Warranty:
As the manufacturer, we provide a 2-year guarantee for these sound systems, calculated from the date of purchase from the specialist dealer.
Within this guarantee period, we will, at our discretion, repair or replace, free of charge, any defects that are due to material or manufacturing faults.
defects in materials or workmanship. The warranty does not cover damage caused by improper use or installation, wear and tear or intervention by
third parties. The guarantee does not cover consequential damage or defects that reduce the value or usability of the sound systems.
The usability of the sound systems only insignicantly. A warranty obligation is not triggered in the case of damage caused by external inuences.
Systems with additional or incorrect mounting holes are excluded from exchange. These are damages to the components that cannot be repaired.
VW Bus T5 /T6 /T6.1
2- oder 3-Wege Rearsystem 67200
VW Bus T5 /T6 /T6.1
2- or 3-way rear system 67200
Jehnert Sound Design I Im Michelreis 14 I 72124 Pliezhausen I Tel.: 07127-93457-0 I [email protected] I www.jehnert.de
Montageanleitung
Assembly instructions
Stand /Status: 21.03.2022
VW Bus T5 / T6 /T6.1
2-oder 3-Wege Rearsystem,
2- or 3-way rear system Art. Nr. 67200
1. Demontage Seitenverkleidung
1. dismantling the side panelling
1.1 Alle Rücksitze ausbauen.
1.1 Remove all rear seats.
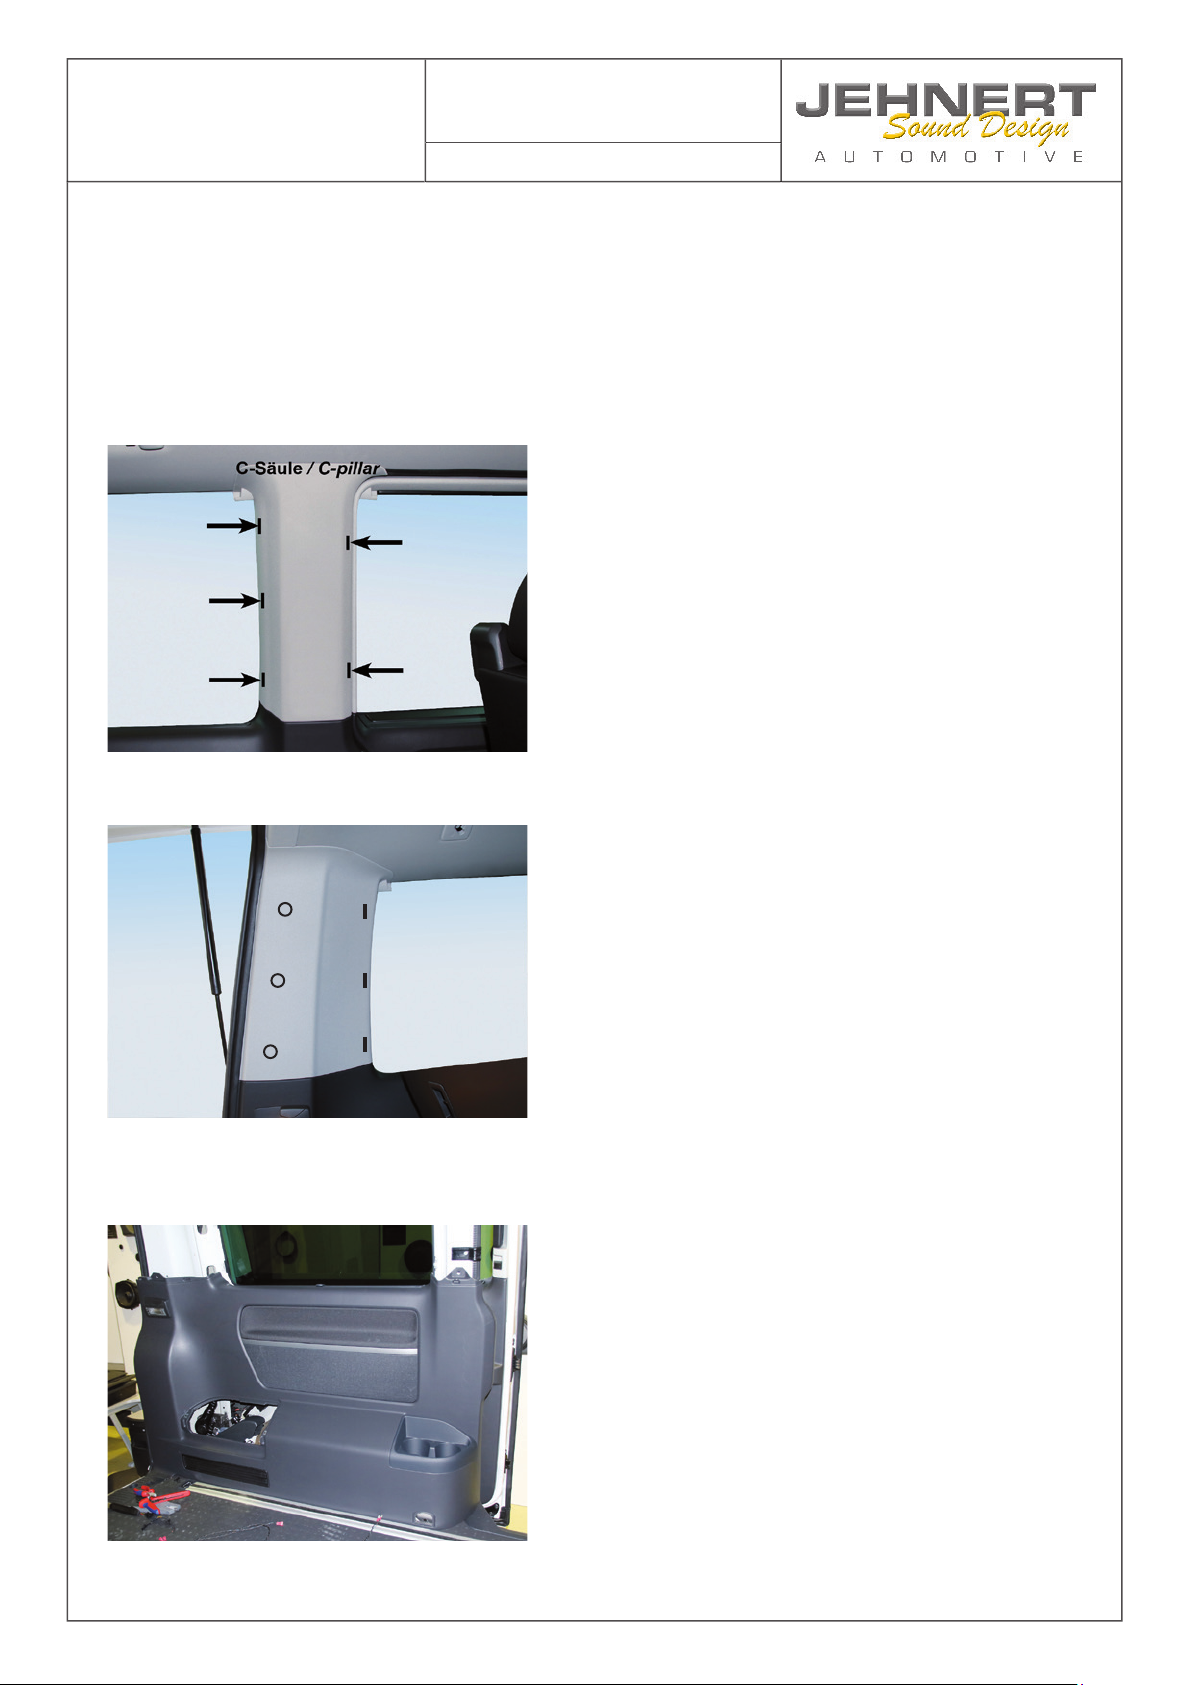
1.2 C-Säule aus den Verankerungen lösen (siehe Abb.)
1.2 Release the C-pillar from the anchors (see fi g.)
1.3 D-Säule zur Heckklappe hin ausclipsen und zum Fenster hin aus den Verankerungen lösen ( siehe Abb.)
1.3 Unclip the D-pillar towards the tailgate and release it from the anchors towards the window (see illustration).
1.4 Jeweils eine Spreizniete am C-und D-Holm und zwei Torx-Schrauben am Boden entfernen (->rote Pfeile)
1.4 Remove one expanding rivet each from the C and D spar and two Torx screws from the fl oor (->red arrows).
1.5 Seitenverkleidung vorsichtig ausclipsen.
ACHTUNG Bruchgefahr! Nur bei Raumtemperatur ausclipsen.
1.5 Carefully unclip the side panel.
CAUTION Risk of breakage! Only unclip at room temperature.
1.6 Original-Tieftöner demontieren (wird nicht mehr verwendet).
Hinweis: Der Original-Lautsprecher-Anschluss wird für die
Adaption Frequenzweiche „Eingang“ verwendet.
1.6 Dismantle original woofer (no longer used).
Note: The original loudspeaker connection is used for the
adaptation crossover "input".
D-Säule / D-pillar

Jehnert Sound Design I Im Michelreis 14 I 72124 Pliezhausen I Tel.: 07127-93457-0 I [email protected] I www.jehnert.de
Montageanleitung
Assembly instructions
Stand /Status: 21.03.2022
VW Bus T5 / T6 /T6.1
2-oder 3-Wege Rearsystem,
2- or 3-way rear system Art. Nr. 67200
2. Frequenzweichenmontage
2. crossover assembly
2.1 Frequenzweiche auf der Seitenwand montieren (Bsp. Abb. unten). Darauf achten, dass der Platz hinter
der Seitenwand ausreichend ist (kann je nach Fahrzeug variieren.)
2.1 Mount the crossover on the side panel (e.g. fi g. below). Make sure that there is enough space behind the
side panel (may vary depending on the vehicle).
2.2 Frequenzweiche mit Lautsprecherkabel 1,5qmm adaptieren und Kabel zum Tieftöner-Montageort (werk-
seitiger Einbauort- Seitenwand) und Mittelhochton-Montageort an der C-Säule führen.
2.2 Adapt the crossover with speaker cable 1.5qmm and lead the cable to the woofer mounting location (fac-
tory installation location- side wall) and mid-high mounting location on the C-pillar.
2.3 Werkseitiges Lautsprecherkabel mit Frequenzweicheneingang adaptieren
(rot/grün = Plus; braun/grün=MINUS)
2.3 Adapt factory loudspeaker cable with crossover input
(red/green = plus; brown/green=MINUS)
Zur Vermeidung von Vibrationsgeräuschen alle Kabelstränge mit Isolierband oder ähnliches sichern.
To avoid vibration noise, secure all cable harnesses with insulating tape or similar.
WICHTIG
Platine vor Feuchtigkeit schützen und darauf achten, dass die Platine nicht an Metallteilen liegt
- Kurzschlussgefahr!
IMPORTANT
Protect the PCB from moisture and ensure that it is not lying against metal parts.
- Danger of short circuit!

Jehnert Sound Design I Im Michelreis 14 I 72124 Pliezhausen I Tel.: 07127-93457-0 I [email protected] I www.jehnert.de
Montageanleitung
Assembly instructions
Stand /Status: 21.03.2022
VW Bus T5 / T6 /T6.1
2-oder 3-Wege Rearsystem,
2- or 3-way rear system Art. Nr. 67200
3. Tieftöner-Montage
3. woofer mounting
Der werkseitige Tieftöner hinter der Seitenverkleidung wird jeweils durch einen
JEHNERT 165mm Power Woofer ersetzt:
The factory woofer behind the side panel is replaced with a
JEHNERT 165mm power woofer:
3.1 Tieftonadapterring auf JEHNERT-Tieftöner aufsetzen.
3.1 Place woofer adapter ring on JEHNERT woofer.
3.2 Jehnert Tieftöner mit Lautsprecherkabel adaptieren.
3.2 Adapt Jehnert woofer with speaker cable.
3.3 Tieftöner mit Adapterring in die werkseitige Öff nung einsetzen und mit den
mitgeliferten 4x Spax-Schrauben 3,5x30 in den werkseitigen Buchsen befestigen.
3.3 Insert the woofer with adapter ring into the factory opening and fi x it in the factory sockets with the
with the 4x Spax screws 3.5x30 provided in the factory sockets.

Jehnert Sound Design I Im Michelreis 14 I 72124 Pliezhausen I Tel.: 07127-93457-0 I [email protected] I www.jehnert.de
Montageanleitung
Assembly instructions
Stand /Status: 21.03.2022
VW Bus T5 / T6 /T6.1
2-oder 3-Wege Rearsystem,
2- or 3-way rear system Art. Nr. 67200
4. Mittel-Hochton-Modul Montage C-Säule
4. mid-treble module C-pillar mounting
4.1 Beiliegende Montageschablone für das Mittelhochton-Modul ausschneiden
4.1 Cutting out the enclosed mounting template for the mid-high module
4.2 Schablone wie auf Abb. rechts angegeben auf der C-säule positionieren.
Bitte beachten Hochtöner ist unten!
4.2 Position the template on the C-pillar as shown in the illustration on the right.
Please note that the tweeter is at the bottom!
4.3 Lautsprecheröff nungen und Schraubenpositionen markieren und Lautsprecheröff nungen
mit einer Stichsäge ausschneiden.
Achtung: nicht zu viel wegschneiden-> Schraubenmarkierungen müssen stehen bleiben.
4.3 Mark the speaker openings and screw positions and cut out the speaker openings with a jigsaw.
Caution: do not cut away too much-> screw markings must remain.
Tipp: um die Verkleidung beim Ausschneiden gegen Kratzer zu schützen,
Fläche ringsrum mit Klebeband abkleben.
Tip: to protect the panelling from scratches when cutting out,
mask the surface all around with adhesive tape.
4.4 Mittelhochton-Modul auf der C-säule positionieren (Hochtöner ist unten)
und mit den mitgelieferten Spax-Schrauben 3x25 gem. Abb. montieren.
4.4 Position the mid-high range module on the C-pillar (tweeter is at the bottom).
and mount with the supplied Spax screws 3x25 according to the illustration.
4.5 Lautsprecher anschließen.
4.5 Connect the speakers.
4.6 C-Säule montieren
4.6 Fitting the C-pillar
Zur Vermeidung von Vibrationsgeräuschen alle Kabelstränge
mit Isolierband oder ähnlichem sichern.
To prevent vibration noises, secure all cable harnesses with
secure with insulating tape or similar.

Jehnert Sound Design I Im Michelreis 14 I 72124 Pliezhausen I Tel.: 07127-93457-0 I [email protected] I www.jehnert.de
Montageanleitung
Assembly instructions
Stand /Status: 21.03.2022
VW Bus T5 / T6 /T6.1
2-oder 3-Wege Rearsystem,
2- or 3-way rear system Art. Nr. 67200
Unser Team in Pliezhausen steht Ihnen gerne jederzeit mit Rat und Tat zur Verfügung:
Our team in Pliezhausen will be happy to provide you with advice and assistance at any time:
JEHNERT Sound Design
»Entwicklung und Produktion von Car-Audio-Systemen«
"Development and production of car audio systems"
Inh. Hans-Peter Jehnert
Im Michelreis 14
72124 Pliezhausen
Tel.: 07127-93457-0
Fax: 07127-93457-10
Notizen /Notes:
This manual suits for next models
3
Table of contents
Other JEHNERT SOUND DESIGN Car Speakers manuals

JEHNERT SOUND DESIGN
JEHNERT SOUND DESIGN 65740 User manual

JEHNERT SOUND DESIGN
JEHNERT SOUND DESIGN 75170 User manual

JEHNERT SOUND DESIGN
JEHNERT SOUND DESIGN 75151 User manual

JEHNERT SOUND DESIGN
JEHNERT SOUND DESIGN AUDI 80 convertible User manual

JEHNERT SOUND DESIGN
JEHNERT SOUND DESIGN 68501 User manual
Popular Car Speakers manuals by other brands

Kenwood
Kenwood KFC-HQ691 Service manual

Directed Audio
Directed Audio 22104 Pro + installation guide

audiophony
audiophony WALLAMPmedia user guide

Harman
Harman Infinity REF-3002cfx owner's manual

MTX
MTX MTX Thunder Axe High End Component TXC5.1 owner's manual

Boston Acoustics
Boston Acoustics Pro50 Connection guide


