JEHNERT SOUND DESIGN AUDI 80 convertible User manual

SoundSound
D E S I G N
JEHNERT
AUDI 80 convertible / coupé
Guarantee
☞
without co-passenger airbag
2002/by.aj/FH - 15 -
Installation instructions
instal.Instr. item-no. 76150/FH10/02
item-no. 76150
Jehnert Sound Design
development and
production of
Car-Audio-Systems
Heinrich-Hertz-Str. 11
70794 Filderstadt
Tel.: 0711-77 97 87- 87
Fax: 0711-77 78 921
e-mail: [email protected]
www.jehnert.com
We grant a manufacturers guarantee of 2 years starting from the date of purchase
of the door panels or sound system from the dealer.
Within this guarantee period to our choice we either repair or replace free of
charge all defects due to material or workmanship.
Exempt from this guarantee are damages due to improper use, wear and tear or
damages which have to be led back on wear or interventions by third parties.
The guarantee does not cover subsequent damages or such defects that only
insignificantly impair the value or the usability of the panels/sound system.
The guarantee does not cover damages due to external influences.
Panels with additional or wrong assembly drill holes cannot be returned.
These are damages to the panel which cannot be repaired again.
Production of
Car-Audio-Systems
Porsche Str. 15
70794 Filderstadt
Tel. 00 49 71 58 / 9 56 99-0
Fax 00 49 71 58 / 9 56 99-10
e-mail: [email protected]
www.jehnert.com
75150
with co-passenger airbag

Packing list ..........................................................................
1. Disassembly of the door lining ..............................................
2. Insulation of the door lining / car doors ................................
3. Panel alignment / reference points ........................................
4. Handling of door lining / Panel installation - Fastening ...........
5. Tweeter - and Midrange Installation / Loudspeaker cables.........
6. Crossover circuit - Loudspeaker cables....................................
7. Installation of the door lining onto the car door ......................
8. Speaker connection ..............................................................
Loudspeaker wiring diagram .................................................
9. Installation of the speaker-grills .............................................
Technical information ...........................................................
Service / fault diagnoses .......................................................
Guarantee ...........................................................................
Steffen Kretzschmar
Saddlery / Completion
page
2
3
4
5
6
7
8
9
10
11
12
13
14
15
76150 - AUDI 80 Convertible/coupé - 14 - © JEHNERT SOUND DESIGN 76150 - AUDI 80 Convertible/coupé - 1 - © JEHNERT SOUND DESIGN
Technical questions Hotline: 0049-711-77 97 87-87
We thank you for your support!
Mirko Schwarz
Development
It is our pleasure to help you!
Dear customer,
We have taken great care to explain the procedures in our installation instructions
more detailed and “step by step”.
Your tips and suggestions help us for the future to eliminate uncertainties and
misinterpretation. Therefore, please inform us. what you would like to be improved
or what we should still change.
Marc Sitter
Export / Service
Marc Sitter
Export / Service
The following notes serve to help troubleshoot and eliminate faults or malfunctions
on your own. If the following measures are not effective, please call us.
What can it be if ... possible cause/ solution
..it doesn’t sound right. wrong polarity on the subwoofers ( page 10)
crosover circuit attached wrong ( page 11)
Doorlining and moisture protection foil
not cut out ( page 5+10)
amplifier doesn’t have enough power( page 13)
amplifier connection
...it doesn’t fit correctly. door panel customization ( page 8)
installation of the panels on the door lining (page 9)
.....grills do not hold. observe notes on page 12!
Self-help and fault diagnosis
Contents
Particularly important notes contain the following remarks:
☞
Please follow the installation instructions
“step by step”
and check the package contents
75150

Packing unit Check list
door panel, covered (right / left)
Speaker grill, covered (right / left)
Tweeter 26 mm
Tweeter mounting bowl (with 6Ktn.Screw M4x8 u. Washer ø12mm)
Midrange 100 mm Q assembly ring
woofer 160 mm (each mounted on the panel with 2 Sheet metal-screws)
Crossover (right / left)
standart cables for subwoofer (right / left)
Hardware bag:
Flat head screws, M 4 x 50
Hex nut M 4
Washer Ø 12mm (f.flat head screws, lower edge of panel)
Washer Ø 20mm (f.head screws M4x50 on the top )
Washer Ø 20mm as spacer for Velcro fastener
Sheet metal screws,black 3,9x13 (f. woofer)
Velcro strip à 2,5 cm (reserve)
Preassembled hardware:
Velcro fastener plus strips
Sheet metal screws, black 3,9x13(f. subwoofer)
Flat head screws, M 4 x 40
Flat head screws, M 4 x 50
The product was carefully packed and checked for its completeness. If you find anything missing, damaged or
defective, please notice our guarantee services on the back of these assembly instructions.
Packing list
76150 - AUDI 80 Convertible/coupé - 13 - © JEHNERT SOUND DESIGN 76150 - AUDI 80 Convertible/coupé - 2 - © JEHNERT SOUND DESIGN
2
2
2
2
2
8
2
2
8
26
18
8
2
16
4
10
16
10
8
Technical information
Equipment: without co-passenger airbag,
electric and/ or mechanical window control
Model/ year : AUDI 80, type 89
Insulation: Insulation not necessary
Note about setting: To obtain optimal stereoscopic sound, all settings
on the radio (bass, treble, loudness etc) should be
set to zero or neutral.
Recommended
amplifier power : from 2x 200 - 360 Watt RMS / 4 Ohm
Metal cutwork : not necessary
Cut-outs for loudspeaker/ 4 x 144mm (max.outer dimensions subwoofer 165 mm)
each side (max.installation depth subwoofer 65 mm)
only compatible with JEHNERT Sound System
Sound-System: 3-ways
4 x 160 mm subwoofer/ side
1 x 100 mm midrange / side
1 x 26 mm tweeter / side
car-customized crossover network
max.continuous Watt/RMS: 2 x 300/500Watt
car specific frequency range: 47-22.000 Hz
Total impedance: 4 Ohm
Time for Installation car hifi-specialist: 4 hours
We reserve the right to make technical changes, as well as development.
20
12
75150

Removing the grills:
The Velcro fasteners stick together very strongly!
The grills can be removed anytime by carefully lifting them off.
Please, avoid any way of forceful yanking at the grills.
It could break!
9.3.
9.2. Our Tip:
If the panel cannot be pressed on completely at some points. . .
Cause: the special form at these points and the resulting differences in
material cross section of the grill.
Solution: the distance can be levelled out with spacers 3 under the
Velcro disc.
(Spacers included with the screw kit)
9.1. Precisely align and carefully press grill into the Velcro fasteners.
The Velcro fastener makes a crackling sound
when it is closed correctly.
1.1. roll down window completely
1.2. remove the door handle (1):
unscrew the 3 screws (A-C) under the door handle (are different according
to year of construction, cross head screws or socket head cap screws)
tip – door handle fastening with socket head cap screws:
the socket head cap screws are difficult to unscrew, check the correct
movable point by turning the screw and pulling the door handle.
1.3. for vehicles with »electric window control«:
push the switch board out of the guide groove in the door handle and
unplug the cables
please observe: some cables on this plug are permanent current
carrying and not protected by fuses.
Short circuits may damage the window electronic!!
1.4. unscrew the screw on the door latch lever (3) and remove the door latch lever.
1.5. remove the adhesive tape underneath the sheet metal clamp (fastening for
the cover of the Bowden pull wire). Hang out the Bowden pull wire for the
door latch.
1.6. remove the chromium cover and the guide contact on the outer door side (2)
1.7. pull the door-lining upward away from the inner door metal
A
B
C
1 . Disassembly of the door lining
76150 - AUDI 80 Convertible/coupé - 3 - © JEHNERT SOUND DESIGN 76150 - AUDI 80 Convertible/coupé - 12 - © JEHNERT SOUND DESIGN
☞
☞
9. Installation of the speaker’s grill:
grill
2 self-adhesive Velcro-strip
1 Velcro fastener
3 Washer M4 ø 20 as spacer
doorpanel
75150

Lautsprecheranschluss - Schaltbild
Alle Lautsprecher und Frequenzweichen anschließen:
H
i
g
h
P
e
r
f
o
r
m
a
n
c
e
D E S I G N
JEHNERT
SoundSound
Midrange
Speaker
MADE IN GERMANY
Lautsprecheranschluss - Schaltbild
Alle Lautsprecher und Frequenzweichen anschließen:
H
i
g
h
P
e
r
f
o
r
m
a
n
c
e
D E S I G N
JEHNERT
SoundSound
Midrange
Speaker
MADE IN GERMANY
H
i
g
h
P
e
r
f
o
r
m
a
n
c
e
D E S I G N
JEHNERT
SoundSound
Tweeter
Speaker
MADE INGERMANY
Der vordere Teil der Kartentasche bleibt auf der Türverkleidung erhalten.
Nur der hintere Teil der Kartentasche wird abgeschnitten:
2.1. Nur die hinteren, werkseitig
mit der Türverkleidung
verschweißten Kunststoff-
bolzen mit einem 6mm Bohrer
auf der Türverkleidungsrückseite
aufbohren (siehe Abb. a-f),
Diese Befestigungslöcher werden
zur späteren Befestigung
des Paneels genutzt.
2.2. Den Teppich am vorderen Teil der Kartentasche ca.
1cm überstehend
zur eigentlichen Schnittkante der Kartentasche (s.Abb.unten) mit einem
scharfen Messer abschneiden und etwas von der Kartentasche abziehen.
2.3. Die Kartentasche am schmalsten Punkt so trennen, dass das Paneel direkt
unter der Armlehne an den vorderen Teil der Kartentasche anliegt.
Zur Überprüfung der Schnittkante das Paneel auf die Türverkleidung legen.
Die Kartentasche mit einer Metallsäge
an der Schnittkante abschneiden.
2.4. Den überstehenden Teppich ver-
kleidend um die Schnittkante
der Kartentasche legen
und befestigen.
2
1
3
Schnittkante des
Teppichs Schnittkante der
Kartentasche
2
1
3
2
75150 - AUDI 80 Cabrio/Coupé- 11 - © JEHNERT SOUND DESIGN
2. Demontage des hinteren Teiles der Original Kartentasche
75150 - AUDI 80 Cabrio/Coupé- 4 - © JEHNERT SOUND DESIGN
Schaltbild 3-Wege Frequenzweiche / 4x Tieftöner
H
i
g
h
P
e
r
f
o
r
m
a
n
c
e
D E S I G N
JEHNERT
SoundSound
WOOFER
Speaker
MADE IN GERMANY
H
i
g
h
P
e
r
f
o
r
m
a
n
c
e
D E S I G N
JEHNERT
SoundSound
WOOFER
Speaker
MADE IN GERMANY
H
i
g
h
P
e
r
f
o
r
m
a
n
c
e
D E S I G N
JEHNERT
SoundSound
WOOFER
Speaker
MADE IN GERMANY
H
i
g
h
P
e
r
f
o
r
m
a
n
c
e
D E S I G N
JEHNERT
SoundSound
WOOFER
Speaker
MADE IN GERMANY
e
d
b
acf
�
HochtönerTieftöner
SoundSound
D E S I G N
JEHNERT
MitteltönerEingang
3-Wege fahrzeugspezifische Frequenzweiche
Audi 80 Cabrio / Coupé
= mitgelieferter Kabelstrang
Verstärker
ab 200 Watt RMS / 4 Ohm
empf.Leistung
hinterer Teil der werkseitigen Kartentasche Schnittkante
des vorderen Teiles
der Kartentasche
75150
2. Disassembly of the back part of the original tray
The front part of the tray stays original on the door card. Only the
back part of the tray is cut off.
Drill only the rear plastic bolts,
which are originally welded with
the door card, on the back side of
the door lining (see g. a-f). Use a
6mm drill. These mounting holes
are used later on for the fastening
of the doorboard.
Cut off the carpet on the front part of the tray ➀ (1 cm is overlapping) the
normal cutting edge ➁ (see g. below) and pull away the tray a little bit.
Separate the tray on its smallest point in a way that the doorboard is
directly under the arm rest and in line with the front part of the tray.
In order to check the cutting edge place the doorboard on the door card.
Cut off the tray with a metal saw on the cutting edge ➁.
Lautsprecheranschluss - Schaltbild
Alle Lautsprecher und Frequenzweichen anschließen:
H
i
g
h
P
e
r
f
o
r
m
a
n
c
e
D E S I G N
JEHNERT
SoundSound
Midrange
Speaker
MADE IN GERMANY
Lautsprecheranschluss - Schaltbild
Alle Lautsprecher und Frequenzweichen anschließen:
H
i
g
h
P
e
r
f
o
r
m
a
n
c
e
D E S I G N
JEHNERT
SoundSound
Midrange
Speaker
MADE IN GERMANY
H
i
g
h
P
e
r
f
o
r
m
a
n
c
e
D E S I G N
JEHNERT
SoundSound
Tweeter
Speaker
MADE INGERMANY
Der vordere Teil der Kartentasche bleibt auf der Türverkleidung erhalten.
Nur der hintere Teil der Kartentasche wird abgeschnitten:
2.1. Nur die hinteren, werkseitig
mit der Türverkleidung
verschweißten Kunststoff-
bolzen mit einem 6mm Bohrer
auf der Türverkleidungsrückseite
aufbohren (siehe Abb. a-f),
Diese Befestigungslöcher werden
zur späteren Befestigung
des Paneels genutzt.
2.2. Den Teppich am vorderen Teil der Kartentasche ca.
1cm überstehend
zur eigentlichen Schnittkante der Kartentasche (s.Abb.unten) mit einem
scharfen Messer abschneiden und etwas von der Kartentasche abziehen.
2.3. Die Kartentasche am schmalsten Punkt so trennen, dass das Paneel direkt
unter der Armlehne an den vorderen Teil der Kartentasche anliegt.
Zur Überprüfung der Schnittkante das Paneel auf die Türverkleidung legen.
Die Kartentasche mit einer Metallsäge
an der Schnittkante abschneiden.
2.4. Den überstehenden Teppich ver-
kleidend um die Schnittkante
der Kartentasche legen
und befestigen.
2
1
3
Schnittkante des
Teppichs Schnittkante der
Kartentasche
2
1
3
2
75150 - AUDI 80 Cabrio/Coupé- 11 - © JEHNERT SOUND DESIGN
2. Demontage des hinteren Teiles der Original Kartentasche
75150 - AUDI 80 Cabrio/Coupé- 4 - © JEHNERT SOUND DESIGN
Schaltbild 3-Wege Frequenzweiche / 4x Tieftöner
H
i
g
h
P
e
r
f
o
r
m
a
n
c
e
D E S I G N
JEHNERT
SoundSound
WOOFER
Speaker
MADE IN GERMANY
H
i
g
h
P
e
r
f
o
r
m
a
n
c
e
D E S I G N
JEHNERT
SoundSound
WOOFER
Speaker
MADE IN GERMANY
H
i
g
h
P
e
r
f
o
r
m
a
n
c
e
D E S I G N
JEHNERT
SoundSound
WOOFER
Speaker
MADE IN GERMANY
H
i
g
h
P
e
r
f
o
r
m
a
n
c
e
D E S I G N
JEHNERT
SoundSound
WOOFER
Speaker
MADE IN GERMANY
e
d
b
acf
�
HochtönerTieftöner
SoundSound
D E S I G N
JEHNERT
MitteltönerEingang
3-Wege fahrzeugspezifische Frequenzweiche
Audi 80 Cabrio / Coupé
= mitgelieferter Kabelstrang
Verstärker
ab 200 Watt RMS / 4 Ohm
empf.Leistung
hinterer Teil der werkseitigen Kartentasche Schnittkante
des vorderen Teiles
der Kartentasche
Place the overlapping carpet
round the cutting edge of the
tray ➂ and afx it.
back part of the original tray
cutting edge of
the front part
of the tray
cutting edge
of the carpet
cutting edge
of the tray

8. Crossover circuit - Speaker connection
8.1. connect all loudspeakers with the included standart cables for woofer
parallel wiring see diagram on page 11.
Notice: You should check the polarity of all subwoofers
before connecting them to the crossover circuit
with a 9 volt battery:
pole of the crossover circuit input to of a 9 Volt battery
pole of the crossover circuit input to of a 9 Volt battery
All subwoofers must move uniformly!
Wrong polarity of a subwoofer can totally
equalize the bass sound!
8.2. Insert subwoofer .
8.3. Connect the Midrange and tweeter to the crossover circuit
see diagram on page 11.
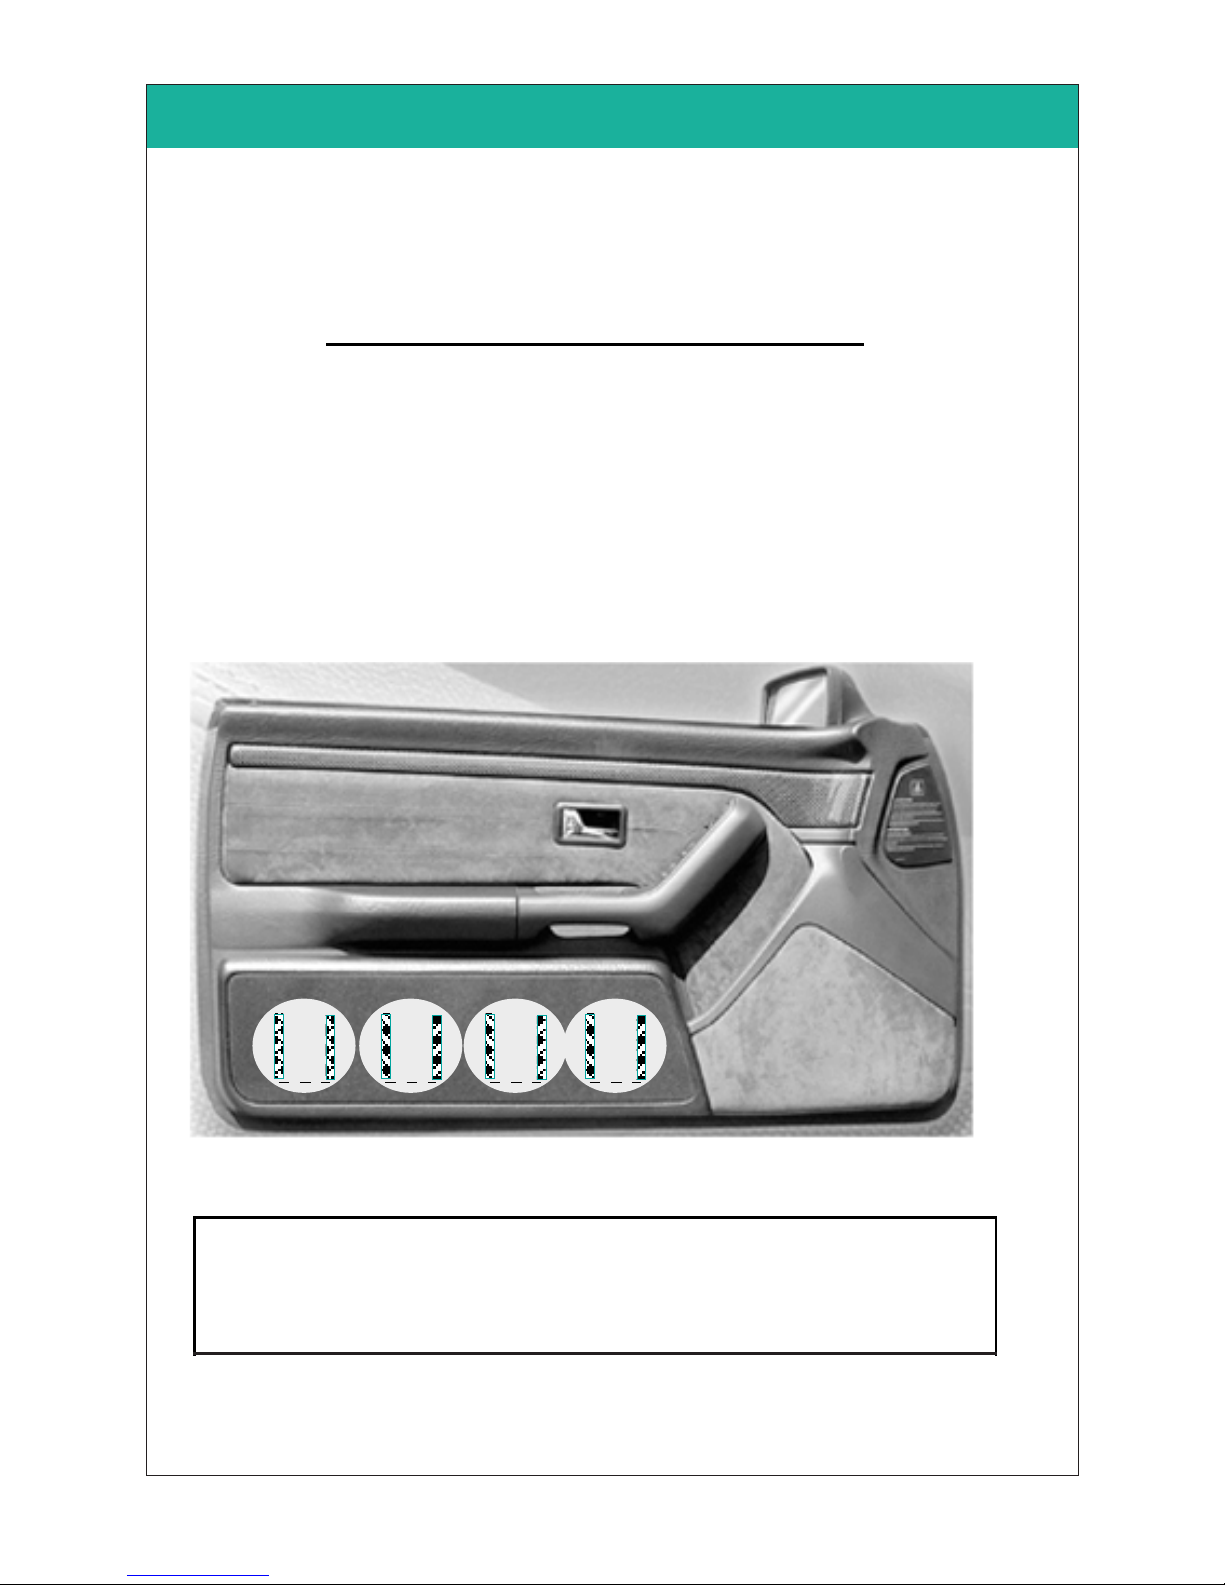
3.1. remove the original tray:
drill the plastic bolts, original welded together with the door lining,
on the backside of the door lining. Use a 6mm drill. These drill holes
will be used for later assembly of the panel.
Tip for later retrofit back to original:
The original tray is fastened with short screws and large washers
to these points if retrofitted back to original.
3.1. Place the door lining on a plane surface.
3.2. Dismount the loudspeakers attached to the panel for transport protection.
Retain the screws for later assembly.
3.3. Place the panel without loudspeakers and grill on the door lining and align it:
Reference points for fitting:
Only precise alignment of the panel with the door
lining warrants optimal fit.
align the staybolts of the lower edge of the panel to the 9 fastening
points of the original tray (ref.points 5-13)
Dismount the loudspeakers attached to the panel for transport protection.
Dismount the loudspeakers attached to the panel for transport protection.
13
10 11 129
8
657
Fig.: original door lining with installed tray
76150 - AUDI 80 Convertible/coupé - 10 - © JEHNERT SOUND DESIGN 76150 - AUDI 80 Convertible/coupé - 5- © JEHNERT SOUND DESIGN
3 . Panel alignment
☞
☞
ref. point 5-13
✚ ✚
75150
8. Lautsprecheranschluss
8.1. Tieftöner einsetzen und alle Lautsprecher mit der
Frequenzweiche verkabeln (Reihen-Paralell-Schaltung - Kabelstrang
im Lieferumfang - Schaltbild vgl. S.11):
Hinweis:
Bevor alle Tieftöner an die Frequenzweiche angeschlossen werden,
sollte die Polarität aller Tieftöner an einer 9 Volt-Batterie
überprüft werden:
Pol des FW-Eingang an von 9 V Batterie
Pol des FW-Eingang an von 9 V Batterie
Alle Tieftöner müssen bei dieser Überprüfung gleichmäßig ausschwingen!
Ein verpolter Tieftöner kann die gesamte Basswiedergabe
aufheben!
8.2. Tieftöner einsetzen und festschrauben.
8.3. Mittel- und Hochtöner ebenfalls mit den Frequenzweichen anschließen -
vgl. Anschlußbild Seite 11.
3.1. Türverkleidung auf eine ebene Fläche legen.
3.2. Die auf dem Paneel zur Transportsicherung befestigten Lautsprecher
demontieren (Schrauben zur späteren Montage aufbewahren)
3.3. Das Paneel ohne Lautsprecher u. Abdeckung auf die Türverkleidung
legen und ausrichten:
Fixpunktlinien zur Anpassung:
Nur die exakte Anpassung des Paneeles auf die Türverkleidung
gewährleistet eine optimale Passgenauigkeit
Fixpunkte 1-6:
Die Stehbolzen der Paneelunterkante exakt in die
6 Befestigungspunkte der Originalkartentasche einpassen
Fixpunktlinie:
Die vordere Paneelseitenkante verläuft bündig zur
Schnittkante des vorderen Teiles der Originalkartentasche
75150 - AUDI 80 Cabrio/Coupé- 10 - © JEHNERT SOUND DESIGN75150 - AUDI 80 Cabrio/Coupé- 5- © JEHNERT SOUND DESIGN
3 . Paneelanpassung
�
�
✚ ✚
Fixpunkte 1-6:
Stehbolzen der Paneelunter-
kante in die Originalbe-
festigungslöcher der Türver-
verkleidung einpassen
Fixpunktlinie
Schnittkante des vorderen
Teiles der Originalkarten-
tasche
8. Lautsprecheranschluss
8.1. Tieftöner einsetzen und alle Lautsprecher mit der
Frequenzweiche verkabeln (Reihen-Paralell-Schaltung - Kabelstrang
im Lieferumfang - Schaltbild vgl. S.11):
Hinweis:
Bevor alle Tieftöner an die Frequenzweiche angeschlossen werden,
sollte die Polarität aller Tieftöner an einer 9 Volt-Batterie
überprüft werden:
Pol des FW-Eingang an von 9 V Batterie
Pol des FW-Eingang an von 9 V Batterie
Alle Tieftöner müssen bei dieser Überprüfung gleichmäßig ausschwingen!
Ein verpolter Tieftöner kann die gesamte Basswiedergabe
aufheben!
8.2. Tieftöner einsetzen und festschrauben.
8.3. Mittel- und Hochtöner ebenfalls mit den Frequenzweichen anschließen -
vgl. Anschlußbild Seite 11.
3.1. Türverkleidung auf eine ebene Fläche legen.
3.2. Die auf dem Paneel zur Transportsicherung befestigten Lautsprecher
demontieren (Schrauben zur späteren Montage aufbewahren)
3.3. Das Paneel ohne Lautsprecher u. Abdeckung auf die Türverkleidung
legen und ausrichten:
Fixpunktlinien zur Anpassung:
Nur die exakte Anpassung des Paneeles auf die Türverkleidung
gewährleistet eine optimale Passgenauigkeit
Fixpunkte 1-6:
Die Stehbolzen der Paneelunterkante exakt in die
6 Befestigungspunkte der Originalkartentasche einpassen
Fixpunktlinie:
Die vordere Paneelseitenkante verläuft bündig zur
Schnittkante des vorderen Teiles der Originalkartentasche
75150 - AUDI 80 Cabrio/Coupé- 10 - © JEHNERT SOUND DESIGN75150 - AUDI 80 Cabrio/Coupé- 5- © JEHNERT SOUND DESIGN
3 . Paneelanpassung
�
�
✚ ✚
Fixpunkte 1-6:
Stehbolzen der Paneelunter-
kante in die Originalbe-
festigungslöcher der Türver-
verkleidung einpassen
Fixpunktlinie
Schnittkante des vorderen
Teiles der Originalkarten-
tasche
Place the door card on a plane surface.
Dismount the speakers, secured for transport and keep the screws for
later assembly.
Put the doorboard without speakers and grilles on the door card
and align it:
Fastening points 1-6:
Insert the stay bolts of the
bottom edge of the doorboard
into the original fastening
holes of the door card
Reference line
Cutting edge of the front part
of the original tray.
Fastening points 1-6: Insert the stay bolts of the bottom edge exactly to the
6 fastening points of the original tray.
Reference line: The front side edge of the doorboard is ush with the
cutting edge of the front part of the original tray.

7. Installation of the door lining onto car door
7.1. Fit the door lining in contrary order (described on page 3).
7.2. Cut out the foamed foil like a U (behind the woofers) in order to
improve the acoustic link to the door volume.
1. use the precisely aligned as pattern for the positioning of fastening points 1- 4
•marking of fixing points 1- 4:
mark with a thin awl on the door lining and set the holes according to
the marks set before. Use a 6mm drill.
2. mark speaker cut outs on the door lining. Take away the door-build. Cut out the
speakers’ outlines (see fig.) by means of a compass saw.
Do not cut out the foamed - it will be done after the installation of the door
lining. (s.page 9)
Tip for later retrofit back to original ( see fig.:)
Measure the cut out in size and volume that the speaker have
a good coupling to the door volume and also have enough bearing
surface for a leather covered carton grill, which may recover the cut-outs
(in case you like to retrofit back to original).
4. Handling of door lining / installation of the door panel
3. screw in the screws (1-4 M4x50). Affix the panel with all M4 screws through
the door lining exactly into the original fastening points. Secure with washers
and nuts. Screw only hand tight (screws 1-4), as there is no definitive point of end.
Check again for precise fit, tighten all screws and secure with adhesive or
safety paint.
All cutting edges of the panel must fit to the door lining snugly
all around without gap.
check all screw connections:
in order to avoid damages to the car door check the length of the staybolts
on the back side of the door lining once again and possibly shorten them.
This does not affect the ventilation.
☞
11 12
13
10
Tip for retrofit:
chose your cut-out
that the bearing
surface is kept
☞
76150 - AUDI 80 Convertible/coupé - 9 - © JEHNERT SOUND DESIGN 76150 - AUDI 80 Convertible/coupé - 6 - © JEHNERT SOUND DESIGN
screws 5-13 = Screws premounted
fastening of screws
fix.point 1-4: M 4 x 50
Screws premounted:
fix.point 5-9: M 4 x 40
fix.point 10-13: M 4 x 50
12
3
5
6789
75150
5-9
7. Installation of the door lining onto car door
7.1. Fit the door lining in contrary order (described on page 3).
7.2. Cut out the foamed foil like a U (behind the woofers) in order to
improve the acoustic link to the door volume.
1. use the precisely aligned as pattern for the positioning of fastening points 1- 4
•marking of fixing points 1- 4:
mark with a thin awl on the door lining and set the holes according to
the marks set before. Use a 6mm drill.
2. mark speaker cut outs on the door lining. Take away the door-build. Cut out the
speakers’ outlines (see fig.) by means of a compass saw.
Do not cut out the foamed - it will be done after the installation of the door
lining. (s.page 9)
Tip for later retrofit back to original ( see fig.:)
Measure the cut out in size and volume that the speaker have
a good coupling to the door volume and also have enough bearing
surface for a leather covered carton grill, which may recover the cut-outs
(in case you like to retrofit back to original).
4. Handling of door lining / installation of the door panel
3. screw in the screws (1-4 M4x50). Affix the panel with all M4 screws through
the door lining exactly into the original fastening points. Secure with washers
and nuts. Screw only hand tight (screws 1-4), as there is no definitive point of end.
Check again for precise fit, tighten all screws and secure with adhesive or
safety paint.
All cutting edges of the panel must fit to the door lining snugly
all around without gap.
check all screw connections:
in order to avoid damages to the car door check the length of the staybolts
on the back side of the door lining once again and possibly shorten them.
This does not affect the ventilation.
☞
11 12
13
10
Tip for retrofit:
chose your cut-out
that the bearing
surface is kept
☞
76150 - AUDI 80 Convertible/coupé - 9 - © JEHNERT SOUND DESIGN 76150 - AUDI 80 Convertible/coupé - 6 - © JEHNERT SOUND DESIGN
screws 5-13 = Screws premounted
fastening of screws
fix.point 1-4: M 4 x 50
Screws premounted:
fix.point 5-9: M 4 x 40
fix.point 10-13: M 4 x 50
12
3
5
6789

5.1. tweeter installation – dashboard:
Insert tweeter bowl instead of the air valves in the dashboard:
(This does not affect the ventilation)
5.1.1. remove the lid of the air valve
5.1.2. drill a small hole into the ventilation duct for the speaker cable
5.1.3. connect tweeter with cable (1,5 - 4 mm2) and lead the speaker
cable to the mount of the crossover in the dashboard (see speaker
connection on (s. page 6 / 6.1.).
5.1.4. install the tweeter with the mounting bowl supplied with and affix it
with a hexagon head screw M4x8 and secure with washer. Connect
the tweeter and affix the mounting bowl either with hot melt adhesive
or insert the clamp into the air valve.
5.2. installation of midrange – dashboard
Install the midrange into the original mount in the dashboard:
5.2.1. lever off the speaker grill and remove the original installed speaker.
5.2.2. connect the JEHNERT midrange with speaker cable (1,5 - 4 mm2).
Lead the speaker cable to the mount of the cross over in the dashboard.
(see speaker connection (s. page 6 / 6.1.).
5.2.3. install the midrange with mounting ring into the original mount and
affix as the factory installed midrange.
6.1. Installation of crossover circuit:
recommendation:
mount of crossover in the dashboard near the steering system respectively
the glove box
6.2. Loudspeaker cables
6.2.1. lead 1x speaker cable (1,5 - 4 mm2) from amplifier to crossover
in the dashboard.
6.2.2. lead the speaker cable (1,5 - 4 mm2) from crossover into the car doors
(see wiring diagram on page 11)
tip: please observe that air duct for the central locking system is kept
open and movable (rubber grommet between bearer and door).
Air duct may knick if closing the door!
6.2.3. adapt set of cables supplied with to the speaker connection.
5. Tweeter and midrange Installation / loudspeaker cables 6. crossover circuit / loudspeaker cables
76150 - AUDI 80 Convertible/coupé - 7 - © JEHNERT SOUND DESIGN 76150 - AUDI 80 Convertible/coupé - 8 - © JEHNERT SOUND DESIGN
75150
6.3. Insulation of the door lining / car doors
Not necessary!
7. Installation of the door lining onto car door
7.1. Fit the door lining in contrary order (described on page 3).
7.2. Cut out the foamed foil like a U (behind the woofers) in order to
improve the acoustic link to the door volume.
1. use the precisely aligned as pattern for the positioning of fastening points 1- 4
•marking of fixing points 1- 4:
mark with a thin awl on the door lining and set the holes according to
the marks set before. Use a 6mm drill.
2. mark speaker cut outs on the door lining. Take away the door-build. Cut out the
speakers’ outlines (see fig.) by means of a compass saw.
Do not cut out the foamed - it will be done after the installation of the door
lining. (s.page 9)
Tip for later retrofit back to original ( see fig.:)
Measure the cut out in size and volume that the speaker have
a good coupling to the door volume and also have enough bearing
surface for a leather covered carton grill, which may recover the cut-outs
(in case you like to retrofit back to original).
4. Handling of door lining / installation of the door panel
3. screw in the screws (1-4 M4x50). Affix the panel with all M4 screws through
the door lining exactly into the original fastening points. Secure with washers
and nuts. Screw only hand tight (screws 1-4), as there is no definitive point of end.
Check again for precise fit, tighten all screws and secure with adhesive or
safety paint.
All cutting edges of the panel must fit to the door lining snugly
all around without gap.
check all screw connections:
in order to avoid damages to the car door check the length of the staybolts
on the back side of the door lining once again and possibly shorten them.
This does not affect the ventilation.
☞
11 12
13
10
Tip for retrofit:
chose your cut-out
that the bearing
surface is kept
☞
76150 - AUDI 80 Convertible/coupé - 9 - © JEHNERT SOUND DESIGN 76150 - AUDI 80 Convertible/coupé - 6 - © JEHNERT SOUND DESIGN
screws 5-13 = Screws premounted
fastening of screws
fix.point 1-4: M 4 x 50
Screws premounted:
fix.point 5-9: M 4 x 40
fix.point 10-13: M 4 x 50
12
3
5
6789
7. installation of the door-lining onto the the car doors
7.1. Check up length of the screws and bolts:
in order to prevent damages of mechanic parts of the car doors, please check
once again the length of all bolts and screws on the back side of the door
lining! No touch with any mechanic parts of the car doors !
(please shorten if necessary).
7.2. reinstall the doorlining - fit it in contrary order of succession as described
on page no. 3
carefully clip on the plastic pins around the doorling
7.3. carefully screw in the SPAX screws 6 + 7 through the door panel and
the door lining to the door metal.
observe cables and mechanic parts !
fastening point 6: Spax-screw 5,0 x 60
7: Spax-screw 5,0 x 100
7.4. cut out the moisture protection foil (u-form) and stabilize the lateral cutting
edges in order to avoid vibration noise ( e.g. use a packing tape)
1. use the fastening angle on the backside of the panel and
the precisely aligned panel as template in order to mark fastening points 1- 5:
•mark the fastening points 1_ premounted in the panel:
pressing the panel to the door lining leaves visible impressions of the screws
•marking of fixing points 2-5:
use a thin awl to set the marks on the door-lining
2. draw the speakers’ cut-outs onto the door-lining
3. take away the door panel. Drill the holes on the backside of the doorlining for the
screws according to the marks set before. Use a 4mm drill for fastening point 1 and
a6mm drill for fastening points 2-5
4. Handling of door lining / Panel installation - Fastening
5. Screw in the 5x M4-screws on the backside of the doorling through the fastening
angle of the panel:
Observe the exactly succession of fastening points 1-5 for precise fitting.
Screw only hand-tight and fix the panel onto the doorlining. Secure all screws
with washers and nuts.
5. check again for precise fitting and tighten screws.
All cutting edges of the panel must fit to the door lining snugly
all around without gap
4. Cut out the holes for both speakers along
the marking with a compass saw: Enlarge the
original cut-out of the doorlining - see fig.
Enlargement
of cut-out Original-
cut-out
☞
☞
Screwing M4-screws:
Observe the exactly succession of
fastening points 1-5 for precise fitting.
6 Ktn. M4x30
already mounted
1
= 6 Ktn. M 4 x 30
76076 - Mercedes SLK - 9 - © JEHNERT SOUND DESIGN 76076 - Mercedes SLK - 6 - © JEHNERT SOUND DESIGN
Doorpanel fastening points
7=
Spax 5,0 x 100
6=
Spax 5,0 x 60
7= see page 9
6= see page 9
ref.points 6+7: no pre-drilling
Drilling has to be done directly
if installing the complete door lining
to the car door (see page 9)
5
= M 4 x 30
2
= M 4 x 30
3
= M 4 x 30
4
= M 4 x 30
☞
☞
☞
✍
✍
7. Montage der Türverkleidung auf die Fahrzeugtüren
Überprüfung der Schrauben-/Stehbolzenlängen:
7.1. Um Beschädigungen von Türmechanikteilen der Fahrzeugtüren vorzu-
beugen, vor der Montage der Türverkleidung nochmals alle Längen
der Stehbolzen / Schrauben auf der Türverkleidungsrückseite
überprüfen - diese dürfen nicht an Türmechanikteile der Fahrzeugtüren
anstoßen! (ggfs.: Zu lange Stehbolzen kürzen).
7.2. Türverkleidung oben in die Türschachtleiste einhängen
7.3. In umgekehrter Reihenfolge wie auf Seite 3 beschrieben wieder
befestigen.
TIPP: vorher die obere Türschachtleiste mit rückstandslosen Gleitmittel
einreiben.
7.4. Schaumfolie zur weiteren Verbesserung der akustischen Ankopplung
an das Türvolumen hinter den Tieftönern u-förmig einschneiden.
1. Zur Positionierung der Befestigungspunkte 1-4 das passgenau ausgerichtete
Paneel als Schablone verwenden:
•Markierung der Befestigungspunkte 1- 4:
mit einem dünnen Vorstecher auf der Türverkleidung markieren und die
Bohrungen gemäß Markierung mit einem 6 mm-Bohrer vornehmen:
2. Alle Lautsprecheröffnungen auf der Türverkleidung anzeichnen.
Paneel wieder abnehmen. Ausschnitt für die Lautsprecheröffnungen (S.Abb.)
auf der Türverkleidung mit einer Stichsäge vornehmen. Die Schaumfolie
nicht
ausschneiden - diese wird erst nach der Montage der Türverkleidung
(s.Seite 9) u-förmig eingeschnitten.
�
Endkontrolle nach Türpaneel-Montage:
Alle Funktionen der Bedienelemente wie Sitzverstellung,
Handschuhfachöffnung, Fensterheber etc. überprüfen.
4. Bearbeitung der Türverkleidung / Montage der Türpaneele
3. Schrauben (1-4: M4x 50) eindrehen. Türpaneel mit der Türverkleidung durch
»leichtes Festschrauben«aller M4-Schrauben fixieren. Alle Schrauben mit den
Unterlagscheiben und Muttern sichern, dabei die Muttern der Schrauben 1-4
nur vorsichtig anziehen, da es hier keinen definierten Endpunkt gibt.
Nochmals Passgenauigkeit überprüfen, Schrauben festziehen und mit
Kontakt-Klebstoff oder Sicherungslack sichern.
Alle Schnittkanten des Paneels müssen umlaufend ohne Spalt auf der
Türverkleidung anliegen.
�
�
75150 - AUDI 80 Cabrio/Coupé- 9 - © JEHNERT SOUND DESIGN 75150 - AUDI 80 Cabrio/Coupé- 6 - © JEHNERT SOUND DESIGN
Schrauben 5-9 = bereits ab Werk im Paneel montiert
Schraubenbefestigung
Punkt 1-4: M 4 x 50
Schrauben bereits montiert:
Punkt 5-9: M 4 x 40
123
5
678
9
7. Installation of the door lining onto car door
7.1. Fit the door lining in contrary order (described on page 3).
7.2. Cut out the foamed foil like a U (behind the woofers) in order to
improve the acoustic link to the door volume.
1. use the precisely aligned as pattern for the positioning of fastening points 1- 4
•marking of fixing points 1- 4:
mark with a thin awl on the door lining and set the holes according to
the marks set before. Use a 6mm drill.
2. mark speaker cut outs on the door lining. Take away the door-build. Cut out the
speakers’ outlines (see fig.) by means of a compass saw.
Do not cut out the foamed - it will be done after the installation of the door
lining. (s.page 9)
Tip for later retrofit back to original ( see fig.:)
Measure the cut out in size and volume that the speaker have
a good coupling to the door volume and also have enough bearing
surface for a leather covered carton grill, which may recover the cut-outs
(in case you like to retrofit back to original).
4. Handling of door lining / installation of the door panel
3. screw in the screws (1-4 M4x50). Affix the panel with all M4 screws through
the door lining exactly into the original fastening points. Secure with washers
and nuts. Screw only hand tight (screws 1-4), as there is no definitive point of end.
Check again for precise fit, tighten all screws and secure with adhesive or
safety paint.
All cutting edges of the panel must fit to the door lining snugly
all around without gap.
check all screw connections:
in order to avoid damages to the car door check the length of the staybolts
on the back side of the door lining once again and possibly shorten them.
This does not affect the ventilation.
☞
11 12
13
10
Tip for retrofit:
chose your cut-out
that the bearing
surface is kept
☞
76150 - AUDI 80 Convertible/coupé - 9 - © JEHNERT SOUND DESIGN 76150 - AUDI 80 Convertible/coupé - 6 - © JEHNERT SOUND DESIGN
screws 5-13 = Screws premounted
fastening of screws
fix.point 1-4: M 4 x 50
Screws premounted:
fix.point 5-9: M 4 x 40
fix.point 10-13: M 4 x 50
12
3
5
6789
75150
7.3.
1. use the precisely aligned panel as template in order to mark fastening
points 1- 7:
•
mark the fastening points 1-3_ premounted in the panel:
pressing the panel to the door lining leaves visible impressions of the screws
•marking of fixing points 4-7:
use a thin awl to set the marks on the door-lining
TIP to mark angular fastening points 6+7:
put in a little bit of packing tape to this position. Measure up the angular position.
Mark panel edge and angular position on the tape.
2. draw the speakers’cut-outs onto the door-lining.
3. take away the door build. cut out the speakers’outlines marked by means
of a compass saw
4. Drill the holes for the screws
according to the marks set
before. Use a 6mm drill.
(fastening point 1 = 10mm)
5. place the door panel precise again and do the panel fastening in
in exactly follow succession
:
fastening from the doorlining - backside
1. fastening points 1-3
secure
with washers and nuts
(fig. see page 5)
2. fastening points 6+7
screw in the metal-screws
3,9 x 25 into the angular
fastening and secure with
sheet metal nuts ø3,9 mm.
fastening points 4+5 from
doorlining - frontside:
screw in both M4x 60 Screws
and secure with washers
and nuts
All cutting edges of the panel must fit to the door lining snugly
all around without gap
7. installation of the door-lining onto the the car doors
7.1.
Check up length of the screws and bolts:
in order to prevent damages of mechanic parts of the car doors, please check
once again the length of all bolts and screws on the back side of the door
lining! No touch with any mechanic parts of the car doors !
(please shorten if necessary).
7.2. put the door-lining into the upper sealing of the car door
tip:
grease the upper door sealing with a residue-free lubricant before
7.3. fit it in contrary order of succession as described on page no. 3
7.4. carefully screw in the metal screws 8-12
through the door panel and
the door lining to the door metal.
IMPORTANT: Do not screw in the self cutting metal screws too tight -
it deforms the doormetal and affects the normal function of
the door mechanic!
fastening point 8-11: metal screw 5,0 x 80
12: metal screw 5,0 x 90
4. Handling of door lining / Panel installation - Fastening
fastening points 8 - 12
: no pre-drilling
fastening with metal screws has to be done directly if installing the
the complete doorling onto the car door (see page 9)
6+7= fastening angular - panel backside - fig see page 5, too
Spax 3,9 x 25 Spax 3,9 x 25
75110 VW Bus T 4 - 9 - © JEHNERT SOUND DESIGN 75110 VW Bus T 4 - 6 - © JEHNERT SOUND DESIGN
8
910 11
45
12
6= 7=
123
8
9
10
11
12
IMPORTANT: Strong tightening of the screws
affects the function of the door mechanic!
Final inspection after panel installation:
•please check all functions of the operating elements such
as seat adjustment, opening of the glove box,
window winder etc.
•no insulation directly behind the speaker !
M 4 x 60 M 4 x 60

8. Crossover circuit - Speaker connection
8.1. connect all loudspeakers with the included standart cables for woofer
parallel wiring see diagram on page 11.
Notice: You should check the polarity of all subwoofers
before connecting them to the crossover circuit
with a 9 volt battery:
pole of the crossover circuit input to of a 9 Volt battery
pole of the crossover circuit input to of a 9 Volt battery
All subwoofers must move uniformly!
Wrong polarity of a subwoofer can totally
equalize the bass sound!
8.2. Insert subwoofer .
8.3. Connect the Midrange and tweeter to the crossover circuit
see diagram on page 11.
3.1. remove the original tray:
drill the plastic bolts, original welded together with the door lining,
on the backside of the door lining. Use a 6mm drill. These drill holes
will be used for later assembly of the panel.
Tip for later retrofit back to original:
The original tray is fastened with short screws and large washers
to these points if retrofitted back to original.
3.1. Place the door lining on a plane surface.
3.2. Dismount the loudspeakers attached to the panel for transport protection.
Retain the screws for later assembly.
3.3. Place the panel without loudspeakers and grill on the door lining and align it:
Reference points for fitting:
Only precise alignment of the panel with the door
lining warrants optimal fit.
align the staybolts of the lower edge of the panel to the 9 fastening
points of the original tray (ref.points 5-13)
Dismount the loudspeakers attached to the panel for transport protection.
Dismount the loudspeakers attached to the panel for transport protection.
13
10 11 129
8
657
Fig.: original door lining with installed tray
76150 - AUDI 80 Convertible/coupé - 10 - © JEHNERT SOUND DESIGN 76150 - AUDI 80 Convertible/coupé - 5- © JEHNERT SOUND DESIGN
3 . Panel alignment
☞
☞
ref. point 5-13
✚ ✚
You should check the polarity of all woofers after having
connected them to the crossover circuit with a 9 volt battery
(input cable on the side of the amplier).
75150

Loudspeaker wiring diagram
Connect all loudspeakers and crossover circuits:
H
i
g
h
P
e
r
f
o
r
m
a
n
c
e
D E S I G N
JEHNERT
SoundSound
Midrange
Speaker
M A D E I N G E R M A N Y
Loudspeaker wiring diagram
Connect all loudspeakers and crossover circuits:
H
i
g
h
P
e
r
f
o
r
m
a
n
c
e
D E S I G N
JEHNERT
SoundSound
Midrange
Speaker
M A D E I N G E R M A N Y
H
i
g
h
P
e
r
f
o
r
m
a
n
c
e
D E S I G N
JEHNERT
SoundSound
Tweeter
S p e a k e r
MA D E I N G E R M A N Y
76150 - AUDI 80 Convertible/coupé - 11 - © JEHNERT SOUND DESIGN
2. Insulation of the car lining
not necessary !
76150 - AUDI 80 Convertible/coupé - 4 - © JEHNERT SOUND DESIGN
Circuit diagram of 3-way crossover / 4x woofer
H
i
g
h
P
e
r
f
o
r
m
a
n
c
e
D E S I G N
JEHNERT
SoundSound
WOOFER
Speaker
MADE IN GERMANY
H
i
g
h
P
e
r
f
o
r
m
a
n
c
e
D E S I G N
JEHNERT
SoundSound
WOOFER
Speaker
MADE IN GERMANY
H
i
g
h
P
e
r
f
o
r
m
a
n
c
e
D E S I G N
JEHNERT
SoundSound
WOOFER
Speaker
MADE IN GERMANY
H
i
g
h
P
e
r
f
o
r
m
a
n
c
e
D E S I G N
JEHNERT
SoundSound
WOOFER
Speaker
MADE IN GERMANY
tweetersubwoofer
SoundSound
D E S I G N
JEHNERT
MitteltönerEingang
3-way crossover circuit
Audi 80 Convertible / Coupé
= set of cables supplied with
amplifier
from 200 Watt RMS / 4 Ohm
recommended power
75150
Removing the grills:
The Velcro fasteners stick together very strongly!
The grills can be removed anytime by carefully lifting them off.
Please, avoid any way of forceful yanking at the grills.
It could break!
9.3.
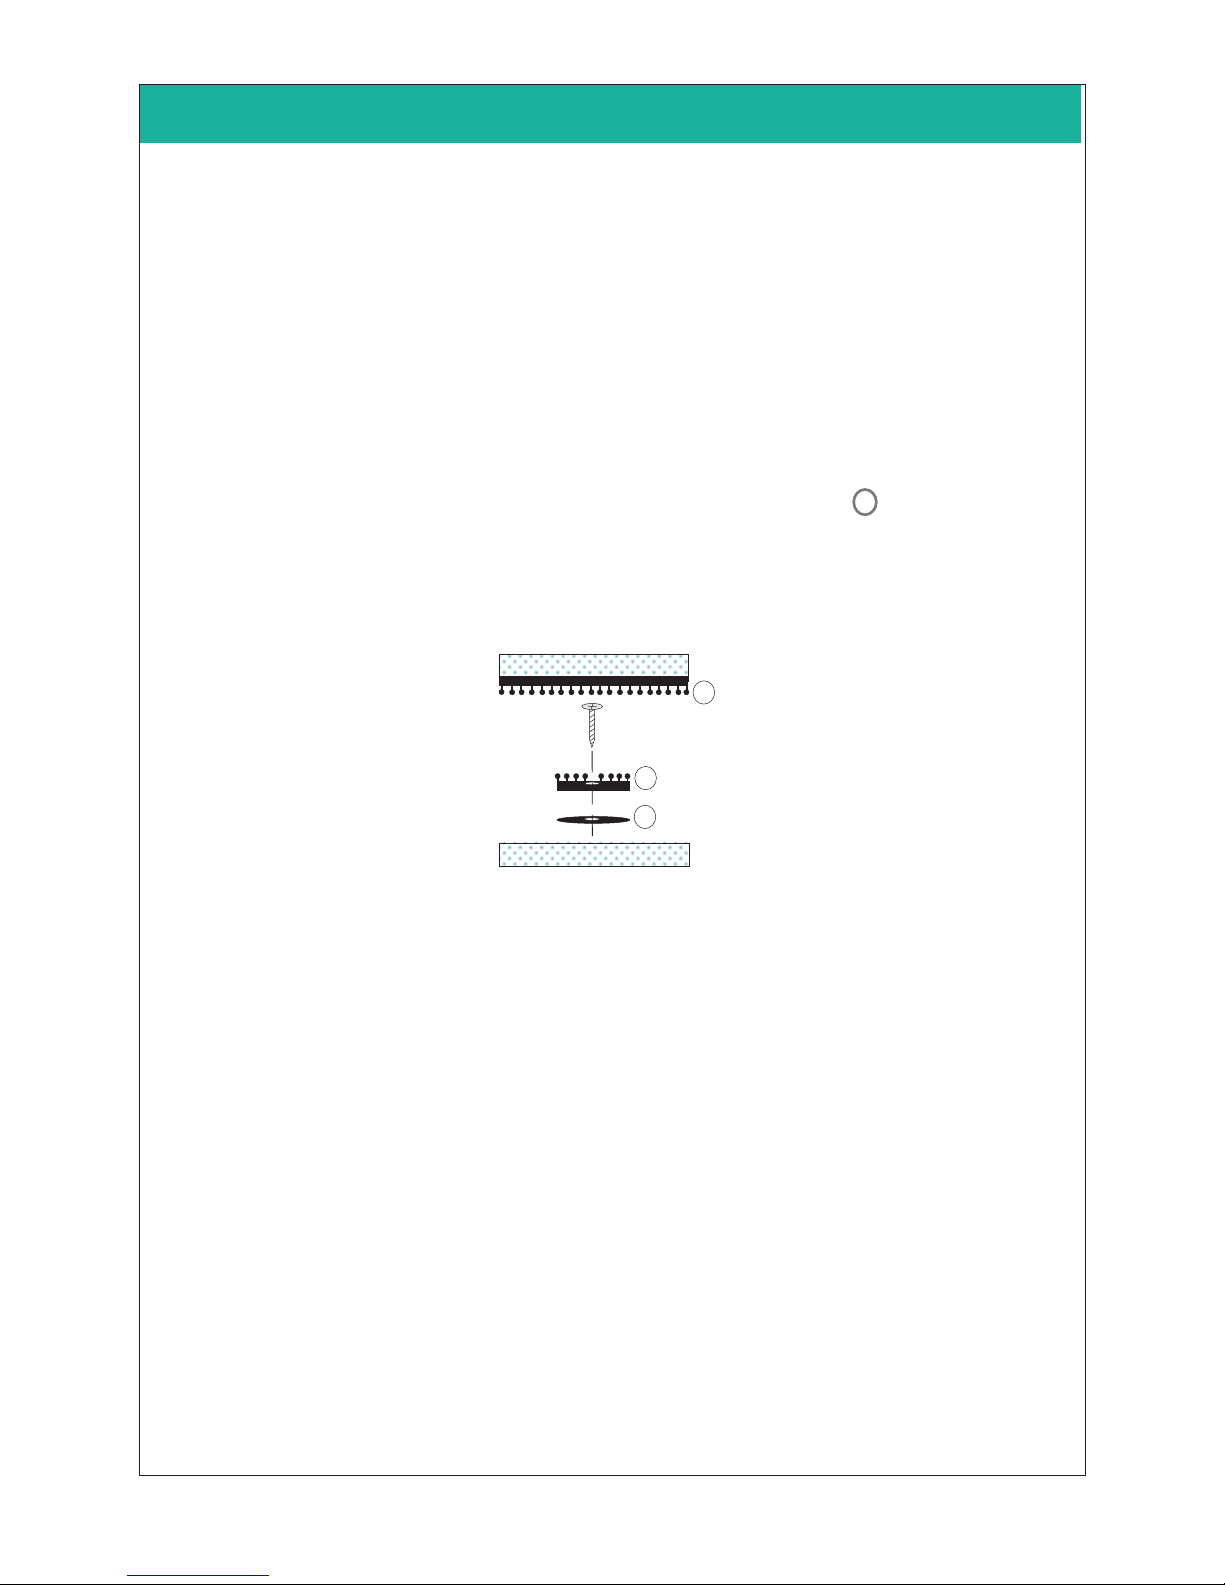
9.2. Our Tip:
If the panel cannot be pressed on completely at some points. . .
Cause: the special form at these points and the resulting differences in
material cross section of the grill.
Solution: the distance can be levelled out with spacers 3 under the
Velcro disc.
(Spacers included with the screw kit)
9.1. Precisely align and carefully press grill into the Velcro fasteners.
The Velcro fastener makes a crackling sound
when it is closed correctly.
1.1. roll down window completely
1.2. remove the door handle (1):
unscrew the 3 screws (A-C) under the door handle (are different according
to year of construction, cross head screws or socket head cap screws)
tip – door handle fastening with socket head cap screws:
the socket head cap screws are difficult to unscrew, check the correct
movable point by turning the screw and pulling the door handle.
1.3. for vehicles with »electric window control«:
push the switch board out of the guide groove in the door handle and
unplug the cables
please observe: some cables on this plug are permanent current
carrying and not protected by fuses.
Short circuits may damage the window electronic!!
1.4. unscrew the screw on the door latch lever (3) and remove the door latch lever.
1.5. remove the adhesive tape underneath the sheet metal clamp (fastening for
the cover of the Bowden pull wire). Hang out the Bowden pull wire for the
door latch.
1.6. remove the chromium cover and the guide contact on the outer door side (2)
1.7. pull the door-lining upward away from the inner door metal
A
B
C
1 . Disassembly of the door lining
76150 - AUDI 80 Convertible/coupé - 3 - © JEHNERT SOUND DESIGN 76150 - AUDI 80 Convertible/coupé - 12 - © JEHNERT SOUND DESIGN
☞
☞
9. Installation of the speaker’s grill:
grill
2 self-adhesive Velcro-strip
1 Velcro fastener
3 Washer M4 ø 20 as spacer
doorpanel
75150

Packing unit Check list
door panel, covered (right / left)
Speaker grill, covered (right / left)
Tweeter 26 mm
Tweeter mounting bowl (with 6Ktn.Screw M4x8 u. Washer ø12mm)
Midrange 100 mm Q assembly ring
woofer 160 mm (each mounted on the panel with 2 Sheet metal-screws)
Crossover (right / left)
standart cables for subwoofer (right / left)
Hardware bag:
Flat head screws, M 4 x 50
Hex nut M 4
Washer Ø 12mm (f.flat head screws, lower edge of panel)
Washer Ø 20mm (f.head screws M4x50 on the top )
Washer Ø 20mm as spacer for Velcro fastener
Sheet metal screws,black 3,9x13 (f. woofer)
Velcro strip à 2,5 cm (reserve)
Preassembled hardware:
Velcro fastener plus strips
Sheet metal screws, black 3,9x13(f. subwoofer)
Flat head screws, M 4 x 40
Flat head screws, M 4 x 50
The product was carefully packed and checked for its completeness. If you find anything missing, damaged or
defective, please notice our guarantee services on the back of these assembly instructions.
Packing list
76150 - AUDI 80 Convertible/coupé - 13 - © JEHNERT SOUND DESIGN 76150 - AUDI 80 Convertible/coupé - 2 - © JEHNERT SOUND DESIGN
2
2
2
2
2
8
2
2
8
26
18
8
2
16
4
10
16
10
8
Technical information
Equipment: without co-passenger airbag,
electric and/ or mechanical window control
Model/ year : AUDI 80, type 89
Insulation: Insulation not necessary
Note about setting: To obtain optimal stereoscopic sound, all settings
on the radio (bass, treble, loudness etc) should be
set to zero or neutral.
Recommended
amplifier power : from 2x 200 - 360 Watt RMS / 4 Ohm
Metal cutwork : not necessary
Cut-outs for loudspeaker/ 4 x 144mm (max.outer dimensions subwoofer 165 mm)
each side (max.installation depth subwoofer 65 mm)
only compatible with JEHNERT Sound System
Sound-System: 3-ways
4 x 160 mm subwoofer/ side
1 x 100 mm midrange / side
1 x 26 mm tweeter / side
car-customized crossover network
max.continuous Watt/RMS: 2 x 300/500Watt
car specific frequency range: 47-22.000 Hz
Total impedance: 4 Ohm
Time for Installation car hifi-specialist: 4 hours
We reserve the right to make technical changes, as well as development.
75150

Packing list ..........................................................................
1. Disassembly of the door lining ..............................................
2. Insulation of the door lining / car doors ................................
3. Panel alignment / reference points ........................................
4. Handling of door lining / Panel installation - Fastening ...........
5. Tweeter - and Midrange Installation / Loudspeaker cables.........
6. Crossover circuit - Loudspeaker cables....................................
7. Installation of the door lining onto the car door ......................
8. Speaker connection ..............................................................
Loudspeaker wiring diagram .................................................
9. Installation of the speaker-grills .............................................
Technical information ...........................................................
Service / fault diagnoses .......................................................
Guarantee ...........................................................................
Steffen Kretzschmar
Saddlery / Completion
page
2
3
4
5
6
7
8
9
10
11
12
13
14
15
76150 - AUDI 80 Convertible/coupé - 14 - © JEHNERT SOUND DESIGN 76150 - AUDI 80 Convertible/coupé - 1 - © JEHNERT SOUND DESIGN
Technical questions Hotline: 0049-711-77 97 87-87
We thank you for your support!
Mirko Schwarz
Development
It is our pleasure to help you!
Dear customer,
We have taken great care to explain the procedures in our installation instructions
more detailed and “step by step”.
Your tips and suggestions help us for the future to eliminate uncertainties and
misinterpretation. Therefore, please inform us. what you would like to be improved
or what we should still change.
Marc Sitter
Export / Service
Marc Sitter
Export / Service
The following notes serve to help troubleshoot and eliminate faults or malfunctions
on your own. If the following measures are not effective, please call us.
What can it be if ... possible cause/ solution
..it doesn’t sound right. wrong polarity on the subwoofers ( page 10)
crosover circuit attached wrong ( page 11)
Doorlining and moisture protection foil
not cut out ( page 5+10)
amplifier doesn’t have enough power( page 13)
amplifier connection
...it doesn’t fit correctly. door panel customization ( page 8)
installation of the panels on the door lining (page 9)
.....grills do not hold. observe notes on page 12!
Self-help and fault diagnosis
Contents
Particularly important notes contain the following remarks:
☞
Please follow the installation instructions
“step by step”
and check the package contents
Technical questions: Hotline 00 49 71 58 / 9 56 99-0
75150

SoundSound
D E S I G N
JEHNERT
AUDI 80 convertible / coupé
Guarantee
☞
without co-passenger airbag
2002/by.aj/FH - 15 -
Installation instructions
instal.Instr. item-no. 76150/FH10/02
item-no. 76150
Jehnert Sound Design
development and
production of
Car-Audio-Systems
Heinrich-Hertz-Str. 11
70794 Filderstadt
Tel.: 0711-77 97 87- 87
Fax: 0711-77 78 921
e-mail: [email protected]
www.jehnert.com
We grant a manufacturers guarantee of 2 years starting from the date of purchase
of the door panels or sound system from the dealer.
Within this guarantee period to our choice we either repair or replace free of
charge all defects due to material or workmanship.
Exempt from this guarantee are damages due to improper use, wear and tear or
damages which have to be led back on wear or interventions by third parties.
The guarantee does not cover subsequent damages or such defects that only
insignificantly impair the value or the usability of the panels/sound system.
The guarantee does not cover damages due to external influences.
Panels with additional or wrong assembly drill holes cannot be returned.
These are damages to the panel which cannot be repaired again.
Table of contents
Other JEHNERT SOUND DESIGN Car Speakers manuals


