JEHNERT SOUND DESIGN 75170 User manual
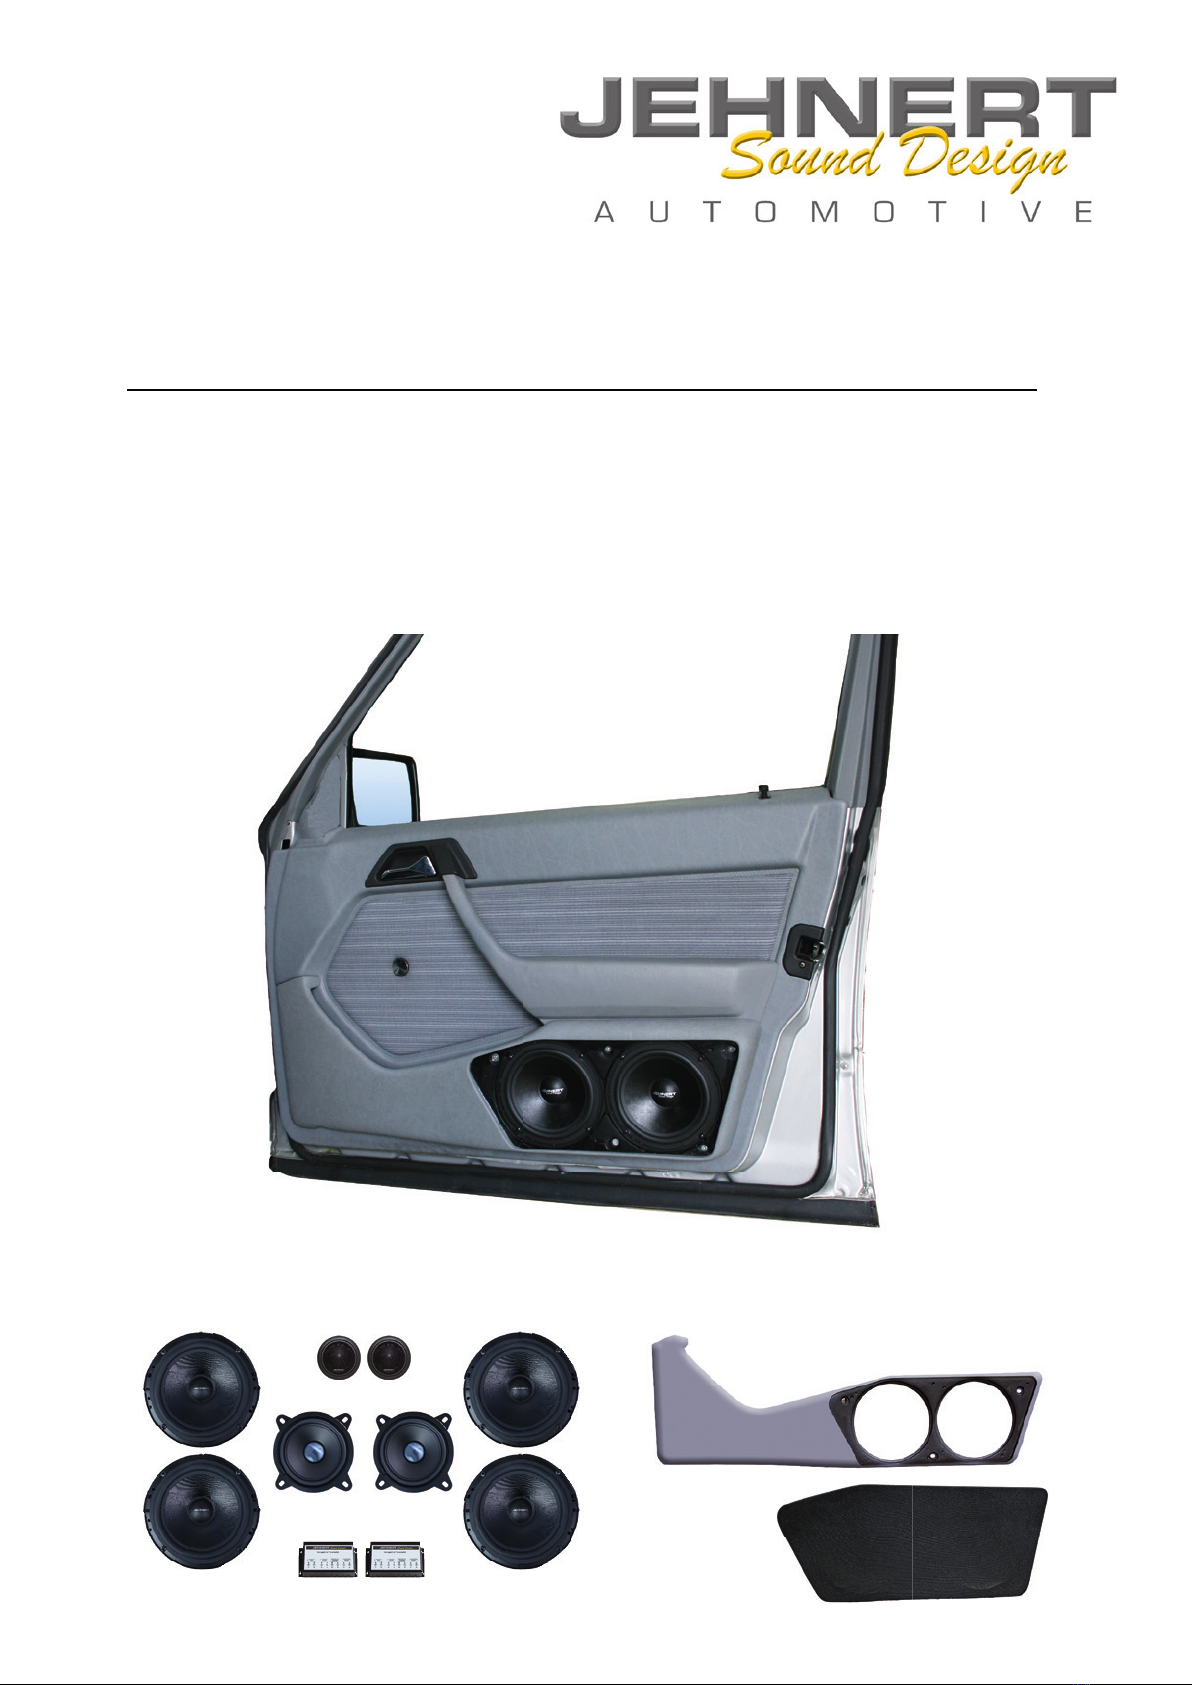
ASSEMBLY INSTRUCTION 75170
MERCEDES E-CLASS
SEDAN W124
Assembly instruction
Status: 03.05.2022
Mercedes E-Class
W124 Doorboard Art. No. 75170
Jehnert Sound Design I Im Michelreis 14 I 72124 Pliezhausen I phone: 07127-93457-0 I sounddesign@jehnert.de I www.jehnert.de
Seite
Packing list 2
Disassembly of the door panel 3
Disassembly of the original card pocket 4
Machining the door panel 5
Door panel insulation 6
Crossovers, loudspeaker cables, midrange-tweeter mounting 7
Mounting the door panel on the vehicle doors 8
Panel mounting on the vehicle doors 9
Loudspeaker connection
Loudspeaker connection -wiring diagram
10
11
Mounting the speaker covers 12
Technical information 13
Service Troubleshooting 14
Warranty 15
Assembly instruction
Status: 03.05.2022
Mercedes E-Class
W124 Doorboard Art. No. 75170
Jehnert Sound Design I Im Michelreis 14 I 72124 Pliezhausen I phone: 07127-93457-0 I sounddesign@jehnert.de I www.jehnert.de
Packaging unit Checklist
Door panels, covered (right / left) 2
Cover panels, covered (right / left) 2
Tweeter 26 mm 2
Midrange 100 mm mounted with mounting ring 2
Adapter ring for midrange and tweeter 2
Woofer 165mm 4
Crossovers (right / left) 2
Small parts bag: Checklist
screws M4x45 4
screws M4x70 4
Lens head 3.9x19 4
Lens head 3.9x16 4
small washer 8
M4 Nuts 8
The products were carefully packed and checked for completeness. In the event of shortages, damage or defects
please refer to our warranty on the back of these assembly instructions.

Assembly instruction
Status: 03.05.2022
Mercedes E-Class
W124 Doorboard Art. No. 75170
Jehnert Sound Design I Im Michelreis 14 I 72124 Pliezhausen I phone: 07127-93457-0 I sounddesign@jehnert.de I www.jehnert.de
1 . Disassembly of the door panel
1. lower the window pane completely.
2nd mirror triangle: Press out the plastic safety
catch with a screwdriver and remove the handle.
3. mirror triangle:
Unclip the cover from the top of the door
frame and pull it out upwards.
4. cover on the inside door actuator
and unscrew the screw on the inside of the handle.
5. unhook the linkage from the door handle
and press the inner door actuator
and remove.
6. window crank: plastic cover
out of the guide according to the arrow (g.) and
and pull it o the shaft.
7. remove the cover on the door lock
and push door panel upwards
and remove.
If the sealing foil on the inner door panel is damaged, it must be replaced before the
be replaced before the door panel is installed.
Assembly instruction
Status: 03.05.2022
Mercedes E-Class
W124 Doorboard Art. No. 75170
Jehnert Sound Design I Im Michelreis 14 I 72124 Pliezhausen I phone: 07127-93457-0 I sounddesign@jehnert.de I www.jehnert.de
2. disassembly of the original card pocket
NOTE RETROFITTING:
The panel dimensions are identical to the original card pocket. This makes
a very simple and problem-free later retrotting is possible.
2.1 Place the door panel on a at surface with the rear side facing upwards.
2.2 The map pocket is xed at the lower edge with 2 plastic rivets on the back of the
on the back of the door trim. Drill these out carefully.*
2.3 Push the plastic holders of the map pocket at the lower edge forward.
to the front. At the same time, lift the map pocket out of the
from the clamps and remove it.
*TIP: Keep the map pocket for possible retting at a later date.

Assembly instruction
Status: 03.05.2022
Mercedes E-Class
W124 Doorboard Art. No. 75170
Jehnert Sound Design I Im Michelreis 14 I 72124 Pliezhausen I phone: 07127-93457-0 I sounddesign@jehnert.de I www.jehnert.de
3. machining of the door panel
3.1 Place the door panel on a at surface.
3.2 Dismantle the speakers attached to the panel to secure them for transport.
(Keep the screws for later assembly).
3.3 Place the panel without loudspeakers on the door panel and align it.
- see xed point lines page 9
3.4 Mark the loudspeaker openings on the door panel.
The size of the cut-outs should be identical to the cut-outs in the panel.
3.5 Remove the panel again. Mark the cutouts for the speaker openings
(see illustration) on the door panel using a jigsaw.
Cutouts vehicle door for woofer
Cutouts for woofer ready mounted

Assembly instruction
Status: 03.05.2022
Mercedes E-Class
W124 Doorboard Art. No. 75170
Jehnert Sound Design I Im Michelreis 14 I 72124 Pliezhausen I phone: 07127-93457-0 I sounddesign@jehnert.de I www.jehnert.de
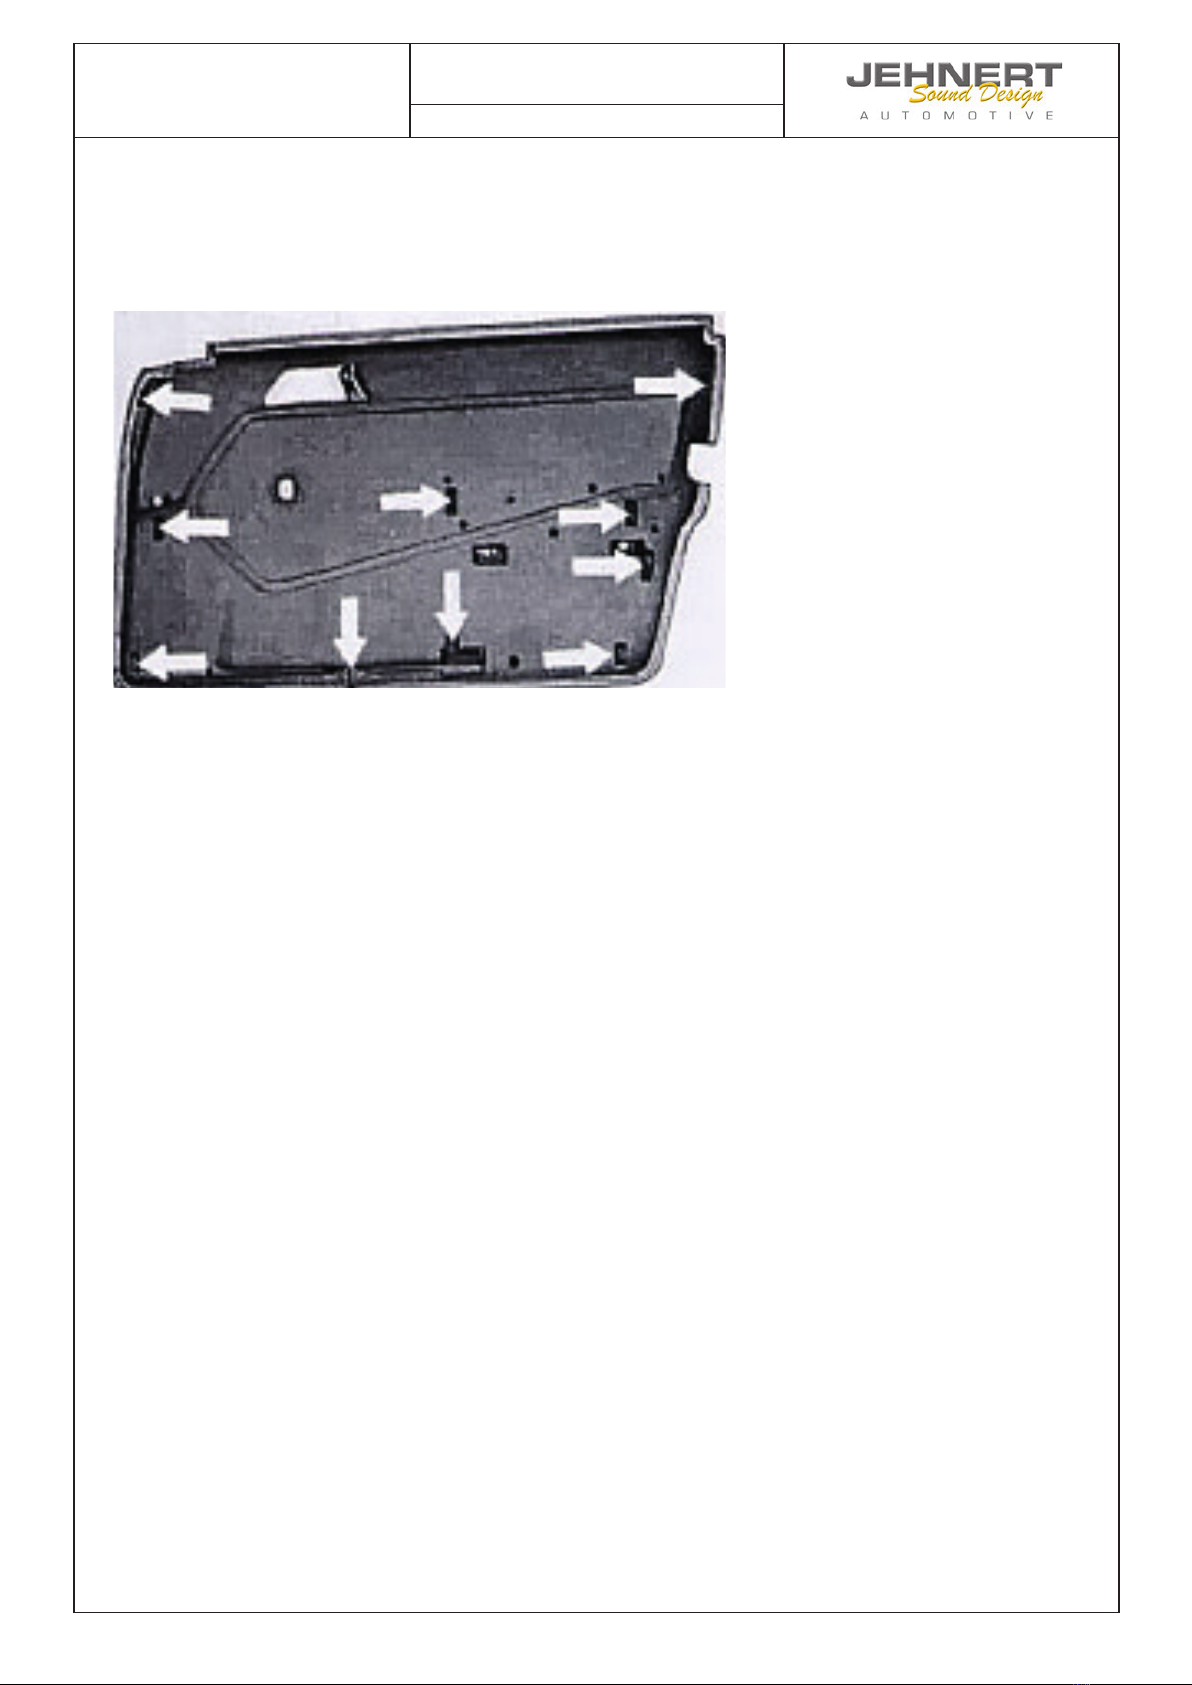
4. insulation of the door panel
Measures against vibration noise:
- Cover the back of the door trim with insulating eece (Order No. 27000) or foam,
(see illustration above) or
- Stabilize the rear side of the door trim with stiening compound (GRP ber ller or similar).
IMPORTANT: Make sure to leave cutouts for door airbag and speakers free!
- Apply self-adhesive bitumen mats / tar mats to the *inside rear side of the door panel (=outer door
skin). (see example below).
- By tapping the vehicle door, vibration noises from door mechanism parts
(e.g. Bowden cables etc.) and wiring harnesses and cover them with foam / felt, Foam rubber or
similar.
- Cut o protruding cable ties (rattling noises!).
- Stick felt or foam under the original wiring harness.
Key Recommendation:
Due to the use of 2 x 165mm woofer / per side, the oscillations of the basses cause vibrations that
can lead to rattling noises in the car door.
ATTENTION / Danger !!!
Do not place any insulating material
behind side airbags (Fig. „B“)
Front
Door panel inside
*Outer door panel =
Rear door panel inside
IMPORTANT:
No damping material behind
- loudspeakers
- Door releases
- Make the hole for the fastening clip
(Fig. „A“)
Fig.: Example of a vehicle door - insulation with bitumen mats / tar mats
Rain protection lm
Assembly instruction
Status: 03.05.2022
Mercedes E-Class
W124 Doorboard Art. No. 75170
Jehnert Sound Design I Im Michelreis 14 I 72124 Pliezhausen I phone: 07127-93457-0 I sounddesign@jehnert.de I www.jehnert.de
5. crossover assembly / loudspeaker cables /
Mid-tweeter mounting in dashboard
5.1 Crossovers:
5.2 Speaker lines:
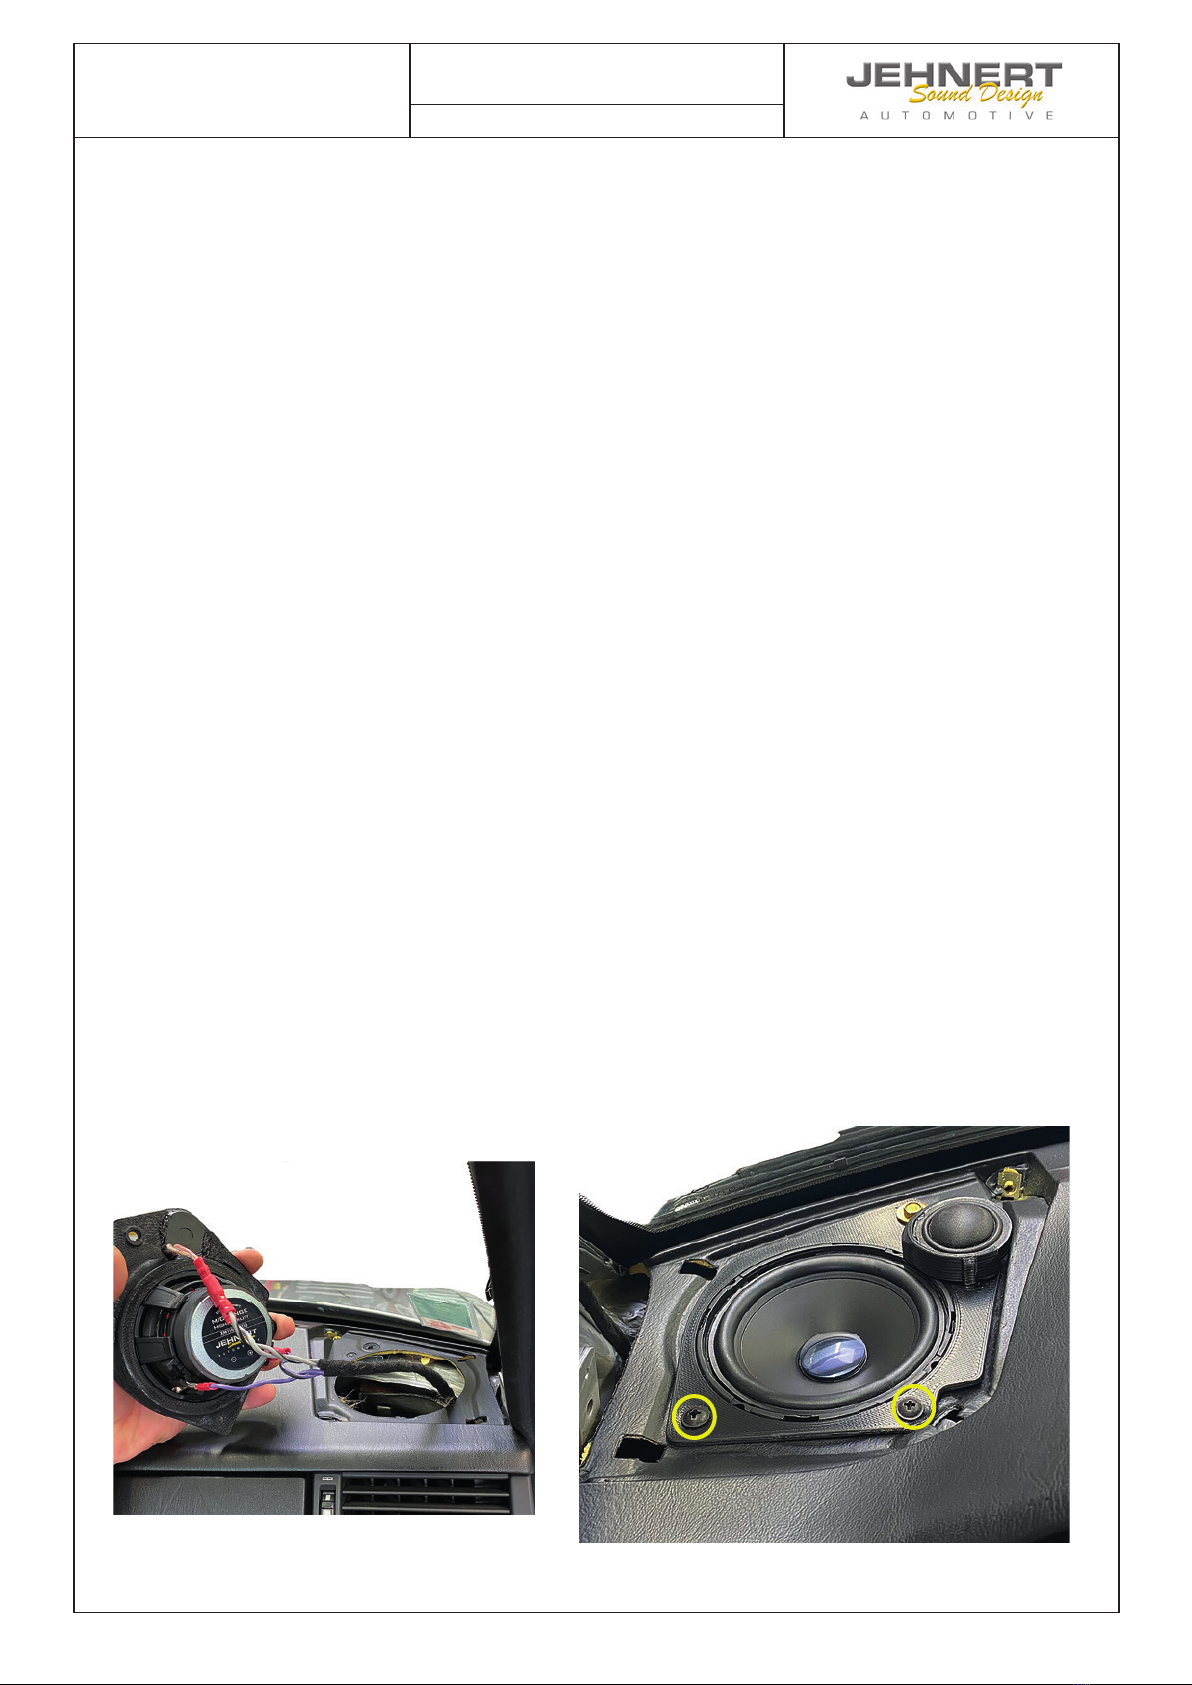
5.3. midrange/tweeter mounting in the dashboard:
5.1.1 Pre-wire the crossovers - see connection diagram on page 11.
5.1.2. Recommendation crossover mounting location: Under the dashboard
or behind the footwell trim on the passenger side.
Insert midrange/tweeter with the supplied adapter rings
in the dashboard instead of the factory speaker.
4x 3.9x16 Lens head
5.2.1. Run 1 x speaker cable (1.5 - 4 mm2 ) from the amplier to the crossover.
5.2.2. Lead 1 x speaker cable (1.5 - 4 mm2 ) from the crossover into the vehicle doors.
(cf. connection diagram page 11)
IMPORTANT Vehicle doors:
- Loosen rain protection lm
- To avoid vibration noises, tighten all factory fastening crews on the inner door panel.
- Ensure that the loudspeaker cables are not squeezed by the window mechanism etc.
are squeezed.
5.2.3. lead 2x speaker cables (1.5 - 4 mm2) - for midrange speaker and tweeter - into the dashboard.
Assembly instruction
Status: 03.05.2022
Mercedes E-Class
W124 Doorboard Art. No. 75170
Jehnert Sound Design I Im Michelreis 14 I 72124 Pliezhausen I phone: 07127-93457-0 I sounddesign@jehnert.de I www.jehnert.de
6. mounting the door trim on the vehicle doors.
The mounting of the door panels is done directly on the mounted
door panel on the vehicle door.
6.1 Insert the processed door lining from above into the plug-in clips on the
window shaft with the hooks, inserting the locking button into the door lining.
Note lower mounting hook for original card pocket:
These are not used. The panels replace the factory map pocket
- The panel fastening (see p. 9) is used to fasten the lower part of the
door panel is fastened to the inner door panel.
6.2. hang linkage on door handle and insert inner door panel (3 slots).
6.3 Fasten the handle on the inside with a screw.
TIP: The screw on the handle is microencapsulated. It must either be
replaced or screwed in with screw locking compound.
6.4 Continue to fasten in reverse order as described on page 3.
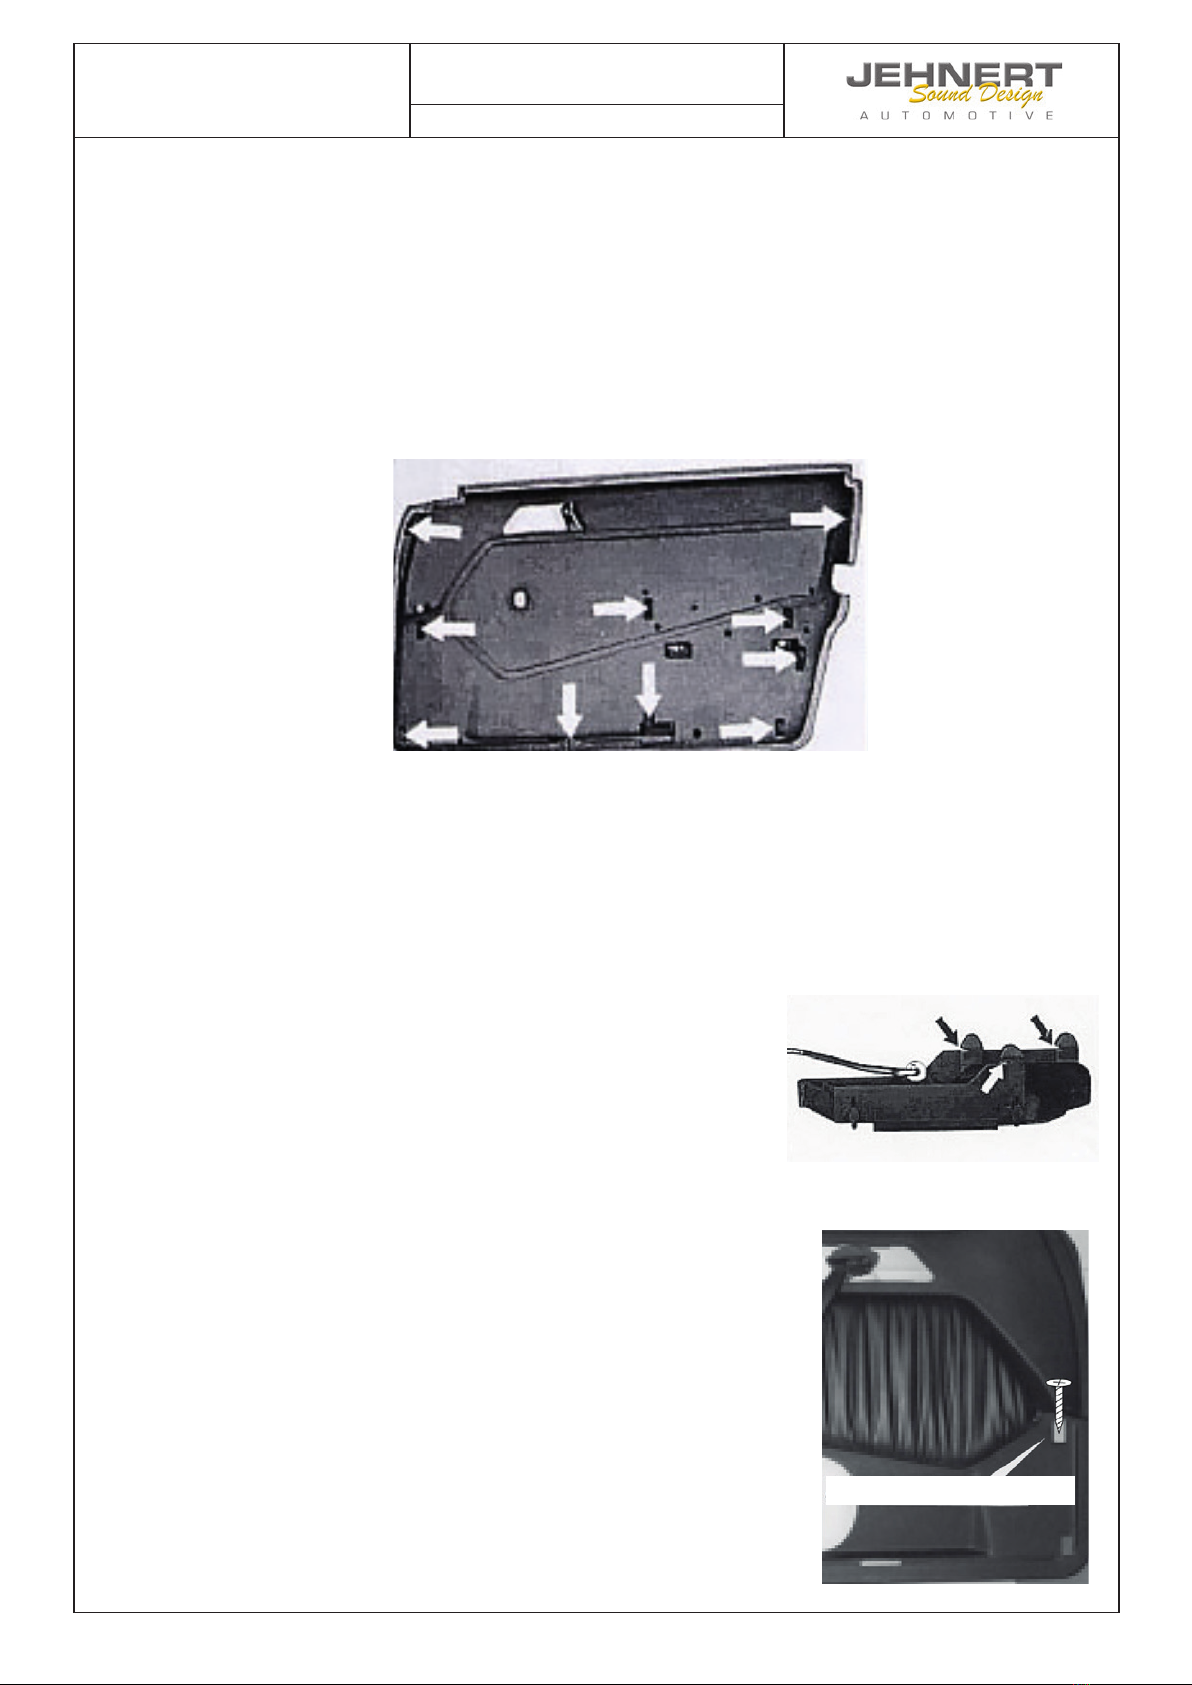
6.5. IMPORTANT - additional xing point
when mounting the door trim:
At the upper front original fastening point of the map pocket
(see illustration), screw the supplied sheet metal screw 3.9 x 13
through the door panel into the inner door panel.
Sheet metal screw 3,9x13
Assembly instruction
Status: 03.05.2022
Mercedes E-Class
W124 Doorboard Art. No. 75170
Jehnert Sound Design I Im Michelreis 14 I 72124 Pliezhausen I phone: 07127-93457-0 I sounddesign@jehnert.de I www.jehnert.de
7 . Panel mounting on the vehicle door
Fixed point lines for adjustment:
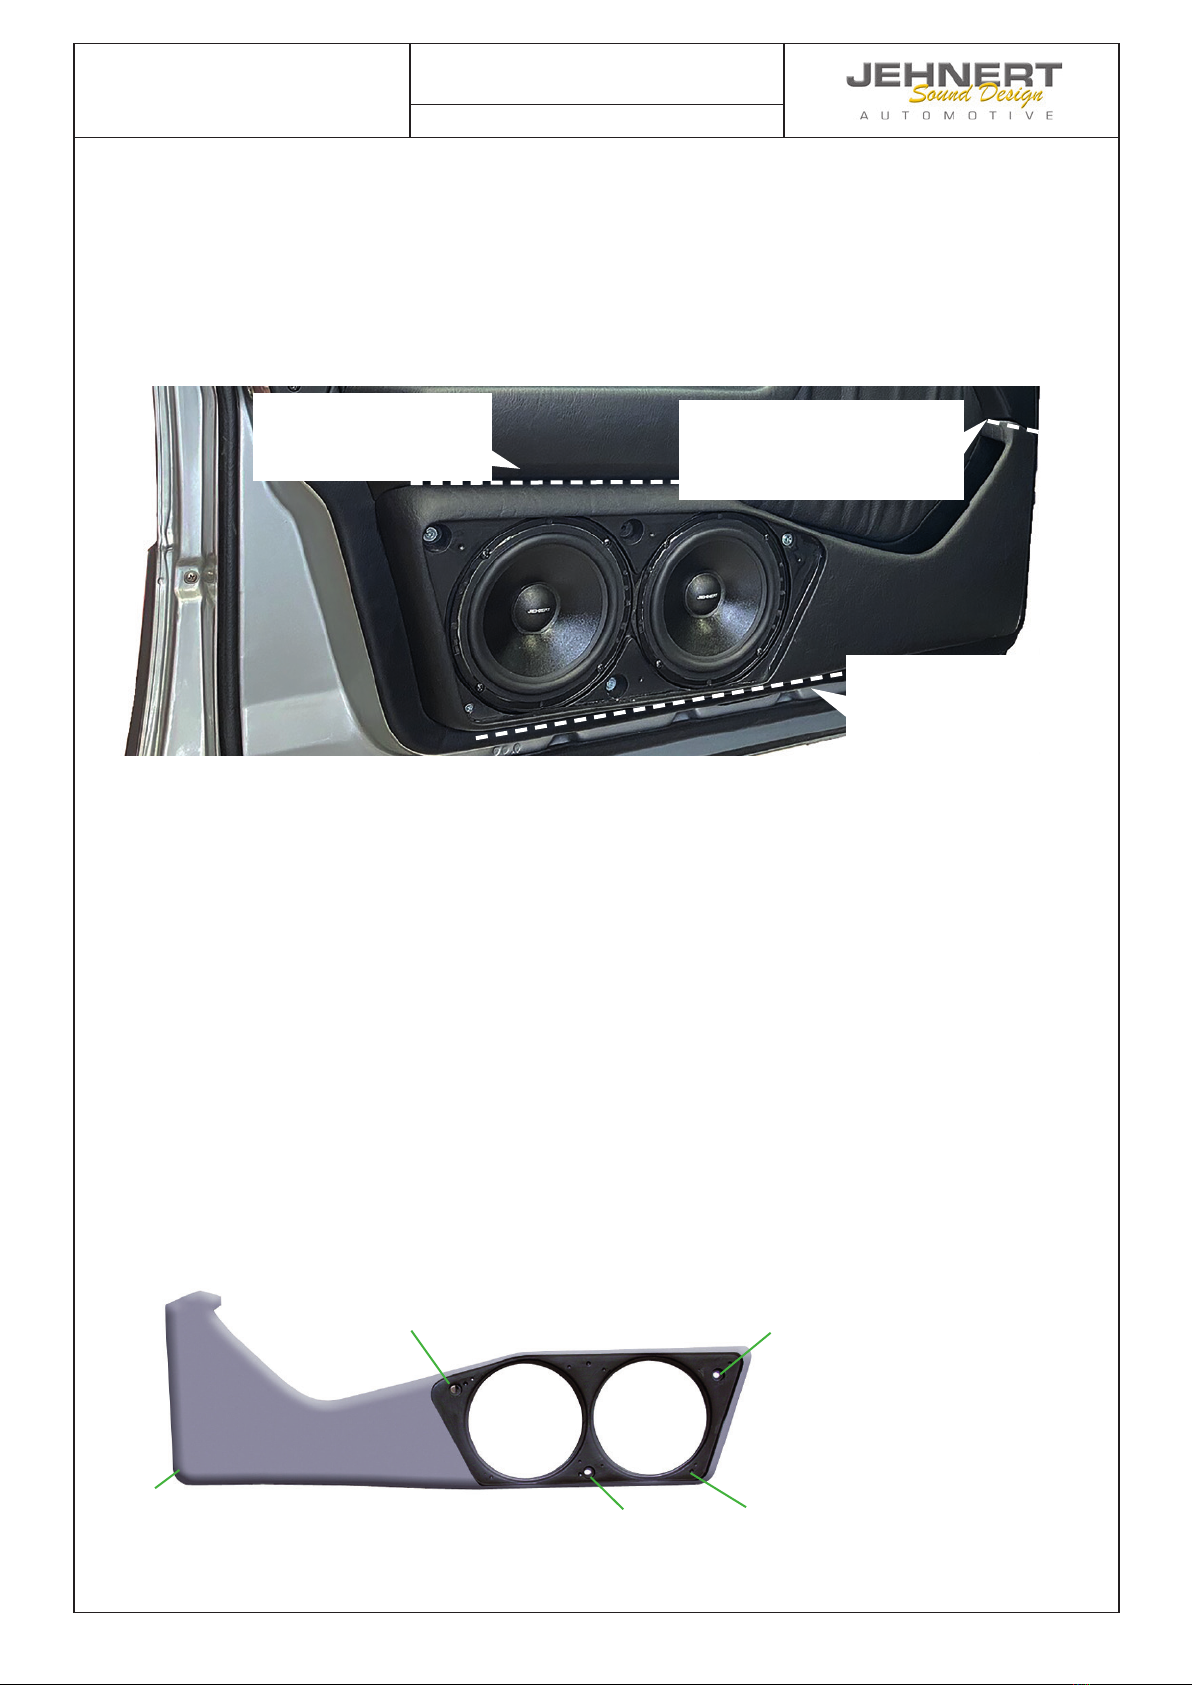
7.1 Place the panel without loudspeaker and cover on the mounted door panel and align it:
Fixed point line 1: Adjust the upper edge of the panel directly under the armrest.
Fixed point line 2: Insert the„nose“ on the upper edge of the panel exactly into the opening above
the front edge of the original card pocket.
Fixed point line 3: The lower edge of the panel and the lower edge of the door trim are ush.
7.2 Screw the supplied Spax and sheet metal screws directly through the panel and door trim into
the inner door panel.
Caution: When screwing in the screws, make sure that no cables, electrical or mechanical parts in
the vehicle door are damaged, electrical or mechanical parts in the vehicle door are damaged.
Secure the door panel with the door trim by screwing it in lightly.
Check t once again and tighten screws carefully.
Only the exact adaptation of the panel to the door trim
ensures an optimal t
All cut edges of the panel must be in contact with the door
trim all around without any gap.
M4x 45
small washer -> TV
M4x 70
small washer
B
M4x 70
M4x 45
small washer
3,9 x19
Lens head
B =predrill
+ large washer + M4
B
B
Fixed point line 3
Fixed point line 2
Fixed point line 1
Slide the„nose“ on the panel directly into
the opening in the door panel
The panel runs
below the armrest
Lower edge of door trim and
Panel lower edge close ush

Assembly instruction
Status: 03.05.2022
Mercedes E-Class
W124 Doorboard Art. No. 75170
Jehnert Sound Design I Im Michelreis 14 I 72124 Pliezhausen I phone: 07127-93457-0 I sounddesign@jehnert.de I www.jehnert.de
8. loudspeaker connection
8.1. rain protection foil to further improve the acoustic coupling to the door volume, cut
in a u-shape behind the woofers.
8.2 Insert woofer and wire all speakers to the crossover (parallel circuit - see p.11 for wiring
diagram).
Final inspection after door panel assembly:
Check all functions of controls such as seat adjustment,
glove compartment opening, window lifter, etc. check.
Note: Before connecting all woofers to the crossover, the polarity of all woofers should be
checked on a 9 volt battery:
Pole of the FW input to from 9 V battery
Pole of the FW input to from 9 V battery
All woofers must resonate evenly during this check!
A bass driver with reversed polarity can cancel out the entire bass response!
+ +
- -

Assembly instruction
Status: 03.05.2022
Mercedes E-Class
W124 Doorboard Art. No. 75170
Jehnert Sound Design I Im Michelreis 14 I 72124 Pliezhausen I phone: 07127-93457-0 I sounddesign@jehnert.de I www.jehnert.de
Loudspeaker connection - circuit diagram
Circuit diagram 3-way crossover / 2x woofer
Amplfi er

Assembly instruction
Status: 03.05.2022
Mercedes E-Class
W124 Doorboard Art. No. 75170
Jehnert Sound Design I Im Michelreis 14 I 72124 Pliezhausen I phone: 07127-93457-0 I sounddesign@jehnert.de I www.jehnert.de
9. speaker cover panels:
9.1 The Velcro fasteners are already completely mounted on the cover panels ex works.
IMPORTANT :
The Velcro fasteners adhere very strongly!
The cover panels therefore only after complete assembly of the door panels
and sound system rmly!
Tip:
... if the cover panel cannot be pressed onto the panel in some places
panel can be pressed tightly ...
Cause: The special shape of the door panels at this point and the resulting dierent material
thicknesses of the cover panels.
resulting dierent material thicknesses of the cover panels.
Solution: With an M 4 washer ø 20mm (3) under the
Velcro plate, this distance is easily and quickly compensated:
Removing the cover panels:
The cover panels can be removed at any time by carefully loosening the Velcro fasteners.
at any time by carefully loosening the Velcro fasteners.
CAUTION:
Please avoid any kind of „ forcible tearing „ on the diaphragms (risk of breakage !)
self-adhesive velcro tape
Velcro pressure closure
Washer M4 20 as distance aid
Cover plate
Door panel

Assembly instruction
Status: 03.05.2022
Mercedes E-Class
W124 Doorboard Art. No. 75170
Jehnert Sound Design I Im Michelreis 14 I 72124 Pliezhausen I phone: 07127-93457-0 I sounddesign@jehnert.de I www.jehnert.de
Technical information:
Vehicle equipment: power and mechanical windows
Model/ Model Year: W 124 Sedan / Estatel
Insulation of the doors: absolutely necessary ! - see page 6
Setting Notice: To achieve the optimum surround sound,
all settings on the radio (bass, treble, loudness
(bass, treble, loudness, etc.) to zero or neutral.
neutral
Recommended amplier power: from 2x 100 - 200 Watt sinus / 2 Ohm
Sheet metal cutting work: omitted
Speaker cutouts per side: 2 x 144mm (max.outer dimension woofer 165 mm)
per side (max.mounting depth woofer 70 mm)
Euro standard basket suitable
door panel is retrottable!
Sound systems: 3-way
2 x 160 mm woofer / side
1 x 100 mm midrange / side
1 x 26 mm tweeter / side
vehicle specic crossover
Power handling continuous / music: 2 x 150/200Watt
Frequency range: 35-22.000 Hz
Impedance: 2 Ohm
We reserve the right to make changes in the interest of technical progress.

Assembly instruction
Status: 03.05.2022
Mercedes E-Class
W124 Doorboard Art. No. 75170
Jehnert Sound Design I Im Michelreis 14 I 72124 Pliezhausen I phone: 07127-93457-0 I sounddesign@jehnert.de I www.jehnert.de
Self-help and troubleshooting
What can it be ... Possible cause / solution
if it doesn‘t sound right Woofer polarity reversed ( page 10)
Crossover incorrectly connected ( page 11)
Door trim and rain protection foil
not cut out ( page 5+10)
Amplier too little power ( page 13)
Amplier connection
to explain„step by step“. Fixed points door panel adjustment ( page 6)
Mounting the panels on the TV ( page 7)
Covers do not adhere Observe notes page 12
Vibration noise Insulation see notes page 6
The following instructions are intended to help you correct errors or malfunctions yourself.
If the following remedies do not work, please call us:
Assembly instruction
Status: 03.05.2022
Mercedes E-Class
W124 Doorboard Art. No. 75170
Jehnert Sound Design I Im Michelreis 14 I 72124 Pliezhausen I phone: 07127-93457-0 I sounddesign@jehnert.de I www.jehnert.de
As the manufacturer, we provide a warranty for these door panels or sound system for 2 years,
calculated from the date of purchase from the dealer.
Within this warranty period, we will, at our option, repair or replace free of charge all defects that are based on ma-
terial or manufacturing defects. Excluded from the warranty are damages that are due to improper use, wear and
tear or to
interventions by third parties.
The warranty does not cover consequential damage or defects that reduce the value or usability of the
or the usability of the panels / sound system only insignicantly.
A warranty obligation is not triggered by damage caused by external inuences.
caused by external inuences. Panels with additional or wrong mounting holes are excluded from exchange.
or incorrect mounting holes. This is damage to the panel, which can not be repaired.
Warranty
Notes:
Our team in Pliezhausen will be happy to provide you with advice and assistance at any
time:
JEHNERT Sound Design
»Development and production of car audio systems«
Inh. Hans-Peter Jehnert
Im Michelreis 14
72124 Pliezhausen
Tel.: 07127-93457-0
Fax: 07127-93457-10
www.jehnert.de
Table of contents
Other JEHNERT SOUND DESIGN Car Speakers manuals

JEHNERT SOUND DESIGN
JEHNERT SOUND DESIGN 65740 User manual

JEHNERT SOUND DESIGN
JEHNERT SOUND DESIGN 68501 User manual

JEHNERT SOUND DESIGN
JEHNERT SOUND DESIGN VW T5 User manual

JEHNERT SOUND DESIGN
JEHNERT SOUND DESIGN AUDI 80 convertible User manual

JEHNERT SOUND DESIGN
JEHNERT SOUND DESIGN 75151 User manual


