JEHNERT SOUND DESIGN 75075 User manual

SoundSound
D E S I G N
JEHNERT
Daimler Chrysler W 129 SL Conv.
Guarantee
�
2002/by.AJ/FH - 15 -
Installation instructions
instal.Art. 75075/76075/FH07/02
item-Nr. 75075 up to Bj.`96
76075 from Bj.`96
Jehnert Sound Design
development and
production of
Car-Audio-Systems
Heinrich-Hertz-Str. 11
70794 Filderstadt
Tel.: 0049-711-77 97 87- 87
Fax: 0049-711-77 78 921
www.jehnert.com
We grant a manufacturers guarantee of 2 years starting from the date of purchase
of the door panels or sound system from the dealer.
Within this guarantee period to our choice we either repair or replace free of
charge all defects due to material or workmanship.
Exempt from this guarantee are damages due to improper use, wear and tear or
damages which have to be led back on wear or interventions by third parties.
The guarantee does not cover subsequent damages or such defects that only
insignificantly impair the value or the usability of the panels/sound system.
The guarantee does not cover damages due to external influences.
Panels with additional or wrong assembly drill holes cannot be returned.
These are damages to the panel which cannot be repaired again.
76075 - from Bj. 96
In-door-assembly-Set
75075 - up to Bj. 96
Production of
Car-Audio-Systems
Porsche Str. 15
70794 Filderstadt
Tel. 00 49 71 58 / 9 56 99-0
Fax 00 49 71 58 / 9 56 99-10
e-mail: [email protected]
www.jehnert.com

Steffen Kretzschmar
Saddlery / Completion
page
Contents
Packing list ..........................................................................
1. Disassembly of the door lining SL mod.up to 96 - Art. 75075...
2. Disassembly of the door lining SL mod.from 96 - Art. 76075....
3. Tweeter Installation .............................................................
4. Handling of door lining / Panel installation - Fastening ...........
5. Loudspeaker cables .............................................................
6. Insulation of the door lining / car doors .................................
7. Installation of the door lining ................................................
8. Crossover circuit - Speaker connection ..................................
Loudspeaker wiring diagram .................................................
9. Installation of the speaker-grills .............................................
Technical information ...........................................................
Service / fault diagnoses .......................................................
Guarantee ...........................................................................
2
3
4
5
6
7
8
9
10
11
12
13
14
15
75075/76075 - SL Cabrio - 14 - © JEHNERT SOUND DESIGN75075/76075 - SL Cabrio - 1 - © JEHNERT SOUND DESIGN
Technical questions Hotline: 0049-711-77 97 87-87
We thank you for your support!
Mirko Schwarz
Development
It is our pleasure to help you!
Dear customer,
We have taken great care to explain the procedures in our installation instructions
more detailed and “step by step”.
Your tips and suggestions help us for the future to eliminate uncertainties and
misinterpretation. Therefore, please inform us. what you would like to be improved
or what we should still change.
Marc Sitter
Service
Marc Sitter
Service
The following notes serve to help troubleshoot and eliminate faults or malfunctions
on your own. If the following measures are not effective, please call us.
What can it be if ... possible cause/ solution
..it doesn’t sound right. wrong polarity on the subwoofers ( page 10)
crosover circuit attached wrong ( page 11)
Doorlining and moisture protection foil
not cut out ( page 5+10)
amplifier doesn’t have enough power( page 13)
amplifier connection
...it doesn’t fit correctly. door panel customization ( page 8)
installation of the panels on the door lining (page 9)
.....grills do not hold. observe notes on page 12!
vibrations insulation, see notes on page 7
Self-help and fault diagnosis
Particularly important notes contain the following remarks:
�
Please follow the installation instructions
“step by step”
and check the package contents
5 + 6

Packing unit Check list
adapter plate (right / left) 2
Tweeter 26mm with perforated Sheet metal,6Ktn.Screw M4x8,Washer ø12mm) 2
Art.Nr. 75075: hot melt adhesive-stics (f.mounting adapter plate) 4
Art.Nr. 76075: hot melt adhesive-stics (f.mounting adapter plate) 2
Midrange 100 mm Q (each mounted on the panel with 4 Sheet metal-screws) 2
Neodym-flat-woofer 200 mm (each mounted with 4 flat head screws M4x20 4
Crossover (right / left) 2
The product was carefully packed and checked for its completeness. If you find anything missing, damaged or
defective, please notice our guarantee services on the back of these assembly instructions.
Packing list 75075 / 76075
75075/76075 - SL Cabrio - 13 - © JEHNERT SOUND DESIGN 75075/76075 - SL Cabrio - 2 - © JEHNERT SOUND DESIGN
Technical information
Equipment: electric window control
Model/ year : 75075 up to models 1996
76075 models from 1996
Insulation: is recommended
Note about setting: To obtain optimal stereoscopic sound, all settings
on the radio (bass, treble, loudness etc) should be
set to zero or neutral.
Recommended
amplifier power : from 2x 100 - 130 Watt RMS / 4 Ohm
Metal cutwork : not necessary
Cut-outs for loudspeaker/
each side
)
Sound-System: 3-ways
1 x 200 mm subwoofer/ side
1 x 100 mm midrange / side
1 x 26 mm tweeter / side
car-customized crossover network
max.continuous Watt/RMS: 2 x 130/200Watt
car specific frequency range: 46-22.000 Hz
Total impedance: 2 Ohm
Time for Installation car hifi-specialist: 2 hours
We reserve the right to make technical changes, as well as development.
2
4
1
4
4
2
2
4
Art.-Nr. 75075: hot melt adhesive-stics (f. mounting adapter plate)
Art.-Nr. 76075: hot melt adhesive-stics (f. mounting adapter plate)
screw M4 x 20
nut M4
sheet metal screw 3,9 x 16
sheet metal nut Ø 3,9
perforated tape
Packing unit Check list
adapter plate (right / left) 2
Tweeter 26mm with perforated Sheet metal,6Ktn.Screw M4x8,Washer ø12mm) 2
Art.Nr. 75075: hot melt adhesive-stics (f.mounting adapter plate) 4
Art.Nr. 76075: hot melt adhesive-stics (f.mounting adapter plate) 2
Midrange 100 mm Q (each mounted on the panel with 4 Sheet metal-screws) 2
Neodym-flat-woofer 200 mm (each mounted with 4 flat head screws M4x20 4
Crossover (right / left) 2
The product was carefully packed and checked for its completeness. If you find anything missing, damaged or
defective, please notice our guarantee services on the back of these assembly instructions.
Packing list 75075 / 76075
75075/76075 - SL Cabrio - 13 - © JEHNERT SOUND DESIGN 75075/76075 - SL Cabrio - 2 - © JEHNERT SOUND DESIGN
Technical information
Equipment: electric window control
Model/ year : 75075 up to models 1996
76075 models from 1996
Insulation: is recommended
Note about setting: To obtain optimal stereoscopic sound, all settings
on the radio (bass, treble, loudness etc) should be
set to zero or neutral.
Recommended
amplifier power : from 2x 100 - 130 Watt RMS / 4 Ohm
Metal cutwork : not necessary
Cut-outs for loudspeaker/
each side
)
Sound-System: 3-ways
1 x 200 mm subwoofer/ side
1 x 100 mm midrange / side
1 x 26 mm tweeter / side
car-customized crossover network
max.continuous Watt/RMS: 2 x 130/200Watt
car specific frequency range: 46-22.000 Hz
Total impedance: 2 Ohm
Time for Installation car hifi-specialist: 2 hours
We reserve the right to make technical changes, as well as development.

1.1. unroll window completely
1.2. unscrew the 3 screw on the chromium grill (1) and remove the chromium grill
1.3. unscrew screw on the locking rosette (2) and move the rosette downward and remove it
1.4. push the grill of rear mirror triangle (3) upward away
1.5. carefully move the small wooden grill (5) upward out (caution: it could break!).
1.6. push the handle for the inner lock (4) and remove it
1.7. open the cover of the door tray and remove it ( see fig./arrows )
1.8. pull out the entry lamp and unplug connections
1.9. unscrew the inner lock grill (5) and remove it
1.10. carefully move the large wooden grill (7) against the door lock and remove it from the
door lining (caution! It could break!)
1.11. disconnect coupling for seat adjustment and remove the wooden grill (7)
1.12. unscrew screw on the inner lock (5)
1.13. unscrew screws of the door tray (front and rear)
1.14. carefully remove the plastic clips of the door lining and move it vertically away from
the door metal
1.15. disconnect the original speaker cable and dismantle the original speaker unit
(will not be used). The grills need not to be removed
SL up to models ’96 (original round speaker grill)
1 . Disassembly of the door lining 75075 - models up to
75075/76075 - SL Cabrio - 3 - © JEHNERT SOUND DESIGN 75075/76075 - SL Cabrio - 12 - © JEHNERT SOUND DESIGN
as the SL shows special acoustic characteristics we recommend the following
sound adjustment to optimize the stereoscopic sound:
our recommendation:
adjust the balance two points further to
the right side (from driver’s side) –may vary
according to the different types of radios.
9. recommended sound adjustment on the radio
�

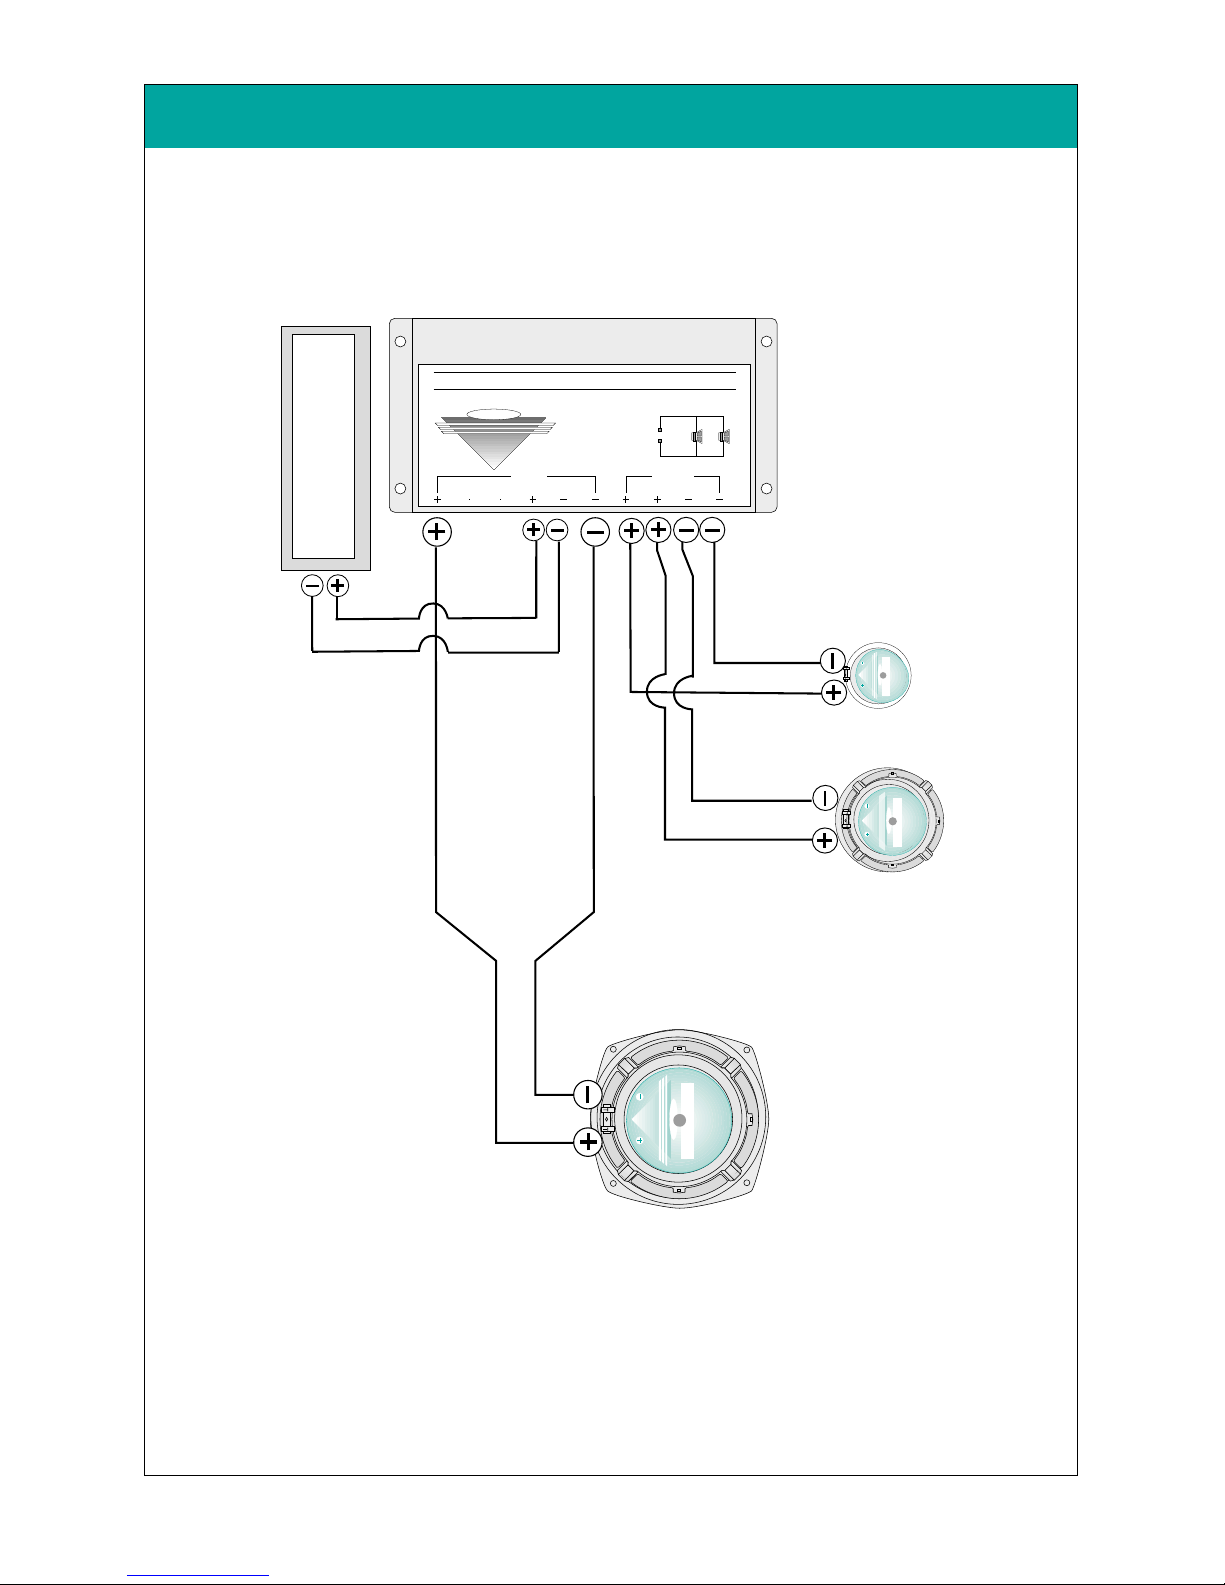
Loudspeaker wiring diagram
Connect all loudspeakers and crossover circuits:
Loudspeaker wiring diagram
Connect all loudspeakers and crossover circuits:
H
i
g
h
P
e
r
f
o
r
m
a
n
c
e
D E S I G N
JEHNERT
SoundSound
Midrange
Speaker
MADE IN GERMANY
SL models from 1996. (original fabrics cover)
1.1. unroll window completely
1.2. unclip the mirror triangle grill (2) from above with a taper key,
move it upward away
1.3. unclip the entry lamp, disconnect the cable and remove the entry lamp
1.4. unclip grill ”SRS”and unscrew the screw (4)
1.5. open cover of the door tray,unclip the cover and remove it
1.6. unscrew all screws (6) of the door tray (front and rear)
1.7. unscrew the screws of the chromium cover (7) and locking rosette (8)
and remove both parts
1.8. carefully push off the door-lining on the plastic clips and move it upward
away from the sealing above (use a taper key), lift it away from the clamps
and simultaneously move it away from the inner door metal
1.9. remove the Bowden pull wire
1.10.disconnect the seat adjustment (10)
1.11 disconnect the original speaker cable and dismantle the original speaker
unit (will not be used any more). The grills need not to be removed.
75075/76075 - SL Cabrio - 11 - © JEHNERT SOUND DESIGN
2 . Disassembly of the door lining 76075 - models from ‘96
75075/76075 - SL Cabrio - 4 - © JEHNERT SOUND DESIGN
Circuit diagram of 3-way crossover / 2x subwoofer
H
i
g
h
P
e
r
f
o
r
m
a
n
c
e
D E S I G N
JEHNERT
SoundSound
WOOFER
Speaker
MADE IN GERMANY
tweetersubwooofer
SoundSound
D E S I G N
JEHNERT
midrangeinput
3-way crossover circuit
DaimlerChrysler SL Convertible - 75075/76075
H
i
g
h
P
e
r
f
o
r
m
a
n
c
e
D E S I G N
JEHNERT
SoundSound
Tweeter
Speaker
MADE IN GERMANY
100-130 Watt RMS / 4 Ohm
amplifier
recommended power

8. Crossover circuit - Speaker connection
8.1. precable crossovers - see fig. page 11.
8.2. install crossover under the dashboard. Check precise fit.
8.3. Insert subwoofer and midrange and connect all loudspeakers
(car door: midrange and subwoofer / dashboard: tweeter)
to the crossover circuit (parallel-circuit):
Notice: You should check the polarity of all subwoofers
before connecting them to the crossover circuit
with a 9 volt battery:
pole of the crossover circuit input to of a 9 Volt battery
pole of the crossover circuit input to of a 9 Volt battery
All subwoofers must move uniformly!
Wrong polarity of a subwoofer can totally
equalize the bass sound!
3.1. unclip the plastic frame of the tweeter grill with a taper key and remove it
3.2. unscrew the screw underneath and remove the speaker’s grill
3.3. remove the original tweeter and disconnect the cable
connect the JEHNERT tweeter (1,5 - 4mm2)
3.4. Length of cable: up to the crossover- mount underneath the dashboard
3.5. affix the perforated sheet metal to the tweeter. Secure with washer and
hexagon head screw.
3.6. Install the tweeter with the perforated sheet metal in the original mount
and lead the speaker cable to the mount of the crossover.
.
Acoustic TIP:
adjust the tweeter in an angular position to the inner rear
view mirror (not driver’s or co-passenger’s side)
75075/76075 - SL Cabrio - 10 - © JEHNERT SOUND DESIGN75075/76075 - SL Cabrio - 5- © JEHNERT SOUND DESIGN
��
✚ ✚
3. tweeter installation in standard mount of the dashboard
7. installation of the door-lining onto the car doors
7.1. put the door-lining into the upper sealing of the car door
7.2. fit it in contrary order of succession as described on page no. 3
7.3. cut out the moisture protection foil (u-form) and stabilize the lateral cutting
edges in order to avoid vibration noise ( e.g. use a packing tape)
1.1. place the door-lining backside up on a plane surface
1.2. align the adapter plate with speakers instead of the factory installed speaker unit
1.3. mark the outlines of the adapter plate and remove the plate again
fitting of adapter plate 75075 –model up to ‘96:
1. sand the outline marked (adhesive property will be better then)
2. put hot melt adhesive on the outlines.
3. fit in the adapter plate exactly and hold it fast to the door-lining until
the adhesive hardens
fitting of adapter plate 76075 –model from ‘96:
1. sand the outline marked (adhesive property will be better)
2. original screwed joint within the outline marking is used to install the
adapter plate:
•detach original screwed joint
•install adapter plate exactly and tighten the screws
3. put holt melt adhesive on the rest of the plate edge.
4. connect subwoofer and midrange with speaker cable (1,5-4mm2) and lead cable
to the mount of the crossover circuit.
Length of cable: up to crossover- mount underneath the dashboard
Remark:
rubber surround of subwoofer touches the expanding rivets of the speaker grills.
But this does not affect the sound (no vibration noise).
mark the oulines of
the adapter plate on
the door-lining
Abb.: 75075-up to’96
Abb.: 76075-ab Bj.96 mark the oulines of
the adapter plate on
the door-lining
use original screwed
joint within the outline
marking for fitting
4. installation of adapter plate onto the door-lining
75075/76075 - SL Cabrio - 9 - © JEHNERT SOUND DESIGN 75075/76075 - SL Cabrio - 6 - © JEHNERT SOUND DESIGN
✍
✍
==>> continue as follows: prod.code. 75075 or 76075 ==>>

7. installation of the door-lining onto the car doors
7.1. put the door-lining into the upper sealing of the car door
7.2. fit it in contrary order of succession as described on page no. 3
7.3. cut out the moisture protection foil (u-form) and stabilize the lateral cutting
edges in order to avoid vibration noise ( e.g. use a packing tape)
1.1. place the door-lining backside up on a plane surface
1.2. align the adapter plate with speakers instead of the factory installed speaker unit
1.3. mark the outlines of the adapter plate and remove the plate again
fitting of adapter plate 75075 –model up to ‘96:
1. sand the outline marked (adhesive property will be better then)
2. put hot melt adhesive on the outlines.
3. fit in the adapter plate exactly and hold it fast to the door-lining until
the adhesive hardens
fitting of adapter plate 76075 –model from ‘96:
1. sand the outline marked (adhesive property will be better)
2. original screwed joint within the outline marking is used to install the
adapter plate:
•detach original screwed joint
•install adapter plate exactly and tighten the screws
3. put holt melt adhesive on the rest of the plate edge.
4. connect subwoofer and midrange with speaker cable (1,5-4mm2) and lead cable
to the mount of the crossover circuit.
Length of cable: up to crossover- mount underneath the dashboard
Remark:
rubber surround of subwoofer touches the expanding rivets of the speaker grills.
But this does not affect the sound (no vibration noise).
mark the oulines of
the adapter plate on
the door-lining
Abb.: 75075-up to’96
Abb.: 76075-ab Bj.96 mark the oulines of
the adapter plate on
the door-lining
use original screwed
joint within the outline
marking for fitting
4. installation of adapter plate onto the door-lining
75075/76075 - SL Cabrio - 9 - © JEHNERT SOUND DESIGN 75075/76075 - SL Cabrio - 6 - © JEHNERT SOUND DESIGN
✍
✍
==>> prod.code. 75075 (models to ‘96) installation of adapterplate
7. installation of the door-lining onto the car doors
7.1. put the door-lining into the upper sealing of the car door
7.2. fit it in contrary order of succession as described on page no. 3
7.3. cut out the moisture protection foil (u-form) and stabilize the lateral cutting
edges in order to avoid vibration noise ( e.g. use a packing tape)
1.1. place the door-lining backside up on a plane surface
1.2. align the adapter plate with speakers instead of the factory installed speaker unit
1.3. mark the outlines of the adapter plate and remove the plate again
fitting of adapter plate 75075 –model up to ‘96:
1. sand the outline marked (adhesive property will be better then)
2. put hot melt adhesive on the outlines.
3. fit in the adapter plate exactly and hold it fast to the door-lining until
the adhesive hardens
fitting of adapter plate 76075 –model from ‘96:
1. sand the outline marked (adhesive property will be better)
2. original screwed joint within the outline marking is used to install the
adapter plate:
•detach original screwed joint
•install adapter plate exactly and tighten the screws
3. put holt melt adhesive on the rest of the plate edge.
4. connect subwoofer and midrange with speaker cable (1,5-4mm2) and lead cable
to the mount of the crossover circuit.
Length of cable: up to crossover- mount underneath the dashboard
Remark:
rubber surround of subwoofer touches the expanding rivets of the speaker grills.
But this does not affect the sound (no vibration noise).
mark the oulines of
the adapter plate on
the door-lining
Abb.: 75075-up to’96
Abb.: 76075-ab Bj.96 mark the oulines of
the adapter plate on
the door-lining
use original screwed
joint within the outline
marking for fitting
4. installation of adapter plate onto the door-lining
75075/76075 - SL Cabrio - 9 - © JEHNERT SOUND DESIGN 75075/76075 - SL Cabrio - 6 - © JEHNERT SOUND DESIGN
✍
✍
Remark:
Rubber surround of subwoofer touches the
expanding rivets of the speaker grills. But this
does not affect the sound (no vibration noise)
==>> prod.code. 76075 (models from ‘96) installation of adapterplate
4.1. Sand the outline marked (adhesive property will be better).
4.2. Original screwed joint within the ouline marking is used to install
the adapterplate:
• detach original screwed joint
• install adapterplate exactly and tighten the screws
4.3. Screw in the 3 screws attached acc. to gure. Secure the M4-screws with
the perforated tape and M4-nuts, sheet metal screw with sheet metal nut.
4.4. Put hot melt adhesive on the rest of the plate edge.
4.5. Connect subwoofer and midrange with speaker cable (1,5 - 4mm2) and
lead the cable to the mount of the crossover circuit.
Lenght of cable: up to crossover-mount underneath the dashboard.
7. Montage der Türverkleidung auf die Fahrzeugtüren
7.1. Türverkleidung oben in die Türschachtleiste einhängen
7.2. In umgekehrter Reihenfolge wie auf Seite 3 beschrieben wieder befestigen.
7.3. Regenschutzfolie für den Tieftöner u-förmig einschneiden und seitliche
Schnittkanten zur Vermeidung von Vibrationsgeräuschen der Folie
stabilisieren (z.B. mit Packband)
4.1. Türverkleidung mit der Rückseite nach oben auf eine ebene Fläche legen.
4.2. Die Adapterplatte mit montierten Lautsprechern direkt anstelle des
demontierten, werkseitigen Lautsprechersystems auf der Türverkl. aufsetzen.
4.2. Umriss der Adapterplatte anzeichnen und Adapterplatte wieder abnehmen.
Befestigung Adapterplatte 75075 - bis Bj. ‘96:
1. Angezeichneter Umriss anrauhen (für bessere Haftbarkeit des Heißklebers)
2. Heißkleber entlang der Umrisszeichnung anbringen.
3. Die Adapterplatte passgenau aufsetzen und “fest”auf die Türverkleidung
aufdrücken bis der Heißkleber hart ist.
Befestigung Adapterplatte 76075 - ab Bj. ‘96:
1. Angezeichneter Umriss anrauhen (bessere Haftbarkeit des Heißklebers)
2. werkseitige Schraubenbefestigung innerhalb der Umriss-Anzeichnung
zur Befestigung der Adapterplatte nutzen:
•werkseitige Schrauben lösen
•Adapterplatte passgenau aufsetzen und Schrauben wieder eindrehen
2. Heißkleber entlang des restlichen unbefestigten Adapterrahmen-Randes
anbringen.
4. Tief- und Mitteltöner mit Lautsprecherkabel (1,5 - 4mm ) verkabeln.
und Lautsprecherkabel zum Frequenzweichen-Montageort führen.
Kabellänge: bis zur Frequenzweiche, Montage unterhalb des Armaturen-
brettes
Anmerkung:
Die Gummisicke des Tieftöners berührt zwar die Spreitznieten der Lautsprecher-
gitter- dies hat jedoch keine negativen Auswirkungen auf etwaige Vibrations-
geräusche)
2
Umrisse der Adapterplatte
auf der Türverkleidung an-
zeichnen
Abb.: 75075-bis Bj.96
Abb.: 76075-ab Bj.96 Umrisse der Adapterplatte
auf der Türverkleidung an-
zeichnen
werkseitige Schrauben innerhalb
der Umrisszeichnung
zur Befestigung verwenden
4. Montage der Adapterplatte auf die Türverkleidung
75075/76075 - SL Cabrio - 9 - © JEHNERT SOUND DESIGN 75075/76075 - SL Cabrio - 6 - © JEHNERT SOUND DESIGN
✍
✍
original screws
sheet metal screw 3,9x16
+ sheet metal nut
M4 x 20 + perforated tape
7. installation of the door-lining onto the car doors
7.1. put the door-lining into the upper sealing of the car door
7.2. fit it in contrary order of succession as described on page no. 3
7.3. cut out the moisture protection foil (u-form) and stabilize the lateral cutting
edges in order to avoid vibration noise ( e.g. use a packing tape)
1.1. place the door-lining backside up on a plane surface
1.2. align the adapter plate with speakers instead of the factory installed speaker unit
1.3. mark the outlines of the adapter plate and remove the plate again
fitting of adapter plate 75075 –model up to ‘96:
1. sand the outline marked (adhesive property will be better then)
2. put hot melt adhesive on the outlines.
3. fit in the adapter plate exactly and hold it fast to the door-lining until
the adhesive hardens
fitting of adapter plate 76075 –model from ‘96:
1. sand the outline marked (adhesive property will be better)
2. original screwed joint within the outline marking is used to install the
adapter plate:
•detach original screwed joint
•install adapter plate exactly and tighten the screws
3. put holt melt adhesive on the rest of the plate edge.
4. connect subwoofer and midrange with speaker cable (1,5-4mm2) and lead cable
to the mount of the crossover circuit.
Length of cable: up to crossover- mount underneath the dashboard
Remark:
rubber surround of subwoofer touches the expanding rivets of the speaker grills.
But this does not affect the sound (no vibration noise).
mark the oulines of
the adapter plate on
the door-lining
Abb.: 75075-up to’96
Abb.: 76075-ab Bj.96 mark the oulines of
the adapter plate on
the door-lining
use original screwed
joint within the outline
marking for fitting
4. installation of adapter plate onto the door-lining
75075/76075 - SL Cabrio - 9 - © JEHNERT SOUND DESIGN 75075/76075 - SL Cabrio - 6 - © JEHNERT SOUND DESIGN
✍
✍

75075/76075 - SL Cabrio - 7 - © JEHNERT SOUND DESIGN 75075/76075 - SL Cabrio - 8 - © JEHNERT SOUND DESIGN
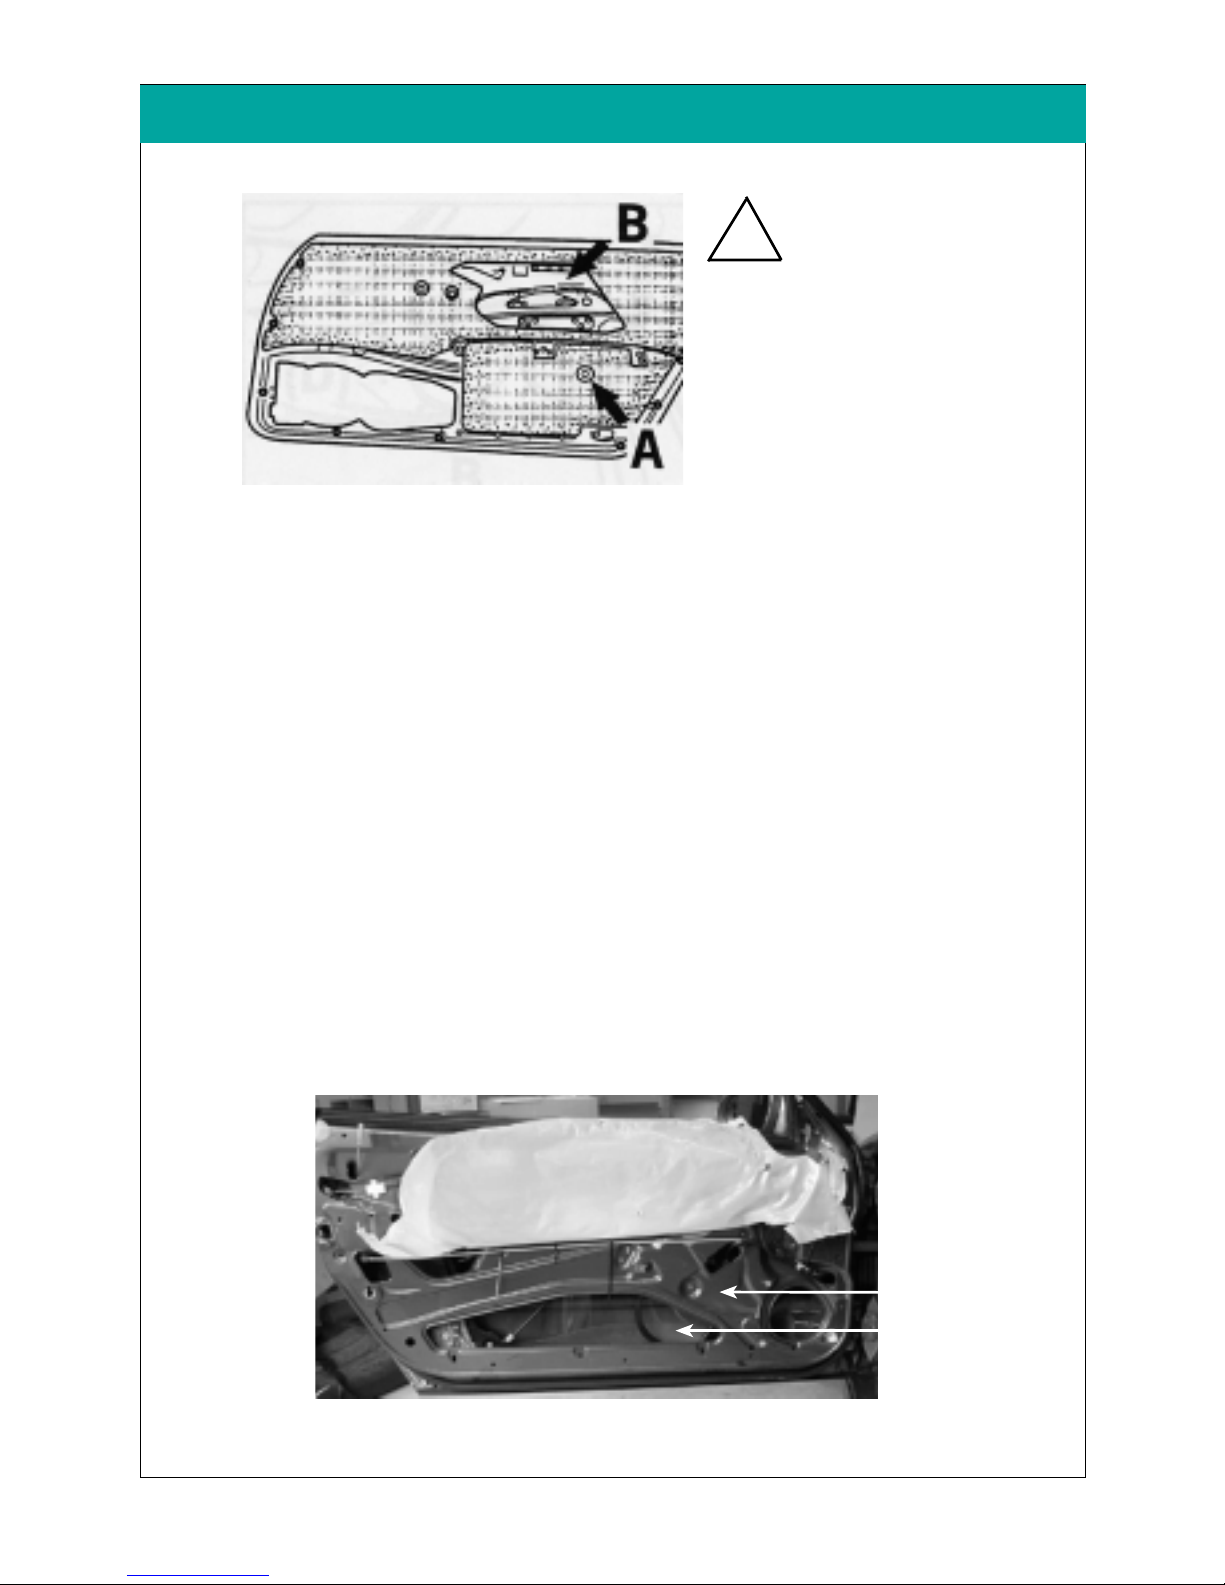
6. insulation of the door lining
Important tip:
the use of woofers may cause vibrations which lead to
annoying rattle noises in the car door
some helpful tips:
•use our self-adhesive insulation fleece (art.no.: 27000) or a foam material for
the backside of the door lining (see fig. above) or
•stabilize the backside of the door lining by means of a special material
(Glass Fibre Filler or stiffening material)
important: keep the cut-outs for the door-airbags and speakers open
•affix the *backside of the inner door metal with self-adhesive asphalt mats (see fig. * )
•by knocking on the car door, vibrations caused by mechanic parts (e.g. Bowden pull wire etc. )
and wiring harness may be found out. Cover these parts with foamed material, felt or
something like that
•cut off overlapping cable tie (rattle noise)
•adhere felt or foamed material under the original wiring harness
!
Important:
No insulation material behind
- loudspeaker
- door latch lever
- (fig. A): drill a hole for the
installation clip
fig.: backside of the door lining –insulation with our article no.: 27000
moisture protection foil
front side of
inner door metal
*door metal outside
= back side of the
inner door metal
attention –danger !!
No insulation behind the
side-airbags (fig. B)
�
�
5. Installation of loudspeaker cables
5.1. carefully remove the moisture protection foil
5.2. insulation of the door lining - Important tips against vibration-noise (s.page.8)
5.3. install cables:
Lead 1 speaker cable (1,5 - 4mm 2) from amplifier into the door.
(mount of crossover circuit: under the dashboard.
5.4. reinstall the moisture protection foil
75075/76075 - SL Cabrio - 7 - © JEHNERT SOUND DESIGN 75075/76075 - SL Cabrio - 8 - © JEHNERT SOUND DESIGN
6. insulation of the door lining
Important tip:
the use of woofers may cause vibrations which lead to
annoying rattle noises in the car door
some helpful tips:
•use our self-adhesive insulation fleece (art.no.: 27000) or a foam material for
the backside of the door lining (see fig. above) or
•stabilize the backside of the door lining by means of a special material
(Glass Fibre Filler or stiffening material)
important: keep the cut-outs for the door-airbags and speakers open
•affix the *backside of the inner door metal with self-adhesive asphalt mats (see fig. * )
•by knocking on the car door, vibrations caused by mechanic parts (e.g. Bowden pull wire etc. )
and wiring harness may be found out. Cover these parts with foamed material, felt or
something like that
•cut off overlapping cable tie (rattle noise)
•adhere felt or foamed material under the original wiring harness
!
Important:
No insulation material behind
- loudspeaker
- door latch lever
- (fig. A): drill a hole for the
installation clip
fig.: backside of the door lining –insulation with our article no.: 27000
moisture protection foil
front side of
inner door metal
*door metal outside
= back side of the
inner door metal
attention –danger !!
No insulation behind the
side-airbags (fig. B)
�
�
5. Installation of loudspeaker cables
5.1. carefully remove the moisture protection foil
5.2. insulation of the door lining - Important tips against vibration-noise (s.page.8)
5.3. install cables:
Lead 1 speaker cable (1,5 - 4mm 2) from amplifier into the door.
(mount of crossover circuit: under the dashboard.
5.4. reinstall the moisture protection foil

7. installation of the door-lining onto the car doors
7.1. put the door-lining into the upper sealing of the car door
7.2. fit it in contrary order of succession as described on page no. 3
7.3. cut out the moisture protection foil (u-form) and stabilize the lateral cutting
edges in order to avoid vibration noise ( e.g. use a packing tape)
1.1. place the door-lining backside up on a plane surface
1.2. align the adapter plate with speakers instead of the factory installed speaker unit
1.3. mark the outlines of the adapter plate and remove the plate again
fitting of adapter plate 75075 –model up to ‘96:
1. sand the outline marked (adhesive property will be better then)
2. put hot melt adhesive on the outlines.
3. fit in the adapter plate exactly and hold it fast to the door-lining until
the adhesive hardens
fitting of adapter plate 76075 –model from ‘96:
1. sand the outline marked (adhesive property will be better)
2. original screwed joint within the outline marking is used to install the
adapter plate:
•detach original screwed joint
•install adapter plate exactly and tighten the screws
3. put holt melt adhesive on the rest of the plate edge.
4. connect subwoofer and midrange with speaker cable (1,5-4mm2) and lead cable
to the mount of the crossover circuit.
Length of cable: up to crossover- mount underneath the dashboard
Remark:
rubber surround of subwoofer touches the expanding rivets of the speaker grills.
But this does not affect the sound (no vibration noise).
mark the oulines of
the adapter plate on
the door-lining
Abb.: 75075-up to’96
Abb.: 76075-ab Bj.96 mark the oulines of
the adapter plate on
the door-lining
use original screwed
joint within the outline
marking for fitting
4. installation of adapter plate onto the door-lining
75075/76075 - SL Cabrio - 9 - © JEHNERT SOUND DESIGN 75075/76075 - SL Cabrio - 6 - © JEHNERT SOUND DESIGN
✍
✍
7.3. Cut out the moisture protection foil (U-form) behind the woofer and
stabilize the lateral cutting edges in order to a vibration noise
(e.g. use a packing tape).
7. installation of the door-lining onto the car doors
7.1. put the door-lining into the upper sealing of the car door
7.2. fit it in contrary order of succession as described on page no. 3
7.3. cut out the moisture protection foil (u-form) and stabilize the lateral cutting
edges in order to avoid vibration noise ( e.g. use a packing tape)
1.1. place the door-lining backside up on a plane surface
1.2. align the adapter plate with speakers instead of the factory installed speaker unit
1.3. mark the outlines of the adapter plate and remove the plate again
fitting of adapter plate 75075 –model up to ‘96:
1. sand the outline marked (adhesive property will be better then)
2. put hot melt adhesive on the outlines.
3. fit in the adapter plate exactly and hold it fast to the door-lining until
the adhesive hardens
fitting of adapter plate 76075 –model from ‘96:
1. sand the outline marked (adhesive property will be better)
2. original screwed joint within the outline marking is used to install the
adapter plate:
•detach original screwed joint
•install adapter plate exactly and tighten the screws
3. put holt melt adhesive on the rest of the plate edge.
4. connect subwoofer and midrange with speaker cable (1,5-4mm2) and lead cable
to the mount of the crossover circuit.
Length of cable: up to crossover- mount underneath the dashboard
Remark:
rubber surround of subwoofer touches the expanding rivets of the speaker grills.
But this does not affect the sound (no vibration noise).
mark the oulines of
the adapter plate on
the door-lining
Abb.: 75075-up to’96
Abb.: 76075-ab Bj.96 mark the oulines of
the adapter plate on
the door-lining
use original screwed
joint within the outline
marking for fitting
4. installation of adapter plate onto the door-lining
75075/76075 - SL Cabrio - 9 - © JEHNERT SOUND DESIGN 75075/76075 - SL Cabrio - 6 - © JEHNERT SOUND DESIGN
✍
✍

8. Crossover circuit - Speaker connection
8.1. precable crossovers - see fig. page 11.
8.2. install crossover under the dashboard. Check precise fit.
8.3. Insert subwoofer and midrange and connect all loudspeakers
(car door: midrange and subwoofer / dashboard: tweeter)
to the crossover circuit (parallel-circuit):
Notice: You should check the polarity of all subwoofers
before connecting them to the crossover circuit
with a 9 volt battery:
pole of the crossover circuit input to of a 9 Volt battery
pole of the crossover circuit input to of a 9 Volt battery
All subwoofers must move uniformly!
Wrong polarity of a subwoofer can totally
equalize the bass sound!
3.1. unclip the plastic frame of the tweeter grill with a taper key and remove it
3.2. unscrew the screw underneath and remove the speaker’s grill
3.3. remove the original tweeter and disconnect the cable
connect the JEHNERT tweeter (1,5 - 4mm2)
3.4. Length of cable: up to the crossover- mount underneath the dashboard
3.5. affix the perforated sheet metal to the tweeter. Secure with washer and
hexagon head screw.
3.6. Install the tweeter with the perforated sheet metal in the original mount
and lead the speaker cable to the mount of the crossover.
.
Acoustic TIP:
adjust the tweeter in an angular position to the inner rear
view mirror (not driver’s or co-passenger’s side)
75075/76075 - SL Cabrio - 10 - © JEHNERT SOUND DESIGN75075/76075 - SL Cabrio - 5- © JEHNERT SOUND DESIGN
��
✚ ✚
3. tweeter installation in standard mount of the dashboard
You should check the polarity of all woofers after having
connected them to the crossover circuit with a 9 volt battery
(input cable on the side of the amplier).
Recommendation:
Install both crossovers on the passenger‘s side underneath the airbag.
*Important:
Protect the sheet bar against humidity and observe that the sheet
bar does not touch any metal parts – danger of short circuit!
8. Crossover circuit - Speaker connection
8.1. precable crossovers - see fig. page 11.
8.2. install crossover under the dashboard. Check precise fit.
8.3. Insert subwoofer and midrange and connect all loudspeakers
(car door: midrange and subwoofer / dashboard: tweeter)
to the crossover circuit (parallel-circuit):
Notice: You should check the polarity of all subwoofers
before connecting them to the crossover circuit
with a 9 volt battery:
pole of the crossover circuit input to of a 9 Volt battery
pole of the crossover circuit input to of a 9 Volt battery
All subwoofers must move uniformly!
Wrong polarity of a subwoofer can totally
equalize the bass sound!
3.1. unclip the plastic frame of the tweeter grill with a taper key and remove it
3.2. unscrew the screw underneath and remove the speaker’s grill
3.3. remove the original tweeter and disconnect the cable
connect the JEHNERT tweeter (1,5 - 4mm2)
3.4. Length of cable: up to the crossover- mount underneath the dashboard
3.5. affix the perforated sheet metal to the tweeter. Secure with washer and
hexagon head screw.
3.6. Install the tweeter with the perforated sheet metal in the original mount
and lead the speaker cable to the mount of the crossover.
.
Acoustic TIP:
adjust the tweeter in an angular position to the inner rear
view mirror (not driver’s or co-passenger’s side)
75075/76075 - SL Cabrio - 10 - © JEHNERT SOUND DESIGN75075/76075 - SL Cabrio - 5- © JEHNERT SOUND DESIGN
��
✚ ✚
3. tweeter installation in standard mount of the dashboard
You should check the polarity of all woofers after having
connected them to the crossover circuit with a 9 volt battery
(input cable on the side of the amplier).
Loudspeaker wiring diagram
Connect all loudspeakers and crossover circuits:
Loudspeaker wiring diagram
Connect all loudspeakers and crossover circuits:
H
i
g
h
P
e
r
f
o
r
m
a
n
c
e
D E S I G N
JEHNERT
SoundSound
Midrange
Speaker
MADE IN GERMANY
SL models from 1996. (original fabrics cover)
1.1. unroll window completely
1.2. unclip the mirror triangle grill (2) from above with a taper key,
move it upward away
1.3. unclip the entry lamp, disconnect the cable and remove the entry lamp
1.4. unclip grill ”SRS”and unscrew the screw (4)
1.5. open cover of the door tray,unclip the cover and remove it
1.6. unscrew all screws (6) of the door tray (front and rear)
1.7. unscrew the screws of the chromium cover (7) and locking rosette (8)
and remove both parts
1.8. carefully push off the door-lining on the plastic clips and move it upward
away from the sealing above (use a taper key), lift it away from the clamps
and simultaneously move it away from the inner door metal
1.9. remove the Bowden pull wire
1.10.disconnect the seat adjustment (10)
1.11 disconnect the original speaker cable and dismantle the original speaker
unit (will not be used any more). The grills need not to be removed.
75075/76075 - SL Cabrio - 11 - © JEHNERT SOUND DESIGN
2 . Disassembly of the door lining 76075 - models from ‘96
75075/76075 - SL Cabrio - 4 - © JEHNERT SOUND DESIGN
Circuit diagram of 3-way crossover / 2x subwoofer
H
i
g
h
P
e
r
f
o
r
m
a
n
c
e
D E S I G N
JEHNERT
SoundSound
WOOFER
Speaker
MADE IN GERMANY
tweetersubwooofer
SoundSound
D E S I G N
JEHNERT
midrangeinput
3-way crossover circuit
DaimlerChrysler SL Convertible - 75075/76075
H
i
g
h
P
e
r
f
o
r
m
a
n
c
e
D E S I G N
JEHNERT
SoundSound
Tweeter
Speaker
MADE IN GERMANY
100-130 Watt RMS / 4 Ohm
amplifier
recommended power

1.1. unroll window completely
1.2. unscrew the 3 screw on the chromium grill (1) and remove the chromium grill
1.3. unscrew screw on the locking rosette (2) and move the rosette downward and remove it
1.4. push the grill of rear mirror triangle (3) upward away
1.5. carefully move the small wooden grill (5) upward out (caution: it could break!).
1.6. push the handle for the inner lock (4) and remove it
1.7. open the cover of the door tray and remove it ( see fig./arrows )
1.8. pull out the entry lamp and unplug connections
1.9. unscrew the inner lock grill (5) and remove it
1.10. carefully move the large wooden grill (7) against the door lock and remove it from the
door lining (caution! It could break!)
1.11. disconnect coupling for seat adjustment and remove the wooden grill (7)
1.12. unscrew screw on the inner lock (5)
1.13. unscrew screws of the door tray (front and rear)
1.14. carefully remove the plastic clips of the door lining and move it vertically away from
the door metal
1.15. disconnect the original speaker cable and dismantle the original speaker unit
(will not be used). The grills need not to be removed
SL up to models ’96 (original round speaker grill)
1 . Disassembly of the door lining 75075 - models up to
75075/76075 - SL Cabrio - 3 - © JEHNERT SOUND DESIGN 75075/76075 - SL Cabrio - 12 - © JEHNERT SOUND DESIGN
as the SL shows special acoustic characteristics we recommend the following
sound adjustment to optimize the stereoscopic sound:
our recommendation:
adjust the balance two points further to
the right side (from driver’s side) –may vary
according to the different types of radios.
9. recommended sound adjustment on the radio
�

Packing unit Check list
adapter plate (right / left) 2
Tweeter 26mm with perforated Sheet metal,6Ktn.Screw M4x8,Washer ø12mm) 2
Art.Nr. 75075: hot melt adhesive-stics (f.mounting adapter plate) 4
Art.Nr. 76075: hot melt adhesive-stics (f.mounting adapter plate) 2
Midrange 100 mm Q (each mounted on the panel with 4 Sheet metal-screws) 2
Neodym-flat-woofer 200 mm (each mounted with 4 flat head screws M4x20 4
Crossover (right / left) 2
The product was carefully packed and checked for its completeness. If you find anything missing, damaged or
defective, please notice our guarantee services on the back of these assembly instructions.
Packing list 75075 / 76075
75075/76075 - SL Cabrio - 13 - © JEHNERT SOUND DESIGN 75075/76075 - SL Cabrio - 2 - © JEHNERT SOUND DESIGN
Technical information
Equipment: electric window control
Model/ year : 75075 up to models 1996
76075 models from 1996
Insulation: is recommended
Note about setting: To obtain optimal stereoscopic sound, all settings
on the radio (bass, treble, loudness etc) should be
set to zero or neutral.
Recommended
amplifier power : from 2x 100 - 130 Watt RMS / 4 Ohm
Metal cutwork : not necessary
Cut-outs for loudspeaker/
each side
)
Sound-System: 3-ways
1 x 200 mm subwoofer/ side
1 x 100 mm midrange / side
1 x 26 mm tweeter / side
car-customized crossover network
max.continuous Watt/RMS: 2 x 130/200Watt
car specific frequency range: 46-22.000 Hz
Total impedance: 2 Ohm
Time for Installation car hifi-specialist: 2 hours
We reserve the right to make technical changes, as well as development.

Steffen Kretzschmar
Saddlery / Completion
page
Contents
Packing list ..........................................................................
1. Disassembly of the door lining SL mod.up to 96 - Art. 75075...
2. Disassembly of the door lining SL mod.from 96 - Art. 76075....
3. Tweeter Installation .............................................................
4. Handling of door lining / Panel installation - Fastening ...........
5. Loudspeaker cables .............................................................
6. Insulation of the door lining / car doors .................................
7. Installation of the door lining ................................................
8. Crossover circuit - Speaker connection ..................................
Loudspeaker wiring diagram .................................................
9. Installation of the speaker-grills .............................................
Technical information ...........................................................
Service / fault diagnoses .......................................................
Guarantee ...........................................................................
2
3
4
5
6
7
8
9
10
11
12
13
14
15
75075/76075 - SL Cabrio - 14 - © JEHNERT SOUND DESIGN75075/76075 - SL Cabrio - 1 - © JEHNERT SOUND DESIGN
Technical questions Hotline: 0049-711-77 97 87-87
We thank you for your support!
Mirko Schwarz
Development
It is our pleasure to help you!
Dear customer,
We have taken great care to explain the procedures in our installation instructions
more detailed and “step by step”.
Your tips and suggestions help us for the future to eliminate uncertainties and
misinterpretation. Therefore, please inform us. what you would like to be improved
or what we should still change.
Marc Sitter
Service
Marc Sitter
Service
The following notes serve to help troubleshoot and eliminate faults or malfunctions
on your own. If the following measures are not effective, please call us.
What can it be if ... possible cause/ solution
..it doesn’t sound right. wrong polarity on the subwoofers ( page 10)
crosover circuit attached wrong ( page 11)
Doorlining and moisture protection foil
not cut out ( page 5+10)
amplifier doesn’t have enough power( page 13)
amplifier connection
...it doesn’t fit correctly. door panel customization ( page 8)
installation of the panels on the door lining (page 9)
.....grills do not hold. observe notes on page 12!
vibrations insulation, see notes on page 7
Self-help and fault diagnosis
Particularly important notes contain the following remarks:
�
Please follow the installation instructions
“step by step”
and check the package contents
Technical questions: Hotline 00 49 71 58 / 9 56 99-0
Steffen Kretzschmar
Saddlery / Completion
page
Contents
Packing list ..........................................................................
1. Disassembly of the door lining SL mod.up to 96 - Art. 75075...
2. Disassembly of the door lining SL mod.from 96 - Art. 76075....
3. Tweeter Installation .............................................................
4. Handling of door lining / Panel installation - Fastening ...........
5. Loudspeaker cables .............................................................
6. Insulation of the door lining / car doors .................................
7. Installation of the door lining ................................................
8. Crossover circuit - Speaker connection ..................................
Loudspeaker wiring diagram .................................................
9. Installation of the speaker-grills .............................................
Technical information ...........................................................
Service / fault diagnoses .......................................................
Guarantee ...........................................................................
2
3
4
5
6
7
8
9
10
11
12
13
14
15
75075/76075 - SL Cabrio - 14 - © JEHNERT SOUND DESIGN75075/76075 - SL Cabrio - 1 - © JEHNERT SOUND DESIGN
Technical questions Hotline: 0049-711-77 97 87-87
We thank you for your support!
Mirko Schwarz
Development
It is our pleasure to help you!
Dear customer,
We have taken great care to explain the procedures in our installation instructions
more detailed and “step by step”.
Your tips and suggestions help us for the future to eliminate uncertainties and
misinterpretation. Therefore, please inform us. what you would like to be improved
or what we should still change.
Marc Sitter
Service
Marc Sitter
Service
The following notes serve to help troubleshoot and eliminate faults or malfunctions
on your own. If the following measures are not effective, please call us.
What can it be if ... possible cause/ solution
..it doesn’t sound right. wrong polarity on the subwoofers ( page 10)
crosover circuit attached wrong ( page 11)
Doorlining and moisture protection foil
not cut out ( page 5+10)
amplifier doesn’t have enough power( page 13)
amplifier connection
...it doesn’t fit correctly. door panel customization ( page 8)
installation of the panels on the door lining (page 9)
.....grills do not hold. observe notes on page 12!
vibrations insulation, see notes on page 7
Self-help and fault diagnosis
Particularly important notes contain the following remarks:
�
Please follow the installation instructions
“step by step”
and check the package contents
Packliste ..............................................................................
1. Demontage der Türverkleidung SL bis Bj. 96 - Art. 75075 ........
2. Demontage der Türverkleidung SL ab Bj. 96 - Art. 76075 .........
3. Hochtöner-Montage ..............................................................
4. Montage der Adapterplatten auf die Türverkleidung .................
5. Lautsprecherleitungen ...........................................................
6. Dämmung der Türverkleidung / Fahrzeugtüren ........................
7. Montage der Türverkleidung ..................................................
8. Frequenzweichenmontage + Lautsprecheranschluss ................
Lautsprecheranschluss - Schaltbild ........................................
9. Einstell-Hinweise Radio ........................................................
Technische Informationen .....................................................
Service / Fehlersuche............................................................
Garantie .............................................................................
Steffen Kretzschmar
Sattlerei / Produktionsablauf
Durchwahl: - 69
Seite
2
3
4
5
6
7
8
9
10
11
12
13
14
15
75075/76075 - SL Cabrio - 14 - © JEHNERT SOUND DESIGN75075/76075 - SL Cabrio - 1 - © JEHNERT SOUND DESIGN
Technische Fragen: Info-Hotline: 0711 - 77 97 87 - 87
Wir danken für Ihre Unterstützung !
Mirko Schwarz
Produktentwicklung / Qualität
Durchwahl: - 67
Wir helfen Ihnen gerne weiter!
Sehr geehrter Kunde,
Wir haben uns sehr bemüht unsere neuen Montageanleitungen ausführlicher und
“Schritt für Schritt”zu erklären.
Ihre Tipps und Anregungen helfen uns künftige Unklarheiten oder Fehlinter-
pretationen weiter auszuschließen.
Teilen Sie uns deshalb mit, was Ihnen nicht gefällt oder was wir noch ändern sollten.
Marc Sitter
Versand / Service
Durchwahl: - 68
Marc Sitter
Versand / Service
Durchwahl: - 68
Die folgenden Hinweise sollen Ihnen dabei helfen, Fehler oder Störungen selbst zu
beheben. Wenn folgende Abhilfemaßnahmen nicht greifen, rufen Sie uns bitte an:
Was kann es sein ... mögliche Ursache / Lösung
wenn’s nicht richtig klingt Tieftöner verpolt ( Seite 10)
Frequenzweichen falsch angeschlossen ( Seite 11)
Türverkleidung und Regenschutzfolie
nicht ausgeschnitten ( Seite 7+9)
Verstärker zu wenig Leistung ( Seite 13)
Verstärker-Anschluss
wenn’s nicht richtig passt Fixpunkte Türpaneelanpassung ( Seite 6)
Montage der Paneele auf die TV ( Seite 7)
Abdeckungen nicht haften Hinweise Seite 12 beachten!
Vibrationsgeräusche Dämmung s. Hinweise Seite 8
Selbsthilfe und Fehlersuche
Inhaltsverzeichnis
Besonders wichtige Hinweise enthalten folgende Markierung:
�
Bitte folgen Sie den Anweisungen der Montageanleitung
“Schritt für Schritt”
und prüfen Sie den Packungsinhalt
Steffen Kretzschmar
Saddlery / Completion
page
Contents
Packing list ..........................................................................
1. Disassembly of the door lining SL mod.up to 96 - Art. 75075...
2. Disassembly of the door lining SL mod.from 96 - Art. 76075....
3. Tweeter Installation .............................................................
4. Handling of door lining / Panel installation - Fastening ...........
5. Loudspeaker cables .............................................................
6. Insulation of the door lining / car doors .................................
7. Installation of the door lining ................................................
8. Crossover circuit - Speaker connection ..................................
Loudspeaker wiring diagram .................................................
9. Installation of the speaker-grills .............................................
Technical information ...........................................................
Service / fault diagnoses .......................................................
Guarantee ...........................................................................
2
3
4
5
6
7
8
9
10
11
12
13
14
15
75075/76075 - SL Cabrio - 14 - © JEHNERT SOUND DESIGN75075/76075 - SL Cabrio - 1 - © JEHNERT SOUND DESIGN
Technical questions Hotline: 0049-711-77 97 87-87
We thank you for your support!
Mirko Schwarz
Development
It is our pleasure to help you!
Dear customer,
We have taken great care to explain the procedures in our installation instructions
more detailed and “step by step”.
Your tips and suggestions help us for the future to eliminate uncertainties and
misinterpretation. Therefore, please inform us. what you would like to be improved
or what we should still change.
Marc Sitter
Service
Marc Sitter
Service
The following notes serve to help troubleshoot and eliminate faults or malfunctions
on your own. If the following measures are not effective, please call us.
What can it be if ... possible cause/ solution
..it doesn’t sound right. wrong polarity on the subwoofers ( page 10)
crosover circuit attached wrong ( page 11)
Doorlining and moisture protection foil
not cut out ( page 5+10)
amplifier doesn’t have enough power( page 13)
amplifier connection
...it doesn’t fit correctly. door panel customization ( page 8)
installation of the panels on the door lining (page 9)
.....grills do not hold. observe notes on page 12!
vibrations insulation, see notes on page 7
Self-help and fault diagnosis
Particularly important notes contain the following remarks:
�
Please follow the installation instructions
“step by step”
and check the package contents
6)
Steffen Kretzschmar
Saddlery / Completion
page
Contents
Packing list ..........................................................................
1. Disassembly of the door lining SL mod.up to 96 - Art. 75075...
2. Disassembly of the door lining SL mod.from 96 - Art. 76075....
3. Tweeter Installation .............................................................
4. Handling of door lining / Panel installation - Fastening ...........
5. Loudspeaker cables .............................................................
6. Insulation of the door lining / car doors .................................
7. Installation of the door lining ................................................
8. Crossover circuit - Speaker connection ..................................
Loudspeaker wiring diagram .................................................
9. Installation of the speaker-grills .............................................
Technical information ...........................................................
Service / fault diagnoses .......................................................
Guarantee ...........................................................................
2
3
4
5
6
7
8
9
10
11
12
13
14
15
75075/76075 - SL Cabrio - 14 - © JEHNERT SOUND DESIGN75075/76075 - SL Cabrio - 1 - © JEHNERT SOUND DESIGN
Technical questions Hotline: 0049-711-77 97 87-87
We thank you for your support!
Mirko Schwarz
Development
It is our pleasure to help you!
Dear customer,
We have taken great care to explain the procedures in our installation instructions
more detailed and “step by step”.
Your tips and suggestions help us for the future to eliminate uncertainties and
misinterpretation. Therefore, please inform us. what you would like to be improved
or what we should still change.
Marc Sitter
Service
Marc Sitter
Service
The following notes serve to help troubleshoot and eliminate faults or malfunctions
on your own. If the following measures are not effective, please call us.
What can it be if ... possible cause/ solution
..it doesn’t sound right. wrong polarity on the subwoofers ( page 10)
crosover circuit attached wrong ( page 11)
Doorlining and moisture protection foil
not cut out ( page 5+10)
amplifier doesn’t have enough power( page 13)
amplifier connection
...it doesn’t fit correctly. door panel customization ( page 8)
installation of the panels on the door lining (page 9)
.....grills do not hold. observe notes on page 12!
vibrations insulation, see notes on page 7
Self-help and fault diagnosis
Particularly important notes contain the following remarks:
�
Please follow the installation instructions
“step by step”
and check the package contents
8

SoundSound
D E S I G N
JEHNERT
Daimler Chrysler W 129 SL Conv.
Guarantee
�
2002/by.AJ/FH - 15 -
Installation instructions
instal.Art. 75075/76075/FH07/02
item-Nr. 75075 up to Bj.`96
76075 from Bj.`96
Jehnert Sound Design
development and
production of
Car-Audio-Systems
Heinrich-Hertz-Str. 11
70794 Filderstadt
Tel.: 0049-711-77 97 87- 87
Fax: 0049-711-77 78 921
www.jehnert.com
We grant a manufacturers guarantee of 2 years starting from the date of purchase
of the door panels or sound system from the dealer.
Within this guarantee period to our choice we either repair or replace free of
charge all defects due to material or workmanship.
Exempt from this guarantee are damages due to improper use, wear and tear or
damages which have to be led back on wear or interventions by third parties.
The guarantee does not cover subsequent damages or such defects that only
insignificantly impair the value or the usability of the panels/sound system.
The guarantee does not cover damages due to external influences.
Panels with additional or wrong assembly drill holes cannot be returned.
These are damages to the panel which cannot be repaired again.
76075 - from Bj. 96
In-door-assembly-Set
75075 - up to Bj. 96
This manual suits for next models
1
Table of contents


