JEI DRILLING & CUTTING SOLUTIONS RAILBEAST RDP-36 User manual

UNIT 21 EMPIRE BUSINESS PARK, ENTERPRISE WAY
BURNLEY, LANCASHIRE, UK, BB12 6LT
TEL: 01706 229490 EMAIL: sales@jeisolutions.co.uk
OPERATOR’S MANUAL
R
RA
AI
IL
LB
BE
EA
AS
ST
T
R
RD
DP
P-
-3
36
6
PETROL RAIL DRILLING MACHINE

Contents
1. GENERAL INFORMATION............................................................................................... 3
1.1. Application................................................................................................................. 3
1.2. Technical data............................................................................................................ 3
1.3. Equipment included ................................................................................................... 4
1.4. Dimensions................................................................................................................ 5
1.5. Design ....................................................................................................................... 6
2. SAFETY PRECAUTIONS.................................................................................................. 7
3. STARTUP AND OPERATION........................................................................................... 9
3.1. Checking the oil level................................................................................................. 9
3.2. Checking the air filter ................................................................................................10
3.3. Filling the fuel tank....................................................................................................11
3.4. Installing, removing, and operating the annular cutter...............................................12
3.5. Installing and removing the rail profile templates.......................................................14
3.6. Installing and removing the hole center positioner.....................................................15
3.7. Clamping the machine onto the rail and unclamping.................................................16
3.8. Connecting and disconnecting the cooling system....................................................17
3.9. Drilling.......................................................................................................................18
4. ACCESSORIES...............................................................................................................22
4.1. Rail profile templates.................................................................................................22
4.2. Hole center positioners .............................................................................................23
4.3. Attachment for tram rails...........................................................................................24
4.3.1. General information.......................................................................................24
4.3.2. Installing the clamping unit ............................................................................25
4.3.3. Installing the annular cutter............................................................................26
4.3.4. Installing the rail profile templates..................................................................27
4.3.5. Installing the hole center positioner................................................................28
4.3.6. Clamping the machine onto the rail................................................................29
5. DECLARATION OF CONFORMITY.................................................................................31
6. QUALITY CONTROL .......................................................................................................31
7. WARRANTY CARD..........................................................................................................33

WWW.JEIUK.COM RAILBEAST RDP-36
This document is protected by copyrights.
Copying, using, or distributing without permission of Ansa Group Ltd is prohibited.
3
1. GENERAL INFORMATION
1.1. Application
The RAILBEAST RDP-36 is a drilling machine designed to drill holes in rails of UIC54,
UIC60, P50, P65, S49, or any other standard. The machine can drill holes with
diameters of up to 36 mm (1-7/16’’) by using annular cutters or with diameters of up to
16 mm (5/8’’) by using twist drill bits. Thanks to the use of a petrol engine, the
machine does not require electrical supply.
Ordered separately rail profile templates allow the machine to be clamped onto a
rail, and hole center positioners allow you to obtain the proper span between holes.
1.2. Technical data
Engine
Honda GXH50
Displacement
49.4 cm3(3.01 cu in)
Power
1500 W
Tool holder
19 mm (3/4’’) Weldon
Maximum drilling diameter with annular cutter
36 mm (1-7/16’’)
Maximum drilling diameter with twist drill bit
16 mm (5/8’’)
Maximum drilling depth
30 mm (1-3/16’’)
Stroke
39 mm (1-9/16’’)
Rotational speed without load
120–280 rpm
Rotational speed with load
225 rpm
Required ambient temperature
From –5°C to 40°C (23–104°F)
Weight
18.7 kg (41 lbs)

WWW.JEIUK.COM RAILBEAST RDP-36
This document is protected by copyrights.
Copying, using, or distributing without permission of Ansa Group Ltd is prohibited.
4
1.3. Equipment included
1
RAILBEAST RDP-36 drilling machine
1 unit
2
Metal box
1 unit
3
Pressure cooling system 5 L
1 unit
4
6 mm hex wrench
1 unit
5
5 mm hex wrench
1 unit
6
4 mm hex wrench
1 unit
7
8 mm combination wrench
1 unit
–
RAILBEAST RDP-36 Operator’s Manual
1 unit
–
Honda GXH50 Owner’s Manual
1 unit
1
2
3
4
5
6
7

WWW.JEIUK.COM RAILBEAST RDP-36
This document is protected by copyrights.
Copying, using, or distributing without permission of Ansa Group Ltd is prohibited.
5
1.4. Dimensions
491 mm (19-5/16’ ’ )
556 mm (21-7/8’’)
365 mm (14-3/8’ ’ )

WWW.JEIUK.COM RAILBEAST RDP-36
This document is protected by copyrights.
Copying, using, or distributing without permission of Ansa Group Ltd is prohibited.
6
1.5. Design
Arbor
Feed lever
Carrying handle
Pressing screw
Engine switch
Choke valve lever
Fuel valve lever
Starter grip

WWW.JEIUK.COM RAILBEAST RDP-36
This document is protected by copyrights.
Copying, using, or distributing without permission of Ansa Group Ltd is prohibited.
7
2. SAFETY PRECAUTIONS
1. Before starting, read the included manuals and complete proper occupational
safety and health training.
2. Use the machine only in applications specified in this Operator’s Manual.
3. The machine must be complete and all parts must be genuine and fully functional.
4. Transport and position the machine by using the carrying handle.
5. The machine must always be placed in vertical position.
6. Untrained bystanders must not be present near the machine.
7. Install the tools securely by tightening the set screws. Remove wrenches from the
work area before starting.
8. Never use tools that are dull or damaged.
9. Never use annular cutters without a pilot pin.
10. Install and remove tools by using protective gloves and only when the engine
switch is set to OFF.
11. Before starting, make sure that the rail profile templates installed are consistent
with the rail standard.
12. Do not make holes which diameter or depth differ from those specified in the
technical data.
13. Never use near flammable liquids or gases, or in explosive environments.
14. Before every use, inspect the machine to ensure it is not damaged. Check
whether any part is cracked or improperly fitted. Make sure to maintain proper
conditions that may affect the operation of the machine.
15. Use the cutting fluid consistent with the ambient temperature.
16. Always use eye and hearing protection and protective clothing during work.
Do not wear loose clothing.
17. Before starting the engine, set the feed lever as far to the front as possible.
18. Do not touch chips or moving parts. Prevent anything from being caught in
moving parts.
19. After every use, remove chips and excess coolant from the machine and tool.
Do not remove chips with bare hands.
20. Cover steel parts with a thin anti-corrosion coating to protect the machine from
rust when not in use for any extended period.

WWW.JEIUK.COM RAILBEAST RDP-36
This document is protected by copyrights.
Copying, using, or distributing without permission of Ansa Group Ltd is prohibited.
8
21. Maintain the machine and install/remove parts and tools only when the engine
switch is set to OFF.
22. Maintain the engine as described in its manual.
23. Repair only in a service center appointed by the seller.
24. If the machine falls from any height or has any other damage that could affect the
technical state of the machine, stop the work and promptly send the machine to
the service center for inspection and repair.
25. Never leave the machine unattended during work.
26. Remove from the worksite and store in a secure and dry place when not in use,
previously removing the tool from the holder.

WWW.JEIUK.COM RAILBEAST RDP-36
This document is protected by copyrights.
Copying, using, or distributing without permission of Ansa Group Ltd is prohibited.
9
3. STARTUP AND OPERATION
3.1. Checking the oil level
Before starting, check the oil level with the engine stopped and on a level surface.
To do this, unscrew the oil filler cap, wipe its dipstick clean, reinsert the cap into the
neck as shown, but do not screw the cap in, and then remove it again. If the oil level
marked on the dipstick is below the minimum required, fill the oil to the bottom edge of
the hole, and then reinstall the cap. The recommended oil is SAE 10W-30 or different
specified in the Honda GXH50 Owner’s Manual. Always fill with oil of the same grade
and manufacturer.
Minimum required oil level
Maximum allowed
oil level
Bottom edge of the hole
Oil filler cap
with dipstick

WWW.JEIUK.COM RAILBEAST RDP-36
This document is protected by copyrights.
Copying, using, or distributing without permission of Ansa Group Ltd is prohibited.
10
3.2. Checking the air filter
Remove the air filter cover and then the filter. If the filter is dirty, clean it as described
in the Honda GXH50 Owner’s Manual or replace with a new one, and then reinsert it
and reinstall the cover. Never start the engine without an air filter installed.

WWW.JEIUK.COM RAILBEAST RDP-36
This document is protected by copyrights.
Copying, using, or distributing without permission of Ansa Group Ltd is prohibited.
11
3.3. Filling the fuel tank
With the engine stopped, cold, and on a level surface, unscrew the fuel filler cap.
Maintaining the requirements specified in the Honda GXH50 Owner’s Manual, fill the
tank with unleaded fuel with octane rating of at least 95, and then reinstall the cap.
Never exceed the maximum fuel level allowed.
Maximum allowed
fuel level
Fuel level mark
WWW.JEIUK.COM RAILBEAST RDP-36
This document is protected by copyrights.
Copying, using, or distributing without permission of Ansa Group Ltd is prohibited.
12
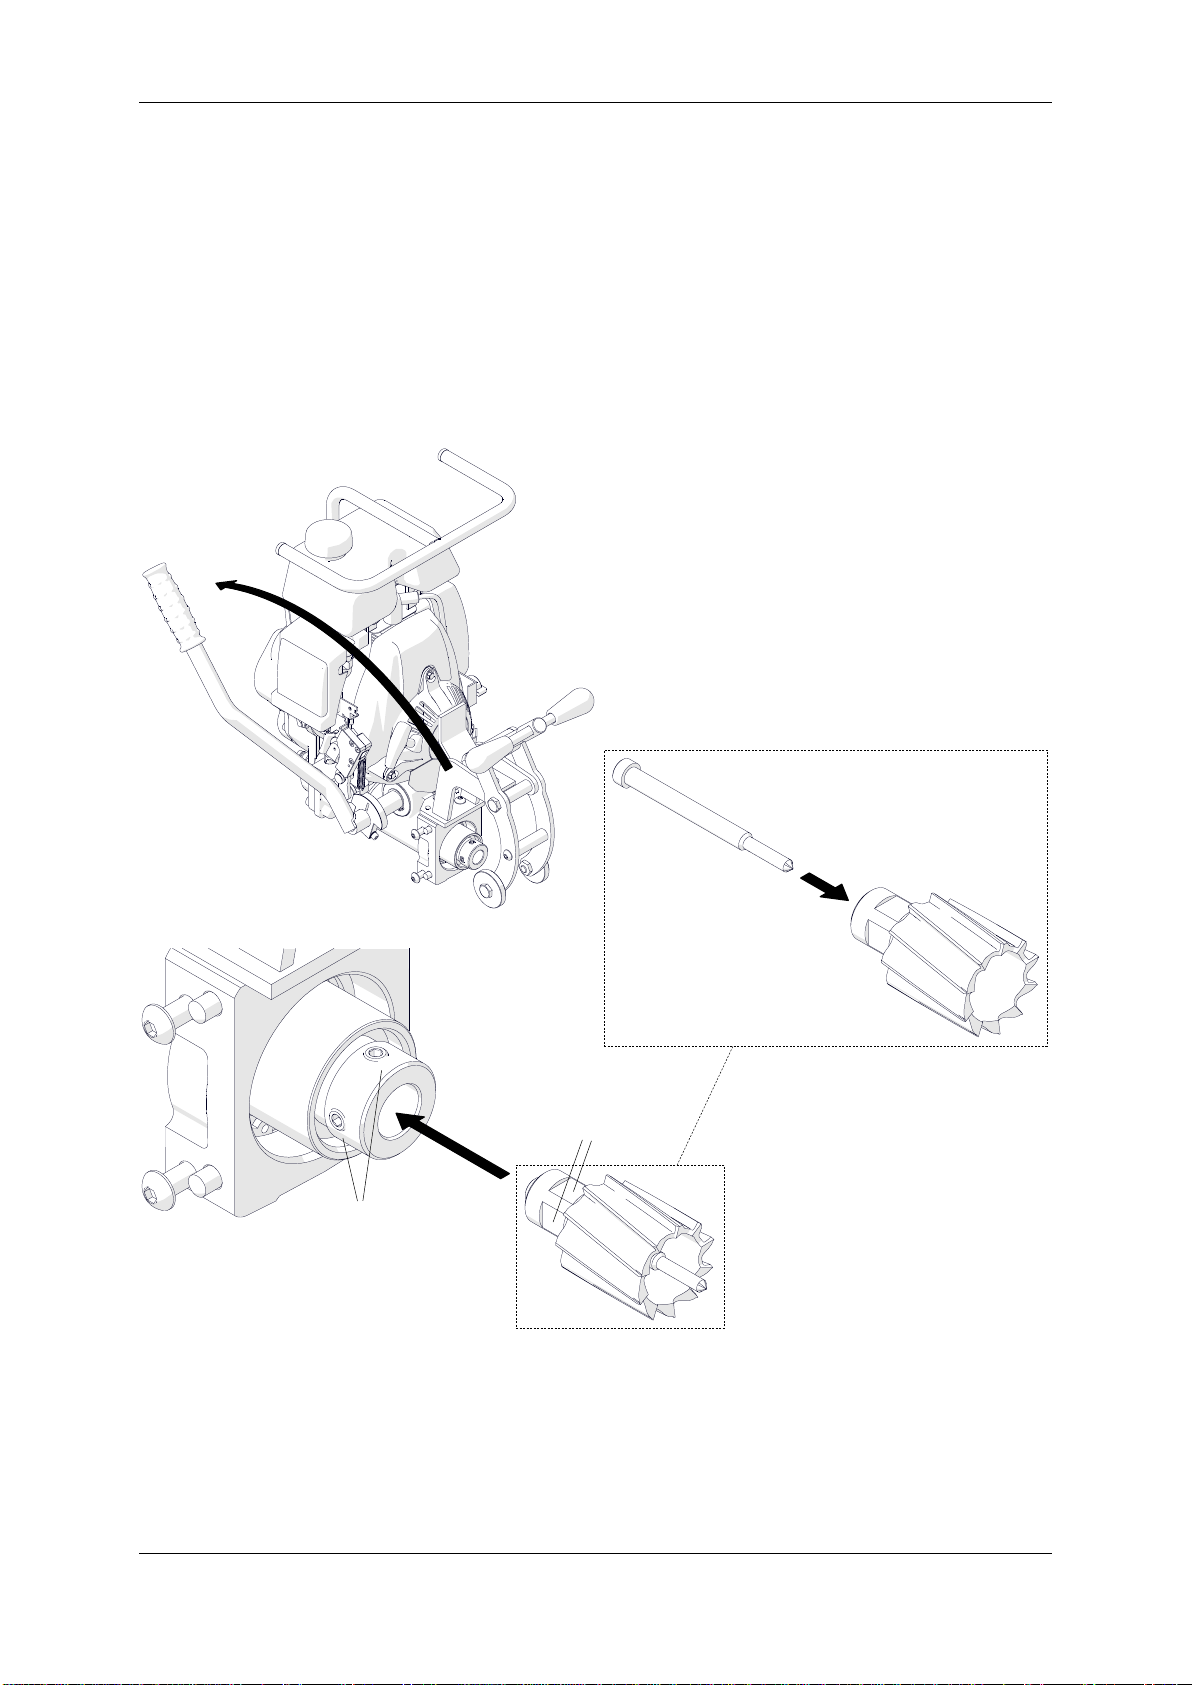
3.4. Installing, removing, and operating the annular cutter
With the engine stopped, move back the feed lever as far as possible (1) to move out
the arbor. Wear protective gloves, insert the proper pilot pin into the annular cutter (2),
and then use a clean and dry cloth to wipe the arbor and cutter. Next, place the cutter
into the arbor (3) so that the flats 4are aligned with the set screws 5, and then use
the 4 mm hex wrench to tighten the set screws.
To remove the cutter, loosen the screws 5with the 4 mm hex wrench.
1
2
3
5
4

WWW.JEIUK.COM RAILBEAST RDP-36
This document is protected by copyrights.
Copying, using, or distributing without permission of Ansa Group Ltd is prohibited.
13
The following figure shows how annular cutters work. As the cutter drills into the
workpiece, the pilot pin retracts and tightens the spring. As a result, after the cutter
drills through the material, the slug core is expelled from the cutter. Also, when
pressed, the pilot pin allows application of coolant to the inside of the cutter.
Slug core
Spring
Pilot pin
Annular cutter
Arbor

WWW.JEIUK.COM RAILBEAST RDP-36
This document is protected by copyrights.
Copying, using, or distributing without permission of Ansa Group Ltd is prohibited.
14
3.5. Installing and removing the rail profile templates
Select rail profile templates (not included) consistent with rail standard, place them
on the pins, and then tighten with the screws and the 6 mm hex wrench.
To remove the templates, unscrew them with the 6 mm hex wrench.

WWW.JEIUK.COM RAILBEAST RDP-36
This document is protected by copyrights.
Copying, using, or distributing without permission of Ansa Group Ltd is prohibited.
15
3.6. Installing and removing the hole center positioner
Select a hole center positioner (not included) consistent with rail standard, and loosen
the levers 1. Place the positioner onto the rail (2) so that the positioner face is aligned
with the rail face (3). Then, lock the levers in this position. Next, use the 6 mm hex
wrench to tighten the screws 4so that the positioner is clamped onto the rail (5).
To remove the positioner, loosen the screws 4and levers 1.
2
3
4
5
1
Clamped
Unclamped

WWW.JEIUK.COM RAILBEAST RDP-36
This document is protected by copyrights.
Copying, using, or distributing without permission of Ansa Group Ltd is prohibited.
16
3.7. Clamping the machine onto the rail and unclamping
Place the machine onto the rail (1) so that the locating pin comes into the first groove
of the hole center positioner (2) and the pressing screw comes into the resisting
socket (3). Then, tighten the screw (4) to clamp the machine onto the rail.
To unclamp the machine, loosen the pressing screw.
1
4
2
3

WWW.JEIUK.COM RAILBEAST RDP-36
This document is protected by copyrights.
Copying, using, or distributing without permission of Ansa Group Ltd is prohibited.
17
3.8. Connecting and disconnecting the cooling system
When using an annular cutter, attach the cooling system to the fitting (1), and then fill
the bottle with a coolant. Do not use only water as the coolant. However, using
emulsions formed from drilling oil and water is adequate. Next, open the valve 2, and
then rotate the handle 3and move it up-down several times to build a pressure inside
the bottle.
To disconnect, close the valve 2,pull up the release valve (4) to release excess
pressure, and then detach the cooling system from the fitting.
1
2
3
4

WWW.JEIUK.COM RAILBEAST RDP-36
This document is protected by copyrights.
Copying, using, or distributing without permission of Ansa Group Ltd is prohibited.
18
3.9. Drilling
Set the fuel valve lever to ON.
To start a cold engine, set the choke valve lever to CLOSED.
To start a warm engine, set the choke valve lever to OPEN.
Fuel valve lever
ON
ON
OFF
Choke valve lever
CLOSED
CLOSED
OPEN
OPEN
OPEN
CLOSED
Choke valve lever

WWW.JEIUK.COM RAILBEAST RDP-36
This document is protected by copyrights.
Copying, using, or distributing without permission of Ansa Group Ltd is prohibited.
19
Set the engine switch to ON.
Hold the carrying handle with one hand and lightly pull the starter grip in the direction
of the arrow until you feel resistance, and then pull briskly. After the engine is started,
gently return the starter grip.
ON
Engine switch

WWW.JEIUK.COM RAILBEAST RDP-36
This document is protected by copyrights.
Copying, using, or distributing without permission of Ansa Group Ltd is prohibited.
20
If the choke valve was closed, open it.
Slowly move back the feed lever to move out the cutter and start drilling until the lever
is retracted as far as possible.
When the cutter goes through the workpiece, the slug core
is expelled from the cutter with a substantial force.
OPEN
OPEN
CLOSED
Choke valve lever
Table of contents
Other JEI DRILLING & CUTTING SOLUTIONS Drill manuals


