JELLYPIG TZ-926 User manual

Dog Training Collar
User Manual
TZ-926
Please Read This Manual Carefully Before Use

Contents
Packaging List
Product Specifications
Main Features
Important Statement
Transmitter Introduction
Receiver Introduction
Charging Instructions
Operation Instructions
Receiver Fitting Instructions
Pairing Instructions
How Does the Training Collar Work
Frequently Asked Questions
Troubleshooting
Training Tips
Common Weights for Different Size Dogs
Common Sizes for Different Breeds of Dogs
Warranty
Compliance FCC -USA
1
2
3
4
5
6
7
8
13
14
15
16
17
18
18
19
20
21

Packaging List
① Remote Transmitter
③ Type-C Charging Cable ⑤ Test Light Tool④ Wrist Strap
② Receiving Collar
-1-
⑦ Contact Points ⑥ Mini Spanner ⑧ Silicone Caps
⑨ User Manual
Remote Dog Training Collar
User Manual
TZ-926
Please Read This Manual Carefully Before Use

Product Specifications
-2-
Product Name:
Product Model:
Material:
Control Range:
Charging Method:
Transmitter/ Receiver
Charging Time:
Transmitter/ Receiver
Standby Time:
Transmitter Waterproof Rating:
Receiver Waterproof Rating:
Working temperature:
Storage temperature:
Relative Humidity:
2.5 Hours
Remote Dog Training Collar
TZ-926
ABS+PC
800M(2600FT)
Type-C
Not Waterproof
IPX7 Waterproof
-30°C- +70°C
-30°C- +85°C
20%-90%
180 Days
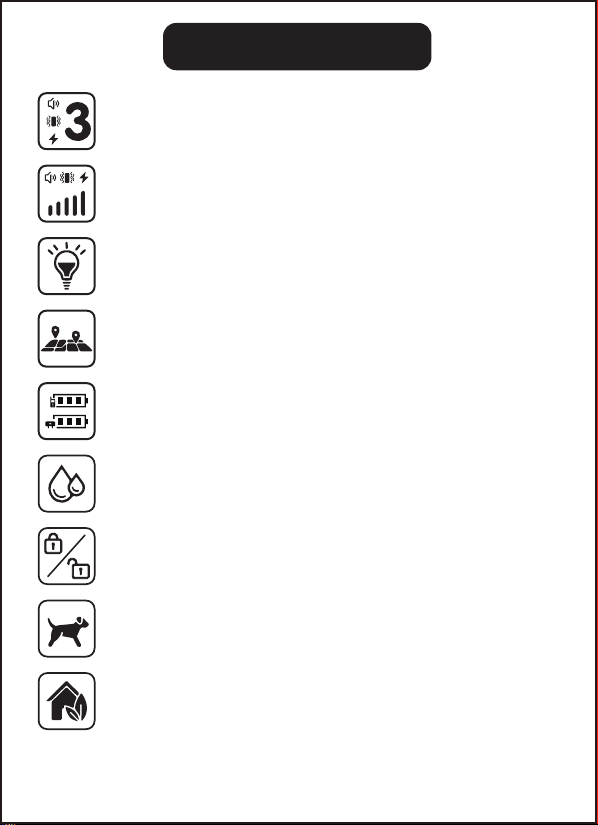
Main Features
-3-
Beep, Vibration, Shock training mode
1-9 adjustable beep sound levels
1-16 adjustable Vibration/Shock levels
With safe LED light for locating your
dog at night
Remote control range up to 800M(2600FT)
Dual battery power display
Receiver is IPX7 waterproof;
Transmitter is not waterproof
Security lock function
One Transmitter can control up to 3 Receivers
Receiver and transmitter with Power Saving Mode

Important Statement
•DO NOT use this product for aggressive dogs or vicious animals.
•When the receiving collar is turned on, the human body should not directly
touch the Shock contact points of the collar.
Risk of skin damage. It’s important to fit the collar properly. A collar that
is fitted too tightly or worn for too long may harm your dog's skin. This
condition, which ranges from redness to pressure ulcers, is commonly
known as bed sores.
•Do not let your dog wear the collar for more than 12 hours per 24-hour period.
•If possible, gently reposition the collar on your dog's neck every 1 or 2hours.
•Never attach a leash to the Receiver Collar, as this would cause excessive
pressure on the contact points.
•When using a separate collar to connect a leash, please ensure that it does
not put excessive pressure on the electronic collar.
•Examine your dog's neck daily for signs of chafing or soreness.
•If a rash or sore is found, stop using the collar till the injured skin has been
healed.
•If the condition persists for more than 48 hours, consult your veterinarian.
•If possible. please use the Beep Mode or Vibration Mode at first. then can
try Static shock function.
To extend the battery life of this product,if you do not intend to use it for a long
period of time please charge them per month.
WARNING!
CAUTIONS
-4-

-5-
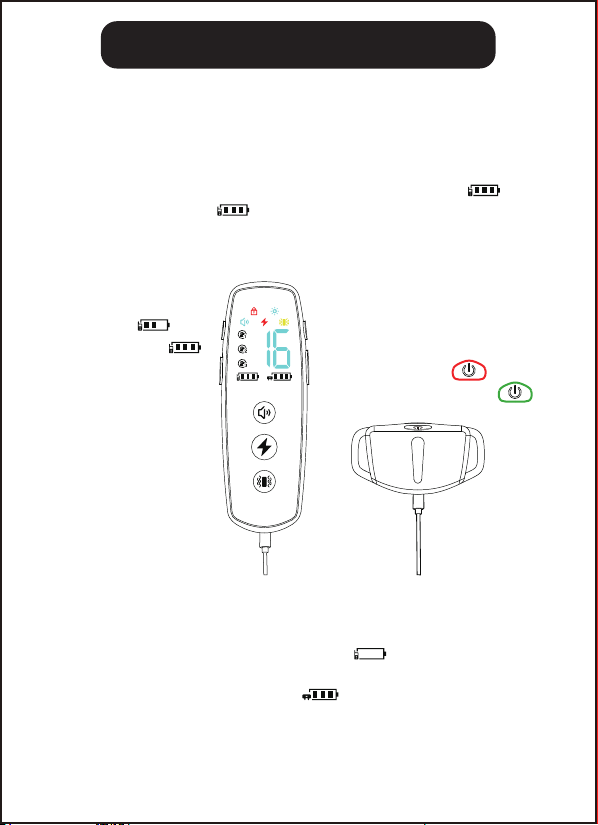
Transmitter Introduction
Vibration Button
Color Screen
LED Light
Button Channel Button
Level+ Button
Key Lock
Switch
Beep Button
Shock Button
Level- Button
Digital Display for
training intensity
level
Lock Key
LED Light Mode
Beep Mode
Shock Mode
Vibration Mode
Channel 1
Channel 2
Channel 3
Transmitter
Battery
Receiver Battery

-6-
Receiver Introduction
LED Mode Indicator Light (The status of the mode indicator light is
as follows in the corresponding mode.)
Charging port
Contact Points
ON/OFF Button(Short press)
Pairing Button (Long press)
Indicator Light
Mode
Beep Mode
Vibration Mode
Shock Mode
LED Light Mode
LED Mode Indicator Light Status
Mode Indicator will light up Green
Mode Indicator will light up Blue
Mode Indicator will light up Red
light off→red light steady on→red light
flashing→green light steady on→green
light flashing→blue light steady on→
blue light flashing
-7-
Charging Instructions
Low Battery Indicator:
•Transmitter: the transmitter battery icon ( ) is flashing for 30s, then
transmitter will be turned off automatically.
•Receiver: the receiver battery icon ( ) will disappear after the receiver
battery icon flashes for 30s, and the indicator red light flashes for 30s, then
receiver will be turned off automatically.
Please charge the product before use or when the transmitter and receiver
battery icons flash on the screen! It takes 2.5 hours to fully charge the transmitter
and receiving collar.
1. When the transmitter is charging, three bars of the battery icon ( ) is running
circularly. The battery icon ( ) remains on when the battery is fully charged.
2. When the receiver is charging, the red LED indicator light is on. When the
battery is fully charged, the green LED indicator light is on.
Charging:
Fully charged:
Charging: Red
Fully charged: Green

-8-
Operation Instructions
1. Turn on/off the transmitter and receiver
•Turn on the transmitter: push down the key lock switch, the screen will light
up, indicating that transmitter is in the working state.
•Lock the transmitter: push up the key lock switch, the lock key icon flashes,
which means entering key lock mode.
LockUnlock
turn on: Green light on → flash intermittently
turn off: Red light on→ off
•Turn on the receiver: press the ON/OFF button, the green LED indicator light
will be on and then flash intermittently, indicating it is turned on.
•Turn off the receiver: In the power-on state, press the ON/OFF button, the red
LED indicator light will be on and off, indicating it is off.

-9-
2. Operate beep function
•Short Press the ( ) button to launch beep signal, the ( ) is displayed
on the screen, the Mode Indicator will light up Green once and the receiving
collar will beep once after receiving the signal. Long press the ( ) button,
the Green light will remain on and the receiving collar will continuously beep.
•Press the button for more than 8s, the number icon and beep icon will flash,
the receiver will automatically stop working to protect your dog and resume
to work after 30 s.
•Adjust beep loudness: press the ( ) button to adjust beep loudness
from 1-9 levels.
3. Operate Vibration Function
•Short press the ( ) button to launch vibration signal, the ( ) is displayed
on the screen, the Mode Indicator will light up Blue once and the receiving
collar vibrates once after receiving the signal. Long press the ( ) button, the
Blue light will be remain on and the receiving collar continuously vibrates.
•Press the button for more than 8s, the number icon and vibration icon will
flash, the receiver will automatically stop working to protect your dog and
resume to work after 30s.
•Adjust vibration intensity: press the ( ) button to adjust vibration intensity
from 1-16 levels.

-10-
4. Operate Shock Function
•Short press the ( ) button to launch shock signal, the ( ) is displayed
on the screen, the Mode Indicator will light up Red once and the receiving
collar will generate static impulse once after receiving the signal. Long press
the ( ) button, the Red light will remain on and the receiving collar will
continuously generate static impulse.
•Press the button for more than 8s, the number icon and shock icon will flash,
the receiver will automatically stop working to protect your dog and resume
to work after 30s.
•Adjust shock intensity: press the ( ) button to adjust vibration intensity
from 1-16 levels.

-11-
5. Operate LED Light Function
•Short Press the ( ) button to turn on LED light mode for locating your
dog at night, and the ( ) is displayed on the screen.
•After the LED light mode is turned on, short press the ( ) button, LED
Mode Indicator will cycle through the following light modes:
1st press: Mode 0, light off
2nd press: Mode 1, red light steady on
3rd press: Mode 2, red light flashing
4th press: Mode 3, green light steady on
5th press: Mode 4, green light flashing
6th press: Mode 5, blue light steady on
7th press: Mode 6, blue light flashing

-12-
7. Channel switching
Our product supports a remote transmitter connected to 3 receivers, can
train 3 dogs at the same time. Press the ( ) to switch between CH1,
CH2, CH3.
6. Use test light tool
The static impulse generated by the Receiving Collar cannot be seen by naked
eyes. To test whether the Static Shock Function works, we need to use the
test light tool.
•Put the test light on contact points on the receiving collar.
•Press the ( ) button on the transmitter, the test light will flash, indicating
the shock function is working normally.
-13-
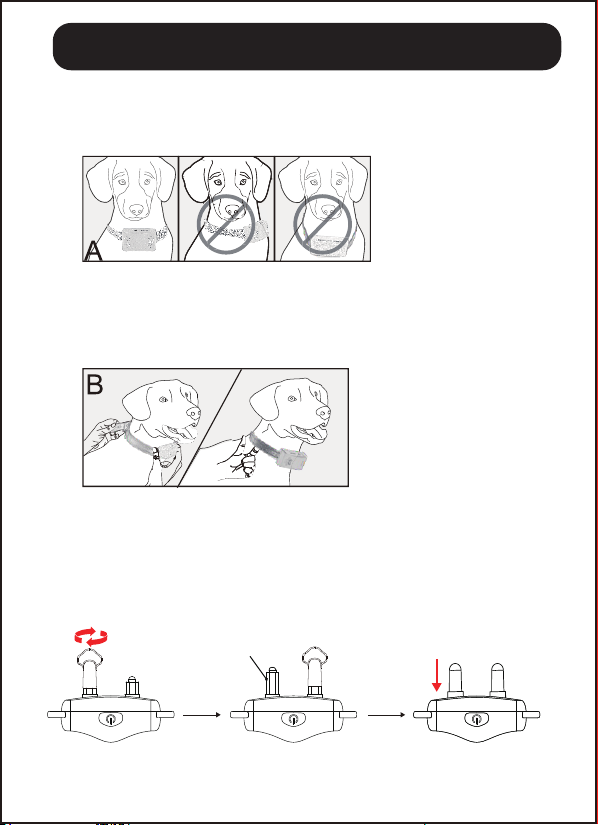
Receiver Fitting Instructions
Please ensure that the receiving collar is fitted correctly.
1. Center the Contact Points under your dog’s neck(A).
2. Please adjust the sliders to have the receiving collar positioned snugly
around your dog’s neck. Make sure that you can leave one finer between
the strap and your dog’s neck(B).
3. Choose the correct Contact Points to suit the length of you dog's hair.
If your dog has long hair, use the longer Contact Points. Use Mini Spanner
to screw/unscrew Contact Points. Remember installing the matching
silicone caps to protect your dog’s skin.
Unscrew
Install the silicone caps
Long Contact Points

-14-
Pairing Instructions
In the 1-receiving collar package, the receiver and transmitter are already
factory-paired on CH1 by default. If you need to connect CH2/CH3 receiver,
pls follow the steps below to pair with the transmitter. If not, you can skip this
step.
1. Press the ( ) button to choose CH2 or CH3.
2. In the power-on state, hold the ON/OFF button till Red and Green LED light
flash alternately, which means it goes into pairing mode.
3. Press the ( ) button, If green LED light will flash intermittently,
indicating that the pairing is successful.
4. If you enter the pairing mode and do not press the buttons within 10mins,
the Red and Green LED light will change from flashing to off and then the
Green LED light flash intermittently, it will exit pairing mode, and you need
to follow step 3 to re-pair.
hold the button till Red and
Green light flash

-15-
How Does the Training Collar Work
The Remote Training Collar has been proven to be a safe, comfortable, and
effective training system for all dogs weighing over 15lbs. This system allows
you to control your dog within a range up to 2600 feet. At the press of a button,
the Remote Transmitter sends signal to the Receiving Collar and activates a
Beep, a Vibration or a Static Shock correction output. By using the Training
Collar properly, you can correct much of your dog's undesired behavior and
teach basic and advanced obedience commands.
Important: The Remote Training Collar has an effective range up to 2600 feet.
Hold the Remote Transmitter horizontally away from your body to achieve the
optimum range. Terrain features, weather, vegetation, transmission from other
radio devices and other factors may affect the range of the Remote Transmitter.
Maximum Effective Control Distance Up to 2600 Feet

-16-
Frequently Asked Questions
Q1: Why don’t the receiver and transmitter work?
A: One reason maybe the transmitter and receiver are not turned on, please
refer to the manual for the power-on operation. the other reason maybe that
the transmitter and receiver batteries are exhausted, please fully charge them.
Q2: Once my dog is trained and has leaned to obey my commands,
will he have to continue wearing the Receiving Collar?
A: Probably not, although you may need to reinforce the training with the
Receiving Collar from time to time.
Q3: Is the Receiving Collar waterproof?
A: Yes. In fact, your dog can swim while wearing the Receiving Collar Must
seal well the charging port tightly, and keep it dry after getting wet.
Q4: What is the lifespan of the lithium batteries?
A: The Lithium battery in the Remote Transmitter and the Receiving Collar
can be charged for 400 times.
Q5: How long should the training session for my dog be?
A: The training sessions should be kept short for maximum effectiveness. It’s
advised not to train your dog for more than 10-15mins at a time.
Q6: Can I charge this product with any type of charger?
A: No, we recommend using a matching charging adapter or charging adapter
rated at 5V/500-1000mA because a charging adapter rated at 9V or 12V may
damage to your device.

-17-
Troubleshooting
I have fitted the Rechargeable and Waterproof Training Collar correctly,
but my dog is not responding.
•Ensure that the batteries are fully charged. You need to charge both the
Remote Transmitter and the Receiving Collar for about 2.5 hours before
they can be used for the first time.
•Check the receiving collar is turned on. Restart the Receiving collar by
pressing the On/ Off button.
•Check the Remote Transmitter can adjust the intensity level of the vibration
or static shock to higher level more than level 1.
•Test the 3 functions (Beep, Vibration and Static Shock) before using the
Receiving Collar for the first time. Please refer to page 9 for instructions
on how to do this.
•The Receiving collar will go into Standby Mode if it is idle for more than 5
minutes. Any movements will re-activate it.
•Make sure that the Contact Points are touching your dog's skin.
•Trim your dog's fur where the Contact Points touch the neck. Ensure that
you are using the correct set of Contact Points suitable for the length of
your dog's fur.
•Verify the receiving collar has been paired.
•If none of the above works, Pair the Remote Transmitter and the Receiving
Collar again. Refer to pairing instructions to repair.
The Remote Transmitter does not work
•You must charge the Remote Transmitter before you use it for the first time.
Charging time is typically 2.5 hours.
•Ensure that the Remote Transmitter has adequate power.
•Check the Remote Transmitter is turned on.
•Remote Transmitter will automatically go into Standby Mode if it is idle for
3mins. No LED light will be illuminated at this time. Press any button to
re-activate the Transmitter.
I am trying to test the Receiving Collar manually, but it does not work.
•If you want to test the Receiving Collar manually on your hand or leg. please
touch the 2 Contact Points simultaneously. Touching only one of the Contact
Points will not work.
The Receiving Collar is broken. It has not worked since I dropped it.
•The Receiving Collar is not designed to be drop-proof. Please do not drop
the Receiving Collar, as this will damage the interior circuits.

-18-
Training Tips
Here are some general tips for training your dog:
•Eliminate one behavioral problem or teach one command at a time. If you
move too fast with the training, your dog may become confused. Be consistent.
Give your dog a single Beep, Vibration, or Static Shock for each misbehavior.
•Do not over-correct your dog. Use a few stimulation as possible during
training.
•Unless you can supervise him/ her, it is recommended that you restrain your
dog from environments in which he/ she has a history of misbehaving.
However, setting up a training session in this case can dramatically improve
your chances of success.
•If your dog reacts to the training by hiding or acting fearfully, redirect his/her
attention to a simple and appropriate behavior, such as the"Sit!"command.
Common Weights for Different
Size Dogs
Large Dogs
Medium Dogs
Small Dogs
Mini Dogs
(Height over 24 in, Weight over 88 lbs)
(Height 16-24 in, Weight 24-86 lbs)
(Height 10-16 in, Weight 8-22 lbs)
(Height under 10 in, Weight under 8 lbs)
Table of contents
Popular Pet Care Product manuals by other brands

Tri-Tronics
Tri-Tronics Pro 500XLS owner's guide

E-Collar Technologies
E-Collar Technologies Barkless Pro BP-504 owner's manual

Mania
Mania PET GROOMING KIT instruction manual

LILIMO
LILIMO DC.KD1PETAOC Assembly instructions

Zoofari
Zoofari AGILITY SLALOM Instructions for use

Martin System
Martin System TT200 user guide


Droll Yankees
Droll Yankees YF Ring Gear manual

PawHut
PawHut D02-062 Assembly & instruction manual

Premier Pet
Premier Pet GFD00-17006 product manual

Innotek
Innotek Digital Advanced Trainers ADV-1000E quick start guide

Monster
Monster Car Dog Pet Crate instruction manual

Dogtra
Dogtra 2200NCP Series owner's manual