Jenn-Air Attrezzi JBL800 User manual

Jenn-Air Attrezzi™ Blender
Model # JBL800
USER GUIDE
Congratulations on your purchase of a Jenn-Air Attrezzi™ Blender.
Inspired by the Italian word for tools, Jenn-Air Attrezzi™ captures the
European appetite for life – combining art, form and function.
Jenn-Air Attrezzi™.
For the love of cooking.
www.jennairattrezzi.com
Table of Contents
Safety Instructions .................................................................................................1-3
Parts and Features.................................................................................................3-4
Assembling Your Blender ...................................................................................5-6
Operating Your Blender.......................................................................................6-8
Speed Control Guide.................................................................................................9
Care and Cleaning...................................................................................................10
Before You Call For Service .................................................................................11
Recipes..................................................................................................................12-15
Warranty/Customer Service...........................................................................16-17
Guide de l’utilisateur...............................................................................................18
Guía del Usuario.......................................................................................................36
Part No. 16025825 2/05

1
When using electrical appliances, basic safety precautions should
always be observed, including the following:
1. Read all instructions.
2. To protect against risk of electrical shock, do not immerse the
cord, plug or blender power base in water or other liquids.
3. Close supervision is necessary when any appliance is used by or
near children.
4. Unplug blender from outlet when not in use, before putting on or
taking off parts, and before cleaning or taking apart the blender
pitcher. Never put hands in blender pitcher or handle the blades
when the appliance is plugged in. Never operate the blender
without the pitcher fully assembled.
5. Avoid contacting moving parts.
6. Do not operate any appliance with a damaged cord or plug or
after the appliance malfunctions, or is dropped or damaged in
any manner. Return appliance to the nearest authorized service
What You Need to Know About Safety
Instructions
Warning and Important Safety Instructions appearing in this manual
are not meant to cover all possible conditions and situations that may
occur. Common sense, caution and care must be exercised when
installing, maintaining or operating appliance.
Always contact your dealer, distributor, service agent or manufacturer
about problems or conditions you do not understand.
Recognize Safety Symbols, Words, Labels
WARNING – Hazards or unsafe practices which COULD result
in severe personal injury or death.
WARNING
CAUTION – Hazards or unsafe practices which COULD result
in minor personal injury.
CAUTION
IMPORTANT SAFEGUARDS
WARNING

2
facility for examination, repair, electrical or mechanical adjustment.
Call the Jenn-Air Customer Service Center at
1-866-982-3313 for assistance.
7. Using attachments not recommended or sold by the appliance
manufacturer for use with this model, including canning jars or
ordinary jars, is not recommended and may cause fire, electric
shock or injury to persons.
8. Do not use the blender outdoors.
9. Do not let the cord hang over the edge of a table or counter.
Do not let cord contact hot surfaces, including stove.
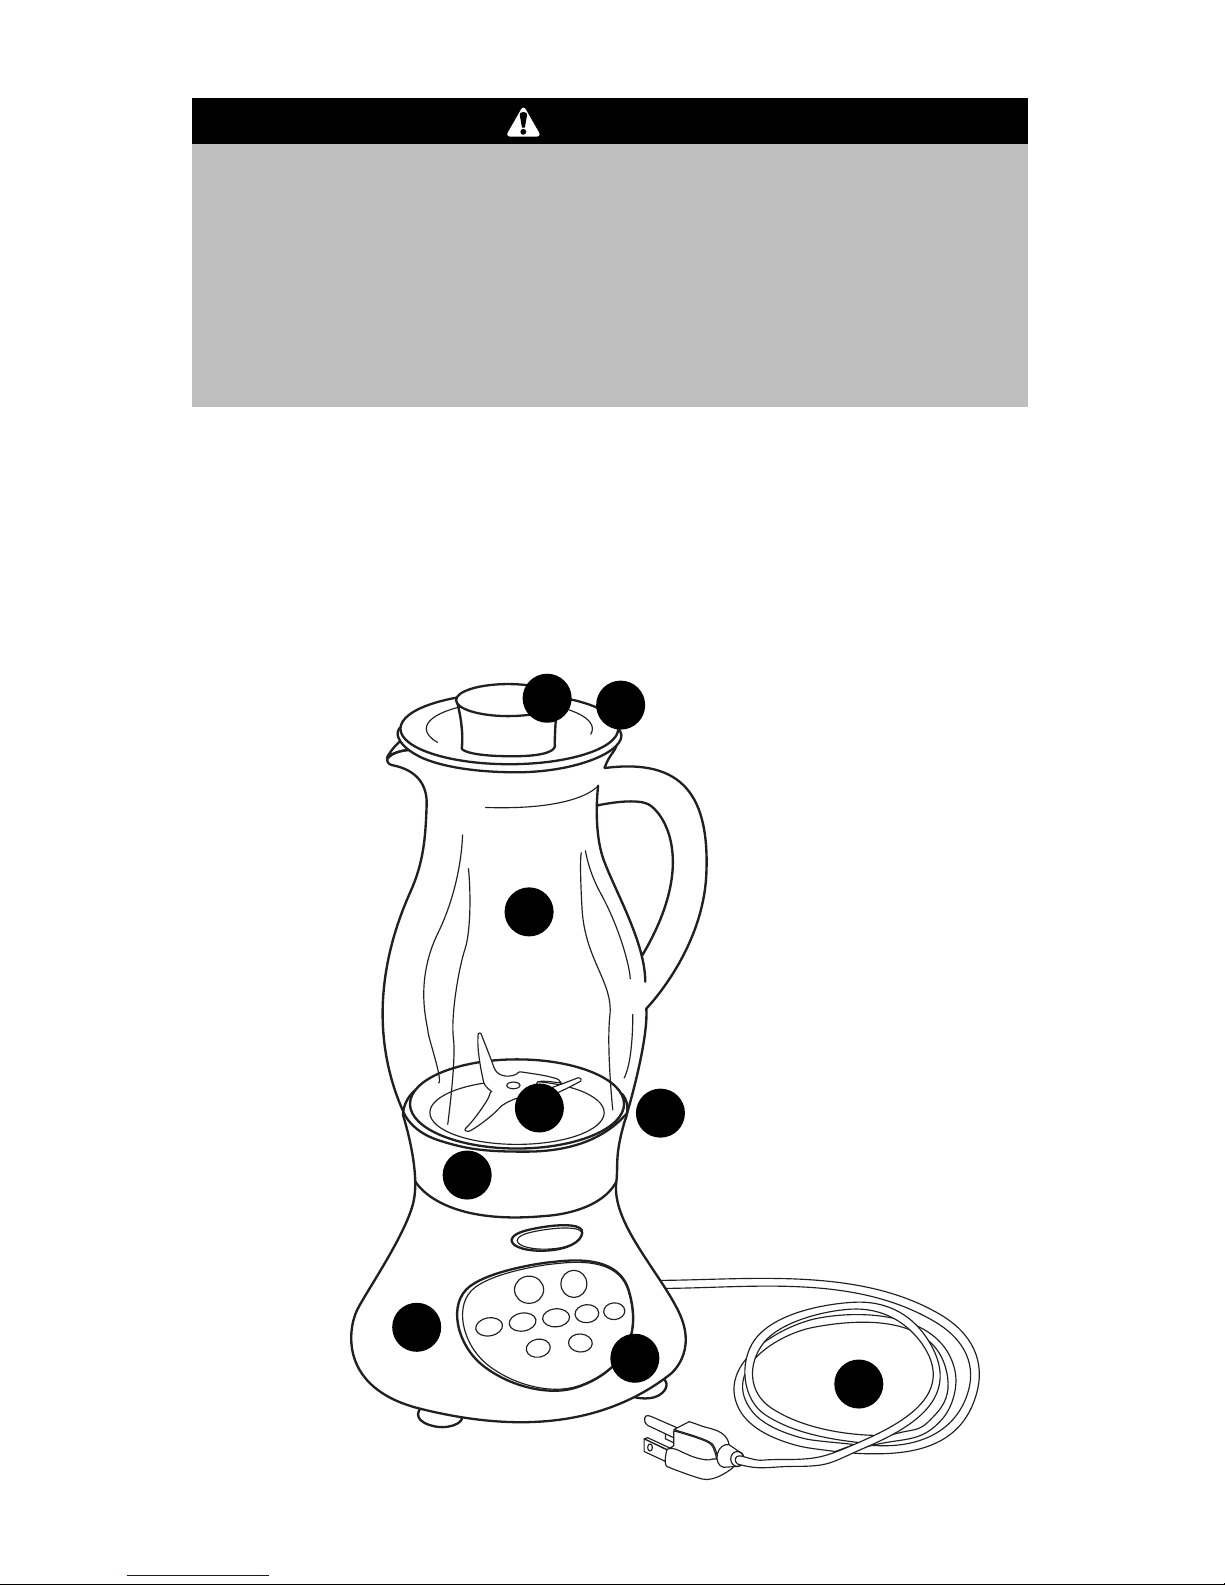
10. Keep hands and utensils out of pitcher while blending to reduce the
risk of severe injury to persons or damage to the blender. A scraper
may be used but must be used only when the blender is not running.
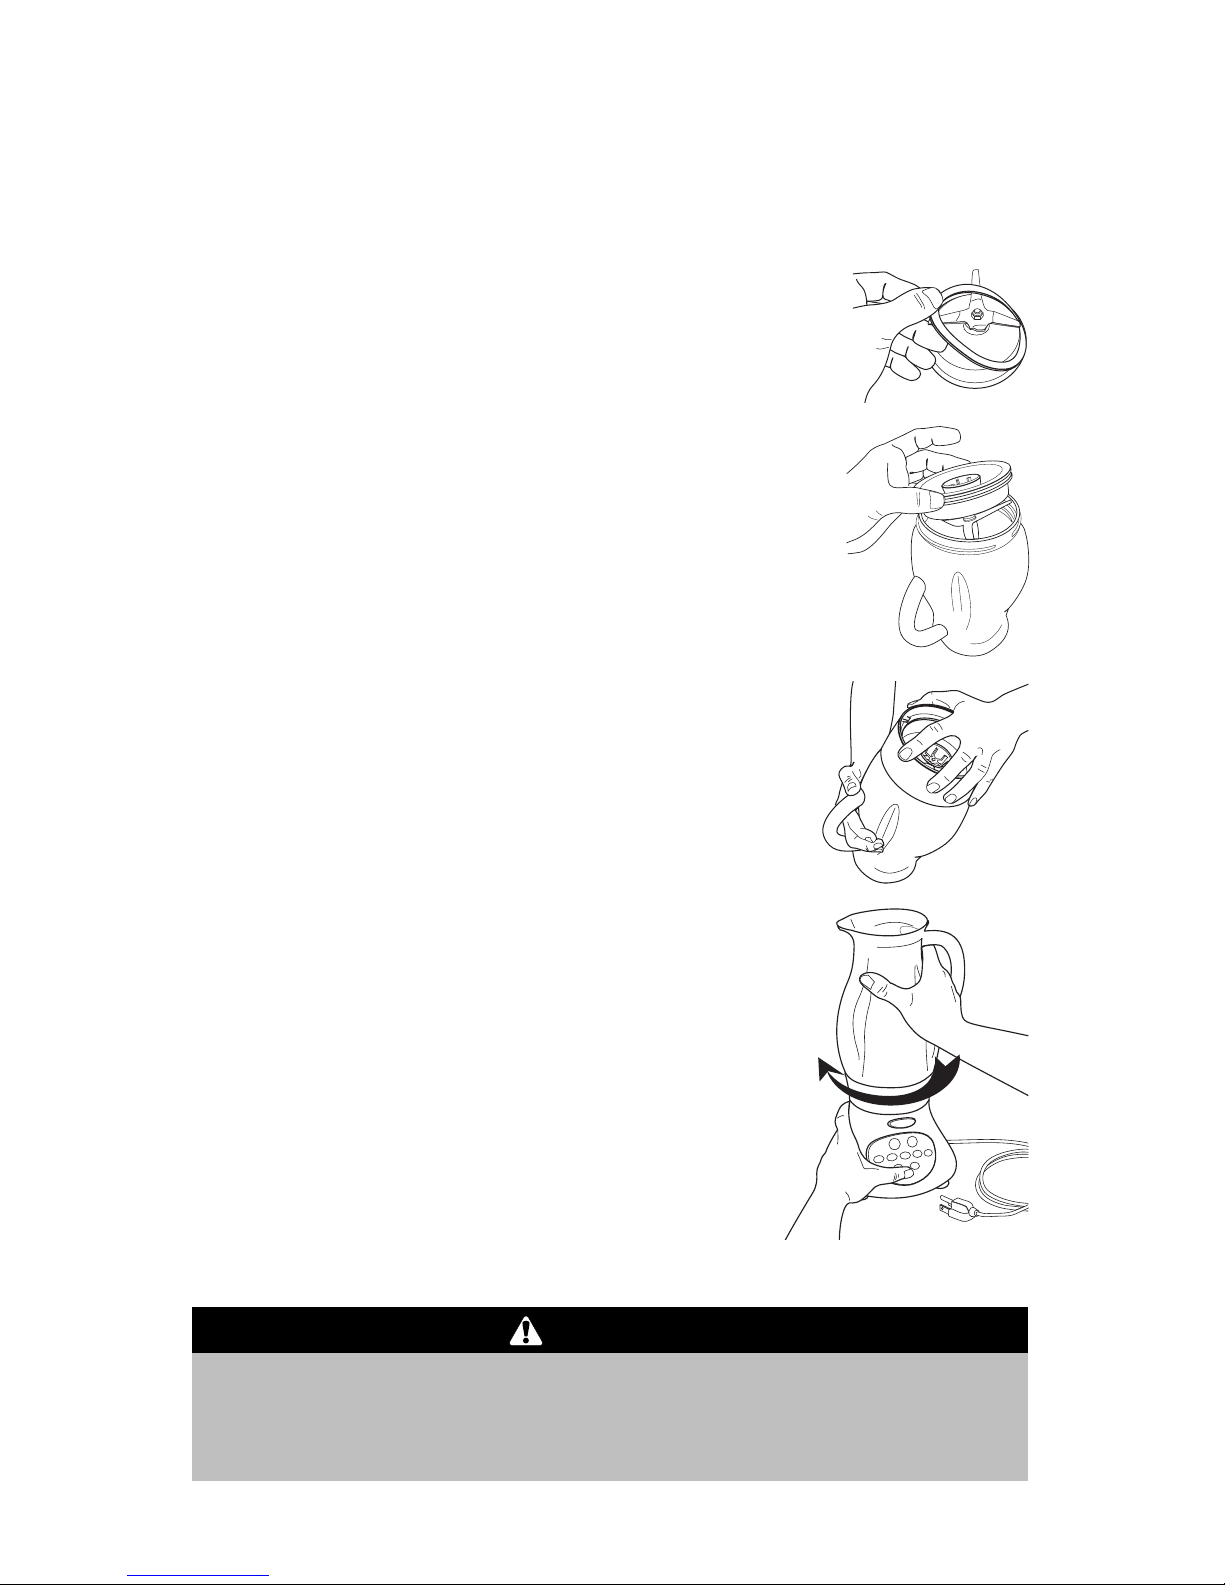
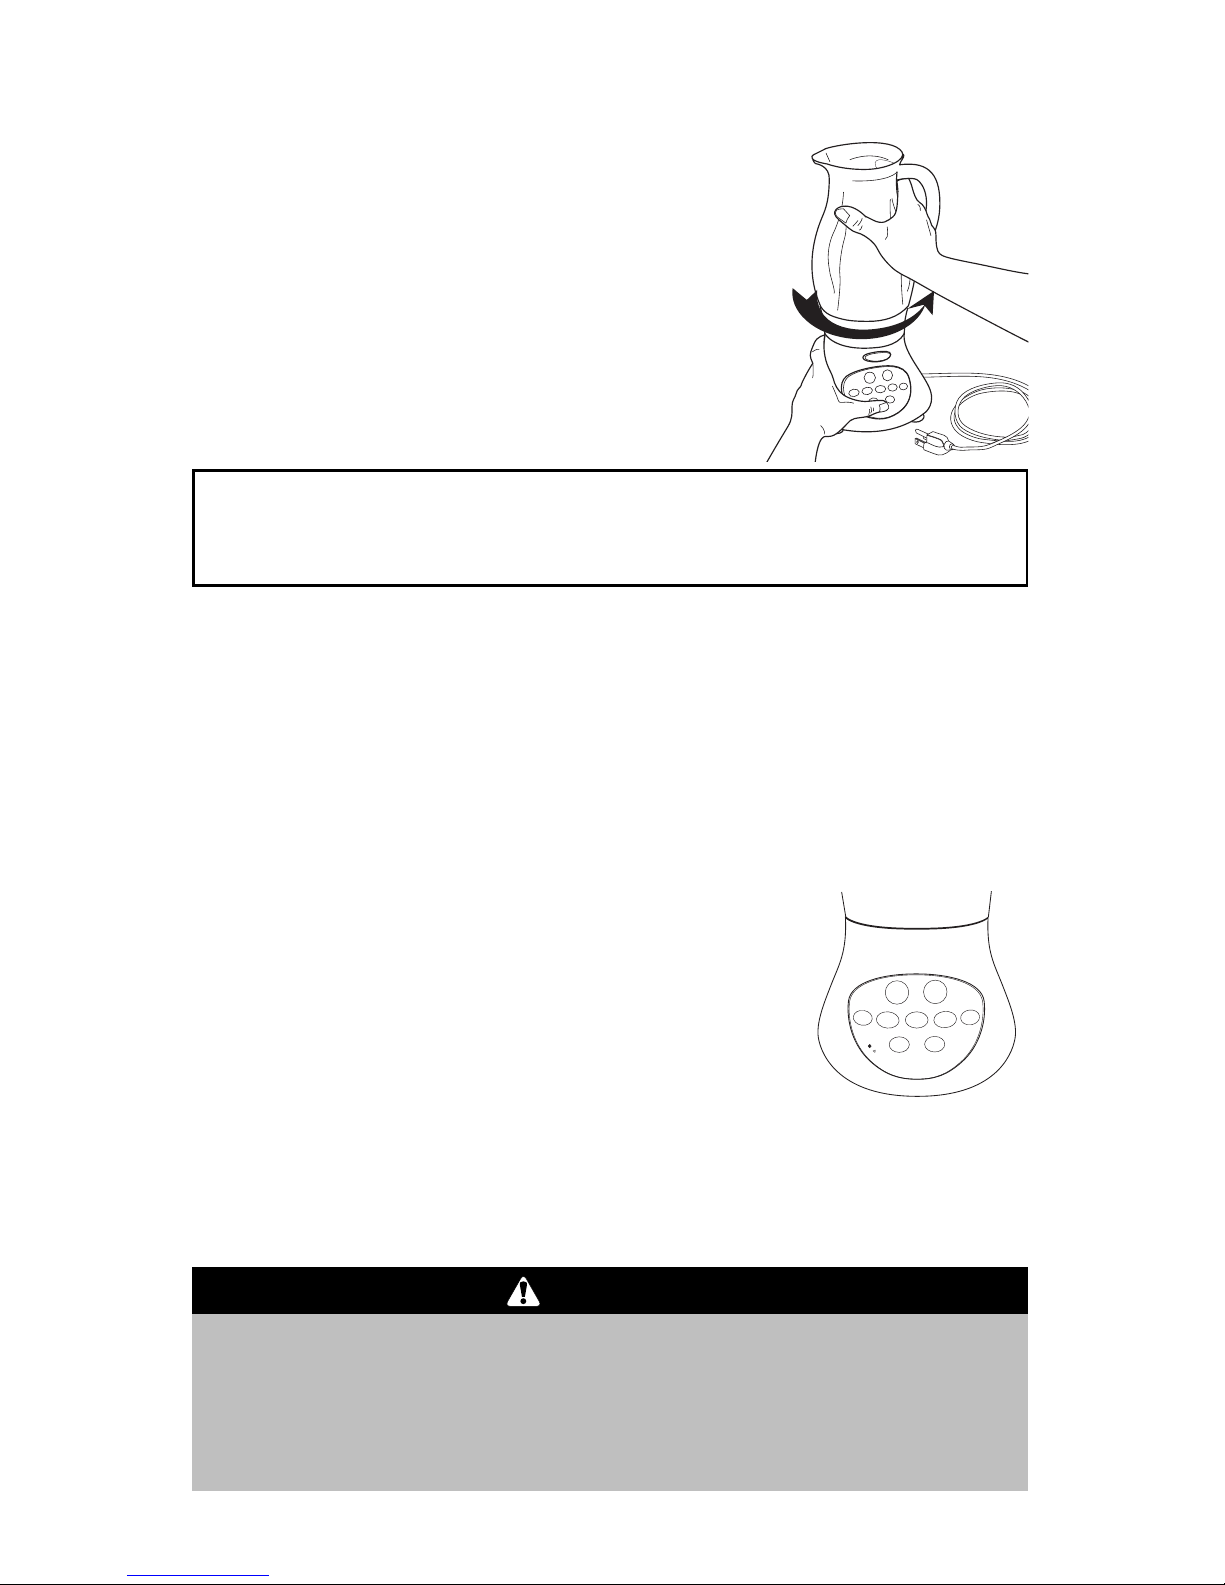
11. Flashing light indicates ready to operate. Avoid any contact with
blades or moveable parts. When the blender is in the “ON” mode,
and the touch control is illuminated, do not touch the blade
assembly, interfere with blade movement or remove the pitcher lid.
Accidentally touching a speed control may activate the blender.
12. Blades are sharp. Handle carefully.
13. To reduce risk of injury, never place the blade assembly on the
power base without the pitcher properly attached.
14. Always operate blender with the lid in place.
15. Never leave blender unattended while running.
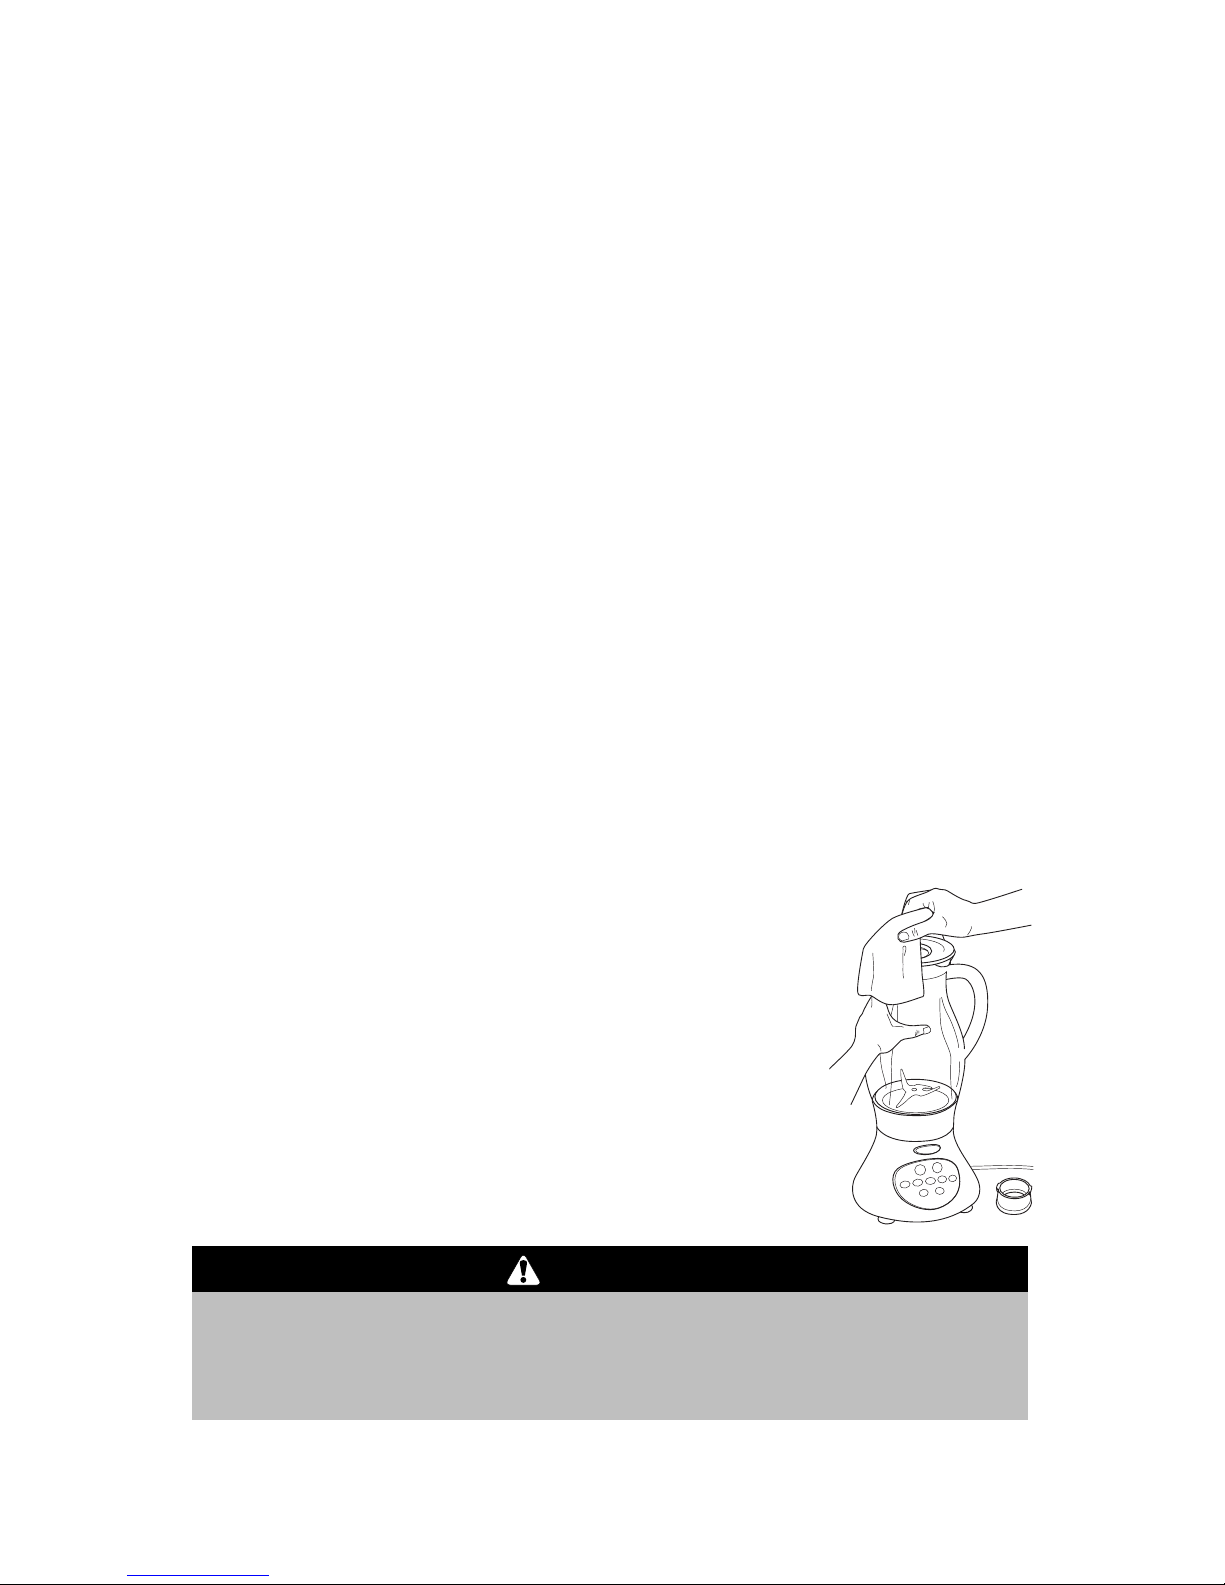
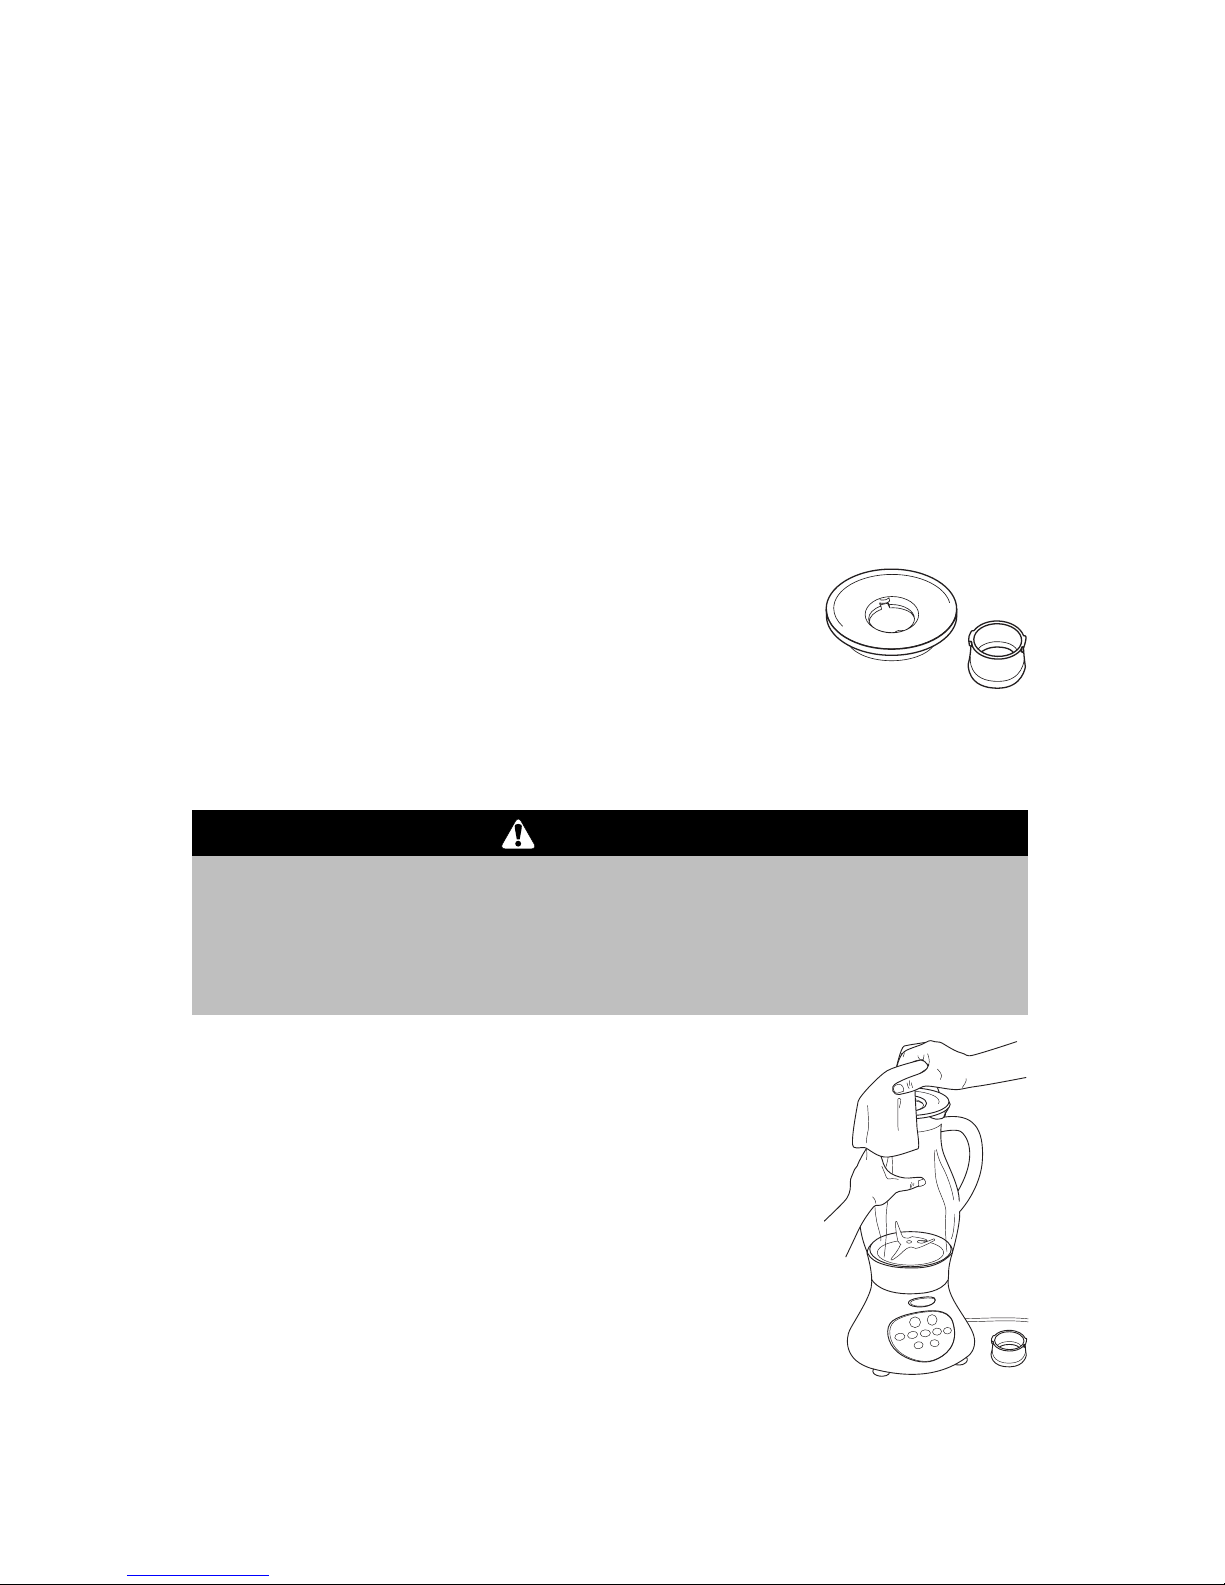
16. Before blending hot liquids, remove pitcher lid cap
from lid. Beware of steam or hot vapor. When
removing the lid, tilt lid slightly to direct steam
away from skin. Place a clean cloth over the lid
cap opening to avoid splattering. Keep hands and
other exposed skin away from opening to prevent
possible burns. Start with slowest speed.
17. Do not use an extension cord with this blender.
To reduce the risk of electrical shock or fire, do not take apart
the blender power base. All repairs must be performed only by
factory authorized personnel.
WARNING
This product is designed for household use only. Do not use blender
for other than intended purpose.

3
Parts and Features
12
3
4
5
6
789
Electrical Grounding Instructions – This appliance is
equipped with a (3-prong) grounding plug for your protection
against shock hazard and it should be plugged directly into a
properly grounded receptacle. Do not cut or remove the
grounding prong from this plug. If the plug fails to fit into an
existing outlet, contact a qualified electrician to update the
outlet.
WARNING
SAVE THESE INSTRUCTIONS FOR
FUTURE REFERENCE

4
1. Pitcher Lid Cap
This center portion of the pitcher lid may be removed, allowing
ingredients to be added during use. (Be sure to check size of
food load in the blender and the speed setting prior to removing
cap.)
2. Pitcher Lid
Seals the top of the pitcher jar.
3. Pitcher Jar
The 72-ounce glass pitcher jar has a unique bulb-shaped design
that offers outstanding blending performance. The pitcher is
beautiful enough to go directly from the countertop to the serving
table.
4. Pitcher Gasket
This seals the bottom of the pitcher jar to the blade base.
5. Blade Base
The wider bottom of the pitcher jar accommodates a larger blade
for improved rollover, increased fluid movement and outstanding
blending.
6. Base Ring
The base ring screws onto the bottom of the pitcher jar, holding
the pitcher gasket and blade base in place.
7. Blender Power Base
The power base features a 500-watt motor and innovative touch
controls. The pitcher locks onto the power base with a simple
quarter turn for safe, no-mess operation.
8. Control Panel
The easy-to-use touch controls feature a range of five powerful
speeds, as well as an ice crush mode and a pulse option. The
controls are activated with the touch of a finger.
9. Detachable Power Cord
The detachable power cord is interchangeable with other
Jenn-Air Attrezzi™ small appliances.

5
Assembling Your Blender
1. Carefully remove all blender parts from the packaging.
2. Place the blender power base on a solid, level surface.
3. Before first use, wash the pitcher jar, pitcher lid,
pitcher lid cap, pitcher gasket, blade base, and
base ring in hot, soapy water. Rinse and dry. The
pitcher jar is dishwasher safe. The pitcher lid,
base ring, and blade base are all top-rack
dishwasher safe.
4. Carefully place the pitcher gasket over the blade
base, while keeping fingers away from the blades.
5. Turn the pitcher jar upside down.
6. Using caution, place the blade base and pitcher
gasket into the bottom opening of the pitcher
jar.
7. Twist the base ring onto bottom of pitcher jar,
making sure it threads evenly and secures the
pitcher gasket and blade base in place. The
base ring should be tightened hand-tight onto
the pitcher jar. Do not over-tighten.
8. Turn the pitcher jar right side up and place
it on top of the blender power base and
turn clockwise to lock the pitcher in place.
9. Insert the pitcher lid cap into the pitcher lid
and tighten it by turning clockwise. Place
the pitcher lid onto the pitcher jar.
10. Plug the detachable power cord into the
blender power base and a properly
grounded 3-prong electrical outlet. The
blender is now ready to use.
Electrical Shock Hazard – Plug into grounded outlet. Do not
remove ground prong. Do not use an adapter. Failure to follow
these instructions can result in death or electrical shock.
WARNING

6
Removing pitcher from base
1. Make sure the blender controls are set to
“OFF” and the power cord is unplugged.
2. Turn the pitcher counterclockwise and lift
the pitcher up and off the base.
3. Do not unscrew the base ring from the
pitcher jar until you are ready to remove
the blade assembly. Loosening it will
cause leaking.
Note
• Be sure to operate your blender on a clean, dry, sturdy surface.
Operating Your Blender
1. Make sure the touch controls are SET TO “OFF” and the power
cord is unplugged.
2. Place the assembled PITCHER ON TOP OF BLENDER BASE and
turn clockwise to lock the pitcher in place.
3. LOAD BLENDER with food to be blended and
place the lid securely on the pitcher jar.
4. TOUCH THE “ON” PAD on the control panel.
The “ON” pad should illuminate and the
WARNING light will flash to indicate that the
blender is ready to operate.
5. TOUCH ONE OF THE 5-SPEED PADS. Refer to the “Speed
Control Guide” in this manual for suggested settings. Refer to
the “Pulse Mode” and “Ice Crushing Mode” sections in this
manual for use of those controls.
ON
OFF
MIX
PUREE
LIQUIFY
CRUSH
PULSE
CHOP
STIR
W
A
R
N
I
N
G
:
F
L
A
S
H
I
N
G
L
I
G
H
T
I
N
D
I
C
A
T
E
S
R
E
A
D
Y
T
O
O
P
E
R
A
T
E
D
O
N
O
T
T
O
U
C
H
B
L
A
D
E
S
To avoid risk of injury, be sure that the blender is fully off with
all control panel lights off before opening the blender and
scraping the sides of the pitcher. Never attempt to scrape the
sides of the pitcher while the blender is operating or with any of
the control panel lights illuminated.
WARNING

7
Turning the Blender Off
While the blender is operating, touch the “OFF” pad on the control
panel or touch the active speed setting pad a second time and the
blender will stop. The “ON” pad will still be illuminated and the
WARNING light will flash to indicate the blender is ready to operate
again. Press the “OFF” pad a second time to completely turn the
blender off.
Auto Shut-off
• The blender will automatically shut off if allowed to stand with no
control pads pressed for 10 minutes.
• If two speed settings pads are accidentally touched at the same
time, the blender will shut off. Select desired speed setting pad to
start or restart.
Pulse Mode
1. Touch the “ON” pad on the control panel. The “ON” pad will
illuminate and the WARNING light will flash to indicate that the
blender is ready to operate.
2. Touch the “PULSE” pad.
3. Select a speed setting and touch the corresponding pad on the
control panel.
4. The blender will operate only while you are touching the speed
setting pad.
Note
• When unsure about the appropriate speed setting, try pulsing to
test various speeds.

Use the cap opening in the lid to vent steam or hot
vapor, however be sure to open the lid and/or lid
cap gradually and direct steam or hot vapor away
from hands, face and other exposed skin.
For best results, blend small amounts of hot liquids
and cover the lid cap opening with a clean cloth.
Use the “PULSE” mode beginning on the lowest
speed setting.
Ice Crushing Mode
1. Load ice cubes in the blender pitcher, making sure to use ice that
is thoroughly frozen. Break up any large chunks of ice.
2. Touch the “ON” pad on the control panel. The “ON” pad will
illuminate and the WARNING light will flash to indicate that the
blender is ready to operate.
3. Touch the “CRUSH” pad on the control panel. The blender will
automatically operate in short bursts to crush the ice.
4. Once the ice is crushed, touch the “OFF” pad on the control panel.
Using the removable pitcher lid cap
1. While blender is off, remove pitcher lid cap by
holding the pitcher jar and pitcher lid down
with one had and twisting and lifting the
pitcher lid cap with the other hand.
2. Use the small opening in the lid to add
ingredients to the blender while the blender is running. Use
caution and blend on low speed while pitcher lid cap is removed.
8
Be cautious when blending hot foods, as steam or hot vapor can
burn skin when the lid is removed. Covering the lid cap opening
with a clean cloth prior to blending will allow steam to escape
and prevent splattering.
CAUTION

9
Speed Control Guide
The following speed control guide provides suggested settings for
your blender. If in doubt, start on a lower setting and try pulsing to
test out various speeds.
Item Setting
Baby food ingredients puree
Blended ice drink crush
Bread chop
Coffee beans liquefy
Crackers chop
Crushed ice crush
Fruit juice from frozen concentrate mix
Milk powder & water liquefy
Nuts chop
Oatmeal puree
Pancake batter mix
Salad dressing mix
Sauces stir
Smoothies liquefy
Tips:
The “pulse” mode can be used with any speed setting. Simply touch
the “pulse” pad and then touch the desired speed setting.
When crushing ice, be sure to use ice cubes that are frozen solid and
break up any large chunks.
If blending a mixture of liquid and solid ingredients, add the liquid
ingredients to the blender first and then add the solids, unless the
recipe states otherwise.

10
Care and Cleaning
Injury hazard. Unplug blender before cleaning. Failure to do so
can result in injury.
WARNING
1. Touch the “OFF” pad to set the blender into its full-off state.
Unplug the power cord.
2. Position blender pitcher over a sink to catch any remaining
ingredients in the pitcher while taking it apart to clean.
3. Unscrew the base ring from the base of the
pitcher (see illustrations A and B). If the base is
difficult to unscrew, place the pitcher on the
power base and turn the pitcher
counterclockwise with both hands to loosen
and remove (see illustration C). DO NOT turn
the pitcher using the handle.
4. Carefully disassemble the pitcher gasket and
the blade base, keeping fingers away from
sharp edges of the blades.
5. All of the pitcher parts should be washed in
warm, soapy water. The pitcher jar is
dishwasher safe. The pitcher lid, base ring,
and blade base are all top-rack dishwasher
safe. The pitcher gasket and lid cap can be
handwashed in warm, soapy water.
6. Wipe down the blender power base, including
the glass touch controls with a damp cloth.
DO NOT immerse the blender base in water.
Do not use an abrasive cleaning pad on the power base unit.
7. DO NOT use pine-based cleaners or cleaners containing bleach
on the blender base. Do not use any type of solvent-based
cleaner or metal polish on the power base unit. Use of these
products may cause staining or discoloration. If these cleaning
products DO come in contact with the power base, immediately
clean with a water-dampened cloth, and wipe dry.
A
B
C

11
Before You Call For Service
Problem
The blender will
not start.
The blender is
spattering ingredients
outside the blender
pitcher jar.
The blender is leaking
around the bottom
of the pitcher.
The blender motor
is bogging down.
The blender wobbles
on the work surface.
Possible Solution
Check the power cord to make sure it is
securely fastened into the blender and
into the electrical outlet.
Make sure the “ON” pad is illuminated.
Next, touch the desired speed setting.
Avoid touching two speed settings at
once since this will cause the blender to
turn off.
Make sure the pitcher lid is securely
fastened into the pitcher jar before
blending.
If the pitcher lid has been removed,
make sure the blender is set on a low
setting to avoid spattering.
The blender may be overloaded.
Remove some of the contents and
continue blending.
Make sure the pitcher gasket is
positioned between the pitcher jar and
the blade base.
Check to see if the base ring is securely
screwed into place and aligned evenly
around the base of the pitcher jar.
Check to make sure the blender isn’t
overloaded with dense foods.
If so, break into smaller pieces.
When using the ice “crush” mode, be
sure to use solidly frozen ice cubes and
break up any large chunks of ice.
Make sure the small pads on the feet of
the blender are all snugly pushed in.
Check to see if the work surface is level.

12
Recipes
Roasted Yellow Pepper Soup
The Mediterranean yellow color of this soup makes it a perfect choice
as the first course for a late summer dinner. With its rich, mellow
flavor, it will be appreciated year around.
1 medium red potato, peeled and cut into 1" cubes
2 stalks celery, coarsely chopped
1 carrot, peeled and coarsely chopped
1 small onion, peeled and coarsely chopped
1 clove garlic, minced
6 sweet yellow bell peppers, seeded and cut into 1" chunks
2 tablespoons extra virgin olive oil
6 cups chicken stock
1 teaspoon green peppercorns
1 cup heavy cream
salt and pepper, to taste
8 leaves of fresh basil
Place potato, celery, carrot, onion, garlic and yellow bell pepper
pieces on an oven-proof baking tray. Drizzle with olive oil. Bake at
400° F. for 40-45 minutes (Convect Roast 30-35 minutes), or until
tender. Cover loosely with foil and set aside to cool slightly
(approximately 20 minutes).
In a large soup pot, bring chicken stock to a boil. Stir in green
peppercorns. Reduce heat to simmer.
Set blender to “puree” and process the roasted vegetables in blender
for 20-25 seconds or until smooth. Stir puree into the simmering
chicken broth. Stir in heavy cream and mix well. Add salt and
pepper to taste. Do not allow soup to boil. Serve immediately with
fresh basil leaf garnish.
Serves 8.

13
Ricotta and Pine Nut Tart with Balsamic
Strawberries
Enjoy this delightful tart sprinkled with pine nuts and drizzled with
strawberries. The filling is mixed in the blender to create a creamy
texture.
Pastry crust:
2 cups all-purpose flour
1⁄2cup sugar
1⁄3cups pine nuts, toasted and finely chopped
12 tablespoons unsalted butter, melted
Filling:
11⁄2cups sugar
1 cup water
6 ounces cream cheese
1 cup ricotta cheese
3 egg yolks
2 whole eggs
1⁄4cup pine nuts, whole
Balsamic Strawberries:
2 pints fresh strawberries
2 tablespoons sugar
1 tablespoon top quality Balsamic vinegar
Pastry Crust:
In a small bowl, mix flour, sugar and chopped pine nuts. Add melted
butter and mix gently.
Press mixture into bottom and about 1" up the sides of a 10" spring
form pan. Chill for ten minutes. Begin making the sugar/water
mixture for the filling. Place aluminum foil over the pastry and fill
with pie weights, dry beans or rice. Bake at 375° F (Convect Bake
350° F) for 15 minutes. Remove foil and pie weights, then bake an
additional 10 minutes, or until golden brown. Cool completely.

14
Filling:
In a small saucepan, bring water and sugar to a boil. Boil until sugar
is completely dissolved, about 4 minutes. Transfer to container with a
pour spout and allow to cool 20 minutes.
Add cream cheese, ricotta cheese, egg yolks and whole eggs to
blender pitcher. Cover with lid and mix 5 seconds. Turn blender off
and scrape sides. Resume mixing for 15 seconds or until smooth.
Turn blender off. Remove the pitcher lid cap. Set blender to “stir”
and with the blender running, add the sugar syrup slowly.
Pour the cheese mixture into the prepared crust. Sprinkle the whole
pine nuts over the top. Return to oven and bake the tart for 40-45
minutes, or until golden but still a bit soft in the middle. Cool. Serve
topped with Balsamic Strawberries.
Balsamic Strawberries:
Clean, hull and slice the strawberries. Place in a shallow pan and
sprinkle with sugar. Cover tightly with plastic wrap. Allow to stand
at room temperature for 30 minutes. Shake occasionally.
Sprinkle with balsamic vinegar, shake pan to distribute flavor and
allow to stand at room temperature for 30 more minutes.
Serves 8.

15
Tiramisu Cream Smoothie
This taste of Italy blends flavors of tiramisu into a refreshing ice cream
drink. Topped with whipped cream and chocolate cookie crumbs, this
drink is a sure party favorite.
1 tablespoon Kahlua
2 tablespoons espresso
2 tablespoons heavy cream or milk
3 tablespoons chocolate syrup
1 pint (2 cups) vanilla ice cream
Whipped cream
Chocolate cookie crumbs
Pour Kahlua, espresso, cream, chocolate syrup and ice cream into
blender. Set blender to “liquefy” and pulse for 15 to 20 seconds or
until ingredients are smooth and creamy. Pour into cocktail glasses.
Garnish with whipped cream and cookie crumbs.
Makes 2 6-ounce servings.
Strawberry Ice
This refreshing icy drink is perfect on a warm summer day.
Add a splash of rum and garnish the rim of the glass with a strawberry
for a festive party cocktail.
1 16-ounce container frozen sweetened, sliced strawberries, thawed
4 cups ice cubes
Place undrained strawberries in blender; add ice cubes. Combine
strawberries and ice cubes on “crush” setting for 35-45 seconds or
until all ice is crushed. Serve.
Makes 4 8-ounce servings.

16
Warranty/Customer Service
Jenn-Air 1 Year Hassle-Free Replacement
Warranty
Jenn-Air stands behind the high quality of our blenders by offering
a one-year hassle-free replacement warranty. If your blender should
fail within the first year of ownership and upon inspection by
Jenn-Air is proven defective, the blender will be replaced without
charge. Jenn-Air will arrange for it to be returned free of charge.
Jenn-Air will also arrange delivery of an identical or comparable
replacement to your door free of charge.
THE WARRANTIES SET FORTH HEREIN ARE EXCLUSIVE AND NO
OTHER WARRANTIES, EXPRESS OR IMPLIED, INCLUDING BUT
NOT LIMITED TO ANY WARRANTY OF MERCHANTABILITY OR
FITNESS FOR A PARTICULAR PURPOSE OR USE, ARE MADE BY
JENN-AIR OR ARE AUTHORIZED TO BE MADE WITH RESPECT TO
THE PRODUCT.
What Is Not Covered By This Warranty:
1. Conditions and damages resulting from any of the following:
a. Any repair, disassembly, modification, alteration, or adjustment
not authorized by Jenn-Air.
b. Misuse, abuse, accidents, unreasonable use, negligence or
failure to follow the Jenn-Air instructions.
c. Incorrect electric current, voltage or supply other than listed
on the product.
d. Improper setting of any control.
2. Warranty is void if the original serial numbers have been
removed, altered or cannot be readily determined.
3. Products purchased for commercial or industrial use.
4. Consequential or incidental damages sustained by any person as
a result of any breach of these warranties. Some states do not
allow the exclusion or limitation of consequential or incidental
damages, so the above exclusion may not apply.

Contacting Customer Service:
1. Call Jenn-Air Customer Service at 1-866-982-3313 U.S.A. or
1-800-688-2002 Canada. They may be able to assist you with
troubleshooting product difficulties. US Customers using TTY for
deaf, hearing impaired or speech impaired, call 1-800-688-2080.
2. Write to Jenn-Air, Attn. CAIR®Center, P.O. Box 2370, Cleveland,
TN 37320-2370. When writing or calling about a service
problem, please include the following information:
a. Your name, address and telephone number;
b. Model and serial number of the blender;
c. A clear description of the problem you are having;
d. Proof of purchase (sales receipt).
3. User guides are available on-line at www.jennair.com.
Replacement parts:
To order new blender parts, including power cords, pitcher lids,
pitcher lid caps, pitcher jars, blade bases, pitcher gaskets, and base
rings, call 1-866-982-3313 or 1-800-688-2002 Canada.
www.jennair.com
17

Mélangeur Jenn-Air AttrezziMC
Modèle n° JBL800
GUIDE DE L’UTILISATEUR
Félicitations pour votre achat du Mélangeur Jenn-Air AttrezziMC. Inspiré du mot italien
pour outil, le Jenn-Air AttrezziMC capture l’appétit européen pour la vie – en
combinant art, forme et utilité.
Jenn-Air AttrezziMC.
Quand on aime cuisiner.
www.jennairattrezzi.com
Table des matières
Instructions de sécurité ................................................................................................................19-21
Pièces et caractéristiques .............................................................................................................21-22
Assemblage du mélangeur...........................................................................................................23-24
Fonctionnement du mélangeur...................................................................................................24-26
Guide de réglage des vitesses...........................................................................................................27
Entretien et nettoyage ...........................................................................................................................28
Avant de contacter un réparateur ....................................................................................................29
Recettes................................................................................................................................................30-33
Garantie / Service à la clientèle..................................................................................................34-35
Guía del Usuario......................................................................................................................................36

19
Lorsque des appareils électriques sont utilisés, les mesures de sécurité de base
devraient toujours être observées, y compris les précautions suivantes :
1. Bien lire toutes les directives.
2. Pour éviter les risques de choc électrique, ne pas immerger le cordon
d’alimentation, la prise et le bloc-moteur du mélangeur dans l’eau ou dans tout
autre liquide.
3. Une étroite supervision est requise lorsqu’un appareil est utilisé par des enfants
ou en leur présence.
4. Débrancher le mélangeur de la prise de courant lorsqu’il n’est pas utilisé, avant
de mettre ou d’enlever les accessoires, de le nettoyer ou d’enlever le récipient.
Ne jamais mettre les mains dans le récipient ni toucher aux couteaux lorsque
l’appareil est branché. Ne jamais faire fonctionner le mélangeur avant que le
récipient soit complètement assemblé.
5. Éviter tout contact avec les pièces en mouvement.
Ce que vous devez savoir à propos des instructions de
sécurité
Les instructions de sécurité importantes et les paragraphes « avertissement » de ce
manuel ne sont pas destinés à couvrir toutes les conditions et situations qui
pourraient se présenter. Il faut faire preuve de bon sens, de prudence et de soin lors
de l’installation, de l’entretien ou du fonctionnement de l’appareil.
Toujours prendre contact avec le détaillant, le distributeur, l’agent de service après-
vente ou le fabricant dans le cas de problèmes ou de conditions qui ne seraient pas
comprises.
Reconnaître les étiquettes, paragraphes et symboles
sur la sécurité
AVERTISSEMENT - Dangers ou pratiques dangereuses qui POURRAIENT
résulter en de graves blessures ou même la mort.
AVERTISSEMENT
ATTENTION - Dangers ou pratiques dangereuses qui POURRAIENT résulter
en des blessures mineures.
ATTENTION
MESURES DE SÉCURITÉ
IMPORTANTES
AVERTISSEMENT
Other manuals for Attrezzi JBL800
2
Table of contents
Languages:
Other Jenn-Air Blender manuals