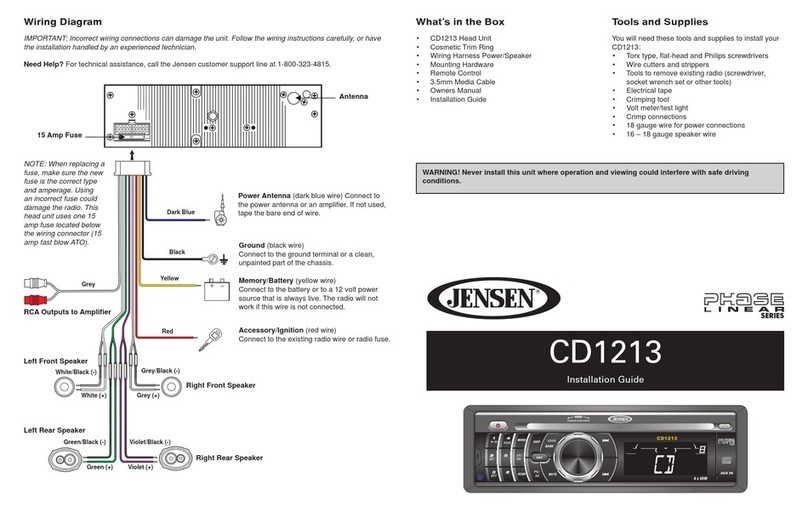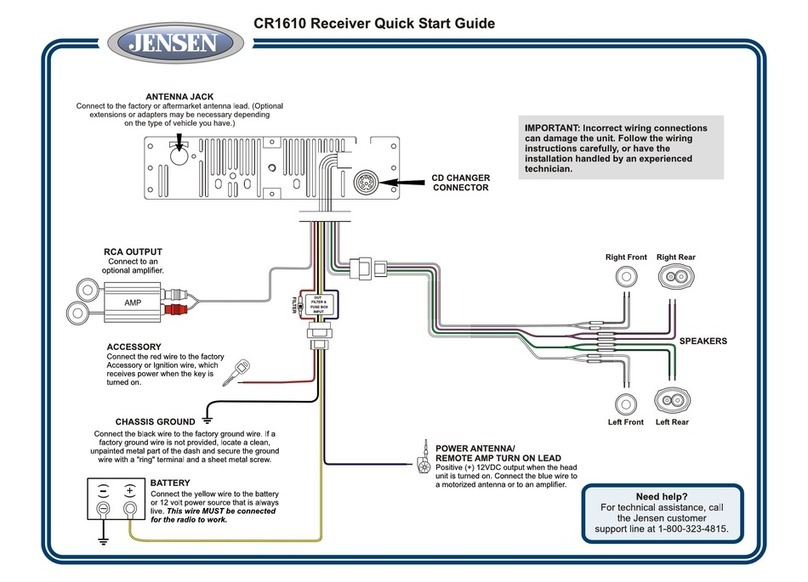
©Copyright 2007 ASA, LLC JDV8035 - 1107
DVD Player Controls
REPEAT: Press to REPEAT current playing
track. Press to release function.
OPEN/EJECT: Press to
OPEN faceplate and insert
DVD. Faceplate will auto-
matically close after DVD
is inserted. Press again to
EJECT DVD. Faceplate will
automatically open when
DVD is ejecting and close
when DVD is taken out.
STOP: Press to
STOP current audio.
PLAY/PAUSE: Press to
PLAY current audio. Press
to PAUSE current audio.
TUNE/TRK: Press >
to SKIP FORWARD to
next chapter. Press <
to SKIP BACKWARD
to previous chapter.
Press and hold to FAST
FORWARD or REWIND
current play.
Memory Card Controls
*Supports SD, MMC, MP3, MP4, JPEG, WMA.
18. MEMORY CARD OPERATION
The unit can support playback MP3 / WMA / JPEG / MP4 and Divx format which are stored into SD
and MMC Memory Card . Pls read below before you start the operation of Memory Card
Inserting and Removing a SD or MMC card on the main unit
Mode change to MEMORY CARD
File Playback Operation
All the SD or MMC Memory Card playback operation function is same as the operation on
CD/MP3/WMA. Pls refer to 'CD/MP3/WMA Operation' for more details.
After a SD or MMC card was inserted into the main unit card slot. Press Mode button to select
card mode. The unit will starts playing the files contained on the Memory Card. Once
the unit read the Memory Card successfully, the first file on the Memory Card will automatically
start playback. Press Mode button repeatedly is allowing changing to other modes or swich back
to card mode.
If no any Memory Card is inserted into the main unit card slot. Press mode button will
Automatically skip card mode.
Inserting the SD or MMC card
Removing the SD or MMC card
Click
Insert the Memory Card
with Label up side
Push in till heard a “click”
1
Detach the
Front Panel
2
Push in till heard a “click” Remove the Memory Card
3
19
JDV8035
External Subtitle setting is used for choosing the language domain, (only for MPEG4). After
select one language domain (alphabet), when playback a MPEG4 with external subtitle, the
subtitle display will use this language alphabet. if you find the displaying subtitle “words” aren't
correctly, please ensure the external subtitle language and select the correct language. The
following language domains are available:
19. MPEG4 Operation
Western European = Include Albanian, Breton, Catalan, Danish, Dutch, English,
Faroese,Finnish, French, Gaelic, German, Icelandic, Irish,
Italian, Norwegian, Portuguese, Spanish and Swedish.
Turkish = Albanian, Danish, Dutch, English, Finnish, French, Gaelic,
German, Italian, Kurdish (Latin), Norwegian, Portuguese,
Spanish, Swedish and Turkish
Slavoic Cyrillic = Include Bulgarian, Belorussian, English, Macedonian,
Moldavian, Russian, Serbian and Ukrainian.
The MPEG4 Subtiltle selection is appear in the ‘SET UP” menu > language > MPEG4
subtitle for the osd menu.
External Subtitle
The unit is support playback MPEG4 files , the details operation as same as CD/MP3/WMA
operation. The following are special function for palyback MPEG4 File:
OSD Menu English
Subtitle English
Audio English
DVD Menu English
OSD Menu On
MPEG4 Subtitle English
Language Video Audio Rating
PANEL RELEASE:
Press to remove
control panel.
Inserting the SD or MMC Card
1. Detach the Front Panel.
2. Insert the Memory Card with label side up.
3. Push in till you hear a “click”.
18. MEMORY CARD OPERATION
The unit can support playback MP3 / WMA / JPEG / MP4 and Divx format which are stored into SD
and MMC Memory Card . Pls read below before you start the operation of Memory Card
Inserting and Removing a SD or MMC card on the main unit
Mode change to MEMORY CARD
File Playback Operation
All the SD or MMC Memory Card playback operation function is same as the operation on
CD/MP3/WMA. Pls refer to 'CD/MP3/WMA Operation' for more details.
After a SD or MMC card was inserted into the main unit card slot. Press Mode button to select
card mode. The unit will starts playing the files contained on the Memory Card. Once
the unit read the Memory Card successfully, the first file on the Memory Card will automatically
start playback. Press Mode button repeatedly is allowing changing to other modes or swich back
to card mode.
If no any Memory Card is inserted into the main unit card slot. Press mode button will
Automatically skip card mode.
Click
Inserting the SD or MMC card
Removing the SD or MMC card
Face
Up
Insert the Memory Card
with Label up side
12
Detach the
Front Panel
3
Push in till heard a “click”
Push in till heard a “click” Remove the Memory Card
19
JDV8035
External Subtitle setting is used for choosing the language domain, (only for MPEG4). After
select one language domain (alphabet), when playback a MPEG4 with external subtitle, the
subtitle display will use this language alphabet. if you find the displaying subtitle “words” aren't
correctly, please ensure the external subtitle language and select the correct language. The
following language domains are available:
19. MPEG4 Operation
Western European = Include Albanian, Breton, Catalan, Danish, Dutch, English,
Faroese,Finnish, French, Gaelic, German, Icelandic, Irish,
Italian, Norwegian, Portuguese, Spanish and Swedish.
Turkish = Albanian, Danish, Dutch, English, Finnish, French, Gaelic,
German, Italian, Kurdish (Latin), Norwegian, Portuguese,
Spanish, Swedish and Turkish
Slavoic Cyrillic = Include Bulgarian, Belorussian, English, Macedonian,
Moldavian, Russian, Serbian and Ukrainian.
The MPEG4 Subtiltle selection is appear in the ‘SET UP” menu > language > MPEG4
subtitle for the osd menu.
External Subtitle
The unit is support playback MPEG4 files , the details operation as same as CD/MP3/WMA
operation. The following are special function for palyback MPEG4 File:
OSD Menu English
Subtitle English
Audio English
DVD Menu English
OSD Menu On
MPEG4 Subtitle English
Language Video Audio Rating
Removing the SD or MMC Card
1. Detach the Front Panel.
2. Push in till you hear a “click”.
3. Remove the Memory Card.
Clock/Date/Time Form Settings
DISP/MENU: Press to
and hold to enter CLOCK,
DATE, and TIME FORM
SETTING MODES.
DATE SET: Rotate
knob CLOCKWISE or
COUNTERCLOCKWISE
to adjust DATE, MONTH,
and YEAR.
CLOCK SET: Rotate
knob CLOCKWISE or
COUNTERCLOCKWISE
to INCREASE or DE-
CREASE the HOUR. Press
ENCODER KNOB to set
the hour. Rotate knob CLOCK-
WISE or COUNTERCLOCKWISE
to INCREASE or DECREASE the
MINUTES. Press ENCODER KNOB
to set the minutes.
TIME FORM SET: Rotate
knob CLOCKWISE or
COUNTERCLOCKWISE
to choose TIME FOR-
MAT between 12 HOURS
and 24 HOURS.
