Jensen CD-60 User manual

PERSONAL COMPACT DISC PLAYER
MODEL: CD-60
USER MANUAL
R
PLEASE READ THIS USER MANUAL COMPLETELY BEFORE OPERATING
THIS UNIT AND RETAIN THIS BOOKLET FOR FUTURE REFERENCE.

E-
1
WARNING
Note:
This product complies with DHHS rule 21 CFR, subchapter J, Part 1 4 at
the date of manufacture.
SAFETY PRECAUTIONS
1. As the laser beam used in this compact disc player is harmful to the
eyes,
do
not attempt to
disassemble
the
casing.
2. Stop
operation immediately
if any liquid or solid object should fall
into
the
cabinet. Unplug the unit and have it checked by
qualified personnel.
3. Do not touch the lens or poke at it. If you do, you may damage the
lens
and the player may not operate
properly.
4. Do not put anything in the safety slot. If you do, the laser diode will
be
ON when the lid is still
opened.
5. If the unit is not to be used for a long period of time, make sure that
all
power sources are
disconnected
from the unit. Remove all
batteries
from
the battery
compartment,
and unplug
the AC
adaptor from the
wall
outlet
Make It a practice to remove
the AC
adaptor by grasping the
main
body
and not by pulling the
cord.
6. This unit employs a laser. The use of
controls
or
adjustment or
performance
of
procedures
other than those
specified
herein may
result
in exposure to hazardous
radiation
COMPLIANCE WITH FCC REGULATIONS
This device complies with Part 15 of the FCC Rules. Operation is subject to the
following two conditions:
(1) this device may not cause harmful interference, and
(2) this device must accept any interference received, including interference that
may cause undesired operation.
NOTE : This equipment has been tested and found to comply with the limits for a Class
B digital device, pursuant to Part 15 of the FCC Rules. These limits are designed to
provide reasonable protection against harmful interference in a residential installation.
This equipment generates, uses and can radiate radio frequency energy and, if not
installed and used in accordance with the instructions, may cause harmful interference
to radio communications. However, there is no guarantee that interference will not
occur in a particular installation. If this equipment does cause harmful interference to
radio or television reception, which can be determined by turning the equipment off and

E-
2
on, the user is encouraged to try to correct the interference by one or more of the
following measures:
- Reorient or relocate the receiving antenna.
- Increase the separation between the equipment and receiver.
- Connect the equipment into an outlet on a circuit different from that to which the
receiver is connected.
- Consult the dealer or an experienced radio/TV technician for help.
CAUTION: Ch nges or modific tions not expressly pproved by the p rty
responsible for compli nce could void the user’s uthority to oper te
the equipment.
PROTECT YOUR FURNITURE
This model is equipped with non-skid rubber 'feet' to prevent the product from moving
when you operate the controls. These 'feet' are made from non-migrating rubber
material specially formulated to avoid leaving any marks or stains on your furniture.
However certain types of oil based furniture polishes, wood preservatives, or cleaning
sprays may cause the rubber 'feet' to soften, and leave marks or a rubber residue on
the furniture. To prevent any damage to your furniture we strongly recommend that you
purchase small self-adhesive felt pads, available at hardware stores and home
improvement centers everywhere, and apply these pads to the bottom of the rubber
'feet' before you place the product on fine wooden furniture.
IMPORTANT NOTES
1. This product does not contain a separate Power On/Off switch.
- Slide the CD/FM Mode selector to the CD position for CD mode, after inserting
a disc and installing batteries/AC adaptor, simply press the Play button to switch
on and play a disc.
- Slide the CD/FM Mode selector to the FM position for FM radio mode.
2. In order to maximize battery life and provide optimum playing time this product
incorporates an Auto Power Off function when in CD mode only. The power to
the player will automatically switch off approximately 3 seconds after a disc
has finished playing or when the CD lid is opened.
3. You must manually slide the CD/FM Mode selector to the CD position (power
off) after listening to FM radio, and to turn the power off. The Auto Power Off
feature does not work when in FM radio mode.


E-
6
BATTERY NOTE AND CARE
1. Danger of explosion if the battery is replaced incorrectly. Replace only with the
same or equivalent type
2. Do not mix old and new batteries.
3. Do not mix alkaline, standard (carbon-zinc) or rechargeable (nickel-cadmium)
batteries.
4. If the unit is not to be used for an extended period of time, remove the
batteries. Old or leaking batteries can cause damage to the unit and may void
the warranty.
5. Do not try to recharge batteries not intended to be recharged; they can
overheat and rupture. (Follow battery manufacturer’s directions).
6. Do not dispose of batteries in fire, batteries may leak or explode.
Using n d ptor (not included) to power the unit
1. Before connecting the adaptor to the player, make sure that the AC voltage of
the adaptor corresponds to you local AC outlet voltage. The polarity of the
adaptor must match to the polarity markings next to the DC jack on the player.
2. Plug the 4.5V DC 7 mA AC-DC adaptor into an AC outlet.
3. Insert the DC plug into the DC IN jack on the player.
NOTE:
When the
AC-DC adaptor is
connected,
the
batteries
will be
automatically
disconnected
and the player will now operate on the
adaptors
power. Once the
adaptor is
unplugged
the player will
automatically
switch to back to battery
power.
EARBUDS CONNECTION
Connect the plug
of the
stereo earbuds
(included)
into the PHONES
socket.
CAUTION
•AVOID EXCESSIVE VOLUME LEVELS FOR LONG PERIODS OF TIME
WHEN USING THE HEADPHONES. PROLONGED USE AT HIGH LEVELS
MAY IMPAIR YOUR HEARING.
•Do not use e rbuds while oper ting motorized vehicle, s it m y cre te
tr ffic h z rd nd is illeg l in m ny re s.
CD OPERATION
PLEASE READ THIS IMPORTANT INFORMATION:
CD mechanisms used in devices like this are designed to fully read all commercial CDs.
They will also read self-compiled CD-R/CD-RW discs but it may take up to 1 seconds
for playback to start. If playback does not start, it is likely due to the quality of the
CD-R/RW disc and/or the compatibility of the CD compilation software. Manufacturer is
not responsible for the playback quality of CD-R/RW discs.
Do not attach a label or seal to either side of the CD-R/RW disc. It may cause a
malfunction.

E-
7
Turning Unit Power On nd Off in CD Mode
1. Slide the CD/FM Mode selector to the CD position.
2. To Turn ON the unit, press the PLAY/PAUSE button, LCD display will be
on and then read the inserted disc after display “6 SEC” anti-skip message. If
no disc is inserted or the inserted disc has an error, the display will show
“disc”.
3. To Turn OFF, in CD stop mode, press STOP button once, display will go off.
In CD playing mode, press STOP button twice will also turn off the power.
NOTE: When the unit is stopped for approximately 3 seconds, the power will be
automatically turned off.
Pl y Mode
1. In power off mode, press the CD door OPEN switch to open the CD door.
2. Insert a CD with the label side facing upward and then close the CD door.
3. Press the PLAY/PAUSE button to turn on the unit. The display will show
“6 SEC”, total number of tracks and playing time in sequence and then start
to play first track automatically.
4. While playing, press the PLAY/PAUSE BUTTON to pause, the elapsed
time will flash. Press PLAY/PAUSE BUTTON again to resume playing
5. Rotate the VOLUME CONTROL KNOB to adjust volume level.
6. Press the STOP BUTTON to stop playing.
7. Press the STOP BUTTON again to turn the unit off.
NOTE: Do not open the CD DOOR when a CD is playing.
BASS Boost
•The BASS boost feature is always on and cannot be turned off.
LCD DISPLAY INFORMATION (CD MODE ONLY)
At initi l st rt up
•The display will show “6 SEC” then “- -“ and then the total number of tracks
and total playing time. The disc will start playing and the display will show the
first track number & instant playing time.
•To review the total number of tracks and total playing time of the disc, press
the STOP button once.
During PLAY mode
•The track number and the elapsed time are displayed.
During PAUSE mode
•When the track playback is paused, the elapsed time flashes.

E-
8
B ttery Low Indic tor (CD Mode only)
• The Battery Low Indicator will appear in the display when the batteries
need to be changed.
CD PLAY MODE
NORMAL PLAYBACK
The whole disc is played and the player will stop after the last track is finished.
SKIP AND SEARCH MODE
1. During Play or Pause mode, tap the SKIP Forward "" or SKIP BACKWARD
"" BUTTON to go to the next track or go back to the beginning of the current
track.
2. During play mode or Pause mode, press and hold the SEARCH Forward ""
or SEARCH BACKWARD "" BUTTON to search within the current track with
audible high speed playback.
Every time the CD PLAY MODE button is pressed, the corresponding mode appears in
the display window, in the following sequence:
REPEAT 1:
When shown on the LCD display, the current track on the disc will
be repeated.
REPEAT ALL:
When shown on the LCD display, all tracks on the disc will be
repeated.
To cancel the Repeat function, press the CD PLAY MODE button
repeatedly until the icon disappears.
INTRO:
To play the first 1 seconds of each track on the disc.
RANDOM:
Enables all the tracks on the disc to be played in a random
sequence.
To cancel INTRO & RANDOM function, press the CD PLAY MODE
button repeatedly until the icon disappears.

E-
9
CD PROGRAMMED PLAY
1. In CD stop mode, press the PROG button once, PROG
number appears. PROG icon and Track number “ ” start
flashing in the display.
2. Press SEARCH/SKIP / button to select the desired
track.
3. When the desired track is displayed, press the PROG
button to register. The PROG number changes to 2. Track number returns to
and flashes together with PROG.
4. Repeat above steps 2 and 3 to program more tracks. Up to 2 tracks can be
programmed into the memory.
5. Press PLAY/PAUSE button to start the programmed play.
6. To erase the program, in STOP mode simply press the STOP button.
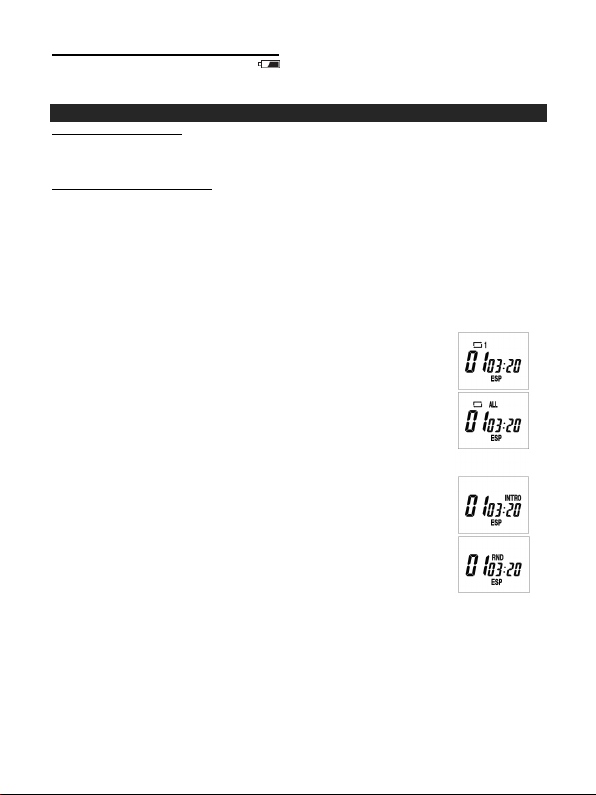
ANTI-SKIP PROTECTION
This player incorporates an electronic anti-skip circuit to prevent interruption of the
sound output when the unit is subjected to shock, vibration or rolling during disc
playback. The anti-shock system will automatically activate when a disc is playing, the
ESP indicator will appear in the display and flashing.
Once anti-skip buffer is full, it will give you approximately 6 seconds of protection
against interruption of sound output. If the player is subjected to shock or rolling for
longer than the buffer memory, some interruption of sound output will occur. This is
normal and to be expected and the sound will resume once the player has stabilized
from the shock or rolling disturbance.
Note: The anti-skip function provides for continuous sound output when the unit is
subjected to shock or vibration. It will not compensate for errors arising from the
use of defective, scratched or dirty discs.
LISTENING TO THE FM SCANNING RADIO
TUNING THE FM RADIO
1. Slide the CD/FM Mode selector to the FM position. The FM radio defaults to the
high end of the FM band, so you may hear static from the earbuds.
2. Press the TUNE+ or TUNE- Button to begin scanning the FM band for a desired
radio station to listen to.
3. Pressing TUNE+ will scan up the FM band and pressing TUNE- will scan down the
FM band. Once a strong FM station is received, the scanning will stop and play that
station.
4. If the station the radio stops on is not one you want to listen to, Press the TUNE+
or TUNE- Button again until the station you want to listen to is received. You may
need to press the TUNE+ or TUNE- Button multiple times to get to the station you
want to listen to if it’s located in the middle of the FM band.
5. Rotate the VOLUME knob to adjust the volume control to the desired level.
6. Turn off the FM radio by slide the CD/FM Mode selector to the CD (power off)
position after listening.
NOTE: When you turn off the power, the FM radio will reset back to the highest station

E-1
on the band. You need to manually tune in the station you were listening to again the
next time you turn the FM radio on.
HINTS FOR BEST RECEPTION:
The cord for the earbuds also acts as the antenna for the FM radio. For best FM
reception, unwrap and fully extend the earbud wires to improve the FM reception.
The FM radio scan depends on the signal strength of the broadcasting station, so
weak stations may be skipped. If FM reception is weak, try repositioning the unit near
an open window until you get the best reception.
CARE AND MAINTENANCE
1. Never wrap the earbuds cord around any animal or person. Special care should
be taken with long wires.
2. Clean the unit with a soft, damp (never wet) cloth. Solvent or detergent should
never be used.
3. Avoid operating your unit under direct sunlight or in hot, humid or dusty places
to reduce the risk of fire or electric shock.
4. Keep your unit away from heating appliances and sources of electrical noise
such as fluorescent lamps or motors.
5. For better Display clarity, avoid operating the unit under direct sunlight or in
strong room illumination.
6. Unplug the unit from the electrical power outlet immediately in case of
malfunction.
7. If drop-outs or interruptions occur in the music
during CD play, or if the CD fails to play at all, its
bottom surface may require cleaning. Before
playing, wipe the disc from the center outwards with
a lint-free soft cleaning cloth.
CAUTION: Never allow any water or other liquids to get inside the unit while cleaning.
TROUBLESHOOTING GUIDE
If you experience problems in the use of this player, please check the following or call
1-8 -777-5331 for Customer Service.
PROBLEM
POINTS TO CHECK
Player fails to function Disc may be inserted upside down
Disc not mounted correctly on chuck
Dirty or defective disc
Dirty pick up lens
Player lid not closed
Moisture/Condensation, allow player to warm up to room
temperature for 6 minutes
AC power to adaptor switched off
Weak batteries
Auto switch off has occurred

E-11
No sound from earbuds
Earbuds plug is not firmly inserted into the Phones
socket.
Intermittent sound Dirty or defective disc
Dirty pick up lens
Player is subject to excessive vibration or shock
Low battery power
Poor headphone connection
Noise or the sound is
distorted on FM
broadcast
Full extend the earbud wires for best reception.
Retune the FM broadcast station.
SPECIFICATIONS
Power Requirement: 2 x “AA” (UM-3) batteries (not included) or
AC-DC Adaptor: 4.5V 7 mA (not included)
At Spectra, environmental and social
responsibility is a core value of our business.
We are dedicated to continuous
implementation of responsible initiatives with
an aim to conserve and maintain the
environment through responsible recycling.
Please visit us at http://www.spectraintl.com/green.htm for more information on
Spectra’s green initiatives or to find a recycler in your area.
90 DAY LIMITED WARRANTY AND SERVICE
VALID IN THE U.S.A. ONLY
SPECTRA MERCHANDISING INTERNATIONAL, INC. warrants this unit to be free
from defective materials or factory workmanship for a period of 9 days from the date
of original customer purchase and provided the product is utilized within the U.S.A.
This warranty is not assignable or transferable. Our obligation under this warranty is
the repair or replacement of the defective unit or any part thereof, except batteries,
when it is returned to the SPECTRA Service Department, accompanied by proof of the
date of original consumer purchase, such as a duplicate copy of a sales receipt.
You must pay all shipping charges required to ship the product to SPECTRA for
warranty service. If the product is repaired or replaced under warranty, the return
charges will be at SPECTRA’s expense. There are no other express warranties other
than those stated herein.
This warranty is valid only in accordance with the conditions set forth below:
1. The warranty applies to the SPECTRA product only while:
a. It remains in the possession of the original purchaser and proof of purchase is
demonstrated.
Frequency Range: FM 87.5 - 108MHz

E-12
b. It has not been subjected to accident, misuse, abuse, improper service, usage
outside the descriptions and warnings covered within the user manual or non-
SPECTRA approved modifications.
c. Claims are made within the warranty period.
2. This warranty does not cover damage or equipment failure caused by electrical
wiring not in compliance with electrical codes or SPECTRA user manual
specifications, or failure to provide reasonable care and necessary maintenance as
outlined in the user manual.
3. Warranty of all SPECTRA products applies to residential use only and is void when
products are used in a nonresidential environment or installed outside the United
States.
This warranty gives you specific legal rights, and you may also have other rights which
vary from state to state. TO OBTAIN SERVICE please remove all batteries (if any) and
pack the unit carefully and send it freight prepaid to SPECTRA at the address shown
below. IF THE UNIT IS RETURNED WITHIN THE WARRANTY PERIOD shown above,
please include a proof of purchase (dated cash register receipt) so that we may
establish your eligibility for warranty service and repair of the unit without cost. Also
include a note with a description explaining how the unit is defective. A customer
service representative may need to contact you regarding the status of your repair, so
please include your name, address, phone number and email address to expedite the
process.
IF THE UNIT IS OUTSIDE THE WARRANTY PERIOD, please include a check for
$10.00 to cover the cost of repair, handling and return postage. All out of warranty
returns must be sent prepaid.
It is recommended that you contact SPECTRA first at 1-8 -777-5331 or by email at
some cases the model you have may be discontinued, and SPECTRA reserves the
right to offer alternative options for repair or replacement.
SPECTRA MERCHANDISING INTERNATIONAL, INC.
423 North Normandy Avenue,
Chicago, IL 6 634, USA.
1-8 -777-5331
To register your product, visit the link on the website below to enter your information.
http://www.spectraintl.com/wform.htm
1218 Printed in China
(CD-6 R)
Table of contents
Other Jensen CD Player manuals

Jensen
Jensen JCR-525 User manual

Jensen
Jensen JMC-180 User manual

Jensen
Jensen CD-540 User manual

Jensen
Jensen CD-575 User manual

Jensen
Jensen CD-490 User manual

Jensen
Jensen CD-470C User manual

Jensen
Jensen CD-600 User manual

Jensen
Jensen CD-560 User manual

Jensen
Jensen CD-26 User manual

Jensen
Jensen JMC-670 User manual

Jensen
Jensen CD-555 User manual

Jensen
Jensen CD-475 User manual

Jensen
Jensen CD-472 User manual

Jensen
Jensen MCR-1000 User manual

Jensen
Jensen RF10DC Operating instructions

Jensen
Jensen JBS-500 User manual

Jensen
Jensen MP5000 - GUIDE User manual

Jensen
Jensen CD-480 User manual

Jensen
Jensen CD-60W User manual

Jensen
Jensen XCH 6RF Instruction Manual