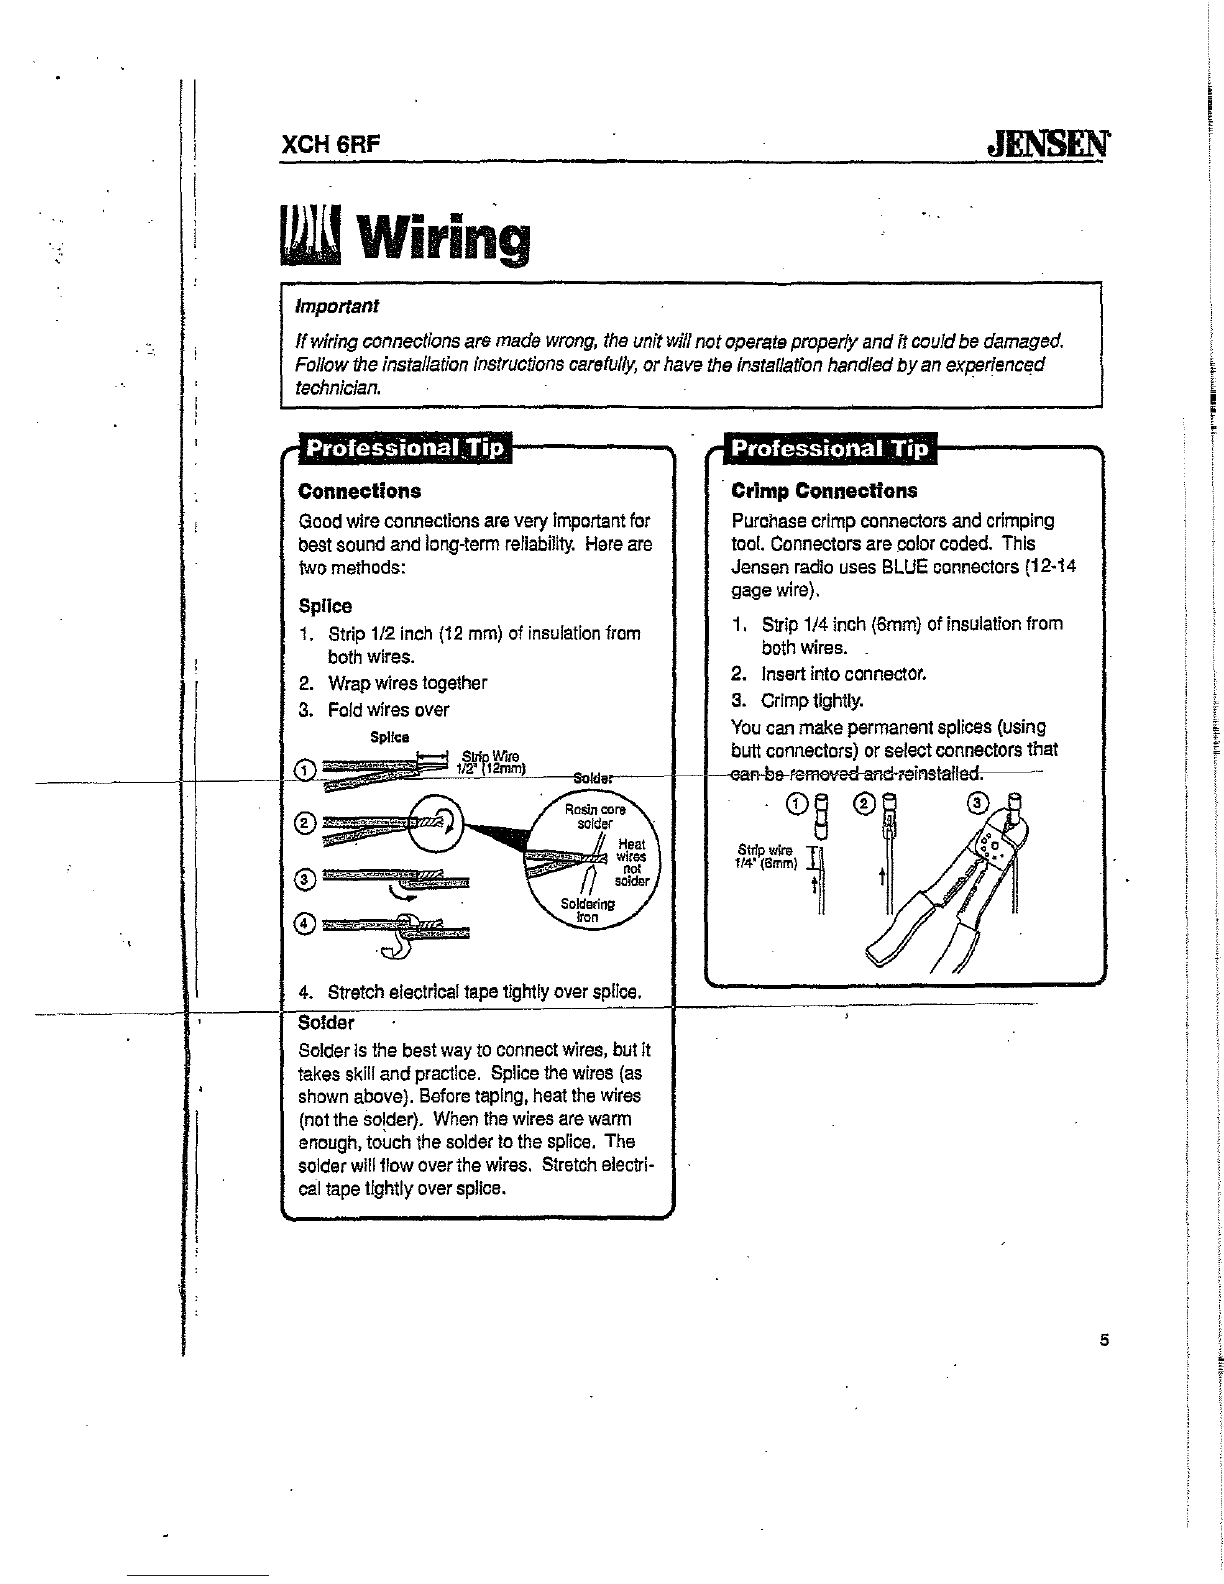
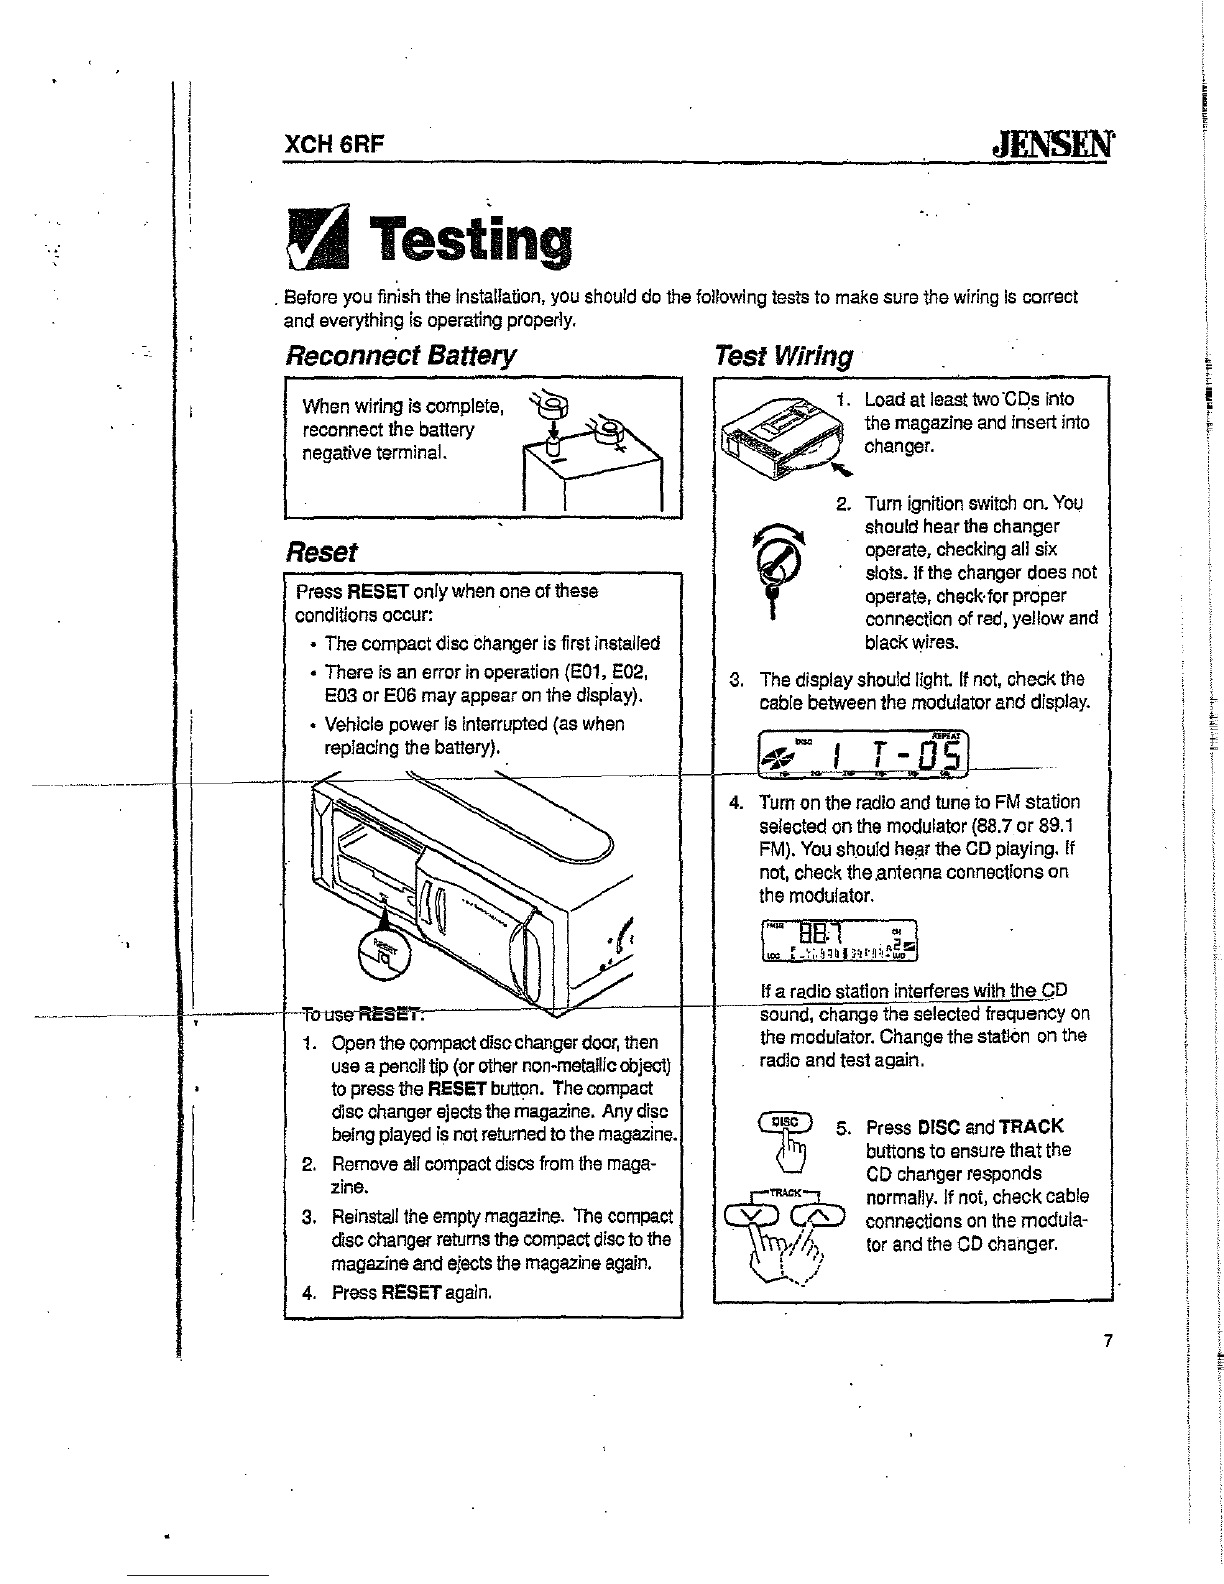
Jensen XCH 6RF Instruction sheet

..
'
.,
JENSEN"
How
to
Install
the
XCH
6RF
6-Disc
Compact
Disc
Changer
Welcomel
What
you're
holding
in
ypur
hands
is
no
ordinary
owner's
manual.
We'lie
tried
to
make
the
instructions
in
this
book
+~lUilJ(J..flas)llo..fo!/c<I.~(·
~~----~~---I
Foryour
Jensen
CD
changer
to
work
right.
it
must
be
installed
correctly.
This
manual
will
show
you
how
to
inStall
your
new
CD
changer
like
a
pro.
It's
a
good1dea
to
read
all
of
these
instructions
before
you
begin
the
installation.
Most
installations
are
straightforward
and
can
be
handled
bya
do-it-yourselfer
with
the
right
tools,
patience,
and
the
ability
to
follow
instructions.
But,
do-it-yourself
installation
isn't
for
everyone_
If
you
still
don't
feel
confident
after
reading
this
book,.
consider
turning
the
installation
job
over
to
someone
Warranty Service
Ifyour
Jensen
CD
changer
should
ever
require
service,
you
will
need
to
have
the
original
dated
receipt.
If
you
everneed
to
return
the
unitfor
any
reason,
always
include
the
receipt
with
the
product.
M
Technical
Assistance
For technical assistance
with
the installation of the
XCH
6RF,
call 1-800-323-0221.
Installation
-..
Contents
. Installation................................... 2
BefOre
You
Begin
Installation
............
2
Tools
and
Supplies
Needed
..............
2
Disconnect
Batiery
............................2
Adapters
for
I;asier
Installation
.........
2
Prepare
CD
Changer
for
Installation
.........................................2
Choose
a
Location
............................
:3
Select
Horizontal
or
Vertical
Installa!lon
.........................................
:3
Install
lhe
Compact
Disc
Changer
.....
4
Wiring............................................. 5
•
Connections
...
............................5
•
Ctlmp
Connections
•.••.•.
_
............
5
Wiring
Diagnam
..............................:
..
6
I
Di~Qlay
..........,,"
...
_
.........
6
Testing ..................."
....
"............... 7
Reconnect
Battery
.............................7
Reset
.................................................7
Test
Wiring
........................................7
SpeCificatIons
and Warranty.... "
.......
"........
""
....
8

..
".
JENSEN"
XCH 6RF
'.-
Installation -
..
Before
You
Begin Installation
Bejore
you
begin,
you
will
need
tools,
supplies
and
adapters.
It
is
best
to
make
sure
you
have
everything
you
need
before
you
begin.
Tools
and
Supplies
Needed
•
Hand
tools
•
Supplies
for
making
wire
connections
(electrical
tape,
twist-type
wire
connec-
tors,
or
crimp-on
terminals:
for
best
results,
make
soldered
connections)
•
Power
tools
(to
drill
boles
to
mount
compact
disc
changer
to
vehicle)
Disconnect
Battery
Prepare
CD
Changer
for
Installation
Remove
Shipping
Screws
The
XCH
6RF
compact
disc
changer
is
shipped
with
the
sho.ck-absorbing
mechanism
secured.
Remove
the
shippirig
label
and
4
shipping
screws
from
the
sides
of
the
compact
disc
changer
before
installation.
Keep
the
screws,
as
they
will
be
required
if
you
transport
the
player
again.
----.---+-----
-Befe~lJ-Ilegll'!l,-,
----:@1~
___
.
-+--\-
disconnect
the
battery
~_
.
negative
terminal.
IY---I
"
Adapters
for
Easler
Instal/ation
Cover
the
screw
holes
with
round
self-a9he-
sive
labels.
1990
and
newer
GM
cars
have
a'small
Install
Door
----I-----!-._Aru>-OOR!_~9!J_Wi.Il_ReOO_lWO_l~Ito-++:_:__:;_::____;____;____,,_,:___-_,____cc
2
ers
when
installing
this
CD
changer
In
a
newer
GM
car.
.

"
.
-',
XCH6RF
Choose
a
Location
Important:
Incorrect
Installation
can
cause
the
CD
changer
to
"skip.
n
Mount
the
unit
firmly
in
place
usIng
supplied
brackets
and
screws.
Select
a
location
for
the
CD
changer
that:
•
Provides
sufficient
ventilation
•
Does
not
have
high
temperatures
(such
as
the
back
wi
ndow
or
near
the
heater
out/et)
•
Is
not
exposed
to
direet
sunlight
•
Allows
the
unit
to
be
located
within
15
degrees
of
horizontal
or
vertical.
Some
possible
locations
are
under
the
dashboard,
under
a
seat,
on
the
trunk
floor
or
hanging
under
the
package
shelf
In
the
trunk.
The
unit
wiIJ
work
best
when
it
is
closest
to
the
center
of
the
vehicle.
t
Top
JENSEN
Select
Horizontal
or
Vertical
Installation
'
Adjust
the
compact
disc
changer's
internal
shock-absorbing
mechanism
for
horizontal
or
verti9!ll
mounting.
Selection
screws
are
located
on
both
sides
of
the
compact
disc
changer.
Incorrect
selection
may
cause
'skipping,
especially
when
driving
over
bumps,
Choose
Horizontal
or
Vertical
Mounting
Loosen
lock
screw.
Slide
to
align
with
Horizontal
(H)
or
Vertical
(V)
and
tighten
lock
screw.
Repeat
for
both
sides
____
I.L.
,_---t
_________
---iI-f-_f-
___
I-.!-
_____
~b1L'---'---"""_:~
__
r-
rtprM=[=.=J1
Horizontal
Mount
VertiCal
Mount
(preferrad
mounlirg
method)
3

-
-,
------1-
"
JENSEN
Install
the
Compact
DIsc
Changer
4
Floor
Mounting
(horizontal
orvertical)
Temporarily
assemble
the
compact
disc
changer
brackets
to
the
disc
changer,
1.
2.
3.
Pull
back
carpet
With
compact
disc
changer
in
position,
mark
location
of
brackets
on
floor.
Drill
1/6
inch
(4.5
mm)
holes
through
the
floor
panel,
4.
Unbolt
the
compact
disc
changer
from
floor
brackets.
5.
Mark
carpei
and
cut
'an
"X'
for
each
hole
you
drilled.
S.
Lay
down
carpet
and
screw
compact
diso
changer
brackets
to
the
holes
In
the
floor.
Install
the
changer
to
the
brackets.
,.t!angil!g..Mc!!l!t!ng I"nde.
package
shelf
or under dashboard)
1.
ASsemble
the
compact
disc
changer
brackets
to
the
changer.
2.
With
compact
disc
changer
in
pOsition,
mark
location
of
brackets
on
the
parcel
shelf
or
dashboard,
3.
Drill
four
1/6
inch
(4.5
mm)
mounting
holes.
4.
Attach
compact
disc
changer
using
four
#5X16
tapping
screws.
XCH 6RF
" ,

"
-""
.,
XCH6RF
JENSEN
111
Wiring
Important
If
wiring
connections
are
made
wrong,
the
unit
will
not
operate
properly
and
it
could
be
damaged.
Follow
the
installation
instructions
carefully,
or
have
the
installation
handled
by
an
experienced
technician.
.
Connections
Good
wire
connections
are
very
Important
lor
best
sound
and
long-term
reliability.
Here
are
two
methods:
Splice
1.
Strip
1/2
inch
(12
mm)
of
insulation
from
both
wires.
2.
Wrap
wires
together
3.
Fold
wires
over
Splice
4.
Stretch
electrical
tape
tlghlly
over
splice.
Solder
is
the
best
way
to
connect
wires,
but
it
takes
skill
and
practice.
Splice
tile
wires
(as
shown
above).
Before
taping,
heat
the
wires
(not
the
solder).
When
the
wires
are
warm
enough,
touch
the
solder
to
the
splice.
The
solder
will
flow
over
the
wires.
Stretch
electri-
cal
tape
tightly
over
splice.
Professional
Tip
.
Crimp
Connections
Purchase
crimp
connectors
and
crimping
tool.
Connectors
are
color
coded.
This
Jensen
radio
uses
BLUE
connectors
(12-14
gage
wire).
1.
Strip
1/4
inch
(6mm)
01
insulation
Irom
both
wires.
2.
Insert
into
connector.
3.
Crimp
tighlly.
You
can
makepermainerlt
splices
(using
butt
or
select
connectors
that
0§
Stripwil'e
~
114'
(Bmm)
til
5

-
-:
"
JENSEN'
,Wiring Diagram
,.,
!~!
)
To
Car
Antenna
1--------,
~:
I
_______
-..!
Antenna
Adapmr
fcrGM
cars
(not
suppl1ed)
r~:
:
[--
.....
-=-
I !
I !
I !
!
___
J
Antenna
Adapter
for
GM
cars
(no,
supplied)
FM
Modtlfator
Set
the
frequency
using
the
frequency
select
switch
located
on
the
rear
of
the
FM
modulator.
Display
XCH6RF
2
amp
Fuse
"'2'/
ACC
I3:C:::J=o:kJ="\l
Power
(red)
In-Un.
Connect
to
existing
radio
wire
or
radio
'fuse.
5amp
Fuse
+12V
Power
B:C:::J=o:t:;:;:)="\l
Wire
(yellow)
In-Uno
Connect
to
battery
or
12
volt
power
source
that
is
I----;===:j::;-i~::;;::=====::..;,;=_,-----;always-livec------
Receiver
CD
Changer
InstallDisplay'
6
1.
With
the
halves
of
hook
and
loop
fastener
together,
remove
the
adhesive
backing
from
one
side.
Attach
to
the
back
of
the
display.
2.
Find
a
good
location
for
the
display.
Remove
adhesive
backing
and
press
into
posnion.
3.
Adjust
display
wire
to
exit
the
side
or
bottom
of
the
display.
The
unit
will
not
work
if
this
wire
Is
not
connected.
Ground
H
"';1:====1)
(black)
'"
Connect
to
ground
terminal
or
clean,
unpainted
metal
part
of
chassis.

XCH6RF
JENSEN'
aTesting
,
Before
you
finish
the
Installation,
you
should
do
the
following
tests
to
make
sure
the
wiring
is
correct
and
everything
is
operating
properly.
Reconnect
Battery
When
wiring
is
complete,
~'@_
reconnect
the
battery
negative
terminal.
Reset
Press
RESET
only
when
one
of
these
conditions
occur:
•
The
compact
disc
changer
is
first
instailed
•
There
is
an
error
in
operation
(E01,
,E02,
EOa
or
E06
may
appear
on
the
display).
,
Vehicle
power
Is
interrupted
(as
when
replacJng
the
battery).
1.
Open
the
compact
disc
changer
door,
then
use
a
pencil
tip
(or
other
non-metallic
object)
to
press
1I1e
RESET
button.
The
compact
disc
changer
ejects
the
magazine.
Any
disc
being
played
is
not
returned
to
the
magazine.
2.
Remove
all
compact
discs
from
the
maga-
zine.
3.
Reinstall
the
empty
magazine.
The
compact
disc
changer
returns
the
compact
disc
to
the
magazine
and
ejects
the
magazine
agaln.
4.
Press
RESET
again.
Test
Wiring
~.
'
Load
at
least
two
'C[)S
into
.
the
magazine
and
insert
into
.-'
changer.
.
"-
2.
Tum
ignition
switch
on.
You
should
hear
the
changer
operate,
checking
all
six
slots.
If
the
changer
does
not
operate,
check·
for
proper
connection
of
red,
yellow
and
black
wires
.
3.
The
display
should
light
If
not,
check
the
cable
between
the
modulator
and
display.
4.
Tum
on
the
radio
and
tune
to
FM
station
selected
on
the
modulator
(88.7
or
89.1
FM).
You
sh,ould
heilr
the
CD
playing.
If
not,
check
the
.antenna
connections
on
the
modulator.
Ifa
radio
station
interferes
with
the
CD
sound,
change
the
selected
frequency
on
the
modulator.
Change
the
statkln
on
the
radio
and
test
again.
Press
DISC
and
TRACK
buttons
to
ensure
that
the
CD
changer
responds
normally.
If
not,
check
cable
connections
on
the
modula-
tor
and
the
CD
changer.
7
I

.,
Specifications
Frequency
response
(+~
2dB)
............................................................................,.,
.....
20
Hz
-
20
kHz
Signalfnoise
ratio
.........................................................................................................
?;SO
dB
at
1kHz
Stereo
separatlon
@ 1
kHz
.......................................................................................................::70
dB
To~1
harmonic
distortion
@ 1
kHz
......
,......................................................................................
:5.0.1%
General
Power
supply
...........................................................................................
10·16
VDC,
negative
ground
Dimensions
............................................................
11.4"
X
3.5"
X
7.7"
(284mm
X
74mm
X
186.5mm)
Weight
.......................;................................................................................................. 5.5
Ibs.
(2.5
kg)
FM
modulator
frequency
....................................................,.................................
88.7
MHz/89.1
MHz
Specifications subjectto
change
without notice.
Limited One Year Warranty-USA and Canada
Length
of
Warranty. This
warranty
from
Recaton
Mabile
Electronics
shall
be
in effect for a
perIod
of
one
year
from
the
date
of
the
first
consumer
purchase.
Persons Protected.
This
warranty
will
be
enforceable
by
the
original
owner
and
any
subsequent
owners
during
the
warranty
period
so
long
as
proof
of
date
of
purchase
from
an'
authorized
Jensen
dea,fer
Is
presented
whenever
warranty
service
Is
required.
What is Covered. Except
as
otherwise
specified
below,
this
warranty
covers
aU
defects
rn.
matenal
and
workman·
ship
In
this product.
The
following
are
not
covered:
damage
resulting
from
accident,
misuse,
abuse,
neglect,
product
modification,
improper
installation,
Incorrect
line
voltage,
unauthorized
repair
or
tailure
to
fo.l[ow
Instructions
supplied
with
the
product;
damage
occurring
during
shipment
(claims
must
be
presented
to the carrier):
elimination
of
car
static
or
other
electrical
interferences;
any
product
purchased
outside
USA
or
Canada,
or
on
which
the
serIal
number
has
been
defaced,
modified
or
ramoved.
How
You
Can
Get
Service
U.s.
Purchasers.
Please
telephone
Jensen
at
1--800-323-4815.
We
will
either
Inform
you
of
the
name
and
address
of
an
authorized
Jensen
repair
station
whIch
will
servIce
the
product or
will
advise
you
to
send
the
product
to afactory
service
center.
Canadfan Purchasers.
The
product
should
be
returned
to
the
Jensen
deafer
from
whom
it
was
purchased
and
such
dealereither
will
service
or
arrange
for
service
of
If
shipment
of
the
product
Is
required.
it
should
be
packed
securely.
The
original
dated
bill
of
sale
must
always
be
Included
with
the
product
as
proof
of
warranty
coverage.
What
We
WlU
Pay
For.
We
will
pay
for
all
labor
and
material
expenses
required
to
repair
the
produc~
but
you
must
pay
any
labor
costs
for
the
removal
and/or installation
01
the
product.
n
the
product
Is
shipped
for warranty
service,
you
must
prepay
the
initial
shipping
charges,
but
Jensen
Will
pay
me
return
shipping cnarges.ltlhe
product
[s
retl!rned
to
an
address
inside
the
.USA
or
Canada.
Umltation
of
fmplled
or
StatutoryWarranties and
Conditions.
All
implied
or statutory warranties
and
conditions,
including
warra(1tles.
or
conditions
of
merchant-
ability.
fitness for particular·purposes
and
non-Infringement,
are
limited
In
duration
to
the
length
of
this
warranty.
Exclusion
of
Certain Damages. Jensen's liability
is
!1mited
to the
repair
or
repl~cement,
at
aur
option,
of
any
defective
product
and
shall not
Include
Incidenta[
or
consequential
economic
damages
of
any
kind.
SOllie
states
arimOI
Plovillces
do
Ilol
atluW'''lfmiratiOJ""is
Oii
how
long
an
implied
warranty
lasts
and/or
do
not
allow
the
exclusion
or
limitation
of incidental or consequential
damages.
so
the
above
Ilmltations
and
exclusions
may
not
apply
to you.
This
warranty
gives
you
specific
legal
rights,
and
you
may
also
have
other
rights
which
vary
from
state
·to
state
and
provfnce
to
province
..
the
product.
JENSEN
Recoton
Mobile
Electronics
.
A
Division
of
R~coton
Audio
Corporation
A
RECOTON8
COMPANY
1090
Emma
Oaks
Trail
Lake
MarY,
Florida
32746
~2002
Reccton
Audio
Corporation
Table of contents
Other Jensen CD Player manuals

Jensen
Jensen JMC-180 User manual

Jensen
Jensen CD-470C User manual

Jensen
Jensen XCH 6RF Instruction Manual

Jensen
Jensen JCR-525 User manual

Jensen
Jensen CD-480 User manual

Jensen
Jensen CD-475 User manual

Jensen
Jensen MCR-1000 User manual

Jensen
Jensen MCD5070 User manual

Jensen
Jensen CD-26 User manual

Jensen
Jensen CD-60 User manual

Jensen
Jensen CD-60C User manual

Jensen
Jensen JMC-670 User manual

Jensen
Jensen CD-470 User manual

Jensen
Jensen CD-575 User manual

Jensen
Jensen JMC-180A User manual

Jensen
Jensen CD-475 User manual

Jensen
Jensen AWM910 User manual

Jensen
Jensen CD-600 User manual

Jensen
Jensen JCD3007 User manual

Jensen
Jensen CD-555 User manual