Jensen JMC-670 User manual

WALL MOUNTABLE FRONT
LOADING DUAL MP3 CD SYSTEM
WITH DIGITALTUNERAND
REMOTE CONTROL
JMC-670
Pleasereadandfollowthisinstructionmanualcarefullybeforeusing
theunitandretainitforfuturereference
INSTRUCTIONMANUAL
HX-1056M3 IB JENS 001 REV0.P65 7/20/2005, 2:50 PM1

E-2
FCCINFORMATION
IMPORTANT NOTES
E-1
WARNING
TOPREVENTFIREORSHOCKHAZARD,DONOTUSETHISPLUGWITHANEXTENSIONCORD,RECEPTACLE
OROTHEROUTLETUNLESSTHEBLADESCANBEFULLYINSERTEDTOPREVENTBLADEEXPOSURE.TO
PREVENTFIREORSHOCKHAZARD,DONOTEXPOSETHISAPPLIANCETORAINORMOISTURE.
IMPORTANTSAFETYINSTRUCTIONS
1. Read these instructions.
2. Keep these instructions
3. Heed all warnings.
4. Follow all instructions
5. Do not use this apparatus near water
6. Cleaning-Unplugthisproduct fromthe walloutletbefore cleaning,Do notuseliquid cleanersor aerosol
cleaners. Use a dry cloth for cleaning
7. Do not block any ventilation openings. Install in accordance with the manufacturer’s instructions.
8. Do not place this product on an unstable cart, stand, tripod, bracket, or table .The product
may fall, causing serious injury to a child or adult, and serious damage to the product.
Use only with a cart, stand, tripod, bracket, or table recommended by the manufacturer,
or sold with the product.Any mounting of the product should follow the manufacturer’s
instructions, and should use a mounting accessory recommended by the manufacturer.
AProduct and Cart Combination Should Be Moved with Care-Quick stops, excessive
force and uneven surfaces may cause the product and cart combination to overturn.
9. Do not install near any heat sources such as radiators, heat registers, stoves, or other apparatus
(Including amplifiers) that produce heat.
10.Do not defeat the safety purpose of the polarized or grounding-type plug.A polarized or grounding-
type plug. Apolarized plug has two blades with one wider than the other.A grounding type plug has
two blades andathird grounding prong.Thewide blade orthe third prongisprovided for yoursafety.
If theprovidedplug does not fitinto your outlet,consultan electrician forreplacement of theobsolete
outlet.
11. Protectthepower cordfrom being walkedon orpinchedparticularlyatplugs conveniencereceptacles,
and the point where they exit from the apparatus.
12. Only use attachments/accessories specified by the manufacturer.
13. Unplug this apparatus during lightening storms or when unused for long periods of time.
14.Referall servicing toqualifiedservice personnel. Servicingis required whentheapparatus has been
damaged in any way, such as power-supply cord or plug is damaged, liquid has been spilled or
objects have fallenintothe apparatus, theapparatushas been exposedtorain or moisture,does not
operate normally, or has been dropped.
15.Thisappliance shallnotbe exposedtodripping orsplashing water andthat no objectfilled with liquids
such as vases shall be placed on the apparatus.
16. Do not overload wall outlet. Use only power source as indicated.
17. Use replacement part as specified by the manufacturer.
18.The product maybemounted to awallonly if recommendedbythe manufacturer.
19.Uponcompletion ofanyservice orrepairsto thisproduct,ask theservicetechnician toperformsafety
checks.
HX-1056M3 IB JENS 001 REV0.P65 7/20/2005, 2:50 PM2

E-3
POWERSOURCE TABLEOFCONTENT
E-4
WELCOME................................................................................................................................................5
INDEXTO PARTSAND CONTROLS..................................................................................................... 5
MAINUNIT ..................................................................................................................................... 5
REMOTECONTROL......................................................................................................................6
DISPLAYSECTION ........................................................................................................................6
INSTALLATION.......................................................................................................................................... 7
FORTABLETOPUSE ...................................................................................................................7
FORWALLMOUNTING ...............................................................................................................7
GETTINGSTARTED..................................................................................................................................8
SPEAKERCONNECTION..............................................................................................................8
LINEIN (AUXIN) CONNECTION(OPTIONAL)...........................................................................8
SUBWOOFERCONNECTION.......................................................................................................8
ANTENNACONNECTION ..............................................................................................................8
POWER SUPPLY...........................................................................................................................8
ACPOWER CONNECTION.........................................................................................................8
LINEIN (AUX IN)CONNECTION (OPTIONAL)............................................................................8
SUBWOOFERCONNECTION(OPTIONAL) .....................................................................................8
ANTENNACONNECTION................................................................................................................8
POWERSUPPLY ............................................................................................................................8
ACPOWER CONNECTION.............................................................................................................8
REPLACINGBATTERYIN THEREMOTECONTROL......................................................................8
CLOCKSETTING..........................................................................................................................................9
TOSET THECURRENTTIME........................................................................................................9
COMPACT DISCOPERATIONS...................................................................................................................9
BASICDISC(s) PLAY........................................................................................................................9
PROGRAMMINGCD TRACKS...........................................................................................................10
PROGRAMMINGMP3 TRACKS...........................................................................................................11
ID3DISPLAY(FOR MP3-CDONLY)....................................................................................................11
RADIOOPERATION....................................................................................................................................12
RADIOTUNING..................................................................................................................................12
TO PRESETCHANNELS......................................................................................................................13
TORECEIVEPRESETSTATIONS...................................................................................................13
AUXOPERATION........................................................................................................................................13
PRESETEQ (EQUALIZATION SYSTEM)....................................................................................................13
USINGHEADPHONES (NOTINCLUDED)....................................................................................................13
SLEEPOPERATIONS..................................................................................................................................14
TIMEROPERATION....................................................................................................................................14
CAREAND MAINTENANCE.......................................................................................................................15
TROUBLESHOOTINGGUIDE.....................................................................................................................15
RESETINGTHE UNIT...................................................................................................................................16
SPECIFICATION..........................................................................................................................................16
HX-1056M3 IB JENS 001 REV0.P65 7/20/2005, 2:51 PM3

REMOTECONTROL
H1. ON/STANDBYBUTTON
H2. ID3BUTTON
H3. FUNCTIONBUTTON
H4. DISC1/2BUTTON
H5. PLAY/PAUSE( )-MONO-ST.BUTTON
H6. MEMO./PROGRAMBUTTON
H7. TUNING BUTTON &
H8. FOLDER - BUTTON
H9. VOL+& VOL-BUTTON
H10. CDDOOROPEN/CLOSEBUTTON
H11. STOP/BAND BUTTON( )
H12.FOLDER+/MEMOUPBUTTON
H13.EQBUTTON
H14.TIMER/SLEEPBUTTON
H15.REPEATBUTTON
H16.MUTEBUTTON
E-5 E-6
MAINUNIT
1). CDDOOR
2). CDDOOROPEN/CLOSEBUTTON
3). FUNCTIONBUTTON
4). CD1/2FUNCTIONBUTTON
5). ID3BUTTON
6). FOLDER+/MEMOUPBUTTON
7). PROGRAM/ MEMORYBUTTON
8).STOP/BAND BUTTON ( )
9).PLAY/PAUSE BUTTON( )
10).ON/STANDBYBUTTON
11).TUNING / SKIP ( / ) BUTTON
12).REPEATBUTTON
13).TIMER/SLEEPBUTTON
14).EQBUTTON
15).VOLUMEUP/DOWNBUTTON
16).HEADPHONEJACK
17).MAINUNITSTAND
18).MULTI-FUNCTIONDISPLAY
19).REMOTESENSOR
20).RESETSWITCH
21).AUXINJACK
22).FMANTENNA
23). ACLINECORD
24).SUBWOOFERJACK
25).SPEAKERTERMINAL
26).SPEAKERBOX
27).SPEAKERWIRE
28).SPEAKERBOXSTAND
DISPLAYSECTION
D1. MP3INDICATOR
D2. ID3INDICATOR
D3. SLEEPINDICATOR
D4. MUTEINDICATOR
D5. AUXINDICATOR
D6. FREQUENCY/PLAYTIME/ CLOCKDISPLAY
D7. BAND INDICATOR
D8. PLAYBACKINDICATOR
D9. CDINDICATOR
D10.FOLDERINDICATOR
D11.MEMORYINDICATOR
D12.REPEATINDICATOR
D13.TIMERINDICATOR
D14.RANDOMINDICATOR
D15.STEREOINDICATOR
INDEX TO PARTS AND CONTROLS
WELCOME
Thankyou forpurchasing theJENSEN WallMountableFrontLoadingDual MP3CDsystem.
Beforeoperatingthe unit,pleaseread this manual thoroughlyand retain itforfuture reference.
JMC-670 INSTRUCTION MANUAL JMC-670 INSTRUCTION MANUAL
HX-1056M3 IB JENS 001 REV0.P65 7/20/2005, 2:51 PM4

E-7 E-8
FOR TABLE TOP USE
FOR WALL MOUNTING
1. Use the wall-mounting template supplied withthe unittomake marks on the wall for the anchors. Make s ure
themarksarelevel.
2. Drill 1/4" holes on the marks. P leas e refer to the appendix s heet attached with this instruction ma nua l
for details .
3. Ins ert the pla s tic a nchor s upplied with unit until it is flus h with the wall.
4 . I ns e rt the s c re w a nd tighte n the s c re w 4 mm a wa y from the wa ll . ( Approx ima te ly the w idth of 2 pe nnie s )
H a ng the ma in unit a nd s pe a ke rs to the s c re w a s i ndic a te d be lo w:
GETTING STARTED
SPE AK ER CONNE CTION
1. Insertthe speaker cables by pushingdown the terminal leverofthe LeftSpeaker Terminal and the Right
Speaker Terminal (25).
2. C onnect the s pea ker to S peaker Terminals (25), with red wire to red termina ls and black wire to black
te rm ina ls .
LINE IN (AUX IN) CONNECTION (OPTIONAL)
1. C onnect the left and right channel R C A plug (not included) into the AU X IN J ack (21) and the other end
to your external player. Make sure the polarity of the right and the left channel is correct, Red to Right, White to Left.
2. Press the
Following the diagrams below, insert the stands into the base and attach the main unit and
speakers as shown.
NOTE: A screwdriver is needed for attacking the stands to the main unit and stands.
ON/STANDBYButton(10/H1) toswitchon theunit.
3.PressFunction Button(3/H3). “AUX”Indicator(#D5) appearsinthe display(18).
4.Playthe auxiliaryinput source.
SUBWOOFERCONNECTION (OPTIONAL)
1.Connectone endofa RCA plug(not included) intothe Subwoofer Jack(24)and theotherend tothe
subwoofer (not included).
2.Turnon the unitandthen your subwoofer.
ANTENNACONNECTION
FM:Unwrap andfully extendthe FMAntenna wire(22)for bestreception.If stereobroadcasting is received,
StereoIndicator(#D15) will light.
AM:Theunit isbuilt-inwith adirectionalferrite antenna, reposition the unit forbestreception.
POWERSUPPLY
ThisFront LoadingDualCD Systemoperates fromAC120V~60Hzlinepower supply.
Theremote controlunitoperates onone 3V“CR2025”lithiumbattery.Topower uptheremotecontrol,removethe
plasticinsulationtab stickingout ofthebattery compartment.
ACPOWER CONNECTION
Connectthepower cord toanAC120V~60Hz power source.
REPLACINGBATTERYIN THEREMOTECONTROL
1.Turnover theremotecontrol, andremovethe batterydoor.
2.Install 1“CR2025”lithium batteryaccording tothe polaritydiagram
on the batterycompartment.
3.Replacethe batterydoor.
INSTALLATION
JMC-670 INSTRUCTION MANUAL JMC-670 INSTRUCTION MANUAL
HX-1056M3 IB JENS 001 REV0.P65 7/20/2005, 2:51 PM5

Note: Theclockhas to beset the firsttimeyou use theunit.
TOSET THECURRENT TIME
Forexampleto setthe clock at7:30AM
1.In STANDBYMode, pressMEMORYButton (7/H6)once. Hourdigitflashes toprompt forinput.
2.Pressthe /Button (11/H7)to adjustthe hour.
Note: Makesurethe hourisset so thatAM or PMis
correctly displayed.
3.PressMEMORY Button(7/H6) toconfirm theselection
and minute positionflashesto promptforinput.
4.Pressthe /Button(11/H7)toadjust theminute.
5.PressMEMORY Button(7/H6) againto completesetting.
COMPACT DISC OPERATIONS
NOTE:This playerplaysnotonlycommercialCDsbutalsoself-complied CD-R/RW/MP3-CDdiscs.
BASICDISC(s) PLAY
1.Pressthe Button(10/H1) toturnon theunit.
2.Pressthe OPEN/CLOSEButton(2/H10)toopenboththe CDdoor.
3.PlacetheCD(s), withlabel sidefacingoutward, insidethe CDcompart
ment.PressOPEN/CLOSEButton(2/H10) againto closetheCDdoors.
IMPORTANT:The CDdoorsaremotorizeddoors. DO NOT PUSH WITH
HAND OR USE ANY OTHER MEANS TO OPEN OR CLOSE IT. THIS
COULD DAMAGE THE DOOR MECHANISM.
4.Pressthe FunctionButton(3/H3) tooperate theunit inCDmode.
5.Press CD1/CD2(4/H4) buttontoselecttheCDlocation.
6.Theunit willscantheCDin selectedCD compartments,thetotalnumber
oftracksandtotalplaytimeof theCD inthe chosenCD locationappear
in thedisplay(18). (Only Foldernumber and tracknumber will shown
for MP3-CD)
Note:If noCD isinserted inthechosen CDlocation, “NODISC”appears.
7.The CDindicator (#D9) appearswith either “ ”or“ ”, indicating thecurrent CD location.
8.Press Button (9/H5)to startplaying.
E-9 E-10
OtherCD/MP3-CD function
1)Repeat(12/H15) -Use thiskeycan selectdifferent PlayModebetween repeatone, repeatfolder(MP3-
CD only),repeatcurrent CDandrandom play.
a)Repeatcurrent track- PressRepeatbutton once,theREPEATindicatorappearsand currenttrack
repeatedcontinuously.
b)RepeatFolder(MP3-CDonly)-PressRepeatbuttonuntilREPEATFOLDERindicatorshownondisplay,the
selectedfolderwill repeated continuously.
c)Repeat currentdisc-PressRepeat buttonunitil REPEATALLindicator shownon display,the currentCD
will repeat continuously.
d)Random play- PressRepeatbuttonuntilRANDOMindicatorappears ondisplay andthe currentdisc will
playrandomly.
DISC ERROR
Note:If thedisc isdirty,damaged orunreadable, the‘NODISC’will appearin thedisplay.If thisoccurs, clean
the disc, insert the disc correctly, or try another disc.
PROGRAMMINGCDTRACKS
Withthisfunction youcan program upto 20titlesof selecteddiscin theorderyou desire.Thisfunction can
onlybedone instop mode.
CLOCKSETTING
1.PresstheMEMORYButton tostartprogramming tracks,“MEMORY”indicator, ‘ ‘appearinthedisplay
and blinks.
JMC-670 INSTRUCTION MANUAL
H1
H5
H4
H3
H10
JMC-670 INSTRUCTION MANUAL
:
:
:
:
M:SSERP:OT ulti-Function Display:
Stop play yalplatotdnaskcartforebmunlatoT)11H/8(
time are shown
Pause play rotacidnIkcabyalPecno)5H/9( (D8) blinksdnarebmunkcartgniyalptnerruCniaga)5H/9(esuapretfayalpemuseR
elapsed play time are shown
Scan forward and backward And hold / (11/H7) Play time changed rapidly degnahcrebmunkcartgniyalP)7H/11(/skcartpikS
Control the volume ± Volume Control (15/H9) Volume Level is shown
Stop output from speakers MUTE Button (H16) once “MUTE” (#D4) lights
Resume speaker output MUTE Button (H16) again “MUTE” (#D4) off
HX-1056M3 IB JENS 001 REV0.P65 7/20/2005, 2:53 PM6

PROGRAMMING MP3 TRACKS
With this function you can program up to 10 titles in the order you desire.This function can only be done
in stop mode.
1.Press the MEMORY Button (7/H6),“ FOLDER”indicator and‘ ’blink, and‘ ’/ MEMORY
indicator appears in the display.
2. Select the desired folder by pressing FOLDER UP or DOWN button (6/H12,&H8).The selected folder
blinks.
3.Press the MEMORY Button (7/H6)again to enter the selected folder.Then press /Buttons
(11/H7)to select your desired track.The selected track blinks.
4.Pressthe MEMORY Button(7/H6) again toenter the selectedtrack.The program numberadvances to
‘ ’.
5. Repeat 2 to 4 to program additional tracks,10 tracks can be memorized.
6.Press PLAY/PAUSE Button to start playing the tracks in your programmed order.
7.To clear the programmed tracks, press STOP Button until the MEMORY indicator disappear.
ID3DISPLAY(FOR MP3-CDONLY)
Thisunitcan supportID3 displaywhenplay theMP3-CD (iftheMP3-CD havethisinformation inthe disc).
Pressbutton ID3(5/H2)once, theID3 iconwill appearon theLCDdisplay,andthe titleof thesong, artistand
thealbum willshow onLCD displayby rolling,press thisbuttonagaintoresumetoshowthefolderandtrack
number, theID3 iconwilldisappear.
2.Select thedesiredtrack bypressing the /Button(11/H7) toselectthe trackyou wantto program.
3.Press theMEMORY Button(7/H6)again toenter theselected trackin programmemory #1.The program
number advances to.
4.Repeatsteps2 &3 toprogramaddiitonal tracks,20tracks canbe memorized.
5.PressPLAY/PAUSE Buttontostartplayingthe tracksin your programmedorder.
6.Toclear theprogrammed tracks,press STOP Buttonuntil theMEMORYindicatordisappear.
Note:Random functionsare disabledinprogram play.
Notes on CD-R/RW Discs
Because of non-standardized format definition/production of CD-R/RW/MP3-CD, playback quality and
performance are not guaranteed.
Manufacturer is not responsible for the playability of CD-R/RW/MP3-CD due to recording conditions
such as PC performance, writing software, media ability, etc.
Do not attach a label or seal to either side of the CD-R/RW/MP3-CD disc. It may cause a malfunction.
RADIOOPERATIONS
RADIOTUNING
1.Pressthe Button (10/H1) toturn on theunit.
2.Pressthe Function Button(3/H3) to operatethe unitin
radiomode.
E-11 E-12
JMC-670 INSTRUCTION MANUAL
811
11 7
7
4
4
11 7
6
6
15 9
11 7
STOP
HX-1056M3 IB JENS 001 REV0.P65 7/20/2005, 2:55 PM7
JMC-670 INSTRUCTION MANUAL

TOPRESETCHANNELS
Thisunit isequippedwith20presetmemoriesforbothAM andFM (AM-10/
FM-10).
1.Pressthe Button(10/H1) toturn on theunit.
2.PresstheFunction Button(3/H3) tooperatethe unitin radiomodeand
desired band.
3.Tunetoa desiredstation.
4.Pressthe MEMORYButton(7/H6), “MEMORY”(#D11)&numberofpre
set station appears.
5.Pressthe MEMO+Button (6/H12)to selectthedesired presetchannel.
6.PressMEMORY Button(7/H6)againtocomplete.
7.Tunetoanother stationandrepeat steps 4to 6 tostorethe stationin
anotherpreset channel.
TORECEIVEPRESETSTATIONS
1.Pressthe Button (10/H1)toturn ontheunit.
2.Pressthe FunctionButton (3/H3)tooperate theunit inradiomode.
3.Press theMEMO+Button(6/H12) toselect thepresetchannels.
Youcan connectleftand rightaudiooutputsfromaTV,VCR, DVD,MP3player orother portable deviceto
theAUX INJacks (21)on therearof thesystem.Touse thisFront LoadingDual CDSystemto amplifyyour
inputaudio signal:
1.Press the FunctionButton(3/H3) tooperate theunitinAUX mode.“AUX” Indicator(#D5)appears inthe
display.
2.Turnon andstartplayingthedevice thatisplugged intotheAUX Jack.
3.AdjusttheVolumeControl toobtain thedesired soundlevel.
Thesoundequalization canbe adjustedforoptimum soundreproduction depending onstyle ofmusicyou
areplaying.By pressingthe EQButton(14/H13), youcanswitch betweenFLAT,CLASSROCK, POP.
USINGHEADPHONES(NOTINCLUDED)
Inserting the plug of your headphones into the Headphone Jack (16) will enable you to listen in private.
Whenusingheadphones, thespeakerswill bedisconnected.
NOTE: READ THIS IMPORTANT INFORMATION BEFORE USING YOUR HEADPHONES
1. Avoidextended play atvery high volumeasit mayimpairyourhearing.
2.Ifyou experience ringinginyour ears, reducethevolume or shutoffyour unit.
3.Keepthe volumeat a reasonablelevel evenifyour headsetis an open-airtype designedtoallow youto
hearoutsidesounds. Pleasenotethat excessivelyhighvolume maystillblock outsidesounds.
SLEEPOPERATIONS
1.Whenthe unitin ON,press theTIMER/SLEEPButton(13)toprogramthesleeptime, SLEEPindicator will
appears and 90 wil blinks on display.
2.Press &button(9/H11)toselect thesleep timebetween 90-60-30-15minntes, thenpress SLEEP
button (13)again tostoreyour desired sleeptime.
3.Thedisplayshows thechosen sleepingtimemomentarily andthen returnstothe currentfunction mode.
4.Theunitwill automaticallyturnoff aftertheset time haselapsed.
5.Tocancel theSleep operation,press theSLEEPButton(13) againuntilSLEEPindicator disappear or
simply switch the unit to standby.
E-13 E-14
Note:
When listeningto an FMstation, fully extendthe antenna toinsure maximum reception.
Automatic tuningrelies on thesignal strengthofthe broadcasting station. Weakerstations areoften
skipped when usingautomatic tuning. Manualtuning is suggestedfor locating andprogramming
weaker stations and also for fine tuning stations found during automatic scan.
ForFMstereo reception,the unitprovidesFM MONO/STEREOselection. Instereo mode,the unitwill
automatically switch to stereo when a FM stereo broadcast is received and the Stereo indicator
(#D15) will light.
To receivea weak (noisy)FMstation, press theST/MO Button (H5)toswitch to MONOmode. The
reception maybeimproved, butthesound is monaural(MONO).
AUXOPERATION
PRESETEQ(EQUALIZATIONSYSTEM)
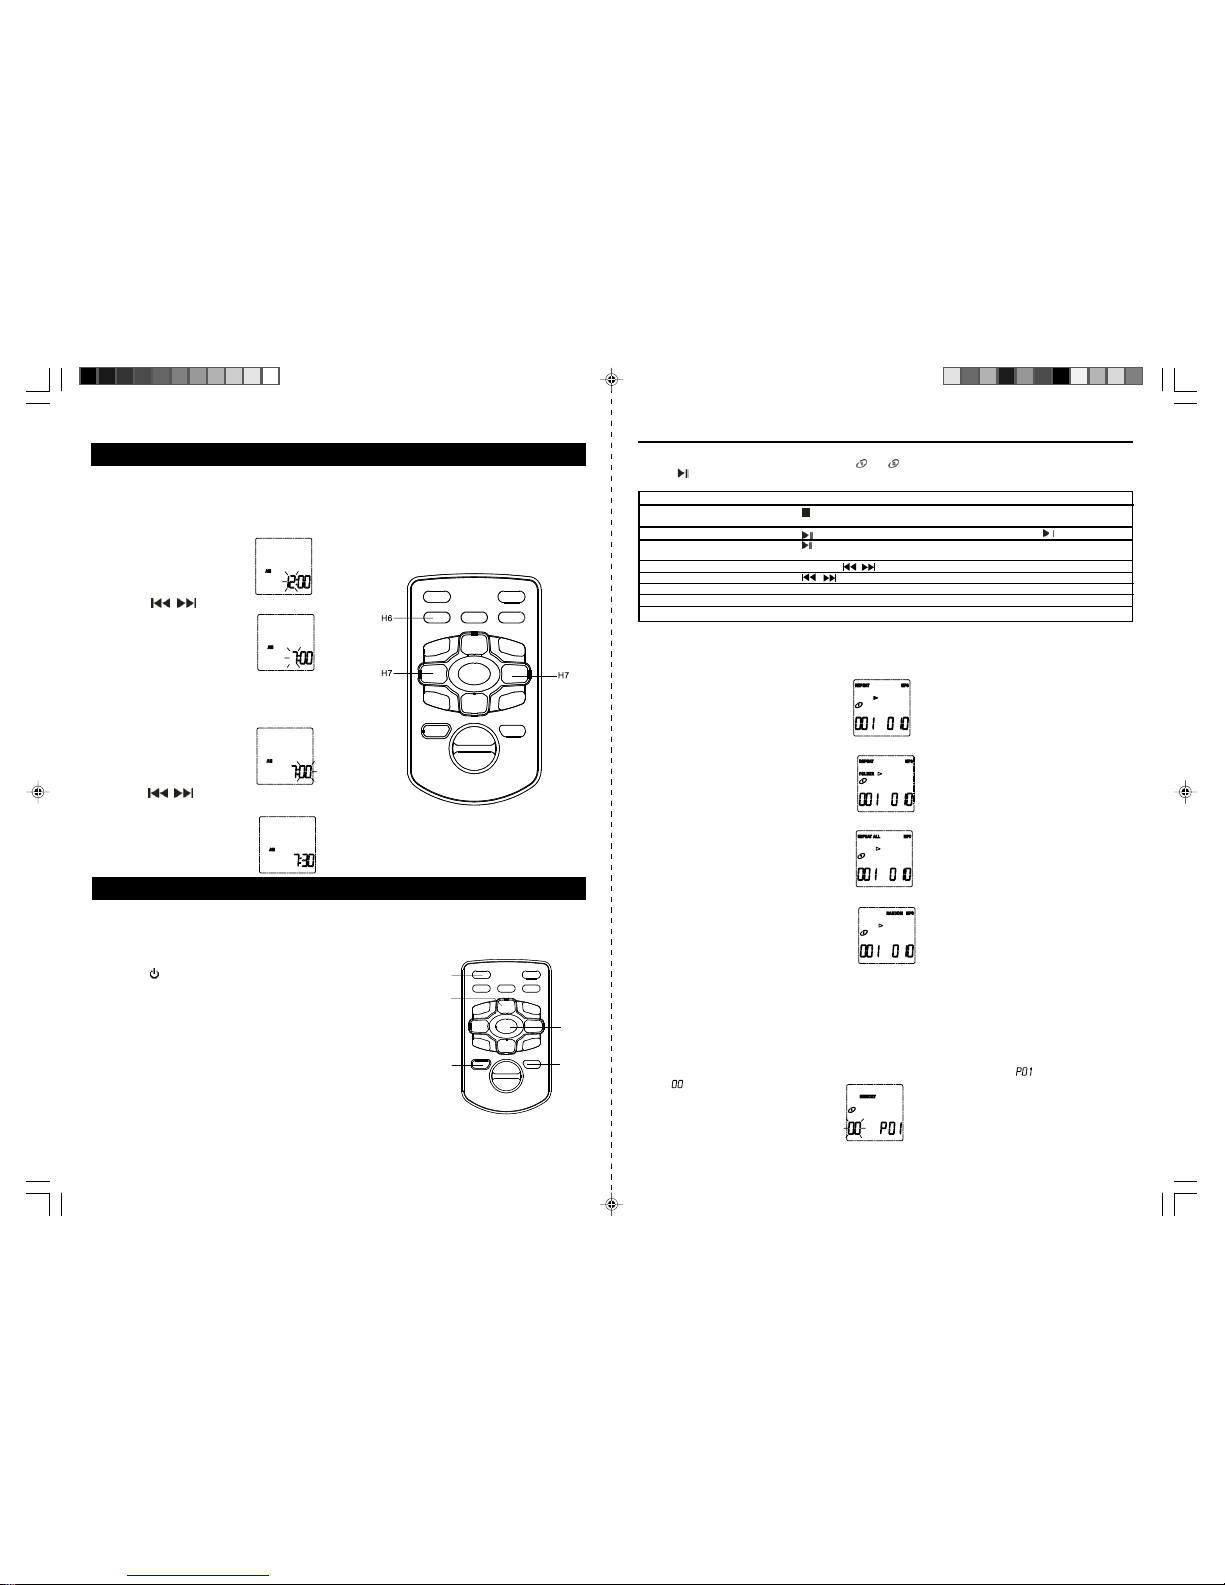
TIMEROPERATIONS
Yourunitcanbeset toturnon atpredeterminedtimeinRadio/CDfunctionmodefor running60minutes unless
turnoff theunit manually.Thissettingcanonlybedoneinstandbymode.Toset theTIMER asfollows :
1.PresstheTIMER/SLEEPButton(13/H14)once the‘TIMER’iconappearand thehourdigit willblinkto setthe
timer ontimeduring standbymode inthe display.
2.Pressthe /Button(11/H7)toadjust thehour.
3.Pressthe TIMER/SLEEPButton to(13/H14) confirmhour setting,minute positionflashes.
4.Press the / Button (11/H7) to adjust the minute.
5.Pressthe TIMERSLEEPButton (13/H14)to completesetting. The‘TU’blinks andvolumelevelwillshow.
6.Pressthe /button (11/H7)toselecttheturnon functiononvolumelevel,press TIMER/SLEEP (13/
H14)button againtostore thetimeron functionandthe volumelevel will blink.
7.Pressthe /button (11/H7)toselectthevolume level,pressTIMER/SLEEPbutton (13/H14)again
to completetimer setting, the‘TIMER’icon andcurrenttime willappear on display, theunit willturnon
running 60 minutesoncereach the timeyou set.
JMC-670 INSTRUCTION MANUAL
HX-1056M3 IB JENS 001 REV0.P65 7/20/2005, 2:55 PM8
JMC-670 INSTRUCTION MANUAL

CAREANDMAINTENANCE
1.Cleanyourunit with adamp(never wet)cloth.Solvent or detergentshouldnever be used.
2.Avoidleavingyour unitindirect sunlight orin hot, humidor dusty places.
3.Keepyourunit awayfromheating appliancesandsources ofelectrical noise suchas fluorescent lamps
or motors.
4.Ifdrop-outs orinterruptions occurinthe musicduring play,or ifthedisc failsto play
at all, itsbottomsurface may requirecleaning. Before playing,wipethe disc from
the center outwards with a good soft cleaning cloth.
TROUBLESHOOTINGGUIDE
E-15
RESETINGTHEUNIT
Incase theunitdisplay beginsfunctioning erraticorrandom
characters are displayed, use a sharp tip to press the RE-
SETSwitch(20) to resetthe unit.
Note:All the presetmemorieswill be erasedand the clock
hastobe set again.
SPECIFICATION
Power source AC120V ~ 60 Hz
DC 3V ,1 pc of “CR2025” lithium battery for remote handset
Power consumption 28 Watts
Dimension Unit: 400 (W) x 116 (D) x 219 (H) mm
Speaker: 132 (W) x 116 (D) x 219 (H) mm
Tuningrange/sensitivity AM 520 ~ 1710kHz
FM 88 ~ 108MHz
Playbacksystems Ball clip CD mechanisms
Frequencyresponse 100 – 18,000 Hz
Poweroutput 5 Watts RMS per channel
Speaker impedance 4 Ohms
Headphoneimpedance 8 – 32 Ohms
AUXinputsensitivity 300 mV
E-16
HX-1056M3 IB JENS 001 REV0.P65 7/20/2005, 2:56 PM9
JMC-670 INSTRUCTION MANUAL JMC-670 INSTRUCTION MANUAL
Should you experience difficulties in the use of this player please refer to the following chart or call
1-800-777-5331 for Customer Service.
SERVICE
Please refer to the instructions on the enclosed warranty card for returning your unit for service.
When returning the unit, please remove batteries to prevent damage to the unit in transit and/or from
possible battery leakage. We are not responsible for batteries returned with the product or for the
cost of replacement.
Distributed by:
Spectra Merchandising International, Inc.
Chicago Industry Tech Park
4230 North Normandy Avenue
Chicago, IL60634, U.S.A.
Please have model number ready, for Customer Service,
call 1-800-777-5331
Printed in China
Table of contents
Other Jensen CD Player manuals

Jensen
Jensen CD-60W User manual

Jensen
Jensen XCH 6RF Instruction sheet

Jensen
Jensen CD-475 User manual

Jensen
Jensen CD-600 User manual

Jensen
Jensen CD-60 User manual

Jensen
Jensen MCD10 User manual

Jensen
Jensen MP5000 - GUIDE User manual

Jensen
Jensen JMC-180 User manual

Jensen
Jensen CD-476 User manual

Jensen
Jensen CD-472 User manual

Jensen
Jensen CD-540 User manual

Jensen
Jensen CD615X User manual

Jensen
Jensen CD-575 User manual

Jensen
Jensen JCD3007 User manual

Jensen
Jensen CD-470 User manual

Jensen
Jensen CD-470A User manual

Jensen
Jensen JMC-180A User manual

Jensen
Jensen JMC-326 User manual

Jensen
Jensen CD-555 User manual

Jensen
Jensen CD-26 User manual