Jensen SMPV-4GBEB User manual

MODEL SMPV-4GBEB
DIGITAL MEDIA PLAYER
PLEASE READ THIS USER MANUAL COMPLETELY
BEFORE OPERATING THIS UNIT AND RETAIN THIS
BOOKLET FOR FUTURE REFERENCE.

1
DEAR JENSEN CUSTOMER
Selecting fine audio equipment such as the unit you've just purchased is only the start of
your musical enjoyment. Now it's time to consider how you can maximize the fun and
excitement your equipment offers. This manufacturer and the Electronic Industries
Association's Consumer Electronics Group want you to get the most out of your
equipment by playing it at a safe level. One that lets the sound come through loud and
clear without annoying blaring or distortion and, most importantly, without affecting your
sensitive hearing. Sound can be deceiving. Over time your hearing "comfort level" adapts
to higher volumes of sound. So what sounds "normal" can actually be loud and harmful to
your hearing. Guard against this by setting your equipment at a safe level BEFORE your
hearing adapts.
To establish a safe level:
- Start your volume control at a low setting.
- Slowly increase the sound until you can hear it comfortably and clearly and without
distortion.
Once you have established a comfortable sound level:
Set the dial and leave it there.
Taking a minute to do this now will help to prevent hearing damage or loss in the future.
After all, we want you listening for a lifetime.
We Want You Listening For a Lifetime
Used wisely, your new sound equipment will provide a
lifetime of fun and enjoyment. Since hearing damage from
loud noise is often undetectable until it is too late, this
manufacturer and the Electronic Industries Association's
Consumer Electronics Group recommend you avoid

2
prolonged exposure to excessive noise.
Customer's Record:
The serial number of this product is found on the unit. You should note the serial number
of this unit in the space provided as a permanent record of your purchase to aid in
identification in the event of theft of loss.
Model Number:SMPV-4GBEB SerialNumber:
LSAFETY INFORMATION
Read this user guide carefully to ensure proper use of the product and to avoid any
danger or physical damage.
Do not use this unit in extremely hot, cold, dusty and moist environment.
Do not drop the unit, this could cause damage to the external cabinet as well as
internal components.
Do not repair the unit by yourself, or it will cause damage.
Avoid getting the unit wet or drop it in water.
Do not use the unit while driving or doing other things that you must fully concentrate in
as it may cause distraction.
Use your unit with care and attention to your health, especially your hearing.
To avoid damage by electrostatic discharge, do not operate the unit in extremely dry
environment.
Always use the accessories provided by or approved by our company, also do not
subject your unit to moisture.
Please follow the right way to download data; we won't be responsible for the loss of
date due to misuse.

3
COMPLIANCE WITH FCC
This device complies with Part 15 of the FCC Rules. Operation is subject to the following
two conditions:
(1) this device may not cause harmful interference, and
(2) this device must accept any interference received, including interference that may
cause undesired operation.
NOTE : This equipment has been tested and found to comply with the limits for a Class B
digital device, pursuant to Part 15 of the FCC Rules. These limits are designed to provide
reasonable protection against harmful interference in a residential installation. This
equipment generates, uses and can radiate radio frequency energy and, if not installed
and used in accordance with the instructions, may cause harmful interference to radio
communications. However, there is no guarantee that interference will not occur in a
particular installation. If this equipment does cause harmful interference to radio or
television reception, which can be determined by turning the equipment off and on, the
user is encouraged to try to correct the interference by one or more of the following
measures:
- Reorient or relocate the receiving antenna.
- Increase the separation between the equipment and receiver.
- Connect the equipment into an outlet on a circuit different from that to which the
receiver is connected.
- Consult the dealer or an experienced radio/TV technician for help.
CAUTION: Changes or modifications not expressly approved by the party
responsible for compliance could void the user’s authority to operate the
equipment.

4
ACCESSORIES INCLUDED
Video
conversion
software CD
USB cable Earbuds User manual
POWER SOURCE & RECHARGING
This unit operates on a built-in Li –polymer battery and must be charged prior to use.
Please charge the unit for at least 8 hours before first use.
1. Connect the PC USB port and the unit’s USB port with the provided USB cable.
2. An animating battery icon will appear as shown in the
diagram on the right during charging. Once full charged, the
battery will stop running. The average recharging time is
approximately 3 hours for normal use.
3. To stop the charging process, disconnect the USB cable.
Notes
Your computer must be turned on while connected to your player for charging.
Do not overcharge the player after the initial charge. Overcharging could shorten
the battery’s life and charging capacity.

5
The built-in Li-polymer battery will normally offer about 300 or more
charge/discharge cycles.
The Li-polymer battery will discharge slowly on its own even when the unit is not in
use, so if the unit is not used for an extended period of time it will be necessary to
recharge the unit at least once every 6 months to maintain normal performance.
CAUTION
1. Danger of explosion if battery is incorrectly replaced. Replacement should be by a
qualified technician and only with the same or equivalent type battery.
2. Do not disassemble, crush, short-circuit or incinerate your battery as it may cause
fire, injury, burns, explosion or other hazards.
3. Please dispose of properly for recycling.
COMPONENTS AND BUTTON FUNCTIONS

6
1. [-]: Backward/Fast Backward/Volume Down Button
2. [+]: Forward/Fast Forward/Volume Up Button
3. [R/V]: Record/Volume Button 4. [M]: Menu Button
5. []: Power on/off / Play/Pause Button 6. LCD Screen
7. Lanyard Strap Hole 8. Mini USB Port
9. Reset Button / mic opening 10. Headphone Jack
11. Hold (Key Lock) Switch
DOWNLOADING MUSIC TO YOUR UNIT
Connecting to your Personal Computer:
1. Connect the unit to your computer USB port using the provided USB cable.
2. The unit will turn itself on automatically.
3. The LCD screen will look like the image on
the right indicating a successful connection
to the computer’ USB interface is
established successfully.
For Windows XP/Vista users, once the unit is connected to your computer, it appears as
a removable drive in “My Computer”. For Mac users, it appears as a removable drive on
the “Desktop”. You can now move, copy, paste and delete files (music or voice recording
files, etc.) between your computer and the unit’s memory.

7
Downloading files into your unit:
For Windows users:
1. Select the track(s) you want to download.
2. Right-click on the file(s), a menu pops up and click “Copy”.
3. Under My Computer or Windows Explorer, double-click the Removable Disk to open
the drive. The Removable Disk window appears.
4. Right-click on the Removable Disk window and click “Paste” in the menu.
5. When the copy process begins, the LCD screen will change to the left diagram
below to indicate that your computer is transferring data to your unit. Do not
disconnect your unit until the LCD screen change back to the idle screen on the right
side diagram. Otherwise, it may result in data loss or even damage to your unit.
For MAC users:
1. Double click on the removable drive named NO NAME (or name assigned to the
player by you) on the Desktop to view the folder(s) in your unit.
2. Then you may drag and drop any song from your iTunes Music Library into any
folder of your unit.

8
Removing the unit from the computer:
Note: Please follow these steps carefully to avoid data loss or unit damage.
For Windows users:
1. Click on the “Safely Remove Hardware” icon (green arrow) in the system tray of your
Windows desktop to bring up the list of USB Mass Storage Device attached to our
computer.
2. From the device list, choose the Drive designator that corresponds to your unit, for
example Drive (H:).
3. Click on the chosen device to unload it from your computer system.
4. After a while, a “Safe To Remove Hardware” system message window will pop up
telling you that your unit can now be safely removed from the system.
5. Disconnect your unit from the USB port of your computer.
For MAC users:
1. Click on the removable drive named NO NAME (or name assigned to the player by
you) and drag it into the trash.
2. The trash will change to an EJECT icon and it is now safe to remove your unit.
LCAUTION:
Do not disconnect the unit while file(s) stored in its memory is/are being opened or
played on your computer.
Do not disconnect the unit from your computer or press any button while transferring
files or it will cause data loss or damage to the player.

9
Creating the playlist:
As soon as the USB cable is disconnected from the unit, the following prompt will pop up:
“ Create playlist or not “
TapButton for “Yes” or M Button for “No“. When Button is pressed, the following
message will appear on the screen:
“Creating Playlist …
Please wait … “
Note: the playlist helps to maintain advanced indexing and sorting of various music, video,
voice recording files properly after each file download from your computer, so we strongly
recommend all users to accept its creation. However, if your unit is fully loaded with all
kinds of media files, it may take considerable time (several minutes) to create.
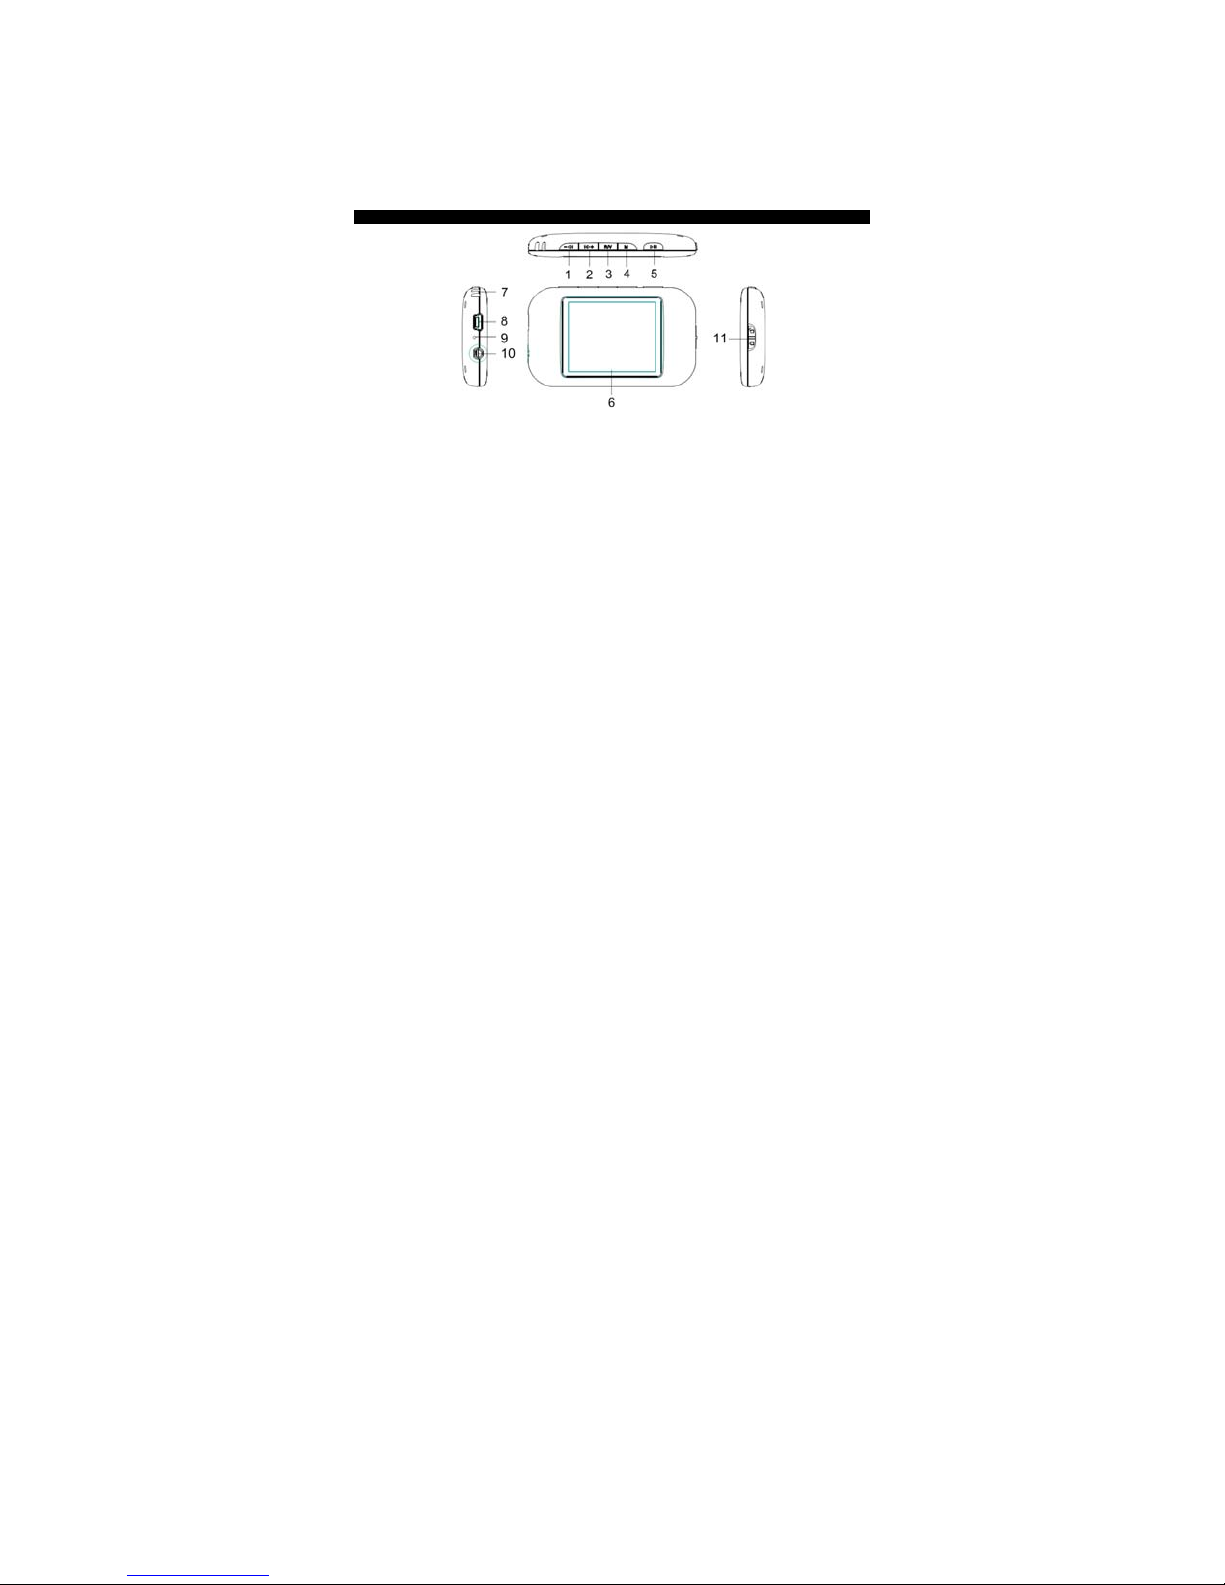
BASIC OPERATIONS
Buttons used for “Menu” [M], “REC/Volume” [R/V], “Play/Pause” [], Skip
[-/+] functions can be controlled in 3 different ways:
1. Tap - press the button briefly then release it immediately.
2. Press - press and hold the button for about 2 seconds then release it.
3. Hold - press and keep holding the button until function change occurs.
Turning power on/off and initializing unit for first use
1. Hold theButton to turn on the unit.
2. On first use, please press the Reset button once with a pointed object such as a
straighten paper clip, to correctly initialize the unit and the unit will restart and go to
Music function of Main Menu automatically.
3. To turn unit off, hold Button.

10
Playing music, video, voice/radio recordings
1. Connect the earbuds to the Headphone Jack.
2. Make sure the Hold Switch is set to the unlock ²position.
3. Tap either -/+ Button to select either music, video or playback mode.
4. Tap Button to enter the desired mode.
5. To play or pause, tap theButton.
Note: the unit supports lyric synchronization in music mode. When you see the lyrics
icon on the screen, hold MButton until the lyric is displayed on the screen. Press M
Button to return to normal music screen.
6. To change tracks, tap either -/+Button.
7. To move backward or forward quickly while playing a track, hold either -or+
Button.
8. To return to the Main Menu, hold the MButton.
ID3 Tag Display
This unit is able to display the title, artist, album, etc. of compatible music files during
playback. If the ID3 tag information is too long to be displayed all at once on the LCD
screen, the hidden information will scroll from right to left across the LCD.
Live/Radio recording
1. Tap Button to starting recording. Tap Button again to pause.
2. Tap the MButton to save the current recording.
Volume Adjustment

11
In Music, Video, Playback or Radio mode, tap R/V Button to select volume adjust mode.
When the speaker icon is shown reversed, tap or hold either -or+ Button to decrease
or increase the volume output.
FUNCTION MENUS AND SETTINGS
Menu Navigation
1. From the Main Menu, tap -or+ Button to select 1 out of 9 functions: Music, Video,
Record, Playback, Radio, Picture, Text, Browser or Setting.
2. Then tapButton to confirm.
Submenu Navigation
1. From each function menu you can tap the MButton for submenus (if available).
2. When viewing submenus, the sign will indicate the current setting. Tap -or+
Button to change to the desired available option.
2. Then tapButton to select or to confirm and go back to the function screen
immediately.
3. If no keys are press within 5 seconds, the last selected option will take effect and it
will return to the function screen automatically.
4. Hold MButton to return to Main Menu immediately.
MENU-1 MUSIC
Choose MUSIC function to play your MP3, WMA, OGG and other supported music files.
Indicators of Music function

12
EQ mode: shows either Nature, Rock, Pop, Classical, Soft, Jazz, DBB or SRS
WOW™HD in effect
File type & bitrate: shows MP3,WMA,OGG,ASF,APE file types and its bitrate in kbps
File search mode: it shows up when file mode in navigation submenu is chosen
Folder search mode: it shows up when folder mode in navigation submenu is
chosen
File information: shows current file number/total file number, filename, ID3 tag &
storing folder details
Lyrics available: indicates a displayable lyric file of the current music file is present
Play/pause: = play,= pause, = stop, =fast backward, =fast forward

13
A-B replay: when A-B replay mode is activated
Repeat mode: 1N=normal, T1=repeat one, 1D=repeat current folder, TD=repeat
current folder, TA=repeat all, TS=random & 1I =intro
Volume level: shows current volume setting from 0 – 28 in form of a bar graph
Volume adjust: it will be highlighted when volume adjust mode is selected by R/V
Button
Playing time: shows the elapsed and total time of current music file
Battery level: shows 3 blue segments when fully charged,
Press MButton for more functions below:
While playing, the following 13 functions are available:
MENU-1-1 Repeat mode
Tap -or+Button to choose from 7 playback/repeat modes:
Normal – Repeat one – Folder once – Folder – Repeat all – Random - Intro
Press Button to confirm.
MENU-1-2 Equalizer (EQ)
Tap -or+Button to choose from 7 preset EQ settings:
Normal (default) –Rock - Pop – Classical – Soft - Jazz – DBB.
Press Button to confirm.
MENU-1-3 SRS WOW HD
This function enhances the sound quality beyond the regular preset EQ settings.
Tap -or+Button to choose from 3 options:
SRS WOW – SRS WOW HD – User setting – Disable SRS WOW HD
In the User setting submenu, tap -or+Button to choose from 8 more options:
SRS 3D, TruBass, FOCUS, CENTER, DEFINITION, Speakersize, Limiter, Exit.

14
Note:
When SRS WOW or HD sound effects are selected, preset EQ will be disabled.
WOW, SRS and are trademarks of SRS Labs, Inc.
WOW technology is incorporated under license from SRS Labs, Inc.
MENU-1-4 Tempo rate
This function allows you to change the playback speed.
There are 17 levels from -8 to +8 in which -8 is the slowest, +8 is the fastest and 0
(default) means normal speed.
MENU-1-5 A-B replay
This function allows you to repeat a certain passage of MP3 songs only for the chosen
number of cycles at the chosen rest interval in between successive replays.
MENU-1-5-1 Replay
TapButton to start replay function. “A” starts to blink in the screen.
Tap+ Button to fix replay start point “A”, “B” will start to flash for the end point.
Tap+ Button to fix replay end point B. “A-B” stops flashing and now it starts to
replay the passage between markers A and B.
If you want to change the marker points for a new replay passage, just tap -Button,
then “A” start to flash and repeat above steps to complete.
TapButton to terminate A-B replay function.
MENU-1-5-2 Replay times
This function allows you to change the numbers of replay cycles.
Tap -or+Button to choose from 1 to 10 cycles.
MENU-1-5-3 Replay gap
This function allows you to change the rest interval in between successive replays.

15
Tap -or+Button to choose from 1 to 10 seconds.
MENU-1-6 Folder list
This function displays all accessible folders in the unit’s user memory.
Note: the ROOT folder is reserved for system use.
MENU-1-7 List mode
This function lists all compatible music files in the unit’s memory according to Title,
Artist, Album & Filename. Choose the Exit option to return to the music screen.
MENU-1-8 Favorite
This function lets you keep a quick list of your favorite music tracks. Choose the Exit
option to return to the music screen.
MENU-1-8-1 View favorite
TapButton to review your current favorite list.
Tap -or+Button to choose the track you want to play immediately.
TapButton to confirm.
MENU-1-8-2 Add favorite
TapButton to add the current playing track to your existing favorite list.
MENU-1-8-3 Delete favorite
TapButton to review your current favorite list.
Tap -or+Button to choose the track you want to remove from the list.
TapButton to confirm.
Note: the original music track will not be erased.
MENU-1-9 Navigation mode
MENU-1-9-1 File mode

16
TapButton to enable file search mode.
In the music screen, when you tap/hold the -or+Button, it will go back to
previous or next music track within the current folder. When all tracks in the current
folder are listed, it will proceed to the files in the previous or next folder.
MENU-1-9-2 Folder mode
TapButton to enable folder search mode.
In the music screen, when you tap/hold the -or+Button, it will go back to
previous or next music folder until the last or first folder is reached.
MENU-1-10 Bookmark
While playing a music track, this function let you insert bookmarks (timestamps) within
it for instant playback from those entry points. Choose Exit option to return to the music
screen.
MENU-1-10-1 View bookmark
TapButton to review your current bookmark list.
Tap -or+ Button to choose the entry point you want to playback immediately.
TapButton to confirm.
Note: the bookmarks will be kept until they are deleted or the original music track is
erased from memory.
MENU-1-10-2 Delete bookmark
TapButton to review your current bookmark list.
Tap -or+Button to choose the entry point you want to remove from the list.
TapButton to confirm.

17
MENU-1-10-3 Add bookmark
TapButton to add the current point to the bookmark list of the playing music
track.
MENU-1-11 FFREV speed setting
This function allows you to set the fast forward or reverse speed while playing a music
track. Tap -or+Button to choose from 5 speeds:
1X – 2X – 4X (default) – 8X -16X
Press Button to confirm.
MENU-1-12 FFREV sound setting
This function allows you to set whether sound can be heard while quickly searching
within the playing music track. Tap -or+Button to choose from:
Sound off (default) – Sound On.
MENU-1-13 Exit
Choose this to return to music screen.
While in pause or stop mode, the following 5 functions are available:
MENU-1-1 Local folder
TapButton to display all supported music tracks in the current folder.
Tap -Button to choose “ \ ” to go up one level to display all other folders in the user
memory.
Tap -or+ Button to choose the desired folder.
TapButton to confirm.
MENU-1-2 Delete file
TapButton to display all supported music tracks in the current folder.
Tap -or+ Button to choose the music track to permanently delete from memory.
TapButton to select.
Tap -or+ Button to choose from “No” (default) or “Yes”.

18
TapButton to confirm.
MENU-1-3 Delete all
TapButton to permanently delete all files in the current folder from memory.
Tap -or+ Button to choose from “No” (default) or “Yes”.
TapButton to confirm.
MENU-1-4 Fade in/out time
TapButton to set the fade in (rise) and fade out (decay) time in music playback.
Tap -or+ Button to choose from 3 settings:
Fast (default) – Normal - Slow
PressButton to confirm.
MENU-1-5 Exit
Choose this to return to music screen.
MENU-2 VIDEO
Choose VIDEO to play only AMV or AVI files converted by the included video conversion
software. Please refer to the video converter quick guide for details.
TapButton to start playing. TapButton to pause and tap it again to resume.
Tap -or+ Button twice to skip to previous or next video.
While in pause or stop mode, the following 5 functions are available:
MENU-2-1 Local folder
TapButton to display all supported video files in the current folder.
Tap -Button to choose “ \ ” to go up one level to display all other folders in the user
memory.
Tap -or+ Button to choose the desired folder.
TapButton to confirm.
MENU-2-2 Delete file

19
TapButton to display all supported video files in the current folder.
Tap -or+ Button to choose the video file to permanently delete from memory.
TapButton to select.
Tap -or+ Button to choose from “No” (default) or “Yes”.
TapButton to confirm.
MENU-2-3 Delete all
TapButton to permanently delete all files in the current folder from memory.
Tap -or+ Button to choose from “No” (default) or “Yes”.
TapButton to confirm.
MENU-2-4 Repeat
Tap -or+ Button to choose from 7 playback/repeat modes:
Normal – Repeat one – Folder once – Folder – Repeat all – Random - Intro
PressButton to confirm.
MENU-2-5 Exit
Choose this to return to video pause or stop screen.
MENU-3 RECORD
Choose RECORD to create a live recording of conversations or meetings.
TapButton to start recording immediately.
TapButton to pause during recording and tap it again to resume.
Tap M Button to save the current recording.
While in pause or stop mode, the following 4 functions are available:
MENU-3-1 Local folder
TapButton to display all recorded files in the current folder.
Tap -Button to choose “ \ ” to go up one level to display all other folders in the user
memory.
This manual suits for next models
1
Table of contents
Other Jensen Media Player manuals

Jensen
Jensen SMP-2GBL - 2 GB Digital Audio Player User manual

Jensen
Jensen SMP-1GBEB User manual

Jensen
Jensen SMPV-4GBUA User manual

Jensen
Jensen MPR419Q Operating instructions

Jensen
Jensen SMPV-4GBTA User manual

Jensen
Jensen SMPV-2GBUB User manual

Jensen
Jensen SMPV-2GBLB User manual

Jensen
Jensen CM9MIR Operating instructions