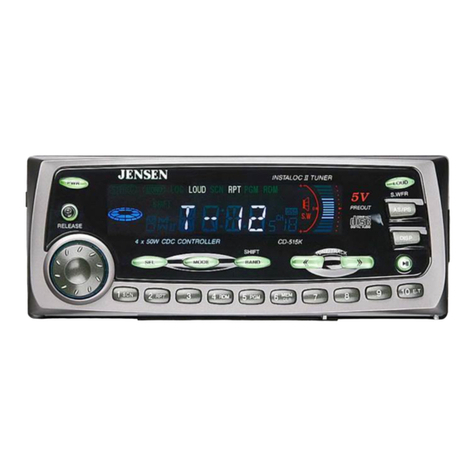
Jensen CD511K Instruction Manual

How to EnjoyYour CD511K AM/FM
Stereo Receiver/CD Player with Optional
CD Changer Control and Detachable
Security Panel
®
CD511K Features
Technical Assistance
For technical assistance with the operation of the CD511K,
call 1-800-323-0221.
Operation
Welcome!
What you're holding in your hands is no ordinary owner's
manual.We've tried to make the instructions in this owner's
manual clear and easy to follow. If you take a few minutes to
look through it, you'll learn how to use all of the features on
your new Jensen car stereo for maximum enjoyment.
For your Jensen stereo to work right, it must be installed
correctly.The enclosed installation manual will show you how
to install your new stereo like a pro. It's a good idea to read
all of these instructions before you begin the installation.
Most installations are straightforward and can be handled by
a do-it-yourselfer with the right tools, patience, and the ability
to follow instructions. But, do-it-yourself installation isn't for
everyone. If you still don't feel confident after reading this
book, consider turning the installation job over to someone
better suited to it.
Warranty Service
If your Jensen stereo should ever require service, you will
need to have the original dated receipt.If you ever need to
return the unit for any reason, always include the receipt with
the product.
Initial Set-up ...........................2
On/Off................................................2
Set-up Programming.........................2
Beep..................................................3
Initial Volume.....................................3
Set the Clock/Display Priority............4
Basic Operation......................5
On/Off................................................5
Select Function .................................5
Volume ..............................................5
Mute ..................................................5
Loudness...........................................5
Bass ..................................................6
Treble ................................................6
Balance .............................................6
Fader.................................................6
Equalizer ...........................................7
Mode .................................................7
Display ..............................................7
Cellular Telephone Mute ...................7
Radio Operation .....................8
Radio Mode.......................................8
Local/Distant Stations .......................8
Select a Band....................................8
Select a Station .................................8
Preset Stations..................................9
Station Title .......................................9
Automatically Store Stations ...........10
Scan Stored Stations
(Preset Scan)..................................10
CD Player Operation.............11
CD Mode ......................................... 11
Insert and Eject CD ......................... 11
Skip Tracks......................................12
Repeat the Same Track ..................12
Scan (Preview all Tracks)................12
Shuffle (Play all Tracks) ..................12
Pause CD Player.............................12
Fast Forward and Fast Reverse......12
Program CD Tracks.........................12
CD Changer Operation .........13
CDC Mode ......................................13
Skip Tracks......................................13
Repeat the Same Track ..................13
Scan (Preview all Tracks)................13
Shuffle (Play all Tracks) ..................13
Pause CD Changer .........................13
Fast Forward and Fast Reverse......14
Disc Up or Down .............................14
CD Title ...........................................14
MUTE
VOL
TUNE
MODE
BAND
TRACK
R
OPEN
DISP LOUD
LO/DX EQ
AS
SCN
6
SHF
SEL
PWR
5
RPT
43
DD
DN UP
21
PS
¤
ROCKPOP
CH
LOC
MONO
DISC IN CLASSIC
LOUD
COMPACT
DIGITAL AUDIO
BASS
TREB
BAL
FAD
5598 CD511K_Eop.p65 3/23/00, 2:15 PM1

2
®
CD511K
Initial Set-up
On/Off
Press any button to turn the
CD511K on. Press PWR to turn it
off.
Set-up Programming
1. Press and hold the
SEL button for more
than two seconds.
ROCK POP
CH
EONLOC
PTY
TP
SKIP
MONO
AF
DISC IN CLASSIC
LOUD
MUTE
VOL
TUNE
MODE
BAND
TRACK
R
OPEN
DISP LOUD
LO/DX EQ
AS
SCN
6
SHF
SEL
PWR
5
RPT
43
DD
DN UP
21
PS
¤
COMPACT
DIGITAL AUDIO
BASS
TREB
BAL
FAD
PWR
(Clock 12/24)
SEL
SEL
SEL
SEL
SEL
SEL
(Beep)
(Initial Volume)
(Clock Minutes)
(Clock Hours)
(Display Priority)
SEL
3
2
1
SEL
2. Press SEL button to
move display through
Beep, Initial Volume,
Clock-Minutes, Clock-
Hours, Priority, and
Clock 12/24 hour
mode programming.
>2 Sec
3. Use the volume ring to make changes to
the selected program.
4. When function has not been adjusted for 6
seconds, display returns to normal radio or
CD display and programming has been
entered into memory.
5598 CD511K_Eop.p65 3/23/00, 2:15 PM2

3
®
CD511K
Beep
1. Press and hold the
SEL button for more
than two seconds.
Current Beep setting
appears in the
display.
2. Use the volume ring
to make changes to
the Beep setting.
Display Program
BEEP OFF beep sound off
BEEP 2ND beep sound enabled
when second function
key is pressed
BEEP ON beep sound on
InitialVolume
1. Press and hold the
SEL button for
more than two
seconds.
2. Press SEL button
one time. INVOL
appears in the
display.
3. Use the volume ring
to set the initial
volume limit.
Display Program
INVOL 0 minimum
INVOL 45 maximum
Program Sequence
Beep off > Beep 2nd > Beep on
SEL
2
1
SEL
SEL
3
2
1
SEL
SEL
>2 Sec
>2 Sec
Use INVOL to set the loudest volume at
which the unit will turn on.
Note:
The unit will turn on at the INVOL limit unless
the volume level was adjusted below the
INVOL limit during last operation, then the
unit will turn on at the lower level.
For example: If the INVOL is set to 20 and
the volume level was adjusted to 15 during
last operation, the unit will turn on at 15. If the
INVOL is set to 20 and the volume level was
adjusted to 35 during last operation, the unit
will turn on at the INVOL setting of 20.
5598 CD511K_Eop.p65 3/23/00, 2:15 PM3

4
®
CD511K
Set the Clock / Display Priority
Setting Minutes
Display Program
CT-- 12 12 hour mode
CT-- 24 24 hour mode
Display Program
CTM set minutes
CTH set hours
Setting Hours
SEL
SEL
SEL
SEL
SEL
3
2
1
SEL
SEL
SEL
SEL
3
2
1
SEL
SEL
SEL
SEL
SEL
3
2
1
SEL
SEL
1. Press and hold the
SEL button for more
than two seconds.
2. Press SEL button four
times. Display shows
current Priority set-
ting.
3. Use the volume ring
to make changes to
the Display Priority
setting.
Display Program
PRO--CT Clock priority
PRO-FREQ Frequency/CD priority
SEL
SEL
SEL
SEL
3
2
1
SEL
SEL
Display Priority
1. Press and hold the
SEL button for more
than two seconds.
2. Press SEL button two
times. Display shows
current time.
3. Use the volume ring
to make changes to
the minutes.
1. Press and hold the
SEL button for more
than two seconds.
2. Press SEL button five
times. Display shows
current clock setting.
3. Use the volume ring to
make changes to the
clock setting.
1. Press and hold the
SEL button for more
than two seconds.
2. Press SEL button
three times. Display
shows current time.
3. Use the volume ring to
make changes to the
hours.
12 or 24 Hour Clock Setting
The clock can be programmed in 12 hour or
24 hour time.
>2 Sec
>2 Sec
>2 Sec
>2 Sec
5598 CD511K_Eop.p65 3/23/00, 2:16 PM4

5
®
CD511K
Select Function
Press SEL button to move display through
volume, bass, treble, balance and fader
functions. Use the volume ring to adjust the
selected function. When function has not been
adjusted for 3 seconds, display returns to
normal radio or CD display.
Basic Operation
On/Off
Press any button to turn the
CD511K on. Press PWR to turn it
off.
VOL
Volume
Adjust volume by turning
volume ring.
VOL 0 = minimum
VOL 45 = maximum
Loudness
Press LOUD to increase bass
output. LOUD appears in the dis-
play. Press LOUD again to deacti-
vate loudness.
Mute
Press MUTE button to silence the
receiver. MUTE appears in the
display. Press MUTE again to
resume listening.
MUTE
VOL
TUNE
MODE
BAND
TRACK
R
OPEN
DISP LOUD
LO/DX EQ
AS
SCN
6
SHF
SEL
PWR
5
RPT
43
DD
DN UP
21
PS
¤
ROCK POP
CH
LOC
MONO
DISC IN CLASSIC
LOUD
COMPACT
DIGITAL AUDIO
BASS
TREB
BAL
FAD
PWR
SEL
MUTE
LOUD
VOL
(Fader)
(Balance) (Treble)
(Bass)
(Volume)
SEL
SEL
SEL
SEL
SEL
5598 CD511K_Eop.p65 3/23/00, 2:16 PM5

6
®
CD511K
Bass
1. Press SEL button one
time. Display shows
current Bass level.
2. Adjust bass level by
turning volume ring.
1. Press SEL button two
times. Display shows
current Treble level.
2. Adjust treble level by
turning volume ring.
Treble
BASS –10 = minimum bass
BASS 0 = flat audio response
BASS +10 = maximum bass
TREB –10 = minimum treble
TREB 0 = flat audio response
TREB +10 = maximum treble
1. Press SEL button
three times. Display
shows current Bal-
ance level.
2. Adjust sound balance
left and right by turn-
ing volume ring.
Balance
BAL 7L = left speakers only
BAL L=R = equal sound left and right
BAL 7R = right speakers only
1. Press SEL button four
times. Display shows
current Fader level.
2. Adjust sound front
and rear by turning
volume ring.
Fader
FAD 7F = front speakers only
FAD F=R = equal sound left and right
FAD 7R = rear speakers only
SEL
2
1
SEL
SEL
2
1
SEL
SEL
SEL
SEL
2
1
SEL
SEL
SEL
SEL
SEL
2
1
SEL
SEL
5598 CD511K_Eop.p65 3/23/00, 2:16 PM6

7
®
CD511K
Equalizer
Mode
When you turn the CD511K on the unit is in
the TUN mode. Press the MODE button to
select CD play (CD), CD Changer (CDC), or to
return to Radio (TUN) mode.
The MODE button only selects the CD mode if
a CD is inserted, and only selects the CDC
mode if a Jensen CD Changer is plugged in
and a CD is inserted.
CellularTelephone Mute
This built in feature will mute the audio volume
when a cellular phone connected to the unit is
in use.
1. Press EQ button. Display
shows current equalizer
setting.
2. Press the EQ button again to
move through the pre-pro-
grammed equalizer settings.
Program Sequence
No select > Classic > Rock > Pop
Display Program
NO SELECT No equalizer setting has
been selected
CLASSIC Preset: Bass = 4,
Treble = 4
ROCK Preset: Bass = 10,
Treble = 6
POP Preset: Bass = -4,
Treble = -4
Display
Press the DISP button to change
the display. After displaying the
selected mode for 5 seconds, the
display will return to the default
mode.
Clock Priority Default Mode
Frequency/CD Priority Default Mode
MODE
MODE
MODE
DISP
EQ
Display sequence during selected mode:
Radio:
Clock > Station title > Frequency > Clock
CDP:
Clock > CDP > Clock
CDC:
Clock > Disc title > CDC > Clock
Display sequence during selected mode:
Radio:
Frequency > Clock > Station title > Frequency
CDP:
CDP > Clock > CDP
CDC:
CDC > Clock > Disc title > CDC
5598 CD511K_Eop.p65 3/23/00, 2:16 PM7

8
®
CD511K
Radio Operation
Select a Band
Select a Station
Press BAND button to change radio between
three FM bands and one AM band. Each
band stores up to six preset stations.
Seek Tuning Press the TUNE/TRACK
button or for less than
two seconds to seek the next
clear station.
Press the TUNE/TRACK
button or for more
than two seconds to disable
seek tuning. Press the TUNE/
TRACK button or to
move radio frequency num-
ber up or down one step. If
Manual Tuning is not used for
more than five seconds Seek
Tuning is enabled.
Radio Mode
When you turn the CD511K on the
unit is in the Radio Mode (TUN).
Press the MODE button to advance
to Radio Mode (TUN) if unit is cur-
rently in CD Play (CD) or CD
Changer (CDC) modes.
Local / Distant Stations
Press LO/DX button to choose
between local or distant stations.
Using the LO setting reduces
interference from nearby stations.
LOC appears in the display.
ROCKPOP
CH
EONLOC
PTY
TP
SKIP
MONO
AF
DISCIN CLASSIC
LOUD
MUTE
VOL
TUNE
MODE
BAND
TRACK
R
OPEN
DISP LOUD
LO/DX EQ
AS
SCN
6
SHF
SEL
PWR
5
RPT
43
DDDN UP
21
PS
¤
COMPACT
DIGITAL AUDIO
BASS
TREB
BAL
FAD
MODE
LO/DX
BAND
TUNE
TRACK
TUNE
TRACK
<2 Sec
>2 Sec
Manual Tuning
5598 CD511K_Eop.p65 3/23/00, 2:16 PM8

9
®
CD511K
Store a Station
Six numbered preset buttons store and recall
stations for each band.
Preset Station Number
1. Select a band (if needed).
2. Select a station.
3. Press a preset button for
more than two seconds.
The preset station number
appears on the display
when station is saved.
Recall a Station
1. Select a band (if needed).
Preset Stations
Band
Use Station Title function to label stations
stored in memory.
StationTitle
1. Press a preset button for
less than two seconds to
select a stored station.
2. Press DISP button. If no
title is currently stored NO
TITLE appears in the
display.
3. Press MODE button for
more than two seconds.
TITLE IN appears in the
display.
SCN
6
SHF
5
RPT
43
DD
DN UP
21
BAND
2
1
3
TUNE
TRACK
SCN
6
SHF
5
RPT
43
DDDN UP
21
>2 Sec
ROCK POP
CH
EONLOC
PTY
TP
SKIP
MONO
AF
DISC IN CLASSIC
LOUD
BAND
1
2
SCN
6
SHF
5
RPT
43
DD
DN UP
21
ROCKPOP
CH
EONLOC
PTY
TP
SKIP
MONO
AF
DISCIN CLASSIC
LOUD
2. Press a preset button for less than two
seconds to select stored station.
4. Press SEL button.
You are now in the
title input mode.
5. Select desired char-
acter by turning the
volume ring.
6. Press to move to
next character to be
input.
Repeat steps five and six
to input remaining charac-
ters. If you need to change
a character press the
or buttons to move to
the character you wish to
edit.
ROCK POP
CH
EON LOC
PTY
TP
SKIP
MONO
AF
DISC IN CLASSIC
LOUD
Store a Station Title
DISP
2
1
SCN
6
SHF
5
RPT
43
DD
DN UP
21
MODE
3
SEL
4
5
SEL
6
MODE
7
TUNE
TRACK
7. Press MODE button again for more than
two seconds to store title into memory.
>2 Sec
>2 Sec
<2 Sec
<2 Sec
5598 CD511K_Eop.p65 3/23/00, 2:16 PM9

10
®
CD511K
Edit / Erase Station Title
To edit or erase a stored title make the
following changes to the steps indicated in
Store a StationTitle:
Automatically Store Stations
Select six strong stations and store them in
current band.
Scan stations stored in current band.
Scan Stored Stations
(Preset Scan)
1. Select a band (if needed).
2. Press AS button. Receiver
stores six new stations
replacing stations already
stored in selected band.
1. Select a band (if needed).
2. Press PS button. Radio
pauses for ten seconds at
each station. Press PS
button again to stop scan-
ning when desired station is
reached.
BAND
2
1
AS
BAND
2
1
PS
StationTitle (continued)
2. Press DISP button. The
title appears in the
display.
3. Press MODE button for
more than two seconds.
EDIT will appear in the
display.
DISP
2
MODE
3
To Edit:
Proceed through the remaining
steps to edit the selected title.
To Erase:
Turn the volume ring until ERASE
appears in the display. Press SEL button to
erase selected title.
5598 CD511K_Eop.p65 3/23/00, 2:16 PM10

11
®
CD511K
CD Player Operation
Insert and Eject CD
1. Press OPEN/ button to pivot
front panel down.
2. Push a CD into slot. The CD will
begin to play.
3. Push front panel up to close.
1. Press OPEN/ button to pivot
front panel down.
2. Press OPEN/ button again to
stop CD play and eject CD from
slot.
3. Push front panel up to close.
Insert CD label side up.
CD Mode
Press MODE button one time to
select CD Player Mode (CD).
The MODE button only selects the
CD mode if a CD is inserted.
ROCKPOP
CH
EON LOC
PTY
TP
SKIP
MONO
AF
DISCIN CLASSIC
LOUD
MUTE
VOL
TUNE
MODE
BAND
TRACK
R
OPEN
DISP LOUD
LO/DX EQ
AS
SCN
6
SHF
SEL
PWR
5
RPT
43
DD
DN UP
21
PS
¤
COMPACT
DIGITAL AUDIO
BASS
TREB
BAL
FAD
MODE
OPEN
OPEN
MUTE
TUNE
TRACK
SEL
MODE
BAND
VOL
BASS
TREB
BAL
FAD
COMPACT DISC PLAYER
CD CHANGER CONTROLLER
DISC
CD511K 4 X 50W
¤
DISP LOUD
LO/DX EQ
AS
SCN
6
RDM
5
RPT
43
D
D
UP DN
2
1
PS
OPEN
COMPACT
DIGITALAUDIO
PWR
x
x
x
x
x
x
x
x
x
x
x
x
x
x
x
x
x
x
x
x
x
x
x
PUSH
Insert CD Eject CD
MUTE
TUNE
TRACK
SEL
MODE
BAND
VOL
BASS
TREB
BAL
FAD
CDCHANGERCONTROLLER
INSTALOCII TUNER
DISC
CD511K4 x 52W
¤
DISPLOUD
LO/DXEQ
AS
SCN
6
SHF
5
RPT
43
D
D
DNUP
2
1
PS
OPEN
COMPACT
DIGITALAUDIO
PWR
PREOUT
R
PUSH
Push front panel up to close.
Note:
•Do not expose CD player to extremely high
or low temperatures.
•Do not drive with ejected CD in the slot.
5598 CD511K_Eop.p65 3/23/00, 2:16 PM11

12
®
CD511K
Fast Forward and Fast Reverse
Press SCN button to play first ten
seconds of each track on current CD.
Display shows SCN and track number
(SCN T:08). Press SCN button again
to stop scan and listen to track.
Scan (Preview all Tracks)
Shuffle (Play all Tracks)
Press SHF button to play all tracks
on CD in random order one time.
Display shows SHF and track num-
ber (SHF T:02). Press SHF button
again to stop shuffle play.
Press and hold TUNE/TRACK
button or to fast forward or
fast reverse a track. CD play
resumes after you release the
button.
Use Program function to select up to 16 CD
tracks to play in any order. Program works by
allowing you to select a track number for each
spot in the playing sequence. A CD must be
inserted to use Program. The program will be
erased when the CD is ejected.
Program CDTracks
1. Press BAND button for
more than two seconds
to enter program mode.
2. PressTUNE/TRACK
button or to
choose track number.
3. Press 2to enter track
number into memory.
Display shows next track
number in sequence.
Continue (up to 16
times) for all desired
tracks. Press 1 to erase
track number from
memory.
4. Press BAND to play CD
in programmed order. If
no program is stored in
memory NO MEM
appears in the display.
Press BAND button to
deactivate program
mode.
SkipTracks
Press TUNE/TRACK button or
to advance to next track.
Display shows track number and
elapsed time (T04 1:43).
Pause CD Player
During CD player operation press
button to pause CD play.
PAUSE appears in the display.
Press button again to resume
play.
Repeat the SameTrack
Press RPT button to continuously
repeat same track. Display shows
RPT and track number (RPT T:06).
Press RPT button again to stop
repeat.
Note:
CDC Disc Title programming does not function
in CD mode.
SCN
6
SHF
5
3
TUNE
TRACK
TUNE
TRACK
RPT
4
D
UP
2
BAND
2
1
3
TUNE
TRACK
BAND
4
>2 Sec
5598 CD511K_Eop.p65 3/23/00, 2:16 PM12

13
®
CD511K
CD Changer Operation
The CD511K is designed to control an optional Jensen 6-disc CD changer.
CDC Mode
Press MODE button two times to
select CD Changer Mode (CDC).
SkipTracks
Press TUNE/TRACK button or
to advance to next track.
Display shows track number and
elapsed time (T04 1:43).
The MODE button only selects the
CDC mode if a Jensen CD Changer
is plugged in and a CD is inserted.
Press SCN button to play first ten
seconds of each track on current CD.
Display shows SCN, disc number and
track number (SCN 7:08). Press SCN
button again to stop scan and listen to
track.
Scan (Preview all Tracks)
Shuffle (Play all Tracks)
Pres SHF button to play all tracks on
CD in random order one time. Dis-
play shows SHF, disc number and
track number (SHF 7:02). Press SHF
button again to stop shuffle play.
Pause CD Changer
During CD Changer operation, press
button to pause CD play. PAUSE
appears in the display. Press
button again to resume play.
Repeat the SameTrack
Press RPT button to continuously
repeat same track. Display shows
RPT, disc number and track number
(RPT 7:06). Press RPT button
again to stop repeat.
ROCKPOP
CH
EON LOC
PTY
TP
SKIP
MONO
AF
DISCIN CLASSIC
LOUD
MUTE
VOL
TUNE
MODE
BAND
TRACK
R
OPEN
DISP LOUD
LO/DX EQ
AS
SCN
6
SHF
SEL
PWR
5
RPT
43
DD
DN UP
21
PS
¤
COMPACT
DIGITAL AUDIO
BASS
TREB
BAL
FAD
MODE
SCN
6
SHF
5
3
TUNE
TRACK
RPT
4
5598 CD511K_Eop.p65 3/23/00, 2:16 PM13

14
®
CD511K
Disc Up or Down
Press D UP to move to the
next disc.
Press D DN to move to the
previous disc.
DD
DN UP
21
Display shows current disc number.
Fast Forward and Fast Reverse
Press and hold TUNE/TRACK
button or to fast forward or
fast reverse a track. CD play
resumes after you release the
button.
TUNE
TRACK
Use CD Title function to label CDs stored in
CD Changer. You must be in the CD Changer
mode in order to store CD Titles.
CDTitle
1. Press D UP or D DN to
select desired disc number.
2. Press DISP button. If no
title is currently stored NO
TITLE appears in the
display.
3. Press MODE button for
more than two seconds.
TITLE IN appears in the
display.
Store a CD Title
>2 Sec
>2 Sec
DISP
2
1
MODE
3
SEL
4
5
SEL
6
MODE
7
TUNE
TRACK
DD
DN UP
21
4. Press SEL button.
You are now in the
title input mode.
5. Select desired char-
acter by turning the
volume ring.
6. Press to move to
next character to be
input.
Repeat steps five and six
to input remaining char-
acters. If you need to
change a character press
the or buttons to
move to the character
you wish to edit.
7. Press MODE button
again for more than
two seconds to store
title into memory.
ROCKPOP
CH
EON LOC
PTY
TP
SKIP
MONO
AF
DISCIN CLASSIC
LOUD
or
5598 CD511K_Eop.p65 3/23/00, 2:16 PM14

Edit / Erase CD Title
To edit or erase a stored title make the
following changes to the steps indicated in
Store a CDTitle:
CDTitle (continued)
2. Press DISP button. The
title appears in the
display.
3. Press MODE button for
more than two seconds.
EDIT will appear in the
display.
DISP
2
MODE
3
To Edit:
Proceed through the remaining
steps to edit the selected title.
To Erase:
Turn the volume ring until ERASE
appears in the display. Press SEL button to
erase selected title.
©2000 Recoton Audio Corporation
Recoton Mobile Electronics
A Division of Recoton Audio Corporation
A RECOTON®COMPANY
1090 Emma Oaks Trail
Lake Mary, Florida 32746
®
5598 CD511K_Eop.p65 3/23/00, 2:16 PM15

16
®
CD511K
5598 CD511K_Eop.p65 3/23/00, 2:16 PM16

Cómo disfrutar de su receptor estéreo
AM/FM/reproductor de CD CD511K con
control de cambiador de CD opcional y
panel de cierre de resorte de seguridad
desmontable
®
Operación
¡Bienvenido!
Lo que usted tiene en sus manos no es un manual común
para usuarios.Hemos tratado de que las instrucciones de
este libro sean fáciles de seguir y claras.Si dedica unos
minutos para hojearlo, podráenterarse de cómo usar todas
las características de su estéreo Jensen para automóvil para
su máximo deleite.
Para que su estéreo Jensen funcione bien, debe estar
instalado correctamente. El manual de instalación adjunto
sirve de guía sobre cómo instalar su nuevo estéreo como si
usted fuera profesional.Es una buena idea que lea todas las
instrucciones del manual antes de comenzar la instalación.
La mayoría de las instalaciones son simples y puede
hacerlas usted mismo si es paciente, utiliza las herramientas
adecuadas y puede seguir bien las instrucciones. Sin em-
bargo, las instrucciones para hacer la instalación por sí
mismo, no son para todos.Si aún no se siente seguro
después de haber leído este libro, puede considerar que la
instalación la haga alguien mejor capacitado para la tarea.
Garantía de Servicio
Si su estéreo Jensen necesitara alguna vez servicio,
necesitarátener la factura original de compra. Si por
cualquier causa necesita devolver la unidad, debe incluir
siempre la factura con la unidad.
AsistenciaTécnica
Para asistencia técnica sobre la operación o instalación
del componente musical CD511K, llamar al teléfono
1 800 323 0221.
Características del
Equipo CD511K
Preparación Inicial...........................2
Encendido/Apagado..................................2
Preparación de la Programación...............2
Bip.............................................................3
Volumen Inicial ..........................................3
Graduación del reloj/Prioridad de
pantalla......................................................4
Operación Básica .............................5
Encendido/Apagado..................................5
Seleccione la función ................................5
Volumen ....................................................5
Silenciador ................................................5
Intensidad..................................................5
Sonidos graves .........................................6
Sonidos agudos ........................................6
Balance .....................................................6
Atenuación acústica ..................................6
Compensador............................................7
Modalidad..................................................7
Pantalla .....................................................7
Silencio de teléfono celular .......................7
Funcionamiento del
sintonizador........................................8
Modo de Radio..........................................8
Estaciones locales/distantes.....................8
Selección de banda...................................8
Selección de emisora................................8
Preselección de emisoras .........................9
Nombre de la estación ..............................9
Almacenamiento automático de
emisoras..................................................10
Recorra las estaciones guardadas
(Estaciones programadas)......................10
Operación del Reproductor de
Discos Compactos ........................ 11
Modo CD ................................................. 11
Inserción y expulsión del disco
compacto.................................................11
Salto de pistas.........................................12
Repetición de la misma pista ..................12
Scan (Preselección de todas la pistas)...12
Reproducción al azar (todas las pistas)..12
Pausar el reproductor de CD ..................12
Avance rápido y retroceso rápido ...........12
Programacíon de las pistas de CD .........12
Operación del Cambiador
de Discos Compactos .................. 13
Modo CDC ..............................................13
Salto de pistas.........................................13
Repetición de la misma pista ..................13
Scan (Preselección de todas las pistas) .13
Reproducción al azar (todas las pistas)..13
Pausar el cambiador de CD....................13
Avance rápido y retroceso rápido ...........13
Subir o Bajar el Disco..............................14
Título del CD ...........................................14
MUTE
VOL
TUNE
MODE
BAND
TRACK
R
OPEN
DISP LOUD
LO/DX EQ
AS
SCN
6
SHF
SEL
PWR
5
RPT
43
DDDN UP
21
PS
¤
ROCKPOP
CH
LOC
MONO
DISCIN CLASSIC
LOUD
COMPACT
DIGITAL AUDIO
BASS
TREB
BAL
FAD
5598 CD511K_Sop.p65 3/23/00, 2:23 PM1

2
®
CD511K
Preparación Inicial
Preparación de la Programación
1. Pulse el botón SEL por
más de dos segundos.
ROCK POP
CH
EONLOC
PTY
TP
SKIP
MONO
AF
DISC IN CLASSIC
LOUD
MUTE
VOL
TUNE
MODE
BAND
TRACK
R
OPEN
DISP LOUD
LO/DX EQ
AS
SCN
6
SHF
SEL
PWR
5
RPT
43
DD
DN UP
21
PS
¤
COMPACT
DIGITAL AUDIO
BASS
TREB
BAL
FAD
(Reloj 12/24)
SEL
SEL
SEL
SEL
SEL
SEL
(Bip)
(Volumen inicial)
(Minutos del reloj)
(Horas del reloj)
(Prioridad de
visualización)
SEL
3
2
1
SEL
2. Pulse el botón SEL
para mover la pantalla
a través de Bip,
Volumen inicial,
Minutos del reloj,
Horas del reloj,
>2 Seg
Encendido/Apagado
Pulse cualquier botón para prender
el CD511K. Pulsar el botón PWR
para apagarlo.
PWR
Prioridad y la programación de modo de
12/24 de Reloj.
3. Usar el anillo de volumen para efectuar
cambios al programa seleccionado.
4. Cuando la función no se ha ajustado por 6
segundos, la pantalla regresa al radio
normal o pantalla de CD y la programación
ha sido enrada a la memoria.
5598 CD511K_Sop.p65 3/23/00, 2:23 PM2

3
®
CD511K
Bip
1. Pulse el botón SEL
por más de dos
segundos. Aparecen
en la pantalla las
graduaciones
corrientes del Bip.
2. Usar el anillo de
volumen para
efectuar cambios a la
graduación del Bip.
1. Pulse el botón SEL
por más de dos
segundos.
2. Pulse una vez el
botón SEL. INVOL
aparece en la
pantalla.
3. Usar el anillo de
volumen para
graduar el volumen
límite.
Pantalla Programa
INVOL 0 mínimo
INVOL 45 máximo
Secuencia del programa
Bip apagado > Bip 2do. > Bip conectado
SEL
2
1
SEL
SEL
3
2
1
SEL
SEL
>2 Seg
>2 Seg
Usar INVOL para graduar el volmen más
alto al cual la unidad funciona.
Nota:
La unidad se enciende al límite INVOL a
menos que el nivel de volumen se ha
ajustado debajo del límite INVOL durante la
última operación, a coninuación la unidad se
enciende al nivel más bajo.
Por ejemplo: Si el INVOL se gradúa a 20 y el
nivel de volumen se ha ajustado a 15 durante
la última operación, la unidad se enciende a
15. Si el INVOL se gradúa a 20 y el nivel de
volumen se ha ajustado a 35 durante la
última operación, la unidad se enciende a la
graduación 20 del INVOL.
Pantalla Programa
BEEP OFF sonido bip desconectado
BEEP 2ND sonido bip habilitado
cuando se oprime la
llave de la segunda
función
BEEP ON sonido bip conectado
Volumen Inicial
5598 CD511K_Sop.p65 3/23/00, 2:23 PM3

4
®
CD511K
Graduación del reloj / Prioridad de pantalla
Graduación de los minutos
Pantalla Programa
CT-- 12 Modo de 12 horas
CT-- 24 Modo de 24 horas
Pantalla Programa
CTM graduar los minutos
CTH graduar las horas
Graduación de la hora
1. Pulse el botón SEL
por más de dos
segundos.
2. Pulse cuatro veces el
botón SEL. La
pantalla muestra la
graduación corriente
de Pantalla.
3. Usar el anillo de
volumen para
efectuar cambios a la
graduación de
Pantalla de Prioridad.
Pantalla Programa
PRO--CT Prioridad de reloj
PRO-FREQ Prioridad de Frecuencia/CD
Pantalla de prioridad
1. Pulse el botón SEL
por más de dos
segundos.
2. Pulse dos veces el
botón SEL. La
pantalla muestra la
hora corriente.
3. Usar el anillo de
volumen para
efectuar cambios a
los minutos.
1. Pulse el botón SEL
por más de dos
segundos.
2. Pulse el botón SEL
cinco veces. La
pantalla muestra la
graduación correcta
del reloj.
3. Usar el anillo de
volumen para efectuar
cambios a la
graduación del reloj.
1. Pulse el botón SEL
por más de dos
segundos.
2. Pulse tres veces el
botón SEL. La pantalla
muestra la hora
corriente.
3. Usar el anillo de
volumen para efectuar
cambios a las horas.
Graduación de reloj de 12 ó 24 horas
>2 Seg
>2 Seg
>2 Seg
>2 Seg
SEL
SEL
SEL
SEL
SEL
3
2
1
SEL
SEL
SEL
SEL
3
2
1
SEL
SEL
SEL
SEL
SEL
3
2
1
SEL
SEL
SEL
SEL
SEL
SEL
3
2
1
SEL
SEL
5598 CD511K_Sop.p65 3/23/00, 2:23 PM4
Other manuals for CD511K
1
Table of contents
Languages:
Other Jensen Stereo Receiver manuals