Jerrold CFT-2000 User manual

CUSTOMER HANDBOOK
Jerrold
Model CFT-2000
Addressable Converter
with
On-Screen Display
n n nn^oN-som* display
uu D u—
MESSAGES- ^J?$RQU2
^3
ana
JERROLD
^COMMUNICATIONS

ACAUTION
RISK OF ELECTRICAL SHOCK.
DO NOT OPEN.
|CAUTION:
TO REDUCE THE RISK OF ELECTRIC SHOCK,
DO NOT REMOVE COVER (OR BACK).
NO USER- SERVICEABLE PARTS INSIDE.
IREFER SERVICING TO QUALIFIED SERVICE PERSONNEL
Graphical symbols and supplemental warning marking
locations on bottom of converter.
WARNING:
TO PREVENT FIRE OR SHOCK HAZARD, DO
NOT EXPOSE THIS APPLIANCE TO RAIN OR
MOISTURE.
CAUTION
TO PREVENT ELECTRICAL SHOCK, DO NOT
USE THIS (POLARIZED) PLUG WITH AN EX-
TENSION CORD, RECEPTACLE, OR OTHER
OUTLET UNLESS THE BLADES CAN BE FULLY
INSERTED TO PREVENT BLADE EXPOSURE.
The lightning flash with arrowhead symbol, within an
equilateral triangle, is intended to alert the user to the
presence of uninsulated "dangerous voltage" within the
products's enclosure that may be of sufficient magnitude
to constitute arisk of electric shock to persons.
The exclamation point, within an equilateral triangle, is
intended to alert the user to the presence of important
operating and maintenance (servicing) instructions in the
literature accompanying the appliance.
This installation should be made by aqualified service
person and should conform to all local codes.
REPAIRS:
If you find the unit in need of repair, contact your cable
system operator for repair or replacement.
NOTE TO CATV SYSTEM INSTALLER:
This reminder is provided to call CATV system installer's
attention to Article 820-40 of the NEC that provides
guidelines for proper grounding and, in particular, speci-
fies that the cable ground shall be connected to the
grounding system of the building ,as close as possible to
the point of cable entry as practical.

IMPORTANT SAFETY INSTRUCTIONS SAVE
THESE INSTRUCTIONS
1. READ INSTRUCTIONS -- All the safety and operating instructions should
be read before the appliance is operated.
2. RETAIN INSTRUCTIONS -- The safety and operating instructions should
be retained for future reference.
3. HEED WARNINGS -- All warnings on the appliance and in the operating
instructions should be adhered to.
4. FOLLOW INSTRUCTIONS -- All operating and use instructions should be
followed.
5. CLEANING -- Unplug this video product from the wall outlet before clean-
ing. Do not use liquid cleaners or aerosol cleaners. Use adamp cloth for clean-
ing.
6. ATTACHMENTS ~Do not use attachments not recommended as they may
cause hazard.
7. WATERAND MOISTURE -Do not use this equipment near water -- for
example, near abath tub, wash bowl, kitchen sink, or laundry tub, in awet
basement, or near aswimming pool, and the like.
8. ACCESSORIES -- Do not place this video product on an unstable cart,
stand, tripod, bracket, or table. The video product may fall causing serious in-
jury and serious damage to the appliance. Use only with acart, stand, tripod,
bracket, or table recommended by the manufacturer, or sold with equipment.
Any mounting of the appliance should follow the manufacturer's instructions,
and should use amounting accessory recommended by the manufacturer.
9. VENTILATION -Slots and openings in the cabinet are provided for venti-
lation and to ensure reliable operation of the equipment and to protect it
from overheating. The openings should never be blocked by placing the video
product on abed, sofa, rug, or similar surface. Equipment should never be
placed near or over aradiator or heat register, or in abuilt-in installation
such as abookcase or rack unless proper ventilation is provided.
10. POWER SOURCES «This video product should be operated only from
the type of power sources indicated on the marking label. If you are not sure
of the type of power supplied to your home, consult your local power com-
pany. For equipment intended to operate from battery power, or other
sources, refer to the operating instructions.
11. GROUND OR POLARIZATION -This equipment may be equipped with
apolarized alternating-current line plug (a plug having one blade wider than
the other). This plug will fit into the power outlet only one way. This is a
safety feature. If you are unable to insert the plug fully into the outlet, try re-
versing the plug. If the plug should still fail to fit, contact your electrician to
replace your obsolete outlet. Do not defeat the safety purpose of the polarized
plug.

ALTERNATE WARNINGS -This equipment may be equipped with a3-wire
grounding-type plug, aplug having athird (grounding) pin. This plug will
only fit into agrounding-type power outlet. This is asafety feature. If you are
unable to insert the plug into the outlet, contact your electrician to replace
your obsolete outlet. Do not defeat the safety purpose of the grounding-type
plug.
12. POWER-CORD PROTECTION -Power supply cords should be routed so
that they are not likely to be walker on or pinched by items placed upon or
against them, paying particular attention to cords at plugs, convenience re-
ceptacles, and the point where they exit from the appliance.
13. OUTDOOR ANTENNA GROUNDING -If an outside antenna or cable
system is connected to the equipment, be sure the antenna or cable system is
grounded so as to provide some protection against voltage surges and built-
up static charges. Section 810 of the National Electrical Code, ANSI/NFPA
No. 70, provides information with respect to proper grounding of the lead in
wire to an antenna discharge unit, size of grounding conductors, location of
antenna-discharge unit, connection to grounding electrodes, and require-
ments to the grounding electrodes. See Figure 1.
(NEC ART 250. PART H)
Figure 1
14. LIGHTNING -For added protection for this equipment during alight-
ning storm, or when it is left unattended and unused for long periods of time,
unplug it from the wall outlet and disconnect the antenna or cable system.
This will prevent damage to the video product due to lightning and power-
line surges.
15. POWER LINES -- An outside antenna system should not be located in the
vicinity of overhead power lines or where it can fall into such power lines or
circuits. When installing an outside antenna system, extreme care should be
taken to keep from touching such power lines or circuits as contact with them
may be fatal.
16. OVERLOADING -- Do not overload wall outlets and extension cords as
this can result in arisk of fire or electrical shock.
17. OBJECT AND LIQUID ENTRY -- Never push objects of any kind into
this equipment through openings as they may touch dangerous voltage points
or short-out parts that could result in afire or electrical shock. Never spill liq-
uid of any kind on the video product.
18. SERVICING -- Do not attempt to service this equipment yourself as open-
ing or removing covers may expose you to dangerous voltage or other haz-
ards, refer all servicing to qualified service personnel.
19. DAMAGE REQUIRING SERVICE -Unplug this equipment from the
wall outlet and refer servicing to qualified service personnel under the follow-
ing conditions:
a. When the power-supply cord or plug is damaged.
b. If liquid has been spilled, or objects have fallen into the equipment.
c. If the equipment has been exposed to rain or water.
d. If the equipment does not operate normally by following the operating in-
structions. Adjust only those controls that are covered by the operating in-
structions as an improper adjustment of other controls may result in
damage and will often require extensive work by aqualified technician to
restore the equipment to its normal operation.
e. If the equipment has been dropped or the cabinet has been damaged.
f. When the equipment exhibits adistinct change in performance, indicating
aneed for service.
20. REPLACEMENT PARTS -When replacement parts are required, be
sure the service technician has used replacement parts specified by the manu-
facturer or have the same characteristics as the original part. Unauthorized
substitutions may result in fire, electric shock or other hazards.
21. SAFETY CHECK ~Upon completion of any service or repairs to this
video product, ask the service technician to perform safety checks to deter-
mine that the video product is in proper operational condition.
22. TELEPHONE EQUIPMENT -Observe the following precautions when
installing telephone modem equipment.
1. Never install telephone wiring during alightning storm.
2. Never install telephone jacks in awet location unless the jack is specifi-
cally designed for wet locations.
3. Never touch uninsulated telephone wires or terminals unless the telephone
lines have been disconnected at the network interface.
4. Use caution when installing or modifying telephone lines.
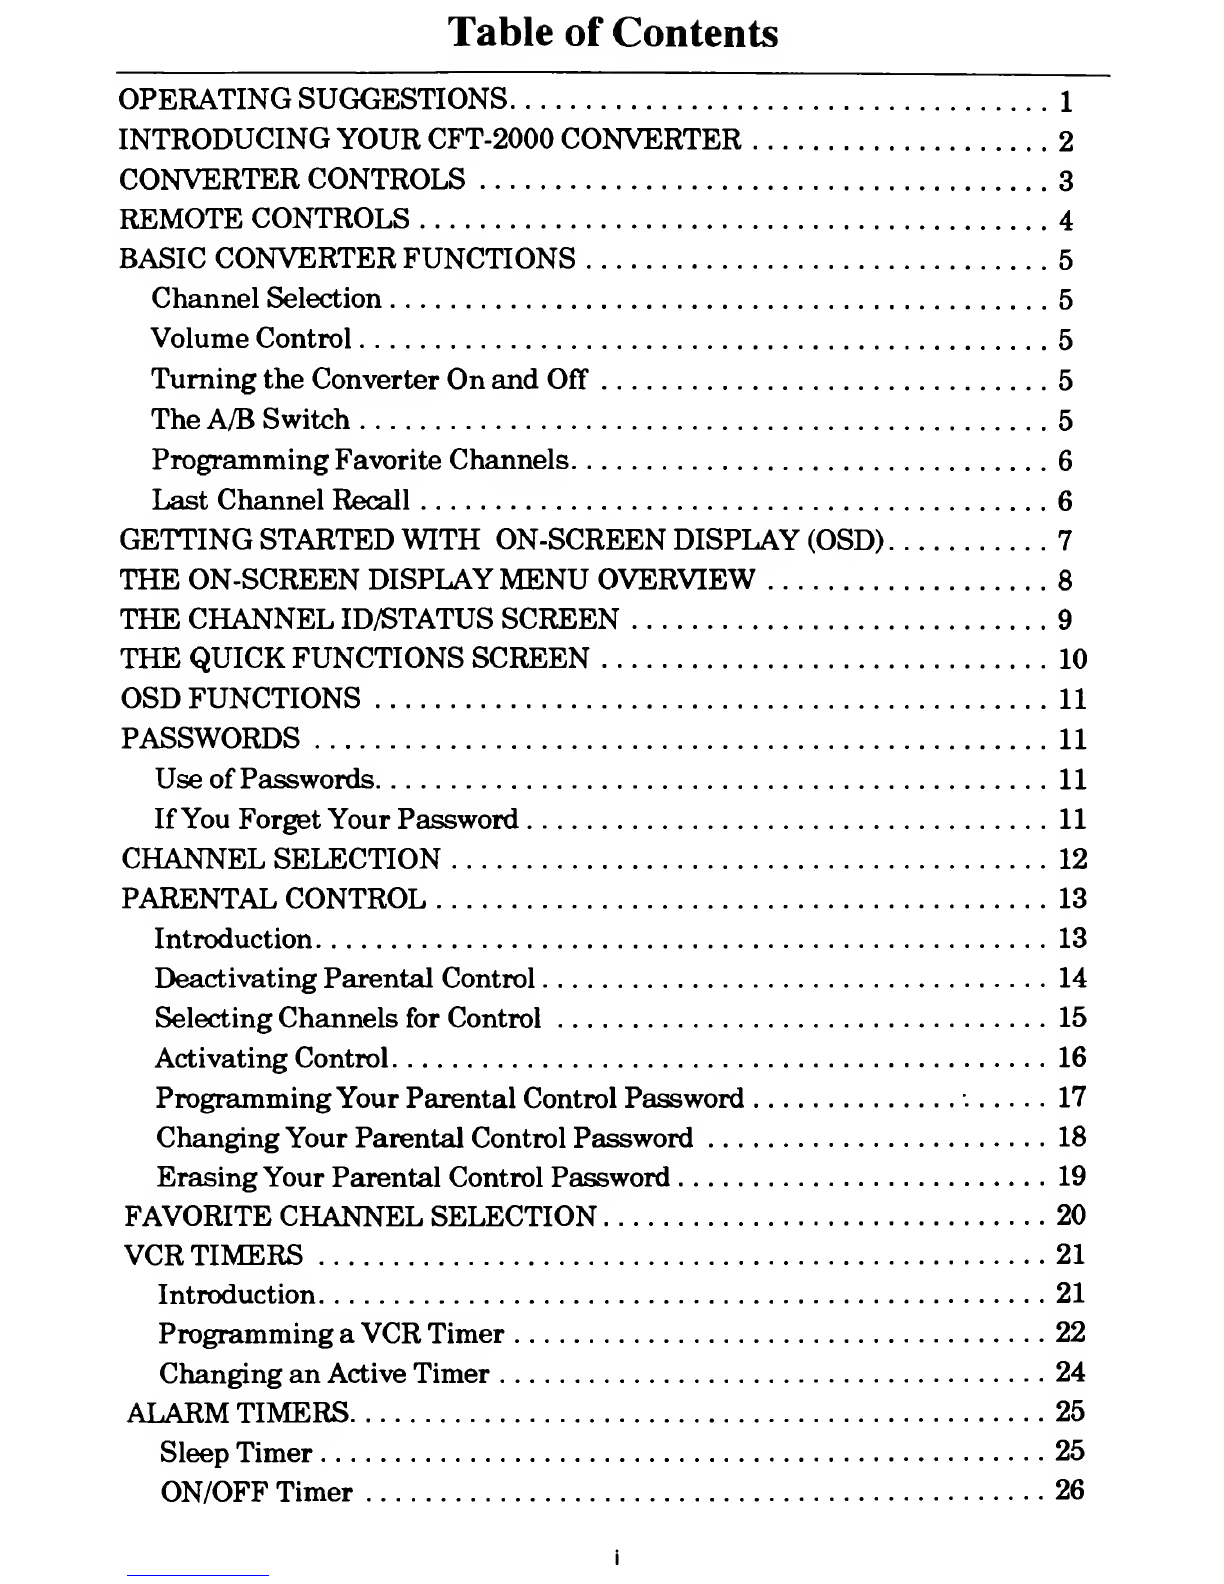
Table of Contents
OPERATING SUGGESTIONS 1
INTRODUCING YOUR CFT-2000 CONVERTER 2
CONVERTER CONTROLS 3
REMOTE CONTROLS 4
BASIC CONVERTER FUNCTIONS 5
Channel Selection 5
Volume Control 5
Turning the Converter On and Off 5
The A/B Switch 5
Programming Favorite Channels 6
Last Channel Recall 6
GETTING STARTED WITH ON-SCREEN DISPLAY (OSD) 7
THE ON-SCREEN DISPLAY MENU OVERVIEW 8
THE CHANNEL ID/STATUS SCREEN 9
THE QUICK FUNCTIONS SCREEN 10
OSD FUNCTIONS 11
PASSWORDS 11
Use of Passwords 11
If You Forget Your Password 11
CHANNEL SELECTION 12
PARENTAL CONTROL 13
Introduction 13
Deactivating Parental Control 14
Selecting Channels for Control 15
Activating Control 16
Programming Your Parental Control Password 17
Changing Your Parental Control Password 18
Erasing Your Parental Control Password 19
FAVORITE CHANNEL SELECTION 20
VCR TIMERS 21
Introduction 21
Programming aVCR Timer 22
Changing an Active Timer 24
ALARM TIMERS 25
Sleep Timer 25
ON/OFF Timer 26

Table of Contents
DISPLAYING MESSAGES 27
MODIFYING OSD SCREEN BACKGROUND 28
MODIFYING STATUS SCREEN BACKGROUND 29
MODIFYING OSD DISPLAY 30
DISABLING THE REMOTE CONTROL 31
SETTINGAC OUTLET CONTROL 31
DISPLAYING TIME-OF-DAY 32
PURCHASING PAY-PER-VIEW EVENTS 33
Introduction 33
Purchasing aCurrent Service 33
Purchasing aService for Unattended Recording 34
Purchasing aService for Unattended Recording (cont'd) 35
Programming Your Purchase Password 36
Changing Your Purchase Password 37
Erasing Your Purchase Password 38
RF BYPASS SWITCH FEATURE 39
RESPONDING TO AN OPINION POLL 40
ERROR CODES 41
REMOTE CONTROL BATTERY REPLACEMENT 42
ii
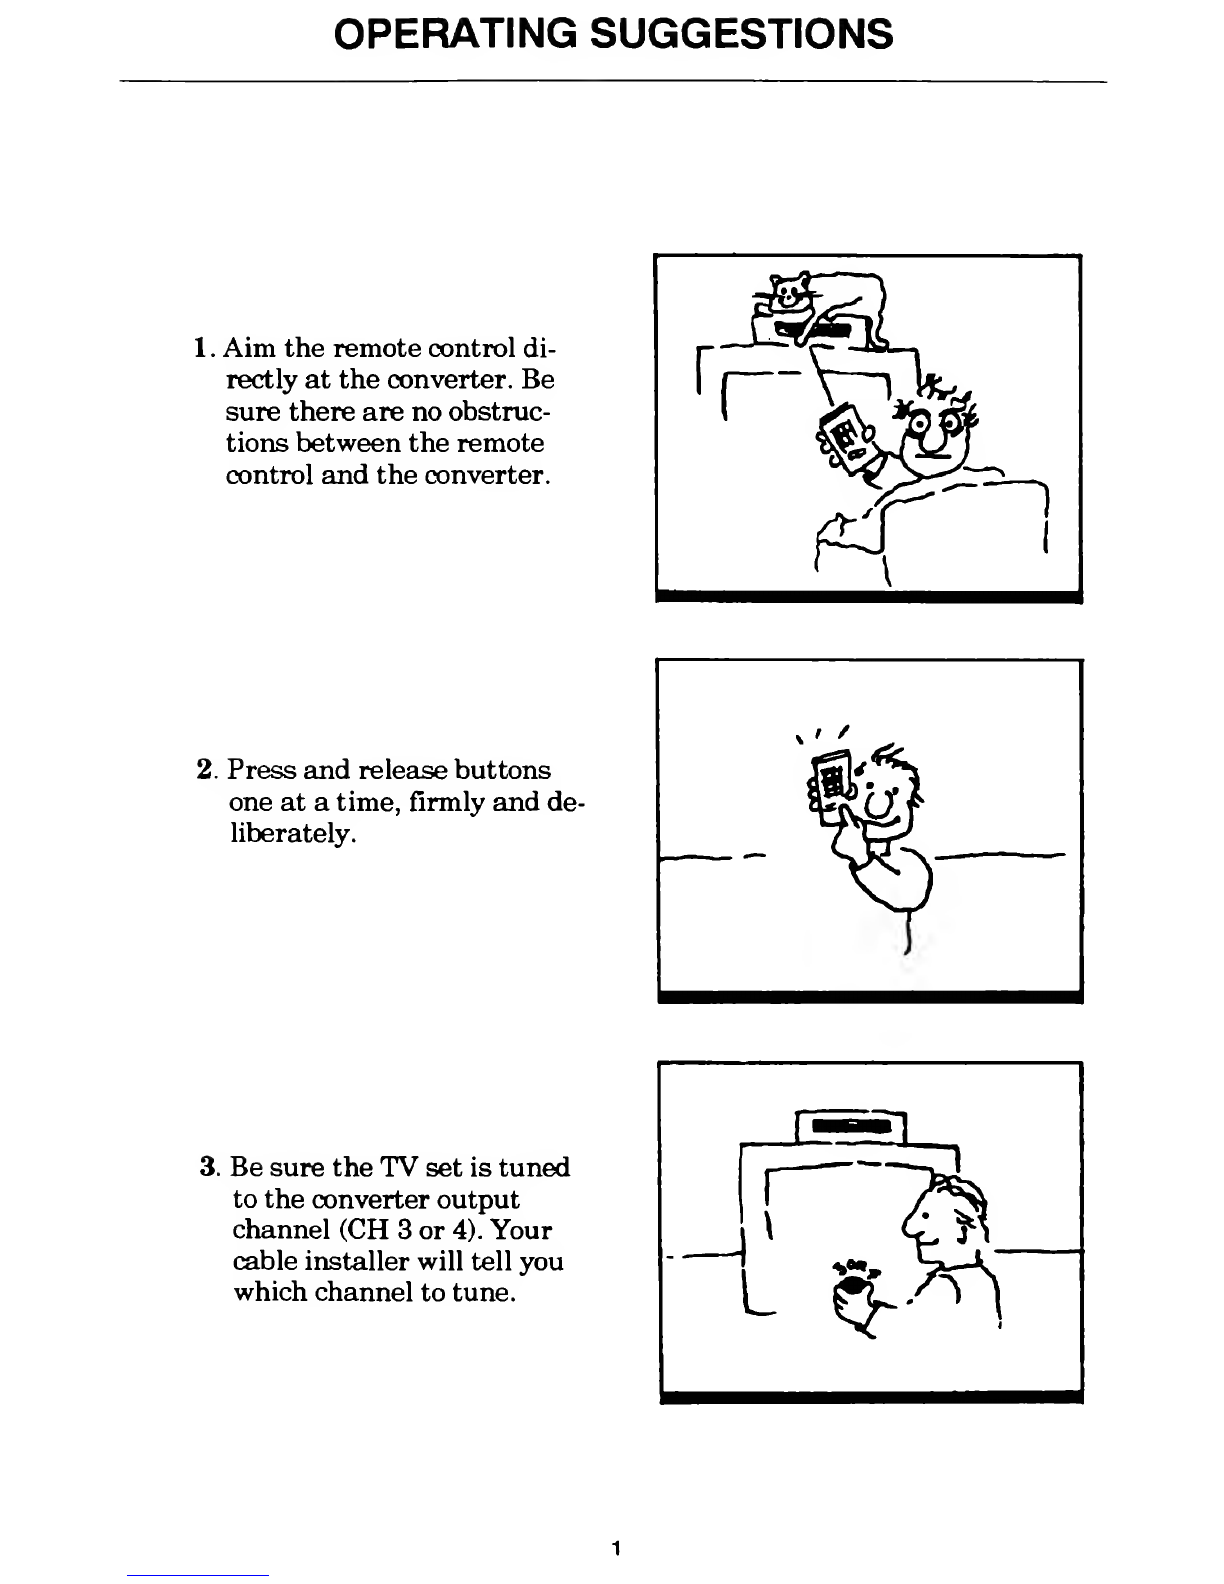
OPERATING SUGGESTIONS
1.Aim the remote control di-
rectly at the converter. Be
sure there are no obstruc-
tions between the remote
control and the converter.
2. Press and release buttons
one at atime, firmly and de-
liberately.
3. Be sure the TV set is tuned
to the converter output
channel (CH 3or 4). Your
cable installer will tell you
which channel to tune.
1

INTRODUCING YOUR CFT-2000 CONVERTER
Your cable operator has provided you with the CFT-2000 converter to en-
hance your television viewing pleasure. The CFT-2000 features on-screen dis-
play (OSD) programming capability.
Some of the many features the converter provides are
DRemote control.
Volume control.
DParental control that restricts access to channels that you select.
Favorite channel recall that allows you to quickly program and tune
to your most frequently viewed channels.
DLast channel recall that tunes to the last channel viewed.
IZI Asleep timer that you program to turn the converter off after aperiod
of time.
DAn alarm timer that can be programmed to turn the converter on and
off at the same time each day.
The keypad located on top of the converter corresponds to the keypad found
on the remote control unit, giving you the option of direct or remote com-
mand entry.
Multi-color menu screens present easy-to-follow instructions which will
guide you through the many features of the CFT-2000. The OSD function
also allows you to adjust the position of the menus on your television screen
and to choose between clear and solid menu backgrounds. In addition, your
OSD enables your cable operator to send you messages telling you of pay-per-
view events or of other services of interest to you.
Be sure to read this customer handbook so that you can fully enjoy all the
features of your CFT-2000 converter.
2
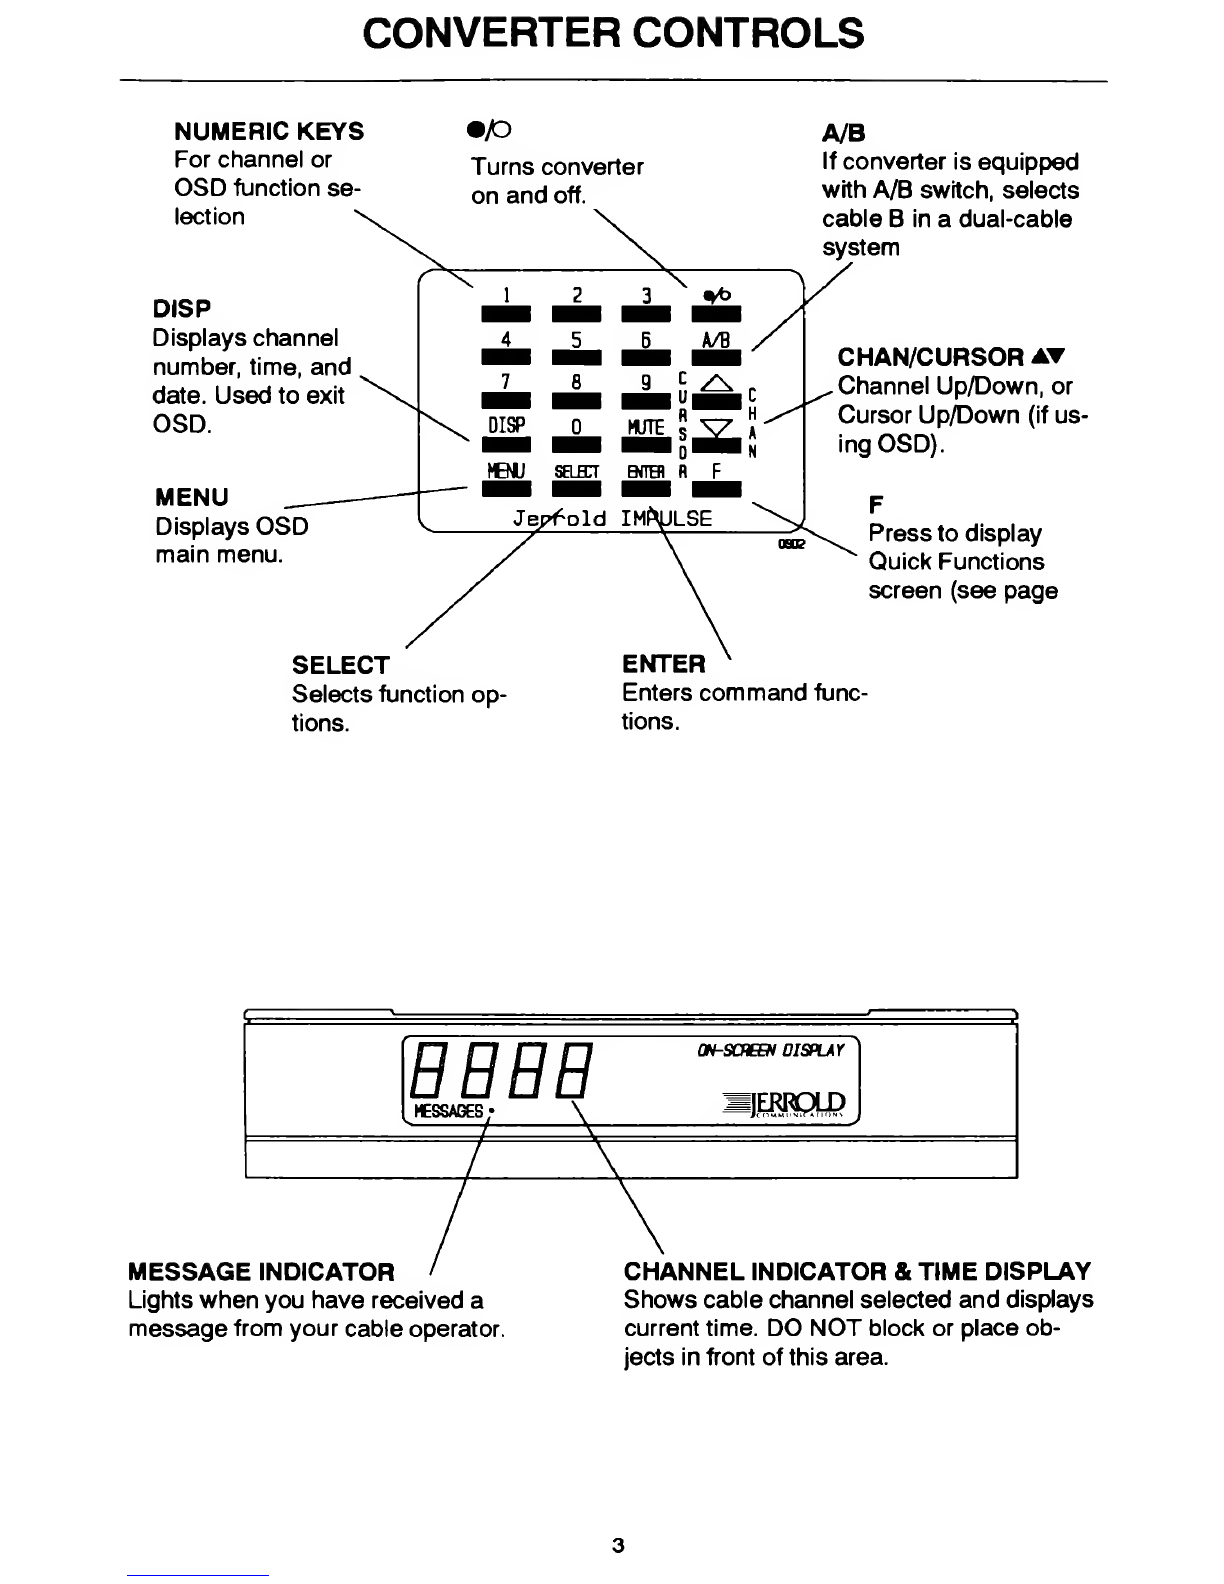
CONVERTER CONTROLS
NUMERIC KEYS
For channel or
OSD function se-
lection
DISP
Displays channel
number, time, and
date. Used to exit
OSD.
MENU
Displays OSD
main menu.
•/O
Turns converter
on and off.
A/B
If converter is equipped
with A/B switch, selects
cable Bin adual-cable
system
CHAN/CURSOR AT
.Channel Up/Down, or
Cursor Up/Down (if us-
ing OSD).
Press to display
Quick Functions
screen (see page
SELECT
Selects function op
tions.
ENTER
Enters command func-
tions.
r~i r~j r°r r~j on-screen display
messages •\—irayu?
MESSAGE INDICATOR
Lights when you have received a
message from your cable operator.
CHANNEL INDICATOR &TIME DISPLAY
Shows cable channel selected and displays
current time. DO NOT block or place ob-
jects in front of this area.
3
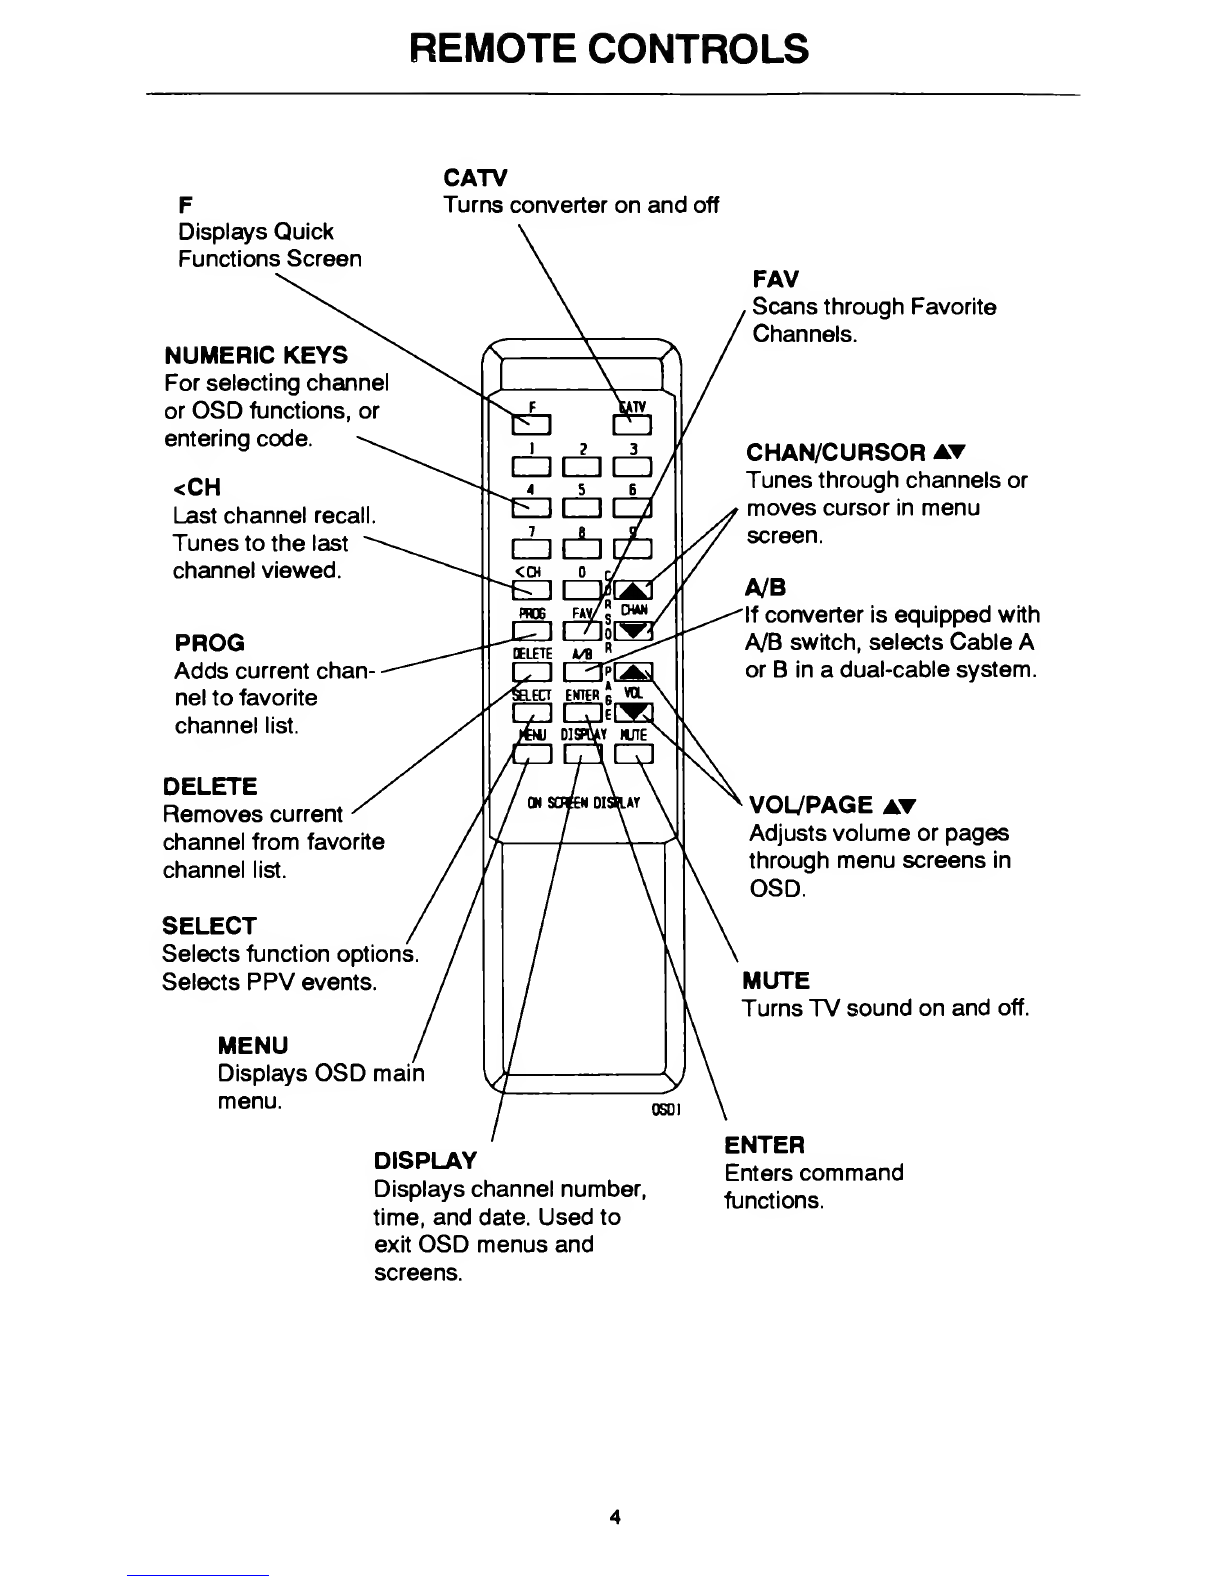
REMOTE CONTROLS
CATV
Turns converter on and off
Displays Quick
Functions Screen
NUMERIC KEYS
For selecting channel
or OSD functions, or
entering code.
<CH
Last channel recall.
Tunes to the last
channel viewed.
PROG
Adds current chan
nel to favorite
channel list.
DELETE
Removes current
channel from favorite
channel list.
SELECT
Selects function options
Selects PPV events.
MENU
Displays OSD main
menu.
DISPLAY
Displays channel number,
time, and date. Used to
exit OSD menus and
screens.
FAV
Scans through Favorite
Channels.
CHAN/CURSOR AT
Tunes through channels or
moves cursor in menu
screen.
A/B
If converter is equipped with
A/B switch, selects Cable A
or Bin adual-cable system.
VOL/PAGE AT
Adjusts volume or pages
through menu screens in
OSD.
MUTE
Turns TV sound on and off.
ENTER
Enters command
functions.
4

BASIC CONVERTER FUNCTIONS
The On-Screen Display (OSD) feature ofyour converter gives easy access to
the full range of converter functions. However, there are basic functions
which you can access simply by pressing keys on the set-top keypad or on the
remote control.
TURNING THE CONVERTER ONAND OFF
Press the ON/OFF key (marked 9/0) on the set-top keypad and CATV on the
remote control.
THEA/B SWITCH
If you are part of adual cable system, you can use the A/B key to switch be-
tween cables.
CHANNEL SELECTION
To select aviewing channel, press the corresponding numeric keys. For ex-
ample press 1then 0for channel 10; press 6for channel 6. Pressing asingle
digit and waiting three seconds will tune to that single-digit channel. You can
use either the set-top key pad or the remote control. The numbers you press
will appear on the upper right corner ofyour screen.
You can also step through the channels one at atime by using the CHAN
keys.
VOLUME CONTROL
When you press the VOL keys on the remote control, the converter will dis-
play the VOLUME bar on your screen. The bar will move as you press the
VOL keys to visually represent changes in volume level. The small triangle
under the volume bar indicates the volume setting for best stereo sound
(unity gain). When unity gain is reached, the words BEST STEREO appear
at the left of the triangle.
You can turn the TV sound on and off by pressing the MUTE key on either
the set-top keypad or on the remote control. When sound is muted the word
MUTE will appear at the upper left corner ofyour screen, and will disappear
once the MUTE key is pressed to restore sound.
5
BASIC CONVERTER FUNCTIONS
PROGRAMMING FAVORITE CHANNELS
By programming the channels you enjoy viewing most (favorite channels)
into your converter you can tune through them simply by pressing the FAV
key on the remote control.
To program afavorite channel simply tune to achannel and press the
PROG key on the remote control. The symbol FAV will appear on your TV
screen.
To remove afavorite channel, tune to the channel and press the DELETE
key. To remove all favorite channels, press the Fkey, then the DELETE key
LAST CHANNEL RECALL
The last channel recall feature of your converter allows you to tune to the
last channel viewed by pressing the <CH key.
6
GETTING STARTED WITH ON-SCREEN DISPLAY
Here are some general guidelines for using the on-screen display (OSD) fea-
ture. The following page shows the OSD menu scheme.
To bring the Main Menu to the screen, press the MENU key. This will bring
the first page of the Main Menu to the screen. The Main Menu consists of
three pages that list the seven main OSD functions:
n
n
t__i PaT*p»n 1tVvnt'ml
XCUCIllCU VU11L1U1
Favorite Channel
VCR Timers
Alarm Timers
Display Messages
Control Panel.
To choose afunction listed on the Main Menu, either press the CURSOR
keys until your choice is highlighted and then press the ENTER key, or just
press the number of the desired choice. The PAGE keys will move you to the
next or previous screen. Pressing the MENU key will also step you through
the Main Menu pages.
The straight-forward screens and their use of color make the CFT-2000 easy
to use. Each screen is composed of four parts:
Part Location On Screen Color
title top blue
choices or password middle yellow
instructions bottom blue
keys to use bottom white
All menu screens will eventually disappear if no keys are pressed for ap-
proximately 15 seconds. If you have not finished aprogramming procedure
when this happens you will have to start the procedure from the beginning.
The MENU key will bring you to the previous menu if it is pressed while in
an OSD screen.
If you press akey that has no function in the current menu, aHELP screen
will appear to remind you of the proper keys to use.
TO EXIT OSD ATANYTIME, PRESS THE DISPLAY KEY.
7
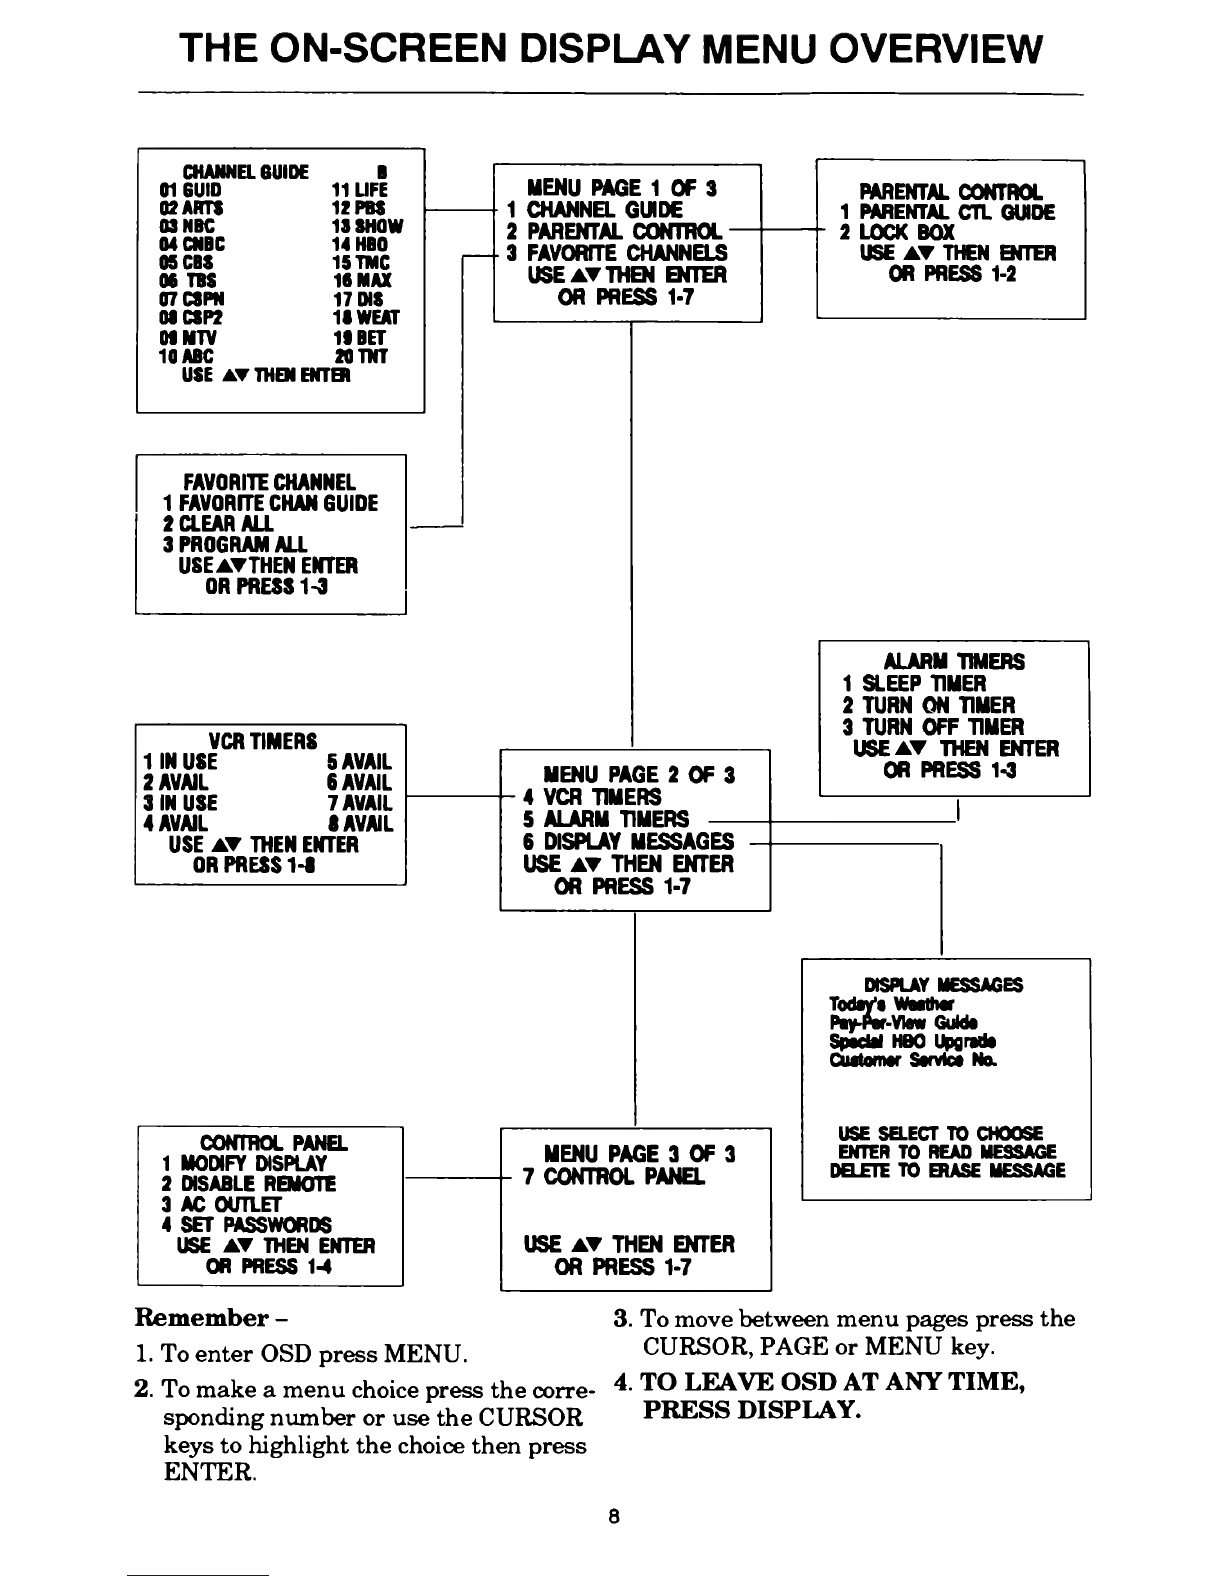
THE ON-SCREEN DISPLAY MENU OVERVIEW
CHANNEL GUIDE B
01 6UI0 11 LIFE
02 ARTS 12 PBS
03 NBC 13 SHOW
04 CNBC 14 HBO
OS CBS 15TMC
06 TBS 16 MAX
07CSPN 17 INS
03CSP2 1IWEAT
Of MTV If BET
10 ABC 20 TNT
USE AT THEN ENTER
FAVORITE CHANNEL
1FAVORITE CHAN GUIDE
2CLEAR ALL
3PROGRAM ALL
USE ATTHEN ENTER
OR PRESS 1-3
VCR TIMERS
11N USE 5AVAIL
2 AVAIL 6 AVAIL
3IN USE 7AVAIL
4AVAIL 8AVAIL
USE AT THEN ENTER
OR PRESS 1-S
MENU PAGE 1OF 3
1CHANNEL GUIDE
2PARENTAL CONTROL -
3FAVORITE CHANNELS
USE ATTHEN ENTER
OR PRESS 1-7
MENU PAGE 2OF 3
4VCR TIMERS
5ALARM TIMERS —
6DISPLAY MESSAGES
USE AT THEN ENTER
OR PRESS 1-7
PARENTAL CONTROL
1PARENTAL CTL GUIDE
2LOCK BOX
USE AT THEN ENTER
OR PRESS 1-2
ALARM TIMERS
1SLEEP TIMER
2TURN ON TIMER
3TURN OFF TIMER
USE AT THEN ENTER
OR PRESS 1-3
DISPLAY MESSAGES
Today1*Waathar
Piy-Pw-Vtow Gulda
SpacU HBO Upgrada
Cuatomar Sarvtca No.
MENU PAGE 3OF 3
7CONTROL PANEL
USE AT THEN ENTER
OR PRESS 1-7
USE SELECT TO CHOOSE
ENTER TO READ MESSAGE
DELETE TO ERASE MESSAGE
CONTROL PANEL
1MODIFY DISPLAY
2DISABLE REMOTE
3AC OUTLET
4SET PASSWORDS
USE AT THEN ENTER
OR PRESS 1-4
Remember -
1. To enter OSD press MENU.
2. To make amenu choice press the corre-
sponding number or use the CURSOR
keys to highlight the choice then press
ENTER.
3. To move between menu pages press the
CURSOR, PAGE or MENU key.
4. TO LEAVE OSD AT ANY TIME,
PRESS DISPLAY.
8

THE CHANNEL ID/STATUS SCREEN
When you press the DISPLAY (DISP) key or change the channel, your
screen will briefly flash the channel number, the channel identification in-
itials (channel ID), and the current date and time. This screen will also dis-
play symbols that indicate whether certain subscriber features (for example,
parental control, favorite channel, sleep timer) have been activated.
Favorite Channel Indicator
Mute Active
Channel
Number
Sleep Timer Active'
Volume Bar
MUTE
El
VOLUME
lllllllllllll
BEST STEREO
SUN DEC 812c00
A/B Cable
Channel ID
Current Date and Time
Channel Is Parentally
Controlled
Converter Is Unlocked
Indicates Volume Set-
ting for Best Stereo
In some instances pressing the DISPLAY (DISP) key will bring amessage to
the TV screen. After reading the message, press the DISPLAY (DISP) key
again to view the status information outlined above.
9
THE QUICK FUNCTIONS SCREEN
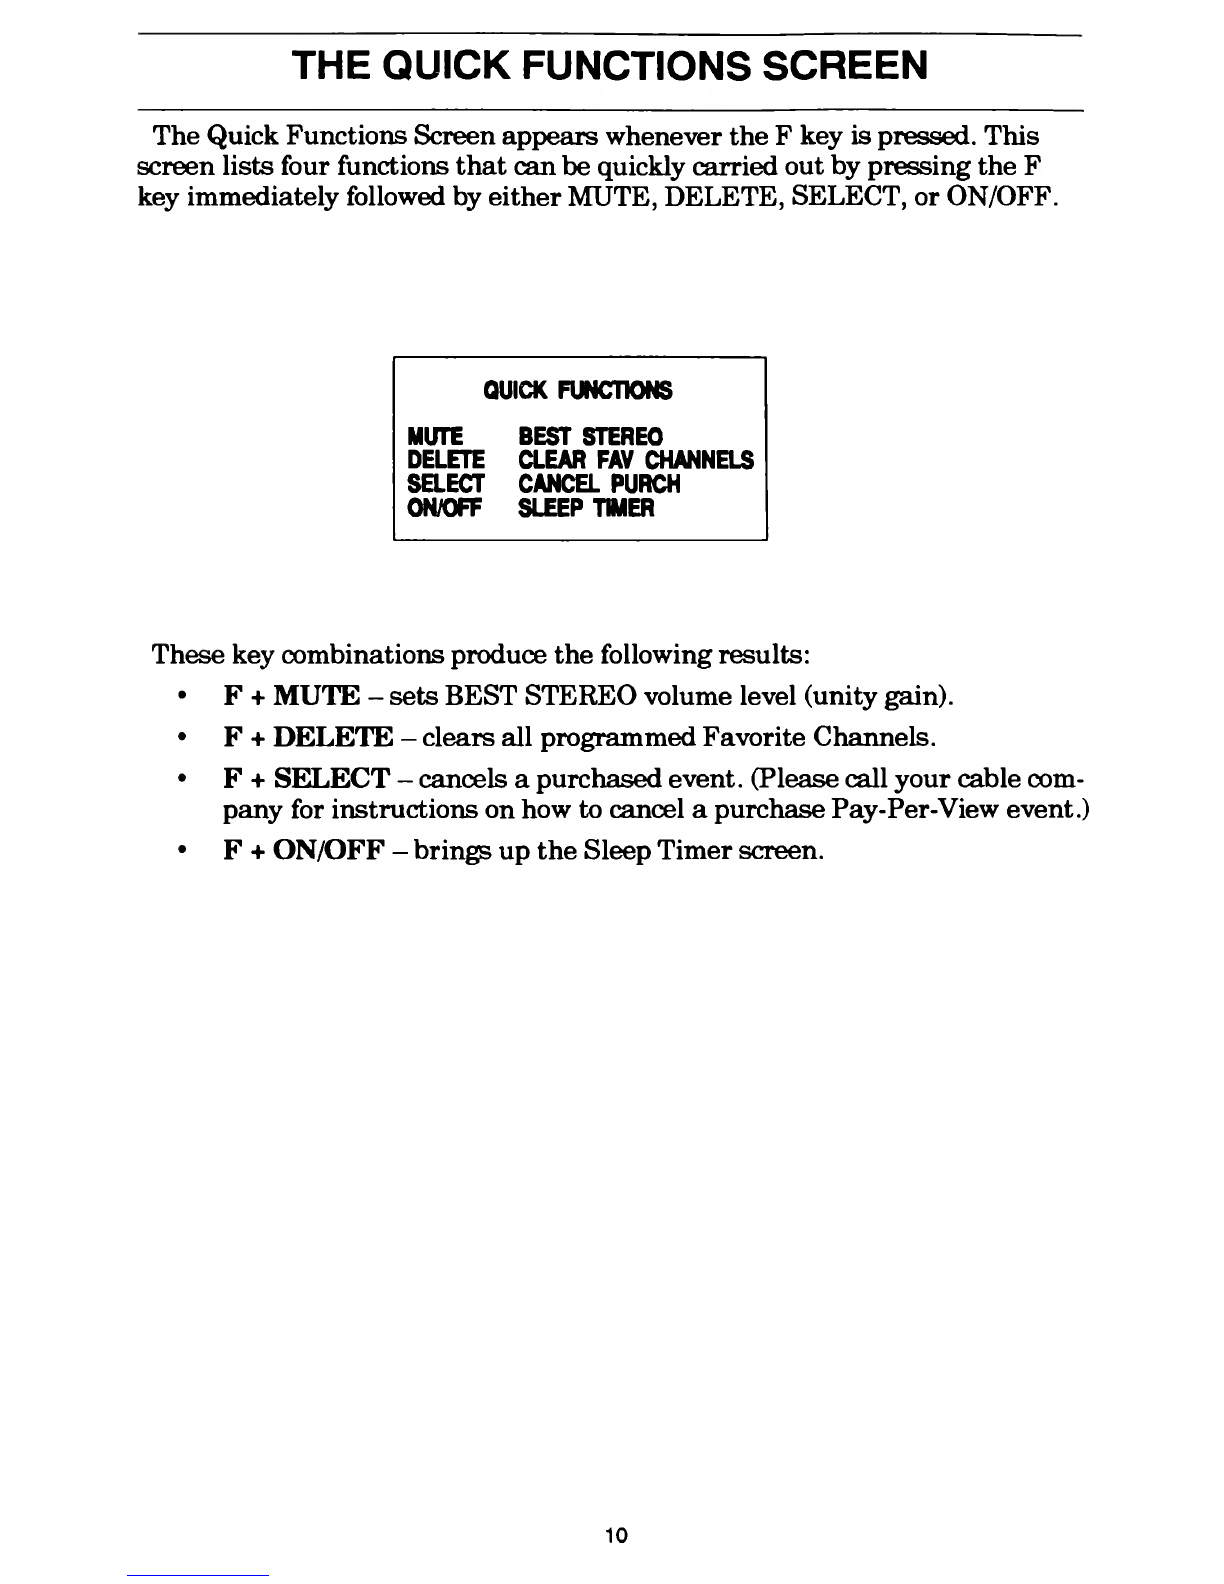
The Quick Functions Screen appears whenever the Fkey is pressed. This
screen lists four functions that can be quickly carried out by pressing the F
key immediately followed by either MUTE, DELETE, SELECT, or ON/OFF
QUICK FUNCTIONS
MUTE BEST STEREO
DELETE CLEAR FAV CHANNELS
SELECT CANCEL PURCH
ON/OFF SLEEP TIMER
These key combinations produce the following results:
•F+MUTE -sets BEST STEREO volume level (unity gain).
•F+DELETE -clears all programmed Favorite Channels.
•F+SELECT -cancels apurchased event. (Please call your cable com-
pany for instructions on how to cancel apurchase Pay-Per-View event.)
•F+ON/OFF -brings up the Sleep Timer screen.
10

PASSWORDS
USE OF PASSWORDS
The use of passwords is entirely optional. If you do not need to make use of
the parental control feature ofyour converter you do not need to create apa-
rental control password.
If you do not wish to control access to pay-per-view then you do not need a
purchase password. You do not need to create apurchase password to
make Pay-Per-View purchases.
The passwords you create cannot be more than four digits long.
IF YOU FORGET YOUR PASSWORD
If you forget your password, please call your cable company. The cable com-
pany can erase the password from the converter's memory so that you can
program anew one.
ON SCREEN DISPLAY FUNCTIONS
The information on the following pages will tell you how to use the OSD fea-
tures ofyour converter. These pages show you the displays you will see on
your TV screen and will list the keys you will need to press. If you press akey
that has no function in the menu you are in, ahelp screen will appear to as-
sist you.
By using the keys as indicated on the various menu screens you will operate
the converter with ease.
Remember -
•To display the OSD Main Menu press the MENU key
•To select an option press the option number or use the CURSOR
keys to highlight the option, then press ENTER.
•To exit OSD at any time press the DISPLAY key.
11

CHANNEL SELECTION
The channel guide lists all of the channels and services, and their channel
identification initials, available on the cable system. You can refer to this
guide if you wish to find out on which converter channel aparticular program
or service is broadcast. The channel guide also makes it easier to keep track
of channels should your cable operator decide to change or move some of the
channels in your system.
You can select aviewing channel by pressing the appropriate numeric keys
as described on page 5. If you wish to use OSD display for this function follow
the sequence below. When you enter the Channel Guide screen the channel
currently being viewed will be highlighted.
1. Enter OSD by pressing MENU.
2. Press key 1,or use CURSOR
keys to highlight choice then
press ENTER.
MENU PAGE 1OF 3
1CHANNEL GUIDE
2PARENTAL CONTROL
3FAVORITE CHANNELS
USE ATTHEN ENTER
OR PRESS 1-7
3. Use the CURSOR keys to high-
light your choice (for example,
channel 2) then press ENTER.
CHANNEL WIDE I
01 QUIP 11UFE
:MAHT1 s^i::;.7
!12 PM
TBUBir^ 13 SHOW
04 CNBC 14 HBO
06 CBS 1STMC
05 IBS 16 MAX
07CSPN 17 ms
OSCSR UWEAT
smnv 10 BET
11 ABC 2STNT
USE THEN ENTER
12

PARENTAL CONTROL
INTRODUCTION
The parental control feature permits you to control viewing access to chan-
nels that you select. When parental control is activated (or when the con-
verter box is locked), the converter will not tune to channels that you have
"locked out". If you wish to view these channels you must use the parental
control password that you have programmed into the converter to deactivate
the parental control feature (unlock the converter box).
To summarize the parental control feature: first, you unlock the box using
your parental control password (page 14); then, you select the channels that
you want locked out (page 15); then you lock the box (page 16). If the box is
unlocked and the channel that is tuned is aparentally-controlled channel,
you will see alock symbol as well as akey symbol in the upper right corner of
the TV screen when you press the DISPLAY key or when you change chan-
nels. The key symbol indicates that the box is unlocked.
The parental control feature is activated whenever you turn off the con-
verter. Your new converter does not have aparental control password pro-
grammed in it. Aparental control password is necessary to use the parental
control feature. Should you decide to use parental control, you must create a
parental control password (see Page 17).
You can change your password as often as you wish (see Page 18). Should
you forget your parental control password, call your cable operator for assis-
tance (see Page 11).
13
Table of contents
Popular Media Converter manuals by other brands


Moxa Technologies
Moxa Technologies VPort 254 Series Quick installation guide

HEIDENHAIN
HEIDENHAIN LIDA 475 Mounting instructions

AV TOOL
AV TOOL AVT-3320 instruction manual

AJA
AJA HDP3 Installation and operation guide

Ask Technology
Ask Technology ADCN0001M1 user manual

Allied Telesis
Allied Telesis AT-GS2002 Series installation guide