Jetco LARK REPRODUCTION User manual

JETCO LARK
REPRODUCTION
BY PAUL BRADLEY
ASSEMBLY GUIDE AND PLAN
OCTOBER 2015
A RUBBER POWERED
27.5" WING SPAN MODEL
FROM THE 1960's

1.
Tape the eleven plan pages together to form five building plan
pages. Use the "+" marks for alignment of the pages.
Glue parts F12, F15, and F16 to the balsa fuselage sides. Also
glue a strip of 3/32" square balsa to top of each side between
the two fuselage former slots. Be sure to make a right and left
side.
2. 3.
4. 5. 6.
7. 8. 9.
Glue parts 5 to the fusleage as shown.
Trim each fuselage side at the rear as shown. Start the trim line
1/4" from rear most point of each side. Make sure you create a
right and left side.
Glue the rear of the fuselage together. Use a clamp to hold the
joint. Insert cross pieces 9 to help form the correct angle at the
rear. Check to be sure things are square and that the sides have a
symmetrical bend.
Glue formers F3, F5, and F6 to one fuselage side. Make sure
they are square to the side.
Glue the other fuselage side to formers F3, F5 and F6. Make
sure everything is square.
F12
F16
3/32" SQ
F15
1/4"
1/32"
F3
F6
5
Using the temporary nose clamp piece, pull the fuselage sides
together at the nose. Glue cross pieces 3 in place to help form the
correct angle at the nose. Make sure everything is square and that
the bend in each side is symmetrical.
9
9
Glue cross pieces 1 and 2 to the nose. Glue in the remaining cross
pieces. Sand the top face of the 3/32" balsa pieces that form the
wing saddle to the angle of formers F3, F5, and F6. Remove the
temporary nose clamp.
3
3
Sand
F5

10.
Cut the six nose block laminations from 1/8" balsa. Also cut the two
nose block key pieces (part F1 on the plan). Note the grain direction
for each nose block piece. Glue all the pieces together. A piece of
1/8" dowel can be used to align the individual laminations. Remove
the dowel after gluing the laminations.
11. 12.
13. 14. 15.
16. 17. 18.
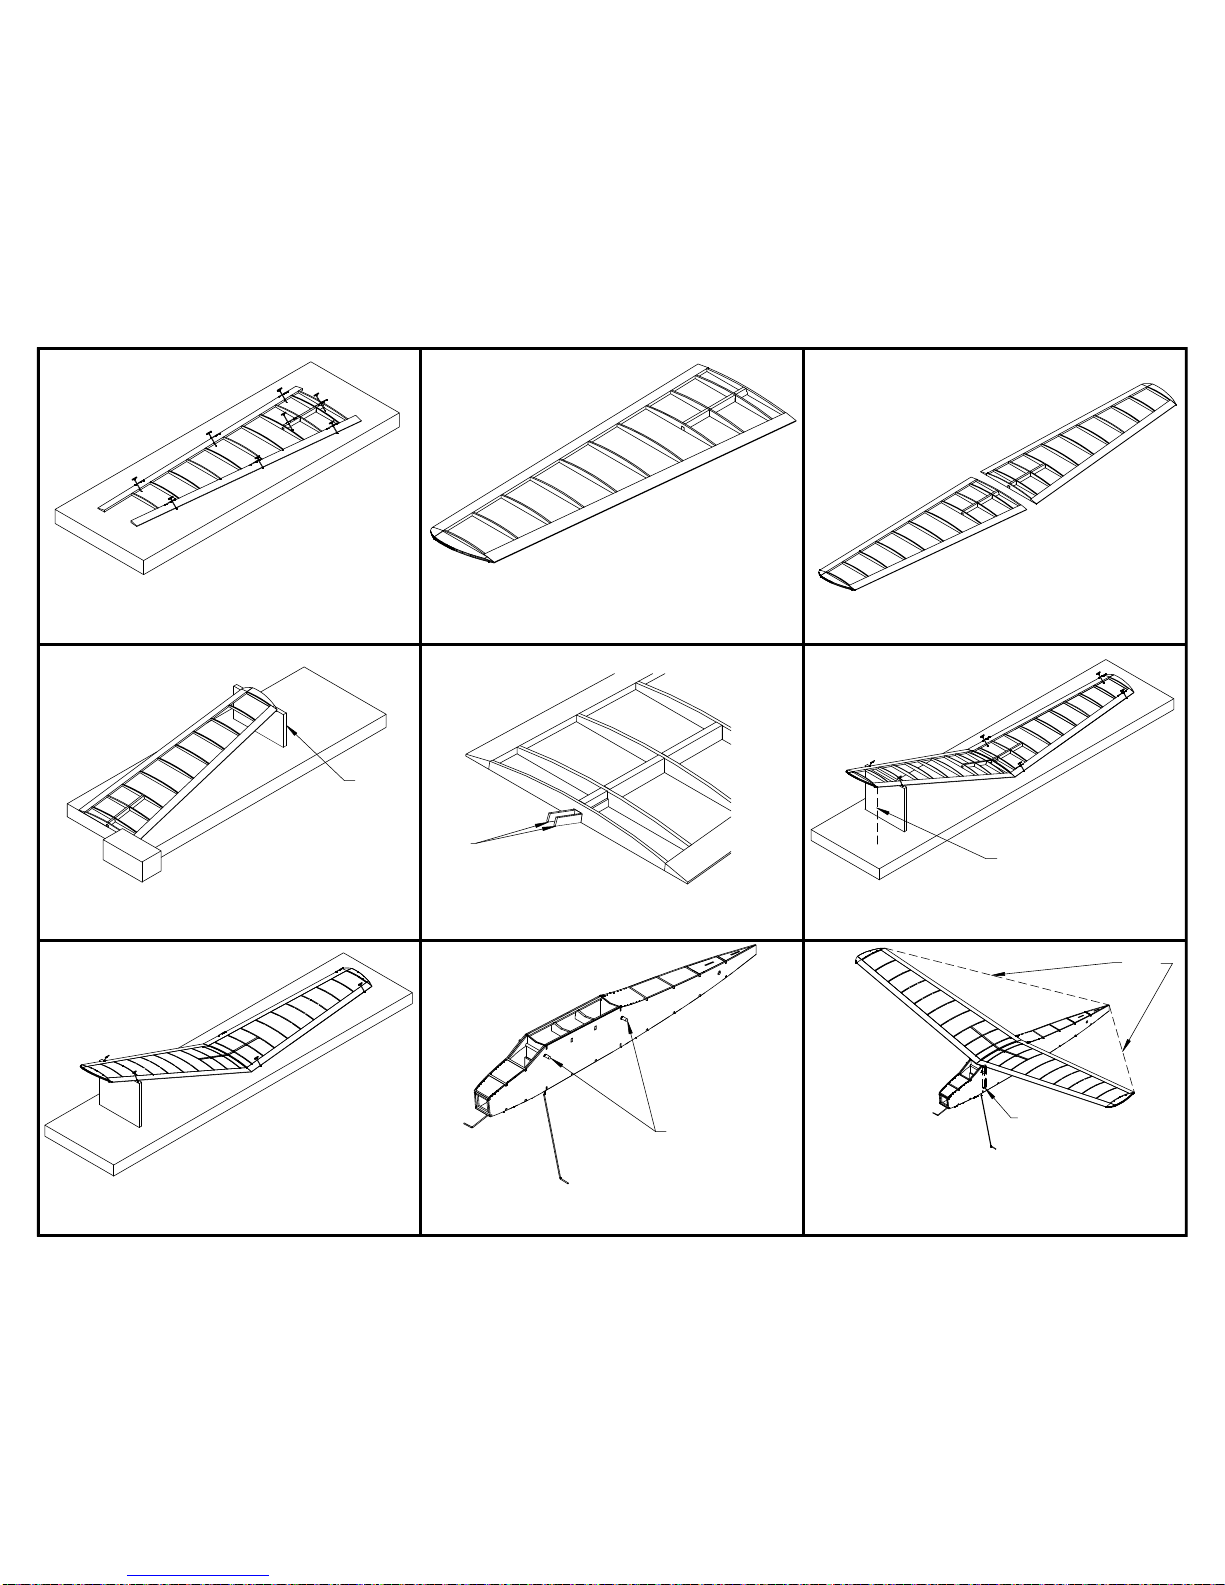
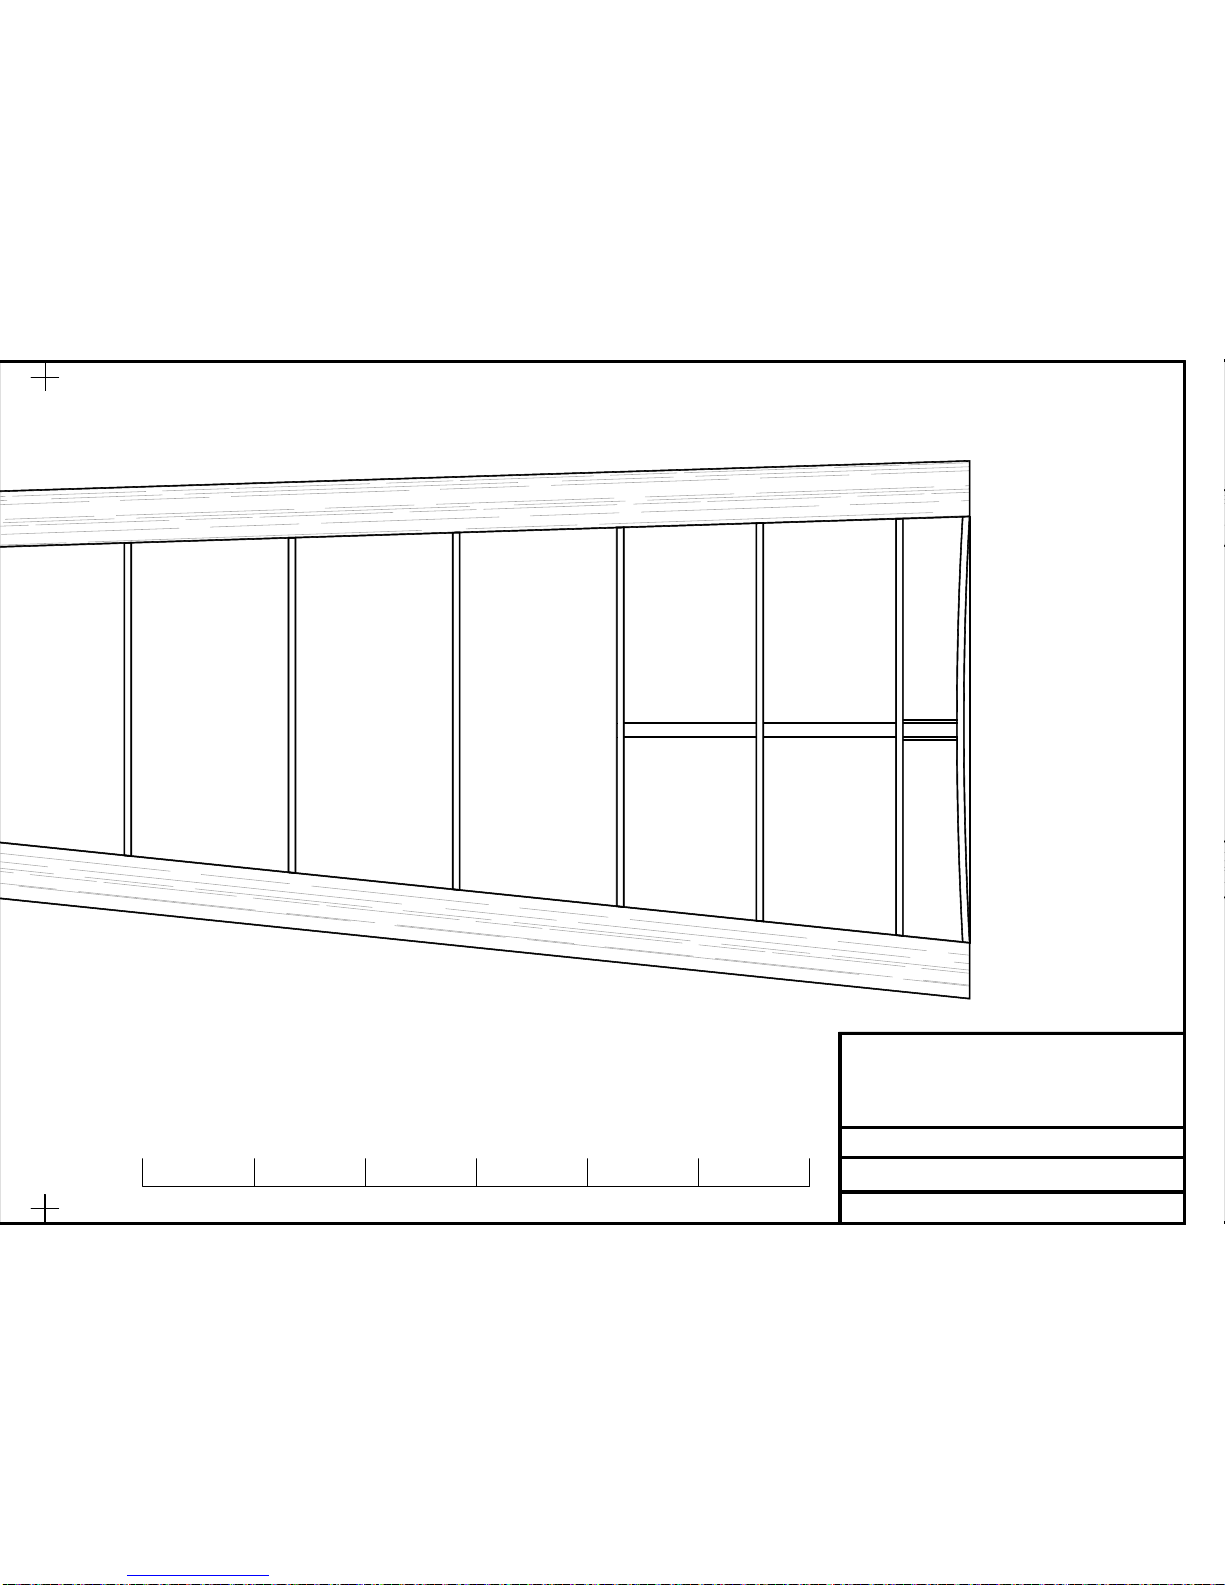
Cut the 1/2" x 1/8" tapered stock for the leading edge, and trailing
edge. Cut each piece a bit long for trimming after assembly. Lay
some plastic kithchen wrap over the plan. Glad Wrap works
especially well. Pin the LE and TE pieces to the building surface.
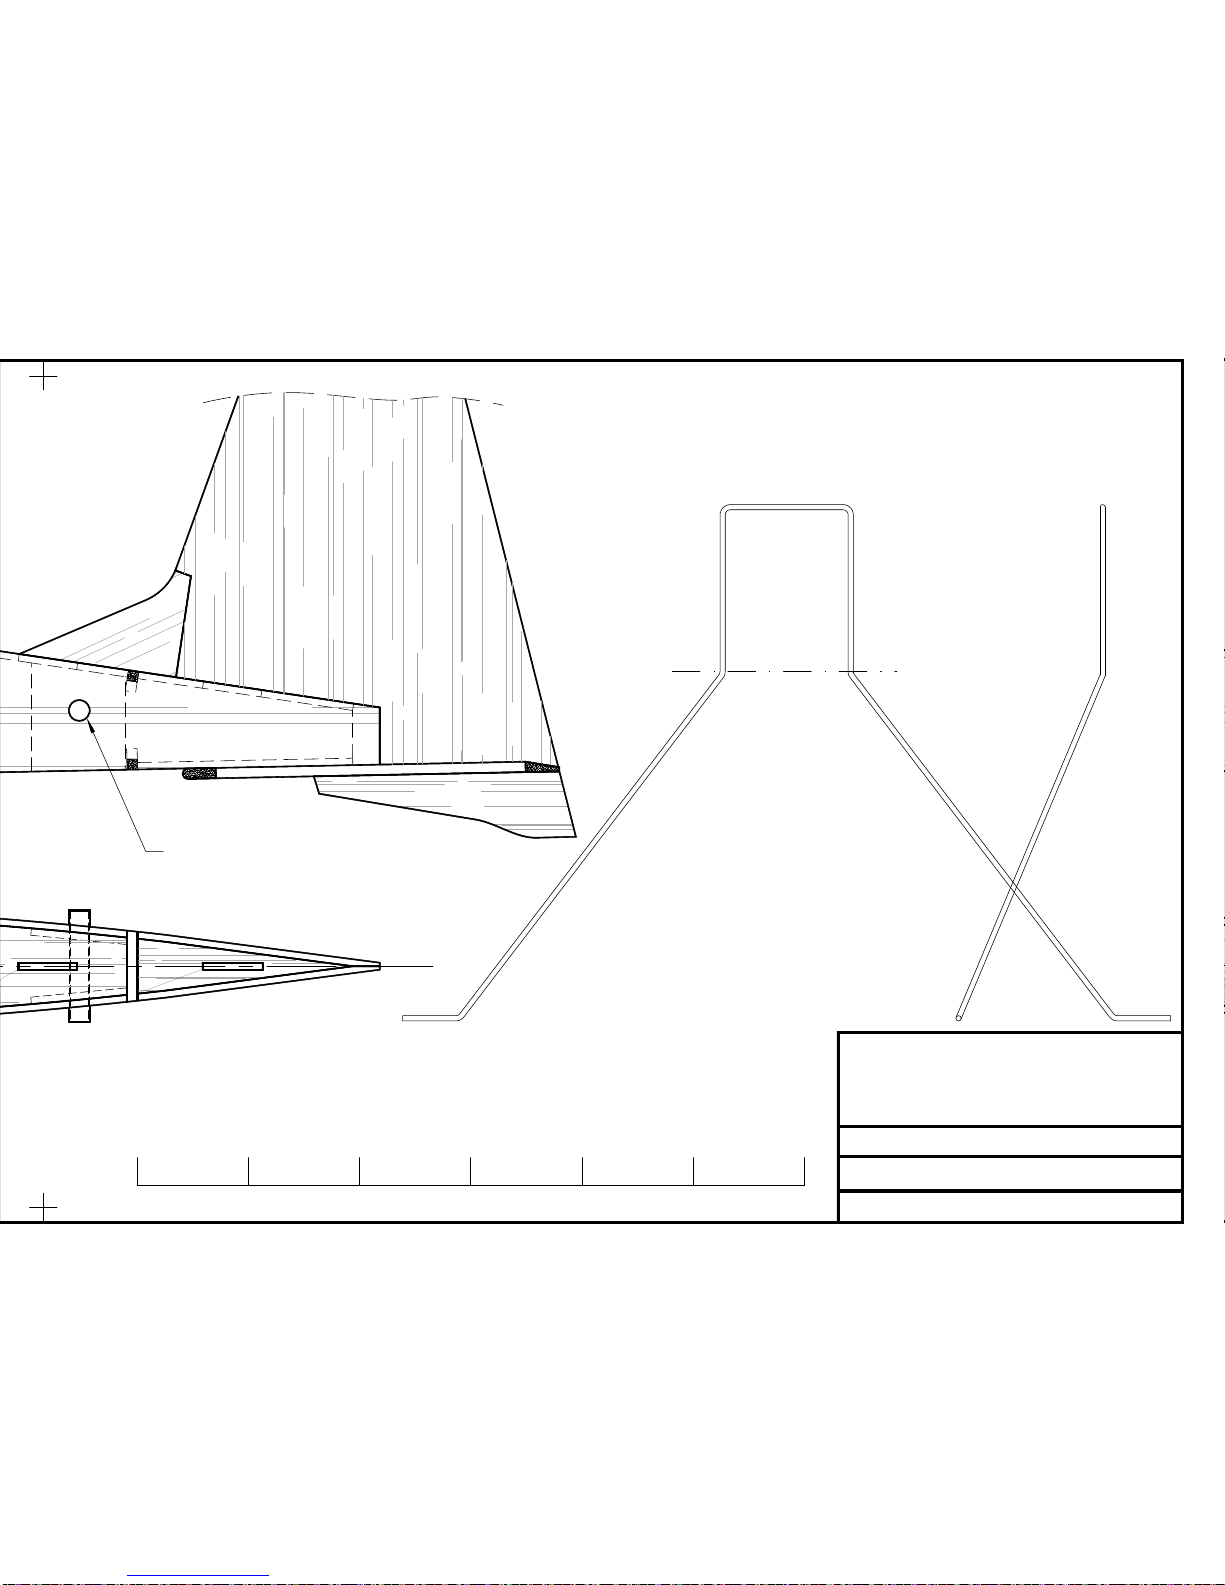
Bend the landing gear from .047" piano wire. Glue the landing gear
to part F2. Also glue part F2A to F2. When dry sand the face of
F2A so it is even with the landing gear wire.
Glue the landing gear assembly to the forward face of former F3.
Also glue in the gussets F4.
Rough shape the nose block using the plan as a guide. Place
the nose block on the fuselage and final sand the nose block
shape.
Build the stab and assemble the two fin parts.
F1 (2)
Sand the stab LE round and the TE to a taper on the top. Cover the
fuselage and stab. If you water shrink and dope the stab, be sure
they are pinned to a flat surface while drying. Two coats of 50-50
clear dope should be enough on the stab. Leave it pinned to a flat
surface for at least a week after doping before it is glued to the
fuselage.
Glue parts F13, F17, and F18 to the rear of the fuselage as shown.
Also add 3/32" balsa strips to the fuselage nose between cross
pieces 1 and 2.
F2 F2A
F4
F18
F17
F13
3/32" SQ
Use ribs R2 and R4 to locate the wing spar. Pin the spar to the
building board using a "X" pattern with the pins. Do not pin
through the spar. Glue the ribs to the LE, TE, and spar.

Fit the remaining ribs and glue them in place. Note that there will be
a gap between the slot in rib R1 and the spar. This gap provides
clearance for the dihedral braces that are added later.
Remove the wing panel from the building surface. Trim the LE
and TE to length. Glue the tip, R12, to the structure. Trim and
round off the LE using the plan as a shape guide.
19.
Build the second wing panel.
20. 21.
22. 23. 24.
25. 26. 27.
Block each wing panel up 2 1/2" at the tip and sand the root so it
is smooth and straight.
Cover the wing. Apply three coats of 50/50 clear dope after water
shrinking the tissue. Like the stab, the wing should cure while
pinned to a simple jig for about a week.
Rubber band the wing to the fuselage. Use two bands on each side
in an "X" pattern. Make sure the distance from each wing tip TE to
the rear of the fuselage is the same. Cut two lengths of 1/8" dowel
1/4" long. Split them along their length. Glue a dowel half to the
bottom of the TE and LE on each side so they just touch the
fuselage.
2 1/2"
Cut two 1/8" wing mount dowels 2" long. Glue them in each set of
wing dowel supports on the fuselage.
1/8" Diameter
Dowels
Glue the dihedral braces to one wing panel. They should be flush
with the bottom of the spar.
Glue other wing panel to the first. Lay the first wing panel flat on
your building surface and then block up the second panel so the tip
is 5" above the building surface. Let the glue dry toughly.
R14
5"
Equal
Split
Dowel

28. 29. 30.
31. 32. 33.
Glue the fin to the fuselage. It fits in the slots. Make sure it is
vertical relative to the wing when sighting from the front and rear.
Glue the stab to the bottom of the fin and fuselage. Make sure the
distance from each wing tip TE and the stab tips LE are equal. To
help the model turn, stab tilt can be used. Glue the stab so one
side is about 1/4" high on the side you want the model to turn
toward. Also glue the sub fin to the bottom of the stab.
Make up a short loop of rubber and install it in the fuselage along
with the nose block and prop. Check the CG location. Adjust if
necessary with some ballast in the nose or tail. Replace the short
motor with a flight motor and the model is now ready for its trim
flights.
Equal
Cut the windshield from clear plastic. Glue the windshield to the top
of F3, the fuselage sides, and the top of cross piece 4.
Install the 1" wheels. A good way to retain the wheels is to wrap
the axles with thread. Apply some glue to the thread as you wrap.
When dry cut off the excess axle length.
Install a Peck thrust bearing in the nose block. Use one for 3/64"
prop shafts. Slide a prop shaft from the rear of the nose block into
the thrust bearing and then install your prop.
TheCGlocationshowninstep33isa
suggested starting point. You may find a more
forward CG provides a better overall
performance envelope.
CG is located 2 3/4"
back from the wing
leading edge

0123456
INCHES
F3
F4
1
2
3
4
34
F2
F15
F4
F1(2)
T
Nose Block Laminations
Make from 1/8" Balsa
Temporary Nose Clamp
Make from 1/32" plywood
F1
Make 2
Windshield Pattern
Make from clear
plastic
Peck thrust bearing
for .047" prop shafts
Top
1" Wheels
Use a 8" or 9"
Plastic Prop

0123456
INCHES
F6
F5
F12
F16
55
6
6
7
7
8
8
F4
F5
F13
1/8" Dowel
CG

Jetco Lark
A reproduction of the kit introduced in
the early 1960's
Drawn by Paul Bradley - Oct 2015
27.5" Wing Span
Sheet 1 of 5
0123456
INCHES
F12
9
9
F17
F18
Landing Gear
Make from .047"
piano wire
3/16" Aluminum
tube motor peg

0123456
INCHES
R8R9R10R11
R12
R1
R2
R3
R4
R5
R6
R7
R8
R9
R10
R11
R12 - Make two
from 3/32" balsa
Make two of each wing
rib from 1/16" balsa
1/8" x 1/2" Tapered Stock

Jetco Lark
A reproduction of the kit introduced in
the early 1960's
Drawn by Paul Bradley - Oct 2015
27.5" Wing Span
Sheet 2 of 5
R1
R2R3R4R5R6R7
R13 R14
R14
0123456
INCHES

0123456
INCHES
R1
R2 R3 R4 R5 R6 R7
R13
R14
R14

Jetco Lark
A reproduction of the kit introduced in
the early 1960's
Drawn by Paul Bradley - Oct 2015
27.5" Wing Span
Sheet 3 of 5
7
R8 R9 R10 R11
R12
0123456
INCHES
R13 - Make two
from 1/8" balsa
R14 - Make two
from 1/32" plywood
1/8" x 1/2" Tapered Stock

0123456
INCHES
S1
S2
S3
S4
S5
S6
S7 S7
S8 S8
S4
S2
S5
S3
S1
S6(2)
S7(2) S8(2)
Make these parts
from 3/32" balsa

Jetco Lark
A reproduction of the kit introduced in
the early 1960's
Drawn by Paul Bradley - Oct 2015
27.5" Wing Span
Sheet 4 of 5
0123456
INCHES
S6
3/32" Square balsa
213
45 6
78 9
Make these parts from 3/32" balsa. Make
two each of parts 3 through 9.
For power use a 9" diameter propeller and 8 strands (four loops) of 1/8" rubber.

0123456
INCHES
F3 F6
F2
F2A
F15(2) F16(2)
F12(2)
F17
F18
F13
Make these parts
from 1/16" balsa
Make two fuselage sides
F4(4)

Jetco Lark
A reproduction of the kit introduced in
the early 1960's
Drawn by Paul Bradley - Oct 2015
27.5" Wing Span
Sheet 5 of 5
0123456
INCHES
Popular Toy manuals by other brands

LEGO
LEGO SPEED CHAMPIONS 75881 instructions

Hasbro
Hasbro NERF MARVEL SPIDER-MAN B9703EU4 quick start guide

PARKZONE
PARKZONE F-27C Stryker instruction manual

Thomas & Friends
Thomas & Friends TrackMaster WILD, WHIRLING OL' WHEEZY SET user manual

Parkside
Parkside PP 1050 A1 Operation and safety notes, Notes for Parents

marklin
marklin 56179 user manual