JetPaks 2003 Bullfrog Portable User manual

Page 1Bullfrog Spas Owner’s Manual
Owner’s
Manual
For all 2003 Bullfrog Portable Spas
(Multiple Patents with Other Patents Pending)
TABLE OF CONTENTS
IMPORTANT SAFETY INSTRUCTIONS
U.L./CSA Safety Instructions ................................ P. 02
Additional Safety Instructions .............................. P. 03
UPGRADES & ACCESSORIES ..................... P. 05
INSTALLATION & SET-UP
Selecting a Site for your Spa ................................ P. 06
Electrical Requirements & Hook-Up ..................... P. 07
Checklist Before Filling Your Spa ......................... P. 10
Initial Start-Up....................................................... P. 11
OPERATION
Control Systems.................................................... P. 12
JetPaks .................................................................. P. 22
Jetting ................................................................... P. 23
JetZones ................................................................ P. 24
MAINTENANCE
Water Chemistry ................................................... P. 25
Changing Your Spa Water..................................... P. 28
Cleaning Your Filter.............................................. P. 29
Light Bulb Replacement........................................ P. 30
Ozone Sterilizer Replacement .............................. P. 30
Spa Shell Care ....................................................... P. 31
Spa Cabinet Care .................................................. P. 31
Spa Cover Care ..................................................... P. 31
Miscellaneous Care............................................... P. 32
LOW-USE OR NO-USE PERIODS ............... P. 32
SERVICE............................................................. P. 33
TROUBLESHOOTING GUIDE ..................... P. 35
MISCELLANEOUS
Parts Identification Diagram ................................ P. 37
Notes..................................................................... P. 39
(Revised: October 20, 2003)

Page 2 Bullfrog Spas Owner’s Manual
IMPORTANT SAFETY INSTRUCTIONS
When installing and using this electrical equipment, basic safety precautions should always be followed, including
the following:
U.L./CSA SAFETY INSTRUCTIONS:
1. READ AND FOLLOW ALL INSTRUCTIONS.
2. WARNING - To reduce the risk of injury, do not permit children to use this product unless they
are closely supervised at all times.
3. CAUTION: Test the ground-fault interrupter before each use of the spa.
4. CAUTION: Adequate drainage must be provided if the equipment is to be installed in a pit.
5. a) A wire connector is provided on this unit to connect a minimum No. 8 AWG (8.4 mm²) solid copper
conductor between this unit and any metal equipment, metal enclosures of electrical equipment,
metal water pipe, or conduit within 5 feet (1.5 m) of the unit.
b) A green-colored wire terminal or a terminal marked G, GR, Ground, Grounding, or the Symbol is
located inside the supply terminal box or compartment. To reduce the risk of electric shock, this
terminal must be connected to the grounding means provided in the electric supply service panel
with a continuous copper wire equivalent in size to the circuit conductors supplying this equipment.
c) At least two lugs marked “BONDED LUGS” are provided on the external surface or on the inside of
the supply terminal box or compartment. To reduce the risk of electric shock, connect the local
common bonding grid in the area of the hot tub or spa to these terminals with an insulated or bare
copper conductor not smaller than No. 6 AWG.
d) All field-installed metal components such as rails, ladders, drains, or other similar hardware
located within 3 m of the spa or hot tub shall be bonded to the equipment grounding bus with
copper conductors not smaller than No. 6 AWG.
6. DANGER - Risk of Accidental Drowning. Extreme caution must be exercised to prevent
unauthorized access by children. To avoid accidents, ensure that children cannot use this spa unless
they are supervised at all times.
7. DANGER - Risk of Injury. The suction fittings in this spa are sized to match the specific water flow
created by the pump. Should the need arise to replace the suction fittings or the pump, be sure that
the flow rates are compatible.
Never operate the spa if the suction fittings are broken or missing. Never replace a suction fitting with
one rated less than the flow rate marked on the original suction fitting.
8. DANGER - Risk of Electric Shock. Install at least 5 feet (1.5 m) from all metal surfaces. As an
alternative, a spa may be installed within 5 feet of metal surfaces if each metal surface is permanently
connected by a minimum No. 8 AWG (8.4 mm²) solid copper conductor to the wire connector on the
terminal box that is provided for this purpose.
9. DANGER - Risk of Electric Shock. Do not permit any electric appliance, such as a light, telephone,
radio, or television, within 5 feet (1.5 m) of a spa. (These units DO NOT have an integral ground fault
circuit interrupter. The installation of a integral ground fault circuit interrupter MUST be done by a
qualified Electrician and must meet all local and national codes.)
10. WARNING - To reduce the risk of injury:
a) Water temperature in excess of 38°C (100°F) may be injurious to your health. The water in a spa or
hot tub should never exceed 40°C (104°F). Water temperatures between 38°C (100°F) and 40°C are
considered safe for a healthy adult. Lower water temperatures are recommended for young children
and when spa use exceeds 10 minutes. (Before entering the spa or hot tub measure the temperature
with an accurate thermometer.)

Page 3Bullfrog Spas Owner’s Manual
b) Since excessive water temperatures have a high potential for causing fetal damage during the
early months of pregnancy, pregnant or possibly pregnant women should limit spa water
temperatures to 38°C (100°F).
c) Before entering a spa, the user should measure the water temperature with an accurate
thermometer since the tolerance of water temperature-regulating devices varies.
d) The use of alcohol, drugs, or medication before or during spa use may lead to unconsciousness
with the possibility of drowning.
e) Persons suffering from obesity or with a medical history of heart disease, low or high blood
pressure, circulatory system problems, or diabetes should consult a physician before using a spa.
f) Persons using medication should consult a physician before using a spa since some medication
may induce drowsiness while other medication may affect heart rate, blood pressure and circulation.
SAVE THESE INSTRUCTIONS.
WARNING SIGN
Included with this spa is a warning sign (Fig. A) to inform
occasional users and guests of the risk of using the spa. This
warning sign is suitable for indoor or outdoor use. Place this
warning sign in a conspicuous place adjacent to the spa. For
free extra copies call Bullfrog International, L.C. at (801) 565-
8111.
ADDITIONAL SAFETY INSTRUCTIONS:
1. WARNING - Risk of Fatal Hyperthermia.
a) The use of alcohol, drugs, or medication can greatly increase the risk of fatal Hyperthermia in
spas and hot tubs.
b) The causes, symptoms, and effects of Hyperthermia may be described as follows:
Hyperthermia occurs when the internal temperature of the body reaches a level several degrees
above the normal body temperature of 37°C (98.6°F). The symptoms of Hyperthermia include an
increase in the internal temperature of the body, dizziness, lethargy, drowsiness, and fainting. The
effects of Hyperthermia include:
•Unawareness of impending hazard;
•Failure to perceive heat;
•Failure to recognize the need to exit the spa or hot tub;
•Physical inability to exit the spa or hot tub;
•Fetal damage in pregnant women; and
•Unconsciousness and danger of drowning.
2. WARNING - Risk to Infants, the Elderly, and Women Planning or Experiencing Pregnancy. Please
consult your physician if the above applies to you or anyone using your spa.
3. WARNING - Risk of Children Drowning. Although your spa cover is not rated as a safety cover, it is
wise to always keep the spa cover securely fastened when not in use. This will help discourage children
from attempting to enter the
spa while not supervised by an adult.
4. WARNING - Risk of Drowning. Use caution when bathing alone. Overexposure to hot water may
cause nausea, dizziness, and fainting.
5. WARNING - Risk of Injury. To avoid injury, exercise care when entering or exiting the spa or hot
tub. Surfaces can be very slippery when wet. Do not step or sit on HeadRests. Also, keep all breakable
(Figure A) Warning Sign

Page 4 Bullfrog Spas Owner’s Manual
objects out of the spa area.
6. WARNING - Risk of Injury. Do not use a spa or hot tub immediately following strenuous exercise.
7. WARNING - Risk of Injury. Prolonged immersion in a spa or hot tub may be injurious to your health.
8. WARNING - Risk of Injury. People with infectious diseases should not use a spa or hot tub.
9. WARNING - Risk of Injury. Short term inhalation of high concentrations of ozone and long term
inhalations of low concentrations of ozone can cause serious physiological effects. Do not inhale ozone
gas produced by your spa's Ozone Sterilizer.
10. CAUTION - Risk of Injury. Maintain water chemistry in accordance with chemical manufacturer’s
instructions.
11. WARNING - Risk of Shock. Spa shall not be operated in severe weather conditions, i.e. electrical
storms, tornadoes, etc.
12. CAUTION - Unauthorized Access. Secure the spa area against unauthorized access. Make sure all
barriers meet both state and local codes. Keep spa cover on spa when spa is not being used.
13. CAUTION - Risk of Damage to Spa or Equipment. By performing maintenance as described later
in this Owner's Manual, the chance of damage to your spa and it's equipment will be greatly reduced.
Never block the air vents that lead to the spa equipment compartment. Doing so may cause the spa
equipment to overheat.
14. CAUTION - Non-Approved Accessories. Using accessories not approved by Bullfrog International,
L.C. could void your warranty or cause other problems. Please consult with your authorized Bullfrog
Portable Spa Dealer.
15. CAUTION - Location of Your Spa. Locate your spa on a surface that can withstand the weight
bearing requirements of the spa (see "Selecting a Site for your Spa"). Also, locate your spa in an
environment that can withstand repeated exposure to water and the possibility of a major spill.
Page 5Bullfrog Spas Owner’s Manual
UPGRADING YOUR BULLFROG SPA
The following are possible upgrades for your Bullfrog
Spa:
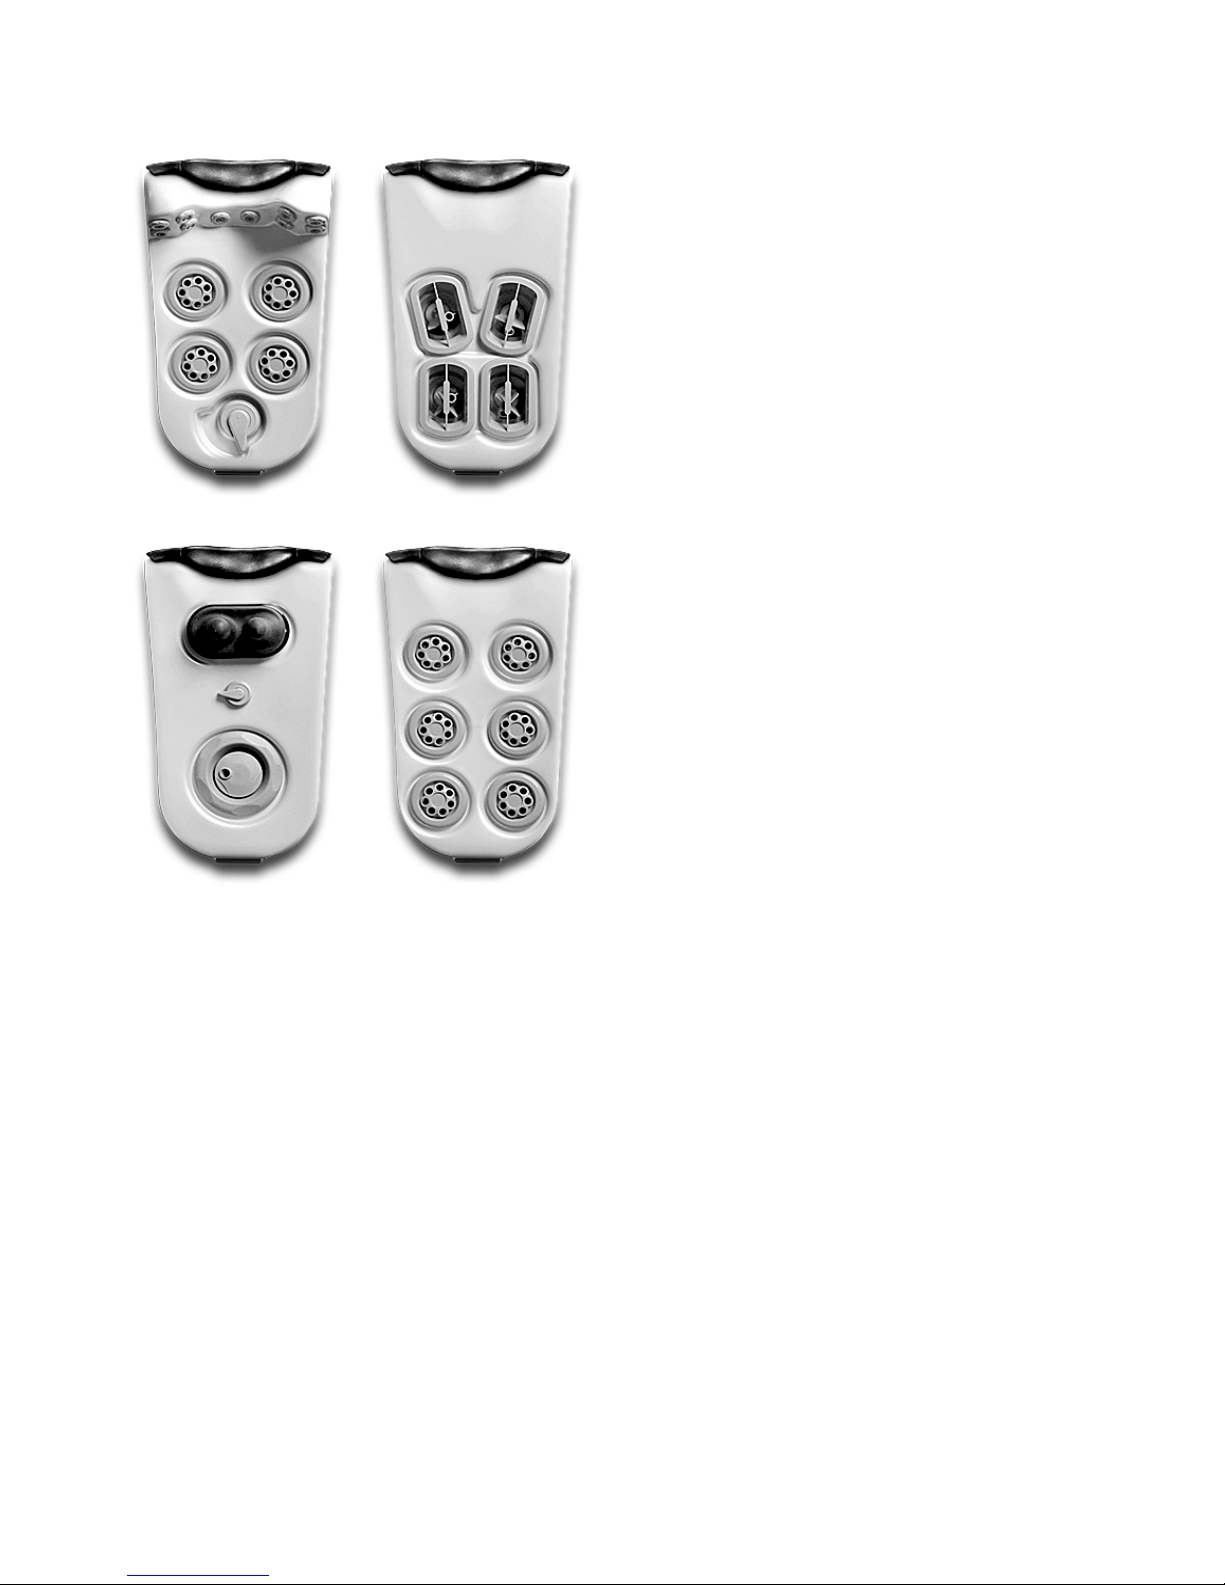
New JetPak™ designs: As new jet types and styles
become available so will new innovative JetPak modules
(Fig. B). Check will your authorized Bullfrog Spa Dealer
on a yearly basis to see what's available.
PowerPlus™: When you're ready for more horsepower
and more jets, just call your authorized Bullfrog Spa
Dealer and ask for PowerPlus.
WellSpring™ Ozone Sterilizer: For cleaner spa water,
we use the most simple, reliable, user-friendly,
affordable ozone system on the market. If your spa did
not come with one, its well worth the investment
(IMPORTANT: Your spa was designed, tested, and UL
Listed with a Bullfrog CDS-16 Ozone Sterilizer. No other
Ozone Sterilizer is recommended for your Bullfrog
Portable Spa.)
LED Lighting System: This unique lighting system offers
12 different lighting “shows” with thousands of different
colors and color schemes.
CoverMate-I Cover Lifter: Take the work out of
uncovering and covering your spa — let Bullfrog’s cover
lifter do the job for you with very little effort. And, while
you are using your spa, the Cover Lifter neatly stores
your cover behind the spa, offering a privacy wall.
Floating Handheld Remote Control: Allows users to
operate the pump(s) and light(s) from anywhere within
20 feet of their spa. (Requires installation of a remote
sensor — See your Authorized Bullfrog Dealer.)
PowerDrain™: This optional accessory allows Bullfrog
Spa owners the ability to drain their spa’s water in five to
nine minutes (see pg. 26).
SpinClean™ Filter Cartridge Cleaning System: Allows
users to more effectively clean their filter cartridges of
debris.
Miscellaneous Upgrades: For upgrades as they become
available, please visit your authorized Bullfrog Spa Dealer
frequently.
(Figure B) Several JetPak™ Variations

Page 6 Bullfrog Spas Owner’s Manual
INSTALLATION & SET-UP
Before attempting to install or use your spa, please read the U.L./CSA Safety Instructions, the Additional Safety
Instructions, as well as all of the Installation Instructions that follow.
SELECTING A SITE FOR YOUR SPA:
Your Bullfrog Spa was designed for either indoor or outdoor use. Whether indoors or outdoors, please adhere to
the following guidelines:
1. Select a site that is stable and capable of supporting the weight of your spa, its water, and the people using it
(refer to the “Model Brochure” or contact an authorized Bullfrog Spa Dealer for the Filled Weight of your spa). If
installed on a suspended floor/deck, the floor/deck should be capable of supporting your spa. If you have
concerns on this matter, please contact a qualified Licensed Contractor.
2. Select a surface that is flat and reasonably level. This surface must provide continuous support for the entire
bottom of the spa. Do not shim or block up the spa creating voids below the spa.
3. Avoid installing the spa in a pit or low area where water may accumulate and damage the spa or its equipment.
Choose a site where water will drain away from the spa and not towards it.
4. Important: With all installations, the spa must be located at least 5 feet from all electrical outlets, switches, and
other permanently installed electrical devices.
Indoor Considerations: There are several considerations when installing your spa indoors: First, the environment
both around and below the spa should be water resistant. It must be capable of handling water splashed out from
the spa as well as the possibility of a leak from the spa (Your Bullfrog portable spa is the most leak-free spa in the
industry, but there is still the possibility of a leak from the spa. A catch basin equivalent to the volume of your spa
is recommended); Second, it is recommended that the room you install the spa in has proper ventilation. Proper
ventilation can usually be achieved by an exhaust fan or an open window.
Note: Typical indoor surfaces include, but are not limited to: concrete, wood, non-slip tile, or linoleum.
Outdoor Considerations: When selecting an outdoor site, several things should be considered: First, Avoid
selecting a site where excessive water may contact the spa, such as from sprinklers or a roof edge without rain
gutters; Second, and if possible, avoid areas of direct, prolonged sunlight. The ultraviolet rays of sunlight will
tend to fade and damage your spa cover and cabinet; Third, Check your local codes on possible restrictions that
require fencing or childproof gates around your spa; Last, avoid locating your spa in an area where debris will be
tracked into the spa.
Note: Typical outdoor surfaces include, but are not limited to: concrete, brick, non-slip tile, wood-decking,
peagravel or sand.

Page 7Bullfrog Spas Owner’s Manual
ELECTRICAL REQUIREMENTS & HOOK-UP
All Bullfrog Portable Spas must be wired in accordance with all local & national electric codes. Have a licensed
electrician perform the electrical installation.
Important: All metal enclosures, pipe or conduit located within 5 feet (1.5m) of the spa must be bonded to the
Control Center Box located inside the equipment compartment of the spa. The wire used to complete this bonding
must be a minimum No. 8 (8.4mm²) solid copper wire. It is to be connected to the ground lug connector on the
exterior surface of the Control Center Box and all metal items described above.
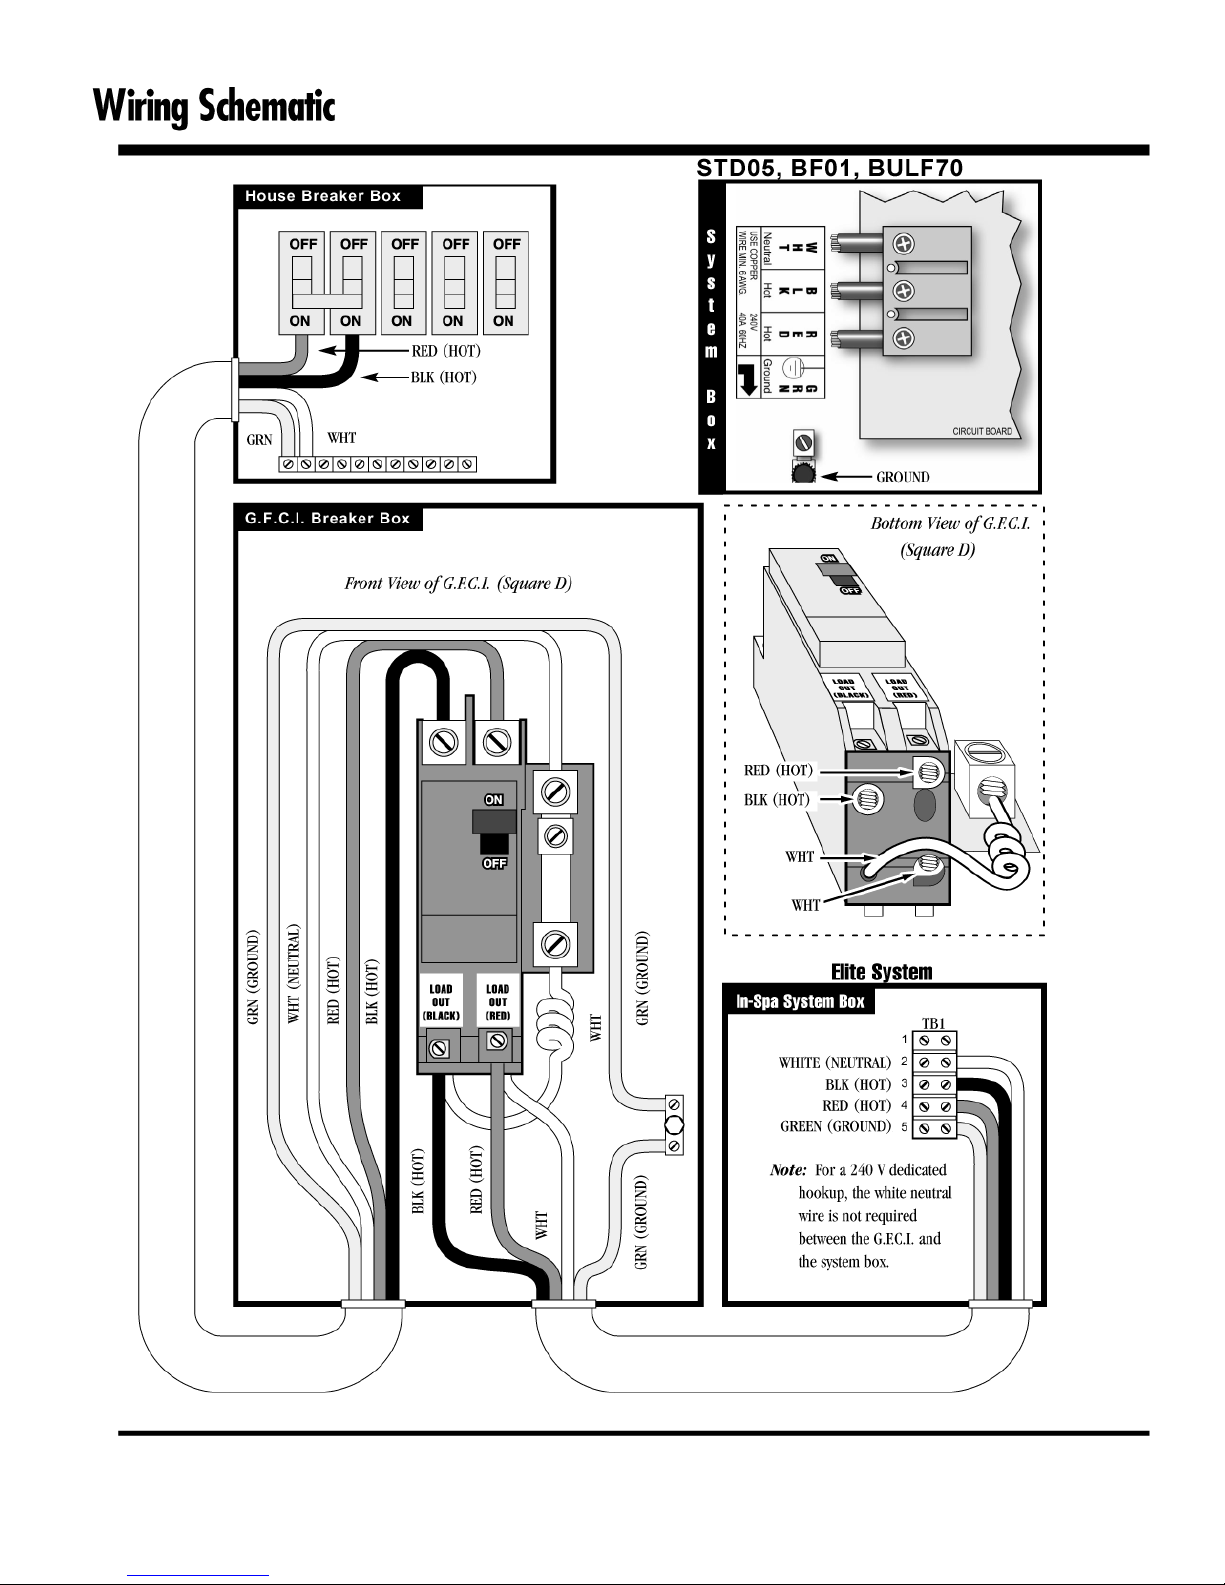
WIRING SCHEMATIC
Please reference the wiring schematic (Figure C.) for assistance with the installation instructions below.
120V/240V CONVERTIBLE EQUIPMENT
Unless you special ordered 120 Volt equipment, your Bullfrog Portable Spa comes standard as a 240 Volt spa.
If your spa is equipped with a Standard Control System (STD-05), it can be wired as either a dedicated 120V or
240V system.
With the 120 Volt Standard Control System, you can take advantage of the Bullfrog PowerPlus feature by upgrading
your 120V system to a more powerful 240V system. The 240V system allows you to increase horsepower as well
as heating capacity.
For specific conversion instructions, please refer to the system wiring diagram locating inside of the control
system box.
120 VOLT INSTALLATION
Use only a qualified Licensed Electrician to make 120 Volt electrical installations.
Your 120 Volt spa requires a dedicated GFCI 20 AMP electrical circuit and a minimum supply wire size of 12
gauge. It is important that this circuit is dedicated (not being used by any other electrical appliance) or your spa
may not function properly.
Position your Bullfrog Portable Spa at least 5 feet (1.5m) from all electrical outlets or devices.
240 VOLT INSTALLATION
Use only a qualified Licensed Electrician to make 240 Volt electrical installations.
Your 240 Volt Bullfrog Portable Spa requires a dedicated 50 AMP electrical circuit and a minimum supply wire size
of 6 gauge. It is important that this circuit is dedicated (not being used by any other electrical appliance) or your
spa may not function properly.
Position your Bullfrog Portable Spa at least 5 feet (1.5m) from all electrical outlets or devices.
30 AMP Conversion Option: If you do not have 50 AMPS of electrical service available, your authorized Bullfrog
Portable Spa Dealer or electrician can easily convert your spa to operate on 30 AMPS with a minimum supply wire
size of 10 gauge. Please be aware, that spas converted to 30 AMPS are only capable of heating the water when the
circulation pump is in low-speed, not high-speed. This heating limitation is acceptable in most climates as well as
in indoor installations.
Page 8 Bullfrog Spas Owner’s Manual
(Figure C.) Standard 120V/240V Wiring Diagram

Page 9Bullfrog Spas Owner’s Manual
ELECTRICIAN'S INSTRUCTIONS:
NOTICE: As of January 1, 1994, the National Electric Code (Article 680-42) requires that all spas, hot tubs, and
associated electrical components shall be protected by Ground Fault Circuit Interrupters.
Providing 120 Volt Service to the Bullfrog Portable Spa: As per code, supply a GFCI protected, 3-wire (Line 1,
Neutral & Ground), 20-AMP, 60HZ, Single-Phase service to the front, left corner (when you are facing the control
pad) of the Bullfrog Portable Spa. This service must include a disconnect that is visible from the spa and located
not less than five feet from the spa and not more than 50 feet from the spa (a GFCI Sub-Panel may be used to
substitute the disconnect if located within the same parameters).
Providing 240 Volt Service to the Bullfrog Portable Spa: As per code, supply a GFCI protected, 4-wire (Line 1,
Line 2, Neutral & Ground), 50-AMP, 60HZ, Single-Phase service to the front, left corner (when you are facing the
control pad) of the Bullfrog Portable Spa. This service must include a disconnect that is visible from the spa and
located not less than five feet from the spa and not more than 50 feet from the spa (a GFCI Sub-Panel may be used
to substitute the disconnect if located within the same parameters).
Installation of the GFCI: All conductors except the green ground must be routed through the GFCI, including the
neutral. Never bypass the neutral line. If the neutral line is bypassed, then the current will be imbalanced and
cause the GFCI to trip.
Note: For a GFCI wiring diagram, please contact Bullfrog International, L.C. or an authorized Bullfrog Portable Spa
Dealer.
Connecting the Spa:
1. Remove the equipment compartment door.
2. Remove the face-plate to the Control Center by removing the four screws located in the front.
3. Connect a 1" non-metallic coupling and conduit to the 1" male CPVC pipe found at the base of the spa cabinet
(see “Parts Identification Diagram” in this manual).
4. Run the required wires through the conduit and to the Control Center.
5. Connect the 3 wires (120V systems)/4 wires (240V systems) to the terminal block located in the Control Center
(see appropriate “Wiring Diagram”).
6. Replace the Control Center face-plate and the equipment compartment door.
7. The electrical hook-up is complete.
Important: Do not fill or start-up the spa until you have completed the following section.

Page 10 Bullfrog Spas Owner’s Manual
CHECKLIST BEFORE FILLING
YOUR SPA
Important: The equipment should never be operated
without water in the spa. Serious damage to the pump
and/or heater may occur.
1. Installing Your Cover: Your spa cover comes with
tie-down straps and locking hardware to attach the cover
to the spa or decking. If your Dealer did not install your
cover, then refer to Cover Installation Instructions that
come in the cover cardboard packaging.
2. Check Drain-Cap: At the end of the drain hose
(located in the Equipment Compartment) is the Drain-Cap
(Fig. E) Make sure it is securely fastened to the end of the
drain hose.
3. Tighten Equipment Fittings: In the equipment
compartment, hand-tighten all PVC Pipe Unions and
Pump Drain Plugs (Figs. F) to prevent the possibility of
leakage (sometimes these fittings loosen during
shipment).
4. Check Valve Keepers: Verify that a Valve Keeper
(Fig. G) is installed on each slice valve. Valve keepers
prevent the valve from vibrating shut during shipment or
operation. A slice valve that closes will result in a noisy
pump due to a lack of water flow to the pump.
5. Fill the Spa: Fill the spa to approximately the
Water Level mark (Fig. H) on the face plate of the filter
assembly. (See Note 2).
Note 1: To avoid air pockets in the pumps and in the
main plumbing intake, it is recommended that the spa be
filled through the filter assembly.
Note 2: The higher the water level, the less spa users it
will take to cause the water to overflow the top of the
spa.
Note 3: Do not fill the spa with soft water unless the
mineral content is raised immediately (see your Dealer).
5. Check for Leaks: After the spa is full, but before
turning the power on, check all the fittings and
equipment in the equipment compartment for signs of
leakage. If a leak is detected, except from fittings that
can be hand-tightened, call your authorized Bullfrog Spa
Dealer.
(Figure F-2) Spa Fittings
(Figure E) Drain Cap
(Figure H) Fill Level Indication Mark
(Figure G) Valve Keeper
(Figure F-1) Spa Fittings

Page 11Bullfrog Spas Owner’s Manual
INITIAL START-UP
Important: Bullfrog Spas come with either a Standard or Deluxe Control System. Refer only to the Control System
that applies to your spa.
STANDARD CONTROL SYSTEM:
When your spa is first activated, it will go into Priming mode, indicated by “Pr” on the display. The Priming mode will
last for less than 5 minutes and then the spa will begin normal operation in Standard Mode. By default, the spa will
begin to heat until it reaches the start-up temperature of 100°F.
DELUXE CONTROL SYSTEM:
When your spa is first activated, it will go into Priming mode, indicated by “Pr” on the display. The Priming mode will
last for less than 5 minutes and then the spa will begin normal operation in Standard Mode. For the first one minute,
“—F” will appear on the display while the system is sensing the water temperature. By default, the spa will begin to
heat until it reaches the start-up temperature of 100°F.
Note: The Priming Mode can be accelerated by pressing the “Jets 1” button and then the “Warm or Cool” button.

Page 12 Bullfrog Spas Owner’s Manual
CONTROL SYSTEM OPERATION
WARNING: This equipment generates and uses radio frequency energy and if not installed and used properly, that is, in strict
accordance with the manufacturer's instruction, may cause interference to radio and television reception. It has been type tested
and found to comply with the limits for a class B computing device in accordance with the specifications in subpart J of part 15 of
the FCC rules, which are designed to provide reasonable protection against such interference in a residential installation.
However, there is no guarantee that interference will not occur in a particular installation. If this equipment does cause
interference, which can be determined by turning the equipment on and off, the user is encouraged to try to correct the
interference by one or more of the following measures: Reorient the receiving antenna. Relocate the receiver with respect to the
spa. Move the receiver away from the spa. Plug the receiver into a different outlet so that the receiver and spa are on different
branch circuits. If necessary, the users should consult the dealer or an experienced radio/television technician for additional
suggestions. The user may find the following booklet prepared by the Federal Communications Commission helpful: “How to
identify and resolve radio-TV interference problems.” This booklet is available from the U.S. Government Printing Office,
Washington, DC 20402, Stock No. 004-000-00345-4.
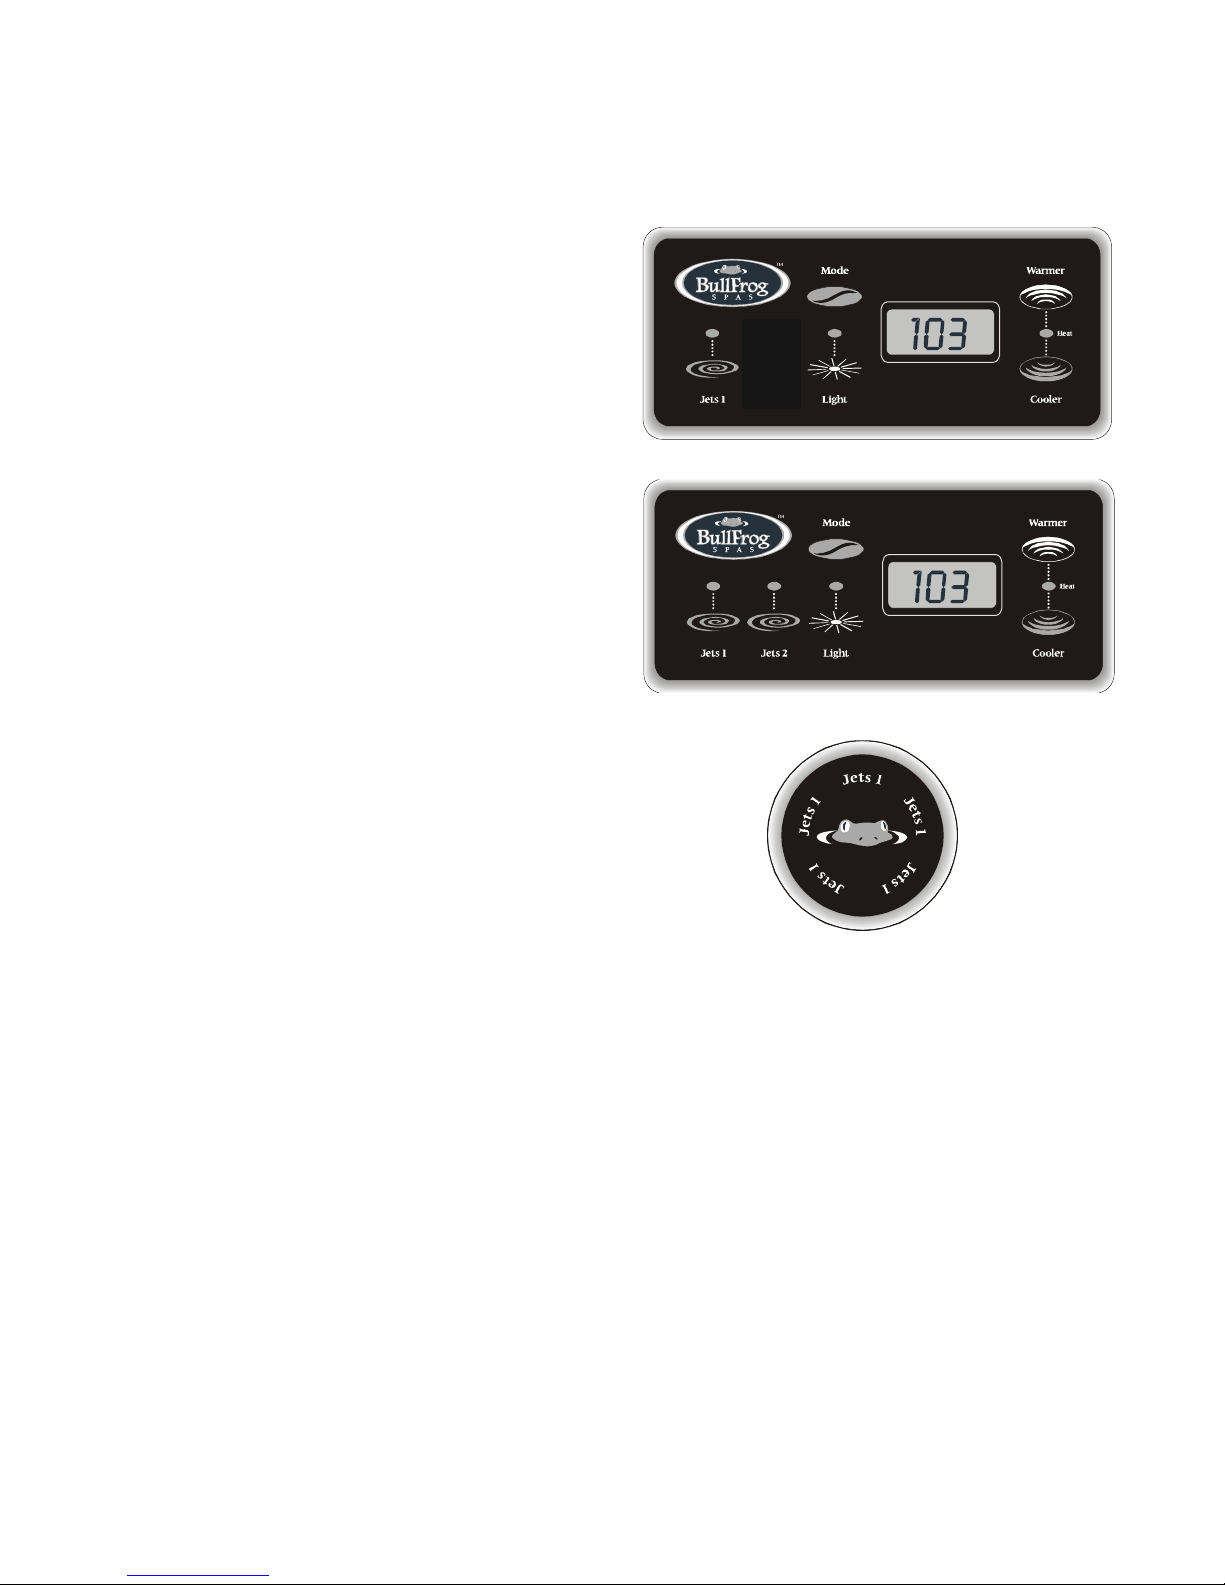
STANDARD CONTROL SYSTEM (STD05)
MASTER CONTROL PAD (Figures I-1 & 2)
Temp Set (80°F - 104°F)
The start-up temperature is set at 100°F. The last measured
temperature is constantly displayed on the LED. Note that
the last measured spa temperature displayed is current
only when pump 1 (“Jets 1” )has been running for at
least 2 minutes.
Press the “Temp Set” button to display and adjust the set
temperature. After three seconds, the LED will automatically
display the last measured temperature.
Jets 1
Touch the “Jets 1” button once to activate the low speed of
pump 1 and again for the high speed. Press the “Jets 1”
button again to turn off pump 1. If left running, the pump’s
low speed will automatically turn off after 2 hours, and the
pump’s high speed will automatically turn off after 30
minutes. The pump’s low speed runs when the spa is
heating, when a filter cycle is activated, or when a freezing
condition is detected. If the pump’s low speed is on under
Automatic Spa Control, it can only be deactivated by entering the Standby Mode.
Jets 2
Touch the “Jets 2” button once to activate the high speed of pump 2 and again to shut the pump off. If left
running, the pump’s will automatically turn off after 30 minutes.
Note: Either pump can also be activated by an optional auxiliary control button (if installed) (Fig. J)
Light
Press the “Light” button to turn the light on and off. If left on, the light automatically
turns off after 4 hours.
Modes
Press “Temp Set”, then “Jets 2” (or “Aux”) to switch between Standard, Economy, and
Sleep Modes.
Standard Mode is programmed to maintain the desired temperature. Note:
the last measured spa temperature displayed is current only when pump 1
has been running for at least 2 minutes. “St” will be displayed momentarily
when you switch into standard mode.
Economy Mode heats the spa to the set temperature only during filter cycles. “Ec” will display solid when
temperature is not current, and will alternate with temperature when temperature is current.
Push “Jets 1” to shift to Standard-in-Economy Mode, indicated by “SE” alternating with the temperature. The spa
operates the same as it does in Standard Mode, but reverts to Economy Mode automatically after 2 hours. During
(Figure I-1) Standard Control Pad
(Figure I-2) Standard Control Pad
1
2
(Figure J) Auxiliary Control Pad
(Custom models only)

Page 13Bullfrog Spas Owner’s Manual
this time, a press of the “Mode” button will revert to Economy Mode immediately.
Note: Heating will occur more quickly in Standard-in-Economy Mode if a low-speed (versus a high speed) pump is operating.
Sleep Mode heats the spa to within 20°F of the set temperature only during filter cycles. “SL” will display solid
when temperature is not current, and will alternate with temperature when temperature is current.
Preset Filter Cycles
The first filter cycle begins 6 minutes after the spa is energized. The second filter cycle begins 12 hours later.
Filter duration is programmable at the Master Control Pad for 2, 4, or 6 hours. The default filter time is 4 hours. To
program, press “Temp Set”, then “Jets1.” Press “Temp Set” to adjust. Press “Jets 1” to exit programming.
Pump 2 purges for 5 minutes at the beginning of each filter cycle. The low speed of pump 1 runs during filtration
and the ozone sterilizer (if installed) will be enabled. If any button is pressed during filtering, the ozone sterilizer
(if installed) will be disabled for 60 minutes.
Standby Mode
The spa can be disabled when the filter needs to be serviced or when changing/servicing a JetPak™. Press the
“Temp Set” button, then the “Light” button, and the display will show “SY.” All spa functions will be disabled except
for auxiliary freeze control. Press any panel button to resume spa operation.
Freeze Protection
If the temperature sensors detect a drop to 40°F within the heater, then pump 1 (and the heater if necessary) will
automatically activate to provide freeze protection. The equipment stays on until the sensors detect that the spa
temperature has risen to within 15°F of the set temperature. Pump 2 will purge for 1 to 2 minutes at the end of the
freeze condition.
DELUXE CONTROL SYSTEM (BULF70)
MASTER CONTROL PAD (Fig. K-1 & 2)
Temp Set (80°F - 104°F)
Page 14 Bullfrog Spas Owner’s Manual
The start-up temperature is set at 100°F. The last measured temperature is constantly displayed on the LCD. Note
that the last measured spa temperature displayed is current only when pump 1 (“Jets 1” )has been running
for at least 2 minutes.
Press the “Warmer” or “Cooler” button to display and adjust the set temperature. After three seconds, the LCD will
automatically display the last measured spa temperature.
Jets 1
Touch the “Jets 1” button once to activate the low speed of
pump 1 and again for the high speed. Press the “Jets 1”
button again to turn off pump 1. If left running, the
pump’s low speed will automatically turn off after 2 hours,
and the pump’s high speed will automatically turn off after
30 minutes. The pump’s low speed runs when the spa is
heating, when a filter cycle is activated, or when a freezing
condition is detected. If the pump’s low speed is on under
Automatic Spa Control, it can only be deactivated by
entering the Standby Mode.
Note: The Auxiliary Control Pad for “Jets 1” (optional) activates the
jets in the same manner as the Master Control Pad. (Fig. M)
Jets 2
Touch the “Jets 2” button once to activate the low speed of
pump 2 and again for the high speed. Press the “Jets 2”
button again to turn off pump 2. If left running, the
pump’s low and high speeds will automatically turn off
after 30 minutes. Note: The Auxiliary Control Pad for “Jets
2” (optional) activates the jets in the same manner as the
Master Control Pad. (Fig. L)
Light
Press the “Light” button to turn the light on and off. If left on, the light
automatically turns off after 4 hours.
Mode
This button is used to switch between Standard, Economy, and Sleep
Modes.
Standard Mode is programmed to maintain the desired temperature. Note: the
last measured spa temperature displayed is current only when pump
1 has been running for at least 2 minutes. “Std” will be displayed momentarily
when you switch into standard mode.
Economy Mode heats the spa to the set temperature only during filter cycles. “Ecn” will display solid when
temperature is not current, and will alternate with temperature when temperature is current.
Push “Jets 1” to shift to Standard-in-Economy Mode, indicated by “SE” alternating with the temperature. The spa
operates the same as it does in Standard Mode, but reverts to Economy Mode automatically after 2 hours. During
this time, a press of the “Mode” button will revert to Economy Mode immediately.
Note: Heating will occur more quickly in Standard-in-Economy Mode if a low-speed (versus a high speed) pump is operating.
Sleep Mode heats the spa to within 20°F of the set temperature only during filter cycles. “SLP” will display solid
when temperature is not current, and will alternate with temperature when temperature is current.
Preset Filter Cycles
The first filter cycle begins 6 minutes after the spa is energized. The second filter cycle begins 12 hours later.
Filter duration is programmable at the Master Control Pad for 2, 4, or 6 hours. The default filter time is 4 hours. To
program, press “Warmer” or “Cooler”, then “Mode.” Press “Warmer” or Cooler” to adjust. Press “Mode” to exit
programming.
Pump 2 purges for 5 minutes at the beginning of each filter cycle. The low speed of pump 1 runs during filtration
and the ozone sterilizer (if installed) will be enabled. If any button is pressed during filtering, the ozone sterilizer
(if installed) will be disabled for 30 minutes.
Temperature Display Inversion
(Figure K-2) Deluxe Control Pad
(Figure K-1) Deluxe Control Pad
(Figure L) Auxiliary Control Pad
(Custom models only)

Page 15Bullfrog Spas Owner’s Manual
Press the “Warmer” or “Cooler” button, then the “Jets 1” button to invert display. Use the same sequence to revert
back to normal display.
Standby Mode
The spa can be disabled when the filter needs to be serviced or when changing/servicing a JetPak™. Press the
“Warmer” or “Cooler” button, then the “Light” button, and the display will show “StbY.” All spa functions will be
disabled except for auxiliary freeze control. Press any panel button to resume spa operation.
Freeze Protection
If the temperature sensors detect a drop to 40°F within the heater, then pump 1 (and the heater if necessary) will
automatically activate to provide freeze protection. The equipment stays on until the sensors detect that the spa
temperature has risen to within 15°F of the set temperature. The pump will purge for 30 seconds to 2 minutes at
the end of the freeze condition.
DIAGNOSTIC MESSAGES:
No Message on Display: Power has been cut off to the spa.
Action Required: The control panel will be disabled until power returns. Spa settings will be preserved for 30 days
with a battery back-up.
“OHH” on Display: “Overheat” - The spa has shut down. One of the sensors has detected 118°F at the heater.
Action Required: DO NOT ENTER THE WATER. Remove the spa cover and allow water to cool. Once the heater has
cooled, reset by pushing any button. If spa does not reset, shut off the power to the spa and call your authorized
Bullfrog Portable Spa Dealer.
“OH5” on Display: “Overheat” - The spa has shut down. One of the sensors has detected that the spa water is
110°F.
Action Required: DO NOT ENTER THE WATER. Remove the spa cover and allow water to cool. At 107°F, the spa
should automatically reset. If spa does not reset, shut off the power to the spa and call your authorized Bullfrog
Portable Spa Dealer.
“ICE” on Display: “Ice” - Auxiliary Freeze Sensor detects potential freeze condition.
Action Required: No action required. The pumps will automatically activate regardless of spa status.
“SnA” on Display: Spa is shut down. The sensor plugged into the Sensor “A” jack is not working.
Action Required: If the problem persists, contact your authorized Bullfrog Portable Spa Dealer. (May appear
temporarily in an overheat situation and disappear when the heater cools.)
“SnB” on Display: Spa is shut down. The sensor that is plugged into the Sensor “B” jack is not working.
Action Required: If the problem persists, contact your authorized Bullfrog Portable Spa Dealer. (May appear
temporarily in an overheat situation and disappear when the heater cools.)
“Sn5” on Display: Sensors are out of balance. If alternating with temperature, it may just be a temporary
condition. If flashing by itself, spa is shut down.
Action Required: If the problem persists, contact your authorized Bullfrog Portable Spa Dealer.
“HFL” on Display: Persistent low flow problems. (Occurs on the third occurrence of the “HFL” message.) Heater
is shut down, but other spa functions continue to run normally.
Action Required: Check water level in spa. Refill if necessary. If the water level is okay, make sure the pumps have
been primed. If problem persists, contact your authorized Bullfrog Portable Spa Dealer.
“LF” on Display: There may be greater than 5°F difference between temperature sensors. This could indicate a
flow problem.
Action Required: Follow action required for “HFL” message. Turn spa off then back on again to restore heating

Page 16 Bullfrog Spas Owner’s Manual
capability.
“drY” on Display: Inadequate water detected in heater.
Action Required: Check water level in spa. Refill if necessary. If the water level is okay, make sure the pumps have
been primed. Press any button to reset.
“dr” on Display: Inadequate water detected in heater. (Displays on third occurrence of “dry” message.) Spa is
shut down.
Action Required: Follow action required for “dry ” message. Spa will not automatically reset; you may press any
button to reset.
Warning! Shock Hazard! No User Serviceable Parts.
Do not attempt service of this control system. Contact your authorized Bullfrog Portable Spa Dealer for assistance.
Follow all owner’s manual power connection instructions. Installation must be performed by a licensed electrician
and all grounding connections must be properly installed.
JetPaks™
To identify a type of JetPak, locate the JetPak Identification Number found on the back side of the JetPak (example:
J03-63-12). This number provides the following information:

Page 17Bullfrog Spas Owner’s Manual
Temp Set (80°F - 104°F / 26.0°C - 40.0°C)
The start-up temperature is set at 100°F/37.5°C. The last measured temperature is constantly displayed on the LCD.
Note that the last measured spa temperature displayed is current only when the pump has been running for
at least 2 minutes.
SELECT CONTROL SYSTEM (BF01)
The pump responsible for heating and filtration (pump 1
low) will be referred to simply as the pump.
Timeouts refer to a preset length of time that a function is
programmed to operate before shutting off automatically.
Certain conditions (filters or freeze) can cause a function to
operate longer, while faults can cause a function to operate
for a shorter length of time. The system keeps track of
timeouts regardless of other conditions occurring.
In multi-button sequences, if buttons are pressed too quickly in sequence, they may not register.
Initial Start-up
When your spa is first actuated, it will go into Priming mode (after displaying some configuration information).
The Priming mode will last for up to 4 minutes and then the spa will begin to heat the spa and maintain the
water temperature in the Standard mode. You can exit Priming mode early by pressing “Warmer” or “Cool.”
Note:
Alternate panel may have an Auxiliary button in place of
a Jets 2 button
Icon Legend
Heat Icon - Indicates different stages of heating.
Jets Icon - Spins fast on high speed; spins slow
on low speed.
1. Setting the Time
Once the spa has been properly connected, notice the
“Time” icon appearing on the screen.
Press Then
Select the hour by pressing Or
(Each press changes the time by 1 hour)
Press to enter
Select minutes by pressing Or
(Each press changes the time by 1 minute)
Press
Press
to exit the time setting procedure
and enter the optional filter cycle
programming.
to exit programming.
Light Icon - On dim, the LCD will show the center
circle plus one quarter of the light beams. Half of the
light beams will show on medium brightness, and all
of the light beams will show on bright.
2. Optional Filter Cycle Programming
You are not required to set filter cycles; however, it is
an option available to you. To change the filter cycle
settings: Press “Time” “Mode/Prog” “Mode/Prog” “Mode/
Prog” within 3 seconds. You will see the “PROGRAM,”
“FILTER 1” and “START TIME” icons appear on the dis-
play. Press “Warmer” or “Cooler” to choose the filter
start time hour. Enter the hour by pressing “Mode/
Prog” . Press “Warmer” or “Cooler” to choose the filter
start time minutes. Each press changes the start time by
5 minutes. Enter the minutes by pressing “Mode/Prog.”
Press “Mode/Prog” to see the “PROGRAM,” “FILTER 1”
and “END TIME” icons. Adjust the time as done above.
Press “Mode/Prog” to see the “PROGRAM,” “FILTER 2”
and “START TIME” icons. Proceed as above.
Press “Mode/Prog” to see “PROGRAM,” “FILTER 2” and
“END TIME” icons. Adjust the time as done above.
Pressing “Mode/Prog” will enter the new filter cycle
times into the system and display the current water
temperature.
Pressing “Time” at any time during this programming
sequence will save the values entered up to that point
and exit programming.
If you would like to select continuous filtration, set the
filter 1 start and end times to be the exact same time.
Press to exit programming. Press to enter. Select min-
utes by pressing Or (Each press changes the time by 1
hour) (Each press changes the time by 1 minute)

Page 18 Bullfrog Spas Owner’s Manual
Warmer / Cooler
Press the “Warmer” or “Cooler” button once to display the set temperature. Each time either button is pressed
again, the set temperature will increase or decrease depending on which button is pressed. After three seconds,
the LCD will automatically display the last measured spa temperature.
Time
When time hasn’t been programmed, the TIME icon flashes. To set the time, press “Time” then “Mode/Prog.” Use
the “Warmer” and “Cooler” buttons to adjust time. See previous page for more detailed instructions. (Time set-
tings on BFO1 are not preserved in the event of power loss; time will have to be reprogrammed upon each power
up.)
Mode/Prog
This button is used to switch between standard, economy, and sleep modes. Press “Mode/Prog” to enter mode
programming, press “Cooler” to cycle through to desired mode (LCD flashes until confirmed), then press “Mode/
Prog” to confirm selection.
Standard mode maintains the desired temperature. Note that the last measured spa temperature displayed is
current only when the pump has been running for at least 2 minutes. The “STANDARD” icon will display until the
mode is changed.
Economy mode heats the spa to the set temperature only during filter cycles. The “ECONOMY” icon will display
until mode is changed Pressing “Jets 1” while in Economy mode puts the spa in Standard-In-Economy mode,
which operates the same as Standard Mode, then reverts to Economy Mode automatically after 1 hour. During
this time, a press of the “Mode/Prog” button will revert to Economy Mode immediately. Sleep mode heats the spa
to within 20°F (11°C) of the set temperature only during filter cycles. The “SLEEP” icon will display until mode is
changed.
Standby Mode
Pressing “Warmer” or “Cooler” then “Jets 2” or “Auxiliary” will turn off all spa functions temporarily. This is helpful
when changing a filter or JetPak. Pressing any button resets the spa.
Jets 1
Press the “Jets 1” button once to turn pump 1 on or off, and to shift between low and high speeds (if equipped). If
left running, the low speed turns off after 4 hours and the high speed turns off after 30 minutes.
The low speed of pump 1 runs when any other pump is on. It may also activate for at least 2 minutes every 30
minutes to detect the spa temperature (polling) and then to heat to the set temperature if needed, depending
upon mode. When the low speed turns on automatically, it cannot be deactivated from the panel; however, the
high speed may be started.
Jets 2 (optional on BF01)
Press the “Jets 2” button once to turn pump 2 on or off, and to shift between low and high speeds. If left running,
the pump will turn off after 30 minutes.
Option
This button does nothing by itself; however, it is used as part of the Invert sequence (see below).
Invert
Press the “Warmer” or “Cooler” button, followed by the “Option” button to change the numbers in the display to
read upside down.
Light
Press the “Light” button to turn the spa light on and off, and to shift between dim and bright settings if your light
is dimmable. On dim, the LCD will show center circle plus one quarter of the light beams. Half of the light beams
will show on medium brightness, and all of the light beams will show on bright.
If the light is left on, it will automatically turn off after 4 hours.
Preset Filter Cycles
On all systems, the pump and the ozone generator** will run during filtration. At the start of each filter cycle, the
lowest speed of pump 2 will run for 5 minutes.

Page 19Bullfrog Spas Owner’s Manual
Diagnostic Messages
Meaning
No message on display.
Power has been cut off to the spa.
“Overheat” - The spa has shut down. One
of the sensors has detected that the spa
water is 110°F (approximately 43.3°C).
“Overheat” - The spa has shut down. One
of the sensors has detected 118°F
(approximately 47.8°C) at the heater.
“Ice” - Potential freeze condition
detected.
Spa is shut down. The sensor that is
plugged into the Sensor “A” jack is not
working.
Spa is shut down. The sensor that is
plugged into the Sensor “B” jack is not
working.
Action Required
The control panel will be disabled until power returns.
Spa settings are preserved until the next power-up.
DO NOT ENTER THE WATER. Remove the spa cover
and allow water to cool. At 107°F (approximately 41.7°
C), the spa should automatically reset. If spa does not
reset, shut off the power to the spa and call your
dealer or service organization.
DO NOT ENTER THE WATER. Remove the spa cover
and allow water to cool. Once the heater has cooled,
reset by pushing any button. If spa does not reset,
shut off the power to the spa and call your dealer or
service organization.
No action required. The pumps and the blower will
automatically activate
regardless of spa status.
If the problem persists, contact your dealer or service
organization. (May appear temporarily in an overheat
situation and disappear when the heater cools.)
If the problem persists, contact your dealer or service
organization. (May appear temporarily in an overheat
situation and disappear when the heater cools.)
Message
There are two filter cycles per day. The start/end times of each cycle are programmable. To program, set time as
instructed above, then press “Mode/Prog” to advance to the next setting (or to exit after the last setting). The de-
fault filter cycles are as follows: The first filter cycle is automatically activated at 8:00 AM and operates the pump
until 10:00 AM. The filter 1 indicator icon will
light when filter 1 is running. The second filter cycle is automatically activated at 8:00 PM and operates the pump
until 10:00 PM. The filter 2 indicator icon will light when filter 2 is running.
Clean-up Cycle (optional)
When the pump is turned on by a button press, a clean-up cycle begins 30 minutes after the pump is turned off
or times out. The pump and the ozone generator** will run for one hour.
**Ozone (optional)
On most systems, the ozone generator (if installed) runs during filter cycles (except when pump 1 is operating at
high speed and during clean-up cycles.
Freeze Protection
If the temperature sensors detect a drop to 44°F (approximately 6.7°C) within the heater, then the pump auto-
matically activates to provide freeze protection. The equipment stays on until 4 minutes after the sensors detect
that the spa temperature has risen to 45°F
(approximately 7.2°C) or higher. In colder climates, an optional additional freeze sensor may be added to protect
against freeze conditions that may not be sensed by the standard sensors. Aux freeze sensor protection acts
similarly except with the temperature thresholds determined by the switch and without a 4-minute delay in turn-
off. See your dealer for details.
Locking the Panel
Press “Time” “Jets 1” then “Warmer” within 3 seconds. When locked, the PL indicator light will light. All buttons are
frozen except the “Time” button. To unlock the panel, press “Time” “Jets 1” then “Cooler.”
Locking the Set Temperature
Press “Warmer” or “Cooler” then “Time,” “Jets 1,” and “Warmer” within 3 seconds to activate the lock. The TL indi-
cator light will light when the set temperature is locked. To unlock the set temperature, press “Warmer” or
“Cooler” then “Time,” “Jets 1” and “Cooler.”

Page 20 Bullfrog Spas Owner’s Manual
If the problem persists, contact your dealer or service
organization.
Check water level in spa. Refill if necessary. If the
water level is okay, make sure the pumps have been
primed. If problem persists, contact your dealer or
service organization.
Follow action required for “HFL” message. Heating ca-
pacity of the spa will not reset automatically; you may
press any button to reset.
Check water level in spa. Refill if necessary. If the wa-
ter level is okay, make sure the pumps have been
primed. Press any button to reset.
Follow action required for “dr” message. Spa will not
automatically reset; you may press any button to re-
set.
See the M-7 Installation Instruction Manual for com-
plete instructions on Power-up and Pump Priming. The
Priming mode will last for up to 4 minutes and then
the spa will begin to heat and maintain the water tem-
perature in the Standard mode.
After the pump has been running for 2 minutes, the
temperature will be displayed.
In Economy or Sleep mode, the pump may be off for
hours outside a filter. If you wish to see the current
spa temperature, either switch to Standard mode or
turn Jets1 on for at least two minutes.
Repair required. Contact your dealer or service organi-
zation.
Press any button to leave Standby Mode and return to
normal operation.
Add pH increaser according to manufacturer’s
instructions.
Add pH decreaser according to manufacturer’s
instructions.
Add sanitizer according to manufacturer’s
instructions.
Remove spa cover and allow sanitizer to dissipate.
Sensors are out of balance. If this is
alternating with the temperature, it may
just be a temporary condition. If the dis-
play shows only this message (periodically
blinking), the spa is shut down.
A substantial difference between the tem-
perature sensors was detected. This could
indicate a flow problem.
Persistent low flow problems. (Displays on
the fifth
occurrence of the “HFL” message within 24
hours.)
Inadequate water detected in heater.
Inadequate water detected in heater.
(Displays on third occurrence of “dr” mes-
sage.) Spa is shut down.
When your spa is first actuated, it will go
into Priming mode.
Temperature unknown.
Temperature not current in Economy or
Sleep mode.
Internal problem detected.
Standby Mode has been activated by
pressing a button combination on the user
panel.
pH is low.
pH is high.
Sanitizer is low.
Sanitizer is high.
Table of contents
Popular Hot Tub manuals by other brands


Jacuzzi
Jacuzzi SALON Installation and operating instructions

SpaDealers
SpaDealers Polar AquaKing user guide

Morphy Richards
Morphy Richards Essentials PC4006 user manual

Iberspa
Iberspa Hotel Spa manual

Master Spas
Master Spas LEGEND XTREME SERIES owner's manual

Aquatic
Aquatic HOTSOAK 83 ai6042SvHS Specification sheet

Bestway
Bestway Lay-Z-Spa Installation, operation & manintenance manual

Sonnenkonig
Sonnenkonig GRIMSEL 50400198 manual

Intex
Intex PureSpa Greywood Deluxe manual

Access Tubs
Access Tubs 3060SI HYDRO Installation & operating instructions

Jacuzzi
Jacuzzi PROJECTA lagoon 170x70 Instructions for preinstallation

ION
ION SUK-805D manual