Jetpik JP-50 User manual

Jetpik
Model JP-50/200
Power Floss System

1. Important safeguards. 3
2. Appliance description. 7
3. Getting started. 9
4. Care of your Jetpik unit. 14
5. Troubleshooting. 15
6. Specs 17
7. Limited warranty. 18

3
1.Important safeguards.
Read all instructions before use
Dangers
To reduce the risk of electrocution:
Do not immerse the charger in water or other liquids,Do not use the charger while bathing.
Do not place or store the appliance where it can fall or be pulled into a bath, washbasin or sink.
Check the main body of the charger and the cable regularly and if damaged please replace.
Warning
To avoid the risks of electric shock, personal injury or fire:
Do not plug the charger into a voltage that is different from the voltage specified on the device or charger.
The Adapter for Jetpik is designed to work within a range of 100 to 240 AC Volts.

4
The charger for Jetpik is designed to be linked to standard USB output which is 4.75 to 5.25 V DC. Please don’t plug the charger
to any other voltage and may cause damage of the equipment.
Do not use this appliance if it has been dropped into water or other liquid and is not working properly. Contact Jetpik or your
local dealer, which can be found at www.jetpik.com.
Do not direct water and floss to any area other than your teeth and gums. This device delivers a pressurized water stream and
moving floss that can cause serious damage on other tissues or body parts.
Use this appliance only as shown in these instructions or as recommend by your dental professionals.
Only use supplies and accessories that are manufactured or recommend by Jetpik.
To irrigate, use only water or other solutions recommended by your dental professionals.
Do not drop or insert any foreign object into any opening on the appliance.

5
Do not use the adapter outdoors and never force the plug into a mains socket. If the plug does not easily fit into the socket,
stop, don’t use it and try an alternative socket or replace with a new adapter.
This appliance contains no user-serviceable parts. Contact Jetpik or your local dealer for service if your Jetpik no longer works
properly and needs repair.
Use this appliance only for its intended use as described in this document or as recommend by your dental professionals.
Jetpik is not intended for use by persons (including children) with reduced physical, sensory, or mental capabilities. Children
should always be supervised and given instruction concerning the use of this appliance by a person responsible for their safety.
Jetpik is a personal care device and is not intended for use on multiple patients or in a dental practice or institution.
Children should always be supervised to ensure that they do not play with the appliance.
Avoid applying excessive pressure to the nozzle. Do not block the water stream by pressing the nozzle to the gum while
cleaning as this may cause damage to the motor.
The Charger should never be left unattended when plugged in and Keep the Charger away from heated surfaces .

6
Medical Warning
Consult your dental professional before using this appliance if you have had oral or gum surgery in the preceding two months.
Contact your dental professional if excessive gum bleeding occurs after using this appliance or if bleeding continues to occur
after one weeks use.
Discontinue using Jetpik and contact a physician/dentist if discomfort or pain is experienced.
Consult your physician if you have any other medical concerns.
Save These Instructions

7
2.Appliance Description.
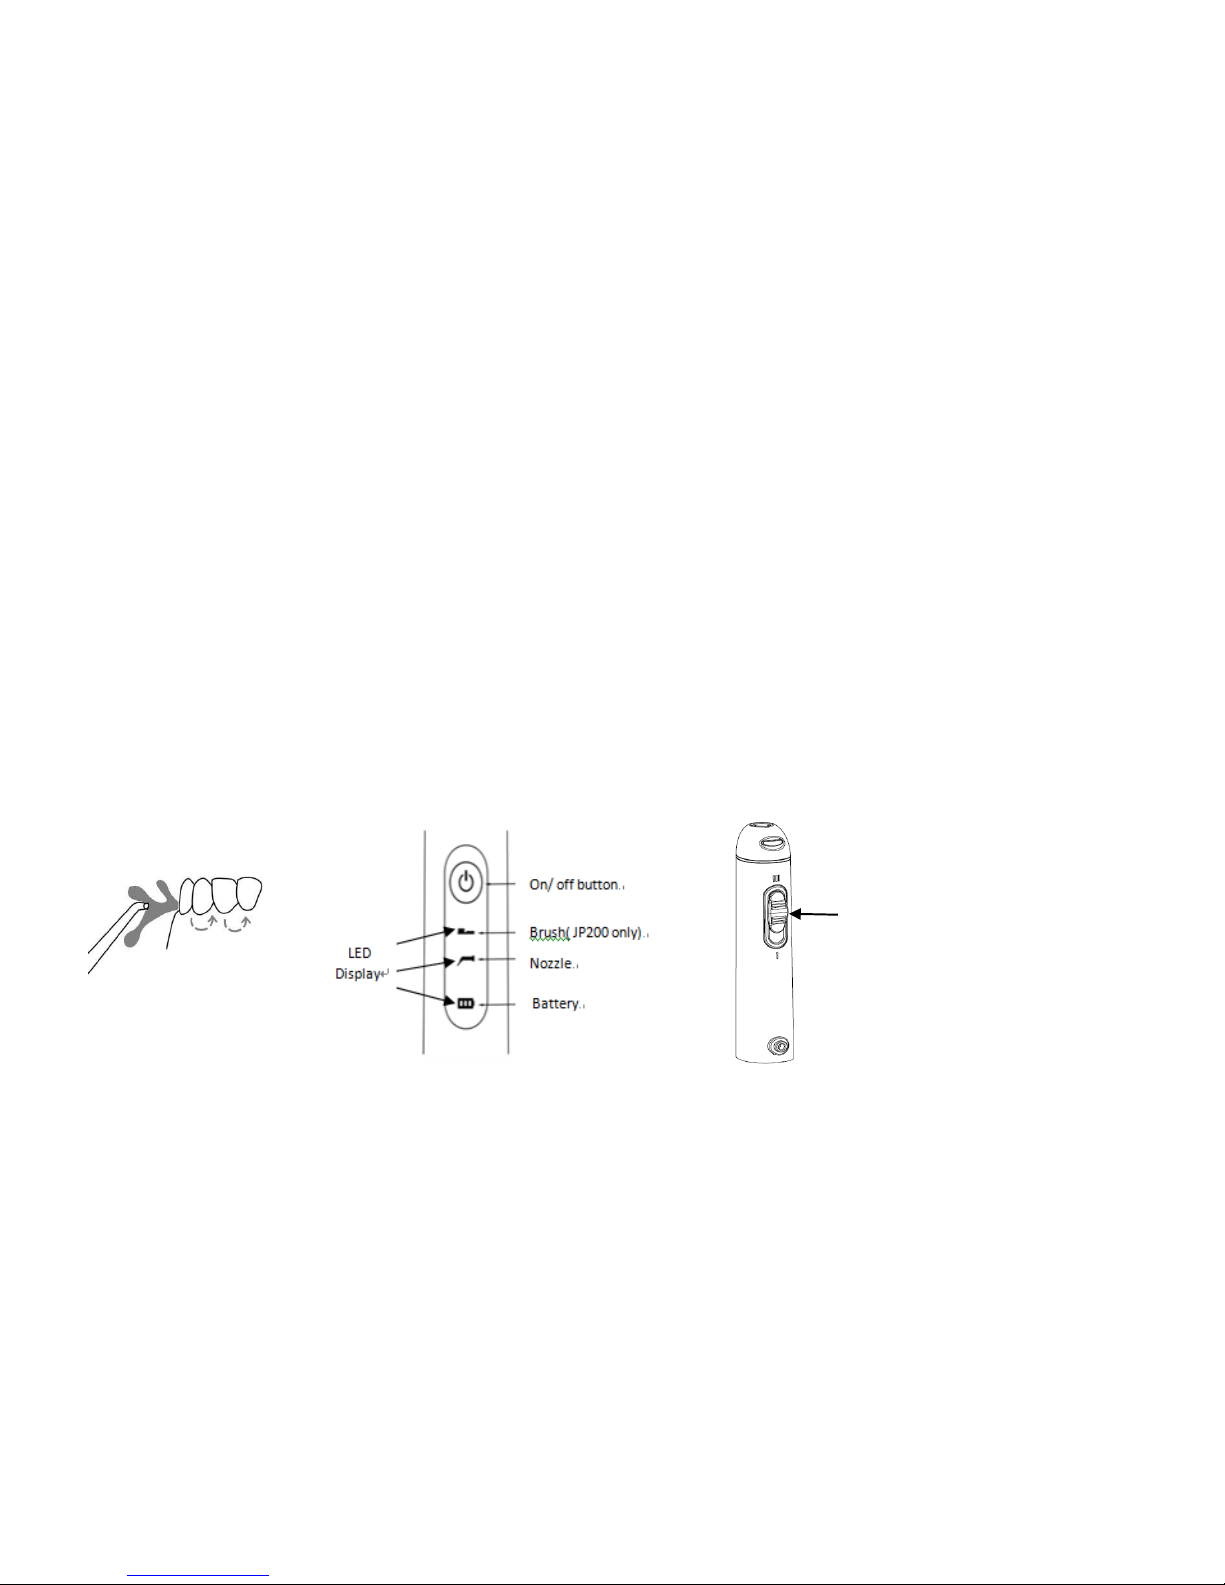
On/ off button
Brush( JP200 only)
Nozzle
release
button
Water
inlet
Pressure setting
LED
Display
Nozzle
Battery
8
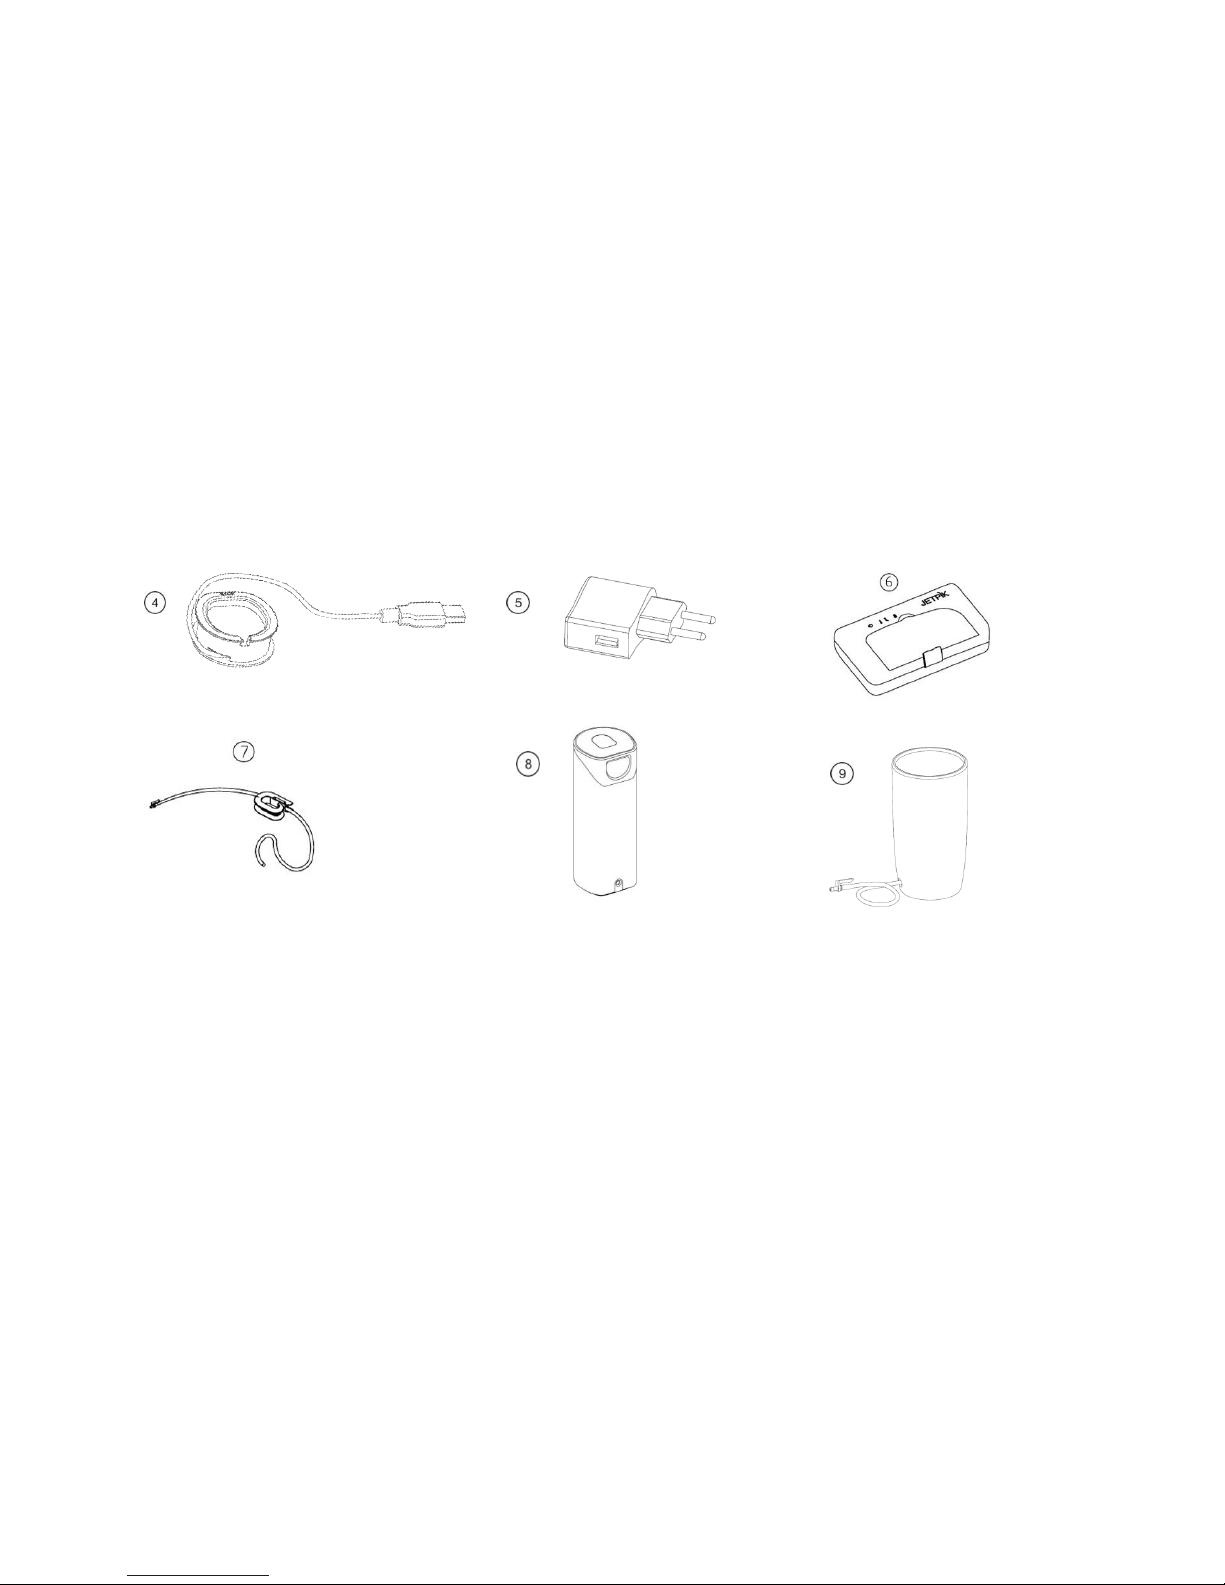
① Nozzle ② Floss capsule ③ Handle ④ Charger ⑤AC Adapter ⑥Travel case ⑦Water supply tube ⑧UV Sanitizer
⑨ Cup

9
3.Getting Started.
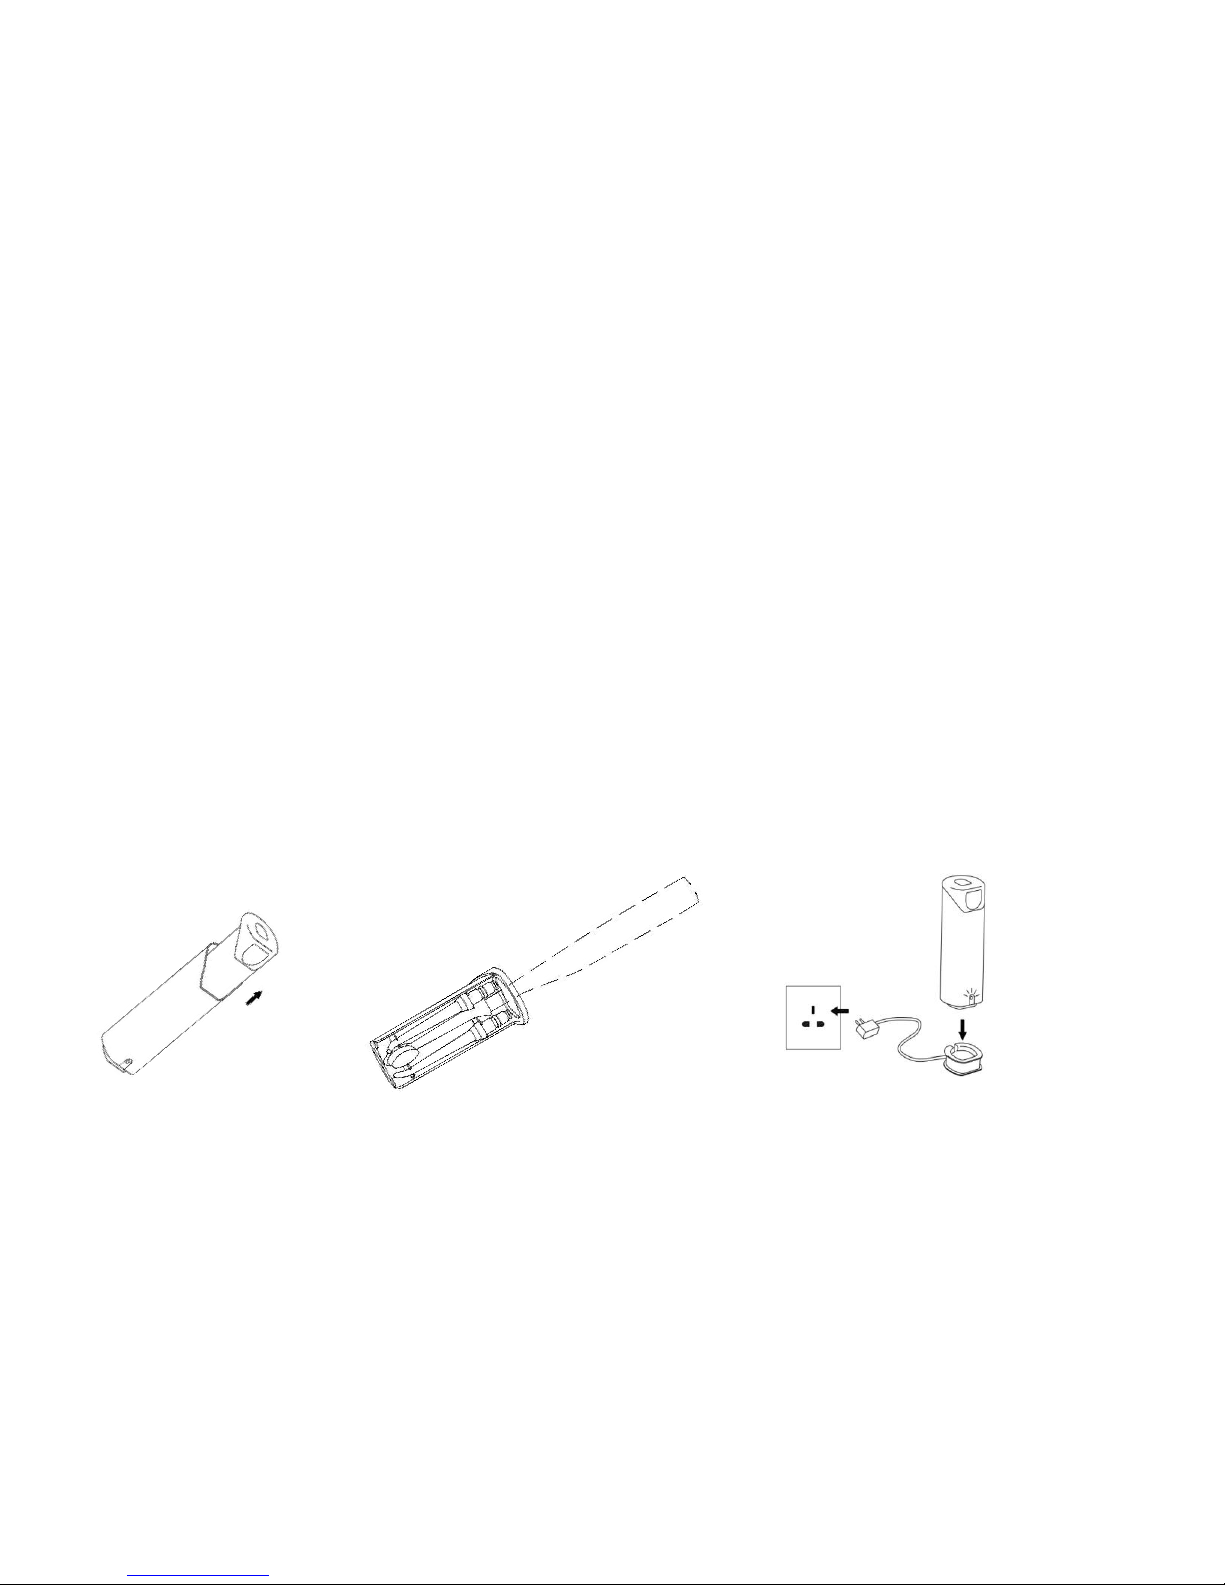
Initial Battery Charging.
Charge Jetpik for 24 hours before first use. To do so connect the charger to your mains socket and place the handle onto the cradle. A
flashing green LED will indicate that the unit is charging and will change to a steady green when the battery is fully charged.

10
Preparing Jetpik for Use.
Before using.
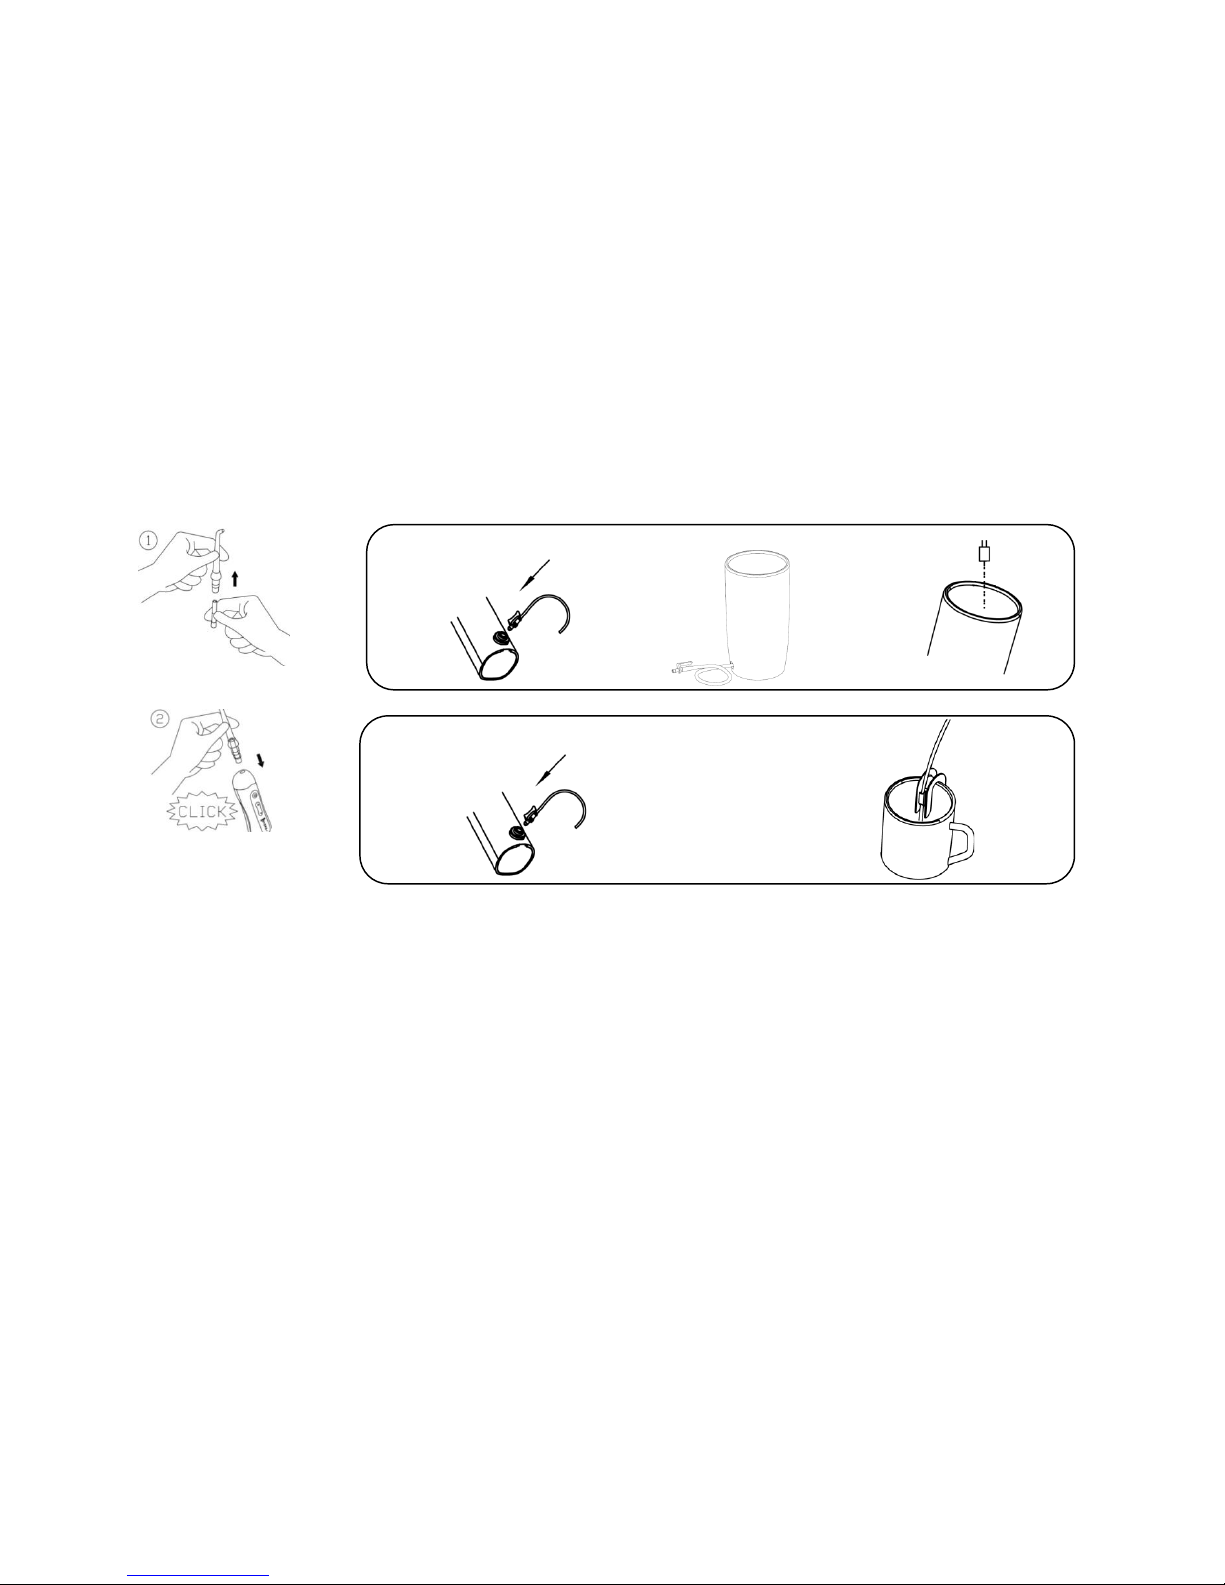
① Place one floss capsule into the nozzle (Note that Jetpik will not work without the floss capsule in position).
② Attach the nozzle to the handle.
When using the Jetpik cup supplied - insert the quick connector of the extendable hose on the lower of the cup to the water
inlet on the Jetpik handle as shown and pull the tube to a comfortable length and fill cup with water. (see below Figure 1)
When using in Travel Mode –Insert the quick connector on one side of the water supply tube to the Jetpik handle water inlet.
Use the spool of water supply tube to clip the other end of the tube into a cup or bottle of water. Note –take care to ensure
that the tube remains fully immersed beneath the surface of the water. (see below Figure 2)
11
Prime the floss:
Press and move the pressure adjust button to top III position and aim the nozzle into the sink and press the “On/Off” button. Wait a
few seconds and when you see water coming out from the nozzle and the floss string coming out from the capsule. Then turn off the
unit by pressing the “On/Off” button again.
Push
Push
Fig2
Fig1
12
Using.
If you have never used a water irrigator before it is recommended to start at a lower setting by move the pressure adjust button to
close to I position. You can gradually increase the pressure providing you don’t experience any gum bleeding or discomfort.
Lean over the sink and place the nozzle into your mouth and position the tip towards your teeth and press the On/Off button. Direct
the jet stream on to your gum-line as illustrated and move from one tooth to another. Slightly close your lips to avoid splashing but
allow water to flow freely from your mouth to the sink. For best results, pause briefly between teeth to let the floss fully clean the area.
Continue until all areas around and between the teeth have been reached. It is recommended that you replace the floss capsule each
week to get the best cleaning results under the gum-line, behind any braces and between the teeth.
Pressure setting

13
Using the Power brush function (JP200)
1. Clip the power tooth brush head to your Jetpik handle as showing. If you have the jet nozzle on you have to replace
it with the brush head.
2. Put comfort amount of toothpaste onto brush and touch your teeth surface. Press on/off button to start the power brush.
3. Press once the button will give you highest strength of power wave to clean your tooth. Press again will give you lower
strength wave. Press the 3rd time will give you a high-low tone, 1 second interval wave to massage your gum and whiten your
teeth.
4. Press the 4th time will turn the power brush off.
14
4.Care of your Jetpik unit.
1. Empty the cup and keep your Jetpik dry if it is not going to be used for a while.
2. Use tap or pure water to rinse your unit if you have used it to deliver mouthwash or antibacterial solutions.
3. Turn on the unit for few seconds to let the remaining water empty before you put the unit into the traveling case.
Using the UV Sanitizer (OPTIONAL)
Some models equipped with the UV sanitizer are designed to clean your nozzles and tooth brush heads.
1. Pull out the drawer of the UV sanitizer and clip your nozzle (max 2) into the drawer. You can also place your manual
toothbrush or electric toothbrush head into the drawer for UV cleaning.
2. Push the drawer to the closed position (the sanitizer will not work if the drawer is not fully closed). Place the sanitizer
into the charging cradle and make sure the charger is connected to a power socket of appropriate voltage. The green
LED on the sanitizer will light up and a blue light glows the top window of the sanitizer. The sanitizer cycle runs for
10 minutes and then shuts off automatically.

15
Disposal
When the appliance reaches “end of life” and prior to disposal, please remove the rechargeable battery from the handle by knocking
and breaking the plastic cover. Then cut the wires to remove the battery from the Jetpik. Now you can recycle or dispose of the battery
based on your local regulations. The rest of the unit can be discarded appropriately.
N.B. Batteries must not be included with normal household waste and should be taken to proper collection points to comply with
Directives 2002/96/EC and 2006/66/EC. Penalties may be applicable for incorrect disposal of this appliance.
5.Troubleshooting Guide
Problem
Cause
Corrective action
Jetpik keeps running but no water
comes out.
1. No floss capsule is in nozzle or the capsule is
too old to function.
2. The water supply tube clogged.
3. The nozzle was not fully engaged.
1. Insert a new capsule into nozzle and
prime it.
2. Flush the tube or replace it.
3. Release and re-install the nozzle.

16
Jetpik doesn’t start.
Battery not charged.
Be sure the power charger is functioning
and the red LED is on when placed in the
cradle. Fully charge for 24 hours and try
again.
Power tooth brush is not running.
Instead the handle motor is running
Brush tip is not in position or brush motor is
dead
Pull out and reinsert the brush tip into
handle.
Replace the brush tip.
Don’t see the blue light glows the top
window of the UV sanitizer or the
green LED is not light up
1. Not connected to power source.
2. The drawer is not fully inserting.
3. Charger is defective.
4. UV sanitizer is defective.
Check the adapter and wires to make
sure it is fully inserted to mains.
Reinsert the drawer into the sanitizer.
Replace the UV sanitizer or charger.

17
6.Specs
1. AC Adapter range: 100 to 240 V AC
2. AC Adapter output: 5V, 1000mA min. USB connector
3. Irrigator pressure range: 30 to 70 PSI adjustable
4. Irrigator jet frequency: 20 to 25 pulse per second
5. Water prove: IPX7

18
7.Limited Two-Year Warranty
Jetpik is warranted to the original consumer to be free from defects in materials and workmanship for 2 years from the date of
purchase. Consumers will be required to submit the original purchase receipt and the entire appliance to support a warranty claim.
Jetpik will replace at its discretion any part of the appliance which is deemed to be defective, provided the product has not been
abused, misused, altered or damaged after purchase, was used according to the provided instructions, and was used only with
accessories or supplies approved by Jetpik. Correct use and installation is the responsibility of the consumer and is not covered by the
warranty. This limited warranty excludes accessories and supplies such as, but not limited to, nozzles, floss capsules and brush heads.
Limitation of Remedies
In no circumstance shall Jetpik or any of its affiliated or subsidiary companies be liable for any special, incidental or consequential
damages based upon breach of warranty, breach of contract, negligence, tort, or any other legal remedy . Such damages include, but
not limited to, loss of savings or revenue; loss of profit; loss of use; the claims of third parties including, but not limited to , dentists and
dental hygienist; and the cost of any substitute equipment or services.

19
Jetpik®
www.jetpik.com
Jetpik® is a trademark of Nucreatronics Electronic Technology (Shanghai) Co.,LTD registered in USA, Europe, Brazil, China.
Jetpik USA:
Ad:16453 Old Valley Blvd. City of Industry, CA 91744, USA.
Tel: +1 626-330-0808
Jetpik Europe:
8 Westmayne Industrial Park, Bramston Way, Basildon, Essex. SS15 6TP , UK
Tel: +44(0) 1268 544588
Other manuals for JP-50
2
This manual suits for next models
1
Table of contents
Other Jetpik Electric Toothbrush manuals


