Jetworks Fairchild A-10 Thunderbolt II Parkjet mk2 Instructions for use

Construction Guide
© 2019 Craig Clarkstone. All rights reseved
4th Generation Jet Fighter
© 2016 Craig Clarkstone. All rights reseved
Parkjet mk2
A-10 Thunderbolt II
Fairchild

Page 2
A-10 Thunderbolt II
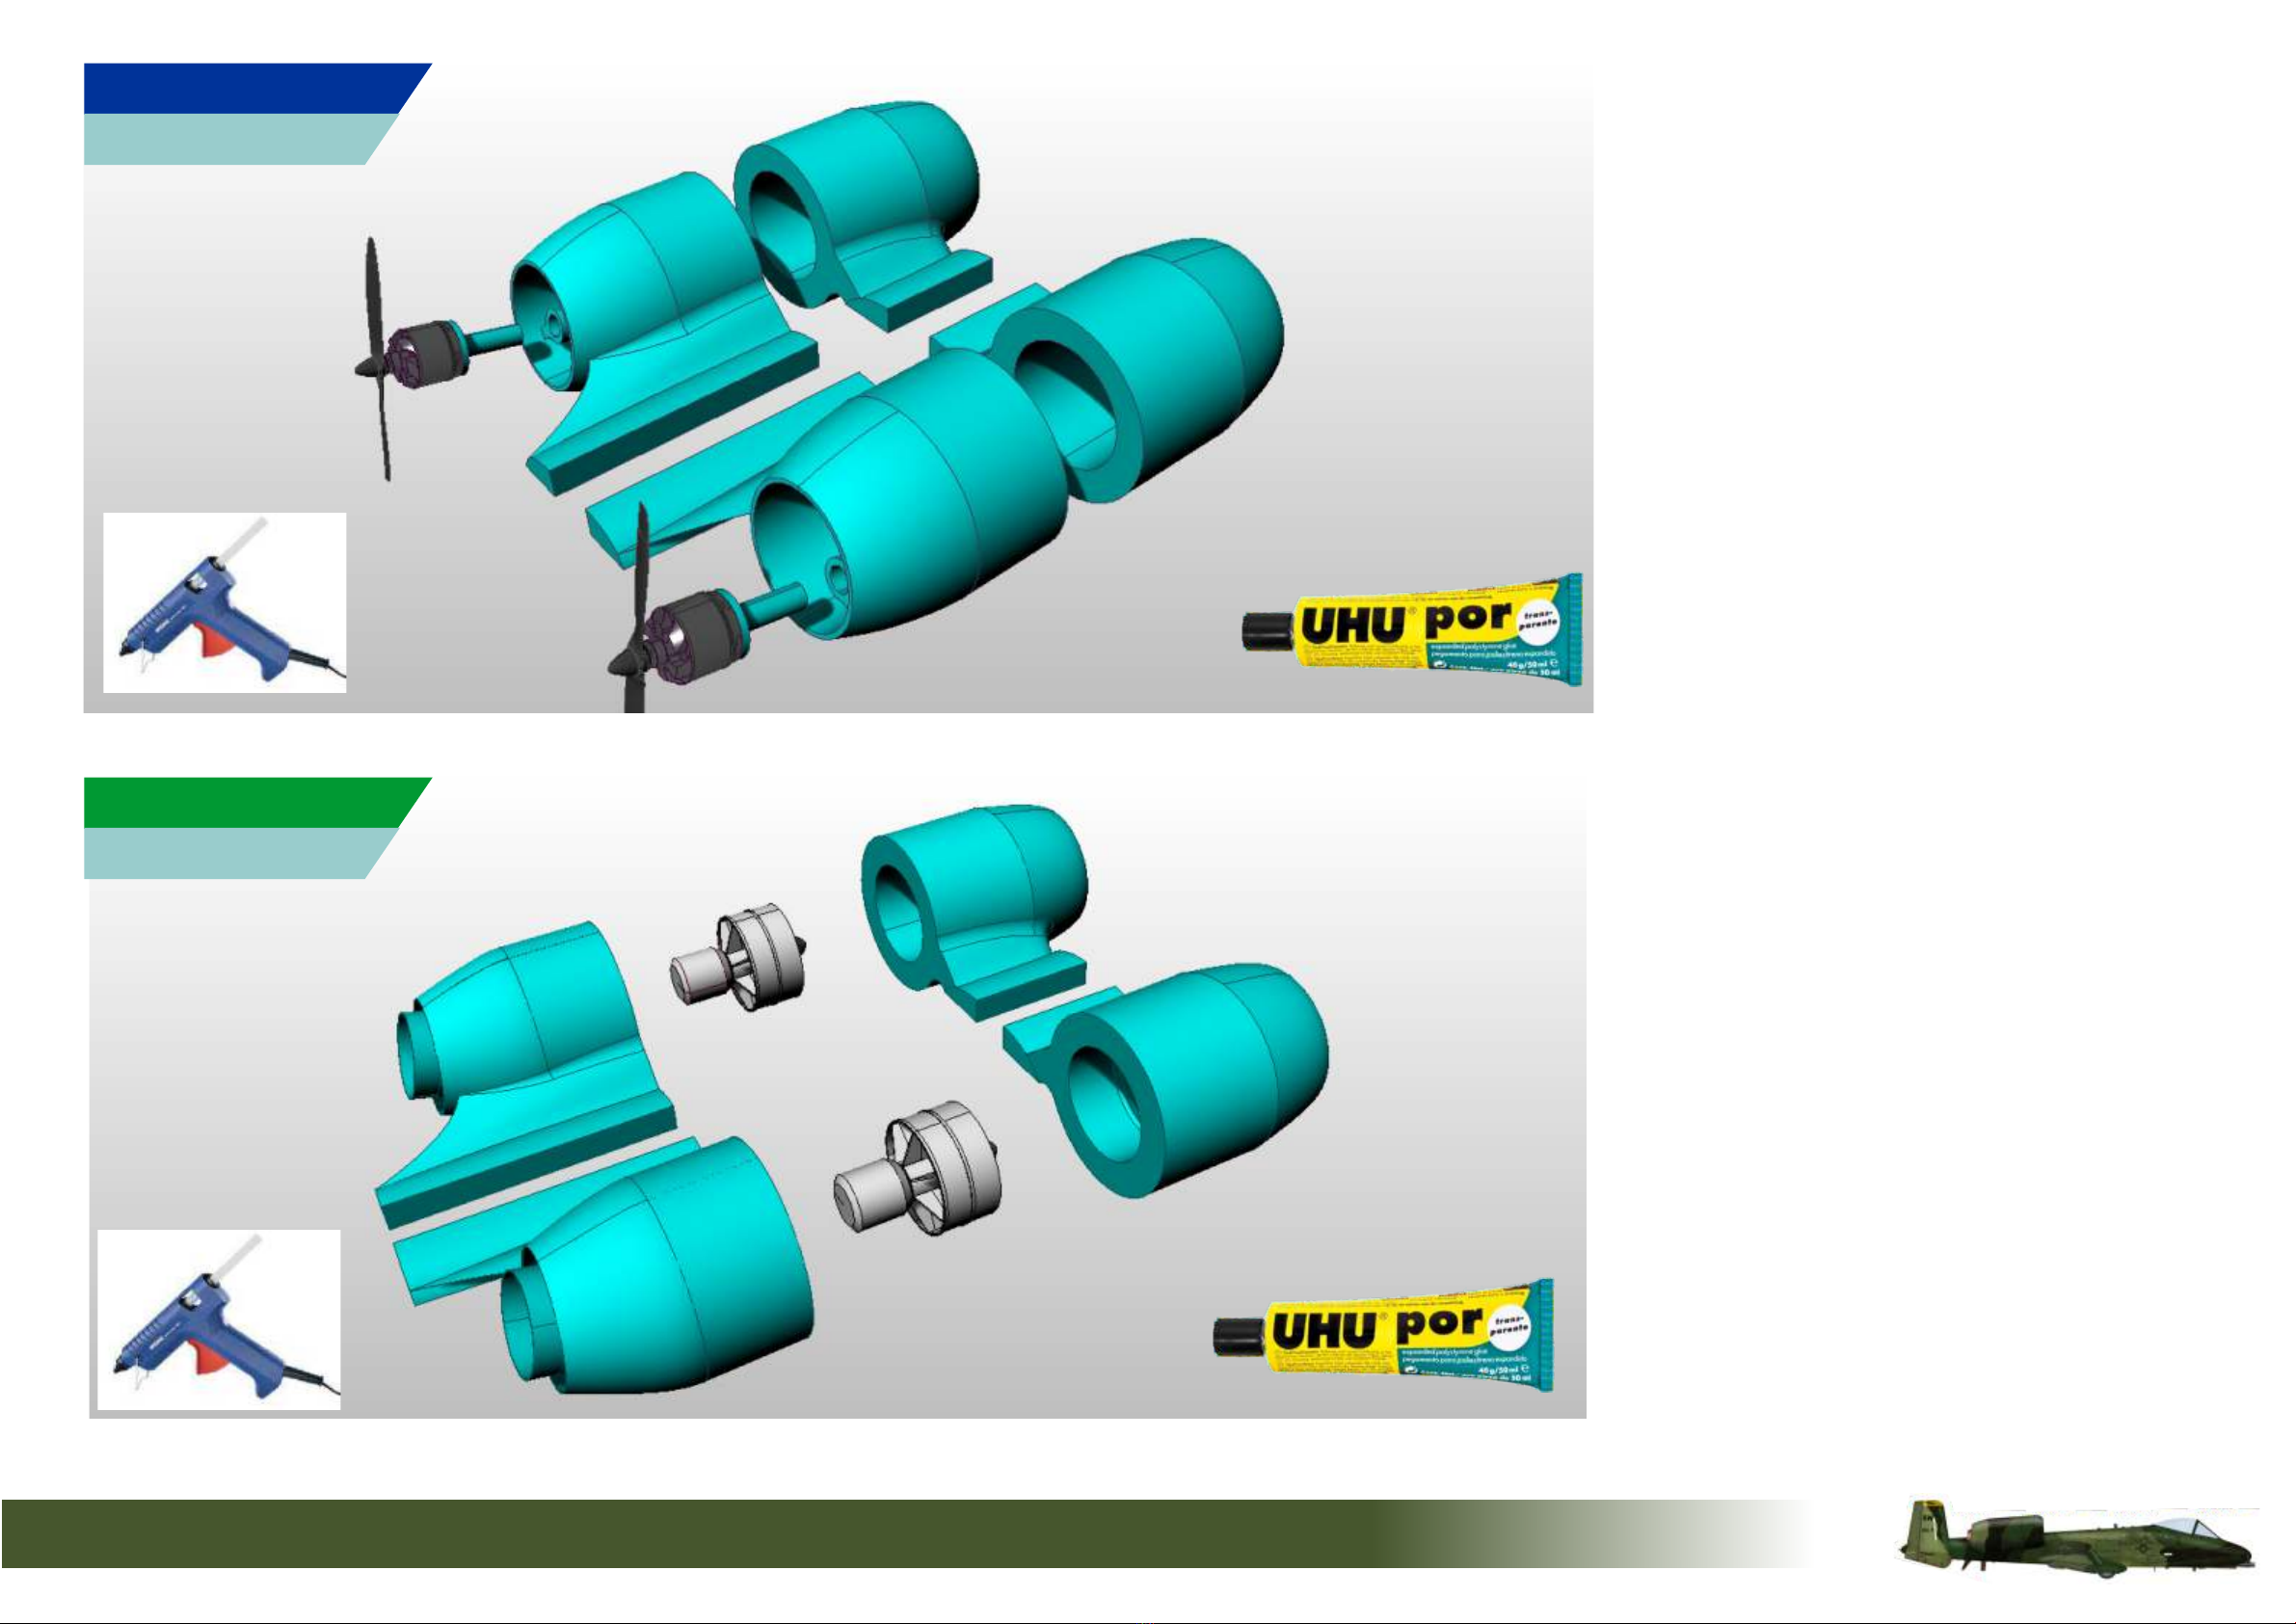
IMPORTANT. Designed for three different powerplant options, the twin
pushers / EDF option are perfectly fine taking off from undercarriage but
when hand launching, it is important to launch at 50% thrust levels and
increase steadily to avoid the downwards angled thrust from the high mounted
motors from overcoming the lift generated by the wing, forcing the plane to the
ground. The tail mounted single pusher is not affected by this affect.
‘Hog’ History Designers Notes
The first time I saw the ‘agricultural’ functional lines of the A-10, It was
unlike anything I had ever seen, and to be honest It took a bit of
warming up to.
It is probably the most brutal flying machine in the battleground,
tough, fearsome and packs a real punch with the gatling gun!
This model is at the limit of a depron sheet size, and introduces ‘crush
bending’ technique. It is also designed to house retracts and twin 5"
pushers or could be modified to take twin 64mm EDF units.
There are lots of camo patterns in existence for this bird, so you can
try the Arctic, Desert or simply grey... For me I love the Euro green
Camo scheme, as this is how I remember them in the 1980's flying
over my parents home in the UK.
Affectionately called the “Warthog” for its aggressive look and
often painted with teeth on the nose cone, the A-10 Thunderbolt
II is the U.S. Air Force’s primary low-altitude close air support
aircraft. The A-10 is perhaps best known for its fearsome GAU-8
Avenger 30mm gatling gun firing armor-piercing depleted
uranium and high explosive incendiary rounds.
The A-10 Thunderbolt II has excellent maneuverability at low air
speeds and altitude, and is a highly accurate and survivable
weapons-delivery platform. The aircraft can loiter near battle
areas for extended periods of time and operate in low ceiling
and visibility conditions. The wide combat radius and short
takeoff and landing capability permit operations in and out of
locations near front lines.
The pilots are protected by titanium armor that also protects
parts of the flight-control system. The aircraft can survive direct
hits from armor-piercing and high explosive projectiles up to
23mm. Their self-sealing fuel cells are protected by internal and
external foam. Manual systems back up their redundant
hydraulic flight-control systems helping pilots to fly and land
when hydraulic power is lost.
The first production A-10A was delivered to Davis-Monthan Air
Force Base, Ariz., in October 1975. The upgraded A-10C
reached initial operational capability in September 2007.
Specifically designed for close air support, its combination of
large and varied ordnance load, long loiter time, accurate
weapons delivery, austere field capability, and survivability has
proven invaluable to the United States and its allies. The aircraft
has participated in operations Desert Storm, Southern Watch,
Provide Comfort, Desert Fox, Noble Anvil, Deny Flight,
Deliberate Guard, Allied Force, Enduring Freedom and Iraqi
Freedom.

Construction

Page 4
A-10 Thunderbolt II
Adhesives
> For the majority of construction :
- UHU Creativ for Styrofoam (also called UHU POR)
- 3M 77 Spray adhesive.
>For wing spars and motor mounts :
- Epoxy. (5 and 15mins cure times are the most convenient)
micro-baloons can be added to reduce weight.
> For servo’s / and quick grab :
- Hot melt glue gun - Caution if the glue gets too hot it will melt foam - test first!
Tapes
> For holding parts tightly together whilst glue sets
- Low tack masking tapes
> For leading edges, hinges, general strengthening
- 3M Gift tape (Purple - not green one!) - I prefer lightweight plastic hinges.
Cutting parts
1. Print the plans,
2. Cut around each part using scissors - allow a border of approx (1/4”) 6mm
3. Use either 3M spray mount or a very light coat of 3M 77 to the back of the parts and
stick in an economical layout on the Depron foam.
4. Using a safety rule and craft knife over a cutting mat - important! use a fresh blade
otherwise it will drag and spoil the foam. (I find the stanley knife perfect) make the
straight edge cuts, then the curved parts freehand.
5. Once the parts are cut-out, keep the template stuck to the part until just before needed
to help identify the parts.
6. After use, I find it helpful to keep all the used tempates in case replacement parts need
making. (the glue eventually dries and they don’t stick together!)
Glueing parts together.
1. Ensure a really good fit - this will reduce the amount of adhesive used. The Bar Sander
is a great tool for this.
2. Follow the adhesive instructions closely.
3. Use ordinary steel head pins to help keep the parts located whilst epoxy sets.
4. Use objects as weights such as paperweights to apply pressure whilst adhesive sets.
5. Use masking tape to apply pressure whilst adhesive sets. Also use masking tape
to along the slots for the wing spars whilst gluing the carbon rod spars into the wings.
IMPORTANT Wherever the plans call for marking guidelines onto the depron,
please ensure that you do otherwise it can cause problems later on. I suggest you
use a Sharpie Fineliner to transfer the lines.
Before you start.

Glue the 3mm liteply Forward
retract parts together and then to
the Retract support panel.
All versions
Glue Bulkhead 1 and Bulkhead 2
to the assembly.
All versions
x
Fuselage side (Inner)
Fuselage upper
corner reinforcers
6mm
EDF only
All versions
Pusher Bulkhead 4
EDF only
Pusher only PARTS ‘CUT AWAY’ FOR
ILLUSTRATION PURPOSES
All versions
Page 5
A-10 Thunderbolt II

Align the Retract space bulkhead
to the edge of the retract aperture
as shown, glue in place.
Glue the Nosecone aligner in
place.
All versions
Using the previous assembly as a
guide, crush bend the forward
fuselage bottom.
Use the edge of a table and compress
the edge of the foam sheet while
bending, so that it crushes the
underside rather than snaps the
topside. (Practice on a few scraps
first)
All versions
x
Fuselage side (Inner)
Fuselage upper
corner reinforcers
6mm
EDF only
All versions
Pusher Bulkhead 4
EDF only
Pusher only PARTS ‘CUT AWAY’ FOR
ILLUSTRATION PURPOSES
All versions
Page 6
A-10 Thunderbolt II
1st Compress forward
2nd Push down
(while pushing forward)
Creases / crushes on this edge
Edge of Table etc

Fuselage sides - choose either 3D
printed Nacelles or not. Cut to suit
Glue the Cockpit support sides in
place.
All versions
All versions
x
Fuselage side (Inner)
Fuselage upper
corner reinforcers
6mm
EDF only
All versions
Pusher Bulkhead 4
EDF only
Pusher only PARTS ‘CUT AWAY’ FOR
ILLUSTRATION PURPOSES
All versions
Page 7
A-10 Thunderbolt II
Carefully crush bend the fuselage
sides as shown.

Glue the components together as
shown.
All versions
All versions
x
Fuselage side (Inner)
Fuselage upper
corner reinforcers
6mm
EDF only
All versions
Pusher Bulkhead 4
EDF only
Pusher only PARTS ‘CUT AWAY’ FOR
ILLUSTRATION PURPOSES
All versions
Page 8
A-10 Thunderbolt II
Glue Bulkhead 3 and Bulkhead 4
to the assembly.

All versions
Page 9
A-10 Thunderbolt II
For the non-3d printed version,
Glue the 3mm Liteply Motor spar
to the assembly.
Glue the Tail reinforcement piece
in place as shown
Non 3D printed

Page 10
A-10 Thunderbolt II
For the 3D printed 50mm EDF
version, print out the parts.
Use 4s FMS EDF units. Sit the EDF
units in the rear nacelle part and glue
in place using hot melt glue
(sparingly)
Glue the printed parts together with
UHU por.
Run the cables through the cable slot
- you may want to extend the cable
length before you fix the EDF’s in
place.
For the 3D printed twin pusher
version, print out the parts and glue
together using UHU por.
Use twin racing quad motors (4s) and
5" contra rotating props.
Run the cables through the cable slot
- you may want to extend the cable
length before you fix the motors in
place.
I suggest you use a drop of hot melt
glue to hold the motor mounts in
place, so that you can remove them
easily if you need to access the
motor.
Twin Pusher only
3D printed
3D
Printed
Part
3D
Printed
Part
(optional)
Twin EDF only
3D printed

Page 11
A-10 Thunderbolt II
Run the motor cables through the
channels cut for them.
Single Pusher only
3D printed
3D
Printed
Part
3D
Printed
Part
(optional)
Twin EDF only
3D printed
For the tail pusher version - simply
glue the nacelle parts together
using UHU por.

Page 12
A-10 Thunderbolt II
Laminate all the pieces of the
nosecone together. Sand to shape.
Glue the forward canopy support to
the assembly.
All versions
All versions

Page 13
A-10 Thunderbolt II
Glue the nosecone to the assembly
using the nosecone aligner to
locate it.
3D
Printed
Part
3D
Printed
Part
(optional)
All versions
All versions Alternatively, print the 3D printed
nosecone and glue to the assembly
using the nosecone aligner to locate
it.

Page 14
A-10 Thunderbolt II
Carefully crush bend the Lower
wing piece so that the wing crank
is the same angle as the wing
spars.
Glue the Canopy Magnet support
panel to the assembly.
All versions
All versions

Page 15
A-10 Thunderbolt II
When the epoxy from the previous
step has set, trim away the slots
for the 6mm carbon spars to sit in.
Glue the carbon spars into the
slots. Ensure a good bond to the
cranked wing spars.
Glue the four cranked Wing spars
in place using epoxy. These can
be lite-ply or 3d printed plastic.
The bottom of the wing spar should
be aligned flush with the underside
of the wing, and protrude 6mm
above the top of the wing.
All versions
All versions
3D
Printed
Part
3D
Printed
Part
(optional)

Page 16
A-10 Thunderbolt II
glue the 6mm carbon spar into both
vertical stabilisers.
Use masking tape to contain the
epoxy and give a smooth finish.
Coat both surfaces with UHU Por
and carefully stick together.
I suggest that you use pencils to
hold the glued wings apart while
you align them. Start at the centre
and work outwards.
All versions
All versions

Page 17
A-10 Thunderbolt II
Dry fit the elevators and elevator
hinges. Do not glue at this stage.
I like to use graupner mini hinges.
All versions
All versions
x
Glue the 6mm carbon spar into the
horizontal stabiliser.
Use masking tape to contain the
epoxy and give a smooth finish.

Page 18
A-10 Thunderbolt II
Bend 0.5mm piano wire into shape,
Remove a brass ball from a ball &
socket joint, and solder the two
ends into the hole in the ball.
You may need to file the piano wire
a little to get them to fit.
Use wet-n-dry to rub away any
excess solder.
All versions
3D
Printed
Part
3D
Printed
Part
(optional)
All versions
Alternatively 3d print this connector,
Bend 0.5mm piano wire into shape
and glue together using epoxy.

Page 19
A-10 Thunderbolt II
Sand a semi-circular leading edge
on the elevators. Cut away a
recess for the hinges to enable a
clean movement.
Use a scrap piece of 6mm tube to
shape a concave trailing edge to
the horizontal stabiliser - in order to
get a nice fit with the elevators.
Glue the piano-wire control arm into
the elevators and then glue the
elevators to the horizontal
stabiliser.
All versions
All versions
3D
Printed
Part
3D
Printed
Part
(optional)
ELEVATOR H. STAB

Page 20
A-10 Thunderbolt II
All versions
All versions
Slide the wing assembly into the
fuselage. Orientate correctly, mark
its position on the wings with a
pencil.
Slide out of centre, apply epoxy to
the areas that will be in contact
when correctly aligned.
Slide the wing back into place.
Wipe off excess glue.
View from underneath.
Table of contents
Popular Toy manuals by other brands

rc3Dprint
rc3Dprint PIAGGIO AVANTI 2 PRINTING & CONSTRUCTION MANUAL

LeapFrog
LeapFrog Leap Builders 123 Fix-It Truck Parents' guide

LeapFrog
LeapFrog Learn and Roll Chickens Parents' guide

PlayActive
PlayActive JE118 owner's manual

Lanier R/C
Lanier R/C MARINER .120 Assembly instructions

Super Flying Model
Super Flying Model TRI-40 II GP/EP instruction manual

Reely Sky
Reely Sky Agusta A109 RtF operating instructions

Maxford USA
Maxford USA GREENSLEEVES instructions

Century Helicopter Products
Century Helicopter Products Swift NX quick guide

Trix
Trix Re 14 Green Cargo manual

THUNDER TIGER
THUNDER TIGER Victoria instruction manual

Mega Bloks
Mega Bloks Neo Shifters IV instructions