JMA EVO XPERT User manual

MANUAL DE INSTRUCCIONES
INSTRUCTION MANUAL
ANWEISUNGSHANDBUCH
NOTICE D’UTILISATION
MANUAL DE INSTRUÇÕES
INSTRUKCJA OBSŁUGI
ИНСТРУКЦИЯ ПО
ЭКСПЛУАТАЦИИ
ИИИИИИИИИИ


ESPAÑOL ENGLISH DEUTSCH FRANCAISE PORTUGUESE POLSKI РУССКИЙ
ENGLISH
21
1. INTRODUCTION AND GENERAL OVERVIEW
1.1 OVERVIEW
1.2 TRANSPORT AND PACKAGING
2. TECHNICAL CHARACTERISTICS
2.1 MACHINE ACCESSORIES
2.2 MAIN PARTS OF THE MACHINE
3. GETTING STARTED
3.1 POSITIONING THE DEVICE
3.2 DEVICE INSTALLATION AND SETUP
3.3 CONNECTIONS: FIRST STEPS
4. CONNECTIONS: CONFIGURATION SETTINGS
MENU
4.1 ETHERNET CONNECTION
4.2 WI-FI CONNECTION
4.2.1 VIA ETHERNET CABLE
4.2.2 WI-FI CONNECTION (WIRELESS WI-FI NETWORK)
4.3 MOBILE HOTSPOT WI-FI CONNECTION
5. UPDATES:
1-TP PART/ IN SETTINGS
2-REMOTE PART/ IN REMOTE
6.1 UPDATES: 1-TP PART IN SETTINGS. AUTOMATIC UPDATE
6.2 UPDATES: 1-TP PART IN SETTINGS. MANUAL UPDATE
6.3 UPDATES: 1-TP PART IN SETTINGS. REBOOT
6. SUPPORT: CONFIGURATION SETTINGS MENU
7. TRANSPONDERS - CLONING ID48 KEYS
8. TRANSPONDERS - CLONING DST80 KEYS

ESPAÑOL
ENGLISH
DEUTSCH
FRANCAISE
PORTUGUESE
POLSKI
РУССКИЙ ENGLISH
22
its use to inside your business premises only), EvoXpert has been fitted with
a battery similar to those used in mobile telephones (Ion-Lithium / 3.7Vdc-
3050mAh). This provides a limited period of time for copying transponders in
places where the machine cannot be plugged in to a mains electricity supply.
The remaining charge in the battery is always visible on the device via an
LED indicator (which turns red when a recharge is necessary) to inform users
of a low battery charge level.
For recharging the battery, EvoXpert comes with a 220AC / (5V/2.4A) power
adapter. (Power connection jack indicated by the number 1 in the image
below).
When leaving the machine in a fixed location, we recommend also leaving it
plugged in to a mains power supply.
As stated at the beginning of this section, EvoXpert is also capable of
pre-programming vehicle remote controls that must be subsequently
programmed inside the vehicle to become operational.
EvoXpert works with three basic types of blank remote controls:
• KRC100 (TP from JMA (IMMO) and remote control, separate). RKE keys.
• KRC200 (TP (IMMO) and remote control, on the same chip). RKE Keys.
• KRC300 (TP (IMMO) and remote control, on the same chip). SMART Keys.
These can be used for all the models currently available and any others that
may be brought to market in the future.
The method for pre-programming these keys will depend on the type of JMA
remote control being used and the technology installed in the vehicle.
• For the KRC100 remote controls, a special cable is used for connection
to the PS2 port (indicated with the number 2 in the image above). This only
records the part of the remote control from the vehicle.
• For the KRC200 / KRC300 remote controls, the same antenna is used as
the one used for the R/W of the transponders, and the generated RFid field
is used to record both the immobiliser part and the remote control part.
Once pre-programmed, they just need to be registered. This can be done
either via a sequence of actions (On-Board Programming-OBP controls) or via
an OBD-II scanner.
The last feature on the device in terms of functionality is the button on the
rear of the EvoXpert (indicated with the number 4 in the image above), which
does one of two things depending on how long it is pressed:
• 1 short press: Resets any Wi-Fi configuration settings and returns the Wi-
Fi configuration to the default settings (AP Mode).
Resets the EvoXpert.
• 1 long 5-second press (do not release early): Resets the EvoXpert.
Updates are free, with only an Internet connection and prior registration of
the EvoXpert machine required.
2.1 MACHINE ACCESSORIES
When unpacking your EvoXpert, you should find the following items inside
the box:
1. INTRODUCTION AND GENERAL OVERVIEW
1.1 OVERVIEW
To conclude our evolution of the TRS family, we are launching the EvoXpert.
We have developed a more compact and technologically advanced machine
based on the already famous and successful TRS-EVO platform. Besides
cloning transponders, this new machine is also capable of generating remote
controls and programming them via OBD-II using any of the scanners that
can be found in the market.
By applying our philosophy aimed at ensuring total ease-of-use, the EvoXpert
has only 1 ON/OFF button that turns the machine on or off based on how
long it is pressed:
· On: 1 short press.
· Off: 1 long press (4 seconds).
EvoXpert requires an Internet connection because the decryption algorithms
for the various types of technology that exist in the market (Megamos
Crypto/Philips Crypto/Texas Crypto, etc.) run on the calculation servers
installed at JMA.
If you encounter any difficulty using or starting up your device, please
contact the Technical or Customer Services Department of the Altuna JMA
Group.
1.2 TRANSPORT AND PACKAGING
The machine comes secured by a Velcro strip inside a cardboard box with
the following characteristics:
• Width = 147.72 mm
• Length = 176.64 mm
• Height = 78 mm
• Weight = 550 g
When unpacking your machine for the first time, carefully inspect it for any
possible damage that may have occurred in transit.
If you find anything out of the ordinary, do not use the machine and contact
the Technical or Customer Services Department of the Altuna JMA Group.
2. TECHNICAL CHARACTERISTICS
EvoXpert not only offers the same comprehensive range of cloning options
for all the leading transponder manufacturers as the TRS-EVO but also
includes the option to prepare remote controls for opening the vehicle.
All the features of this device are available immediately because its
software has not been fragmented to thus enable additional charges for
certain specific features.
Unlike the TRS-EVO, which could calculate some of the technologies present
in the market (Philips Crypto HT2 / Texas Crypto DST40) with no connection
whatsoever, EvoXpert requires uninterrupted Internet access because users
need to log in to verify the EvoXpert database and to check that access is
available to the calculation servers located at JMA.
EvoXpert has been fitted with all the necessary connectivity features
to make Internet access as easy as possible. This connection can be
established via:
• A wired LAN network (Ethernet port RJ-45, indicated by the number 3 in
the image below).
• A wireless Wi-Fi network.
In order to improve the operational capabilities of the machine (and not limit
1 2 3
4

ESPAÑOL ENGLISH DEUTSCH FRANCAISE PORTUGUESE POLSKI РУССКИЙ
ENGLISH
23
3.2 DEVICE INSTALLATION AND SETUP
Once the machine has been positioned correctly, and based on how it will be
used (in-store or outside) and the availability of connections (wired Ethernet
LAN/Wi-Fi), the material received with your new machine can be installed:
1. Check that the items contained inside the box you received
from the factory are all of those listed in Section 2.1 of this manual on
Machine Accessories.
2. Check the EvoXpert battery charge level. Depending on this
charge level and the location where you intend to use the machine, you can
either plug it in using the Input (90~264 Vac / 50-60 Hz) and Output (5V / 2.4
A) power adapter provided to charge the machine for use outside or leave it
permanently connected to the power adapter for use in-store.
3. Based on the location of your EvoXpert and the accessibility
between it and your router, which will be providing the Internet access, you
can either use the LAN Ethernet cable to connect the two devices or a Wi-Fi
signal to link your EvoXpert to your router wirelessly.
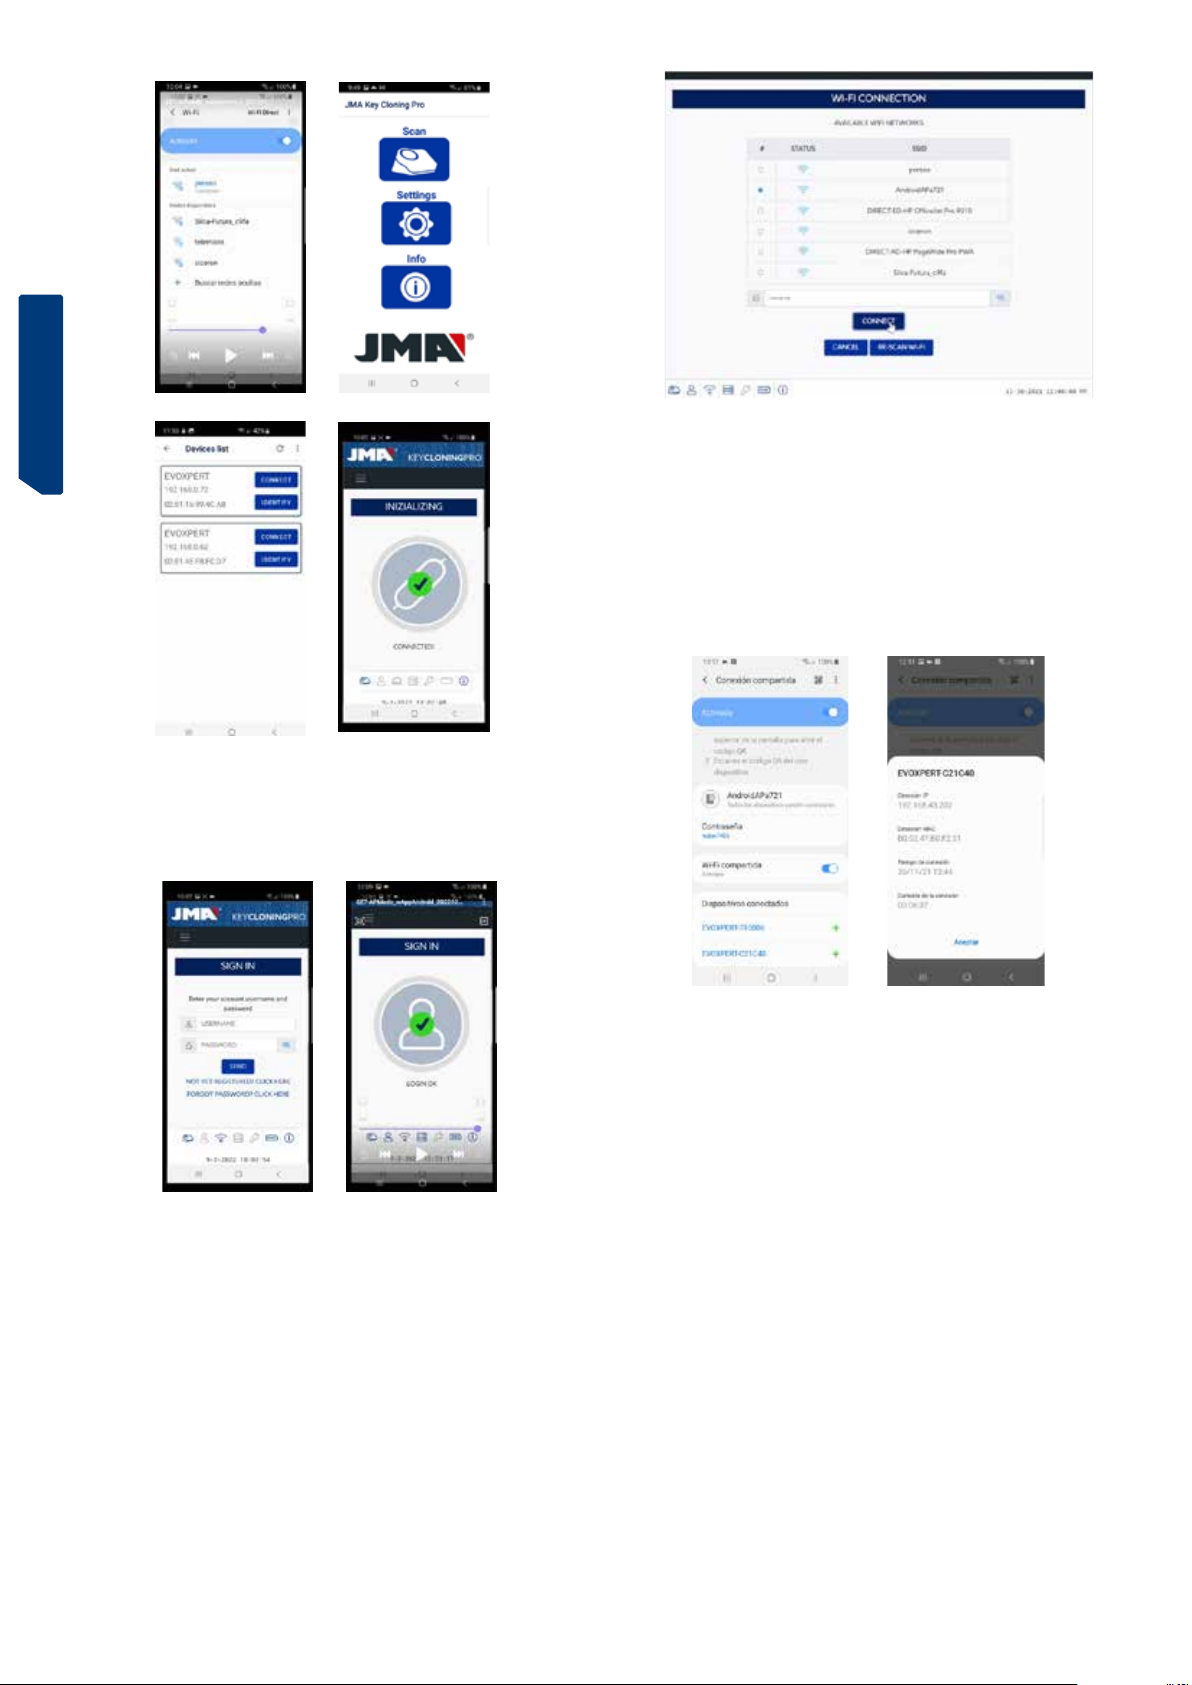
4. Finally, link the device you intend to use as a display (any mobi-
le telephone, tablet, laptop, desktop PC, etc.) to your EvoXpert while always
maintaining a cautious distance between the transponder scan area and the
display device.
3.3 CONNECTIONS: FIRST STEPS
To access the EvoXpert and proceed with the configuration settings, a series
of first steps must be followed for either of the two connection methods
(Ethernet (LAN cable) / Wi-Fi):
1) Login (username/password) and register our EvoXpert by accessing:
1.1) Directly from the link on the login page
(Not registered yet? Click Here)
1.2) Directly typing the JMA
registration website address into your browser:
(http://www.jma-tp.com/users/registration_2php
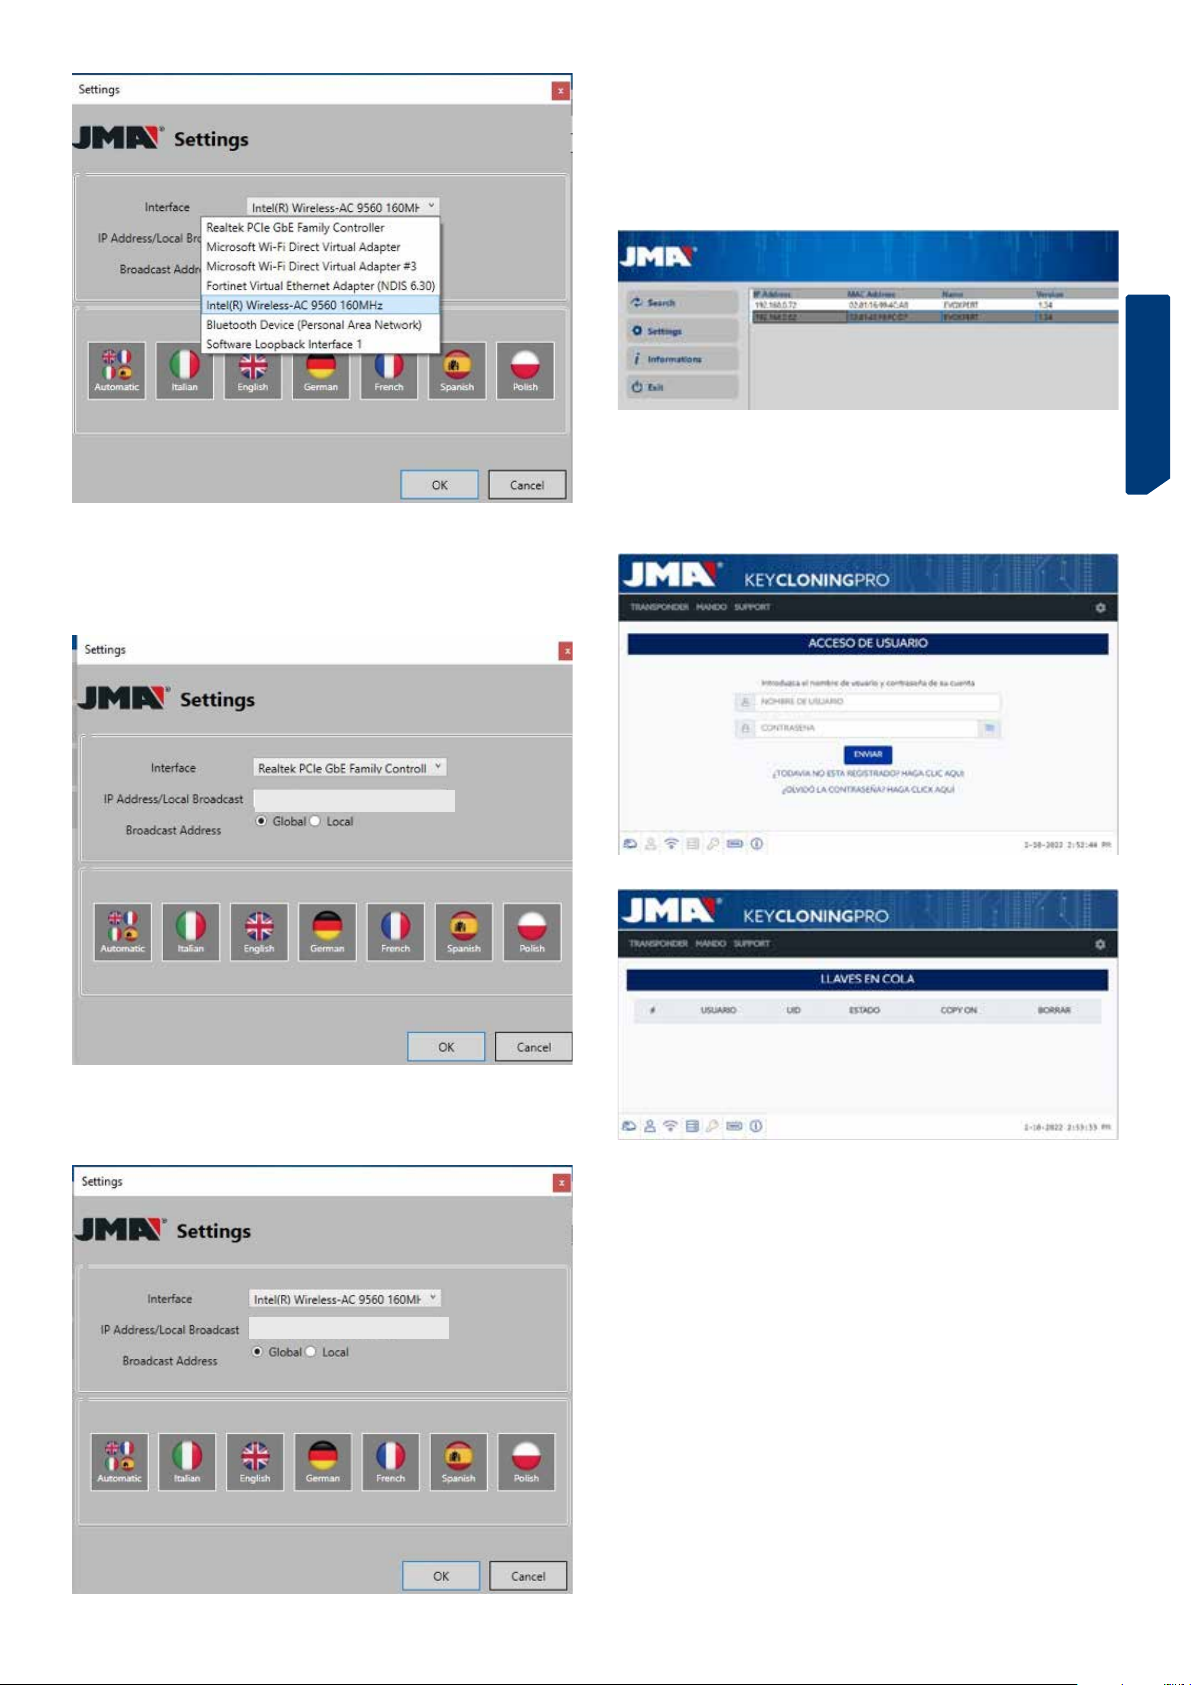
2) Connect the EvoXpert machine to the “KEY CLONING PRO”
web app.
To do so, use any web browser to enter the host-name written on the label
found on the bottom of your machine (evoxpert-xxyyzz).
Given that all major web browsers now use the HTTPS Internet communica-
tion protocol, if the “Key Cloning Pro” web app fails to load, you will need
to enter the host-name using standard Internet protocol (http://evoxpert-
xxyyzz).
For this example, our machine was connected to the Internet via an Ethernet
cable. This caused the following icons to be activated on the lower toolbar:
3) For access to the servers, you will need to log in with your Username &
Password (which are the same as those entered during the registration pro-
cess and that, if forgotten, can always be recovered using the e-mail address
used during the registration process). This will activate the ‘user logged in’
and the ‘server connected’ icons on the lower toolbar:
After completing the three steps above (and in the EvoXpert example used),
you should see the first four icons on the lower toolbar activated. Pressing
the Tools icon (on the right, in the upper Menu bar) will open a drop-down
menu. If you select the CONNECTIONS option, you will be shown the com-
munication parameters explained in Section 4 in more detail.
• Power adapter: Input (90~264 Vac / 50-60 Hz) and Output (5V / 2.4 A).
• Standard LAN cable (Ethernet/cat6) (1 metre), for connection between the
Local Ethernet Network with Internet access and the LAN port (RJ-45) on the
EvoXpert machine
• Instruction manual
• JMA catalogue
• Cable for programming KRC100 remote controls
• Plastic insert for sniffing HT2 devices (Megamos devices use the copied
key)
2.2 MAIN PARTS OF THE MACHINE
Below is a description of the main parts of your EvoXpert machine, starting
with the keypad and what the LEDs next to the ON/OFF button represent:
• “Bi-colour” EvoXpert Status LED (Red = Initialising / Green = Ready).
• “White” Wi-Fi LED (ON when connected to a Wi-Fi network / OFF when in
AP Mode).
• “Blue” Bluetooth LED (ON when this connection is activated. This will
always be off for now because it is not used).
• “Red” battery charge indicator (ON when the battery charge becomes
critical, indicating that the EvoXpert should be plugged in to recharge).
• Battery charge indicator LED (ON when the EvoXpert machine is plugged
in to the mains).
• 1 (ON/OFF) button (short press = ON / Long press (4 sec.) = OFF).
On the rear of the machine, the following connections are used:
• 1 DC connector: 5.5 x 2.5 x 11mm, C+.
• 1 PS2 connector for programming KRC100 remote controls.
• 1 LAN Ethernet RJ-45 connector.
• 1 dual-purpose button (Reset/Set Wi-Fi to AP Mode).
3. GETTING STARTED
3.1 POSITIONING THE DEVICE
After carefully unpacking the machine, it should be placed on a surface that
is not made of metal or any other material that might cause electromagnetic
interference during the scan because the antenna is the most sensitive
component to such interference and therefore to metallic objects that distort
the signal captured from the key, as well as the tuning frequency.
For example, a wooden workbench would be a good place to position the
machine.
The machine should also be positioned at least 80-100 cm away from any
source of electromagnetic interference (computer monitors, televisions,
electrical switching devices, motors, walkie-talkies, mobile telephones,
laptops, tablets, etc.).

ESPAÑOL
ENGLISH
DEUTSCH
FRANCAISE
PORTUGUESE
POLSKI
РУССКИЙ ENGLISH
24
4. CONNECTIONS: CONFIGURATION
SETTINGS MENU
After opening the Connections Menu (by clicking SETTINGS/CONNECTIONS),
you will see both the type of connection currently enabled and the various
parameters of that connection.
Both connection modes can be enabled regardless of the mode (Ethernet/
Wi-Fi) used to connect previously.
To switch modes, you just need to:
• Enable the new parameters on the connections page.
• Wait for EvoXpert to restart automatically so that the new
settings for either option are stored.
The image below shows the default connections that are configured by JMA
on all EvoXpert machines, for both Ethernet and Wi-Fi connections:
• Ethernet connection (wired LAN network). Mode = DHCP:
For a wired connection (via Ethernet), the IP address for the network to
which you have connected is obtained automatically.
That is what is meant by DHCP (Dynamic Host Configuration Protocol).
In this case, the assigned router address is the one shown on the left in the
image above. However, this will be different for each client.
• Wi-Fi connection (wireless Wi-Fi network). Mode = AP Mode. (Access
Point - AP Mode):
In this case, the EvoXpert machine creates a Wi-Fi network but does not yet
provide Internet access.
In this mode, the Wi-Fi network created lets you configure the network name
(SSID) and the Wi-Fi network password for the client router with Internet
access.
This address and the password are the same for all EvoXpert machines.
The main connection types for EvoXpert are explained below
4.1 ETHERNET CONNECTION (WIRED LAN NETWORK)
Whenever the router can be accessed from wherever you choose to position
your EvoXpert machine, we recommend using an Ethernet cable between
the two devices as this provides faster communication, is much easier and
transfers data more quickly.
If the client’s router is configured in DHCP mode (as the vast majority of rou-
ters are), the router itself will assign an IP address to your EvoXpert machine
for subsequent Internet access.
No additional configuration will be required.
You can access the EvoXpert web app by entering the name shown on the
label found on the bottom of your machine into any available web browser.
To make this easier (finding the EvoXpert on the network and accessing the
web app included with the device), specific apps have been developed for
(Android/iOS/Windows) that need to be installed and opened.
For the connection used in our example:
• PC with a Windows OS connected to the router via Wi-Fi.
• EvoXpert connected to the same router via an Ethernet cable.
From the indicated web address (www.jma.es, “downloads” section),
download the JMA KEY CLONING PRO setup file and install it on the PC with
a Windows OS.
If you are running JMA Key Cloning Pro for the first time, you will need to
configure the type of connection being used by the PC (Ethernet / Wi-Fi) in
the SETTINGS folder in order to connect to the router.
All the physical cards installed will appear in the Interfaces drop-down list,
as well as the virtual connections associated with that PC.
INIZIALIZING EVO
XPERT
CONNECTED!

ESPAÑOL ENGLISH DEUTSCH FRANCAISE PORTUGUESE POLSKI РУССКИЙ
ENGLISH
25
If my laptop has been connected to the router via an Ethernet cable, I will
need to connect using the Network card in my PC, which in this case is
called:
However, given that the connection between my PC and the router is via
Wi-Fi, I will need to select the Wi-Fi card in my PC, which has the name
indicated below and a set of default addresses:
After this initial configuration, the connection will be established
automatically on future occasions. (Provided we do not change the PC-Router
connection).
To connect to the EvoXpert web app, open the programme and press the
SEARCH option to display all the EvoXpert machines that are connected to
that network on the panel.
Finally, double-click on your device, open the app and, after logging in, you
will be ready to start copying keys.

ESPAÑOL
ENGLISH
DEUTSCH
FRANCAISE
PORTUGUESE
POLSKI
РУССКИЙ ENGLISH
26
4.2 WI-FI CONNECTION (WIRELESS WI-FI NETWORK)
If you lack viable Ethernet cable access to the router from the usual EvoXpert
location, you can always connect your machine to a router via Wi-Fi.
To do so, the Wi-Fi connection can be configured in one of two different
ways:
4.2.1 The simplest configuration in this case is to make a first and
only connection via Ethernet cable from where the client router is located
following the steps in Section 4.1, and then open the Settings/Connections
page:
Once this page is open, you can change the Wi-Fi configuration on your
EvoXpert (which comes in AP Mode by default) by pressing
Wi-Fi SCAN.
This will refresh the WI-FI CONNECTION page.
From this page (after pressing RE_SCAN WI-FI), scan all the Wi-Fi networks
within range of the EvoXpert (hidden Wi-Fi networks cannot be configured).
Finally, you will simply need to select the local Wi-Fi network you want to
use, enter the password and press CONNECT.
When switching MODE (AP Mode/Client Mode) or Wi-Fi network, the EvoX-
pert will automatically restart itself, so you will need to wait for the Status
LED to turn green again for the changes (EvoXpert configured in CLIENT
MODE with Internet access via the local Wi-Fi network) to become effective.
Note:
Remember to disconnect the Ethernet cable used to enable this initial confi-
guration (Wi-Fi express) before the machine restarts.
Once the EvoXpert is connected via Wi-Fi to the client router, you just need
to connect the device you will be using as your display (mobile/tablet/PC/
laptop) to the same Wi-Fi network on the client router. This is because both
the EvoXpert machine and the display device you want to use (mobile/tablet/
laptop) must be connected to the same network.
Once they are both connected to the same network, you will be able to use
your EvoXpert from any web browser.
4.2.2 Wi-Fi Connection (wireless Wi-Fi network)
Whenever you lack Ethernet cable access to the router or you only have a
Wi-Fi router or a smartphone in tethering/hotspot mode as your only way
to access the Internet (when travelling to vehicles away from your usual
business premises), you will always need to configure the EvoXpert Wi-Fi
connection in AP Mode (Wi-Fi generated by your EvoXpert).
In this example, we will use an Android mobile to make the connec-
tion, but any other device with a Wi-Fi connection can be used.
This connection process takes place in two stages:
4.2.2.1) In the first stage, and given that your EvoXpert leaves the factory
with its Ethernet connection set to DHCP Mode and the Wi-Fi network in AP
Mode (Access Point), you will need to find and select the Wi-Fi network ge-
nerated by your EvoXpert machine on the terminal being used as your display
from among all the available Wi-Fi networks. It will be called EVOXPERT.
You will need to enter the generic password (the same for all EvoXpert
machines): 12345678.
KEYCLONNONGPRO
INIZIALIZING EVO
XPERT
CONNECTED!

ESPAÑOL ENGLISH DEUTSCH FRANCAISE PORTUGUESE POLSKI РУССКИЙ
ENGLISH
27
Press Connect to establish a connection between the device being used as
MMI and the EvoXpert web app.
At this point, you will not have configured any Internet access on your EvoX-
pert so you can accept the message stating that the Wi-Fi network to which
you have connected has no Internet connection.
4.2.2.2) The second stage will require you to use any web browser
available on the access terminal used for connecting to the EVOXPERT Wi-Fi
network and enter the web address that appears on the label found on the
bottom of your EvoXpert (192.168.8.1).
The web page will automatically display your communication configuration
settings menu.
Browse to your Wi-Fi connections (just below the Ethernet connections) and
press SCAN WI-FI to display the next menu.
Here, press RE-SCAN WI-FI and select your router from the list of available
Wi-Fi networks, for which the SSID is the name of the Wi-Fi network (in this
case, dlink-FBA7) and the password is the one used to access the Wi-Fi from
the client router.
After entering the Wi-Fi network settings, after pressing CONNECT and
while waiting for your EvoXpert machine to automatically restart itself, you
can connect the display device (the mobile in this case) to the same Wi-Fi
network because all the devices (EvoXpert and connection device being used
as a display) must be on the same network.
To make this easier (finding the EvoXpert on the network and accessing the
web app included with the device), specific apps have been developed for
(Android/iOS/Windows) that need to be installed and opened.
The following example shows the same steps as explained in Sections
4.2.2.1 and 4.2.2.2 but executed from the app installed in Android.
You can download and install our JMA KEY CLONING PRO app by scanning
the QR Code supplied or by searching in the Google Play Store or the Apple
Store.
As stated in Section 4.2.2.1, you need to select the Wi-Fi network generated
by your EvoXpert machine (called EVOXPERT) on the Android device and then
open the JMA KEY CLONING PRO app.
Press the Scan option and your EvoXpert machine will appear on the list of devices
at the address (192.168.8.1), which is AP Mode by default.
Click connect and the connections page will open by default, where you will need
to select the client Wi-Fi Network so your EvoXpert can gain access to the Internet.
While your EvoXpert machine restarts automatically with the new client
Wi-Fi network settings (wait to re-scan devices connected to the JMA Key
Cloning Pro app until the status LED completes the Green-Red-Green cycle).
Do not forget that the same Wi-Fi network as previously selected on your
EvoXpert machine must also be selected on the Android terminal being used
as a display device because the two devices must be on the same network
to function.
Once the two devices are connected to the same NETWORK, you can now
scan the EvoXpert terminals again with the JMA KEY CLONING PRO app and
connect to your machine.
ANDROID IOS

ESPAÑOL
ENGLISH
DEUTSCH
FRANCAISE
PORTUGUESE
POLSKI
РУССКИЙ ENGLISH
28
After connecting to your EvoXpert machine, you just need to log-in using
your account details to perform any copying process, now with full access to
the calculation servers located at JMA.
4.3 MOBILE HOTSPOT WI-FI CONNECTION
Bearing in mind that the portable nature of EvoXpert means the machine can
be used on vehicles that are not located at your usual business premises,
the following settings will need to be configured in the Wi-Fi connections
section so that EvoXpert can be used in these conditions. This configuration
process is described below:
4.3.1 The easiest way to set up your connection for this
situation is by connecting to your business Wi-Fi network (in the example
above, that would be Perseo) and, before heading out to the vehicle to make
the copy, searching for your mobile Wi-Fi (in Hotspot Mode) to enter the
SSID and password of your mobile hotspot network.
After pressing CONNECT and waiting for your EvoXpert to restart (the Status
LED completes the Green-Red-Green cycle), you will have configured the
Wi-Fi connection on your EvoXpert to work with the Hotspot Wi-Fi network
on your mobile.
On some mobiles, you can check that this connection has been established
correctly by checking that the EvoXpert hostname (in this case, evoxpert-
C21C40) appears on the list of devices connected to the mobile Hotspot.
Having verified this step, the IP address that appears when clicking on
the hostname for the EvoXpert machine in connected devices (EVOXPERT-
C21C40 in this case, which translates to IP:192.168.43.202) can be used with
any browser on that mobile to access the web pages of the EvoXpert, with
an Internet connection obtained via the 4G/5G service on the customer’s
mobile.
An easier way (as explained in Section 4.2.2.1) is by clicking on the JMA
KEY CLONING PRO app, finding your EvoXpert machine (to which you want
to connect) on the Wi-Fi HotSpot network created by your mobile and
connecting to it.
NOTE:
Before opening the JMA Key Cloning Pro app in HotSpot mode (shared
connection), we recommend disconnecting Wi-Fi on your mobile because, if
you scan with the two networks enabled at the same time, the app will find
your EvoXpert machine on the normal Wi-Fi network by default and not on
the HotSpot Wi-Fi network.
At this point, both the EvoXpert and the mobile could be switched off while
travelling and switched back on again when reaching the test location in the
following order:

ESPAÑOL ENGLISH DEUTSCH FRANCAISE PORTUGUESE POLSKI РУССКИЙ
ENGLISH
29
• First the Mobile (setting it to Hotspot mode).
• Then the EvoXpert.
Any browser installed on the mobile can now be used to type in the
hostname of the EvoXpert (http:// EVOXPERT-C21C40) or the IP address
assigned to the EvoXpert and an Internet connection will be established via
the 3G/4G service on the mobile.
4.3.2 If, for whatever reason, you forget to establish a mobile Hotspot
connection while inside the store, you can follow the Wi-Fi configuration
steps described in Sections 4.2.2.1 and 4.2.2.2, with a few differences:
• Because your mobile is in Hotspot Mode (producing a Wi-Fi
network), this handset cannot be used to connect to the Wi-Fi being
produced by EvoXpert.
Therefore, and ONLY to establish this initial connection via the already
known IP address 192.168.8.1, you will need a tablet, mobile or other device
with Wi-Fi to connect to the EvoXpert and navigate to the Connections page
to search for the Wi-Fi from the mobile being used as a hotspot.
• Because EvoXpert was already configured to connect to your
business Wi-Fi, you will need to hold the Reset button for 1 second and
return the machine to its default settings in AP Mode (Access Point) so the
“EVOXPERT” Wi-Fi network is activated.
IMPORTANT: If you do not hold the button down (producing a short press),
you will perform a standard reset.
Therefore, you should perform this first part of the connection process with
the mobile you are NOT using in HotSpot Mode in order, as explained above,
to connect to the EVOXPERT Wi-Fi network generated by your terminal and
open the default web page at 192.168.8.1 from any web browser on that
mobile:
Or access that web page by opening JMA KEY CLONING PRO:
Where the terminal is selected and the website opened in a single step by directly
accessing the Connections page, where the HotSpot Wi-Fi network from the mobile
is entered.
After waiting for the EvoXpert to restart, you can check that the EvoXpert is
actually connected to that HotSpot Wi-Fi network in shared connections (connected
devices).

ESPAÑOL
ENGLISH
DEUTSCH
FRANCAISE
PORTUGUESE
POLSKI
РУССКИЙ ENGLISH
30
Remember that, if you want to open the JMA KEY CLONING PRO app on the
terminal on which you have selected the HotSpot option, you will first need to
disable normal Wi-Fi.
The steps for opening JMA KEY CLONING PRO are those described above:
5. UPDATES: 1-TP PART/ IN SETTINGS &
2-REMOTE PART/ IN REMOTE.
To completely update your EvoXpert machine, as well as update all the
components of the SETTINGS/UPDATES menu, you also need to update the
components of the REMOTES/UPDATES menu.
These update processes take place separately.
Let’s start with a brief description of all the components that make up
the heart of the system (under the heading of SYSTEM INFO) and that are
displayed when loading the SETTINGS/UPDATES page:
1) SW update:
This process updates the main service running on your EvoXpert. Among
other things, this is responsible for managing communications both between
the various boards and the data traffic to/from the servers located at JMA.
2) FW update:
This process mainly updates the management of transponders.
3) DB update:
This process updates the various tables in the various databases that make
up EvoXpert with new text definitions, new transponders, etc.
4) Website update:
This process updates the pages and content displayed by EvoXpert each time
you connect to it.
To conclude this description of all the components, those that are displayed
when loading the REMOTES/UPDATES page are described below:
Firmware and Remotes update the following, respectively:
1. Firmware:
This process updates the number of Remotes prepared using the EvoXpert
machine.
2. Remote:
This process updates the tables, names and new texts that are included in
the Remote databases.
5.1 UPDATES: 1. THE TP PART/IN SETTINGS. AUTOMATIC UPDATES.
When loading the SETTINGS/UPDATES page of your EvoXpert machine and
because the AUTOMATICALLY CHECK FOR UPDATE option is enabled by
default, the local versions of modules present on your EvoXpert machine
are automatically checked against the latest versions released on the JMA
server.
The icons appearing to the right of the module versions clearly tell you the
status of the version you are currently using:

ESPAÑOL ENGLISH DEUTSCH FRANCAISE PORTUGUESE POLSKI РУССКИЙ
ENGLISH
31
NOTE:
If, for whatever reason, you disable the AUTOMATICALLY CHECK FOR
UPDATE option, a different icon may appear to the right of the module
versions:
Module on EvoXpert machine not defined and pending UPDATE
SYSTEM.
To determine the real status of the modules on your EvoXpert, you will need
to first press CHECK UPDATES.
After doing this, the real status of your modules will be displayed. Clicking
UPDATE SYSTEM will update any modules that are out-of-date.
5.2 UPDATES: 1. THE TP PART/IN SETTINGS. MANUAL UPDATES.
From the same SETTINGS/UPDATES page on your EvoXpert, we have
included a section called MANUAL UPDATE.
Using this new feature, we can create a unique update so that one specific
client can test either a new product or a correction to a specific EvoXpert
module without all our other clients being affected.
By pressing UPDATE SYSTEM from the MANUAL UPDATE section, you will
be asked to start downloading a file.
Press CHOOSE FILE and, from the local folder where the manual update
was saved, upload it to the website and download it to the EvoXpert after
pressing UPLOAD.
The latest official version of this module on the server is currently
installed on your EvoXpert machine.
This module on your EvoXpert machine is out-of-date and pending
update to the latest official version on the server.
To update the module(s) in question, you just need to accept (press YES) on
the message that appears after pressing UPDATE SYSTEM.
A page will then load showing you how many modules have been updated
and the update progress for each one:
Your EvoXpert machine will automatically restart when the update process is
complete and will be fully up-to-date after restarting.

ESPAÑOL
ENGLISH
DEUTSCH
FRANCAISE
PORTUGUESE
POLSKI
РУССКИЙ ENGLISH
32
After that, everything can be fixed by activating Remote Support.
Download the JMA TeamViewer app:
Run the program that was downloaded from the DOWNLOADS directory.
Generate a random password that is only valid for this specific session
(create new random password).
Finally, you will need to provide those two parameters to the experts from
the JMA technical assistance service so they can solve the problem with the
client.
When using the Android OS (e.g., when using an Android mobile as MMI
with EvoXpert), the installation of TeamViewer will be slightly different.
In this OS, you do not need to directly download the JMA TeamViewer app
but rather the official TeamViewer app from Play Store.
From here, the update process is the same as described above for the
automatic updates and it can be activated by pressing UPDATE SYSTEM.
After checking that everything works properly, the new version can
be activated on the server and will be available to everyone via the
AUTOMATIC UPDATE process.
5.3 UPDATES: 1. THE TP PART/IN SETTINGS. MAINTENANCE.
Rather than switching your EvoXpert off and on using the power button, this
can also be performed via SW by pressing REBOOT SYSTEM.
If you have more than one machine available, the IDENTIFY button will
identify the device you are connected to with three flashes of the Bluetooth
LED.
The RESTART button only restarts the board responsible for the
transponders.
SUPPORT: HELP MENU AND REMOTE
ASSISTANCE
Depending on the OS you are using (Windows, MAC, iOS or Android),
pressing this option (for Windows) will download the JMA TeamViewer
to allow experts from our technical assistance service to access the client
device and solve the problem that led to your query.
Given that this technical assistance service requires the available JMA
experts to receive the Username and Password generated by TeamViewer,
we recommend getting in touch with the JMA technical assistance service
by telephone first (+34 943793000) so that an available expert from the
department in question can advise us about the problem that led to your
query.

ESPAÑOL ENGLISH DEUTSCH FRANCAISE PORTUGUESE POLSKI РУССКИЙ
ENGLISH
33
After downloading and installing the TeamViewer QuickSupport app from
Play Store, the user ID is the only information you need to provide to the
experts from the JMA technical assistance service so they can quickly and
easily connect and solve any problems with the client.
The user ID is random and only provides temporary access to the handset.
This access is interrupted either when JMA closes the session or when the
client closes the TeamViewer QuickSupport app.
If you need to reconnect, the client will need to open the app again and send
the new number generated by the app to the experts at JMA given that the
previous number can no longer be used.
7. TRANSPONDERS - CLONING ID48 KEYS
The copy process begins automatically after inserting any key with a
transponder into the device’s antenna.
The key icon will change from grey (NO KEY) to blue (KEY IN).
Your EvoXpert machine will identify the key and also tell you whether the
copy is made instantly or via access to the calculation servers located at
JMA.
In this example, for an original Audi A1 (2013) key, we need to access the
Megamos codes server. This will become apparent when the Pop-up Menu
below appears.
You can fill this in completely or partially but you must enter information in
the required fields marked with * (Brand / Model).
This menu is displayed whenever the client has purchased & registered their
EvoXpert machine correctly.
This registration process not only allows access to the Megamos 48 server
(current key) but also allows the key technologies listed below to access
their respective servers at JMA.
• Texas DST40.
• Texas DST80.
• Philips HT2 (46).
• TOYOTA-AES (pending connection to the EvoXpert machine).
• HONDA-G (pending connection to the EvoXpert machine).
Whenever you are using the guided copy process, you will then be told
which type of blank JMA chip you need to insert, in this case a blank TPX8/
TPX8+ chip:
The copy process continues by changing the chip settings and setting it to
SNIFF Mode so you can then collect certain data from the vehicle ignition

ESPAÑOL
ENGLISH
DEUTSCH
FRANCAISE
PORTUGUESE
POLSKI
РУССКИЙ ENGLISH
34
lock.
This data collection process is exclusive to key types with Megamos Crypto
and Philips Crypto II technology.
For all other technologies (broadly those described in the type of servers
implemented at JMA), you only need to scan the original key and the frames
(challenge-response) that you collect from the original key in the device’s
antenna.
If the operating mode change process continues correctly, the following
menu will be displayed telling you to collect data from the vehicle ignition
lock.
Given that you might have different keys with access to different servers at
different stages of the process (based on the transponder technology), the
individual process control panel on each client machine will be displayed
while a transponder is inserted into the antenna. This panel shows the
progress of your keys and the precise status of each one in the process:
After the data has been collected from the vehicle (see the JMA YouTube
channel for different videos about sniffing that were published previously for
the TRS-EVO), EvoXpert allocates the data to the correct key from the list on
the client control panel according to the key ID:
After reading the sniffed data, the process will ask you to reinsert the
original key to collect different frames-responses. These basically provide
the information that will be sent to the calculation server:
If the frames are correct, the process continues to either the Key in Queue
status depending on how many people are processing keys at the same time
(Megamos) or the Processing Key status if there was nobody waiting in a
queue.

ESPAÑOL ENGLISH DEUTSCH FRANCAISE PORTUGUESE POLSKI РУССКИЙ
ENGLISH
35
Staying with the guided copy process, the copy menu shown below tells us
which JMA TPX chip to use based on the type of chip in the original key:
This will also conclude with the TPX overwrite menu shown in option 1.
For both copy options, the final menu asking us whether you want to make
another copy is the same.
If you do not wish to make another copy right now, press NO so that the key
is deleted from both the Pending Keys process on the server and the task
control panel on the client machine.
If you subsequently decide to make another copy of the same key, bear in
mind that the chip technology will dictate whether you are asked to collect
sniff data from the vehicle again and send that information to the servers to
complete the search, which, also depending on the technology in the original
key, will complete the process with a shorter search time.
8. TRANSPONDERS - CLONING DST80 KEYS
There are two main groups within the technology used in Texas DST80 keys.
• Those that require no access to the servers for calculation (TOYOTA-G).
• Those that do require access to the servers for calculation (FORD/
HYUNDAI-KIA/MAZDA).
The group requiring server access can be further subdivided into two
subtypes:
• DST80-FAST: Calculation time <30 seconds (FOCUS/FIESTA/KIA OPTIMA).
• DST80-Timming: Calculation time >30 seconds and requiring the key to be
After the calculation period, which is different for each key in the
Processing Key status, the process will conclude with the Key Found
status.
Having reached this stage of the process and the server has the code for
your key ready, there are two ways to proceed with the final copy onto the
blank JMA transponder indicated in the panel under the Copy to TPX8/TPX8+
column.
1. If you only have one key in the panel, as in this case, insert the
indicated JMA TPX chip (in this case, a blank TPX8/TPX8+) and the copy
process will begin automatically.
2. If you have several different keys in the panel with different
technologies (Megamos, Philips, Texas, etc.), you will need to select the key
you want to copy (click on the pencil icon in the first column of each row of
keys that have previously reached the “Key Found” status (green), which
clearly indicates that the data are ready on the server and that they need to
be sent to the JMA TPX chip indicated under the COPY ON column:

ESPAÑOL
ENGLISH
DEUTSCH
FRANCAISE
PORTUGUESE
POLSKI
РУССКИЙ ENGLISH
36
After sending the frames to the server and based on the number of current
requests, your key will be given the status of Key in Queue until it is your
turn.
Naturally, all this information is displayed on your client panel.
After passing through the Processing Key stage, the key status will
eventually change to Key Found.
As is the case with the Megamos key we used in the previous example,
there are two ways to proceed with the final copy onto the blank JMA
transponder indicated under the “Copy On” column: TPX7.
If you only have one search process under way, you can simply insert the
blank JMA transponder indicated and the copy will begin automatically.
However, if you have more than one key on your control panel, you will need
to click on the Write Key icon for the one you want to copy to force a manual
copy process onto the chip indicated under the Copy On column: TPX7.
The copy will begin after inserting the JMA chip indicated for the type of
technology in question:
left in the antenna for the duration of the copy process.
As with all other keys, the copy process always begins automatically after
inserting a key with a transponder into the device’s antenna.
The key icon will change from grey (NO KEY) to blue (KEY IN).
In this case, we can see the scan from a KIA Optima with key technology
based on Texas DST80 and the DST80-FAST, based on the calculation time
required on the JMA servers.
There are other models in the HYUNDAI-KIA / FORD / MAZDA group that
also use this DST80-FAST type.
As in the previous example, this process will require our servers at JMA to
process this type of key so the access menu will be displayed:
This type of technology (DST80) does not require any data sniffing in the
customer’s vehicle.
All you will need are the frames obtained from the original key using the
antenna on your EvoXpert machine.

ESPAÑOL ENGLISH DEUTSCH FRANCAISE PORTUGUESE POLSKI РУССКИЙ
ENGLISH
37
Finally, the process will ask whether you wish to make another new copy.
Press NO to decline and complete the process if you do not wish to make
another copy.
As in the previous example, if you subsequently wish to make another copy,
you will need to collect the frames again using the EvoXpert antenna and
send the information to the servers to complete the search process. For the
key used in this example, that will take the same amount of time as the
previous search.
In short, there is no time saving advantage when calculating the same key a
second time without doing so via the Copy Another button.

Table of contents