JNJ SPAS SPA-301 User manual

1 /16
OWNERS MANUAL
GUANGZHOU JNJ SANITARY WARE CO., LTD.
TEL:86-20-36460026
ADD:No.166, HUANGJINWEI INDUSTRIAL ZONE, SHIJING, BAIYUN, GUANGZHOU, CHINA

2 /16
Table Of Contents
Introduction·····································3
Important Safety Instruction·················4
Choosing a Location···························5
Site Preparation·································5
Installation·······································6
Control System Instruction····················8
Spa Care and Maintenance····················9
Water Quality and Maintenance··············11
Appendix········································15
PRODUCT PAREMETERS
Model
SPA-301
Serial Number
Structure
Index
Dimension:
380×240×995cm
86.6×76.8×39inches
Dry Weight: 510 kg
Water Volume 3100 Liters
818 Gallons
Total Weight Filled
With Water: 3610 kg
Electric
Index
Voltage 400V3N~/50Hz Controller Model BP6013
Current 27.5A Panel Model TP600
Power
11000W
Water Resistance Grade
IPX5
Heater 220-240V~/3KW×1 Water Pump 220-240V~/3HP×3
Circulating
Pump
220-240V~/1HP×1 Air Pump 220-240V~/700W×2
Ozone 220-240V~/5W Light 12V~/5W×3

3 /16
INTRODUCTION
Your choice of spa indicates that you are devoted to excellence. The manufacturer appreciates your
patronage and takes pride in the tradition of quality spas that our company represents. we are confident
that your new spa will provide you, your family and friends, with years of enjoyment and fulfill all your
hydrotherapy needs.
In order to get the most enjoyment of your spa, we strongly suggest that you take the time to read through
this manual before electrically connecting your spa and operate your spa. This will acquaint you with the
safety procedures, installation methods, operating features, and maintenance, ensuring an enjoyable
experience right from the start. The manufacturer has tried to anticipate all of your needs and desires.
however, if you need any additional information, feel free to call the local dealer.
This manual was written to ensure the proper installation and use of your spa. Any modifications to the
procedures outlined in this manual may result in your warranty being voided. Please take the time to read
this manual to avoid any unnecessary problems with your brand new spa and equipment.
THIS MANUAL AND ITS CONTENTS ARE SUBJECT TO CHANGE WITHOUT NOTICE.
ALTHOUGH WE HAVE PREPARED THIS MANUAL TO BE AS ACCURATE AND PRECISE
AS POSSIBLE, WE WILL NOT BE LIABLE FOR LOSS, INJURY OR DAMAGES CAUSED BY
IMPROPER INSTALLATION OR USE OF SPA OR MAINTAIN (IMPROPER OR
OTHERWISE).WE ALSO NOT BE LIABLE FOR THE INJURY THAT SPA INSTALLED BY
THE INSTALLER WITHOUT A QUALIFICATION.
MANUFACTURE RESERVES THE RIGHT TO CHANGE SPECIFICATIONS WITHOUT
NOTICE.

4 /16
IMPORTANT SAFETY INSTRUCTIONS
When installing your spa and using this equipment, basic safety precautions should always be followed.
The following instructions are required by IEC 60335-1 standard. They contain important safety
information we strongly urge you to read and apply. For your safety and the safety of others, it is vital
that the following be mentioned:
Do not permit children to use spa unless they are closely supervised at all times.
Do not allow children to submerge their head under water.
Set a comfortable water temperature and always confirm water temperature with an accurate
thermometer before entering your spa.
Pregnant woman should consult a physician before using spa. And using spa under the guidance of
the doctor and Accompanied by the guardian.
Slow moving/weak elderly or disabled persons should take care when using spa.
People using medications and/or having any adverse medical history are not allowed to use spa .
To avoid unconsciousness and possible drowning, do not use drugs or alcohol before or during the
use of spa.
Always cover spa and use safety locks to prevent accidents when the spa is not in use.
The suction fittings in the spa are sized to match the specific water flow created by the pump/pumps.
Should the need arise to replace the suction fittings or the pump/pumps, be sure that the flow rates are
compatible.
Do not use a wall switch, ground fault circuit interrupter, circuit breaker, fuse, or plugging and
unplugging the spa as a means of turning on or off your spa for normal everyday use.
Set the spa on a firm level (flat) surface. For floor recessed spas, install to permit access for servicing
from above or below floor. Position spa to provide proper drainage, accessibility of electrical
compartments. Do not set spa on blocks as structural damage may occur to spa.
A wire connector is provided on this unit to connect a minimum (6mm²) solid copper conductor
between unit and any metal equipment, metal enclosures of electrical equipment, or conduit, if that
item is located within 5 feet (1.5m) of the unit. The wire connector must be grounded.
Do not leave audio cover open. Replace audio components only with identical components.
Do not connect any auxiliary components. For example additional speakers, headphones, etc. to the
system.
Maintain water chemistry/balance in accordance with dealer’s instruction.
The warning sign (yellow) below is packed with your new Spa. This sign must be posted in a
prominent place in close proximity to the spa installation site immediately upon completion of spa
installation. It is extremely important that this sign be permanently placed in clear view of any
persons using the spa. Occasional spa users may not be aware of some of the dangers hot water poses
to pregnant women, children, and people under the influence of alcohol. If you did not receive a
warning sign or your sign has become damaged, please contact your spa dealer.

5 /16
HYPERTHERMIA
Prolonged immersion in water that exceeds normal body temperature can lead to hyperthermia.
Hyperthermia occurs when the internal temperature of the body reaches a level several degrees above the
normal body temperature of 98.60° F (37.0° C). The symptoms of hyperthermia include drowsiness,
lethargy, and an increase in the internal temperature of the body. The effects of hyperthermia include:
Unawareness of impending hazard;
Failure to perceive heat;
Failure to recognize the need to exit spa;
Physical inability to exit spa;
Fetal damage in pregnant women; and unconsciousness and danger of drowning.
CHOOSING A LOCATION
Your spa can be installed indoors or out, on the ground, in the ground or half-and-half. The following
information will assist you in choosing the right location for your individual needs. When making your
decision, always remember that the spa can be enjoyed year-round, indoors or out, regardless of the
climate.
Outdoor Location
In selecting the ideal outdoor location for your spa, we suggest that you take into consideration:
The proximity to changing area and shelter (especially in colder weather conditions).
The pathway to and from the spa (free of debris, dirt, leaves as not to be tracked into spa).
The closeness to trees and shrubbery (leaves and birds could create extra work).
A sheltered environment (less wind, weather exposure resulting in lowered operation and
maintenance costs).
It is preferable not to place the spa under eave because the water drop/flow will shorten the servicing
life of the cover.
Indoor Location
In selecting the ideal indoor location for your spa, you must choose proper flooring area for spa.
The following you must take into consideration:
Be sure your spa will fit into the space you have chosen. Proper access into the home is needed to
move the spa into place.
Ventilation or window may be needed because of the humidity from the spa. In most cases, a spa
cover is sufficient.
Though most homes meet the requirement of 80lbs per square foot, be sure to check the load carrying
capabilities of the floor you will be installing your spa on (manufacturer not responsible).
Insure you have proper drainage in the event of a leak or water spill due to over load of spa with
people causing water damage (manufacturer not responsible.)
In case of maintenance problems leave enough room around the spa to work.
SITE PREPARATION
Because of the combined weight of the spa, water and users, it is extremely important that the base upon
which the spa rests be smooth, flat, level and capable of uniformly supporting this weight. Without
shifting or settling, for the entire time the spa is in place. If the spa is placed on a surface which does not
meet these requirements, damage to the skirt and/or the spa shell may result. Damage caused by improper
support is not covered under warranty. It is the responsibility of the spa owner to assure the integrity of
the support at all times.
We strongly recommend that a qualified, licensed contractor prepare the foundation for your spa. The
manufacturer recommends a poured, reinforced concrete slab with a minimum thickness of 4 inches
(10cm).
The spa must be installed in such a manner as to provide drainage away from the spa. Placing the spa in a
depression without provisions for proper drainage could allow rain, overflow and other casual water to
flood the equipment.

6 /16
Install so as to permit access to the equipment, either from above or below, for servicing. Make certain
that there are no obstructions which would prevent removal of the cabinet side panels and access to the
inner components.
Above-ground Installation
For best results, we recommend the installation of a level concrete pad:
Dig out and level the ground 20-30 cm (8-12 in.) below your desired base level;
Install 10-15 cm (4-6 in.) of crushed stone;
Next, install 10-15 cm (4-6 in.) of poured concrete;
Level the concrete and apply a broom-type finish;
We recommend that the pad be made 15 cm (6 in.) large than the spa on three sides, and 1 m (3 ft.)
larger on the side where the access steps.
In-ground or Partial In-ground Installation
It is sufficient to ensure that the base of the hole or cavity created for the spa has a dry, stable,
compacted level base and proper drainage;
It is necessary that a poured level concrete base, complete with concrete footings, be installed as
outlined in the section Above-ground Installation.
We recommend that the base be made 60 cm (24 in.) large than the spa on three sides, and 1 m (3 ft.)
larger on the side where the access exit or ladder.
Always ensure that there is good drainage, via a properly designed French drain system and/or a
sump pump, to prevent ground water flooding damage to the support equipment or spa structure.
NOTE: SEE APPENDIX FOR SPA SIZE.
INSTALLATION
Preparation
At least two persons are necessary for the assembly.
Necessary tools for assembly are including: level meter, cross screwdriver, vise tool , multimeter ,
Multi-functional screwdriver, diagonal plier, pipe wrench tool, etc.
Additional materials for the installation are including: a GFCI(Ground Fault Circuit Interrupter),
cable etc.
Unloading And Handling Instruction
Each spa is factory strapped onto a wood skid. Each wood skid has a clearance width to allow movement
of the spa on its side through alley-ways. Where this is possible, the use of a forkman to lift the spa from
the truck or trailer over the house to the patio or yard is often a simple and economical option. The
following you must pay attention to:
when your spa is stow on end, you must make sure that your forkman’s arm already cross the two-third
line of the wood skid. As picture:
two-third line two-third line
When your spa is a swimming spa which is laid flat. Manufacturer recommend you to unload and handle
as the following pictures:

7 /16
NOTICE:
Make sure that there is sufficient assistance to gently slide the spa off the dolly or cart to the support
base without any damage.
Damage caused during transportation or by improper handling is not covered by the factory warranty.
Installation Instructions
A suitability of installer with qualification who shall be able to demonstrate to the relevant authorities
their awareness and competence in application of National Regulatory requirements for
safety ,electrical and water supply/disposal.
The electrical installation, which shall be in accordance with National Regulatory requirements.
The spa must connect to a GFCI. Manufacturer recommend the GFCI be attached to the end of the
spa’s electrical cord. The GFCI. must be installed by a licensed, qualified electrician. GFCI devices
must meet all national and local electrical cord. Press the TEST button and RESET button to test and
reset the GFCI.
The means of the power supply cable connection meet the controller manual.
A appropriate mean to connect the drainer must be used.
Equipotential bonding
A permanent equipotential grid is required around the perimeter of the pool extending 3 in. beyond
the side of the pool in order to eliminate voltage gradients in the pool area prescribed. All the
metallic parts in the area, including the pool are required to connect to the equipotential grid.
There is a metal equipotentail bonding bar on the stainless steel frame of the pool, please use a 4 mm²
copper conductor to connect the equipotential bonding bar to the area equipotential gird permanently.
Disconnection
Disconnection from the supply mains having a contact separation in all poles that provide full
disconnection under overvoltage category Ⅲconditions must by incorporated in the fixed wiring in
accordance with the national wire rules.
Encouraging statement
The installer and first owner of the spa to make the instructions available to subsequent owners and users.

8 /16
CONTROL SYSTEM INSTRUCTION
NOTE:
The function and connection of the controller meets the corresponding model of controller manual.
The function and parameter of the spa meet the APPENDIX.
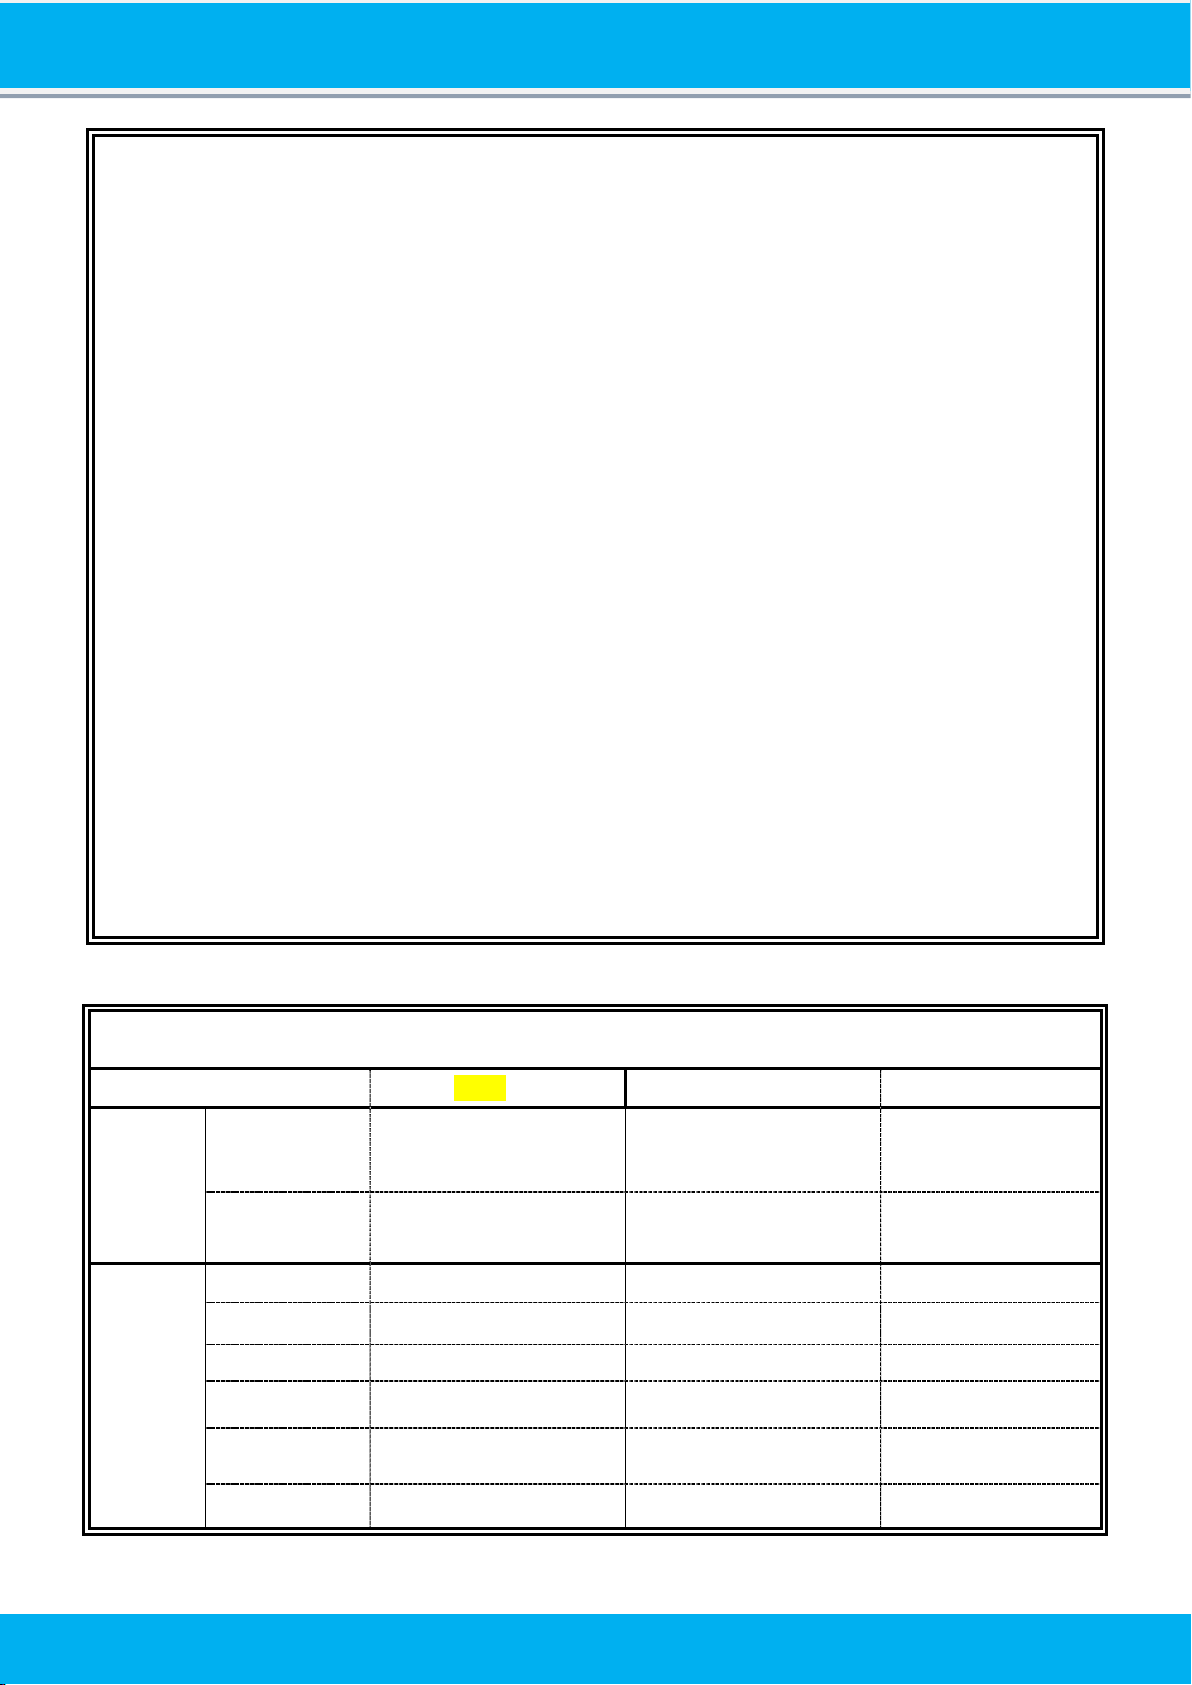
Display Message
Message
Meaning Action Required
No message on display. Power has been cut off
to spa.
The control panel will be disabled until power returns.
The system reset the time of day on each power up. Spa
settings are preserved.
OHH
Overheat"- The spa has shut down. One of the
sensors detected 118egree F (approximately
47.8
degree C) at the heater.
Do not enter the water. Remove the spa cover and allow
the water to cool. Once the heater has cooled, reset by
pushing any button. If the spa does not reset, shut off the
power to the spa and call the local dealer or service.
OHS
Overheat"- The spa has sh ut down. One of the
sensors detected that the spa water is 110egree
F
(approximately 43.3 degree C).
Do not enter the water. Remove the spa cover and allow the
water to cool. At
107 degree F (approximately 41.7 degree
F), the spa should automatically
reset. If the spa does not
reset, shut off the power to the spa and call the local
dealer for service.
ICE
Ice" - Potential freeze condition detected.
No action required. The pumps and the blower will
automatically activate regardless of the spa status.
SnA
Spa is shut down. The sensor that is plugged into
the "Sensor B" jack is not working correctly.
Check the sensor "B" plug connection to circuit board. If the
problem persists,
contact the local dealer or service. (The
problem may appear temporarily in an
overheat situation
and disappear when the heater cools).
SnS
Sensors are out of balance. If this is alternating
with temperature, it may just be temporary
condition. If the display shows only this message
(periodically blinking), the spa is shut down.
If the problem persists, contact the local dealer or service.
HFL
A substantial difference between sensors was
detected. This could indicate a flow problem.
Check water level in spa and the circulation system. Add
water if necessary. Be sure that slide-valves are
open. Make
sure the circulation pump have been primed and has
power. Change the new filter cartridge.
LF
Persistent low flow problems. Displays on the
fifth occurrence of the "HFL" message within
24 hours. Heater is shut down, but other spa
functions to run normally.
Follow actions required for "HFL" message. Heating
capacity of the spa will not reset automatically; you may
press any button to reset or cycle the power
off and on.
Dr
Inadequate water detected in heater. Displays
on
third occurrence of "dr" message. Spa is shut
down for 15 minutes.
Check water level in spa. Add water if necessary. Be sure
that slide-valves are
open. Make sure the
circulation pump
have been primed and has power. On
the third consecutive
occurrence of the dr message (without a successful
heating cycle in between) the panel will display dr4.
Dry
Inadequate water detected in heater. Displays
on
third occurrence of "dr" message. Spa is
shut
down and will not reset in 15 minutes.
Check water level in spa. Add water if necessary. Be sure
that slide-valves are
open. Make sure the circulation pump
have been primed and has power. Press
any button to reset.
Pr
When your spa is first activated, it will go into
Priming mode.
See the 24 hour circulation pump operation. The Priming
mode will last for
up to four minutes and then the spa will
begin to heat and maintain the water
temperature in
Standard mode.
-F
-C
Temperature unknown
Temperature unknown
After 6minutes Pr mode, the temperature will be
displayed. After 6minutes Pr mode, the temperature will
be displayed

9 /16
Filter Cartridge
Periodic Reminder Messages
Press the “Mode” button to reset a displayed reminder.
Message Frequency Action Required
rPH
Every 7 days
Test and adjust pH chemical levels (see pages 11-13)
rSA
Every 7 days
Test and adjust sanitizer chemical level (see pages 11-13)
rCL
Every 30 days
Remove, clean and install filter (see page 10)
rt9
Every 30 days
Test and reset GFCI (see page 7)
rdr
Every 90 days
Drain and refill spa (see page 9)
rCO
Every 180 days
Clean and condition cover, pillows (see pages10)
rtr
Every 180 days
Clean and condition cabinet (see page 10)
rCH
Every 365 days
Install new filter (see page 7)
SPA CARE AND MAINTENANCE
Draining and Refilling Your spa
To prevent damage to spa's components, you must fill the SPA to the water lever with municipal drinking
water before turn on power. Turn off power before draining it. Do not turn the power back on until your
spa has been refilled. Depending on your spa model, the drain valve is located on the left or right side of
the spa . The drain valve is flush mounted to the spa frame below. To drain spa, pull the spout out,
leaving the exterior end cap on. Once extracted the drain valve will stay in the closed position. Remove
the end cap and attach garden hose to exposed threads. After the garden hose is installed, push the spout
back in halfway to actuate the drain. Drain valve will drain approximately 5 gallons of water per minute.
NOTICE:
During draining the pool, please make sure no person stay in the pool. Please make sure the draining
water not reaching the power supply or any power cable of the surrounding electrical equipments.
We recommend to use a standard garden hose to fill water, turning the tap slightly to prevent damage
to the pool surface by a jerking hose connection.
The recommended water level of filling is at least 5cm higher than the highest jet of the pool, or
reaching the water level mark before turn on power.
Filter cleaning and Cartridge Replacement.
The Filter cartridges should be checked periodically. In normal use, check them at least once a month.
Keep them clean. An obstructed filter cartridge reduces water quality and inhibits proper system
performance. According to the following process:
Press “warm” or “cool” button then “Jets 2” button. It will temporarily turn off all spa functions and
put the spa in standby mode.
Removable filter cartridges are located inside the filter well. To remove them lift the filter lid, then
rotate each filter cartridge counterclockwise to unthread from mating wall fitting. Remove both
cartridges from filter well.
Use a garden hose with straight flow nozzle to wash down the filter element. Work from the top
down, holding the nozzle at 45 degree angle, and wash all the pleats with emphasis between pleats.
Rinse until all dirt and debris is gone.
Re-install filter. Press any button to exit standby mode.
Corresponding replacement cartridges may be purchased from the local dealer.
Care of The Spa
Spa Shell
Your spa shell is made of acrylic. Stains and dirt generally will not adhere to the surface. Use of a soft rag
or a nylon scrubber should remove most dirt. See your dealer for the best product to use. The only
products which have passed the manufacturer’s test like Soft Towel and Windex can be used to clean spa.

10 /16
Sodium bicarbonate (baking soda) can also be used for minor surface cleaning. Always thoroughly rinse
off any spa shell cleaning agent with fresh water.
NOTICE:
Most household chemicals are harmful to your spa shell.
Iron and copper in the water can stain the spa shell if allowed to go unchecked. Ask the local dealer
about a stain and scale inhibitor to use if your spa water has a high concentration of dissolved
minerals.
The use of alcohol or any household cleaners other than those listed to clean the spa shell surface
above is not recommended. Do not use any cleaning products containing abrasives or solvents since
they may damage the shell surface. Never use harsh chemicals.
Damage to the shell by the use of harsh chemicals is not covered under the warranty.
WARNING: Some surface cleaners and water treatment biocide contain eye and skin irritants. Keep all
cleaners out of the reach of children and use care when applying.
Free Cabinet
The spa consists of a rigid polymer that combines the durability of plastic with the beauty of a redwood
looking cabinet. The cabinet will not crack, peel, blister or delaminate. Cleaning consists of simply
spraying the cabinet with a mild soap and water solution to remove any stains and residue.
Pillow
Remove and clean the headrest pillows as needed with soapy water using a cloth or soft-bristle brush.
Always remove the pillows when adding chemical shock treatment to the spa water. The pillows can be
returned to the spa when sanitizer reading drops below 5ppm. Never attempt to remove the pillows by
pulling on them. Grasp pillow with finger tips and gently pry outward from spa shell.
Spa Cover
To clean and maintain the vinyl cover:
Remove the cover from the spa and gently lean it up against a wall or fence.
Using a garden hose, spray the cover to loosen and rinse away any dirt or debris.
Using a sponge and/or a soft bristle brush, and using a very mild soap solution (one teaspoon
dishwashing liquid with two gallons of water), or baking soda (sodium bicarbonate), scrub the vinyl
top in a circular motion. Do not let the vinyl dry with a soap film on it before it can be rinsed clean.
Scrub the cover’s perimeter and side flaps. Rinse clean with water.
Rinse off the underside of the cover with water only (use no soap), and wipe it clean with a dry rag.
To condition the cover after cleaning, apply a thin film of vinyl cleaner to the surface and buff to a
high luster.
NOTICE:
Do remove snow buildup to avoid breakage of the foam core from the additional weight of the snow.
Do lock cover locking straps to secure the cover when the spa is not in use.
Do not walk or stand on top of cover (unless you own a “walk-on-cover”).
Do not drag or lift the spa cover using either of the flaps, or the cover lock straps.
Winterizing Your Spa
During the cold weather you may not wish to use your spa outside. In this case you may move it to a
heated area, and leave it until the weather warms up. Or the following steps should be used to protect your
spa from freezing:
Disconnect the spa from the power supply.
Remove the screws holding your spa excess panel door.
Open the drain valve, open the pumps plugs, and the spa will drain by gravity flow.
Remove the filter cartridge, then clean and store in a dry place.
Attach a wet/dry shop vac (capable of blowing air as well as vacuuming) into the filter housing.
Turn blower on and allow it to blow out any water remaining in the plumb lines. (Should take no
more than 5 minutes).
Reinstall the filter housing.
Use the shop vac to remove water inside spa inhaled through jets.
Use a shop vac and clean towel and remove any remaining water from bottom of spa until dry.

11 /16
Leave the drain open.
Close the spa cover and fasten with tie down safety locks.
WATER QUALITY AND MAINTENANCE
The quality of the water in your spa is important and must be kept clean. Your program will vary
depending on your water’s mineral content, and how often you use your spa, and the amount of people
using it.
General Information - The three fundamental areas of water maintenance include Water Filtration,
Chemical Balance/pH Control and Water Sanitation.
Water sanitation is the owner’s responsibility of maintaining clean quality water in your spa, and is
achieved through the regular and periodic (daily), addition of an approved sanitizer if necessary. The
sanitizer will chemically control the bacteria and viruses present in the fill water or introduced during the
use of the spa. Bacteria and viruses can not grow quickly in under sanitized spa water.
The water’s chemical balance and pH control are also your responsibility. You will have to add chemicals
to maintain proper levels of Total Alkalinity (TA), Calcium Hardness (CH) and pH. Proper water balance
and pH control will minimize scale buildup and corrosion of metals, extend the life of the spa, and allow
the sanitizer to work at maximum efficiency.
Methods For Testing Spa Water
Accurate water testing and analysis are an important part of effectively maintaining your spa water. You
must have the ability to test for:
Total Alkalinity (TA).
pH.
Calcium Hardness (CH).
Sanitizer.
Two types of testing methods are recognized and recommended:
Reagent Test Kit is a method which provides a high level of accuracy. They come in either liquid or
tablet form.
Test Strips are a convenient testing method used by many spa owners. Keep in mind that test strips
are susceptible to heat and moisture.
Basic Chemical Safety
When using chemicals, always read the labels carefully and follow directions. Though chemicals protect
you and your spa when used correctly, they can be hazardous in concentrated form. Observe the
following guidelines:
Allow only a responsible person to handle spa chemicals. KEEP OUT OF THE REACH OF
CHILDREN.
Accurately measure the exact quantities specified, never more. Do not overdose your spa.
Handle all containers with care. Store in a cool, dry well ventilated place.
Always keep chemical containers closed when not in use. Replace caps on their proper containers.
Don’t inhale fumes, or allow chemicals to come in contact with your eyes, nose, or mouth. Wash
your hands immediately after each use.
Follow the emergency advice on the product label in case of accidental contact, or if the chemical is
swallowed. Call a doctor or the local Poison Control Center. If a doctor is needed, take the product
container along with you so that the substance can be identified.
Don’t let chemicals get on surrounding surfaces or landscaping. Rinse off with fresh water if spilled.
Never smoke around chemicals. Some of the fumes can be highly flammable
Adding Spa Chemicals
Fold back the spa cover. Carefully remove and set aside the filter lid.
Push the Jet1button to turn on the pump 1 to provide high water flow.

12 /16
Carefully measure the recommended amount of chemical and slowly pour it into the filter
compartment. Use care not to splash chemicals on your hands, eyes, or on the spa shell surface or
cabinet.
Replace filter lid and run spa for 10 minutes on high speed. Re-install spa cover.
NOTICE:After administering a super chlorination treatment or non-chlorine shock to your spa, leave the
cover open for a minimum of 20 minutes to allow the oxidizer gas to vent. A high concentration of
trapped oxidizer gas which may exist as a result of the shock treatment (not daily sanitation) may
eventually cause discoloration or vinyl degradation to the bottom of the cover. This type of damage is
considered chemical abuse and is not covered under the warranty.
Balancing Total Alkalinity (TA)
The recommended Total Alkalinity (TA) for your spa water is 125-150ppm.
Total Alkalinity is measure of the total levels of carbonates, bicarbonates, hydroxides, and other
alkaline substances in the water. TA is referred to as the water’s “pH buffer”. It’s a measure of the
ability of the water to resist changes in pH level.
If the TA is too low, the pH level will fluctuate widely from high to low. Fluctuations in pH can
cause corrosion or scaling of spa components. Low TA can be corrected by adding pH/Alkalinity UP
(sodium hydrogen carbonate).
If the TA is too high, the pH level will tend to be high and may be difficult to bring down. It can be
lowered by adding pH/Alkalinity down (sodium bisulfate).
Once the TA is balanced, it normally remains stable, although the addition of more water with a high
or low alkalinity will raise or lower the TA reading of the water.
When the Total Alkalinity is within the recommended range, proceed.
Balancing Calcium Hardness (CH)
The recommended Calcium Hardness (CH) level for your spa is 150-200ppm.
Calcium Hardness is a measure of the total amount of dissolved calcium in the water. Calcium helps
control the corrosive nature of the spa’s water. That’s why calcium-low water (commonly know as
“soft” water) is not recommended. It is very corrosive to the equipment, and can cause staining of the
spa shell. If the calcium level is too low, we recommend using Calcium Increaser to bring the
calcium hardness level to within the recommended range.
If the CH is too high (commonly know as “hard” water), formation of scale on the spa’s shell surface
and equipment can result. CH can be decreased by dilution - a mixture of 75% hard and 25% soft
water will be a good starting point. If soft water is not available, or practical for you, a stain and scale
control such as Scale Defense should be added to the spa water, according to instructions on its label.
Once the CH is balanced, it normally remains stable, although the addition of more water with a high
or low calcium content will raise or lower the CH reading of the water.
When the Calcium Hardness is within the recommended range, proceed.
Balancing The pH
The recommended pH level for your spa water is 7.4-7.6.
The pH level is the measure of acidity and alkalinity. Values above 7 are alkaline; those below 7 are
acidic.
Maintaining the proper pH level is extremely important:
1) Optimizing the effectiveness of the sanitizer.
2) Maintaining water that is comfortable for the user.
3) Preventing equipment deterioration.
If the spa water’s pH level is too low, the following may result:
1) The sanitizer will dissipate rapidly.
2) The water may become irritating to spa users.
3) The spa’s equipment may corrode.
If the pH level is too high, the following may result:
1) The sanitizer is less effective.
2) Scale will form on the spa shell surface and the equipment.
3) The water may become cloudy.

13 /16
4) The filter cartridge pores may become obstructed.
METHOD: If the pH level is too low, it can be increased by adding pH/Alkalinity Up (sodium hydrogen
carbonate) to the spa water If the pH is too high, it can be decreased by adding pH/Alkalinity Down
(sodium bisulfate) to the spa water.
NOTICE: After adding pH/Alkalinity Up (sodium hydrogen carbonate) or pH/Alkalinity Down (sodium
bisulfate), wait at least two hours before testing the water for pH. Measurements taken too soon may not
be accurate.
It is important to check the pH on a regular basis. The pH will be affected by the bather load, the addition
of new water, the addition of various chemicals, and the type of sanitizer used.
When the pH is within the
recommended range, proceed.
Maintaining Sanitizer Level
Sanitizer is extremely important for killing algae, bacteria and viruses, and preventing unwanted
organisms from growing in the spa. At the same time, you don’t want too high a sanitizer level, or it can
irritate your skin, lungs, and eyes.
Always maintain the sanitizer level in your spa at the recommended level for each type of sanitizer.
Ozone
Spa’s Ozone System drastically reduces the use of chemicals in the water. This aids in maintenance is
that the amount of harsh chemicals and frequency with which they are used is lowered.
NOTE: Call the local dealer to provide you with maintenance service if replacement of ozonator or tubing
is required.
Vacation Care Of Spa
Follow these instructions to ensure that the water quality of your spa is maintained:
For Short Periods (3 to 5 days)
Adjust the Ph
Sanitize the water
Lock cover for safety
For Long Periods (5 to 14 days)
Set temperature to its lowest level approximate water temperature of 80.0F
Adjust the pH
Sanitize the water
Lock cover for safety
Return Procedures
Sanitize the water following shock procedures
Return water temperature to original setting
Insure chlorine level had dropped below 5.0ppm
NOTE: If you plan on not using your spa for periods exceeding 14 days, you may ask a family member
or neighbor to assist with your spa maintenance, and if not available you will need to drain or winterize
spa.
SPA WATER MAINTENANCE & TROUBLESHOOTING
Problem
Probable Causes
Solutions
Cloudy Water
Dirty Filter/s
Excess oils / organic matter
Improper sanitization
Suspended particles /organic matter
Overused or old water
Clean filter or replace.
Shock spa with sanitizer.
Add sanitizer.
Adjust pH and/or alkalinity, r
un jet pump(s) and
clean filter.
Drain and refill spa.
Water Odor
Excessive organics in water
Improper sanitization
Low pH
Shock spa with sanitizer.
Add sanitizer.
Adjust pH to recommended range.
Chlorine Odor
Chloramine level too high
Low pH
Shock spa with sanitizer
Adjust pH to recommended range.

14 /16
Musty Odor
Bacteria or algae growth
Shock spa with sanitizer – if problem is visible
or persistent, drain, clean and
refill spa.
Organic buildup / scum
ring around spa
Build-up of oils and dirt
Wipe off scum with clean rag- if severe, drain
the spa, use a spa surface and tile cleaner to
remove the scum, and refill
spa.
Algae Growth
High pH
Low sanitizer level
Adjust pH.
Shock spa with sanitizer and maintain sanitizer
level.
Eye Irritation
High pH
Low sanitizer level
Adjust pH.
Shock spa with sanitizer and maintain sanitizer
level.
Skin Irritation / Rash
Unsanitary water
Free chlorine level above 5ppm
Shock spa with sanitizer and maintain sanitizer
level.
Allow free chlorine level to drop below 5ppm.
Stains
Total alkalinity and/or pH too low
High iron or copper in source water
Adjust total alkalinity and/or pH.
Use a metal deposit inhibitor.
Scale
High calcium content in water –
total alkalinity and pH too high.
Adjust total alkalinity and pH– If scale requires
removal, drain the spa, scrub off the
scale, refill
the spa and balance the water.
NOTE: Water Terminology:
Bromamines: Compounds formed when bromine combines with nitrogen from body oils, perspiration, etc. Unlike
chloramines, bromamines have no pungent odor, and are effective sanitizers.
Bromine: A halogen sanitizer (in the same chemical family as chlorine). Bromine is commonly used in stick, tablet,
or granular form.
Calcium Hardness: The amount of dissolved calcium in the spa water. This should be approximately 150-220ppm.
High levels of calcium can cause cloudy water and scaling. Low levels can cause harm to the spa equipment.
Chloramines: Compounds formed when chlorine combines with nitrogen from body oils, urine, perspiration, etc.
Chloramines can cause eye irritation as well as having a strong odor. Unlike bromamines, chloramines are weaker,
slower sanitizers.
Chlorine: An efficient sanitizing chemical for spas.
Chlorine (or Bromine) Residual: The amount of chlorine or bromine remaining after chlorine or bromine
demand has been satisfied. residual is therefore the amount of sanitizer which is chemically available to kill
bacteria, virus and algae.
Corrosion: The gradual wearing away of metal spa parts, usually caused by chemical action. Generally, corrosion
is caused by low PH or by water with levels of TA, CH, pH or sanitizer which are outside the recommended ranges.
DPD: The preferred reagent used in test kits to measure the Free Available Chlorine.
Halogen: Any one of these five elements: fluorine, chlorine, bromine, iodine, and astatine.
MPS: MPS is the non-chlorine oxidizer used with the purification system.
Nitric Acid: The formulation of nitric acid, a highly corrosive chemical, is a byproduct of the ozone generating
process. Nitric acid is produced in very small quantities and is readily dissolved in the water stream with ozone.
Oxidizer: The use of an oxidizing chemical is to prevent the buildup of contaminants, maximize sanitizer efficiency,
minimize combined chlorine and improve water clarity.
Ozone: Ozone is a powerful oxidizing agent which is produced in nature and artificially by man. Ozone forms no
byproducts of chloramines (ozone actually oxidizes chloramines) and will not alter the water’s pH.
Pathogen: A microorganism such as bacterium that cause disease.
pH: The measure of the spa water’s acidity and alkalinity. The recommended pH for the spa water is 7.4 to 7.6.
Below 7.0 (considered neutral), the spa water is too acidic and can damage the heating system. Above 7.8, the
water is too alkaline and can result in cloudy water, and scale formation on the shell and heater.
Reagent: A chemical material in liquid, powder, or tablet form for use in chemical testing.
Sanitizer: Sanitizers are added and maintained at recommended residuals to protect bathers against pathogenic
organisms which can cause disease and infection in spa water.
Scale: Rough calcium-bearing deposits that can coat spa surfaces, heaters, plumbing lines and clog filters.
Generally, scaling is caused by mineral content combined with high pH. Additionally, scale forms more readily at
higher water temperatures.

15 /16
APPENDIX :

16 /16
Table of contents
Other JNJ SPAS Hot Tub manuals
Popular Hot Tub manuals by other brands

Dimension One Spas
Dimension One Spas Diplomat Specifications

Artesian Spas
Artesian Spas PLATINUM ELITE owner's manual

AquaTerra
AquaTerra Fairfax owner's manual

Sterling Plumbing
Sterling Plumbing 76131100 Specification sheet

Kohler
Kohler K-1394 Series installation guide

Kohler
Kohler K-1152-L Roughing-In Guide