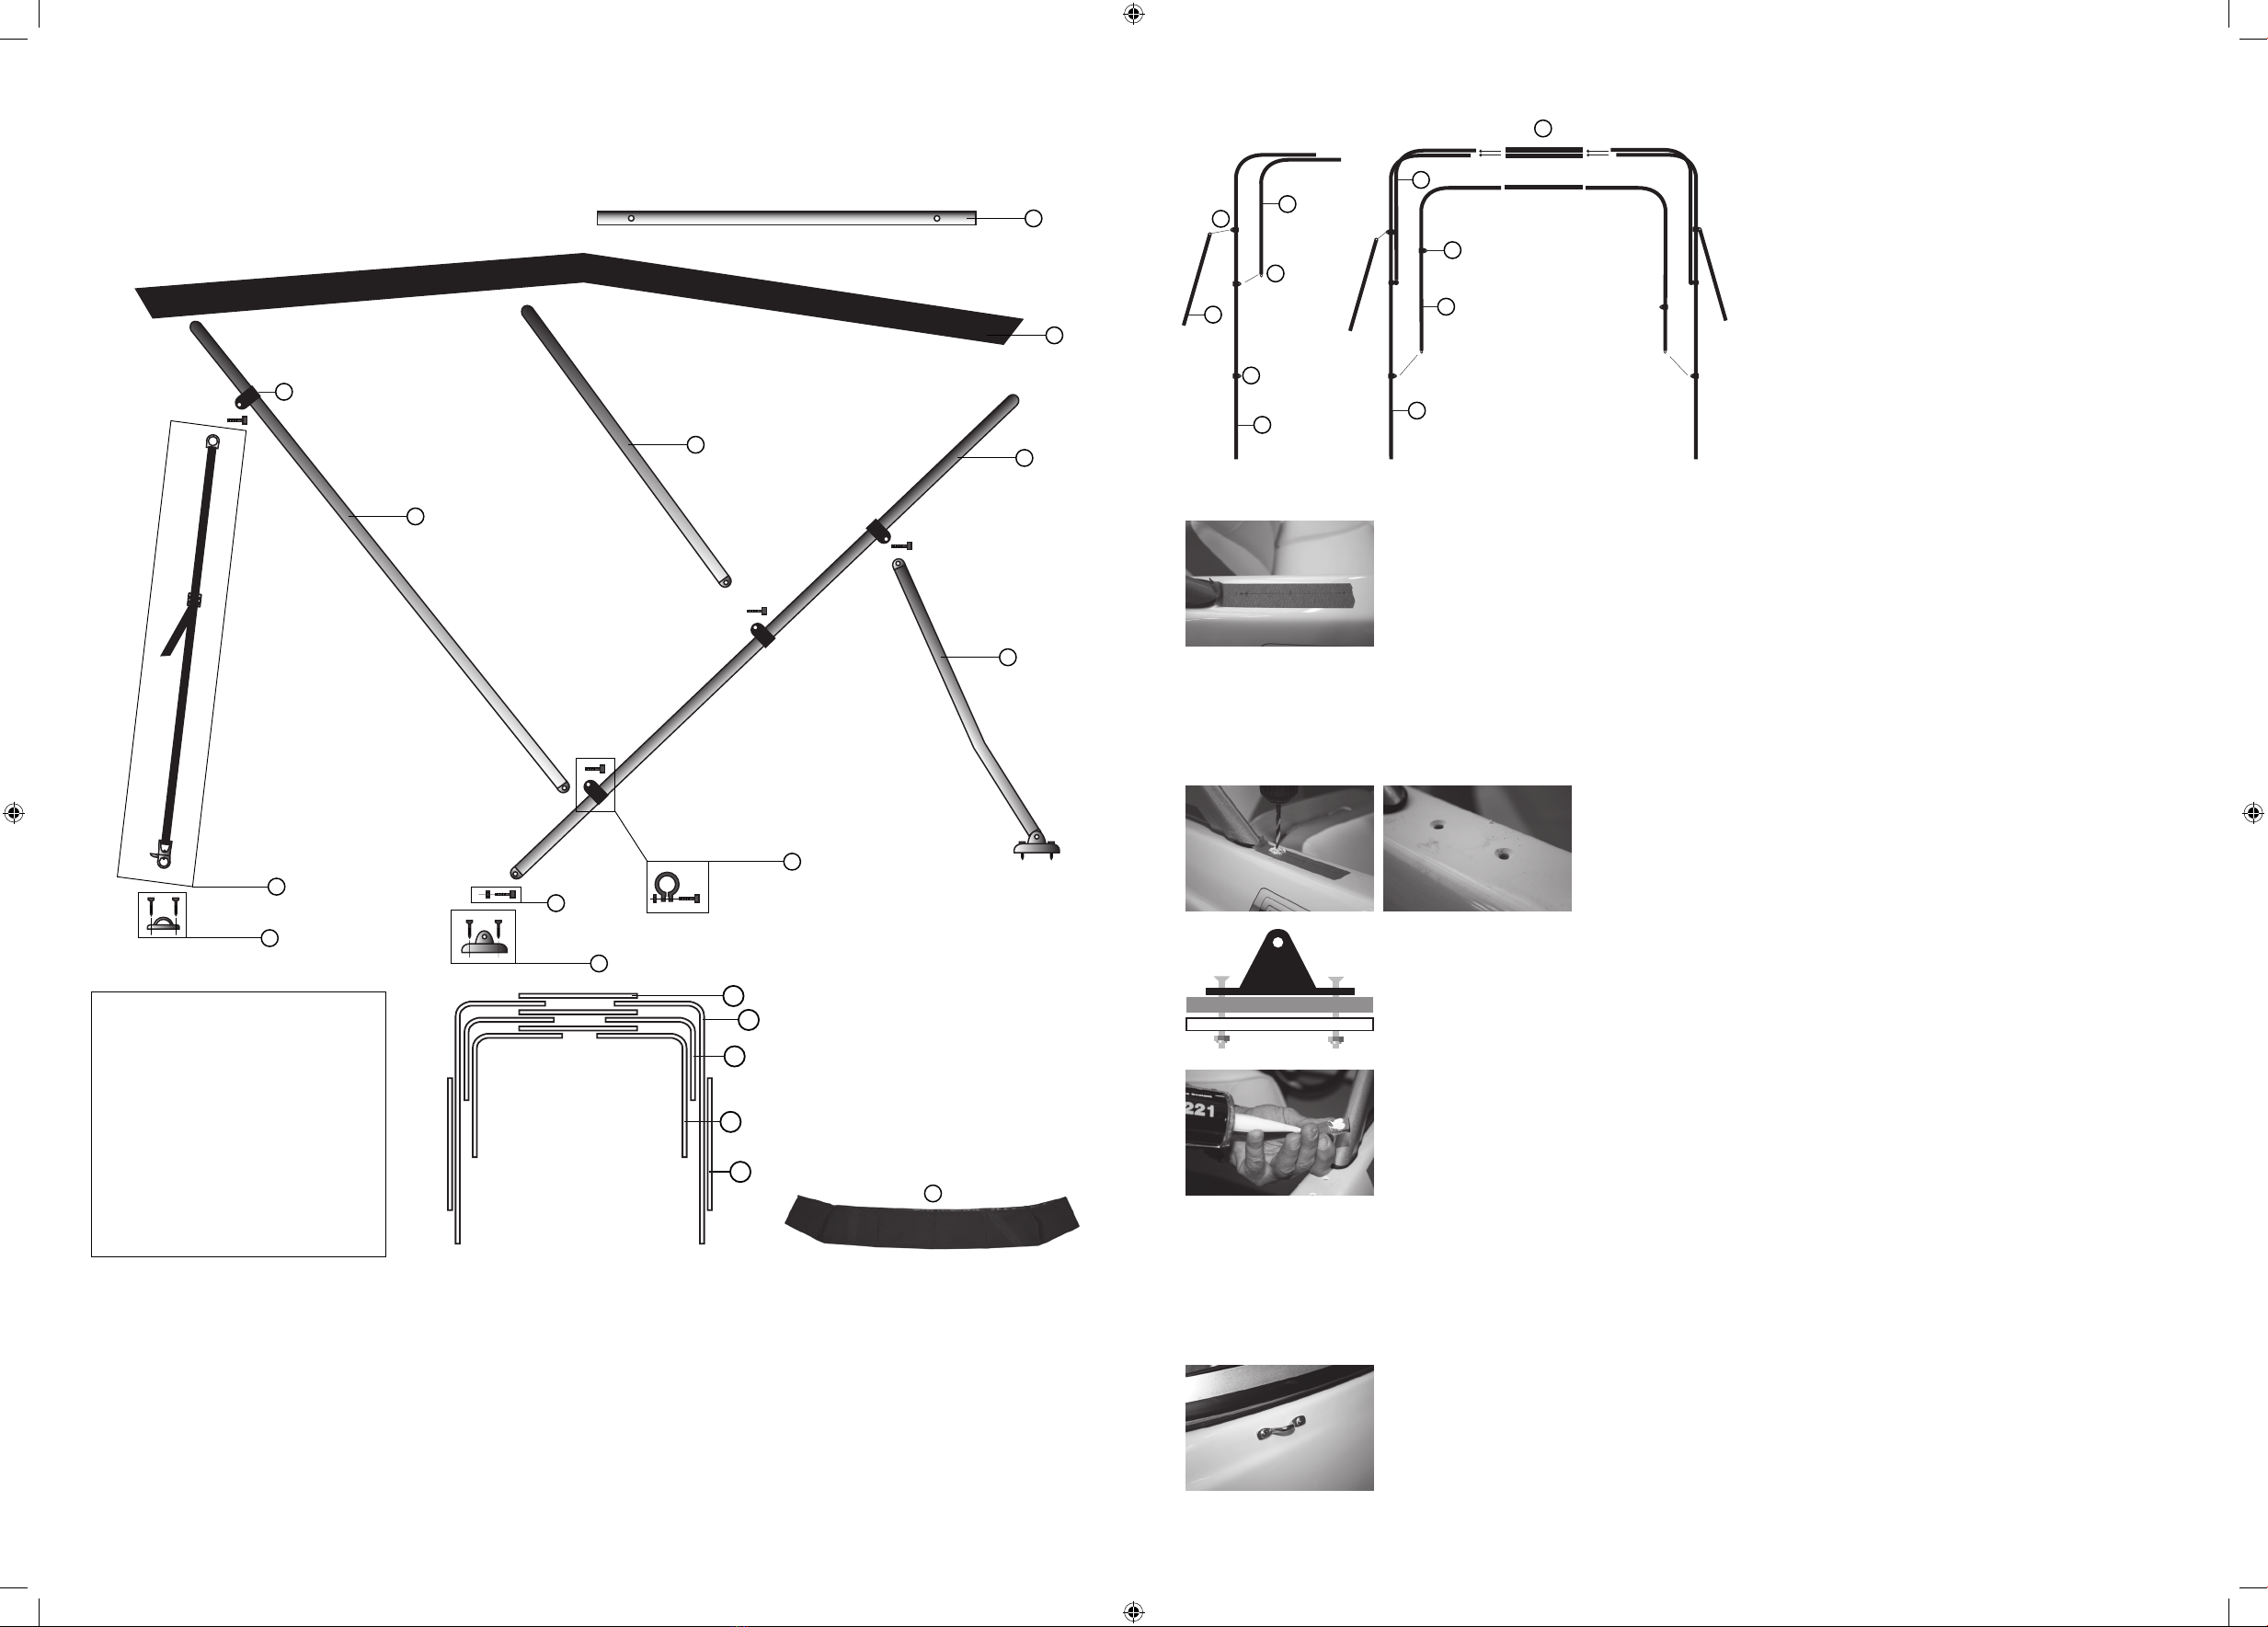
Step1
Assemble the frame as pictured below:
Step 2
Cover the area where the mounting feet (06) will be placed with masking tape. This should be done at all points where the bi-
mini will contact and the near surrounding area. This will help to prevent scratches on your boat while adjusting and measuring
your bimini attachment points.
Step 3
When you have determined the correct position mark the positions of both mounting brackets (06) on one side of the boat on the masking tape using the
mountingbracket.!Makesurethemountingbracketsaremountedcompletelylevel(onaatsurface)!
Aftermarkingonesideoftheboatyoucanmarktheothersideusingreferencepointsonyourboat.Makesuretomountthebracketexactontheoppositeof
each other.
Step 4
Before drilling inspect underneath these locations for obstructions such as wires or cables,
also check the accessibility. You are now ready to drill the holes. For this use the drill bit size
4mm.
After drilling the holes you can remove the masking tape. It is recommended to chamfer the
holes using the chamfer drill bit to prevent the gelcoat from cracking.
IMPORTANT: When the BOAT DECK is less than 8mm thick we strongly advise to reinforce the mounting bracket with wood or
breglasscloth.Thistopreventstressontheboatwhichcausesthegelcoattocrack.
WARRANTY DOES NOT COVER: Any cracks or other damage to the gelcoat or boat because of mounting the bimini.
Step 5
Supply a small amount of waterproof construction adhesive on the mounting bracket. Mount the mounting bracket on the boat
with the included screws.
(When you need to reinforce the boat deck keep in mind to use longer screws which are not included.)
Step 6
Pick your partly assembled frame up with 2 persons and attach the front legs (04) on the mounts you have already installed on the boat.
After mounting the front legs you can mount the rear legs (05)
Step 7
Place the Sunbrella® top over the frame and zip the Sunbrella® top on the frame.
Note to have the red Jobe label facing the front of the boat.
Also note to fold frame section (03) to the front. this makes the assembly of the Sunbrella® top easier.
Step 8
Attach the nylon straps on the frame (14) and determine where the eye strap should be placed. !Try to keep the nylon strap
parallel to main frame section (04) and keep the strap free from any obstructions! Cover the area where the eye straps will be
placed with masking tape. Mark the spot to drill the holes. Before drilling inspect underneath these locations for obstructions
such as wires or cables, also check the accessibility. You are now ready to drill the holes. For this use the drill bit size 4mm.
After drilling the holes, you can remove the masking tape, it is recommended to chamfer the holes using the chamfer drill bit,
this to prevent the gelcoat from cracking.
First assamble one side of the frame and slide the bimini top on
the frame before assambeling the other half of the frame.
The (size S) Bimini top
67” to 72” / 170cm to 183cm
The (size M) Bimini top
73” to 78” / 185cm to 198cm
The (size L) Bimini top
79” to 84” / 200cm to 213cm
Assamble the bows onto one side of the legs, using the predrilled
holes. Slide the large (main) bow through the sleeve on the back of
the top. Slide the medium bow through the sleeve in the forward
section of the bimini. Insert the last (front) bow in the sleeve of the
bimini top.
Operating under the theory that an ounce of prevention is worth a pound of headaches.
Notethatthisinstallationguideisonlyaguideline.EachboatisdierentandimprovisationisneededtomountyourAddictBoatBimini.
WeadviseyoutohaveyourBiminimountedbyaprofessionalwhohasexperienceinboatconstructionsandmountingtowersandBiminis.
Readandunderstandalloftheinformationcontainedinthisoperator’smanualbeforeassemblingandusingthisproduct.
Contents of Box
Unpack the carton, there will be 11 frame sections, mount set, Sunbrella® Top, Bimini boot and webbing straps:
Prior to assembly, make sure all the required parts are present.
The best way to determine the correct position on the boat is to semi-assemble the bimini and hold it over the boat with two persons so that a third persen can
give directions. Bear in mind the height in the boat, the windscreen window, additional tower and accessories, wiring, where the shadow should fall etc etc…
04
05
03
02
09
11
06
10
07
08
04
05
02
01
03
09
Necessities:
Electric Drill
Drill bit size 4mm
Masking tape
Chamfer drill bit
14
BOAT BIMINI
BB01 Sunbrell® Top (Size S/M/L)
BB02 Frame section (Middle)
BB03 Frame section (Front)
BB04 Frame section (Main)
BB05 Support Pole
BB06 Mounting Bracket
BB07 Mini Clamp
BB08 Nylon Strap
BB09 Adjustable bar
BB10 Connection Bolt
BB11 Eye Strap
BB12 Bimini Boot (storage cover)
12
BOAT DECK
Reinforcement
picture 1 picture 2
09
04
04
05
02
02
03
14
13
13
13