manuals.online logo
Brands
  1. Home
  2. •
  3. Brands
  4. •
  5. Johnson Controls
  6. •
  7. Control Unit
  8. •
  9. Johnson Controls tyco AMD-2 User manual

Johnson Controls tyco AMD-2 User manual

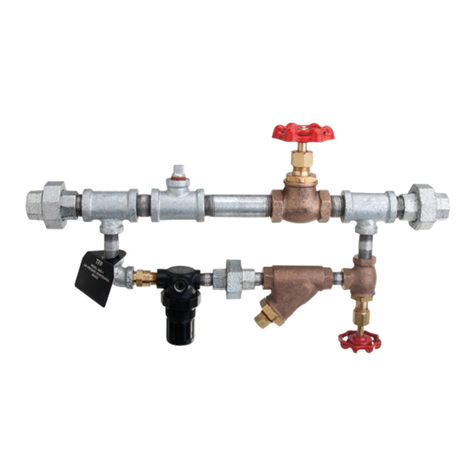
Model AMD-2 Automatic Air Maintenance Device
Compressor Control Type with
Field-Adjutable Pressure Switch
Page 1 of 4 AUGUST 2018 TFP1231
Worldwide
Contacts
www.tyco-fire.com
IMPORTANT
Refer to Technical Data Sheet
TFP2300 for warnings pertaining to
regulatory and health information.
General
Description
The TYCO Model AMD-2 Automatic Air
Maintenance Device is an automatic,
field-adjustable device that controls
the on-off cycling of an air compres-
sor. It is used to control the pressure in
a dry pipe sprinkler system, preaction
system, or dry pilot line of a dry pilot
actuated deluge or preaction valve.
The Model AMD-2 Device is utilized
in applications requiring the use of a
small, non-tank mounted compressor
dedicated to system pressurization.
The Model AMD-2 Device monitors
system pressure and automatically
cycles the air compressor on and off
to maintain system pressure within
preset limits.
The Model AMD-2 Device features a
Pressure Switch with integral unload-
ing valve that automatically bleeds the
pressure between the air compressor
and the Model AMD-2 Device after the
air compressor automatically shuts off.
This feature prevents start-up of the air
compressor under load.
The Model AMD-2 Device is a re-desig-
nation for the Central Model DU-2, Gem
Model F326, and Star Model S465.
NOTICE
The Model AMD-2 Automatic Air Main-
tenance Devices described herein must
be installed and maintained in compli-
ance with this document and with the
applicable standards of the NATIONAL
FIRE PROTECTION ASSOCIATION, in
addition to the standards of any author-
ities having jurisdiction. Failure to do so
may impair the performance of these
devices.
Owners are responsible for maintain-
ing their fire protection system and
devices in proper operating condition.
The installing contractor or sprinkler
manufacturer should be contacted with
any questions.
Technical
Data
Approvals
UL and C-UL Listed
FM Approved
NYC Approved under MEA 206-02-E
NEMA Rating
The housing of the Pressure Switch meets
NEMA 1 requirements.
Field-Adjustable Pressures
Minimum Cut-In (On) 14 psi (1,0 bar)
Maximum Cut-Out (Off) 60 psi (4,1 bar)
Pressure Switch Differential
6 psi (0,4 bar)
The switch ratings are as follows:
115 VAC, 1 Phase . . . . . . . . . . . . . . . . . . . . 2 HP
230 VAC, 1 Phase . . . . . . . . . . . . . . . . . . . . 3 HP
230 VAC, 3 Phase . . . . . . . . . . . . . . . . . . . . 5 HP
575 VAC, 3 Phase . . . . . . . . . . . . . . . . . . . . 5 HP
115 VDC. . . . . . . . . . . . . . . . . . . . . . . . . . . . 2 HP
230 VDC . . . . . . . . . . . . . . . . . . . . . . . . . . . 2 HP
Factory-Set Outlet Pressure
35 to 41 psi (2,4 to 2,8 bar)
Assembly
Major components illustrated in Figure
1 are factory-assembled, galvanized
steel nipples and malleable iron pipe
fittings.
Operation
The By-Pass Valve in the Model AMD-2
Automatic Air Maintenance Device
is opened to quickly fill the system
during initial pressurization. After
the cut-out pressure of the Pressure
Switch is reached, its actuating lever
transfers the DPDT switch contacts to
shut off the air compressor and open
the unloader valve to bleed pressure
between the air compressor and the
Restrictor Check Valve. The By-Pass
Valve is then closed to place the Model
AMD-2 Device in automatic operation.
The Restrictor Check Valve prevents
the unloader valve from bleeding down
the system. With the By-Pass Valve
closed, its 3/32 in. (2,4 mm) orifice
limits air flow into the system to a value
significantly less than that exhausted
by the operation of a 5.6 K-factor
sprinkler.
When there is a small leak in the
system, the Pressure Switch automati-
cally transfers its contacts at the cut-in
pressure to start the air compressor
and shuts off the air compressor after
the cut-out pressure is reached.
TFP1231
Page 2 of 4
Installation
The TYCO Model AMD-2 Automatic
Air Maintenance Device should be
installed in the horizontal position as
shown in Figure 1, as well as in accor-
dance with the following instructions.
NOTICE
Moisture build-up can adversely affect
performance. Suitable consideration
must be given to the removal of exces-
sive moisture from the compressed air
supply.
1. Make connections a minimum of
1/2 in. (DN15) pipe size between
the air compressor and the Model
AMD-2 Device, as well as between
the Model AMD-2 Device and the
system to pressurize.
2. If a moisture lter with integral
drain is not installed at the outlet
of the air compressor, install a Drip
Leg in the air line between the Air
Compressor and the Model AMD-
2 Device as shown in Figure 2.
3. Place a 1/2 in. (DN15), non-spring
loaded, rubber-faced, swing-type
check valve between the Model
AMD-2 Device and the system to
pressurize. A check valve of this
type is provided in the air supply
trim of TYCO dry pipe valves, pre-
action valves, and dry pilot trim.
4. Make conduit and electrical con-
nections to the Pressure Switch in
accordance with the requirements
of the authority having jurisdic-
tion and/or the National Electrical
Code. Refer to Figure 3 for identi-
cation of the wiring terminals.
The Pressure Switch is wired
through two, 1/2 in. Conduit
Openings in the base of its enclo-
sure. The No. 8 screw terminals
accept up to No. 12 AWG wire.
Setting
Procedure
The TYCO Model AMD-2 Automatic
Air Maintenance Device must be
set in accordance with the following
instructions.
1. Open the By-Pass Valve in the
Model AMD-2 Device.
2. Open the control valve in the
air supply trim to the system to
pressurize.
3. To pressurize the system, apply
electrical power to the Pressure
Switch.
4. Close the By-Pass Valve after the
Pressure Switch cuts out. Note the
cut-out pressure.
5. Open a connection to the system
slowly enough to reduce the air
pressure and close it immediately
after the Pressure Switch cuts in.
Verify that the cut-in pressure
meets the minimum requirements
of the system to pressurize, and
note the cut-out pressure.
If necessary, remove the cover
from the Pressure Switch and ad-
just the cut-in pressure adjustment
screw shown in Figure 3. The cut-
in pressure changes approximately
1.5 psi (0,1 bar) per half-turn of the
screw.
The cut-in pressure should be set
at the minimum required value, in
order to minimize the time to sys-
tem trip in the event of a sprinkler
operation.
6. Repeat Step 5 if the cut-in pres-
sure required adjustment. Note
both the cut-in and cut-out pres-
sures for future reference.
1/2" NPT OUTLET
CONNECTION
PRESSURE SWITCH
(WITH UNLOADER VALVE)
P/N 92-326-1-001
(TO SYSTEM)
7"
(177,5 mm)
12-1/2"
(317,5 mm)
2-1/2"
(63,5 mm)
16-1/2"
(419,1 mm)
4"
(101,6 mm)
RESTRICTOR
CHECK VALVE STRAINER
BY-PASS VALVE
(NORMALLY CLOSED)
P/N 46-047-1-004
1/2" NPT INLET
CONNECTION
(FROM AIR
COMPRESSOR)
1/2" CONDUIT
OPENINGS
P/N 92-326-1-003 P/N 52-353-1-002
FIGURE 1
MODEL AMD-2
AUTOMATIC AIR MAINTENANCE DEVICE
TFP1231
Page 3 of 4
Care and
Maintenance
The TYCO Model AMD-2 Automatic
Air Maintenance Device must be main-
tained and serviced in accordance with
the following instructions, in addition to
any specific requirements of the NFPA.
Any impairment must be immediately
corrected.
NOTICE
Before closing a fire protection system
main control valve for maintenance
work on the fire protection system
that it controls, obtain permission to
shut down the affected fire protec-
tion system from the proper authori-
ties and notify all personnel who may
be affected by this action.
Do not allow condensed moisture
to back-up into the air compressor
cylinder.
It is recommended that accumulated
moisture be removed from air supply
moisture filtration equipment at least
quarterly. More frequent inspections
may be necessary in particularly humid
environments.
After placing a fire protection system
in service, notify the proper authori-
ties and advise those responsible for
monitoring proprietary and/or central
station alarms.
Responsibility lies with owners for the
inspection, testing, and maintenance of
their fire protection system and devices
in compliance with this document, as
well as with the applicable standards
of the NATIONAL FIRE PROTECTION
ASSOCIATION (for example, NFPA 25),
in addition to the standards of any other
authorities having jurisdiction. Contact
the installing contractor or sprinkler
manufacturer regarding any questions.
Automatic sprinkler systems are rec-
ommended to be inspected, tested,
and maintained by a qualified Inspec-
tion Service in accordance with local
requirements and/or national code.
The Model AMD-2 Automatic Air Main-
tenance Device must be inspected
quarterly in accordance with the fol-
lowing instructions.
7. Verify that the Model AMD-2 By-
Pass Valve is closed.
8. Clean out the 1/4 in. Model AMD-2
Strainer located at the inlet to the
Restrictor Check Valve. Be sure to
re-install the strainer screen and
tighten the cap securely.
9. Close the system’s main control
valve and open the main drain
valve. Close the accelerator con-
trol valve, if the system is so
equipped.
10. Open a connection to the sys-
tem slowly enough to reduce
the air pressure and close it
immediately after the Pres-
sure Switch cuts in. Verify
that the cut-in and cut-out pres-
sures are essentially the same
as the previously established
requirements.
11. Open the accelerator control valve,
as applicable.
12. Slowly open the main control valve
and after water begins to ow,
slowly close the main drain valve.
Completely open the main control
valve. The Model AMD-2 Device is
now ready for service.
Limited
Warranty
For warranty terms and conditions, visit
www.tyco-fire.com.
Ordering
Procedure
Contact your local distributor for avail-
ability. When placing an order, indi-
cate the full product name, including
description and Part Number (P/N).
Model AMD-2 Device
Specify: Model AMD-2 Automatic Air
Maintenance Device, P/N 52-326-2-001
Replacement Parts
Specify: (description) for use with the
Model AMD-2 Automatic Air Mainte-
nance Device, P/N (from Figure 1)
AIR COMPRESSOR
MODEL AMD-2
AIR MAINTENANCE
DEVICE
TO
SYSTEM
6" DRIP LEG
INCREASE PRESSURE
LINE MOTOR LINE
CUT-IN (ON) PRESSURE
ADJUSTMENT SCREW
FIGURE 2
INSTALLATION OF DRIP LEG BETWEEN
AIR COMPRESSOR AND MODEL AMD-2 DEVICE
FIGURE 3
ADJUSTMENT SCREW
AND WIRING TERMINALS
(COVER REMOVED)
TFP1231
Page 4 of 4
NATIONAL FIRE PROTECTION ASSOCIATION and NFPA are registered trademarks of National Fire Protection Association
1400 Pennbrook Parkway, Lansdale, PA 19446 | Telephone +1-215-362-0700
© 2018 Johnson Controls. All rights reserved. All specifications and other information shown were current as of document revision date and are subject to change without notice.

This manual suits for next models

1

Other Johnson Controls Control Unit manuals
Johnson Controls Tyco DV-5a Series User manual

Johnson Controls

Johnson Controls Tyco DV-5a Series User manual

Johnson Controls S1-TTSCC01 Quick start guide

Johnson Controls

Johnson Controls S1-TTSCC01 Quick start guide

Johnson Controls Tyco DV-5a Series User manual

Johnson Controls

Johnson Controls Tyco DV-5a Series User manual

Johnson Controls NIE39 User manual

Johnson Controls

Johnson Controls NIE39 User manual

Johnson Controls System 450 Series User manual

Johnson Controls

Johnson Controls System 450 Series User manual

Johnson Controls MS-IOM2710-0U User manual

Johnson Controls

Johnson Controls MS-IOM2710-0U User manual

Johnson Controls S300 Series Assembly instructions

Johnson Controls

Johnson Controls S300 Series Assembly instructions

Johnson Controls GH-5000 User manual

Johnson Controls

Johnson Controls GH-5000 User manual

Johnson Controls CKM-MR51E Assembly instructions

Johnson Controls

Johnson Controls CKM-MR51E Assembly instructions

Johnson Controls Tyco 8200-1466-01 User manual

Johnson Controls

Johnson Controls Tyco 8200-1466-01 User manual

Johnson Controls GM 20 Series User manual

Johnson Controls

Johnson Controls GM 20 Series User manual

Johnson Controls MS-IOM3723 User manual

Johnson Controls

Johnson Controls MS-IOM3723 User manual

Johnson Controls METASYS NU-XBN101-0 User manual

Johnson Controls

Johnson Controls METASYS NU-XBN101-0 User manual

Johnson Controls Penn System 450 Series User manual

Johnson Controls

Johnson Controls Penn System 450 Series User manual

Johnson Controls TrueRH Series Guide

Johnson Controls

Johnson Controls TrueRH Series Guide

Johnson Controls Penn P28 Series User manual

Johnson Controls

Johnson Controls Penn P28 Series User manual

Johnson Controls Penn System 350 S350P User manual

Johnson Controls

Johnson Controls Penn System 350 S350P User manual

Johnson Controls GM 20 Series User manual

Johnson Controls

Johnson Controls GM 20 Series User manual

Johnson Controls VP140 L Series User manual

Johnson Controls

Johnson Controls VP140 L Series User manual

Johnson Controls System 450 Series Operation and maintenance manual
Johnson Controls

Johnson Controls System 450 Series Operation and maintenance manual

Johnson Controls IOM3711 User manual

Johnson Controls

Johnson Controls IOM3711 User manual

Johnson Controls S1-TTSCC01 User manual

Johnson Controls

Johnson Controls S1-TTSCC01 User manual

Johnson Controls G77 Series Service manual

Johnson Controls

Johnson Controls G77 Series Service manual

Johnson Controls H Series User manual

Johnson Controls

Johnson Controls H Series User manual

Popular Control Unit manuals by other brands

Orno OR-GB-426 Operating and instalation instructions

Orno

Orno OR-GB-426 Operating and instalation instructions

Kohler ENGLEFIELD K-98095X Installation and care guide

Kohler

Kohler ENGLEFIELD K-98095X Installation and care guide

CALEFFI 3048 Series manual

CALEFFI

CALEFFI 3048 Series manual

Hankscraft Runxin HS Series Service manual

Hankscraft Runxin

Hankscraft Runxin HS Series Service manual

Belden Miranda DENSITE Series Guide to installation and operation

Belden

Belden Miranda DENSITE Series Guide to installation and operation

Vetus VRF56A installation instructions

Vetus

Vetus VRF56A installation instructions

Crestron CNTV Operation guide

Crestron

Crestron CNTV Operation guide

Tigo TS4-F Installation & quick start guide

Tigo

Tigo TS4-F Installation & quick start guide

GEM 660 operating instructions

GEM

GEM 660 operating instructions

Toshiba TECRA S1 Series Replacement guide

Toshiba

Toshiba TECRA S1 Series Replacement guide

Viessmann Cascade control unit Installation, operating and service instructions

Viessmann

Viessmann Cascade control unit Installation, operating and service instructions

PedalPCB Pumbaa Distortion manual

PedalPCB

PedalPCB Pumbaa Distortion manual

Viessmann VITOTRONIC 200 Installation and service instructions for contractors

Viessmann

Viessmann VITOTRONIC 200 Installation and service instructions for contractors

Panasonic WX-CC411BP operating instructions

Panasonic

Panasonic WX-CC411BP operating instructions

NOXAS Connection Kit manual

NOXAS

NOXAS Connection Kit manual

Texas Instruments TWL6032 user guide

Texas Instruments

Texas Instruments TWL6032 user guide

Eldes ESIM120 manual

Eldes

Eldes ESIM120 manual

Kitronik PROGRAMMABLE MUSIC BOX KIT manual

Kitronik

Kitronik PROGRAMMABLE MUSIC BOX KIT manual

manuals.online logo
manuals.online logoBrands
  • About & Mission
  • Contact us
  • Privacy Policy
  • Terms and Conditions

Copyright 2025 Manuals.Online. All Rights Reserved.