JOHNSON HEALTH TECH. Tempo Fitness TP-DH-8619 User manual

A brand of Johnson Health Tec
h
TP-DH-8619
AIR ROWER
USER
MANUAL
https://www.jhta.com.au/consumer-support/

2
Safety instructions
Thank you for purchasing our products. The correct use of this equipment is your guarantee of safety and
health. Please read this manual carefully before installing and using this equipment! Exercises can be made
safe and effective only if they are properly installed, maintained, and used.
1. Before starting a practice program, consult your doctor to determine your current physical condition and whether it will be
hazardous to your health when using this equipment. If you are doing some treatment about heart rate, blood pressure, and
cholesterol, then the doctor's advice is very important.
2. Pay attention to some signals from your own body. Incorrect and excessive exercise will hurt your health. If you feel the following
discomfort: pain, chest tightness, fast heartbeat, shortness of breath, top-heavy, dizzy, and nausea, stop practicing immediately. If
you want to continue your practice program, please consult your doctor first.
3. Keep children and pets away from this equipment. This equipment is designed for adults.
4. Put a sturdy, flat material at the bottom of the equipment to protect your floor and carpet. For your safety, please ensure that there
is at least 0.6m of free space around the equipment.
5. Please ensure that the screws and nuts are tightly locked before use and check the product regularly.
6. Please use the machine carefully. If you notice any defects when installing or using the equipment, or if you hear any abnormal
noise, stop the exercise immediately.Do not continue to use the machine until the problem is resolved.
7. Wear fitted clothing during exercise to prevent loose clothing from being shackled or restricting movement.
8. Do not put your fingers or other objects in the equipment.
9. The maximum load of this product is 136KG (300 lbs).
10. This product cannot be used as a medical device.
11. Be careful when handling this equipment to avoid unnecessary injury.
12. This product is suitable for use in a cool, dry environment. Do not store in extremely cold, hot or humid places as this may corrode
the product or cause other problems.
13. This product is for indoor use only and is not suitable for commercial use.
Spare parts lists:

3
EXPLODED-VIEW & PARTS LIST

4
N
O
DES. Specification Qt
y
N
O
DES. Specification Qt
y
1 Main Frame 1 43 Wave washer
d10*Φ15*0.3
2
2 Front Stabilizer 1 44
Wheel casing
Ø10*Ø6.2*40
1
3 Seat Bracket 1 45
Pedal webbing
2
4 Rear Stabilizer 1 46
Hex Bolts
M6*55*15*S10
1
5
rear foot tube plug
2pcs=1set
2
47
Form Grip
2
6
Seat Bracket plug
1
48 Adjustment lever 1 4
7 Connecter for Seat right support
plate 1 49 Chained U shape 30*10*T1.5 4
8 Seat right support plate 1 50 Hex nuts M10*1.0 4
9 U-shaped baffle 2 51 One-way bearing sleeve ф17*44 1
10 Handrail tube 1 52 washer d36 1
11
connecter for Ribbon and wheel
axle
Φ22*130 1 53 Webbing fixed shaft Φ5*43 1
12 Belt pulley Φ26*104 1 54 One-way bearing
ф35*d17*16
1
13 Ribbon wheel assembly Φ35*110 1 55 Bearing
16003-2RS
Φ35*Φ10*11 2
14 Scroll spring cover Φ PA66+20%纤 1 56 Bearing
6300-2RS
Φ35*Φ10*11 1
15 Fixed foot pedal 1 57 Scroll spring t0.5*22*5080 1
16 Fixed foot pedal 1 1 58 Hexagon socket head screw M8*40*15*S5 1
17 Pedal connecter 2 59
Cross recessed pan head tapping
screws
ST4.2*16*Φ8 12
18
Pedals
2
60 Hex flange nut M12*1.0 4
19 Rotating connector 1 61 Bearing 6008-2Z 6
20 Pull handle 1 62 Roller spacer d8*φ15*4 6
21
plug
1
63
Nut
M8*H7.5*S13
4
22 Footpad Φ52*40*M10 1 64 Hex bolts M8*125*15 *S14 3
23 Hexagon socket head screw 2 65 Magnetic plate 1
24
Protective cover left
1 66
Electronic watch fixed piece
1
25
Protective cover right
1 67
Countersunk Phillips screw
M6*10
4
26 Outside cover for the wheel Φ89*Φ16.5*0.5 1 68 Console 1
27 Board of Ribbon wheel Φ111*Φ16*0.5 1 69 Hexagon socket head cap screws M8*15*S5 18
28 front foot tube plug 2pcs=1set 2 70
Round head hexagon socket head cap
bolt M6*70 1
29
Roller wheel
3
71 Flat gasket ф16*ф8.5*1.5 26
30 Hex bolts
M12*155*25
*S19
4 72 Sensor with strip 2
31 Fan leaf 1 73
Round head Phillips screw
M5*12
4
32 Seat 1 74 Hexagon socket head screw M6*35*15*S5 8
33 wheel for Ribbon belt 115*110*34.5 1 75 Armrest fixing pad 104*50*18 1
34 elliptical tube plug 60*30*1.5 1 76 Round head Phillips screw M5*12 4
35 Rubber pad 2 77 Sixteen fine-tuning 1
36 spring 1 78 washer D6*Φ12*1.5 1
37 Belt 1 79 Sensor seat 1
38
Net cover Right
1
80
hexagonal wrench
S5
1
39 Net cover Left 1 81 Open end wrench S10-S19 1
40
Bearing
6000
3
82 washer d6.5*Φ12*1.5 2
41
Nut
M6*H6*S10
5 83 Cross recessed flat head screw M4*15 10
42 Shaft circlip
D10
2 84 Strake 1

5
Assembly instructions
Step 1:
Turn over the Seat Bracket (#3) and Seat ( #32)
like picture show. Use 2pcs M6*10(#67) to lock
1pc(#35) to with the Seat Bracket(#3). Then
conncet the Rear Stabilizer (# 4) with the Seat
Bracket (#3) by using 4pcs M8*15(#60) and
4pcs Flat gasket (#71)
Step 2:
Connect the Front Stabilizer (#2)with Main
Frame(#1)by using 4 pcs M8*15(#69) and
4pcs Flat gasket (#71), and locked by S5 (#80)
Note: The frame has a package of Styrofoam in
the middle of the assembly. When assembling,
the front roller is facing downwards. After
tightening the screws, stand up and remove the
Styrofoam
Step 3:
Use M12 Hex flange nut(#30) to through
the padels and then lock on the Main Frame
(#1), and then use the wrench(#81) to lock.
Note: Please distinguish the left and right foot
pedals

6
Assembly instructions
Step 4:
First connect the two wire terminals, and then
connect the Console(#68)with the Main
Frame (#1). Insert the M6*70 screw (#70) and
OD12*ID6.5*1.5 washer (#82) into the hole,
screw the Nut (#41)into screw (#70). Finally,
using the S5(#80) and S10-19(#81) to lock.
Step 5:
Firstly, put the Seat Bracket (#3)into Main
Frame(#1), and then put the 6pcs M8*15 (#69)
and 6pcs OD20*ID8.5*1.5 (#71)into the hole,
lock them with wrench S5 (#80)
Assembly is complete! Please confirm if all screws are tightened

7
Moving machine warning! When moving parts such as cushions, you
may crush or cut your body. Do not touch the rails when using the
machine. The knob #55 can be bounced into the rail #3 in the limit
seat cushion.
Adjustment guide
Warning!
When erecting the machine,
please note that the head
may touch the rear support
tube.
To move the machine, lift the rear support tube until the
moving wheel on the front support tube touches
Adjusting balance
If the machine is not flat after assembly, adjust the pipe
plug on the rear support tube to balance it.
Machine storage
Warning!
The seat will slide
down when the rails
are erected.
When the flattening machine is in use,
press #21# to put the smooth track #3,
then lift the #20 pull handle up and
hear the sound of the #21 slot card.
You can erect the machine to
save space when not in use.

8
Pedal adjustment
1、The pedal webbing is adjustable and can be adjusted to 37 for different user's foot sizes.
2. The position of the foot can be adjusted by adjusting the length of the 23 pedals, and the foot size of different users can be applied.

9
Exercise Coputer
FUNCTIONAL BUTTONS:
MODE -Push down for selecting functions.
UP - In setting status, press this button to increase setting value in relevant flashing window for TIME, COUNT, CAL,DIST
DOWN - In setting status, press this button to decrease setting value in relevant flashing window for TIME, CONT, CAL,
DIST
RESET -Push down for resetting count 、time、dist and calories .
FUNCTION AND OPERATIONS:
1. COUNT: (1)Accumulate the steps while exercising.
(2)Press“MODE”button until“Count”appears,Press“UP/DOWN”button to set exercise Count.
When the SET is zero, the computer will stop about 1 seconds after the start of the time.
2. RPM: Display the steps per minute while exercising.
3. TIME: (1) Count the total time from exercise start to end.
(2)Press“MODE”button until“TIME”appears,press“UP/DOWN”button to set exercise time.
When the“SET”is zero, the computer will stop 1 seconds after the start of the time
4. DIST: (1) Count the distance from exercise start to end.
(2)Press“MODE”button until“DIST”appears,Press“UP/DOWN”button to set exercise distance.
When the“SET”is zero, the computer will stop about 1 seconds after the start of the time.
5. CALORIES: (1) Count the total calories from exercise start to end.
(2)Press“MODE”button until“CAL”appears,Press“UP/DOWN”button to set exercise calories.
When the SET is zero, the computer will stop about 1 seconds after the start of the time
6. TEMP:(1) The monitor will display current room temperature when the monitor is in sleep mode.
(2)Press“MODE”button until“TEMP”appears,Press“UP/DOWN”button to set ℉/℃
NOTE:
1. If the display is faint or shows no figures , please replace the batteries.
2. The monitor will automatically shut off if there is no signal received after 4 minutes .
3. The monitor will be auto-powered on when starting to exercise push button w/signal in.
4. The monitor will automatically start calculating when you start to exercise and
will stop calculating when you stop exercising for 4 seconds
SPECIFICATIONS:
COUNT
0-999
RPM
0-999
TIME
00:00’~99:59’
DIST
0.00~999(ML)KM
CALORIES
0.0~999kCAL
BATTERY TYPE
2pcs of SIZE –AAA or UM –4
OPERATING TEMPERATURE
0°C ~ +40°C
STORAGE TEMPERATURE
-10°C ~ +60°C

9
5
Beginners Guidelines
If you’re beginning an exercise program, you should check with your doctor if:
You have been diagnosed with heart problems, high blood pressure or other medical
conditions.
You have not exercised for over a year.
If you are over 35 and do not currently exercise.
You are pregnant.
You have diabetes.
You have chest pain, or experience dizziness or fainting spells.
You are recovering from an injury or illness.
WORKOUT TIPS
Always perform stretching exercises both before and after your workout.
Start slowly, doing too much or too soon can lead to injuries.
If you are sore or tired, give yourself a few extra days to recover.
HOW TO BEGIN
Start with two or three 15 minute sessions per week with a rest day between work-outs.
Warm-up for 5 to 10 minutes with gentle movements like walking or swinging your arms in a
circle and then stretch the muscles that you’ll use during your workout.
Increase the pace and resistance to a little harder than comfortable and exercise as long as you
can. You may only be able to exercise for a few minutes at a time, but that will change quickly if
you exercise regularly.
End each workout with a 5-minute cool down period at a gradually reducing pace. You should
then stretch the muscles you’ve just worked to prevent injury and cramp.
Increase your workout time by a few minutes each week until you can work continuously for 30
minutes per session.
Don’t worry about distance or pace.
For the first few weeks, focus on endurance and conditioning.
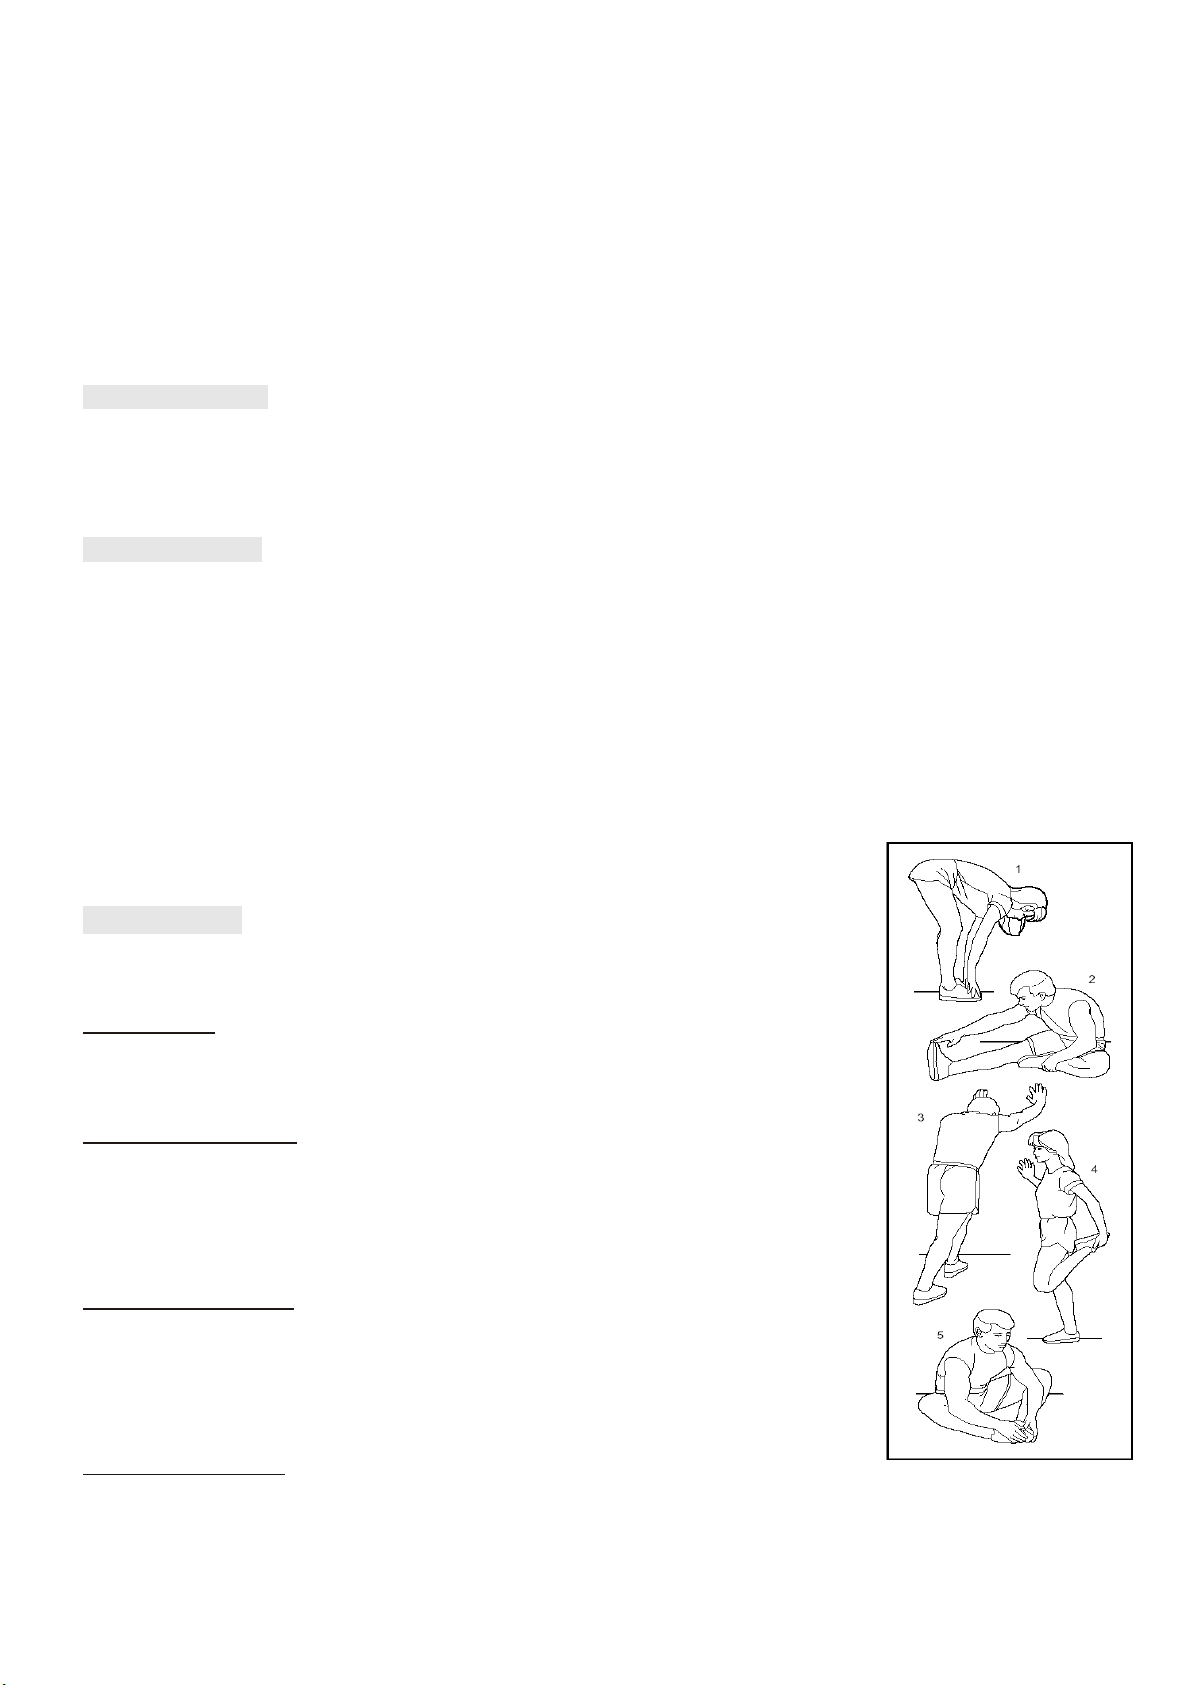
Stretching Tips
Before running, user should do 5-10 minute’s warm-up exercise
as followings:
Toe touches
Slowly bend forward from your waist, letting your back
and
shoulder relax as you stretch toward your toes. Reach down
as far as you can and hold for 15 seconds.
Hamstring stretches
Sit with your right leg straight in front of you. Straighten your
leg out while trying to hold on to your outstretched leg with
your hand. Starting up with your back straight. Slowly exhale
and try to bring your chest to the knee of your outstretched
leg. Hold, then repeat on the other side for 15 seconds.
Calf/Achilles stretch
Lean against a wall with your left leg in front of the right and your
arms forward. Keep your right leg straight and the left foot on
the floor; then bend the left leg and lean forward by moving
your hips toward the wall. Hold, then repeat on the other side
for 15 seconds.
Quadriceps stretch
With one hand against a wall for balance, reach behind you and
pull your right foot up. Bring your heel as close to your buttocks
as possible. Hold for 15 counts and repeat with left foot up.
Johnson Health Tech Australia
78 Logis Boulevard
Dandenong South VIC 3175
© 2018 Johnson Health Tech Australia.
All Rights Reserved.
Product specifications subject to change without notice.
For any customer service support
please call 1300 760 601 or
log on to www.jhta.com.au/service

Inner thigh stretch
Sit with the soles of your feet together with your knees pointing
outward. Pull your feet as close into your groin as possible.
Gently push your knees toward the floor. Hold for 15 counts.
10
Johnson Health Tech Australia
78 Logis Boulevard
Dandenong South VIC 3175
© 2018 Johnson Health Tech Australia.
All Rights Reserved.
Product specifications subject to change without notice.
For any customer service support,
please call 1300 760 601 or
log on to https://www.jhta.com.au/consumer-support/
Table of contents