Johnson JSC8B User manual

SECADORA
MANUAL DE USUARIO
USER MANUAL
•JSC8B
Lea este manual
Use todas las instrucciones y
explicaciones de instalación antes de
usar el aparato. Siga las instrucciones
cuidadosamente y téngalo a mano para un
futuro uso. Si el aparato es vendido o
prestado, asegúrese de que el nuevo dueño
recibe estas instrucciones.
¡Peligro! Riesgo de incendio
V.1
V.1

CONTENIDO
INSTRUCCIONES DE SEGURIDAD
■
INSTALACIÓN
■
■
F
UNCIONAMIENTO
■
■
■
■
■
6
MANTENIMIENTO
■
■
■E
º .
'
.
■
INSTRUCCIONES DE SEGURIDAD
2
•
•
Este producto pertenece a la categoría I de aparatos eléctricos, y
solo está diseñado para secar textiles que se han lavado con agua
en el hogar. ¡Preste atención a la seguridad del uso de la corriente
durante su funcionamiento!
Se debe utilizar una fuente de alimentación con conexión a tierra
confiable. Su cable de tierra debe estar enterrado bajo tierra y no
debe estar conectado con los servicios públicos, como tuberías de
agua de la ciudad o de gas, etc. El cable de tierra y el cable nulo
deben distinguirse y no deben conectarse entre sí.
•
•
El cable de alimentación debe cumplir con IEC y debe ser
capaz de soportar la corriente por encima de 16A. Para
garantizar su seguridad y la de su familia, realice mejoras
de inmediato si el uso de energía en su hogar no cumple
con los requisitos mencionados anteriormente.
• No ponga más carga de la recomendada Obedezca el
volumen de carga máximo. Consulte el capítulo
relacionado en el manual del usuario.
•
•La secadora no se debe utilizar si se han utilizado productos
químicos industriales para la limpieza.
•No seque artículos sin lavar en la secadora.
•Las prendas que han sido manchadas con sustancias como
aceite de cocina, acetona, alcohol, gasolina, queroseno,
quitamanchas, trementina, ceras y quita ceras deben lavarse
en agua caliente con una cantidad extra de detergente antes
de secarse en la secadora.
•Los suavizantes o productos similares, deben usarse según
lo especificado en las instrucciones del suavizante de telas.
Instrucciones de seguridad
ʽ¡Advertencia!
Para evitar cualquier daño a la vida o propiedad de
usted y de otros, debe seguir las normas de seguridad.
V.1
V.1

3 4 3 4
INSTRUCCIONES DE SEGURIDADINSTRUCCIONES DE SEGURIDAD
•El aparato no debe volcarse durante el uso o mantenimiento.
•Retire todos los objetos de los bolsillos, como encendedores
y fósforos.
•Este aparato puede ser utilizado por niños de 8 años en
adelante y personas con capacidades físicas, sensoriales o
mentales reducidas o falta de experiencia y conocimiento si se
les ha dado supervisión o instrucciones sobre el uso del
aparato de manera segura y entienden peligros involucrados.
Los niños no deben jugar con el aparato. Los niños no deben
realizar la limpieza y el mantenimiento sin supervisión (esta
advertencia es solo para el mercado EUROPEO)
•El aparato no está diseñado para ser utilizado por personas
(incluidos niños) con capacidades físicas, sensoriales o
mentales reducidas, o falta de experiencia y conocimiento, a
menos que una persona responsable de su seguridad les haya
dado supervisión o instrucciones sobre el uso del aparato. Los
niños deben ser supervisados para asegurarse de que no
jueguen con el aparato. (Esta advertencia no es para el
mercado EUROPEO)
•Si el cable de alimentación está dañado, debe ser
reemplazado por el fabricante, su agente de servicio o
personas igualmente cualificadas para evitar un peligro.
•Este aparato es solo para uso en interiores.
•Las aberturas no deben estar obstruidas por una alfombra.
•Los niños de menos de 3 años deben mantenerse alejados a
menos que estén continuamente supervisados.
•Si el aparato tiene una temperatura anormalmente alta,
desenchufe la corriente inmediatamente.
•
Los artículos como gorros de ducha de gomaespuma (espuma de
látex), textiles impermeables, artículos con respaldo de goma y
ropa o almohadas con almohadillas de gomaespuma no deben
secarse en la secadora.
•
La parte final de un ciclo de secadora se produce sin calor (ciclo
de enfriamiento) para garantizar que las prendas se dejen a una
temperatura que asegure que evite que se dañen.
•
La trampa de pelusas debe limpiarse con frecuencia.
•
No se debe permitir que la pelusa se acumule alrededor de la
secadora.
•
•e debe proporcionar una ventilación adecuada para evitar el
reflujo de gases a la habitación por la quema de otros
combustibles, incluidos los fuegos abiertos.
•
El aire de escape no debe descargarse en un conducto de humos
que se utiliza para expulsar los humos de los electrodomésticos
que queman gas u otros combustibles.
•
El electrodoméstico no debe instalarse detrás de una puerta con
cerradura, una puerta corredera o una puerta con una bisagra en
el lado opuesto al de la secadora ya que se restringe la apertura
total de la puerta de la secadora.
•
Las prendas manchadas por aceite pueden encenderse
espontáneamente, especialmente cuando se exponen a fuentes de
calor, como en una secadora. Las prendas se calientan, causando
una reacción de oxidación en el aceite. La oxidación crea calor. Si
el calor no puede escapar, los artículos pueden calentarse lo
suficiente como para incendiarse. Apilar o almacenar prendas
manchadas de aceite puede evitar que el calor se escape y, por lo
tanto, generar un peligro de incendio.
•
Si es inevitable que las telas que contienen aceite vegetal o de
cocina o que hayan sido contaminadas por productos para el
cuidado del cabello se coloquen en una secadora, primero se
deben lavar en agua caliente con detergente adicional; esto
reducirá, pero no eliminará, el peligro.
V.1
V.1

JSC8B
Eliminación correcta de este producto
En base a la norma europea del 2002/96/CE de residuos
de aparatos eléctricos y electrónicos (RAEE), los
electrodomésticos no pueden ser arrojados en los contenedores
municipales habituales; tienen que ser recogidos selectivamente
para optimizar la recuperación y reciclado de los componentes y
materiales que los constituyan, y reducir el impacto en la salud
humana y el medio ambiente. El símbolo del cubo de basura
tachado se marca sobre todos los productos para recordar al
consumidor la obligación de separarlos para la recogida
selectiva. El consumidor debe contactar con la autoridad local o
con el vendedor para informarse en relación a la correcta
eliminación de su electrodoméstico.
V.1
V.1

I
NSTALAC
I
ÓN
■
■
•
l
•El material de embalaje (por ejemplo, películas, espuma de poliestireno) puede ser peligros:J
o
para los niños. ¡Existe el riesgo de asxia! Mantenga todo el embalaje lejos del alcance de los
niños.
7
I
NSTALAC
I
ÓN
U se unos alicates para
quitar la manguera de
drenaje del conector de la
manguera.
�- _
Coloque el soporte de la manguera en el
lavabo o en cualquier otro egadero.
8
V.1
V.1

FU
NCIONA
M
IEN
T
O
■Inicio rápido
[�Nota! 7
Secado
) ) §)8
start
Después de secar
l Nota!
9
FU
NCIONA
M
IEN
T
O
10
Antes de cada lavado
¡Nota!
Mmo
e
e o ueros
s @roe ro opa eo
r e o
ses s � ees
o o o
� Nota!
Qos
o
ss
o
Antes del primer ciclo y evitar que su ropa se contamine, siga estos pasos
para eliminar el polvo y la grasa que pueden permanecer en esta secadora
del período de fabricación y transporte:
•Ponga algunos trapos limpios en el tambor
•Enchufe la corriente.
•Seleccione el programa "Rápido", presione el botón "Inicio / Pausa".
•Después de terminar este programa, siga las instrucciones de "Limpieza y
cuidado" para limpiar el filtro de pelusas y el condensador de aire en la
página 19.
V.1
V.1

FU
NCIONA
M
IEN
T
O
solo disolvente de petróleo
L
Sin
& Intensidad de
secado
Inicio/Pausa
FU
NCIONA
M
IEN
T
O
11 12
V.1
V.1

0/G
;l
BM
Filter
Full
G
Indicador de velocidad
&/O
13 14
FU
NCIONA
M
IEN
T
O
FU
NCIONA
M
IEN
T
O
Selector de programa
1.El tambor dejará de funcionar después de que finalice el programa, la señal sonará,
la pantalla mostrará " ",
La luz de estado de la última fase del ciclo parpadeará. La
secadora iniciará la función ǏAnti-arrugas】si el usuario no retira la ropa en
para contar la alimentación1 minuto (vea la pág.). Por favor, pulse y
retire el enchufe.
2. Trate con el problema de "Pantalla y soluciones de mal funcionamiento", si
hay una parada inesperada durante el proceso de secado y la secadora
muestra información (consulte la página 20).
【On/Off】
1.Presione 【On / Off】, cuando la pantalla LED se ilumine, gire la perilla del programa
para seleccionar el programa deseado.
2.Seleccione el 【Inicio diferido】, 【Tiempo】, 【Intensidad】, 【Velocidad de
secado】, 【Señal】 o función 【Anti-arrugas】 para una opción adicional.
3.Presione el botón 【Inicio / Pausa】.
Inicio del programa
El tambor seguirá girando después de que comience el programa, la luz de
estado en el área de visualización parpadeará en secuencia, el tiempo restante
mostrado cambiará automáticamente.
Fin del programa
•
Instrucciones de la función【Inicio diferido】
Esta función se utiliza para retrasar el tiempo de secado de la ropa en 24 horas.
El tiempo de retraso significa que el programa comenzará después de x horas.
Cuando se inicia el programa de inicio diferido, el tiempo comienza a disminuir
en la pantalla y el icono de retraso parpadea. Pasos:
• Instrucciones 【Velocidad de secado】
Según del modelo de lavadora:
Use esta función para reducir el tiempo de secado en los programas 【Algodón
Extra】 【Algodón Estándar】 【Mix】 【Vaqueros】 puede configurar la
función.
Use esta función para reducir el tiempo de secado en los programas【Algodón
Extra】 【Algodón Estándar】 【【Ropa de cama】 【Vaqueros】
Otras funciones
1.Cargue su colada y asegúrese de que la puerta está cerrada.
2.Pulse 【On/Off】y gire la ruleta para seleccionar el programa deseado.
3.Puede seleccionar 【Anti-arrugas】o【Señal】de acuerdo con sus necesidades.
4.Presione el botón【Inicio diferido】.
5.Siga pulsando【Inicio diferido】para ajustar el tiempo de retraso.
6.Después de pulsar 【Inicio/Pausa】,la secadora funcionará en esas condiciones.
El programa de secado, funcionará cuando se acabe el tiempo de retraso.
7.Si pulsa【Inicio/Pausa】otr a vez, la función inicio diferido se pausará.
8.Si desea cancelar la función inicio diferido, pulse【On/Off】.
Instrucciones de la función 【Tiempo】
Cuando se selecciona el programa de Calentar, Enfriar o Refrescar, el botón
【Tiempo】 se puede usar para ajustar el tiempo de secado en 10 minutos. Pasos:
Instrucciones de la función 【Intensidad】
Use esta función para ajustar el nivel de sequedad de la ropa.
Hay 4 grados de intensidad. El tiempo de secado aumenta 5 minutos en cada grado.
1.La función de intensidad solo se puede activar antes de que comience el programa.
2.Presione el botón 【Intensidad】 repetidamente para seleccionar el tiempo de secado.
3. Excepto 【Algodón planchado】 【Rápido】 【Sintético plachado】
【 Calentar】 【Enfriar】,【Refrescar】, todos los demás programas pueden
configurarse con la función 【Intensidad】.
V.1
V.1

FUNCIONAMIENTO FUNCIONAMIENTO
SN
SN
SN
SN
SN
S S
Planchado
Para el lavado sin planchado de tejidos sintéticos y mezclados, algodón.
Para algodones y prendas de algodón o lino de colores.
Estándar
Estándar
Sintético
Camisa
Vaqueros
Mix
Extra
Sports
Planchado
MI ciclo
8.0kg
Alogdón
Extra
Peso(max)
Especial
Programa
Define y guarda su programa favorito.
Calentar
Tiempo
Para calentar ropa desde mínimo 10 min. hasta un máximo de 120 minutos (pasos en 10 min.)
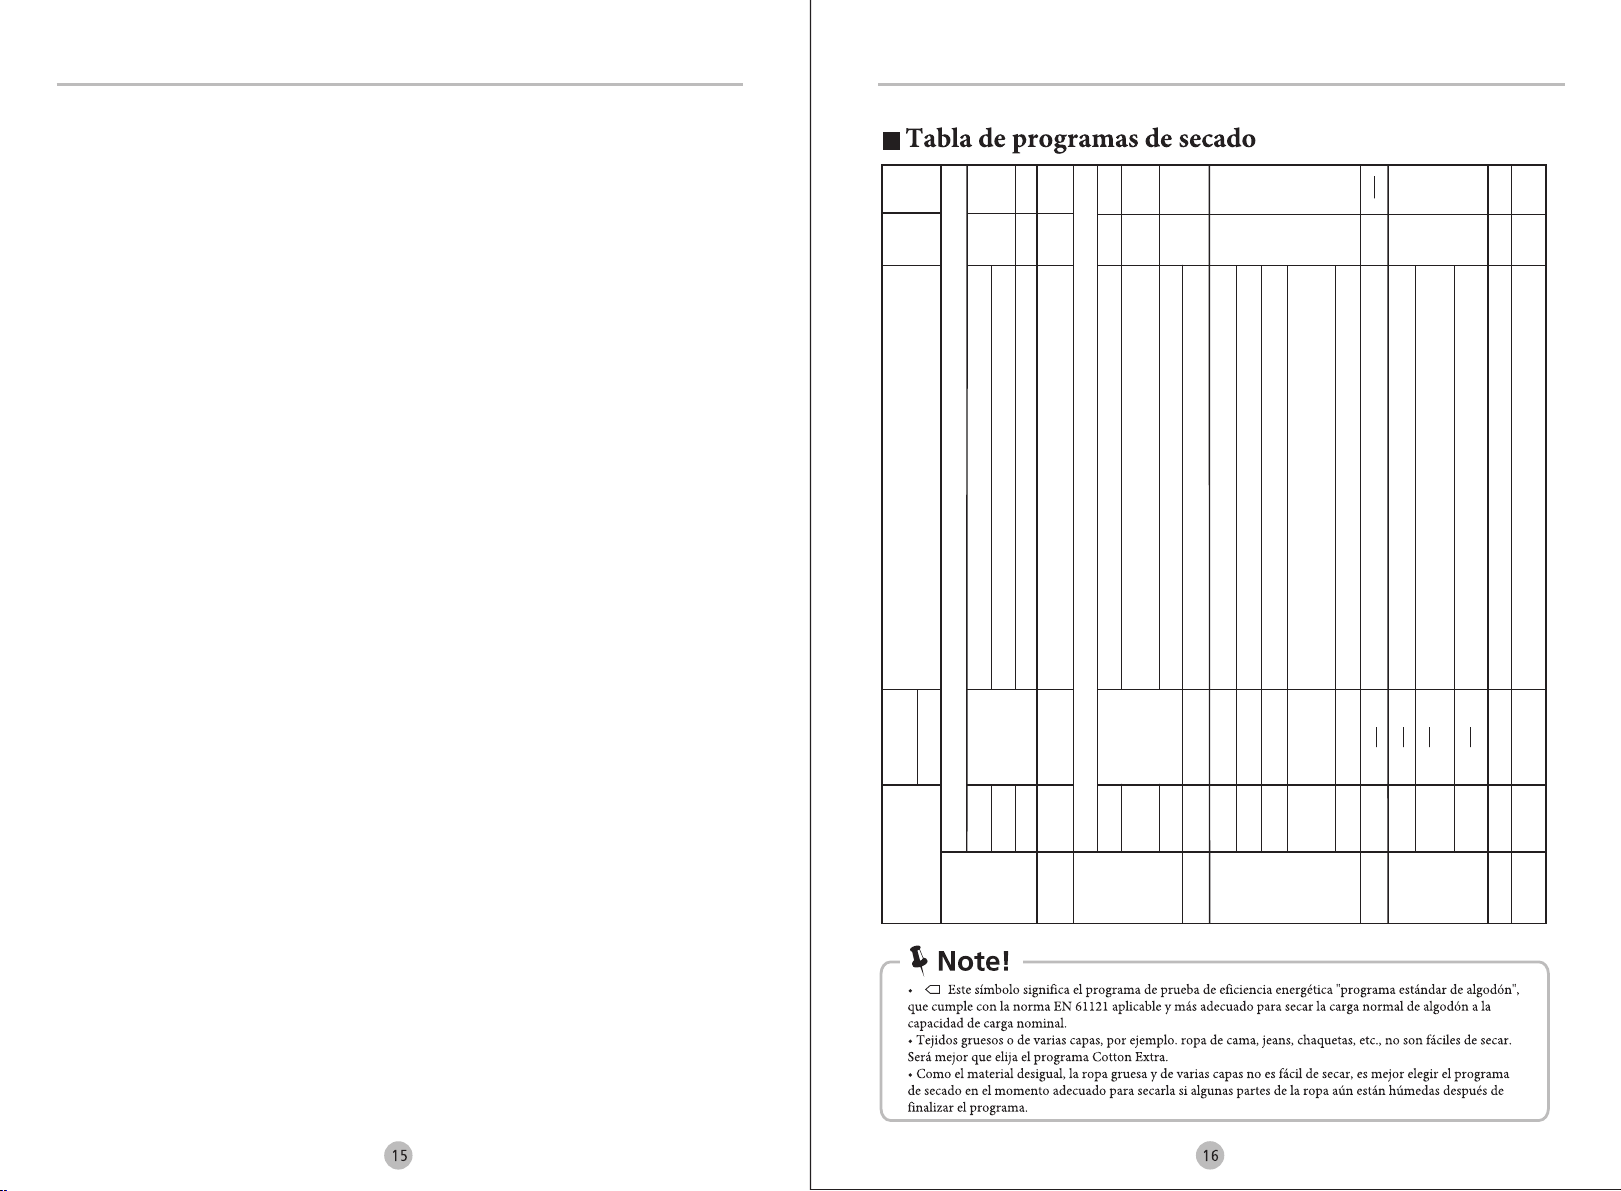
Para secar tejidos sintéticos gruesos o de varias capas. Nivel de secado: extra seco.
Para secar prendas de algodón. Nivel de secado: para planchado
Para secar prendas de algodón. Nivel de secado: para guardar en armario
Para secar prendas de algodón. Nivel de secado: extra seco.
Aplicación/programas
Para secar tejidos sintéticos delgados que también se plancharán, como prendas de punto, camisas.
Rápidp
Para colada que se debe secar rápidamente, por ejemplo, hecho de fibras acrílicas
o para prendas pequeñas individuales. También para su posterior secado.
Ropa bebé
Para secar pequeñas cantidades de ropa de bebé.
Enfriar
Refrescar
Para secar vaqueros o ropa de ocio que se hacen girar a altas velocidades en la lavadora.
Si no puede determinar cuál es el material de la ropa, elija Mix.
Para secar ropa deportiva, telas finas, poliéster, que no se planchan.
Para prendas de fácil cuidado como camisas y blusas con función
antiarrugas para un mínimo esfuerzo de planchado. Coloque la ropa suelta
en la secadora. Una vez seca, cuélguela en una percha
Para refrescar la ropa que se ha mantenido en ambientes cerrados durante mucho tiempo
desde un mínimo de 20 min. hasta un máximo de 150 minutos (pasos en 10 min.)
Inicio
diferido
Tiempo
Rápido SN
Ropa bebé
MI ciclo S
8.0kg
3.0kg
3.5kg
3.0kg
6.0kg
3.0kg
1.0kg
3.0kg
Para enfriar la ropa sin soplar aire caliente desde un mínimo de 10 min.
hasta un máximo de 30 minutos (pasos en 10 min.)
SN
Ropa de cama
Para secar sábanas u otros textiles de gran tamaño.
4.0kg
Lana
lana 1.0kg
Para una ropa de lana suave y esponjosa (no se puede usar para secar).
SN
Delicado Delicado Para secar la ropa delicada que es adecuada para el secado o la ropa
que se recomienda lavar a mano a una temperatura más baja.
1.0kg SN
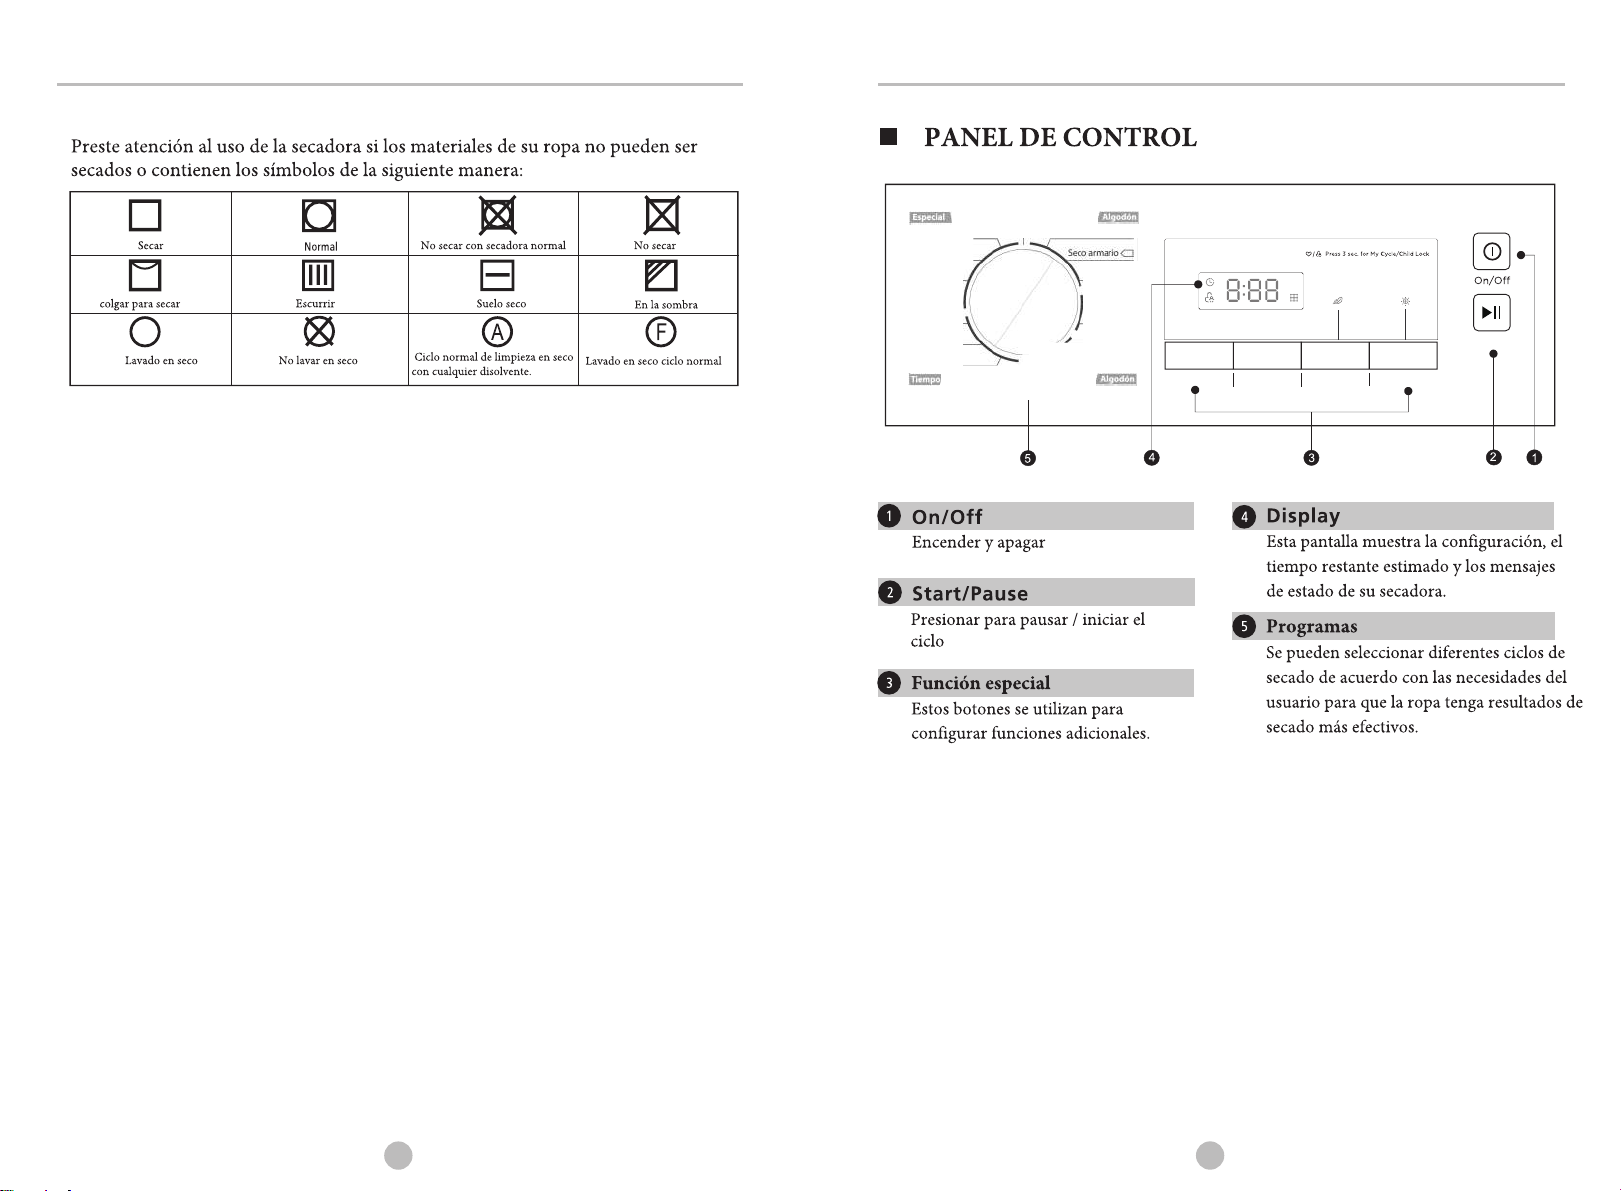
• Instrucciones de la función【Señal】
Activa o desactiva la señal acústica. En condiciones generales, la señal está apagada.
Por favor toque si es necesario
Cuando la señal está encendida:
1. La secadora emitirá el sonido principal si presiona los botones de función
adicionales.
2. Si la secadora está funcionando, al girar la perilla de programas, la secadora le
recordará que es una elección no válida.
3. Cuando finalice el programa de secado, la señal sonará.
• Instrucciones de la función【Anti-Arrugas】
Al final del ciclo de secado, el tiempo de fase antiarrugas es de 30 minutos
(predeterminado) o 120 minutos (seleccionado).
Esta función evita que la ropa se arrugue. La ropa se puede retirar durante la fase
antiarrugas. Excepto en 【Enfriar】, 【Lana】 y 【Refrescar】, todos los demás
programas tienen esta función.
• Instrucciones de la función 【Mi Ciclo】
Se usa para definir y guardar sus programas favoritos y que usa con frecuencia.
1. Use la perilla de programa para seleccionar el programa requerido y otras
funciones de secado.
2. Mantenga presionado el botón 【Intensidad】 durante 3 segundos hasta que se
escuche el pitido y el programa requerido.
3. Gire el selector de programa a la posición 【Mi Ciclo】, para iniciar sus
programas favoritos. Si desea cambiar la configuración de 【Mi ciclo】, repita los
pasos (1) y (2).
• Instrucciones de la función【Bloqueo infantil】
1.Esta máquina incorpora un bloqueo especial de seguridad para niños, que puede
evitar que los niños presionen las teclas sin cuidado o pongan en marcha la
secadora.
2.Cuando la secadora esté en funcionamiento, presione 【Anti-Arrugas】 y el
botón de 【Señal】 al mismo tiempo durante más de 3 segundos para iniciar la
función de bloqueo infantil. Cuando la función de bloqueo infantil está
configurada, la pantalla mostrará el icono de bloqueo infantil y ningún botón está
operativo excepto el botón 【On / Off】
3.Bajo el estado el bloqueo infantil, si presiona los botones 【Anti-arrugas 】y
【Señal】 al mismo tiempo durante más de 3 segundos, podrá liberar la función
de bloqueo infantil.
Para secar telas sintéticas finas que no se planchan, como camisas de fácil
cuidado, mantelería, ropa de bebé, calcetines.
V.1
V.1

MANTENIMIENTO
■LIMPIEZA Y CUIDADO
Limpieza del ltro
� Nota!
Lave el condensador de aire
Aertencia!
l •
---
1
7
MANTENIMIENTO
Vacíe el depósito de agua
ADVERTENCIA!
■Solución de problemas
"E30"
"E32"
"E33"
18
V.1
V.1

JSC8B
19
20
Si no puede resolver el fallo usted mismo y necesita ayuda:
• Pulse 【On/Off.】
•Desenchufe el aparato y llame al servicio técnico.
!¡
Advertencia
!
•
Limpie el filtro de pelusas y el intercambiador de calor.
•
Vacíe el contenedor de agua.
•
Revise la manguera de drenaje.
•
El lugar de instalación de la secadora es demasiado
restringido.
•
Limpie los sensores de humedad.
•
Mantenga limpia la entrada de aire.
•
Use un programa de mayor nivel de intensidad de secado
o un programa de tiempo.
• “ ”o “FUL”se ilumina
•“ ”se ilumina
Problema Solución
•La pantalla no se
enciende
•Compruebe si la fuente de alimentación
funciona.
•Compruebe si el enchufe está insertado.
•Verifique el programa seleccionado.
•Presione el botón 【On / Off】.
•Vacíe el contenedor de agua.
•Si la luz sigue encendida, llame al servicio técnico..
•Limpie el intercambiador de calor.
•Limpie el filtro de pelusas.
•La secadora no se
inicia
•Verifique que el programa se haya configurado.
•Compruebe que el botón de inicio se ha pulsado.
• Compruebe que la puerta está cerrada
•No se alcanzó el grado
de sequedad o el
tiempo de secado fue
demasiado largo
Frecuencia nominal
Dimensiones(Fon*An*Al)
Consumo nominal
Modelo
Parámetros
Temp. ambiente
Voltaje nominal
Capacidad nominal
Peso del producto
V.1
V.1

JSC8B
Modelo
Observaciones
Condensación
Automatica
560.2 kWh/año
GARANTÍA COMERCIAL
CONDICIONES DE LA GARANTIA COMERCIAL
Este aparato tiene una garantía de reparación de dos años, a partir de la fecha
de venta, contra todo defecto de funcionamiento proveniente de la fabricación,
incluyendo mano de obra y piezas de recambio. Para justificar la fecha de
compra será obligatorio presentar la factura o ticket de compra. La presente
garantía solo será efectiva en España.
EXCLUSIONES DE LA GARANTÍA
• Los aparatos utilizados para uso profesional o no exclusivamente doméstico,
en establecimientos industriales o comerciales.
• Los aparatos utilizados indebidamente, de manera no conforme a las
instrucciones de uso.
• Los aparatos desmontados o manipulados por personas ajenas a los Servicios
Técnicos autorizados.
• Las operaciones periódicas de mantenimiento del producto.
• Las averías producidas por causas fortuitas, siniestros de fuerza mayor o
derivados de una instalación incorrecta.
• Los materiales rotos o deteriorados por desgaste o uso normal del aparato:
juntas, plásticos, cristales, escobillas, etc.
www.ponjohnsonentuvida.es
21
22
V.1
V.1
Consumo energético en programa normal de algodón
1.47 kWh
Tiempo de programa ponderado del programa estándar de algodón a carga completa y parcial

• This product belongs to CategoryⅠelectrical appliances, and
only for drying textiles which have been washed with water in
the household. Please pay attention to the safety of power
use during the operation!
• The power source with reliable earthing must be used. Its
earth wire must be buried under the ground and shall not be
connected with the public utilities such as city water pipe or
gas pipe etc. The earth wire and null wire shall be
distinguished and shall not be connected together.
• The power wire shall be met IEC and must be able to
withstand the current above 16A. To ensure your and your
family's safety, please make improvement immediately if any
power use at your home does not meet the above-mentioned
requirements.
• Do not put more load than recommended. Obey the maximum
load volume. See the related chapter in the user manual.
• That the tumble dryer is not to be used if industrial chemicals
have been used for cleaning.
• Do not dry unwashed items in the tumble dryer.
• Items that have been soiled with substances such as cooking
oil, acetone, alcohol, petrol, kerosene, spot removers,
turpentine, waxes and wax removers should be washed in hot
water with an extra amount of detergent before being dried in
the tumble dryer.
1 2
CONTENTS SAFETY INSTRUCTIONS
Safety Instructions
SAFETY INSTRUCTIONS
Safety Instructions ..................................................
INSTALLATION
Product Description ................................................
Installation ...........................................................
OPERATIONS
Quick Start .............................................................
Before Each Drying ..................................................
Control Panel .........................................................
Other Functions......................................................
Drying Programmes Table ........................................
MAINTENANCE
Cleaning And Care .................................................
Trouble Shooting ....................................................
Technical Specifications .........................................
Product Fiches.........................................................
2
7
7
9
10
12
14
16
17
18
20
21
Warning!
!
To prevent any damages to your and others' life or
property, you have to follow the safety notes.
V.1
V.1

• Items such as foam rubber (latex foam), shower caps,
waterproof textiles, rubber backed articles and clothes or
pillows fitted with foam rubber pads should not be dried
in the tumble dryer.
• Fabric softeners, or similar products, should be used as
specified by the fabric softener instructions.
• The final part of a tumble dryer cycle occurs without heat
(cool down cycle) to ensure that the items are left at a
temperature that ensures that the items
will not be damaged.
• The lint trap has to be cleaned frequently.
• The lint must not to be allowed to accumulate around
the tumble dryer.
• Adequate ventilation has to be provided to avoid the
back flow of gases into the room from appliance burning
other fuels, including open fires.
• The exhaust air must not be discharged into a flue which
is used for exhausting fumes from appliance burning gas
or other fuels.
• The appliance must not be install behind a lockable door,
a sliding door or a door with a hinge on the opposite side
to that of the tumble dryer. In such a way that a full
opening of the tumble dryer door is restricted.
• Oil-affected items can ignite spontaneously, especially
when exposed to heat sources such as in a tumble dryer.
The items become warm, causing an oxidation reaction in
the oil. Oxidation creates heat. If the heat cannot escape,
the items can become hot enough to catch fire. Piling,
stacking or storing oil-affected items can prevent heat
3 4
SAFETY INSTRUCTIONSSAFETY INSTRUCTIONS
from escaping and so create a fire hazard.
• If it is unavoidable that fabrics that contain vegetable
or cooking oil or have been contaminated by hair care
products be placed in a tumble dryer they should first be
washed in hot water with extra detergent-this will reduce,
but not
eliminate, the hazard.
• The appliance should not be overturned during normal use
or maintenance.
• Remove all objects from pockets such as lighters and
matches.
• This appliance can be used by children aged from 8 years
and above and persons with reduced physical, sensory or
mental capabilities or lack of experience and knowledge
if they have been given supervision or instruction
concerning use of the appliance in a safe way and
understand the hazards involved. Children shall not play
with the appliance. Cleaning and user maintenance shall
not be made by children without supervision.(This warning
is only for EUROPEAN market)
• The appliance is not intended for use by persons (including
children) with reduced physical, sensory or mental
capabilities, or lack of experience and knowledge, unless
they have been given supervision or instruction concerning
use of the appliance by a person responsible for their safety.
• Children should be supervised to ensure that they do not
play with the appliance.(This warning is not for EUROPEAN
market)
V.1
V.1

3 4
SAFETY INSTRUCTIONSSAFETY INSTRUCTIONS
Correct Disposal of this product:
The european directive to 2002/96/EC on wasted electrical and
electronic equipments (WEEE), requires that household electrical
appliances must not be disposed of in the normal unsorted municipal
waste stream. appliances must be collected separately in order to
optimize the recovery and recycling of the materials they contain, and
reduce the impact on human health and the environment. The
crossed out “wheeled bin” symbol on the product reminds you of
your obligation, that when you disposed of the appliances, it must be
separately collected. Consumers should contact their local authority
or retailer for information concerning the correct disposal of their old
appliance.
5 6
SAFETY INSTRUCTIONSSAFETY INSTRUCTIONS
Never stop a tumble dryer before the end of the drying
cycle otherwise too much heat will diffuse and may
cause harm.
Warning!
!Damage danger
Explosion danger
Injury danger
Electric shock hazard
•Do not draw the power cord forcefully to pull out the mains
plug.
•Please do not plug/draw the mains plug with wet hands.
•Do not damage the power cord and the power plug.
•Do not disassemble and install the dryer under no instruction
or supervision.
•Do not stack this dryer on washing machine without stacking
kits.(if want stacking on washing machine, please purchase
the independent parts and it must be installed by the
manufacturer, its service agent or similarly qualified persons
in order to avoid a hazard.)
•Do not lean on the opened door of the dryer.
•Do not put any pyrotoxin on the dryer, such as the candle,
electric cooker.
•Do not dry over the rated capacity.
•Do not operate the dryer without the filter door and filter base.
•Do not dry the clothes before being spun.
•Do not expose the dryer directly under the sun, and indoor
use only.
•Do not install the dryer in humid and drenching environment.
•While cleaning and maintenance, please do remember to
pull out the power plug and do not directly wash the dryer
with water.
Please do not dry the clothes with some flammable substances
such as coal oil, alcohol or there will be explosion.
• If the power cable is damaged, it must be replaced by
the manufacturer, its service agent or similarly qualified
persons in order to avoid a hazard.
• This appliance is for indoor use only.
• The openings must not be obstructed by a carpet.
• Children of less than 3 years should be kept away unless
continuously supervised.
• If the appliance appear high temperature abnormally ,
please draw the mail plug immediately.
• Warning: The appliance must not be supplied through an
external switching device, such as a timer, or connected to
a circuit that is regularly switched on and off by a utility.
• Remove all packages before using the appliance.
Otherwise,serious damage may result.
Model Rated capacity
JSC8B 8.0kg
V.1
V.1

7 8
INSTALLATION
Accessories
The following parts are optional
for specific models.
If your dryer has following parts,
please wear gloves and install them
following the instruction below .
Hose holder(optional)
Condensing drain
hose(optional)
Container
Control Panel
Door
Drum
Power Cord
Handle
Maintenance cover
Air inlet
Top board
Product Description
Use pliers to remove
the drain hose from
the hose connector.
Insert the
external
drainage hose.
Max.120cm
200cm
Put the hose holder on the washing
basin or any other sink.
Installation
Lint filter
Transport
Move cautiously. Do not grasp any salient parts of machine. The machine door can not be
used as the handle for delivery.
Installation Position
Level Adjusting
Once in its permanent operating position,
check that the dryer is absolutely level with the aid
of a spirit level. If it is not, adjust the feet with a tool.
Power Supply Connection
1.It is recommended that, for your convenience, the machine is positioned close
your washing machine.
2.The tumble dryer must be installed in a clean place, where dirt does not build up.
Air must be able to circulate freely all round the appliance. Do not obstruct the
front air inlet or the air intake grilles at the back of the machine.
3.To keep vibration and noise to a minimum when the dryer is in use, it should be
placed on a firm and level surface.
4.The feet must never be removed. Do not restrict the floor clearance through
deep pile carpets, strips of wood or similar. This might cause heat built-up which
would interfere with the operation of the appliance.
to
1.Make sure that the voltage of the power supply is the same as the electric specification
2.Do not connect the dryer with the power connection board, the universal plug or socket.
of the dryer.
INSTALLATION
•Unpacking the dryer machine
•Packing the dryer machine
•
•
Packaging material (e.g. Films, Styrofoam) can be dangerous for children.
There is a risk of suffocation ! Keep all packaging well away from children.
!Warning!
Note: Please see the products you purchased in kind prevail.
V.1
V.1

910
OPERATIONS
After Drying
Drying
Buzzer beep or " :00"on display.0
1 2 3 4 5
open the door and
take out laundry
pull out the
container
pour out
condensate water
clean the filter power off
Quick Start
Before using, please make sure it's installed properly.
Note!
1
plug in
2
load
3
close door
start
on select program select function
or default
• If use the socket with a switch, please press the switch to turn off the power
directly.
Note!
Never overload.
• Not for textile with dropping water. The dryer could be damaged, even fire.
• Not suitable for silk or woolen textiles.
•
1.Before drying, thoroughly spin the laundry in washing machine. High spin speed can
the drying time and save energy consumption.
2.For uniform drying result, sort the laundry according to fabric type and drying programme.
3.Before drying, please close zips, hooks and eyelets, button up, tie fabric belts, etc.
4.Do not over dry the clothes, because over dried clothes can easily get creases.
5.Do not dry the articles containing rubber or similar elastic materials.
6.The door can be opened only after the programme of the drying machine finishes to
from being scalded by hot steam or over heated drying machine.
7.Clean the lint filter and empty container after each use to avoid extension of drying time
and energy consumption.
8.Do not dry these clothes after dry-clean process.
reduce
prevent human skin
The reference weight of dry clothes (each)
Note!
Before Each Drying
Attention!
Before the first cycle, the dust and grease may remain in this dryer during the
period of manufacture and transportation, to avoid contaminating your clothes,
please follow these steps:
• Put some clean rags into the drum.
• Plug the power.
• Select the “Quick” Programme, press “Start/Pause” button.
• After finishing this programme, please follow the “Cleaning And Care” to clean
the lint filter and air condenser on page 19.
OPERATIONS
Mixed-fabric clothes
(about 800g)
Jacket
(about 800g cotton)
Jeans
(about 800g)
Towel quilt
(about 900g cotton)
Single bedsheet
(about 600g cotton)
Short sleeve shirt
(about 180g cotton)
Work clothes
(about 1120g)
Short pants
(about 70g cotton)
Sleepwear
(about 200g)
Socks
(about 50g
mixed-weave)
Long sleeve shirt
(about 300g cotton)
V.1
V.1

Please pay attention to use the drying machine if the materials of your clothes can not be
dried by it or contain the symbols as follows:
OPERATIONS OPERATIONS
11 12
Control Panel
Dry
Dry clean
Line dry / hang to dry Drip dry
Do not dry clean
Normal Do not dry
In the shade
Dry flat
Not tumble dry normal
Dry clean normal cycle
with any solvent
Dry clean normal cycle
petroleum solvent only
On/Off
Product is switched on or off.
1
1
Start/Pause
the button to start or pause the
drying cycle.
Press
1
2
Specialty function
These buttons are used for setting
additional functions.
3
Display
This display shows the setting, estimated
remaining time and status messages of
your dryer.
4
Programmes
Different Dryer cycle can be selected
according to the user's needs to make the
clothes have more effective drying results.
5
21
3
4
5
V.1
V.1

OPERATIONS OPERATIONS
13 14
Speed dry indicator
Programme selector
1.The drum will stop running after the programme ends,
the display will show " ", last cycle phase status light will flash. The
dryer will start Anti-crease if user doesn’t remove the load in
1 minute (refer to page 15). Please press key to cut off power and
pull the plug out.
2.Deal with the problem accroding to “Malfunction display and solutions , if
there is a unexpected stop during the drying procedure and the dryer show
information(refer to page 20 ).
the buzzer will beep,
the
【 】function
【On/Off】
”
The drum will keep rotating after the programme starts, the state light in the
display area will flash in sequence, the remaining time displayed will change
automatically.
1.Press the【On/Off 】 button ,when the LED display screen brightens up, rotate
the programme knob to select the desired programme.
2.Select the【Delay】,【Time】,【Intensity】,【Speed Dry】,【Signal】or
【Anti-Crease】 functions for additional option.
3.Press the【Start/Pause】button.
Programme start
Programme end
Delay start
Remaining Time indicator/Error message
Cycle phase status
Clean filters (warning)
Empty water container (warning)
Dryness level (four grades)
Signal indicator
Anti-crease mode My cycle
Time
Child lock • Instructions of the 【Delay】 function
This function is used for delaying clothes drying time within 24 hours. The delay time
means the programme will start after x hours. When the delay programme starts, the
time starts to decrease on the display and the delay icon blinks.
Steps in details
1. Load your laundry and make sure the machine door is closed.
2. Press the 【On/Off】button,then to turn the programme selector knob and select a
desired programme.
3. You can select the 【Anti-Crease】 or 【Signal】functions according to your need.
4. To press the 【Delay】 key.
5. Continue to press the 【Delay】to select the delay time.
6. After the 【Start/Pause】 button is pushed, the dryer is at the run condition. The
drying procedure will be automatically performed when the delay time is over.
7. If you push the【Start/Pause】button again, the delay function will be paused.
8. If you want to cancel the “Delay” function, please press the 【On/Off】button.
• Instructions of the 【Time】function
When the warm or cool or refresh programme is selected, the 【Time】button can be
used to adjust the drying time in 10 min. steps.
• Instructions of the 【Intensity】function
Used to adjust the dryness level of the laundry. The level has four grades .
The drying time increases minutes in every grade.
1. The intensity function can be activated only before the programme start.
2. Press the 【Intensity】button repeatedly to select the drying time.
3. Except the 【Cotton Iron】【Qucik】【Synthetic Iron】【Warm】【Cool】
【Refresh】,all the other programmes can be the【Intensity】function.
• Instructions of the 【Speed dry】
Depending on the dryer model
Use to curtail shorten the drying time, the 【Cotton Extra】【Cotton Standard】
【Mix】【Jean】programme can be set the function. Use to curtail shorten the
drying time, the 【Cotton Extra】【Cotton Standard】【Bed linen】
【Jean】programme can be set the function.
5
Other Functions
V.1
V.1

15 16
OPERATIONS OPERATIONS
• Instructions of the【Signal】function
Set up the buzzer on or off. In the general condition, the buzzer is on. Please press it if
needed. When the buzzer on:
1. The dryer will give the leading sound if press the extra function buttons.
2. If the dryer is running, rotate the function choosing knob, the dryer will remind the
operator it is an invalid choose.
3. When the drying programme is end, the buzzer will also remind the user
• Instructions of the【Anti-Crease】function
At the end of the drying cycle,the anti-crease operation time is 30 minutes (default ) or 120
minutes (selected).
The 【Anti-Crease】 light shall illuminate when the anti-crease function is selected. This
function prevents the laundry from creases. The laundry can be removed during the
anti-crease phase. Except【Cool】,【Refresh】, all the other programmes
have this function.
Drying Programmes Table
• This symbol means the energy efficiency test programme “standard cotton programme”, which is
accordance with the applicable EN 61121 standard and most suitable to dry normal cotton load at rated
load capacity.
• Thick or multi-layered fabrics,e.g. bedlinen, jeans, jackets etc, are not easy to dry.
You'd better choose Cotton Extra programme.
• As the uneven material, thick and multi-layered clothes are not easy to dry, it is better to choose the
appropriate time drying programme to dry them if some parts of the clothes still damp after programme
finished.
Note!
Y N
Y N
Y N
Y N
Y N
Y Y
Iron
For non-iron washing made of synthetic and blended fabrics,cotton.
For cottons and coloureds made of cotton or linen.
Standard
Standard
Synthetics
Shirts
Jeans
Mix
Extra
Sports
Iron
My Cycle
8.0kg
Cotton
Extra
Weight(max)
Special
Programme
Define and save your favorite programme.
Warm
Time
To warm clothes from minimum 10 min. to maximum 120 min.(in 10 min. steps).
To dry thin synthetic
table linen, baby clothes, socks.
fabrics which are not ironed, such as easy care shirts,
To dry thick or multi-layered synthetic fabrics. Drying level: extra dry.
To dry cotton pieces of clothing. Drying level: applicable to iron.
To dry cotton pieces of clothing. Drying level: cupboard dry.
To dry cotton pieces of clothing. Drying level: extra dry.
Application/Properties
To dry thin synthetic fabrics which are also to be ironed, such as knitwear, shirts.
Quick
For washing which is to be dried quickly,eg,made of acrylic fibres or
for individual small items. Also for subsequent drying.
Baby Care To dry small amount of baby clothing.
Cool
Refresh
To cool clothes without blowing hot air from minimum 10 min. to maximum
To dry jeans or leisure clothes that are spun at high speeds in the washing machine.
If you can not determine what the clothing's material is, please choose Mix.
To dry sportswear, thin fabrics, polyester,which are not ironed.
For easy care clothes such shirts and blouses with anti-crease mechanism
for minimum ironing effort. Place clothes loosely in the dryer. Once dried,
hang it on a clothes hange
time from minimum 20 min. to maximum 150 min.(in 10 min. steps).
To refresh the clothes that have been kept at closed environments for a long
Delay Time
Quick YN
Baby Care
My Cycle Y
8.0kg
3.0kg
3.5kg
3.0kg
6.0kg
3.0kg
1.0kg
3.0kg
30 min.(in 10 min. steps).
Y N
Bed linen To dry sheets or other large sized textiles.
4.0kg
Wool
Wool 1.0kg
For a fluffy and fresh wool clothing (Can not be used for drying).
Y N
Delicate Delicate To dry delicate laundry that is suitable for drying or laundry which is
at a lower temperature.advised to be hand-washed
1.0kg Y N
• Instructions of the 【My Cycle】 function
Used to define and save your favorite proragmmes that are used frequently.
1.Use the programme knob to select the required programme and other drying
functions.
2.Press and hold the 【Intensity】 button for 3 seconds until the beep and the
required programme has been saved.
3.Turn the programme selector to the 【My Cycle】 position, you can start your
favorite proragmmes. If you want to change the 【My Cycle】 settings, repeat
the steps (1) and (2).
• Instructions of the 【Child Lock】 function
1.This machine incorporates a special child safety lock, which can prevent
children from carelessly pressing keys or making the faulty operation.
2.When the dryer is at the operation state, press the【Anti-Crease】and
【Signal】buttons at the same time for over 3 seconds to start child lock
function. When child lock function is set, the display will show Child lock
icon and no key can effect to the dryer except 【On/Off】button. Under the
start state of the child lock, the【Anti-Crease】and 【Signal】buttons shall
be pressed at the same time for over 3 seconds to release the child lock
function.
V.1
V.1
Table of contents
Languages:
Other Johnson Dryer manuals