JOJO WINGS XF 15 User manual

Date: 01.08.2008 Manual
Revision: XF 15
Page: 1
JOJO
JOJ
O

Date: 01.08.2008 Manual
Revision: XF 15
Page: 2
JOJO
Dear Skydiver,
Thank you for purchasing a new canopy from JO JO Wings. We are sure you will enjoy the perform-
ance—openings, flight and landings—as well as the quality and durability of this sport canopy.
You and your rigger should carefully inspect your new canopy. Then please take the time to read this
manual and thoroughly familiarize yourself with all aspects of your new canopy—assembly, inspec-
tion, maintenance, packing and performance characteristics—before jumping it. Do not hesitate to
contact us with any questions or comments.
Once again, we appreciate your choice of a JO JO Wing product.

Date: 01.08.2008 Manual
Revision: XF 15
Page: 3
JOJO
CONTENT PAGE
Warning; About this Manual 4
Disclaimer—No Warranty 5
Canopy Description; Technical Specifications 5+6
Read Before Assembly or Use 6
Canopy Size 7
Improving the Performance of Your Canopy 7
Assembly 8
Periodic Inspection Procedure 9
Installation of PD Soft Links 10
Cleaning Your Canopy; Storage 11
Introductory Jumps 12
Swoop Landings 13+14
“DOs and DON’Ts” for Consistently Good Openings 15+16
Packing Tips for Good Openings 17
Pre-Packing Instructions 18
Read the Manual First; Packing Nylsilk-Fabric Canopies 19
Inspection Performed Before Each Packing 20
Packing Procedures 21
Setting the Brakes 22
Doublestring Slider 23
Cloth Link Bumpers; Slider Preparation 24
Folding the Canopy (Illustrations 1-37) 25 - 32
Contact JO JO WINGS 33

Date: 01.08.2008 Manual
Revision: XF 15
Page: 4
JOJO
! Warning !
Each time you use this parachute you risk serious bodily injury or death
You can substantially reduce this risk:
1) By assuring that every component of the parachute system has been assembled and packed
in strict compliance with the manufacturer’s instructions.
2) By obtaining proper instruction in the use of this canopy and the rest of your equipment.
3) By operating the system in strict compliance with the owner’s manual and safe parachuting
practices.
However, parachute systems sometimes fail to operate properly even when properly assembled,
packed and operated, so you risk serious injury or death each time you use the system!
About This Manual
It is beyond the scope of this manual to teach you how to deploy, fly, land or maintain this parachute.
The U.S. Parachute Association publishes recommended procedures on learning to jump and using
skydiving equipment. We urge you to learn and follow these procedures. We also recommend you
obtain instruction from a competent USPA-rated instructor before using this parachute for the first
time
Other countries have similar organizations for instruction. If you are not in the USA, get instructions
from a competent instructor that is rated by your country's organization.
Jumping this parachute without first receiving thorough and personal instruction increases the risk of
serious injury or death.
Sport parachuting technology and procedures continue to develop and change rapidly. Although
reasonable care has been made in the preparation of this manual, Jo Jo wings cautions that it may
contain information that may be incorrect or behind the current state-of-the-art parachute use.
For these reasons, we urge you to work closely with qualified experts (riggers and instructors) to help
you inspect, assemble, pack, use and maintain this parachute. We also welcome your comments,
positive and negative, about our products.
Read this manual completely before assembling,
packing or using your Jo Jo wings main canopy.
Differentials may vary +O.25” or -O.25” from the original dimensions. Other canopies of the same
size may have different trims, and this manual may not be applicable to them. This manual maybe
revised at any time by JO JO WINGS. The only way to be sure this manual is current for your canopy
is to check periodically with JO JO WINGS. We welcome suggestions of ways to improve this publi-
cation. If you feel parts are incorrect or hard to understand, please let us know in writing.

Date: 01.08.2008 Manual
Revision: XF 15
Page: 5
JOJO
Disclaimer - No Warranty
Because of the unavoidable danger associated with the use of this parachute, the manufac-
turer makes no warranty, either express or implied. It is sold with all faults and without any
warranty of fitness for any purpose.
The manufacturer also disclaims any liability in tort for damages, direct or consequential, in-
cluding personal injuries resulting from a defect in design, material or workmanship or manu-
facturing whether caused by negligence on the part of the manufacturer or otherwise.
By using this parachute assembly, or allowing it to be used by others, the user waives any
liability of the manufacturer for personal injuries or other damages arising from such use.
If the buyer declines to waive liability on the part of the manufacturer, buyer may obtain a full
refund of the purchase price, by returning the parachute before it is used to the manufacturer
within 15 days from the date of the original purchase, with a letter stating why it was re-
turned. ! Warning !
EACH TIME YOU USE THIS PARACHUTE YOU RISK SERIOUS
BODILY INJURY OR DEATH.
Type Main cross braced Canopy
Number of Cells 7 / 21
Manufacturer JO JO WINGS, Germany
Suspension Line Links Stainless-steel Mini Links or Soft Links
Canopy Material Nylon Zero-P (double coated PU & Silicon)
Suspension Lines Vectran, HMA
Canopy Description

Date: 01.08.2008 Manual
Revision: XF 15
Page: 6
JOJO
Technical Specifications
Canopy
Model Size Pack-
volume Weight Exit
Weight
Min.
Exit
Weight
Max.
ft² cuinch Kg Kg Kg
85 85 48 70
89 89 48 80
93 93 48 90
97 97 48 100
105 105 55 110
115 115 62 120
Read Before Assembly or Use
Since parachutes are manufactured and inspected by people, there is always a possibility this para-
chute contains defects as a result of human error.Therefore, the entire parachute system—main
and reserve canopies, harness, container and other components—must be thoroughly inspected be-
fore its first and before each subsequent use.
Parachutes get weaker over time for a number of reasons. They receive wear during packing, de-
ployment and landing. Exposure to many agents, including sunlight, heat and household chemicals,
significantly weakens parachutes. The damage may or may not be obvious.
To help minimize the risk of parachute failure and possible serious injury or death, the entire para-
chute system should be thoroughly inspected at least every 120 days or 50 jumps, whichever comes
first. It should be immediately inspected if at any time it is exposed to a degrading element or unusu-
ally hard opening or any time damage may be suspected.
Remember that some chemicals will continue to degrade the parachute long after initial exposure.
Regular and thorough inspections are necessary to insure the structural integrity, reliability and flight
characteristics of the system are maintained.
Always know the entire life history of every part of your parachute system. That way you will know
no part has been exposed to an element that may seriously weaken or damage it.

Date: 01.08.2008 Manual
Revision: XF 15
Page: 7
JOJO
Canopy Size
It is important for your safety and enjoyment that you match your canopy with your ability and weight.
JO JO WINGS canopies are built in several models that span a wide range of canopy surface area.
Any canopy's descent rate and forward speed increases as the weight it is carrying—the so-called
exit weight—increases. The canopy also becomes more responsive as forward speed increases. It
also reacts more radically when it is stalled or turned.
Because of these aerodynamic facts, it is unsafe to put too much weight under any particular canopy.
Safe and comfortable landings will be difficult to obtain, even for experienced jumpers under ideal
conditions. Less experienced jumpers will have even a harder time and be at greater risk.
Determining the wing loading of the parachute you intend to jump or buy is a good way to compare
canopy sizes.
Wing loading is easily calculated by dividing the total exit weight in pounds by the surface area of the
canopy in square feet. Total exit weight is the weight of the jumper plus all his clothing and gear, in-
cluding the main parachute itself.
The surface area of JO JO WINGS canopies is printed on the data panel, on the center cell rib, or on
the center cell top surface near the tail. (Be sure to actually check the data panel—canopies of dif-
ferent sizes may look the same.)
A typical ready-to-jump sport piggyback (rig and both canopies) weighs 20 to 30 lbs. Add this, plus
the weight of your jumpsuit, clothing and accessories to your body weight to get the total suspended
weight.
For example, a jumper who weighs 165 lbs. wearing his jumpsuit and who jumps a packed rig that
weighs 25 lbs. would have an exit weight of 190 lbs.
Here is an example of how to calculate wing loading of a 150 ft² canopy and the jumper used in the
example above: 190 lbs. : 150 ft² = 1.27 lbs /ft²
Calculate the wing loading now for the canopy you intend to jump.
It is useful to compare the wing loading of a canopy you intend to jump with the wing loading values
of parachutes you have been jumping. If the difference is great, you should expect the new canopy
to perform very differently than the ones you have jumped before. See the section of this manual
on Introductory Jumps for our suggestions on learning about your new canopy.
Improving the Performance of your Canopy
The most effective methods of increasing performance involve reducing drag or wind resistance. The
following factors will, to a large extent, determine the performance you get out of your canopy.
Three decisions you made at the time of purchase determine the performance of your canopy. (1)
The size was the most important. Smaller canopies are faster but have a noticeably lower glide ratio.
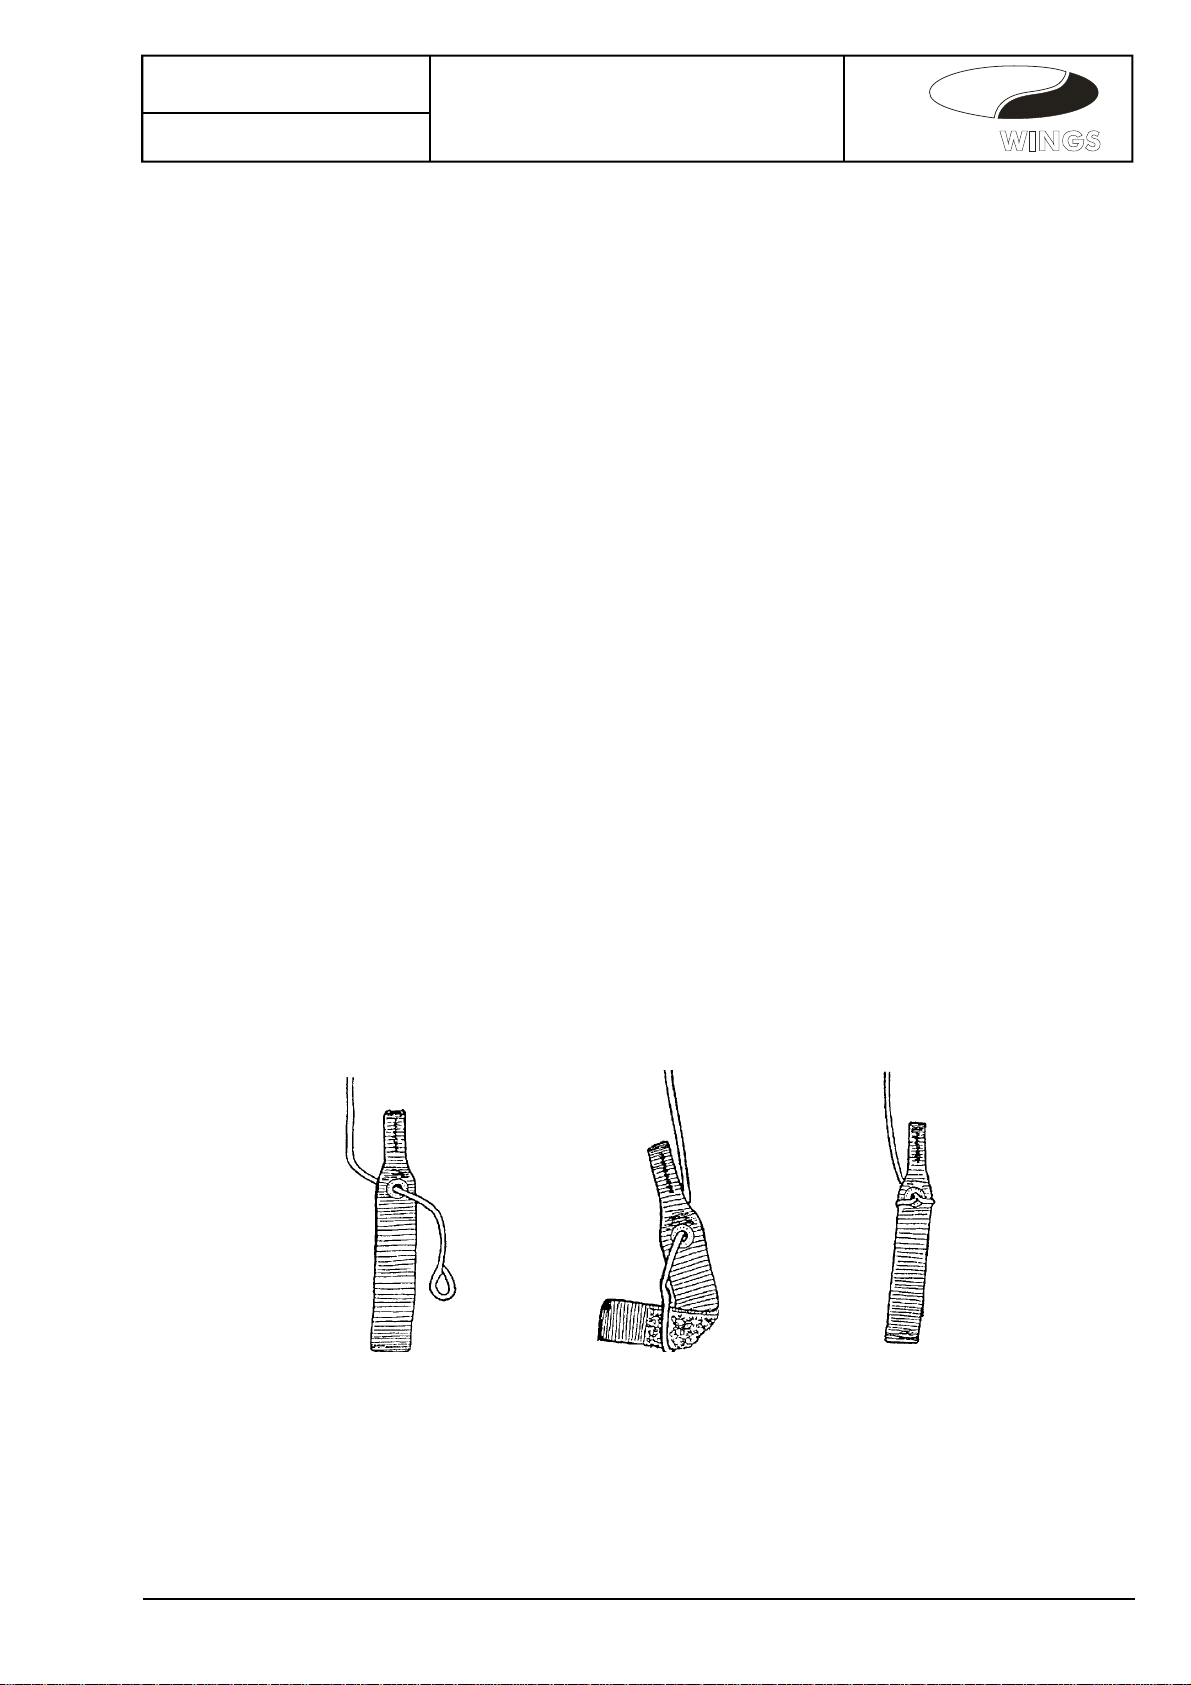
(2) HMA improves the performance over vectran line. (3) Large grommets allow you to pull the
slider down below the links, allowing the canopy to spread out more.

Date: 01.08.2008 Manual
Revision: XF 15
Page: 8
JOJO
The performance of your canopy is greatly affected by how it is set up. The most effective thing that
you can change here is to reduce the pilot chute drag. There are several systems available for col-
lapsing the pilot chute, each with distinct advantages and disadvantages. You should thoroughly in-
vestigate the options available and choose the one that is best for you.
How you use the canopy will effect the performance you get out of it. The slider drag may be reduced
by stowing it. On JOJO WINGS canopy models, a tie strap is installed on the slider for this. If you do
use this or a similar method, be sure the slider is re-set before you start to pack the canopy.
JOJO WINGS recommends that you leave the slider above the links. Some jumpers bring the slider
past the toggles, down to the bottom of the risers and stow it behind their neck. This does result in a
slight increase in performance, however, it is dangerous. If the slider should inflate or move from its
stowed position it can obstruct your vision.
Assembly
Your canopy should be assembled by a certified rigger. Before you begin, be sure the risers, tog-
gles, bridle, deployment bag, pilot chute, harness, container and other items are compatible with your
JOJO WINGS canopy and each other. Some toggles, for example, will not work properly on certain
type of risers. Assemble your system in accordance with the owner’s manual for your rig.
These instructions will work for Dacron/Micro/Spectra/Vectran lined canopies. However, we recom-
mend following the rig manufacturer's instructions for toggle attachment.
Two common problems that may happen if the toggles are installed improperly are:
A) The toggle knot getting caught on the guide ring, and
B) The knot slipping.
Be sure that your installation is safe. The container manufacturer's instructions may not be compati-
ble with this canopy.
Recommended attachment of Velcro-backed toggles on JOJO WINGS steering lines with finger-
trapped loops:
Route the steering line through the slider, then the toggle guide ring and then the toggle. See draw-
ing #1. Thread the toggle through the loop in the steering line. See drawing #2. Pull loop up to the
toggle grommet. Note that the loop of the steering line is going through and around the toggle. See
drawing #3.
#1 #2 #3

Date: 01.08.2008 Manual
Revision: XF 15
Page: 9
JOJO
Periodic Inspection Procedure
Performed at assembly and after every 50 jumps or 120 days, whichever comes first.
Your canopy must be inspected thoroughly before it is jumped the first time and periodically thereaf-
ter. This procedure is more thorough than the inspection which should be completed each time the
parachute is packed. Your rigger should inspect your parachute system in a clean, well-lighted area
in which the canopy can be spread out.
Here is one recommended procedure. Consult the owner's manuals for your rig and other compo-
nents for instructions on inspecting them. It's best to inspect your canopy in a careful, systematic
way. We recommend starting at the top of the canopy and working down to the risers. You should
leave the canopy attached to the rig.
1) Bridle attachment: Be sure the bridle is correctly attached to the canopy. Check the integrity of
the canopy fabric and reinforcement tapes in the area where the bridle ring is attached.
2) Top surface: Spread the canopy out on its bottom surface and inspect the top skin. Look for
rips, stains or failed seams. Check the fabric strength.
3) Bottom surface: Turn the canopy over and spread it out to inspect bottom skin. Check for rips,
stains, failed seams. Check fabric strength and line attachment points.
4) Inspect each rib: from the leading edge to the tail by looking inside each cell. Pay extra atten-
tion to line and bridle attachment points.
5) Lay the canopy out neatly on one side, stacking each rib on top of the others. Check that all lines
in each line group are the same length and that the trim differential between each line group is cor-
rect for this canopy. Check condition of stabilizers and slider stops.
6) Suspension lines: Check the full length of each line for damage and wear. Look for fraying at all
cascades (Y-shaped junction of two lines) and where each line attaches to the connector link.
7) Slider: Be sure the fabric isn't torn and that the grommets are undamaged, have no sharp edges
and are securely attached to the slider.
8) Risers: Be sure the barrels of the connector links are tightened and the slider stops properly posi-
tioned.
9) The toggles: must be installed correctly and must match the guide ring and Velcro on the risers.
A rigger must check this installation. Be sure the riser release system is assembled correctly and
that it will function when activated.
10) The rest of the assembly: Follow the instructions in the rig manufacturer's owner's manual to
inspect the rest of your parachute system.

Date: 01.08.2008 Manual
Revision: XF 15
Page: 10
JOJO
1 2 3
654
7 8 9
Installation of Performance Designs Soft Links ©

Date: 01.08.2008 Manual
Revision: XF 15
Page: 11
JOJO
Cleaning Your Canopy
Standard Materials
Avoid washing or cleaning your canopy if at all possible. Cleaning the material will increase the po-
rosity, causing reduced performance. Only clean areas that are contaminated with a substance that
will degrade the material. Mild soap and water will remove most contaminants. If necessary, mineral
spirits may be used for grease or oil. Do not use any other cleansers. Do not use cleansers that
contain bleach. Avoid agitating the canopy, especially when wet. Agitation will cause a reduction in
canopy performance.
Fabric
The NYLSILK fabric is not affected by water. However, the reinforcement tapes may be. All tapes
used in these canopies are pre-shrunk at the factory to make them more dimensionally stable.
However, if they get wet, this does not mean that they will return to the exact same size when dry.
Small changes in lengths may make a large difference in canopy performance. To maintain the best
performance, avoid getting the canopy wet.
Water jumps are not recommended.
If you need to clean your canopy, please wash only dirty or contaminated areas. Use only a mild
soap and water. Oil and grease usually do not penetrate the coating surface, so solvents are not
normally necessary. Also, some solvents may affect the coating. Avoid getting tapes wet if possible.
Do not machine wash.
Storage
Store your parachute in a cool, dry place in a container through which light will not pass. This will
prevent the permanent and difficult-to-detect damage caused by ultraviolet light from sunlight and
other sources.
Certain other agents—notably acids—will quickly cause great damage to your parachute. Do not
store your parachute where it might come into contact with such substances. For example, automo-
bile trunks contaminated long ago with battery acid have destroyed many parachutes.

Date: 01.08.2008 Manual
Revision: XF 15
Page: 12
JOJO
Introductory Jumps
On your first jump with your new canopy –
please do not go to terminal!
We recommend making a 5-sec. delay
(because a subterminal opening will stretch fabric and lines symmetrically).
Also, pulling at a higher altitude will give you more time to become familiar with your
new canopy.
Even if you are familiar with ram-air parachutes, including JO JO WINGS canopies, your new para-
chute may handle differently. Therefore always make several jumps with the purpose of getting to
know your new parachute.
Pick a day with favorable wind conditions and jump by yourself. Open high and find out how the can-
opy flies. Try slow turns and fast turns from no brakes, quarter brakes, half-brakes, three-quarter
brakes and full brakes!
Determine if the canopy helicopter turns (stall turns) and, if so, under what conditions. Find out how
the canopy recovers from various types of stalls. Stall the canopy several times and see how this
happens both from full flight and minimum air speed. Turn the canopy by pulling on the front or rear
risers rather than the toggles.
Fly some practice approaches and flare the canopy as you would when you land it. Notice how far
you must depress the toggles to get a landing stall and how quickly this stall occurs.
Keep track of your location relative to your intended landing area as you "test” your canopy so you
won’t drift too far away. Discontinue your experimenting when you've descended to 1000 ft. above
the ground.
Plan and execute a conservative landing approach into a large, unobstructed landing area. Steer,
flare and land the canopy as you were taught by your instructor. Most jumpers underestimate how
far they will travel over the ground during the landing flare. Make sure you have enough open area
ahead of your intended touchdown point.
Since you might misjudge your early landings, be prepared to do a safe parachute landing fall rather
than a stand-up!
Such introductory jumps will help you discover what makes your canopy respond violently. The can-
opy will let you know that it is about to do something violent by its “feel.” You must be experienced
in these flight modes to know what it is telling you!
Knowing this will help you avoid these situations close to the ground when they can be quite danger-
ous.

Date: 01.08.2008 Manual
Revision: XF 15
Page: 13
JOJO
Swoop Landings
At most drop zones there are some jumpers who like to do high-approach-speed (swoop) landings.
These landings look impressive, traveling long distances inches off the ground and then going
backup before landing. The problem is that these landings can be very dangerous for the jumper
and anyone else around the jumper.
Many of these swoop landings are started by a low turn. If timed incorrectly the jumper can hit the
ground hard enough to be fatal. Many jumpers have been hurt by having another turn into them.
To minimize the danger involved in skydiving you should avoid all turns close to the ground and turns
that could bring you close to another jumper in the air. If you insist on performing a swoop landing
make sure you are alone in the air. Do not attempt a swoop landing if there are other jumpers in the
air or the landing area.
The following advice is not intended to recommend that you try swoop landings, rather, it is only in-
cluded because we recognize that some people will try to do swoop landings, even though JOJO
Wings recommends not to. We have included this section to minimize the risk to those who are go-
ing to attempt swoop landings.
Do not try any swoop landings until you are very familiar with your canopy and the landing area.
Even people who are very skilled occasionally hurt themselves. Start out slowly. You do not need
any more speed than full glide when first learning. Never try a swoop landing unless the weather
conditions are suitable. As you become more familiar with your canopy, you may want to start using
a faster approach. If so, increase your speed in small increments over many jumps. Most people get
hurt by trying too much too soon.
Try several practice approaches while at high altitude going through everything up to landing. Do not
attempt a high-speed landing until you are sure you can deal with the high initial sink rate.
The best weather for practicing is a smooth, calm, low wind day when the canopy will be relatively
stable and responding only to pilot control. It is important to avoid any possibility of the canopy being
influenced by changes in wind direction or speed.
The idea in a swoop landing is to skim your feet across the ground or make the canopy go back up.
There is a very small section of the control range of the canopy where this is possible. If you pull the
toggle down just a little beyond what is necessary to skim across the ground, the canopy may climb.
However, just a little more toggle may cause the canopy to do a high-speed stall.

Date: 01.08.2008 Manual
Revision: XF 15
Page: 14
JOJO
In other words, if you pull your toggle down any more than it is necessary, you will pass right through
the control range you want. The result of this could be dangerous. The exact position of this small
area of the control range of the canopy is different on almost every jump. You must have a complete
and intrinsic understanding of your canopy to know exactly what to do for every approach.
Remember that the last thing you do in a swoop landing is land. If you let yourself get in where the
canopy does not have enough air speed to fly,you drop from that altitude. If that happens to be ten
feet high, you fall ten feet!
Once you have mastered the canopy, you may decide to try approaches at high air speeds. lt’s logi-
cal that the faster you go, the harder you will hit, so be careful. There are three methods to gain ex-
tra airspeed on approach: front risers, front riser hook turns and toggle hook turns.
Pulling down both front risers on a straight-in approach is the least dangerous method. A minimal
pull down on the front risers (less than two inches) will result in a very large increase in airspeed
(increasing the flare power on almost any landing). The flare then begins with a smooth release of
the front risers and is continued by smoothly pulling the toggles down as much as necessary.
The altitude to begin the flare varies with each approach and how fast the flare is executed. It takes
practice to determine these factors. This practice can be hazardous to your health! When using
front risers to gain extra speed, never let go of the toggles for any reason.
Also, be sure not to use front risers in gusty or turbulent winds. Pulling on front risers in these condi-
tions could cause your canopy to collapse.
Front riser turns are very dangerous. The forward speed gained with this maneuver is much more
dramatic than with a straight front-riser approach, and you may undercut the airflow. A collapsed
canopy (A-line stall) may be the result.
The big disadvantage is that it is much more difficult to judge correctly. If you misjudge this type of
approach, you could seriously hurt yourself. JOJO Wings recommends that you do not try this.
Toggle hook turns are the most dangerous of the three options and offer no advantage in perform-
ance. Because both the bank angle and the altitude at the start of the turn must be exact, toggle
hook turns are very difficult to perform correctly.
They are also very unpredictable in turbulence. Do not try a toggle hook turn under any circum-
stances.

Date: 01.08.2008 Manual
Revision: XF 15
Page: 15
JOJO
“DOs and DON’Ts”
For Consistently Good Openings
When jumping heavily loaded, elliptical-wing canopies, consistent, on-heading openings become
exponentially more important. Bad packing and/or bad body position on opening could induce un-
recoverable line twists and a potentially difficult cutaway.
1.DO maintain good body position during pull and canopy deployment.
This means: DON’T look at your pilot chute and
DON’T drop a shoulder to look up at the canopy during opening.
With higher exit weight loads, be extra careful to have a good body position during deployment. If it
is necessary to look up at the canopy during opening—look straight up and NOT over the right or
left shoulder. Looking up over a shoulder drops the opposite shoulder, which makes the risers un-
even and will usually cause an off-heading opening or line twists.
2.DO pro-pack neatly.
The drawback of high performance is that faster canopies respond quickly even when you don't
want them to. Sloppily packing a tiny pocket rocket is much more likely to result in a cutaway than
a larger version of the same parachute.
Over the past few years, more and more canopies are being designed with naturally soft opening
characteristics—without the need for any special packing requirements.
We recommend pro-packing the main almost the same as a reserve, leaving the nose exposed,
slider quartered between the canopy's slider stops, and all fabric flaked neatly between the A, B, C,
D and brake lines. The only difference is that when packing the main, we suggest bringing the tail
around and rolling it just enough to keep the slider in place and the pack job together as the canopy
is gently placed on the floor.
All of the newer canopy designs we've seen recently open soft when the canopy is packed like this.
Softer deployment also puts less strain on the parachute, though some jumpers who are used to
fast openings say it takes a little getting used to.
3. DON’T over-roll the nose and wrap the tail.
The more you roll the nose, wrap the tail, etc., the less likely it is that your canopy will open sym-
metrically. A super snivel pack job that rocks you around as it twists and inflates can actually feel
harder than a faster, more even deployment.
If your canopy opening goes something like, "snivel, snivel.... Thwack," you may have over-rolled
the nose or tail, allowing the canopy to inflate too much before pushing the slider down your lines.

Date: 01.08.2008 Manual
Revision: XF 15
Page: 16
JOJO
4. DO keep the slider securely against the slider stops when laying the canopy down.
Some canopies have gotten a reputation for snivel openings 99 percent of the time, with the occa-
sional neck-jarring thwack. This could be because the slider wasn’t securely against the slider stops
while laying the canopy down or putting it in the bag. This allows the canopy to push the slider down
the lines faster than usual.
5. DO allow at least 18” between the last line stow and the main risers.
Perhaps the most common cause of line twists severe enough to require a cutaway is making the
last line stow closer than 18 inches to the main risers. This can cause the lines to grab the bottom of
the reserve container as the pilot chute lifts the main D-bag out of the main container, causing the
bag to spin while the lines un stowed.
Some local riggers and a few manufacturers now offer a modified main deployment-bag where
line-stow rubber bands attach closer to the center of the D-bag instead of the sides. This places
shorter line stows closer to the center of the bag and keeps the lines further from the top edges of
the main container. This also makes the D-bag more stable as the lines un stowed during deploy-
ment.
Remember:
DO maintain good body position during pull and canopy deployment.
DON’T look at your pilot chute.
DON’T drop a shoulder to look up at the canopy during opening.
DO pack neatly.
DON’T over-roll the nose and wrap the tail.
DO keep the slider securely against the slider stops.
DO allow at least 18” between the last line stow and the main risers.

Date: 01.08.2008 Manual
Revision: XF 15
Page: 17
JOJO
Packing Tips, For Good Openings
On your first jump with your new canopy –
please do not go to terminal!
We recommend making a 3-sec. delay
(because a subterminal opening will stretch fabric and lines symmetrically).
Also, pulling at a higher altitude will give you more time to become familiar with your
new canopy.
1) Don’t forget to cock the slider.
2) Make sure slider is as far up as possible and stays there!
3) Keep all cells together (see packing illustrations 7 to 16)...
4) and push them back to the B-line group
(unless openings are too slow).
(If the openings are too slow, do not push the nose back to the
B-line groups!)
5) Make sure that the slider is “quartered” in
and between the stabilizers.
6) Roll the tail.
7) Use tight elastic bands instead of Tube Stows.
8) Make large line stows—about 2 inches.
9) Allow 18” between the last line stow and the main risers.
10) Only use our low-drag 24” kill-line pilot chute!

Date: 01.08.2008 Manual
Revision: XF 15
Page: 18
JOJO
Pre-Packing Instructions
Today's ram-air canopies are very reliable parachutes. If a ram-air has straight lines—that
is, if it is assembled correctly and untangled after the last time it was jumped— it will usually
inflate even if folded in ways that are quite unusual. In other words, it is difficult to pack a
ram-air main canopy so it won’t open.
We're not saying other packing methods won’t work with your Performance Variable canopy,
but the method shown here will probably help your canopy open more consistently.
Before You Begin
Where you pack your JO JO WINGS canopy is important.
Since sunlight irreversibly damages nylon parachutes, an indoor shady area is best. Packing
in the sunlight is unavoidable at most places, so try to reduce your canopy’s exposure to di-
rect sunlight as much as possible. Cover it with a packing mat or jumpsuit while you debrief
a jump or critique a student.
Packing on concrete and asphalt should also be avoided because they will wear the fabric,
lines and fittings that are used to build your parachute system. A dry lawn is best.
Packing behind a building or van will make packing easier because it blocks the wind.
FAA regulations require that a main parachute be packed by either an FAA-certified rigger or
the person who will jump it. Other countries may have similar regulations.
A Word About Help
When you're learning to pack, never hesitate to ask a rigger or your instructor for help. They
will show you tips that will make the process faster and easier.
Be sure they refer to this manual, however, as they might not be familiar with our packing
method.

Date: 01.08.2008 Manual
Revision: XF 15
Page: 19
JOJO
Read the Manual First
Read these packing instructions completely before you begin. Doing so will give you a better idea of
what you are doing, and it will help you go a little faster.
Packing Canopies Made of NYLSILK Fabric
Canopies made from NYLSILK can be packed just like any other similar canopy. If you prefer to flat
pack and have been getting good results with a similar canopy, this method should work with your
new canopy. There are many different pack jobs currently being used. We recommend the pro-pack
detailed in the owner's manual.
This pack method consistently results in soft, on-heading openings, with minimum risk of canopy
damage. Others may not work as well. If you try a different pack method, you do so at your own
risk. If you use a side or book pack, start at the tail and work forward to squeeze the air out.
Packing a canopy made of NYLSILK is a new skill that must be learned. At first, it will be more diffi-
cult to pack than canopies made out of conventional materials. However, with practice it will become
just as easy. You can make the pack job considerably easier by getting a bag that is slightly larger
than your main container. It is easier to squeeze a small amount of the air out after the canopy is in
the bag. (Consult the container manufacturer about this.)
The key to making the job easy is to pack fast and accurately. Each fold or roll must be done quickly
and correctly the first time. This will only come with practice. Packing does not hurt the canopy, so
please practice until you are good at getting a neatly folded canopy into the bag before you start
jumping the canopy.
The fabric has a memory and always tries to open back up. Once you start, you must continue until
the canopy is in the bag and the first locking stows are secure. You can't waste time at any point in
the packing procedure because this gives the canopy time to move around, form a big mess, and
you will have to start over.
After the folding and organizing portion (done while standing) is complete, you should roll the tail. Be
careful not to let the tail unroll while squeezing the air out. lf you kneel on the canopy facing the pilot
chute attachment just above the warning label, you will be in a better position to control this. Slowly
lay down on the canopy while still containing it with your hands. The only place for the air to leak out
is the stitch holes, so go slowly. If you go too fast, the air will blow the pack job apart.
Demon canopies are designed for a slow-to-medium speed, two-step opening when packed as de-
scribed in the JO JO WINGS manual. You should tailor the packing, especially of the nose, for your
particular canopy and preferences. For example, the nose can be gently pushed into the middle; the
slider should be quartered and left in its position. Or for a slower opening, the nose can be rolled.

Date: 01.08.2008 Manual
Revision: XF 15
Page: 20
JOJO
Inspection
Performed before each packing
You must inspect your parachute system each time you pack it. It takes only a few moments and will
help prevent malfunctions and other problems. The inspection is best done when the rig and canopy
are stretched out on the ground prior to packing. The procedure outlined below is different than the
thorough inspection that must be performed periodically and when the parachute is first assembled
or if damage is suspected. The more thorough procedure was presented earlier.
If you discover any worn or improperly rigged components, bring them to the attention of an FAA cer-
tified rigger before jumping the system again.
During your inspection of the entire system, pay special attention to the items listed below. Any dam-
aged or worn parts must be repaired or replaced before jumping the system again. Start with the
harness and container and work up to the canopy and pilot chute. Although the owner's manual that
came with the rig contains specific inspection procedures, be sure to check the items listed below!
Reserve: It must be sealed and in date. The ripcord pin (s) must be seated properly and not bent.
The cable must move freely in its housing. The ripcord handle must be properly stowed in its pocket.
If the rig is equipped with an automatic opener, it must be installed and calibrated correctly.
Harness: Inspect the entire harness for broken stitches and excessive wear.
Main Container: The locking loop must not be worn, as a problem with the locking device can result
in a premature opening or a locked container.
Risers: Check the riser releases carefully. They must be installed and assembled properly. If your
harness has 3-ring releases, be sure the white locking loop is not worn (it must pass only over the
smallest ring).
Be sure the release cables are inserted correctly in the white loops. Check the steering lines and tog-
gles. Look for damage, loose knots and slipping toggles. (Serious injuries could result if an incor-
rectly attached toggle detaches from the steering line during the landing flare— don't let it happen to
you.)
Check VELCRO for wear!
Table of contents