Joker Boat CLUBMAN 21 User manual

Use and Maintenance

All photos, diagrams and pictures in this manual are purely indicative; the manufacturer reserves the right to make changes to the boat without
notice. At the time of purchase, check with your retailer that no changes have been made to the basic outfitting of the boat at your request, which
would require the due specifications from the retailer who made such changes, in order to have the correct information for the use of the boat in
complete safety.

Owner’s manual
I JT B- O
Boat Identification Data Plate UNI EN ISO 10087 - 2006
The C.I.N. includes the following information:
Nationality of manufacturer IT
Manufacturer’s code JBO
Serial no.
Month of build
Year of build
Year of sale or use
This manual consists of 136
(one hundred and forty) pages
+ relevant annexes (on-board
instruments and engines, where
supplied).
The boat in question is designed
for use in a temperature range of
between -10°C and + 60°C.
This manual also includes ex-
planations about optionals not
supplied as standard; check on
the www.jokerboat.it website or
with your retailer which optionals
are supplied as standard and for
which models.


Owner’s manual
Introduction 6
Standards and degree of hazard 8
Chapter 1 CE certification and main characteristics 9
Chapter 2 Main characteristics 12
Chapter 3 Inflation and deflation instructions 16
Chapter 4 General safety regulations 19
Chapter 5 Refuelling, fire extinguishing systems, fuel system 24
Chapter 6 Flooding, taking on water and draining water 32
Chapter 7 Black water system (where present) 37
Chapter 8 Fresh water system (where present) 41
Chapter 9 Cooker 42
Chapter 10 Electrical system 44
Chapter 11 Personal flotation devices 61
Chapter 12 Recommendations on using the safety equipment 65
Chapter 13 Advice on handling the boat 66
Chapter 14 Before each trip 70
Chapter 15 Boat hauling and loading advice 75
Chapter 16 Manufacturer’s advice 78
Chapter 17 Helm station and driving the boat 84
Chapter 18 Mooring to the pier 94
Chapter 19 Help, rescue and towing 99
Chapter 20 Advice on cleaning, repair work and laying up 102
Chapter 21 Notes for versions with EFB engines 109
Chapter 22 Troubleshooting 112
Chapter 23 Schemes: projects, sessions and holding point 115
Chapter 24 Guarantee contract 124
Warranty receipt, delivery report, annual servicings 126

6
Introduction
The Shipyard thanks you for choosing a Joker Boat, certain that your choice is guaranteed
by a quality product that will meet your needs.
Our boats have been built respecting the European CE legislation and according to the
tradition of the Shipyard; the design and the fitting have been conceived to guarantee on
board comfort, safety and overall practicality.
This Manual has been conceived to help you conduct and manage your boat in total safety
and ease. It contains information on the boat, the systems, the equipment supplied and
installed, and their operation and maintenance.
Before using your boat, please read it carefully to become familiar with it.
If this is your first boat or if you are switching to a type of craft you are unfamiliar with, for
your convenience and safety, make sure you have acquired management and operation
experience before taking command.
Your Dealer or Yacht Club will be happy to advise you on local sailing schools or competent
instructors.

7
Owner’s manual
Premise
This manual contains basic recommendations and guidelines for the safe use of the boat.
As it is not possible to provide safety information for every potential situation, it is strongly
recommended that you:
•Regularly inquire about the safety requirements in force.
•All the crew members must be familiar with the use and arrangement of the safety
equipment on board.
•The boat must never be loaded more than the maximum weight indicated bythe manufacturer.
•Keep the boat and on board facilities in good condition.
•Have the boat compulsorily inspected by your authorised Joker Boat, dealer once a year
using the ANNUAL COUPON form attached to this manual. Penalty for negligence the
forfeiture of the guarantee.
•All the crew must receive adequate preparation and training.
KEEP IN MIND: this manual is drawn up in order to give preliminary information to
begin to understand the operation of your boat, therefore a careful reading and
understanding of the same must then be completed by a safe and gradual use of
the boat, for this boat it is necessary to have a good familiarity with the sea and all
the topics covered in order to obtain a nautical license.
This manual does not purport to make the owner able to carry out interventions on
specific systems or extraordinary repairs, in fact these are tasks entrusted to highly
specialized personnel, just as the manual of your car will not teach you to replace
the mechanical workshops.

8
Standards and degree of hazard
Reference standards:
•UNI EN ISO 10240 (date of entry into force).
Standard concerning the drawing up of the Owner’s Manual.
•UNI EN ISO 11192 (date of entry into force).
Standard concerning the definition of ISO symbols to apply
to the diagrams/systems.
In addition, the following ISO standards were also consulted
to draw up this manual, for relevant aspects, with the validity
date applicable in the year 2016:
ISO 6185 ISO 8099
ISO 8666 ISO 9093
ISO 9094 ISO 10133
ISO 10592 ISO 11591
ISO 11812 ISO 12217
ISO 14946 ISO 15083
ISO 15084 ISO 15085
Degrees of hazard:
This Manual contains notices highlighted as follows, which
contain instructions regarding safety or the environment.
READ THEM AND NEVER DISREGARD THEM.
DANGER
This type of notice indicates the existence of a
serious risk, which is very likely to cause death
or serious permanent injury, unless appropriate
precautions are taken.
WARNING
This type of notice indicates the existence of a
risk, which could cause an accident or even death,
unless appropriate precautions are taken.
CAUTION
This type of notice indicates a reminder to apply
safety or anti-pollution practices, or it attracts
attention to unsafe behaviour which could cause
personal injury or damage the boat, its compo-
nents or the Environment.

9
Owner’s manual
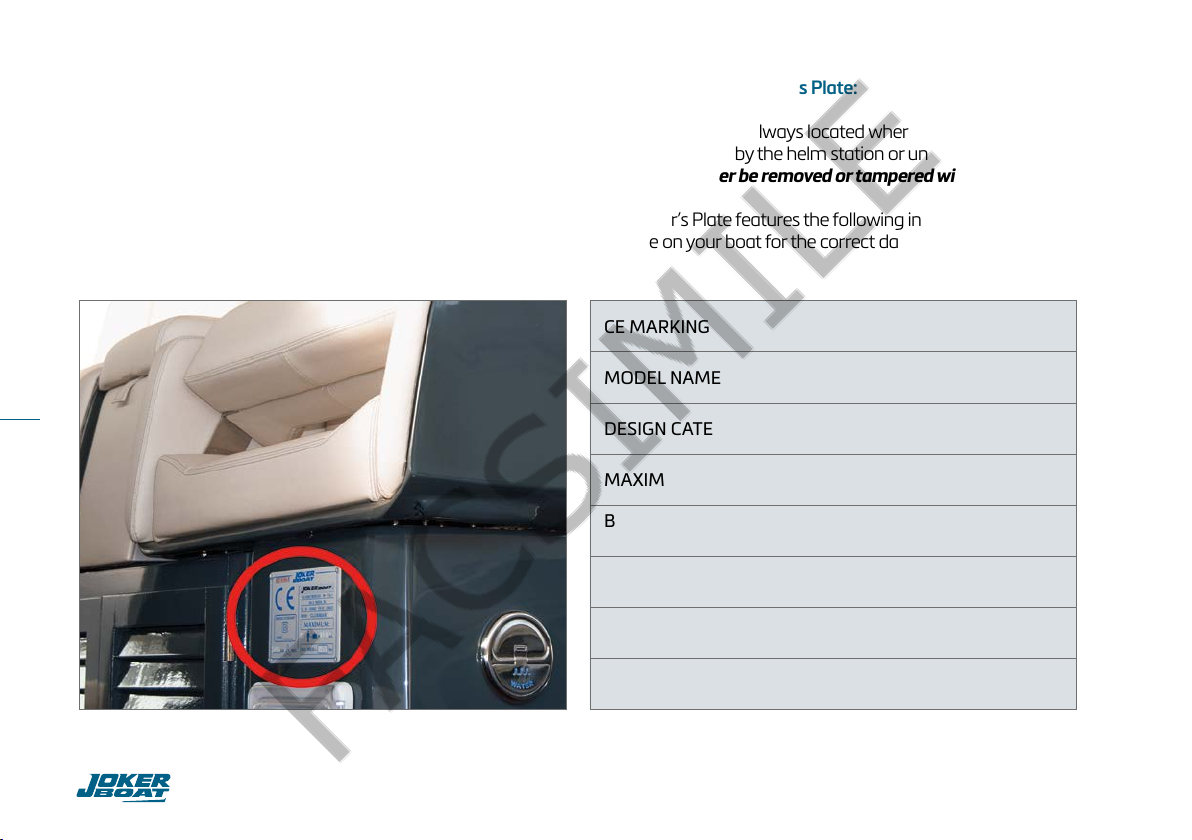
CE Certification and main characteristics
Chapter 1
N.B.:
The CE mark indicates that the boat has been built in accordance with “Directive 2013/53/EU” concerning
Recreational Craft.
CAT. PROG. “A” = Above force 8 wind waves above 4 metres
CAT. PROG. “B” = Force 8 wind waves up to 4 metres
CAT. PROG. “C” = Force 6 wind waves up to 2 metres
CAT. PROG. “D” = Force 4 wind waves up to 0.5 metres
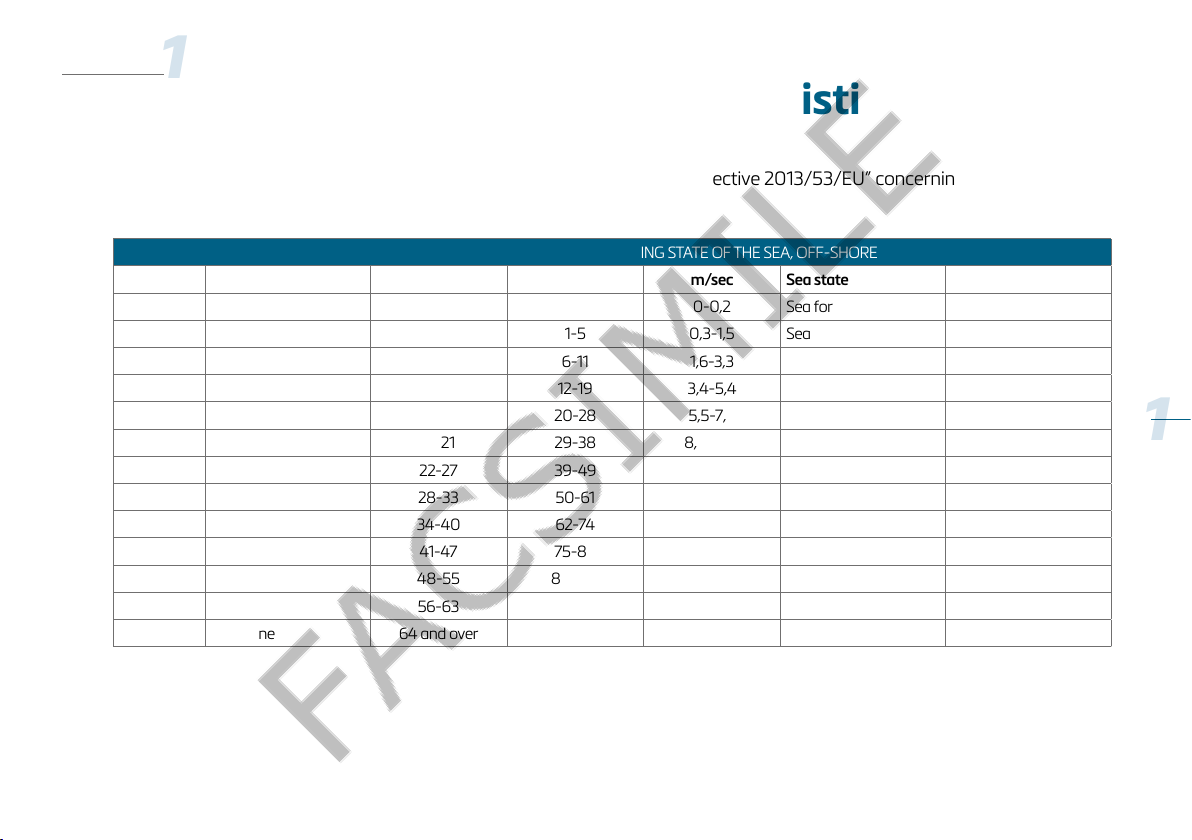
BEAUFORT WIND SCALE AND CORRESPONDING STATE OF THE SEA, OFF-SHORE
Force Name Knots Km/h m/sec Sea state Max. wave height in m
0Calm <1 <1 0-0,2 Sea force zero 0
1Light air 1–3 1-5 0,3-1,5 Sea force one 0.12
2Light breeze 4-6 6-11 1,6-3,3 Sea force two 0.2-0.3
3Breeze 7-10 12-19 3,4-5,4 Sea force two 0.6-1
4Lively breeze 11-16 20-28 5,5-7,9 Sea force three 1-1.5
5Gentle breeze 17-21 29-38 8,0-10,7 Sea force four 2-2.5
6Strong breeze 22-27 39-49 10,8-13,8 Sea force five 3-4
7Moderate gale 28-33 50-61 13,9-17,1 Sea force six 4-5.5
8Moderate gale 34-40 62-74 17,2-20,7 Sea force seven 5.5-7.5
9Strong gale 41-47 75-88 20,8-24,4 Sea force eight 7-10
10 Storm 48-55 89-102 24,5-28,4 Sea force nine 9-12.5
11 Storm 56-63 103-117 28,5-32,6 Sea force ten 11.5-16
12 Hurricane 64 and over 118 and over 32,7 and over Phenomenal n.a.
1
1

10
CE MARKING
MODEL NAME
DESIGN CATEGORY
MAXIMUM PERMISSIBLE POWER IN KILOWATTS
BUILDER OR PERSON
RESPONSIBLE FOR MARKETING
MAX. NUMBER OF PEOPLE ALLOWED
MAXIMUM OCCUPANCY WEIGHT INCLUDING
PEOPLE + LUGGAGE
TUBE INFLATION PRESSURE
Data plates fitted on board:
The Builder’s Plate and 2 (two) boat Identification Data Plates
are fitted on board.
UNI EN ISO 14945 Builder’s Plate:
The builder’s plate is always located where it can be easily
seen, for example, by the helm station or under the skipper’s
seat. It must never be removed or tampered with.
The Builder’s Plate features the following information: (check
the plate on your boat for the correct data).

11
Owner’s manual
Boat Identification Data Plate UNI EN ISO 10087 - 2006:
2 (two) Boat Identification Data Plates are fitted on board.
One is fixed to the starboard side of the transom. The second
plate is resin-finished and located in a concealed spot known
only to the Shipyard.
The Data Plates must never be moved or tampered with.
The CIN includes the following information (indicative example):
Nationality of manufacturer ITALIA
Manufacturer’s code JBO
Serial no NNNNN
Month of build M
Year of build Y
Year of sale or use HH
This is an example and does not necessarily match the plate on your
boat. Check the plate fitted on board for the correct data.
IT JBO NNNNN MY HH
CAUTION
Permissible power, type of engine, fuel tank ca-
pacity and fresh water tank capacity may vary ac-
cording to the yard’s or customer’s requirements;
check on your boat and on the relevant Builder’s
Plate for the data in question.
CAUTION
The presence of the Data Plates on board is vital
as they are the only means of recognising and
identifying the vessel, without which it would not
comply with the applicable Laws in force. They
must not be removed, so any tampering with or
removal of the Data Plates not authorised by the
Manufacturer comes under the sole responsibility
of the Customer.
1

12
2
Main characteristics
Chapter 2
Name Unladen Weight (*)
(Kg) Fuel Tank (l) Fresh Water Tank (l) Black Water Tank (l)
CLUBMAN 21 450 110 60
CLUBMAN 22 PLUS 1200 210 70
CLUBMAN 24 750 380 70
CLUBMAN 26 900 380 70 40 (for EFB)
CLUBMAN 28 1800 400 120 40
CLUBMAN 30 2240 400 120 40
CLUBMAN 35 3100 700 170 70
COASTER 470 250 52 60
COASTER 520 500 85 60
COASTER 580 PLUS 600 110 47
COASTER 650 500 135 50
COASTER 650 PLUS 780 170 70
BARRACUDA 580 500 120 50
BARRACUDA 650 700 170 70
(*) without engine
(°) with engine type

13
Owner’s manual
2
(*) check the plate on board
Name Max Power
(kW*)
People allowed
(N.)
Max weight carried
Kg (people + luggage)
Design
category*
Max diameter
of tubes (m)
Chambers
(N.)
CLUBMAN 21 112 12 1080 C 0,55 6
CLUBMAN 22 PLUS 184 14 1200 C 0,54 6
CLUBMAN 24 224 16 1440 B 0,62 6
CLUBMAN 26 224 22 1980 B 0,63 6
CLUBMAN 28 442 16 1440 B 0,63 6
CLUBMAN 30 597 16 1440 B 0,65 8
CLUBMAN 35 672 16 1440 B 0,62 8
COASTER 470 55 8 720 C 0,52 6
COASTER 520 97 8 720 C 0,55 6
COASTER 580 PLUS 96 8 450 C 0,55 6
COASTER 650 148 16 1440 C 0,55 6
COASTER 650 PLUS 148 16 1440 C 0,55 6
BARRACUDA 580 97 10 900 C 0,58 6
BARRACUDA 650 166 15 1350 C 0,55 6

14
Lh
D
Bh
The immersion data are specified in the Declaration of
Conformity with the symbol “T”.
The dimensions (Lh, Bh and D) do not include the dimensions
of the engine and all the removable parts like the stern plat-
forms, bow anchor winch etc. which vary according to the
chosen engine and version.
The unladen weight does not include the engine, which could
vary. Check with your retailer or with the Manufacturer the
overall weight and dimensions according to your choice of
engine. Measurements and data specified with the tolerance
values outlined by ISO 8666.
Lh = CE certified length
Bh = CE certified breadth
D = CE construction height
Name Lh
(m)
Bh
(m)
D
(m)
Fully laden
weight (Kg)
CLUBMAN 21
6,20 2,50 0,89 1850
CLUBMAN 22 PLUS
6,83 2,78 0,96 2600
CLUBMAN 24
7,46 2,99 1,12 3240
CLUBMAN 26
7,93 2,99 1,12 3970
CLUBMAN 28
8,25 3,15 1,23 5250
CLUBMAN 30
9,04 3,15 1,23 4400
CLUBMAN 35
9,99 3,64 1,31 6086
COASTER 470
4,95 2,18 0,70 1190
COASTER 520
5,06 2,58 0,85 1500
COASTER 580 PLUS
5,80 2,50 0,85 1200
COASTER 650
6,57 2,48 0,97 2400
COASTER 650 PLUS 6,90 2,50 0,83 2400
BARRACUDA 580 5,80 2,50 0,85 1120
BARRACUDA 650
6,70 2,45 0,96 2580

15
Owner’s manual
Facsimile of
Declaration
of Conformity
Sample CE Certification And Related Declaration Of Conformity:
In addition to this Manual, you were also handed the Declaration of Conformity, in which the
Manufacturer confirms that the boat you own was built in compliance with the applicable
Regulations in force. It is understood that all components installed and work performed by
your Retailer fall under the responsibility of the latter, who will provide due warranty thereof.
2

16
3
Instructions for inflation and deflation of tubes
Chapter 3
The pneumatic part of the boat consists of a rubberised fab-
ric tube divided into several separate chambers; the inflation/
deflation valves (one per chamber) require periodic mainte-
nance. Make sure they are always closed to stop dirt blocking
the mechanisms.
Inflation:
Open all the inflation valve caps and inflate ALL the chambers
without bringing them to full pressure. Next, pressurise them
to the operating pressure (MAX 0.2 Bar) one compartment at
a time and close the plug.
If the boat remains exposed to the sun, check the tube
pressure; if it is much higher than the value specified on the
builder’s plate, deflate the chambers slightly until the desired
operating pressure is reached.
If, on the other hand, the boat is moored in a cool place,
check that the pressure is not lower than the operating pres-
sure. If this is the case, restore optimum conditions before
setting sail.
If you do not have a pressure gauge, check by pressing the
tube with your fingers, if the fabric does not give way, then
the chamber is inflated correctly.
Cruising when the tubes are not fully inflated may lead to
increased, uneven wear on the rubber joints which will even-
tually rupture them. Always check the condition of the tubes
before setting sail.
Side view
View at stern
Tube correctly inflated,
reduced contact surfaces
with water.
Tube not correctly inflated,
reduced contact surface
with water, risk that joints
become unglued.

17
Owner’s manual
3
Inflator generally recommended and provided by the ma-
nufacturer. A manual inflator is provided with small models
while the “superturbo bst 12” or “turbomax” inflator may be
provided with larger models.
CAUTION
When inflating, do not use compressors and/or
other types of inflators which are not approved
by the manufacturer. Remember that due to its
very construction, the tube continually undergoes
internal inflation variations due to usage, temper-
ature, etc., so any variations are not necessarily
ascribable to leaks or valve failures. Please contact
qualified staff only after checking repeatedly and
carefully any pressure variations that may have
occurred in a short space of time.
CAUTION
The tube valves may require tightening in the event
of loss of tightness; to do this, the manufacturer
provides a purpose-provided spanner for its sales
network, which you can purchase. In any case,
it must be used with extreme caution, so please
contact your sales network if you are unsure about
performing this type of maintenance work.
Example of spanner for
tightening the tube valves
Example of tube repair kit
provided by the builder

18
Deflation with metal valves:
1 Unscrew the cap and remove the cover.
2 Use the cover to unscrew the pushpin inside the valve. To
deflate the boat tubes completely, use a pump approved
by the manufacturer to create suction.
3 The pushpin inside the valve has a rubber part as shown in
figure 4. This component is prone to wear over time. If air in
a chamber of the tube leaks out through the seal, this
rubber component may need to be replaced (contact your
retailer).
CAUTION: there is a rubber seal (figure 5) in the valve, between
the cap and the pushpin. Make sure not to lose this component
when using the valves.
WARNINGS
NEVER set out if the caps are not in their housing; if
one or more caps are damaged or have been lost,
replace them with caps with the same characteris-
tics (have them replaced by specialised staff).
Before sailing, always check that the tubes are
correctly inflated and airtight, especially after long
periods of inactivity (after storage) or after long
cruises in rough seas. If one or more chambers
are damaged, contact a specialist to resolve the
problem.
If one or more chambers are damaged while
cruising, do not panic. Make sure that everyone on
board puts on a life jacket and head for the nearest
port at a moderate speed.
Given the characteristics of the boat, even if some
of the tubes are damaged or if the tubes are intact
but the hull is damaged, the boat is the safest place
for the crew and remains buoyant even when it has
taken on water. The decision to abandon ship must
only be taken if there is a serious risk of sinking.
Note: The number of chambers in your boat is given
in the tables of the main characteristics.
1
4 5
2 3

19
Owner’s manual
4
General safety regulations
Chapter 4
4
This manual contains recommendations and basic guidelines
on using the boat safely.
Since safety information cannot be provided for every possible
situation, as a general rule we recommend:
•Being regularly informed of the safety requirements in force;
•Keeping the boat and systems in perfect working order;
•NEVER set off without the pilot wearing the safety cord
connected to the engine start-up;
•Having the boat inspected by your dealer or any other
authorised dealer at least once a year;
•Always checking weather/sea conditions before setting sail;
•If you decide to set off on a long cruise, it is always advisable
to sail in the company of other boats. In any case, make your
destination and route known to others or authorities that
can give advice if necessary;
•In order to be safe, the boat must be kept in perfect working
order, i.e. in the same state in which it was delivered;
•Do not use the boat for diving;
•When cruising, sit in the seats provided, be very careful
when moving about on the boat while cruising and when
anchored and while getting on and off the boat;
•Distribute loads and persons on board correctly so that
the boat is evenly balanced. Concentrating loads in one point
affects stability when cruising and when anchored;
•When in use and also when anchored, one person who can
sail the boat MUST ALWAYS remain on board to prevent the
craft from accidentally drifting because of waves or wind
while the passengers are in the water;
•Never start the engines or leave them running if there are
people swimming;
•If people are transported who are poor swimmers or cannot
swim at all or have motor problems, they should always
wear personal flotation devices (life jackets, life belts, etc.);
•Use and periodically check the safety equipment according
to the type of sailing you intend to do and the people on
board (for specifications, see the Coastguard table www.
capitaneria.it if in Italy and contact the relevant authority
if abroad), inform all crew and passengers where the
safety and fire-fighting equipment are located (made easily
accessible by the skipper) and demonstrate how they work;
•The manufacturer shall not be held responsible for any
damage to property and/or persons deriving from improper
use of the boat or a failure to observe the instructions in this
manual;
•Remember to be especially careful when opening and
closing lockers as accidental closure could injure your hands
and head;
•All drawings and photographs in this manual are for
illustrative purposes only and the manufacturer reserves
the right to modify boats, equipment, systems and fittings
without prior notice;
•Do not modify or tamper with any of the onboard systems,
control group or anything else without written permission

20
from the manufacturer and without the technical support of
specialists;
•In addition to its design features, the boat’s state of repair,
the ability and physical condition of the crew and knowledge
of the boat and waters you have decided to sail in are vitally
important for dealing with adverse sea conditions and,
above all, getting maximum pleasure from your boat and
maximum safety.
•Check regularly the condition of all clamps and silicone,
and pay particular attention to the tank compartment hatch
(if present) as any water seepage could cause rusting and
facilitate the perforation of the tank due to galvanic currents.
•Be very careful when moving about on the boat while
cruising and when anchored; remember than sun cream
can leave marks and make surfaces and handles slippery.
•Do not walk on the tubes, as you could fall.
•Be very careful when handling any reclining backrests or
other moving parts, as the reclining backrests could become
unstable if they are used to rest on, becoming dangerous.
•Care for the boat as a good father looks after his child.
•Periodically check the tightening of all the bolts, screws and
nuts, including those on pulpits, awnings, etc.
•The owner must keep the boat in good condition and
replace at once any equipment that shows signs of
deterioration or deficiencies that could compromise safe
and efficient sailing.
•The boat can only be piloted by the skipper and/or by a
person with the boat licence.
•It is forbidden to smoke in the engine room and use naked
flames, which can pose a risk of fire (it is advisable in any
case not to smoke anywhere on board).
•Smokers must not leave lit cigarettes below deck (see also
above). It is advisable to use an anti-roll ashtray.
•It is strictly forbidden to smoke while refuelling.
•Do not leave boiling pots unattended.
•Always check the engine room (for EFB versions) for any oil
leaks after refuelling and before starting the engines.
•Do not place hands or feet on the stops of the doors and
hatches or on the latches; when walking on the deck, make
sure not to step on the bitts and fairleads, or on any manual
or automatic buttons for securing cushions and tarpaulins.
•Remember that some doors or hatches do not have
stops. Be careful as these can close unexpectedly or be
inadvertently closed by other people on board, both at sea
and at berth, and cause damage or physical injury.
•Before setting sail, make sure to properly secure all the
equipment and anything else that can move and cause a
hindrance to setting sail.
•After making any repairs or carrying out any checks, put
the tools back in place and remove any parts replaced in the
engine room or elsewhere on the boat.
•It is recommended not to obstruct or completely fill the
rooms where the fire or safety equipment is kept.
•It is recommended not to store rescue or safety equipment
in lockers that are difficult to access.
•Before starting the engines (in the case of EFB), make sure
that nobody is present in the engine rooms and implement
the normal procedures for starting the engines in safety.
•No one should be seated on the stern platform (if provided)
during cruising or mooring operations.
•There must be safety equipment on board.
•Never overload the boat, but observe the load rating given
This manual suits for next models
13
Table of contents
Other Joker Boat Boat manuals