JOLIKE M2 User manual

JOLIKE M2 Music Player
User Manual
Thank you for purchasing our JOLIKE Music Player.
Please read the manual carefully before using the device.
If you have any question, please contact our customer
Service: joli[email protected]m
2
Basic Operations

3
1.Charge the Player
1. Plug the attached USB cable into the USB port of
a computer to charge the player. When you start
charging, it will show two options: “Charge &
Transfer” and “Charge & Play”. An indicate on the
top right will show the charging statue.
2. Use only the 5V/500mA charger for charging or it
may lead to product failure.
2.Power On/Off
Hold the Power button 3 seconds on the right to turn
on/off the player.
3.Date Transfer
Plug it into your computer and copy over media files
with the attached USB cable as if it was a flash
driver or use music management software such as
Windows Media Player to transfer the files.(Not
supported for iTune)
Note: if your computer cannot detect the MP3 Player,
try to update your USB driver or use another cable.

4
If it still can’t work for you. Ask RUIZU Customer
Service for additional help. (See Cover)
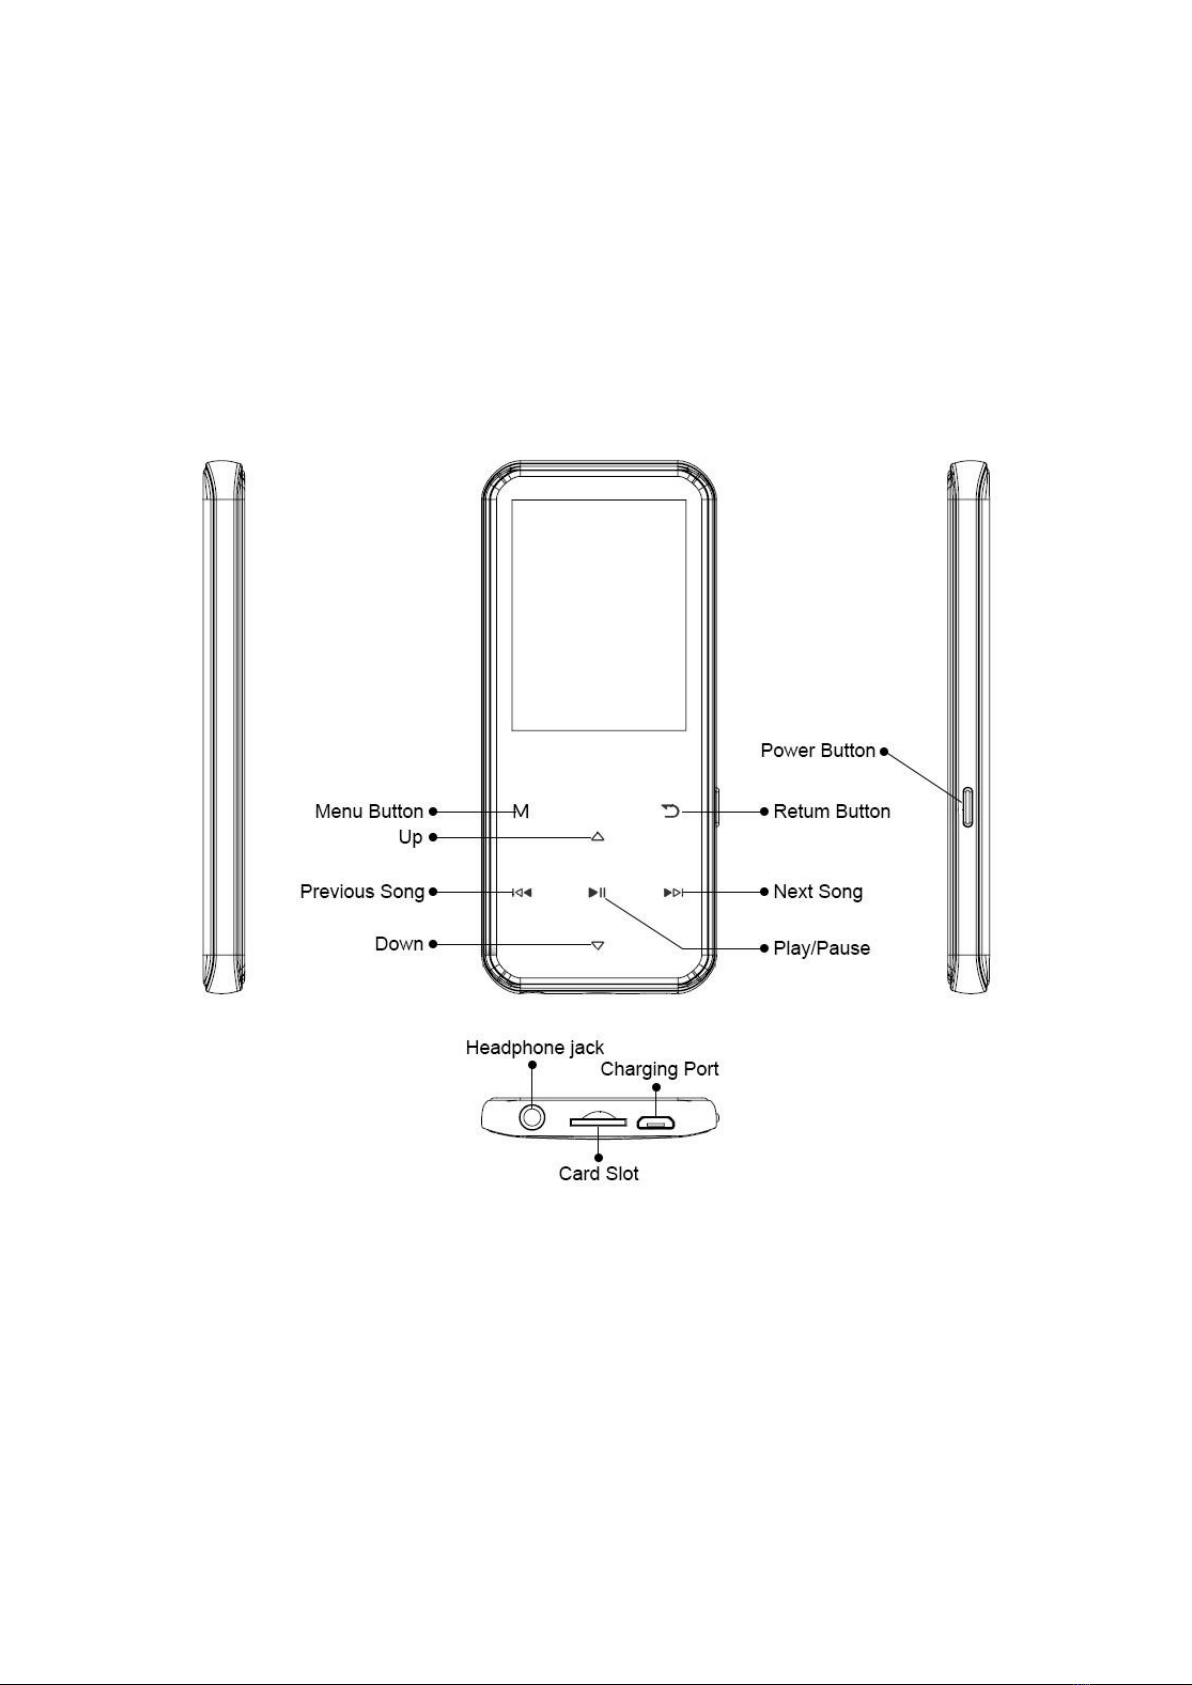
4.Lock Screen
Hold the Menu button(“M”button) to lock the screen.
Repeat to unlock it.
5.Return
While on playing interface, touch the button to
exit.
6.Volume Adjustment
While on Music/Radio/Movie playing interface,touch
the button to turn up/down the volume.

5
Music
Touch button with “Music” on main interface to
access to its function. A related list will show as
follows:
All songs: View the songs list.
Artists: Play songs from Artist you like.
Albums: Play songs from Album you like.
Genres: Play songs from Genres you like.
Playlists: Play songs from 1 of 3 playlists.
Update Playlist: Refresh the playlist you just edit.
Options when SD card inserted:
Local folder: View songs in MP3’s memory.
Card folder: View songs in SD card’s memory.
JOLIKE M2 Music Player supports MP3, WMA, APE,
WAV, FLAC format audio files. (Maximum 4001
songs supported)
Rewind/Forward
While it’s on music playing interface, touch button /
to go to the previous/next song.
Hold button / for fast rewind/ forward.

6
Sorting
Audio files in the “Music” section will be sorted by
alphabetic order automatically. If you’re trying to
use numerical order, you need to rename files and
add 0 before 0-9 such as 00, 01, 02, 03...08, 09.
If you don’t want to rename the file, or want to sort
files by your own order. Please go to “Browse”.
Settings
While it’s on music playing interface, touch Menu
button to access its sub-menu. The related list will
show:
1. Play mode
1.1. Play music from...
...All song: Play all songs in your mp3 player.
...this artists: Play songs by certain artist.
...this album: Play songs by certain album.
...this genre: Play songs by certain genre.
1.2. Repeat
Repeat off: Turn off repeat function.
Repeat 1: Repeat play the audio currently playing.
Repeat all: Play all of your audios and repeat.

7
View Playing: Test Play mode, audio will auto play
for a few seconds and skip. Select Repeat 1 to quit
this mode.
1.3. Shuffle
Turn on/off shuffle play.
JOLIKE MP3 player can shuffle up to 4001 songs.
1.4. Repeat settings
Repeat mode:
1) Play music as A-B loop. Enter Replay Mode, an
“A” on the bottom left will flash. touch button to
set a start time.
2) The “B” on the bottom left will flash once you
touch button . Touch button again to set an end
time and begin A-B loop, or touch button to reset a
start time.
3) Touch button again to end the A-B loop.
Replay Times:
Set how many times will A-B loop play.
Replay Interval:
Set how many seconds interval at beginning of A-B
loop play.

8
2. Sound settings
Equalizer: Choose from the 6 sound effects, or
choose "off" to turn off equalizer.
Variable speed playback: Adjust play speed from
-8 (Slowest) to +8 (Fastest). MP3 and WAV format
only.
Volume limit: Adjust the maximum sound volume.
3. Delete
Delete the currently playing song from Mp3 player.
4. Bookmarks
Add bookmark: Add a bookmark in the audio.
Go to bookmark: Go to your saved bookmark.
Delete bookmark: Delete saved bookmark
5. Add to playlist
Add the currently playing song to 1 of 3 playlists.
6. Remove from Playlist
Remove the song from 1 of 3 playlists.

9
Movie
Touch button with “Movie” on main interface to
access to its function.
JOLIKE M2 MP3 Player Support Converted AMV
format videos. Please go and visit JOLIKE website
http://www.jolike.com.cn/ to get the converter tool.
Settings
While it’s on video playing interface, touch Menu
button(“M”button) to access to its sub-menu. The
related list will show.
Brightness:
Adjust Screen brightness.
Repeat:
Repeat off: Turn off repeat function.
Repeat 1: Repeat play the audio currently playing.
Repeat all: Play all of your audios and repeat.
Delete video:
Delete the currently playing video.
Create Playlist:
Refresh the playlist you just edit.

10
Fadio
Touch button with “FM radio” on main interface to
access to its function. .
Note: Wired headphones are required as antenna
for FM radio function. FM frequency range 87.50 -
107.00 HZ.
Stations: Search and Save channels to preset.
Manual tune: Manual Search FM signal.
Auto tune: Auto Search FM signal.
FM Recording: View recorded FM radio.
Settings
While on radio playing, touch Menu button go to its
sub-menu. A related list will show:
Start FM radio recording:
Record current playing FM radio.
Radio background:
Enable FM radio play even quit “FM radio” section.
Other manuals for M2
1
Table of contents
Other JOLIKE MP3 Player manuals


