JOLIKE M5 User manual
JOLIKE M5 Music Player
User Manual

Headphone
Jack
USB Port
Volume +
Volume -
Power ON/OFF
TF Card Slot
Screen
11

Power ON/OFF
1.Power ON/OFF: Hold the Power button for 3s to turn on/off.
In the state of power on, short press the power off button to turn
off the screen.
2.Touch the left or right arrow to choose the functions included:
Music/Bluetooth/Video/FM Radio/Pedometer/Browser/
Record/E-book/Settings/Alarm/Stopwatch/Photo/Calendar.
You can also use your finger to gently swipe left or right on the
screen to select the function menu.
Basic operation
2

3.Touch each function icon to enter the function's menu.
4. Volume +/-: Click or hold the "Volume +" button to increase
the volume, click or hold the "Volume -" button to decrease the
volume.
12 Volume +
Volume -
5. Return: Touch icon to return to the previous interface.
Return
3

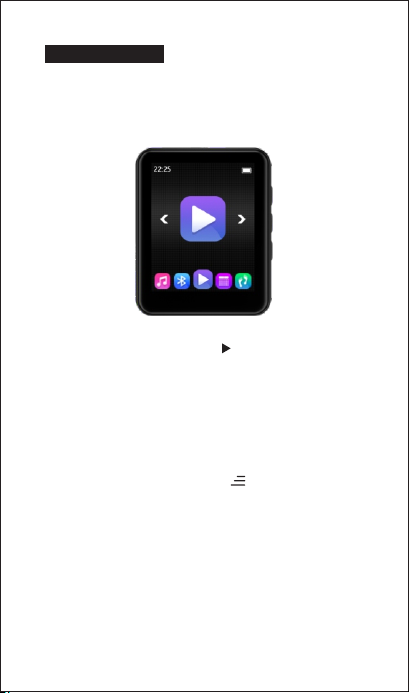
Music
Simple touch the "Music" icon enter to the Music's menu
Touch back to main menu to back to main menu.
Touch to select the function option in the music menu.
Touch “nowplaying” into playing interface.
4
Music
Touch to play last song hold to Rewind playback
Touch to play next song, hold to Fast forward playback
Touch to play / pause

Touch enter to music settings interface a related list will
show as:
Back to Home
Repeat
Repeat settings
Sound settings
Bookmarks
Delete
Add to playlist
Remove from playlist
How to set A-B repeat ?
On music playing interface, touch the" Menu
icon " enter to setting menu then choose option "Repeat
settings" and then choose " Repeat Mode". After you will see the
letter "A" begins to flashing, then touch the letter B to confirm
the repeat start point (Point A ), on the same time point "B" will
start to flashing, touch the letter B again to confirm the end point
of the A-B repeat, now it will start to play music from A point to
B.
Replay Times: Set A-B repeat times from 1~ 10 times.
Replay Interval: Set the time interval (1s to 7s ) for each repeat
play.
How to set the play speed?
On the music playing interface, touch the menu icon, enter to
setting menu, then choose option”setting sound”enter to variable
speed to set the rate.
How to set play mode ?
1. On the music playing interface touch the play mode icon on
the buttom left, to change the play mode
5
Sequential Play Repeat One
1
Repeat all Shuffle + Repeat

2. On music playing interface touch the "Menu key " enter to
settings menu than choose option "Repeat" all the play modes
that can be selected will be listed here including:/Repeat 1/
Repeat all/Shuffle
How to add you music onto the mp3 player?
1. Download your favorite music to your computer at first. Then
connect you computer with your mp3 player by USB cable, after
connected successfully, drop the music files from computer to the
mp3
2. Connect your mp3 player with your smartphone ( Only support
Android smart phone )by OTG connector. You could drop your
favorite music to your mp3 player.
Remark the format could be supported by this mp3 player as
below:
MP3: Bitrate: 8Kbps~320Kbps, Sampling rate: 8MHz~48MHz;
WMA: Bitrate: 5Kbps~384Kbps, Sampling rate: 8MHz~48MHz;
APE: Bitrate: 800Kbps~1000Kbps(FAST normal compressed)
Sampling rate: 8MHz~48MHz;
WAV: Bitrate: 32Kbps~384Kbps, Sampling rate: 8MHz~48MHz;
FLAC: Bitrate: 1000Kbps~1200Kbps(L0~L8), Sampling rate:
8MHz~48MHz
ACC-LC: Bitrate: 8Kbps~320Kbps, Sampling rate: 8MHz~48MHz;
6
Movie
Play / Pause: Click the "play button " to play the video, click
again to Pause.
Play the Last /Next Video : Click "<" / ">" to play the last / next
video.
Fast forward / Revind: Hold the button "<"/">" to fast forward /
Revind.
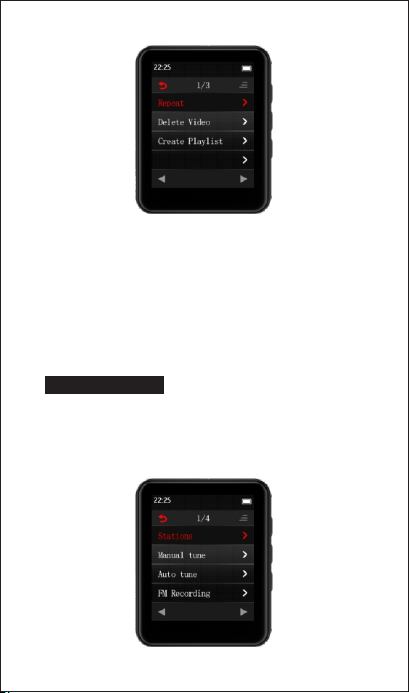
Video Settings
On the video playing interface, touch enter to the movie
setting interface, a related list will show as below:
Repeat
Delete Video
Create Playlist
Touch the "Movie" icon enter to the video menu, all the video
files will be listed on the videos menu, simple touch the video file
start to play.
7
Remark:
Video format supported: This mp3 player support AMV/ AVI
format, Video resolution size:128*160.
To get Video conversion tool please feel free to contact with our
customers service.
FM Radio
Touch "Radio" enter to FM Radio menu a related list will show
as: Stations/Manual Tune/Auto tune/FM Recording (Please
insert earphone as antenna)
8

Stations: The Radio station you have listen will be listed in this
menu
Manul Tune: Manul select the FM station.
Auto tune: Auto select the FM radio station.
FM recording: All the FM radio recording files will save in this
menu.
FM Settings
On the FM Radio Playing interface, Click the button enter to
the FM settings menu, a related list will show as:
Save
Clear all Stations
Clear Station
Auto Tune
Tuner Region
FM Recording
How to FM Recording ?
While on the FM playing interface, enter
to the FM Settings menu choose the option "Start FM recording "
it will begin to record the FM.On FM recording interface touch the
buttonto suspend FM recording, touch again to continue FM
recording,Touch >button will pop up a prompt window "Save the
recording ?"Choose "Yes" to save the FM recording, choose "No"
will cancelthe FM recording.
9
Other manuals for M5
2
Table of contents
Other JOLIKE MP3 Player manuals


