7
6
possa tagliare tutti i capelli.
Pettinate ogni tanto i capelli seguendo il senso di crescita, in modo che il
tagliacapelli possa aerrare più facilmente i capelli.
Per ottenere un ottimo risultato in caso di capelli ricci, radi, lunghi o sottili,
usate un pettine per avvicinare i capelli all’apparecchio.
Vi consigliamo di eliminare spesso i capelli tagliati dall’apparecchio.
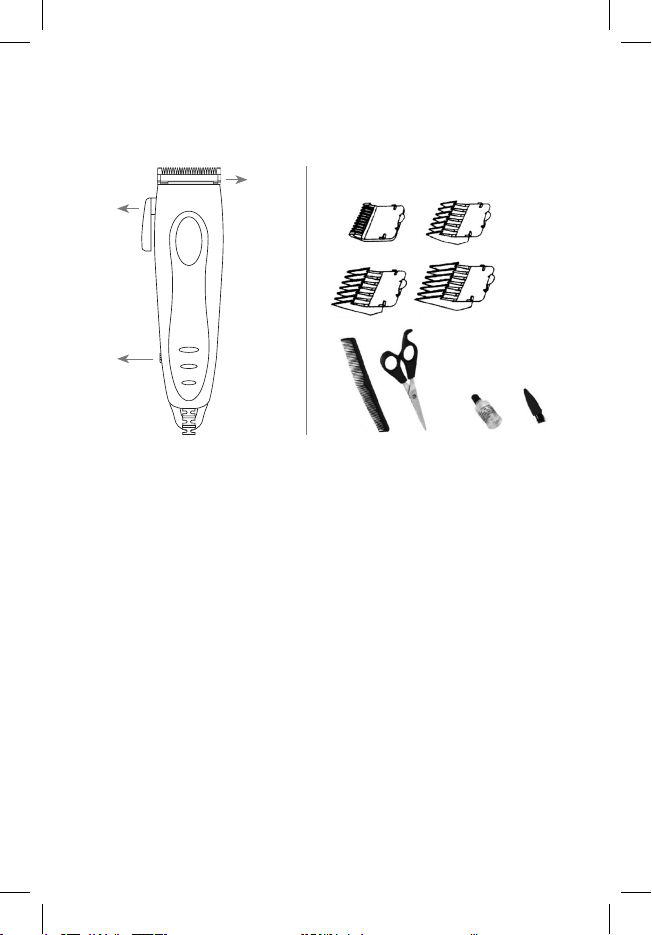
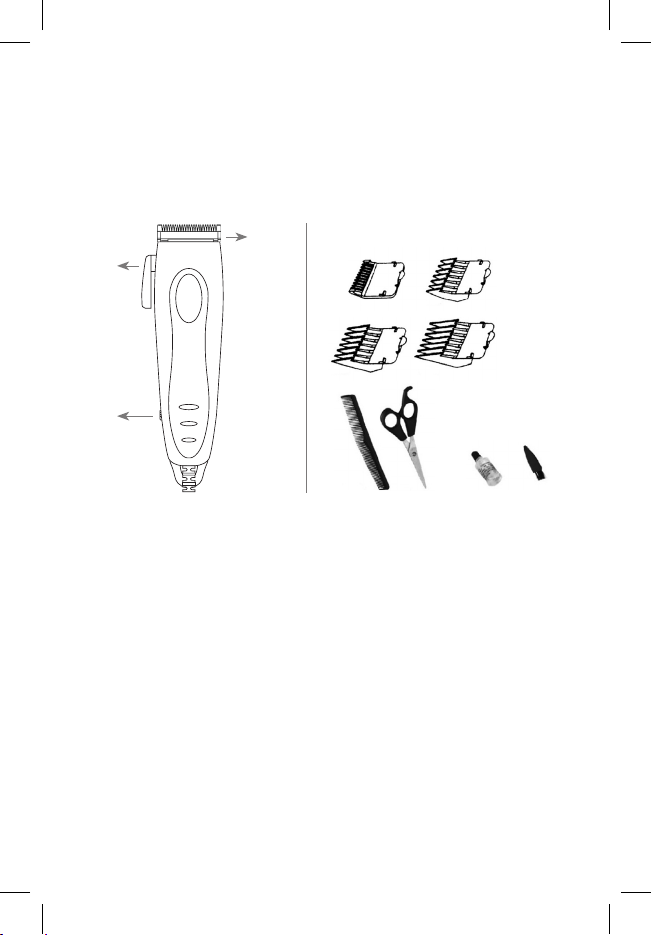
ALLINEAMENTO DELLE LAME
Il Tagliacapelli viene posto in vendita pronto all’uso e con le lame già
allineate e lubricate.
Se le lame risultano non essere allineate correttamente, devono essere
nuovamente allineate procedendo nel seguente modo:
allentare leggermente le viti di ssaggio, far combaciare i denti delle due
lame e posizionare quelli della lama superiore più bassi di circa 1.2 mm
rispetto a quelli della lama inferiore, come mostrato nel disegno, quindi
serrare nuovamente le viti.
1,2 mm
CARATTERISTICHE TECNICHE
Alimentazione: 220-240V ~ 50 Hz
Potenza: 10 W
Lame in acciaio inossidabile
4 guide di taglio
Set manutenzione e pulizia
Set per capelli
Condizioni operative di utilizzo:
Temperatura ambiente: da 10°C a 40°C.Umidità relativa: dal 30% al 75%
senza condensa. Pressione: da 700 – 1060 hPa.
Condizioni ambientali di trasporto ed immagazzinamento: Tempera-
tura: da 10 a 40°C. Umidità: da 5 a 95%. Pressione: da 700 –1060 hPa.
PULIZIA E MANUTENZIONE DEL PRODOTTO
- Staccare sempre la spina prima di procedere alla pulizia del prodotto.
- Non immergere mai l’apparecchio nell’acqua.
- Pulire esternamente il prodotto con un panno morbido e leggermente
umido.
- Dopo aver utilizzato il prodotto slare il pettine e utilizzando l’apposita
spazzolina, rimuovere i residui di peli e capelli dalle lame.
- Non utilizzare mai solventi o prodotti abrasivi.
- Al ne di assicurare un buon funzionamento e una lunga vita al prodotto,
si consiglia di olearemolto spesso la testina del tagliacapelli Svitare
la testina dell’apparecchio e applicare una goccia di olio, dopodiché
accendere il prodotto e farlo funzionare per alcuni secondi, in modo che la
testina si lubrichi in maniera adeguata.
Conservare sempre l’apparecchio con il copri-testina applicato.
SIMBOLOGIA
Questo dispositivo è conforme a tutte le direttive europee
applicabili
Apparecchio di classe II
SMALTIMENTO
L’apparecchio, incluse le sue parti removibili e accessori, al
terminedella vita utile non deve essere smaltito insieme ai riuti
urbani ma in conformità alla direttiva europea. Dovendo essere
trattato separatamente dai riuti domestici, deve essere conferito in
un centro di raccolta dierenziata per apparecchiature elettriche ed
elettroniche oppure riconsegnato al rivenditore al momento dell’acquisto
di una nuova apparecchiatura equivalente. In caso di trasgressionesono
previste severesanzioni.
Tutte le indicazioni e i disegni si basano sulle ultime informazioni disponibili al
momento della stampa del manuale e possono essere soggette a variazioni.
GB
INSTRUCTION MANUAL
Thanks you for having purchased JOYCARE hair clipper.
Please, before starting using this appliance, read carefully the following
instruction manual.
SAFETY WARNINGS
This appliance may be used by