JRC JSS-2150 - User manual

150W MF/HF RADIO EQUIPMENT
Installation Manual
7ZPJD0455

.

*
CAUTIONS AGAINST HIGH VOLTAGE
Radio and radar devices are operated by high voltages of anywhere from a few hundred volts up to
many hundreds of thousands of volts. Although there is no danger with normal use, it is very
dangerous if contact is made with the internal parts of these devices. (Only specialists should attempt
any maintenance, checking or adjusting.)
There is a very high risk of death by even a few thousand volts, in some cases you can be fatally
electrocuted by just a few hundred volts. To prevent accidents, you should avoid contact with the
internal parts of these devices at all costs. If contact is inevitable as in the case of an emergency, you
must switch off the devices and ground a terminal in order to discharge the capacitors. After making
certain that all the electricity is discharged, only then can you insert your hand into the device.
Wearing cotton gloves and putting your left hand in your pocket, in order not to use both hands
simultaneously, are also very good methods of shock prevention.
Quite often, an injury occurs by secondary factors, therefore it is necessary to choose a sturdy and
level working surface. If someone is electrocuted it is necessary to thoroughly disinfect the affected
area and seek medical attention as soon as possible.
When you find an electrocution victim, you must first switch off the machinery and ground all circuits. If
you are unable to cut off the machinery, move the victim away from it using a non-conductive material
such as dry boards or clothing.
When someone is electrocuted, and the electrical current reaches the breathing synapses of the
central nervous system inside the brain, breathing stops. If the victim's condition is stable, he or she
can be administered artificial respiration. An electrocution victim becomes very pale, and their pulse
can be very weak or even stop, consequently losing consciousness and becoming stiff.
Administration of first aid is critical in this situation.
Cautions concerning treatment of
electrocution victims

*
First aid
☆Note points for first aid
Unless there is impending danger leave the victim where he or she is, then begin artificial respiration.
Once you begin artificial respiration, you must continue without losing rhythm.
(1) Make contact with the victim cautiously, there is a risk that you may get electrocuted.
(2) Switch off the machinery and then move the victim away slowly if you must.
(3) Inform someone immediately (a hospital or doctor, dial emergency numbers, etc.).
(4) Lay the victim on his or her back and loosen any constrictive clothing (a tie, or belt).
(5) (a) Check the victim's pulse.
(b) Check for a heartbeat by pressing your ear against the victim's chest.
(c) Check if the victim is breathing by putting the back of your hand or face near the victim's
face.
(d) Check the pupils of the eyes.
(6) Open the victim's mouth and remove any artificial teeth, cigarette or chewing gum. Leave the
mouth opened and flatten the tongue with a towel or by putting something into the mouth to
prevent the victim's tongue from obstructing the throat. (If he or she is clenching the teeth and it is
difficult to open the mouth, use a spoon or the like to pry open the mouth.)
(7) Continually wipe the mouth to prevent the accumulation of saliva.

*
☆If the victim has a pulse but is not breathing
(“Mouth to mouth” resuscitation) Figure 1
(1) Place the victim’s head facing backward (place something under the neck like a pillow).
(2) Point the chin upward to widen the trachea.
(3) Pinch the victim’s nose, take a deep breath, then put your mouth over the victim’s mouth and exhale
completely, making sure that your mouth completely covers the victim’s mouth. Then remove your
mouth. Repeat this routine 10 to 15 times per minute (holding the nostrils).
(4) Pay attention to the victim to notice if he or she starts to breath. If breathing returns, stop
resuscitation.
(5) If it is impossible to open the victim’s mouth, put something like a plastic straw or vinyl tube into one
of the nostrils then blow air in while covering the mouth and the other nostril.
(6) Occasionally, when the victim comes back to consciousness, they immediately try to stand up.
Prevent this and keep them in a laying position. Give them something warm to drink and be sure
that they rest (do not give them any alcohol).
Administering artificial respiration by raising the head.
①(1) Raise the back of head, then place one
hand on the forehead and place the other
hand under the neck. →①
Most victims open their mouth when this is
done, making “mouth to mouth”
resuscitation easier.
②(2) Cover the victim’s mouth by opening your
mouth widely, then push your cheek
against the victim’s nose, →②
or pinch the victim’s nose to prevent air
from leaking out of it. →③
(3) Completely exhale into the lungs.
Exhale into the lungs until the chest
inflates.
You have to blow as rapidly as possible for
the first 10 times.
“Mouse to mouse” artificial respiration
Figure 1

*
☆If the victim has no pulse and is not breathing
(Heart massage in combination with artificial respiration.) Figure 2
If the victim has no pulse, his or her pupils are dilated, and if you cannot detect a heartbeat, the heart may
have stopped, beginning artificial respiration is critical.
(1) Put both hands on the diaphragm, with hands on top of each other keeping both arms straight (If your
elbows are bent, you cannot push with as much power). Press the diaphragm with your body weight
until the chest sinks about 2 cm (about 50 times per minute).
(2) If administering first aid when alone:
Perform the heart massage about 15 times then blow in twice. Repeat this routine.
If administering first aid with two people:
One person performs the heart massage 5 times, and the other person blows air in once. Repeat
this routine (Heart massage and “mouth to mouth” resuscitation used together).
(3) Constantly check the pupils and the pulse, if the pupils become normal and the pulse steadies, keep
them in a laying position and give them something warm to drink, be sure that they rest (do not give
them any alcohol). In any case you have to entrust major decision making to a doctor. Having
understanding people around is essential to the victim’s recovery from the mental shock of
electrocution.
① ②
③④
Heart massage in combination with artificial respiration Figure 2

Before Operation
Concerning the symbols
This manual uses the following symbols to explain correct operation and to
prevent injury or damage to property.
The symbols and descriptions are as follows. Understand them before
proceeding with this manual.
WARNING Indicates a warning that, if ignored, may
result in serious injury or even death.
CAUTION Indicates a caution that, if ignored, may
result in injury or damage to property.
Examples of symbols
The Δsymbol indicates caution (including DANGER and
WARNING). The illustration inside the Δsymbol specifies the
content of the caution more accurately. (This example warns of
possible electrical shock.)
The ;symbol indicates that performing an action is prohibited.
The illustration inside the ;symbol specifies the contents of the
prohibited operation. (in this example disassembly is prohibited.)
The zsymbol indicates operations that must be performed. The
illustration inside the zsymbol specifies obligatory instructions.
(In this example unplugging is the obligatory instruction.)
Concerning the WARNING labels
The WARNING labels are put on the NTD-2150 MF/HF Transceiver, NFC-2150
Antenna tuner, NBD-2150 AC/DC Power supply, and NBB-724 Battery charger.
Do not take off, destroy, or modify the labels.
Ex) NBD-2150 AC/DC Power supply (Upper view)
v

Handling precaution
CAUTION
Do not distribute this INSTALLATION MANUAL to ordinary users, because
it has been created and published only for use by our service engineers.
Do not use this equipment for anything other than specified.
Doing so may cause failure or malfunction.
Do not turn the trimmer resistors or the trimmer capacitors on the PCB
unit, except when and if they need to be adjusted. Doing so may cause
failure or malfunction. They are preset at the factory.
Do not install this equipment in a place near water or in one with
excessive humidity, steam, dust or soot. Doing so may cause fire, electric
shock, or malfunction.
Do not test the distress call as doing so will inconvenience local shipping
and Rescue Centers.
Use an artificial antenna (antenna dummy load) in the case of the test of
equipment, or adjustment.
When using an antenna unavoidably, shorten transmitting time,
When repairing a RoHS compatible unit, use RoHS compatible parts and
lead-free solder, and also RoHS compatible wiring materials.
If a false distress alert is transmitted accidentally, follow the instructions below:
1. Press the CANCEL key on the controller (when appropriate, follow
the commands on screen) and terminate the transmission of the
distress call.
2. Report the false distress call to a nearby RCC (Rescue Coordination
Center).
(In Japan, inform the nearest Japan Coast Guard.)
Information to be reported:
The date/time, location, and reason why the false distress call was
transmitted. Also report the ship's name, type, nationality, and ID
number as well as the unit model name and manufacture number/date,
if possible.
3. Report the false distress call to nearby ships using 2182.0 kHz or
another frequency for distress and safety purposes on the
radiotelephone.
4. If any acknowledgements to the distress call are received, inform the
ships of the false distress call.
Do not shorten the lines of the mini plug. Doing so may cause malfunction.
vi

CAUTION
Locate the antenna tuner, TX antenna and lead-in wire in locations as
far as possible from people and surrounding structures to satisfy the
following conditions.
•Far at least 30cm beyond anyone’s reach.
•Low vibration.
•Good ventilation and drainage.
•Protected from water (for above deck installation).
•Not exposed to smoke or corrosive gasses from the smokestack.
•Not exposed to heat.
•Protected from icing.
In the field maintenance mode, all DSC functions including distress alert
cannot be used. So when setup is complete, always restart by powering
off and on using breakers, or place the system in sleep mode.
If the equipment is left without operating in this mode, the maintenance
mode off timer automatically put the system into sleep mode.
Use F2.3.3 Calibration menu only when having a margin of error
obviously.
The batteries, except for sealed lead-acid batteries that require no
equalization, should be carried out the equalizing charge at least every
six months
vii

Contents
Preface ....................................................................................... v
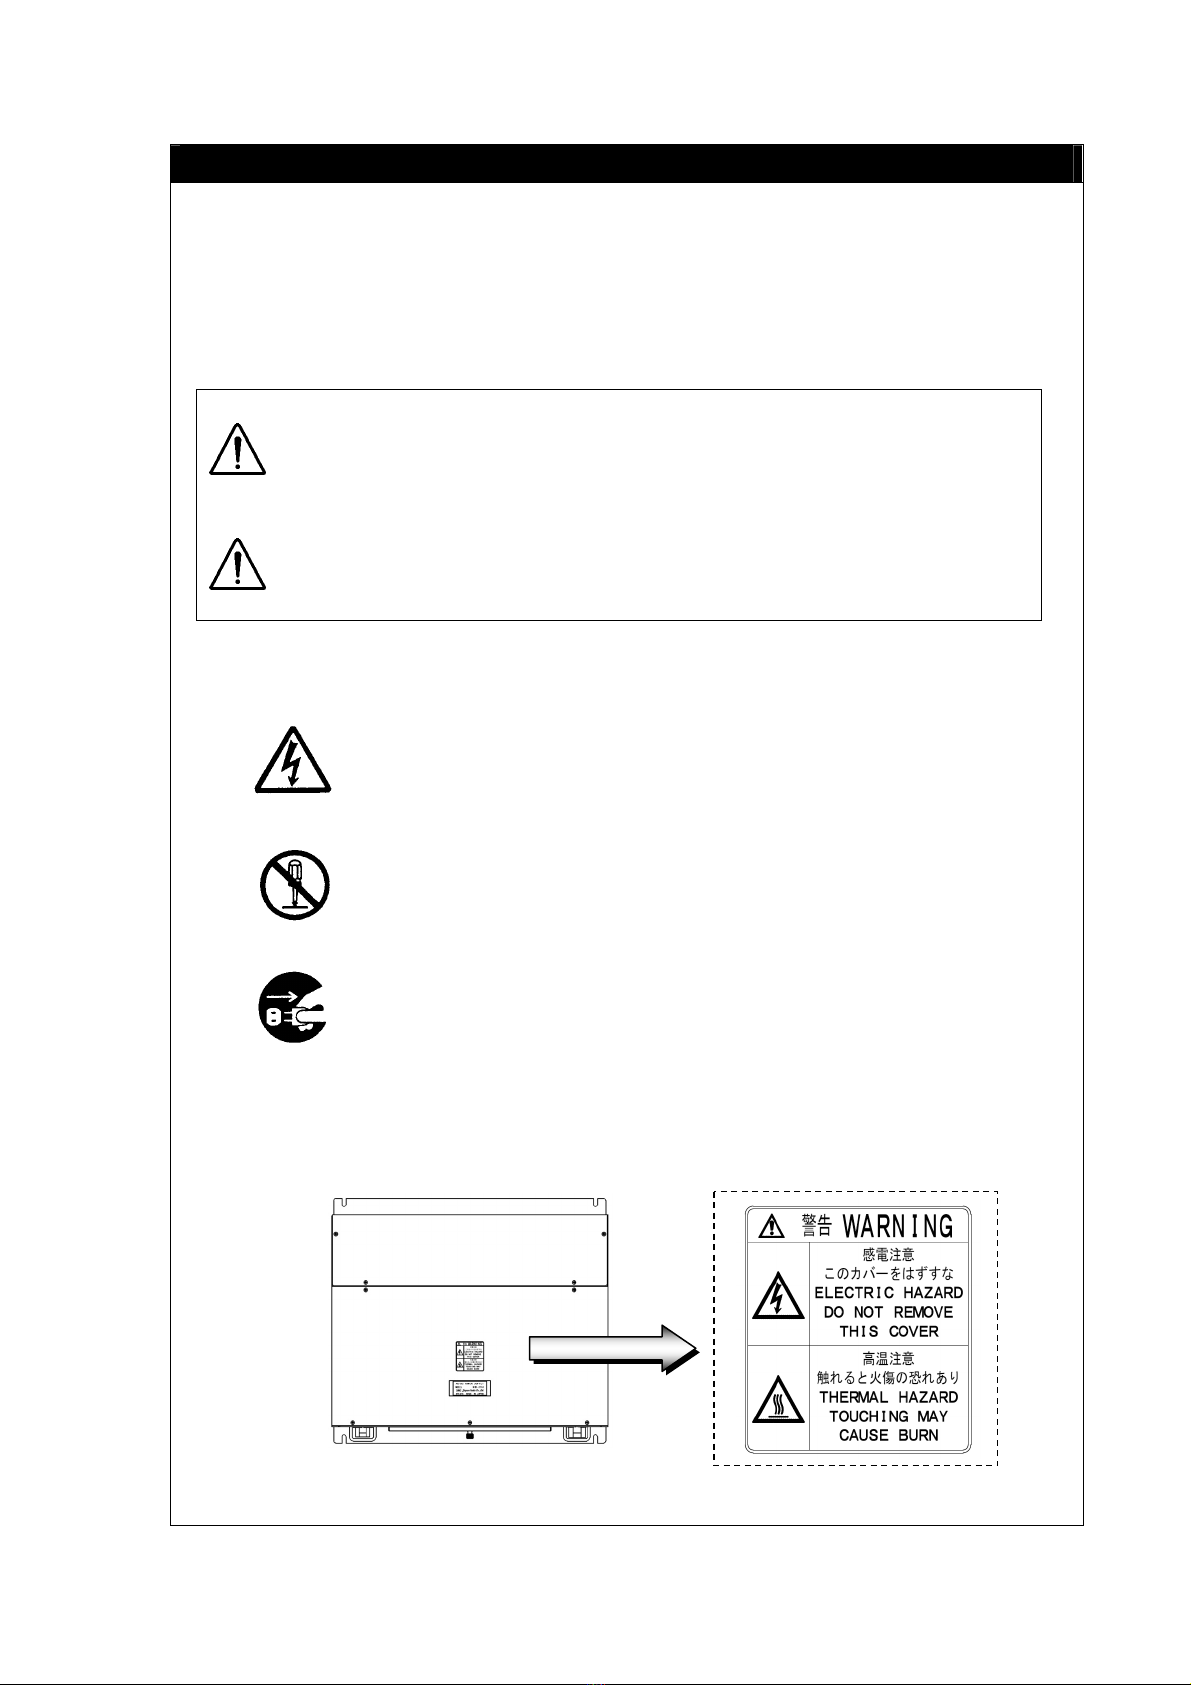
Handling precautions .................................................................... vi
1. CONFIGURATION AND SPECIFICATIONS .................................... 1-1
1.1 Basic configuration ........................................................................... 1-1
1.1.1 Basic configuration of the equipment ........................................... 1-1
1.1.2 Options ........................................................................................ 1-1
1.1.3 System configuration.................................................................... 1-2
1.2 Block diagram .................................................................................... 1-3
1.3 Specifications ................................................................................... 1-4
1.3.1 JSS-2150 MF/HF Radio Equipment ............................................. 1-4
1.3.2 Options ........................................................................................ 1-7
1.3.3 Peripheral interfaces .................................................................... 1-9
1.4 Interconnection diagram ................................................................... 1-10
1.4.1 General configuration ................................................................. 1-10
1.4.2 Overall configuration ................................................................... 1-11
2. INSTALLATIONS .......................................................................... 2-1
2.1 Installation procedure ....................................................................... 2-1
2.2 External dimensions and equipment overview ..................................... 2-5
2.2.1 NTD-2150 MF/HF Transceiver ..................................................... 2-5
2.2.1.1 External dimensions and installation space ........................................ 2-5
2.2.1.2 Installation ........................................................................................ 2-6
2.2.1.3 Connecting the power cable .............................................................. 2-18
2.2.1.4 Connecting the signal lines ................................................................ 2-19
2.2.1.5 Terminal description .......................................................................... 2-20
2.2.2 NCM-2150 MF/HF Controller ....................................................... 2-22
2.2.2.1 External dimensions and installation space ........................................ 2-22
2.2.2.2 Installation ........................................................................................ 2-23
2.2.2.3 Supplementary materials ................................................................... 2-27
2.2.3 NQW-261 Handset ...................................................................... 2-29
2.2.3.1 External dimensions .......................................................................... 2-29
2.2.3.2 Building the connector for the handset ............................................... 2-30
2.2.4 NQD-2250 Connection Box ......................................................... 2-31
2.2.4.1 External dimensions .......................................................................... 2-31

2.2.4.2 Installation ....................................................................................... 2-32
2.2.4.3 Connecting the signal lines ............................................................... 2-33
2.2.4.4 Terminal description ......................................................................... 2-34
2.2.5 NFC-2150 Antenna Tuner ........................................................... 2-35
2.2.5.1 External dimensions and installation space ....................................... 2-35
2.2.5.2 Antenna tuner installation ................................................................. 2-36
2.2.5.3 Cable processing .............................................................................. 2-39
2.2.5.4 Wiring the control signal lines ........................................................... 2-41
2.2.5.5 Example of antenna installation ........................................................ 2-43
2.2.6 NQD-2253 Junction Box .............................................................. 2-45
2.2.6.1 External dimensions ......................................................................... 2-45
2.2.7 NBD-2150 AC/DC Power Supply ................................................. 2-46
2.2.7.1 External dimensions ......................................................................... 2-46
2.2.7.2 Connecting the signal lines ............................................................... 2-47
2.2.7.3 Setting the AC input voltage (110 VAC/220 VAC) ............................... 2-47
2.2.8 NBB-724 Battery Charger ........................................................... 2-48
2.2.8.1 External dimensions and installation space ....................................... 2-48
2.2.8.2 Connecting the signal lines ............................................................... 2-49
2.2.8.3 Setting the AC input voltage (110 VAC/220 VAC) ............................... 2-50
2.2.8.4 Setting the battery charging voltage .................................................. 2-52
2.2.8.5 Prohibiting equalized charging .......................................................... 2-53
2.2.8.6 Details on switches and controls in the blank panel ........................... 2-54
2.2.8.7 Accessory terminals ......................................................................... 2-56
2.2.8.8 Other functions (protection circuit) .................................................... 2-56
2.2.9 NKG-91 Printer ........................................................................... 2-58
2.2.9.1 External dimensions and installation when attached to a wall ............ 2-58
2.2.9.2 External dimensions and installation for a flush mount ....................... 2-60
2.2.9.3 Connecting the signal lines ............................................................... 2-62
2.2.10 DPU-414 Printer (desktop type) .................................................. 2-63
2.2.10.1 External dimensions and installation space ....................................... 2-63
2.2.10.2 Connecting the signal lines ............................................................... 2-64
2.2.11 NKG-800 Printer (Centronics compliant/desktop type) ................. 2-65
2.2.11.1 External dimensions and installation space ....................................... 2-65
2.2.11.2 Connecting power supply and the signal lines..................................... 2-66
2.2.11.3 Setting the DIP switches ................................................................... 2-67
3. APPENDIX ................................................................................... 3-1
3.1 Block diagram ...................................................................................... 3-1
3.1.1 NTD-2150 MF/HF TRANSCEIVER ............................................... 3-1
3.1.2 CAH-2415 PA UNIT ..................................................................... 3-2
3.1.3 CMN-2250 TRX UNIT ................................................................. 3-3

3.1.4 CMJ-2250 WKR MODEM UNIT ................................................... 3-4
3.1.5 NCM-2150 MF/HF CONTROLLER ............................................... 3-5
3.1.6 NFC-2150 ANTENNA TUNER (CFG-2150 MATCHING UNIT) ......... 3-6
REPLACEMENT PROCEDURE for the CAH-2415 PA UNIT ............................ 3-7
REPLACEMENT PROCEDURE for the CMN-2250 TRX UNIT ......................... 3-9
REPLACEMENT PROCEDURE for the CMJ-2250 WKR MODEM UNIT ........... 3-10
REPLACEMENT PROCEDURE for the CBD-2415 PS UNIT ........................... 3-11
REPLACEMENT PROCEDURE for the CQD-2415 TERMINAL UNIT ............... 3-12
REPLACEMENT PROCEDURE for the CMV-3775 AF CONTROL UNIT .......... 3-13
REPLACEMENT PROCEDURE for the CDJ-3775 CONTROL UNIT ................ 3-15
REPLACEMENT PROCEDURE for the CCK-3775 MAIN PANEL UNIT ............ 3-17
REPLACEMENT PROCEDURE for the CCK-3776 SUB PANEL UNIT ............. 3-18
REPLACEMENT PROCEDURE for the CFG-2150 MATCHING UNIT .............. 3-19
REPLACEMENT PROCEDURE for cooling fans (3108NL-05W-B50-L09) ........ 3-21

CONFIGURATION AND SPECIFICATIONS
1-1
1. CONFIGURATION AND SPECIFICATIONS
1.1 Basic configuration
1.1.1 Basic configuration of the equipment
No. Description Model Qty Notes
1 MF/HF transceiver NTD-2150 1
2 MF/HF controller NCM-2150 1
Includes the connection cable (7ZCJD0343)
3 Handset NQW-261 1 Includes the cradle
4 Antenna tuner NFC-2150 1
5 Instruction manual 7ZPJD0455 1
1.1.2 Options
No. Description Model Notes
1 TX antenna NAW-60 6m whip antenna
2 RX/WKR antenna NAW-60 6m whip antenna
3 Joint box JQD-69C For RX/WKR antenna
4 Junction box NQD-2253
5
Coaxial connector
M-P-7, M-A-JJ
For receiving cable RG-12/UY and transmitting
cable RG-10/UY
6 AC/DC power supply NBD-2150
6-1 Rack mount kit 7ZZJD0072
7 Battery charger NBB-724
7-1 AC-IN cable 7ZCJD0347
7-2 BATT-OUT cable 7ZCJD0348
7-3 BATT cable 7ZCJD0349
7-4 Rack mount kit 7ZZJD0073
8 MF/HF controller NCM-2150
8-1 Flush mounting bracket MPBC42957
8-2 Mounting bracket MPBX44354
One additional controller available.
8-3 Connection box NQD-2250 For extension and expansion of the controller
9 Handset NQW-261 Waterproof type (IP66 equivalent)
10 Printer NKG-91
10-1 Printer cable 7ZCJD0254A
10-2 Roll paper 7ZPJD0384
10-3 Wall mounting kit MPBP31446
Wall mount or Flush mount type
11 Printer DPU-414
11-1 Printer cable 7ZCJD0254A
11-2 Printer PS cable 7ZCJD0257C
11-3 Roll paper 6ZCAF00252A
Desktop type
12 Printer NKG-800
12-1 Printer cable 6ZCSC00407
12-2 Printer PS cable 6JNKD00100B
12-3 Roll paper 5ZPCM00006
12-4 Ink ribbon (SP-16051) 5ZZCM00003
Desktop type
13 Distress message controller NCH-321A

CONFIGURATION AND SPECIFICATIONS
1-2
1.1.3 System configuration
NCH-321A DMC
GPS
NCM-2150 MF/HF Controller/
NQW-261 Handset
NTD-2150 MF/HF Transceiver
Expansion Controller
* The radiotelephone can
also be used when
connected to remote
maintenance system
equipment.
NFC-2150
Antenna Tuner
NKG-91 Printer
NBD-2150 AC/DC Power Supply
NBB-724 Battery Charger

CONFIGURATION AND SPECIFICATIONS
1-3
1.2 Block diagram
NTD-2150
MF/HF Transceiver
NBD-2150
AC/DC Power supply
NCM-2150
MF/HF Controller
GPS
24V DC
200Ah
AME
RMS
(VDR)
DPYC-10
24V DC
RG-12/UY
TTYCS- 1
MPYCS- 7
NKG-91
Printer
TTYCS- 1
TTYCS- 4
5D-2VH
RX/WKR ANT
TX
ANT
M-P-7
M-P-7
Tx antennaRx/WKR antenna
7ZCJD0254A
TTYCS- 4
DPYC-2.5(x2)
NQW-261
Handset
7ZCJD0343
(5m)
NQD-2250
Connection box
6.5V DC
NFC-2150
Antenna tuner
TX ANT
TTYCS-4
Lead wire
TH-7/1.6
NQD-2253
Junction box
NCM-2150
MF/HF Controller
NQW-261
Handset
NQD-2250
Connection box TTYCS- 4
DPYC-2.5
7ZCJD0343
(5m)
JQD-69C
Joint box
100V/220V AC
50/60Hz 1φ
TTYCS-1
NBB-724
Battery charger
NCH-321A
DMC
RG-10/UY
M-P-7/M-P-5
M-A-JJ
DPYC-16
7ZCJD0347
7ZCJD0349
7ZCJD0348

CONFIGURATION AND SPECIFICATIONS
1-4
1.3 Specifications
1.3.1 JSS-2150 MF/HF Radio Equipment
zGeneral Specifications
Transmission frequency 1605.0 - 27500.0 kHz (100 Hz steps)
Reception frequency 90.0 - 29999.9 kHz (100 Hz steps)
Frequency stability Within ±10 Hz
Type of emission TEL mode : J3E
DSC mode : F1B
CW mode : A1A
AM mode : H3E
H2B mode : H2B
DATA mode : J2D
Channels User definable channels : Max. 400 ch
(20 channels x 20 groups)
ITU preset channels : 831 ch
Scan channels Max. 20 channels (group specification method)
Nominal frequency J3E/ A1A/ H3E/ H2B/ J2D : Carrier frequencies
F1B : Assigned frequency
Communication method in TEL Push-to-talk (simplex, semi-duplex)
Antenna impedance 50unbalanced
Channel switching duration 15 sec or less
Interface IEC61162-1 (GPS/AME/RMS)
Compass safety distance 1.9 m
Main controls DSC call (sending and receiving), communication frequency/
channel settings, Tx power settings, RF gain adjustment, volume
adjustment, LCD adjustment
Performance criteria IMO A.806(19), A.694(17), MSC68(68), MSC/Circ.862
Power supply voltage 24 VDC (21.6 VDC to 31.2 VDC)
Current consumption 150W transmission : Maximum 30 A
Reception: : Maximum 5 A
Operating temperature range -15°C - +55°C(parts exposed to condensation -25°C - +55°C)
Storage temperature range -15°C - +55°C(parts exposed to condensation -25°C - +70°C)
Humidity resistance No abnormality after standing 4 hours in +40°C, 93%RH
Vibration resistance (3 axes) 2 Hz - 5 Hz to 13.2 Hz : Full amplitude ±1 mm±10%
13.2 Hz to 100 Hz : Maximum acceleration 7 m/s2
fixed
No abnormality after testing resonance points or at 30 Hz for 2 hours
or more
Continuous operation (TEL) No abnormality after operating continuously for 8 hours
Continuous operation (DSC, WKR) No abnormality after operating continuously for 24 hours
Protection rating IP22 equivalent (controller panel)
Dimensions and mass Transceiver
349mm(W) x 391mm(H) x 143mm(D) [excluding projections],
approximately 12.3kg
Antenna tuner
256mm(W) x 430mm(H) x 100mm(D) [excluding projections],
approximately 3.3kg
Controller
230mm(W) x 142mm(H) x 89mm(D) [excluding projections],
approximately 1.3kg

CONFIGURATION AND SPECIFICATIONS
1-5
zTransmitter
Antenna output power 1605.0 - 3999.9 kHz : 75/ 100Wpep (Low: 33Wpep)
4000.0 - 27500.0 kHz : 75/ 100/ 150Wpep (Low: 50Wpep)
Modulation method Low-power stage balanced modulation
Occupied bandwidth J3E/ J2D/ H2B : Within 3 kHz
F1B/ A1A : Within 0.5 kHz
Carrier suppression (J3E) 40 dB or more
Unwanted emissions in the
out-of-band domain
Mean power of 50 mW or lower, or 43 dB or more lower than the
mean power of the basic frequency
Unwanted emissions in the spurious
domain
At J3E:
1.5 to 4.5 kHz : 31 dB or more
4.5 to 7.5 kHz : 38 dB or more
7.5 kHz and upwards : 43 dB or more
(Peak power of unwanted emissions is 50 mW or less.)
At F1B:
Mistuned frequency [Hz]
A
ttenuation [dB]
Overall distortion and noise -20 dB or less
AF frequency response Deviation is within 6 dB in 350 Hz to 2700 Hz range.
Tone frequency 1500 Hz or 1400 Hz
zReceiver
Receiving system Double superheterodyne
1st IF 70.036 MHz
2nd IF 36 kHz
Reception frequency stability Within ±10 Hz
Sensitivity (SINAD 20dB) J3E :2.5 uV or less (1605.0 to 27500.0 kHz)
F1B :0.7 uV or less (1605.0 to 27500.0 kHz)
A1A :1.4 uV or less (1605.0 to 27500.0 kHz)
Pass band/Adjacent signal
selectivity
J3E :2.4 - 3.0 kHz (6 dB bandwidth) within
±2.1 kHz (66 dB bandwidth)
F1B :270 - 300Hz (6 dB bandwidth) within
±550 Hz (60 dB bandwidth)
Spurious response J3E :60 dB or more
F1B :Symbol error rate of 1% or better at a wanted signal level
of 10 uV and an unwanted signal level of 31.6 mV
separated by 750 Hz
Blocking/Desensitization J3E :When an unwanted signal level separated by 3 kHz is
added to the wanted signal level of 10 uV, the unwanted
signal input voltage suppressing output of the wanted
signal by 3 dB is 10 mV or more.
F1B :Symbol error rate of 1% or better at a wanted signal level
of 10 uV and an unwanted signal level of 1 mV
separated by 500 Hz
Overall distortion and noise When an input signal level of 30 uV is applied, the ratio between
low-frequency output 1000 Hz and unwanted components contained
in that output is 30 dB or more.
Conducted spurious emission Power emitted from antenna terminal is 2 nW or less (9kHz - 2GHz)
and 20 nW or less (2GHz - 4GHz).
Clarifier variable range ±200 Hz (1 Hz steps)
Antenna impedance 50unbalanced
Line output 0 dBm 600(balanced)

CONFIGURATION AND SPECIFICATIONS
1-6
zDSC Watch Keeping Receiver.
Reception frequency Distress and safety frequencies of 2187.5 kHz and 8414.5 kHz, and
additionally on one or more of the 4207.5 kHz/ 6312.0 kHz/ 12577.0
kHz/ 16804.5 kHz
Receiving system Double superheterodyne
1st IF 40.04025 MHz
2nd IF 40.25 kHz
Frequency stability Within ±10 Hz
Sensitivity 1% or lower symbol error rate at reception input voltage of 1µV
Passband 6 dB bandwidth : 270 - 300 Hz
30 dB bandwidth : Within ±380 Hz
60 dB bandwidth : Within ±550 Hz
Spurious response Symbol error rate of 1% or better when an unwanted signal level of
31.6 mV is applied to a wanted signal level of 10 uv from an
intermediate frequency separated by 750 Hz or more through to a
frequency 3x the test frequency
Blocking/Desensitization Symbol error rate of 1% or better at a wanted signal level of 10 uV
and an unwanted signal level of 1 mV separated by 500 Hz
Conducted spurious emission Power emitted from antenna terminal is 2 nW or less.
Antenna impedance 50unbalanced
zDSC Modem
Modulation rate Within 100 baud ±30x10-6
Modulation method FSK (sub-carrier: 1700 Hz)
Mark frequency (Y) Transmission : Within 1615 Hz ±0.5 Hz
Reception (permissible value) : Within 1615 Hz ±20 Hz
Space frequency (B) Transmission : Within 1785 Hz ±0.5 Hz
Reception (permissible value) : Within 1785 Hz ±20 Hz
DSC protocol ITU-R recommendation M.493-11 (Class A and B)
DSC operation standards ITU-R recommendation M.541-9, M.821-1
DSC code 10-bit error detecting code
Message storage 20 messages for distress and 20 messages for others
zAntenna Tuner
Frequency range 1605.0 - 27500.0 kHz
Max. input power 1605.0 - 3999.9 kHz : 150Wpep
4000.0 - 27500.0 kHz : 200Wpep
SWR after tuning 2:1 or less
Tuning method Preset or auto-tuning
Tuning time Preset tuning: 0.5 sec, auto-tuning: max. 45 sec
Power supply 24 VDC (21.6 VDC to 31.2 VDC)
zController
Communication speed 57.6 kbps
Communication interface RS-485 and RS-232C, and Centronics compliant
Microphone input impedance 150balanced
Standard modulation input -54 dBm
Audio output Internal loud speaker (8) : 5W max
External speaker impedance : 8or more
Handset phone (150) : Rated 1mW or more
LCD display 3.8 inch FSTN monochrome, 320 x 240 dot, LED backlight

CONFIGURATION AND SPECIFICATIONS
1-7
1.3.2 Options
(1) AC/DC Power Supply (NBD-2150)
Source voltage 90 VAC - 132 VAC or 180 VAC to 264 VAC (50/60 Hz) and 24 VDC
(21.6 VDC to 31.2 VDC)
Output voltage 24 VDC (19.0 VDC to 34.0 VDC)
Maximum output current 30 A
Source switching function
Automatic switching to DC power when AC power is cut off. (uninterrupted output)
Automatic switching from DC to AC when AC power is restored.
Alarm notification functions AC power OFF, low battery voltage
Temperature range for full
performance
-15°C - +55°C
Operating temperature range -15°C - +55°C
Storage temperature range -25°C - +65°C
Humidity resistance No abnormality after standing 4 hours in +40°C, 93% RH
Vibration resistance (3 axes) 2 Hz - 5 Hz to 13.2 Hz: : Full amplitude ±1 mm±10%
13.2 Hz to 100 Hz: : Maximum acceleration 7 m/s2
fixed
No abnormality after testing resonance points or at 30 Hz for more
than 2 hours
Continuous operation No abnormality after operating continuously for 8 hours
(2) Battery Charger (NBB-724)
Source voltage 90 VAC - 132 VAC or 180 VAC to 264 VAC (50/60 Hz)
Current consumption Charging : 15 A or less (100 VAC input)
8 A or less (220 VAC input)
Discharging : 0.5 A or less (at 24 VDC
operation)
Charging current Float charging : 20 A
Balanced charging : 10 A
Alarm notification functions Abnormal charging, low battery voltage
Temperature range for full
performance
-15°C - +55°C
Operating temperature range -15°C - +55°C
Storage temperature range -25°C - +65°C
Humidity resistance No abnormality after standing 4 hours in +40°C, 93% RH
Vibration resistance (3 axes) 2 Hz - 5 Hz to 13.2 Hz: : Full amplitude ±1 mm±10%
13.2 Hz to 100 Hz: : Maximum acceleration 7 m/s2
fixed
No abnormality after testing resonance points or at 30 Hz for more
than 2 hours
Continuous operation No abnormality after operating continuously for 8 hours

CONFIGURATION AND SPECIFICATIONS
1-8
(3) Printer (NKG-91)
Printing system Thermal line dot
Communication interface RS-232C, 4.8/9.6/38.4 kbps
Data control RTS/CTS
Data buffer 4096 byte
Maximum print speed 20 mm/sec or more
Roll paper width 58 mm
Power supply voltage 6.5 VDC (5 VDC to 8.7 VDC)
Current consumption Maximum 2 A
(4) Printer (DPU-414)
Printing system Thermal serial dot
Communication interface RS-232C, 4.8k/9.6k/38.4kbps
Data control HW busy
Data buffer About 28kbyte
Maximum print speed 52.5cps
Roll paper width 112mm
Power voltage 6.5VDC
Current consumption Maximum 2A
(5) Printer (NKG-800)
Printing system Serial impact dot matrix
Communication interface Centronics compliant
Supported fonts ANK FX850 mode : 324 characters
IBM Proprinter II mode : 264 characters
Paper feed system Roll paper holder
Paper type 209 - 216 mm (8.23 - 8.50") roll paper
Buffer size ANK FX850 mode : 21 kbytes
IBM Proprinter II mode : 9.3 kbytes
Density adjustment Manual (nonstepped)
Power supply voltage 10.2 VDC - 31.2 VDC
Power consumption Maximum 35 W
Other manuals for JSS-2150 -
5
Table of contents
Other JRC Radio manuals