JUICERNET PINABAR User manual

User Manual
Self Serve Pineapple Coring Machine
Prot while promoting good health.

TABLE OF CONTENTS
START-UP ....................................................................................................................1
STARTING POINT........................................................................................................1
PINEAPPLE CYCLE.....................................................................................................2
WASTE BIN..................................................................................................................3
CLEANING INSTRUCTIONS .......................................................................................3-4
SERVICE & MAINTENANCE .......................................................................................5
WARRANTY .................................................................................................................5
SOLVING ERRORS .....................................................................................................5
SPARE PARTS.............................................................................................................6
TECHNICAL DATA .......................................................................................................8
DISCLAIMER: The data and recommendations in this User Manual are based on the latest information before print. Information in this
User Manual is subject to change without notice and does not represent a commitment on the part of the manufacturer or Juicernet.
Juicernet has made every eort to ensure that this User Manual is accurate; Juicernet disclaims liability for any inaccuracies or
omissions that may have occurred. If you nd information in this manual that is incorrect, misleading, or incomplete, we would
appreciate your comments and suggestions. Juicernet disclaims liability for damage that has occurred due to the use of this manual
and/or the use of the Piñabar.
This User Manual has been prepared in accordance with legislation, as established in the machine
guideline 2006/42/CE. This User Manual describes the operation and maintenance of the Piñabar.
Regarding subjects not addressed in this manual or subjects that are not clear, please contact Juicernet
directly. This User Manual should be stored in an accessible location for all who work with the Piñabar.
PLEASE READ THIS USER MANUAL CAREFULLY AND FOLLOW INSTRUCTIONS BEFORE USE.
Performing activities on the Piñabar is allowed only by personnel who is:
1. Authorized based on education or experience.
2. Capable of performing the activity independently and safely.
3. Under the supervision of someone who is familiar with the activities and who has provided instructions.

PAGE 1
PIÑABAR OPERATION
The Piñabar is a machine for coring and spearing pineapples. A fully functional system for automatic
peeling of a pineapple within a timeframe of 20 seconds. The feed and output of the pineapple is done
manually, while the remaining operations are completely automatic.
START-UP
The main switch of the Piñabar is located behind the front door. NOTE: Once servicing is completed,
close the door and lock it with the provided key.
►Turn the switch by pushing the red tab up.
STARTING POINT
After starting up, the machine needs to be in the starting point position. This is indicated by the green
ashing light of the start button.
If the machine is not at its starting point the normal functions will not work properly; the operation system
needs to know where the tongs are before a function can be selected.
Put the machine at the starting point:
► Press the start button. The green light start button will ash.
►
After the machine is at the starting point, “Place Pineapple” will ash indicating machine is ready for use.
First the vertical axis (pressing-axis) is put in starting position. If, when pressing the start button, the press
is not at the top the motor is started and will move the press up. Is the press already at the top then the
turning axis will be put in the right position.
The turning axis makes a maximum of one turn, even if the switch on the In/Output is already operated.
This is done to make sure the machine always gets the exact same position: the tongs are in the front.
When the machine has been turned o longer than 15 seconds, the machine requires a test run before it’s
ready for use again. Never place a pineapple or bucket in the machine when performing a test run.

PAGE 2
PINEAPPLE CYCLE
When all the conditions are met (starting position, empty waste bin, no running pineapple cycle) the lights
ash “Place Pineapple” to indicate that a pineapple can be placed. “Place Bucket” will follow indicating a
bucket needs to be placed at the bottom of the machine.
► Place pineapple and close the door
“Place Pineapple” light burns continuously
► Place bucket
“Place Bucket” light burns continuously
► Press the start button. (Pineapple door is locked and machine starts operation.)
Pineapple door is locked and machine begins operation. "Start" light burns continuously
► End of cycle as pineapple drops into the bucket
“Take Bucket” light ashes repeatedly
► Machine ready for next cycle
“Place Pineapple” light ashes repeatedly
When the pineapple and bucket are in place (the lights burn continuously). The start button will begin to
ash green. If the bucket is removed before pressing the start button, the “Place Bucket” light will ash
again. Place the bucket again.
Make sure the sliding door is closed properly and then press the start button. The sliding door will be
locked and the cycle will start, the start button light now burns continuously.
If, after pressing the start button, the bucket is removed the light will burn continuously, the program will
run until the moment the fruit is above the output valve. Place a bucket.
The pineapple turns through the machine. As soon as the pineapple sensor doesn’t see the pineapple (in
the beginning of the movement) the “Place Pineapple” light is turned o.
During the rotation to the press position, the top and bottom of the pineapple is cut, resulting in a
pineapple with the proper height.
The turning axis stops at the "pressing axis" in the back of the machine. Now the presser moves down and
the pineapple is pushed through the rosette blade. The skin of the pineapple is cut loose and falls into the
waste bin. The core is also cut and pushed out.
If no bucket is present at the output station, the program stops. Place a bucket, the machine will continue
and the “Place Bucket” light ashes continuously.
If the pineapple holder is at the output position, the pineapple will fall into the bucket and the cycle is
nished.
The light “Take Bucket” will start ashing to indicate that the bucket can be removed. If this is completed
the “Take Bucket” and “Start” lights are turned o. The “Place Pineapple” light will start ashing indicating
the machine is ready for the next cycle.

PAGE 3
WASTE BIN
After every cycle, the cut pineapple is registered by adding 1 to the
counter. This is also the indicator for the number of skins in the waste
bin (not visible in the display). If the maximum number of skins has
been reached (standard set to 15) the orange light will start to ash.
No pineapple can be cut at this time. The waste bin needs to be
emptied. By opening the door, the count is automatically reset.
► Waste bin full. start button light ashes orange.
► Open the machine door.
► Remove the waste bin from the machine.
► Empty the waste bin.
► Place the waste bin back into the machine.
► Close the machine door. Orange light is o. “Place Pineapple” light ashes.
ATTENTION: THE WASTE BIN IS NOT CHECKED ON CONTENTS. IN CASE OF OPENING THE
DOOR BUT NOT EMPTYING THE WASTE BIN, THE WASTE BIN COULD BECOME TOO FULL.
CLEANING INSTRUCTIONS
A trained operator is able to clean the Piñabar in approximately 15 minutes. Because of food safety and
functional reasons, we recommend cleaning the machine once per day, at the end of each operational day.
► Open the door (See the manual in the door)
Please watch our online cleaning instruction video at: https://youtu.be/mVWSjClHqtU
Or search Youtube for Piñabar cleaning instructions at the Dutch Food Technology channel.
► Remove the removable parts from the machine (steps 1–7) as indicated below.
1. top blade
2. bottom blade
3. rosette blade
1. Turn the top blade counter-clockwise to remove.
CAUTION: VERY SHARP BLADES!
CUT-SAFE GLOVES RECOMMENDED.
2. Turn the bottom blade counter-clockwise to remove.
CAUTION: VERY SHARP BLADES!
CUT-SAFE GLOVES RECOMMENDED.
3. Remove the Rosette blade from the cutout in the
connecting unit. Pay attention to positioning and
sharp side up. Be sure to lift blade up, by pressing it
from the bottom. Then remove it.
CAUTION: VERY SHARP BLADES!
CUT-SAFE GLOVES RECOMMENDED.

PAGE 4
6. pineapple cup/holder
4. Remove the safety pin.
5. Remove the presser/masher from the machine.
6. Twist the pineapple cup/holder from the valve.
7. Remove the safety valves from the machine.
4. safety pin
5. presser/masher
7. safety valves

PAGE 5
8. Empty the waste bin (see page 3).
9. Clean machine with warm water and soap.
10. Removable parts can also be placed in dishwasher except for the blades.
11. Now place the parts back into the machine in reverse order:
a. Place part 6 back into the machine. Make sure the two green dots are aligned over each other.
b. Place part 5, the presser/masher, into the machine and x it with the safety pin (number 4) to the
press unit.
c. Place part 3, the Rosette blade into the cutout of the connecting beam. Pay attention to
positioning and sharp side up.
d. Place part 2, the bottom blade into the machine. Place it in the cutout of the connecting beam.
When placed, press the blade to lock it in correctly.
c. Place part 1, the top blade into the machine. Place it in the cutout of the connecting beam.
When placed, press the blade to lock it in correctly. The top blade is marked with an inscription
"mes boven”.
In case of intermediate cleaning (not at the end of the day) the machine can be switched on with the main
switch. Close the door and position the machine back to its starting position as indicated on page 1.
SOLVING ERRORS
In case of an error, the red lights will ash, indicating machine is not in the starting position.
► Open the door.
► Remove pineapple from machine.
► Turn main switch to “OFF” and wait a minimum of 10 seconds.
► Turn main switch to “ON”.
► The machine is reset and will return to the starting position.

PAGE 6
DESCRIPTION SIZE PART NUMBER
Safety Valve............................................ 74333312-01-016
Ring Safety Valves ................................. 74333312-08-031
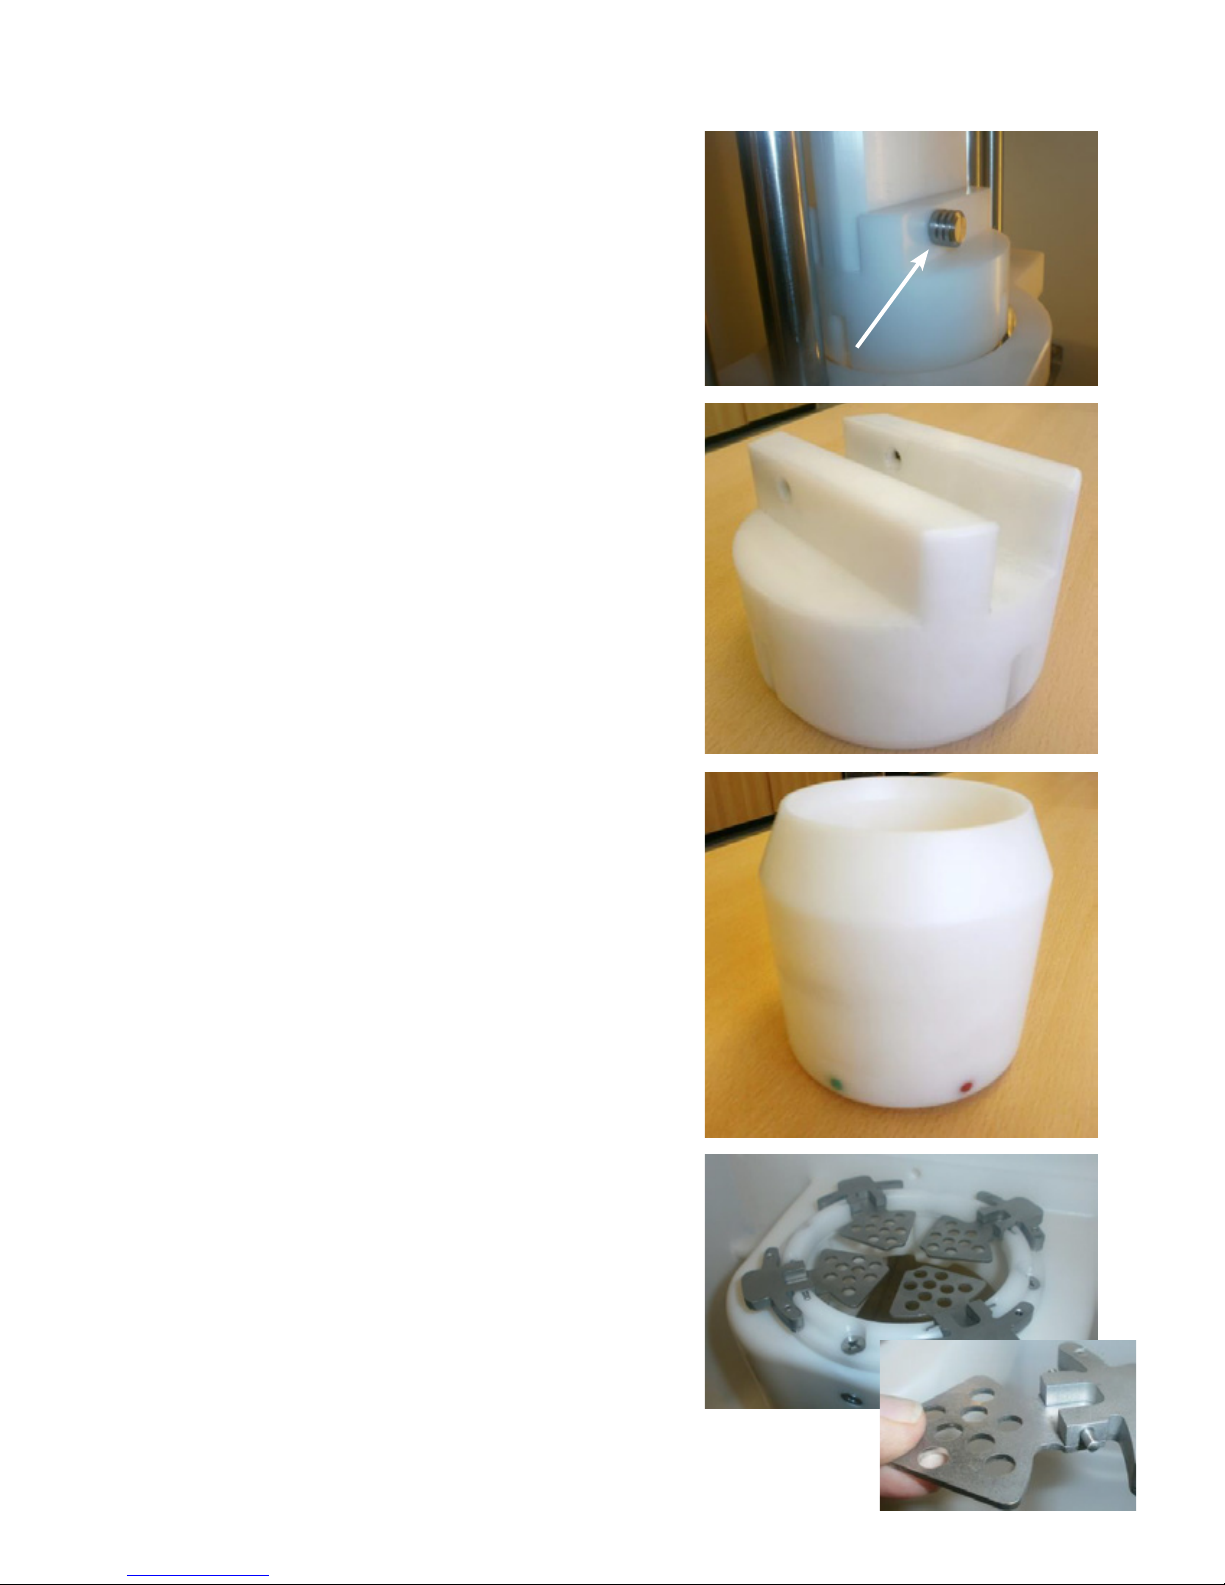
Pineapple Cup/Holder ....... T5 ............... 74333312-01-916
T5S ............. 74333312-01-918
T6 ............... 74333312-01-914
T6S ............. 74333312-01-919
T7 ............... 74333312-01-913
T7S ............. 74333312-01-907
T8 ............... 74333312-01-915
T8S ............. 74333312-01-925
T9 ............... 74333312-01-926
T9S ............. 74333312-01-927
Presser .............................. T5 ............... 74333312-01-023
T5S ............. 74333312-01-042
T6 ............... 74333312-01-013
T6S ............. 74333312-01-038
T7 ............... 74333312-01-007
T7S ............. 74333312-01-021
T8 ............... 74333312-01-002
T8S ............. 74333312-01-046
T9 ............... 74333312-01-055
T9S ............. 74333312-01-056
Presser Safety Pin.................................. 74333312-02-016
Top Blade........................... T5+T5S ...... 74333312-01-324
T6+T6S ...... 74333312-01-326
T7+T7S....... 74333312-01-327
T8+T8S....... 74333312-01-328
T9+T9S....... 74333312-01-329
Bottom Blade.......................................... 74333312-01-325
Rosette Blade.................... T5 .............. 74333312-01-303
T5S ............ 74333312-01-307
T6 .............. 74333312-01-302
DESCRIPTION SIZE PART NUMBER
T6S ............ 74333312-01-306
T7 .............. 74333312-01-301
T7S ............ 74333312-01-304
T8 .............. 74333312-01-300
T8S ............ 74333312-01-309
T9 .............. 74333312-01-301
T9S ............ 74333312-01-311
Blade Set........................... T5 .............. 74333312-01-100
T5S ............ 74333312-01-104
T6 .............. 74333312-01-101
T6S ............ 74333312-01-105
T7 .............. 74333312-01-102
T7S ............ 74333312-01-106
T8 .............. 74333312-01-103
T8S ............ 74333312-01-107
T9 .............. 74333312-01-108
T9S ............ 74333312-01-109
Cup Sensor............................................. 74333312-07-019
Pineapple Sensor ................................... 74333312-07-016
Fall-out Unit ............................................ 74333312-01-960
Main Key................................................. N/A
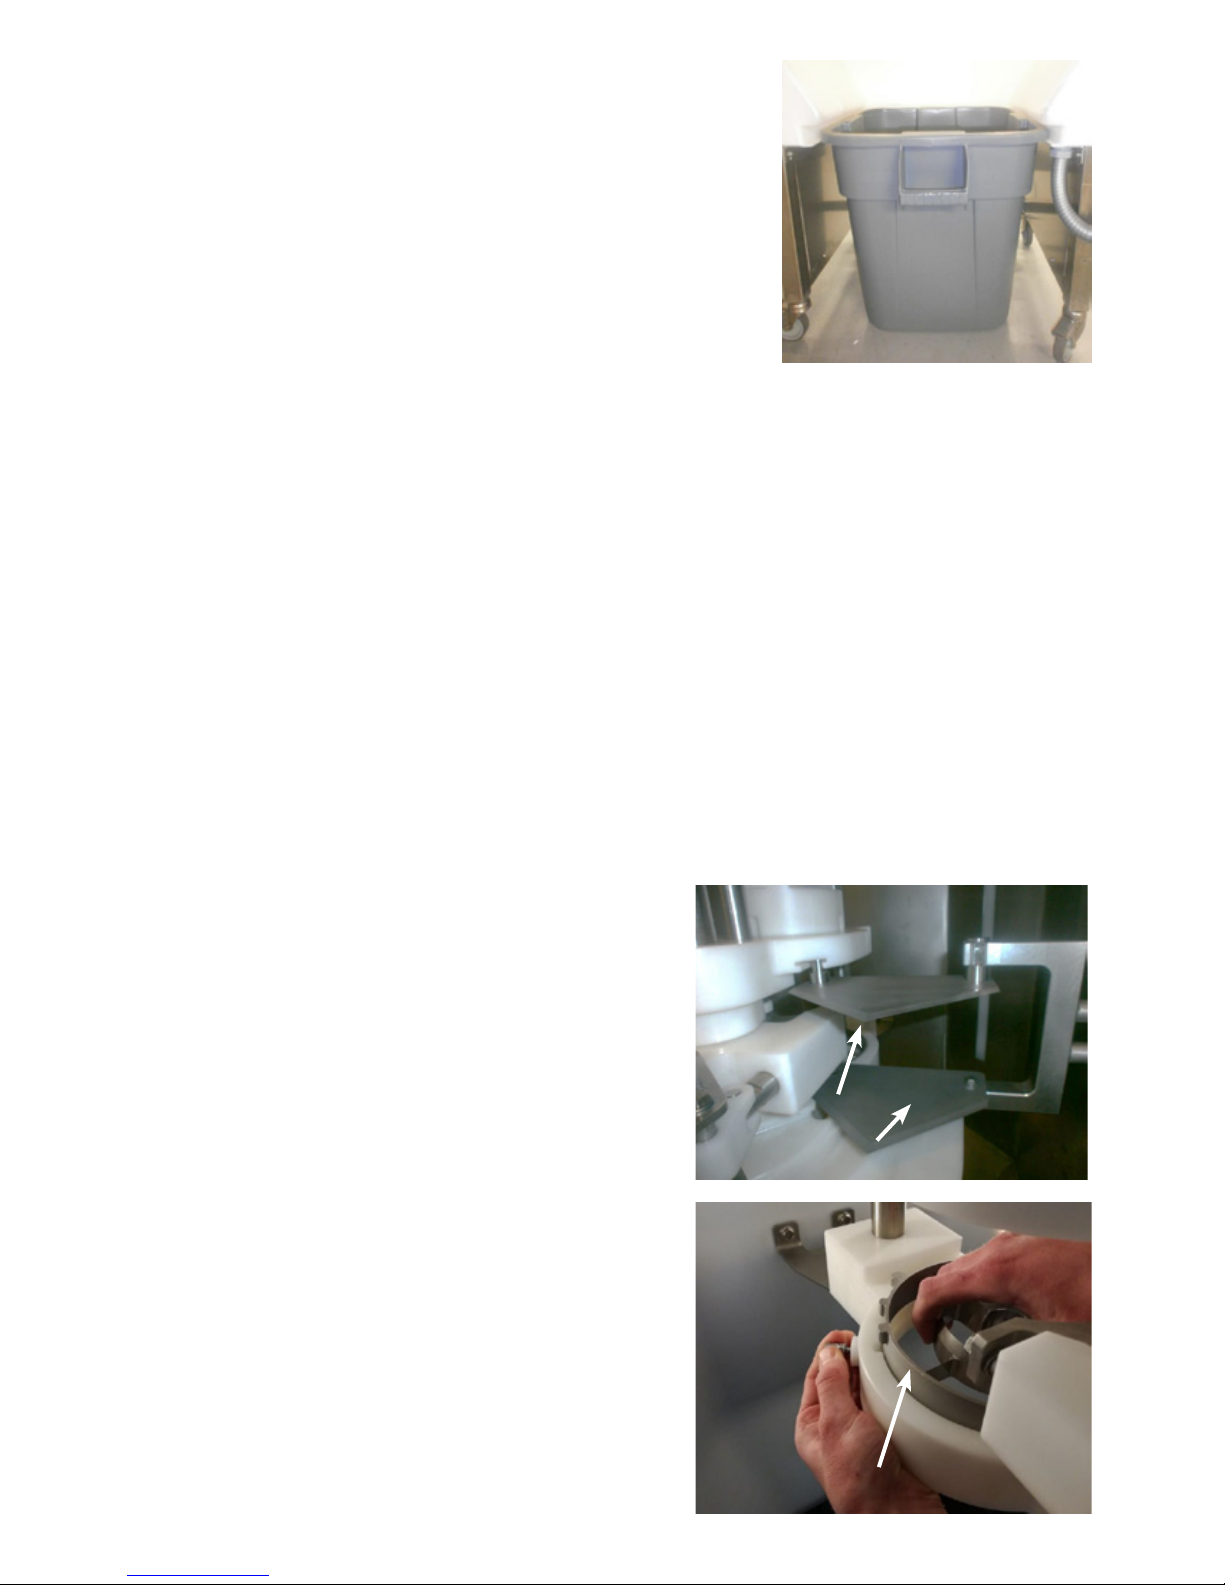
Waste Bin ............................................... 74333312-07-002
Dolly for Waste Bin ................................. 101-204-00-001
Cup Stand............................................... 8719326017327
Sensor Motion Motor .............................. 74333312-07-001
Swivel Caster.......................................... N/A
Caster..................................................... N/A
Main Switch ............................................ N/A
Electric Switch ........................................ N/A
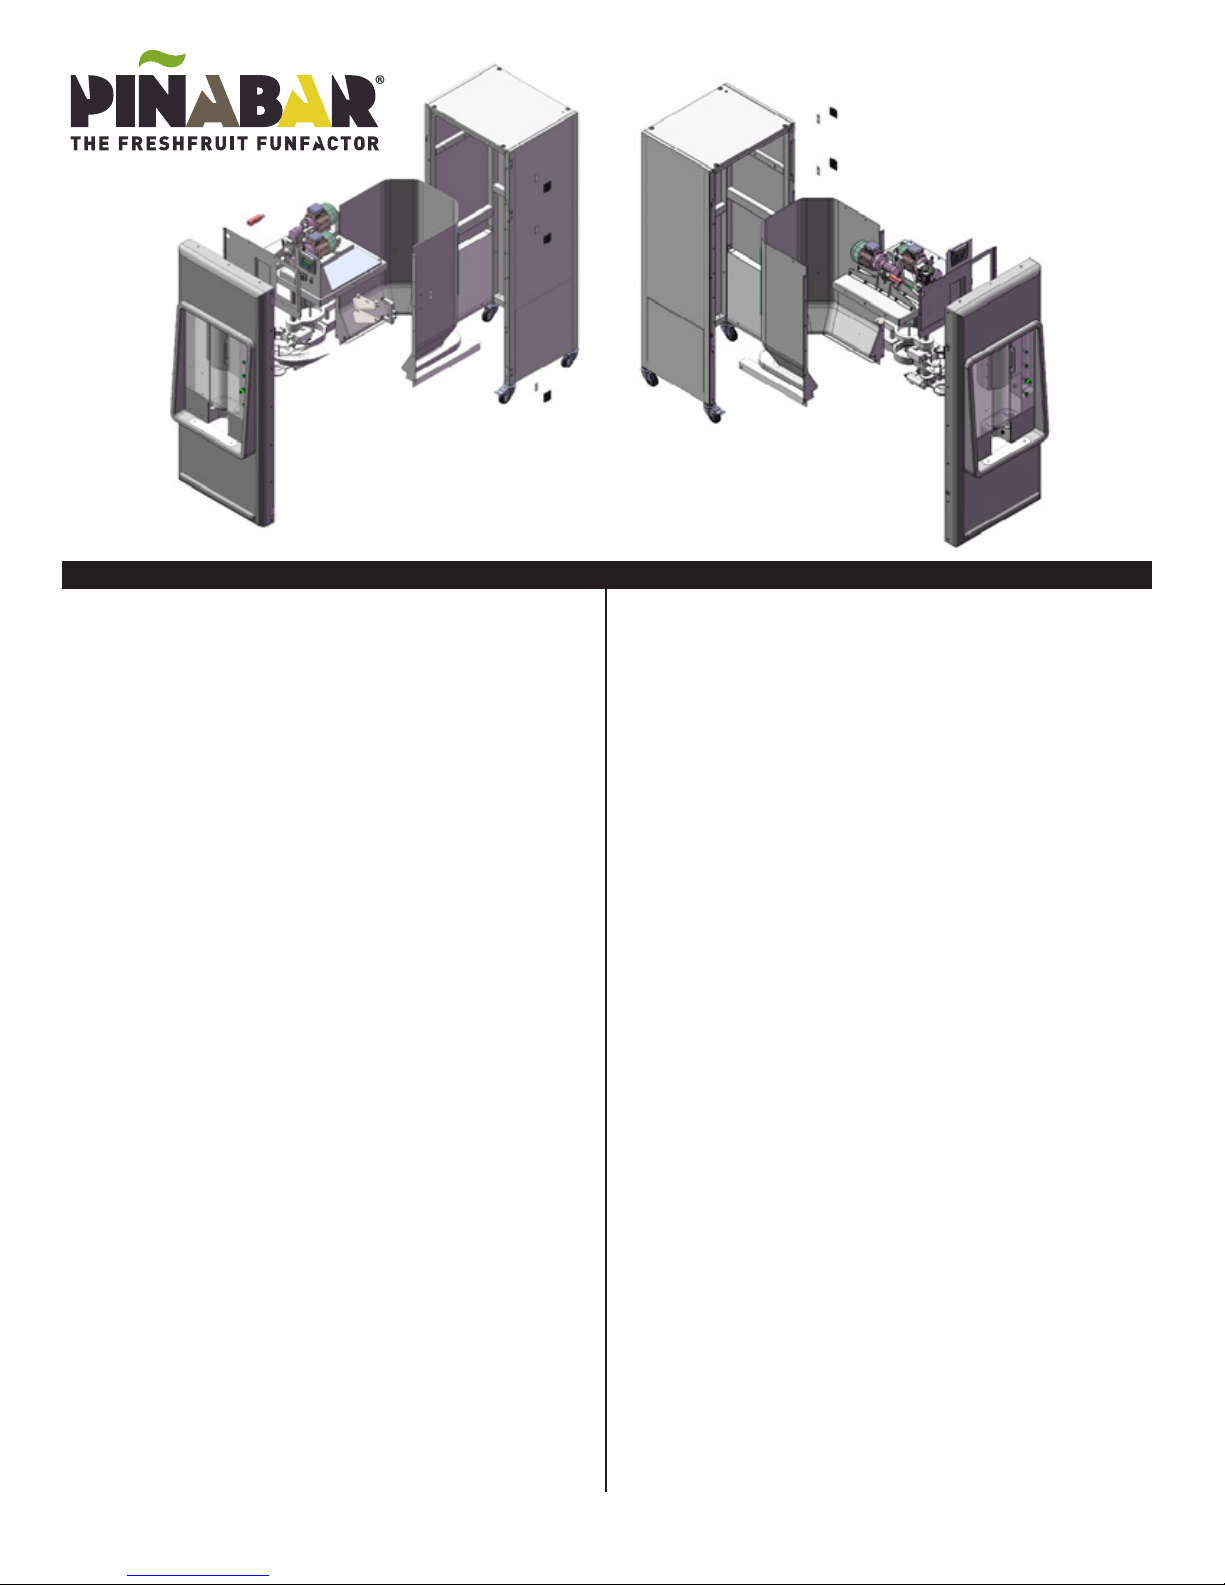
Front Door (complete) ............................ 74333312-01-011
Drain Grill................74333312-05-018 + 74333312-05-024
PLC Unit ................................................. 74333312-07-025
Frequency Controller.............................. N/A
To order call: 1-800-627-2886
Email: [email protected]
PIÑABAR SPARE PARTS

TECHNICAL DATA
PRODUCT SPECIFICATIONS:
Dimensions: 76”H x 29”W x 32”D
Weight: 725 lbs.
Color: Fully customizable
Blades: Available for pineapple types 5-9; always use the correct blade set for each size.
Waste container capacity: 40 lbs. of peel (25 pineapples)
Capacity: 5/min
Cleaning: We recommend cleaning once per day.
Waste container and user manual inlcuded with each machine.
ELECTRICAL SPECIFICATIONS:
120V, 60Hz single phase 20 AMP
Service on a dedicated circuit.
Power: 350 watts
Sound level: < 70 dB
SHIPPING SPECIFICATIONS:
Height: 85 in.
Width: 48 in.
Depth: 48 in.
Weight: 750 lbs.
PINEAPPLE CONTAINER SPECIFICATIONS:
Diameter top: 4.6 in.
Diameter bottom: 3.6 in.
Height: 4.9 in.
Pineapple sizes 5 and 6 = 1000 ml container
Pineapple sizes 7 and 8 = 850/870 ml container
WARRANTY:
1 year parts and 90 days labor
CERTIFICATIONS:
PAGE 8
Table of contents