Juplink EC4-1200 User manual

USAGE MANUL
Juplink EC4-1200
Wireless Range Extender

Chapter 1 Product Overview
1.1. Package Contents
Unpack the package carefully and verify the following items are included:
• Wireless Range Extender
• Quick Start Guide
Note:
If any of the above items are incorrect, missing, or damaged, please contact us in Juplink.com for
replacement.
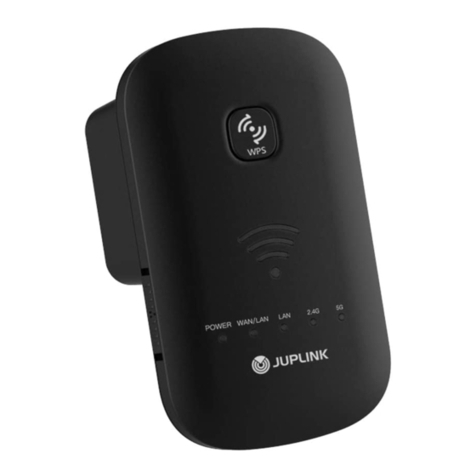
1.2. Getting to Know Your Wireless Range Extender

LED
LED
Status
Description
PWR
LED off
Power off
LED on
Power on
2.4G / 5G Signal LED
LED off
Equipment Connection Normal No Wi-Fi
signal or Power off
LED on
No Transferming data
LED Flashing
Transferming data
WPS
LED off
Function not enabled or Powered off
LED on
WPS is enabled and connected
LED Flashing
WPS is enabled and in connection
Wi-Fi Signal Strength
Indicator LED
One LED on
Weak reception, strength below 25%
Two LED on
Good reception, strength 50~75%
Three LED on
Excellent reception, strength 75~100%
Port & Button
1 LAN/WAN: Port for connecting to a PC, switch or router.
2 RESET: Press it for over 10 seconds until the PWR LED is no longer blinking to
restore factory default settings.
3 WPS button: Range Extender button for wireless extension.
1.3. Position Your Wireless Range Extender
For best performance, follow rules below to place your wireless range extender:
The Best Way is Half-Way
Generally, the ideal location for the range extender is half-way between your
wireless router and your Wi-Fi enabled devices. If that is not impossible, placing the
range extender closer to your wireless router will ensure better performance.
Solid Green LED
Choose a location that lights up the green signal strength LED AAA
Less Interference = More Stability
Try to position your range extender away from electrical devices that are potential
sources of interference, such as ceiling fans, home security systems, microwaves, PCs,

refrigerators, the base of a cordless phone, or a 2.4 GHz cordless phone.
Less Obstacles = Better Performance
Try to choose a location that minimizes obstacles between the range extender and
your wireless router. Open corridors and other spacious locations will typically
provide better conditions for performance than a crowded room.

Chapter 2 Internet Connection Setup
2.1. Hardware Installation
①Position the wireless Range extender close to a wireless router or access point
and then plug it into a power outlet nearby.
②Connect your Wireless Clients (such as notebook, pad, smart phone, etc.) to the
range extender wirelessly. Or you can connect your PC to the either of the two LAN
port of Range Extender with an Ethernet cable.
2.2 Connect Your Range Extender
•Method 1: Wired
Connect your Device to the range extender with an Ethernet cable.
• Method 2: Wirelessly
①Find the SSID (Network Name) printed on the label at the back of the range
extender.
②Click the network icon of your computer or go to Wi-Fi Settings of your smart
device, and then select the SSID to join the network.
• Method 3: Use the WPS button
Wireless devices that support WPS, including Router, most Android phones, tablets,
and most USB network adapters, can be connected to your repeater through this
method.

Note: -The WPS function cannot be configured if the wireless function of the router is disabled. Also,
the WPS function will be disabled if your wireless encryption is WEP. Please make sure the
wireless function is enabled and is configured with the appropriate encryption before
configuring the WPS.
①Tap the WPS button on the Router
②Within two minutes, press the WPS button on your range extender.
2.3 Log In to Your Range Extender
With a web-based utility, it is easy to configure and manage the range extender. The
web-based utility can be used on any Windows, Mac OS or UNIX OS with a web
browser, such as Microsoft Internet Explorer, Mozilla Firefox or Apple Safari.
Follow the steps below to log in to your range extender.
①Open browser
②Enter 192.168.0.2 or router.Juplink.com*[Only for v1.0.2 firmware] in the address
③Enter the Username admin and Password admin then click Login (You can modify
the login password in Page Change the Login Password)
Note: If the login window does not appear, please refer to the FAQ Section.

Chapter 3 Extender Internet Connection
3.1 Manually Set Up Internet Connection- Repeater / Client (default)
Connect your Device to the Range Extender with an Ethernet cable or via wireless
connection and Log In to Your Range Extender.
①Select Repeater - default
②Select a Wi-Fi network (SSID) you want to extend
Note: -It may take a few second to scan the network, If you can't find the signal you want to expand.
Click Site Survey button search the signal again.

③Enter the password of the Wi-Fi network you want to extend.
④Scroll to the bottom of the page and select “Save&Apply”.
Wait a moment, after theChange setting successfully! Page appears you can enjoy
your network.
3.2 Manually Set Up Internet Connection- Access Point (AP)
Connect your Device to the Range Extender with an Ethernet cable or via wireless
connection and Log In to Your Range Extender.
Note: -Before using this mode, please use an Ethernet cable to connect the Ethernet port on the
extender to a router Ethernet LAN port or a remote Ethernet LAN jack with LAN access ;
-All ports are Automatically Adjust Port. You can use any network port to connect your router

①Select Access Point (AP)
②Select Auto, Configure LAN IP address. Set the Network name (SSID), Pre-Shared
Key (password), and click the Save&Apply button to complete the setup.
Your settings are applied and the extender is ready to be used as an access point.
③Use a Wi-Fi network manager on the computer or Wi-Fi device to connect to the
new access point network.
3.2 Manually Set Up Internet Connection-Router
Connect your Device to the Range Extender with an Ethernet cable or via wireless
connection and Log In to Your Range Extender.
Note: -Before using this mode, please use an Ethernet cable to connect the Ethernet port on the
extender to a Modem Ethernet LAN port or a remote Ethernet LAN jack with LAN Access ;
-All ports are Automatically Adjust Port. You can use any network port to connect your Modem
-According to your actual condition or the mode required by your ISP. You need select Fixed IP,
Auto Config. (DHCP) or PPPoE Dial-Up. Under Router mode, Below is the detailed method of
setting.

3.2.1. Router-Auto Config. (DHCP)
①Select Auto Config. (DHCP) –default
②Set the Network name (SSID), Pre-Shared Key (password)
③Click Auto Fill button behind the MAC Address Clone, and click Save&Apply
button, Your settings are applied and the extender is ready to be used as a router.
3.2.2. Router-Fixed IP
①Select Fixed IP
②Set the Network name (SSID), Pre-Shared Key (password)
③Fill in the IP address, Subnet Mask, Default Gateway, DNS(if in need) blanks

④Click Auto Fill button behind the MAC Address Clone, and click Save&Apply
button, Your settings are applied and the extender is ready to be used as a router.
3.2.3. Router-PPPoE
①Select PPPoE
②Set the Network name (SSID) and Pre-Shared Key (password)
③Fill in the User name & Password which was provide by your ISP.
④Click Auto Fill button behind the MAC Address Clone, and click Save&Apply
button, Your settings are applied and the extender is ready to be used as a router.

Chapter 4 Maintain the Extender
4.1 Change the Extender User Name and Password
You can change the user name and password to log in to the extender.
①After Log in to Your Router, Click Advanced button on the top of Web page
②Click Management>Password
③Change your user name, password click Save&Apply. Your settings are applied
4.2 Save/Reload Settings
This page allows you to save current settings to a file or reload the settings from a file that
was saved previously. You can also reset the current configuration to factory defaults.
①After Log in to Your Router, Click Advanced button on the top of Web page
②Click Management>Save/Reload Setting
③-Save Settings to File Click Save Settings to File, then save it to your device,
Your browser extracts the configuration file from the extender. By default, the
name of the backup file is config.dat.
-Load Settings from File: Click Load Settings from File then click Upload button
-Reset Settings to Default: Click reset button, your Extender will restore to
factory settings

4.3 Time Zone Setting
You can maintain the system time by synchronizing with a public time server over
the Internet.
You can modify the Time Zone of the device as follows
4.3.1 copy computer Time (not: Only for Windows devices)
4.3.2 Enable NTP client Update-select stable NTP sever or add servidor NTP Manual
4.4 System Log
This page can be used to set a remote log server and view the system log.
①After Log in to Your Router, Click Advanced button on the top of Web page
②Click Management> System Log
③Click Enable Log, select System All or Wireless, DoS, Enter Log Server IP Address
after Enable Remote Log

4.5 Diagnostics
This page can be used to run target system command.
4.5.1Diagnostic Command-PING
①After Log in to Your Router, Click Advanced button on the top of Web page
②Click Management> Diagnostics
③Select PING in Diagnostic Command list.
④Enter Number, Host (Domain) and click Apply button. Then you can check result.
4.5.1Diagnostic Command-TRACE ROUTE
①After Log in to Your Router, Click Advanced button on the top of Web page
②Click Management> Diagnostics
③Select TRACE ROUTE in Diagnostic Command list.
④Enter Number, Host (Domain) and click Apply button. Then you can check result.

4.6 Change Login Address
Change your default login address
①After Log in to Your Router, Click Advanced button on the top of Web page
②Click Network> LAN Settings
③Enter an IP Address in the IP Address blank. After click Save&Apply button, You
can Login your Extender using this IP address.

Chapter 5 Extender Internet Srtting
5.1 Static DHCP Setup (IP Address reservation)
This page allows you reserve IP addresses and assign the same IP address to a
network device with a specified MAC address each time it requests an IP address.
This is similar to having a static IP address except that the device must still request
an IP address from the DHCP server.
①After Log in to Your Router, Click Advanced button on the top of Web page
②Click Network> LAN Settings>Select Sever in DHCP Drop-down menu>Click Set
Static DHCP button.
③Select Enable Static
④Enter the IP address you want to specify and enter the MAC address of the
device (For easy identification, you can add a comment in the comment column)

5.2 Wireless Basic Settings
This page allows you reserve IP addresses and assign the same IP address to a
network device with a specified MAC address each time it requests an IP address.
This is similar to having a static IP address except that the device must still request
an IP address from the DHCP server.
5.2.1 Select country
①After Log in to Your Router, Click Advanced button on the top of Web page
②Click Wireless> WLAN1(5GHz)>Basic Settings or
Click Wireless> WLAN2(2.4GHz)>Basic Settings
③Select your country in Drop-down list and click Save&Apply button
5.2.2 Change Channel Width
①After Log in to Your Router, Click Advanced button on the top of Web page
②Click Wireless> WLAN1(5GHz)>Basic Setting or
Click Wireless> WLAN2(2.4GHz)>Basic Settings
③Change Channel Width in Drop-down list and click Save&Apply button

5.2.3 Switch channel
①After Log in to Your Router, Click Advanced button on the top of Web page
②Click Wireless> WLAN1(5GHz)>Basic Setting or
Click Wireless> WLAN2(2.4GHz)>Basic Settings
③Switch Channel Number in Drop-down list and click Save&Apply button
5.2.4 Wireless Advanced Settings
These settings are only for more technically advanced users who have a sufficient
knowledge about wireless LAN. These settings should not be changed unless you know
what effect the changes will have on your Access Point.
①After Log in to Your Router, Click Advanced button on the top of Web page
②Click Wireless> WLAN1(5GHz)> Advanced Settings or
Click Wireless> WLAN2(2.4GHz)> Advanced Settings
Note: It is not recommended to modify the default values

5.2.5 Wireless Security Setup
This page allows you setup wireless security. Using WEP or WPA Encryption Keys will help
prevent unauthorized access to your wireless network.
①After Log in to Your Router, Click Advanced button on the top of Web page
②Click Wireless> WLAN1(5GHz)> Security Setup or
Click Wireless> WLAN2(2.4GHz)> Security Setup
Note: If you cannot connect to your Extender after modification, please try to factory reset.
5.2.6 Wireless Access Control
If you choose Allowed Listed, only those clients whose wireless MAC addresses are in the
access control list will be able to connect to your Access Point. When Deny Listed is
selected, these wireless clients on the list will not be able to connect to the Access Point.
①After Log in to Your Router, Click Advanced button on the top of Web page
②Click Wireless> WLAN1(5GHz)> Access Control or
Click Wireless> WLAN2(2.4GHz)> Access Control
③Fill in the MAC address and Comment blank. click Save&Apply button apply your
change.

5.2.7 Wi-Fi Protected Setup-WPS setting
This page allows you to change the settings for WPS (Wi-Fi Protected Setup). Using this
feature allows a wireless client to automically & syncronize its settings and easily and
securely connect to the Access Point.
①After Log in to Your Router, Click Advanced button on the top of Web page
②Click Wireless> WLAN1(5GHz)> WPS setting or
Click Wireless> WLAN2(2.4GHz)> WPS setting
Note: You can fill in the Client PIN Number and connect to a specific device.
5.2.8 Wireless Schedule-Green AP
This page allows you setup the wireless schedule rule. Do not forget to configure the system
time before enabling this feature.
①After Log in to Your Router, Click Advanced button on the top of Web page
②Click Wireless> WLAN1(5GHz)> Green AP or
Click Wireless> WLAN2(2.4GHz)> Green AP
③Click Enable Wireless Schedule and set Day and Time
Table of contents
Other Juplink Extender manuals