manuals.online logo
Brands
  1. Home
  2. •
  3. Brands
  4. •
  5. Juplink
  6. •
  7. Extender
  8. •
  9. Juplink EC3-750 User manual

Juplink EC3-750 User manual

Off Powered off
On Powered on
Off Cable connection not ok
On Cable connection ok
Off
On
Flashing
Normal connection but no transmissing data
No Wi-Fi signal or powered off
Transmissing data
Off
On
Flashing
Function not enabled or powered off
WPS is enabled and connected
WPS is enabled and connection being established
One LED on
Two LEDs on
Three LEDs on
Weak reception, strength below 25%
Good reception, strength between 50~75%
Excellent reception, strength above 75%
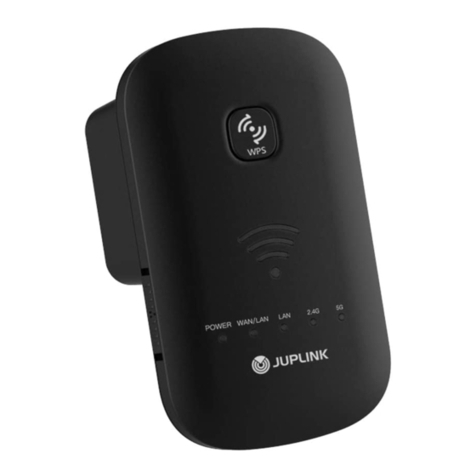
① POWER
② WAN/LAN&LAN
③ ④ 2.4G/5G Wi-Fi Signal LED
⑤ WPS
⑥ Wi-Fi Signal Strength
Indicator LED
Status Description
LED
(Three curve LEDs)
LED Status Indicators
Button & Interface
Quick Start Guide
EC3-750
Wi-Fi Extender
To customize your wireless network connection and other advanced repeater
Operating Conditions
Tech Support
Working Temperature: 0~45°C / 32~113°F
Working Humidity: 10%~90% RH
, non-condensing
Storage Temperature: -40~85°C / -40~185°F
Storage Humidity: 5%~95% RH
, non-condensing
E-mail: [email protected]
Website: www.juplink.com
Tel : +1 (833) 923 - 2468 (toll free)
Service Time: EST : 09:00-17:00/PDT: 06:00-14:00
settings, please go to www.Juplink.com/Support/ to download EC3-750
firmware updates and User Guide for more information.
Mode 1: Repeater Mode
Method 1: Using A Web Browser (recommended)
Step 1: Power On
Step 2: Configure
1. Move the Mode switch to “Repeater”.
1. Extend your Wi-Fi device to the repeater’s SSID:
Juplink-EC3-750 or Juplink-EC3-750_5G.
3. Enter User Name: admin/ Password: admin to access the settings page.
4. Click on Repeater Wizard.
5. Select your network by clicking “Choose”
button in the corresponding line and
enter your password details in Key field.
2. Plug the repeater into a power outlet near the router.
3. Ensure the Power ON/OFF switch is turned to “ON” .
It may take about 10-20 seconds to scan the network.
Note:
6. Click the “Save” button. The settings are
now being saved, that is why the repeater
will ask you to wait for 90 seconds.
Afterwards you can remove the Ethernet
cable, and install the Wi-Fi repeater
at the selected location.
What’s in the Box:EC3-750 Wi-Fi Extender*1 ; Quick Start Guide*1 ; Troubleshooting *1
Detached UK plug*1 ; Detached EU plug *1.
When the Extender is working in repeater mode, it does not boost your network speed, but supports wider
wireless coverage, that is, you can enjoy Wi-Fi connection where your router signal may not reach directly.
Note:
① ②
⑤
④③
⑥
⑨
⑦
⑧
⑩
11
12
⑩ LAN&WAN / LAN
Button/Interface
⑧ RESET Press the RESET button for about 5sec (until the WPS LED flashes),
to restore to factory defaults.
⑨ WPS Press to enable WPS function. For details, go to “Step 2: Configure”.
Description
Left port can serve as LAN or WAN port / right side can only serve as LAN port
and can be connected to your computer or another terminal device using a
RJ45 cable when necessary.
Move the mode switch on the left side panel to use the device in repeater, AP or
router mode. Caution: Please be aware that after moving the switch to another
mode, the device will be rebooted.
⑦ ON/OFF switch It is a slide switch on the right side panel.
Ensure the switch is turned ON before using the extender.
Mode switch
11
12
XXX_HomeWiFi
XXX_HomeWiFi_1
XXX_HomeWiFi_2
XXX_MYWiFi
XXX_HomeWiFi
XXX_HomeWiFi_5GEXT
XXX_HomeWiFi_2.4GEXT
Default SSID is [SSID of your router] + suffix of [2.4GEXT] or + suffix of
[5GEXT], depending on the band the extender is connected to your
router. You can also modify the SSID of the extended network,
the same as that of the existing network you chose to extend.
Note:
Default password are automatically copied from router network.
1. Go to the Wi-Fi Settings page, enter the SSID and password that you wish to apply to
the extended Wi-Fi network.
Optional: If you want to modify the SSID, please follow the steps below.
2.Launch a web brower on a device which has
been connected to repeater, and enter
router.juplink.com in the address bar to log in.
Mode 2: AP Mode
Mode 3: Router Mode
Method 2: Using WPS
Step 1: Power On
Step 2: Configure
Step 3: Relocate
2. Plug the extender into a power outlet near the router within 5 feet.
3. Wait for about 30sec until the 2.4G or 5G Signal LED turns solid green.
1. Press the WPS button on the router,and then press the WPS button of the
repeater for more than 5 seconds.
2. Wait until the 2.4G/5G Singal LED turns solid green.
1. For better performance, plug the extender into an outlet about halfway between the router and the Wi-Fi dead zone.
The location you choose must be within the range of your existing Wi-Fi network.
2. Wait until the 2.4G/5G Signal LED turns solid green, or the Wi-Fi Signal Strength Indicator shows at
least Two LEDs on.
OR
1. Move the Mode switch to “Repeater”.
Step 1: Power on Step 2: AP Wizard
Step 2: Router Wizard
1. Move the Mode switch to “AP”. 1. Click AP Wizard in the Web UI.
2. Enter wireless settings.
2. Connect the Ethernet cable and plug it into the LAN port at the bottom.
3. Plug the repeater into a power outlet near the router.
4. Ensure the Power ON/OFF switch is turned to “ON”.
5. Launch a web brower on a device which has been connected to repeater,
and enter router.juplink.com in the address bar to log in.
Step 1: Power on
1. Move the Mode switch to “Router”.
2. Connect the Ethernet cable and plug it into the LAN port at the bottom.
3. Plug the repeater into a power outlet near the router.
4. Insure the Power ON/OFF switch is turned to “ON”.
5. Launch a web brower on a device which has been connected to
repeater, and enter router.juplink.com in the address bar to log in.
1. Click Router Wizard in the Web UI to select the connection Type.
a. If your Internet connection type is PPPoE, enter your PPPoE user name and password
and select Encrypted to customize your wifi password, then click Save.
b.If your Internet connection type is static IP, enter your IP address and other informatio
your ISP provides.Then select Encrypted to customize your Wi-Fi password,and click Save.
c.If your Internet connection type is DHCP,select Encrypted to customize your Wi-Fi
password,and click Save.
2. Enter wireless settings.
3. Connect to LAN port of the extender or use wireless Internet access.
Note:
Note: 1, Some ISP gateways disable the WPS function by default. If the WPS method fails, please use Method 1.
2, After the WPS pairing is successful, your device's Wi-Fi list will show the extended router's SSID with a
suffix of "_2.4G EXT or_5G EXT"
If the WiFi network is still not succesfully extended after the above steps are conducted, or in case you want to set up from the start as some previous settings may be incorrect,
please try pressing RESET button (for about 5sec) until the WPS LED flashes, to restore to factory defaults.
Then, repeat the above steps and try a different option, or just call us at +1 (833) 923 - 2468.
5
3. Connect the Ethernet cable and plug it into the LAN port of the extender or use
wireless network access.
EC3-750 Wi-Fi Extender
Troubleshooting
A2:
Q1:
How to reset the repeater?
A1:
When the POWER LED of the repeater is solid on, press RESET button (for about 5sec)
until the WPS LED flashes. After the POWER LED turns solid on again, the repeater is restored to
the factory settings.
Why is my power light off after connecting the extender to power supplies?
Please ensure the right side switch is ON.
Q2:
Q3:
A3:
Q4:
Why can’t the repeater find the Wi-Fi network of my router/modem,
such as Comcast,Verizon?
A4:
The encryption method in the Comcast,Verizon router may not be recognized by EC3-750 Wi-Fi Extender.
Try the following to solve the problem:
①Log in to Comcast or Verizon router and enter the wireless settings page.
② Change the wireless encryption method to WPA/WPA2 or WPA-PSK/WPA2-PSK.
③ Confirm the settings and use EC3-750 Wi-Fi Extender to search the router signal.
Why does it fail to log in to Web page of the repeater?
Please check if the situation is before or after network extension.
a. Before extension
• Please confirm you are connected to the correct SSID (wireless network) of the repeater
(see the name of its wireless network on the product label).
• Check if the information entered in the address bar is correct (192.168.3.1 or router.juplink.com).
• If you are unable to log in, please close the browser (not just return) and open a new page to try again.
If it still failed, please clear all the browser cache or reboot your mobile device.
• If none of the above solutions work, it is recommended to restore the repeater to factory settings or
recharge the plug in the socket, then try to connect and logging in again.
b. After extension
Method 1:
• Make sure that you are connected to the correct SSID (wireless network) of the repeater.
• Then log in to this address: router.juplink.com
• If it failed, please cut off the power supply and re-connect it. Then try to log in to the above
address after the repeater extends automatically.
• If it still does not work, please use another laptop or mobile phone to log in.
Method 2:
• Make sure you are connected wirelessly (neither to the router nor to the repeater), and then
log in to the Web page of the router;
• Open the Client List to view connected devices. After finding the MAC address
(see product label) of the repeater, you can get the IP address of repeater assigned by the router.
• This IP address is the updated login address of the repeater.
Why can l find someone else's Wi-Fi network, but not mine?
• Check if the encryption mode of the uplink router is WEP. Only no encryption, WPA, WPA2 and
mixed mode are supported by this repeater.
• Check on your mobile device to see if the uplink wireless network is hidden.
Q5:
A5:
Q6:
A6:
Q7:
Why does it always prompt for failure during extension?
A7:
• Check if the wireless signal indicator is green or off. Off indicates extension failure.
• If you can't find the uplink wireless network during extension, please try the following:
①Set the SSID of the router and that of the repeater to combinations of numerals and letters.
②Move the repeater closer to the router (within 5ft is recommended).
③Ensure that the encryption mode of the uplink wireless network is not WEP. Only no encryption,
WPA-PSK, WPA2-PSK or mixed mode of the above is supported by the repeater.
④Ensure that the uplink wireless network is not turned off or hidden.
⑤Log in to the Web page of the router to check if any restriction is made, such as MAC filter,
blacklist, etc.
⑥Ensure that the correct password of the uplink router is entered during extension.
How can I know if the extension is successful?
①Check if there is the default SSID. If yes, the extension fails.
② Check the status of the wireless signal indicator. If the indicator is on or flashing,it indicates
successful extension.If the indicator is off,it indicates extension failure.while off indicates extension failure.
③Log in to the Web page of the repeater to see if it is in the extended state.
• If you are sure that the extension is successful, keep the antennas upwards and in parallel with the
antennas of the router. If not, please adjust their angle.
• Try putting the repeater and router closer, and check if the signal strength indicator becomes
solid green.
Q8:
A8:
A9:
• Check if the extension is successful (by observing whether the signal indicator lights up.
If not, please reset the repeater, and try extending again.).
• Disconnect the device which loses Internet access, and connect again to see if it becomes available.
• Log in to the Web page of the repeater and check if the network signal of the uplink router is too weak.
It is recommended to put the repeater in a place where the signal strength is at least between 40%-50%.
• Check the location of the repeater. Do not put it at a corner.
• Reset the repeater and try connecting to another wireless network.
Q9:
Why is there no Internet access after extension?
Why is the extended signal poor, even lose connection to the repeater
after extension?
• Do not put the repeater too close to the router, also do not put it at a corner.
• For better performance, plug the extender into an outlet about halfway between the router and the
Wi-Fi dead zone. The location you choose must be within the range of your existing Wi-Fi network.
• If you want to extend the wireless network horizontally, ensure that the repeater’s antennas are
positioned upwards, and in parallel to those of the router.
• If it is for duplex house, both the antennas of the repeater and router should be tilted and remain
in parallel.
The best performance distance is 5 ~ 30 ft.
A10:
Q10: Why does the wireless network show strong signal strength
but low speed after extension?.
① Check the signal strength indicator on the physical housing of the repeater.
In general, the repeater works in its best performance when the strengh of signal that the repeater
receives is between 50% and 75% (when the indicator shows the signal of 3 bars).
② Check the location of the repeater. Do not put it at a corner.
③Check if the antennas of the repeater and router are in parallel. Antennas aligned in parallel ensure
better connection.
④ If it still does not work, reset the repeater, and try connecting the repeater to the router again.
Note: When the Extender is working in repeater mode, it does not boost your network speed,
but supports wider wireless coverage, that is, you can enjoy Wi-Fi connection where your
router signal may not reach directly.

Other manuals for EC3-750

1

Other Juplink Extender manuals

Juplink EC3-750 User manual

Juplink

Juplink EC3-750 User manual

Juplink EC4-1200 User manual

Juplink

Juplink EC4-1200 User manual

Juplink EC3-1200 User manual

Juplink

Juplink EC3-1200 User manual

Popular Extender manuals by other brands

J-Tech Digital JTECH-4K88-EX2 user manual

J-Tech Digital

J-Tech Digital JTECH-4K88-EX2 user manual

FrSky FP2CH4 instruction manual

FrSky

FrSky FP2CH4 instruction manual

Black Box LS900A manual

Black Box

Black Box LS900A manual

Allworx Tx 92/24 installation guide

Allworx

Allworx Tx 92/24 installation guide

Xantech HDMIEXTEND user manual

Xantech

Xantech HDMIEXTEND user manual

PureTools PT-HDBT-1010 user manual

PureTools

PureTools PT-HDBT-1010 user manual

D-Link DAP-1620 Quick install guide

D-Link

D-Link DAP-1620 Quick install guide

D-Link DAP-X1860 Quick installation guide

D-Link

D-Link DAP-X1860 Quick installation guide

Shenzhen Shunxun Electronics SX-EHU100 Operating	 instruction

Shenzhen Shunxun Electronics

Shenzhen Shunxun Electronics SX-EHU100 Operating instruction

Vislink HDT-1000 User and technical manual

Vislink

Vislink HDT-1000 User and technical manual

Satel CA-64 O-OC manual

Satel

Satel CA-64 O-OC manual

Atlona AT-SDI10SR-LC user manual

Atlona

Atlona AT-SDI10SR-LC user manual

Gefen EXT-AUD -1000 user manual

Gefen

Gefen EXT-AUD -1000 user manual

NETGEAR XAVN2001 datasheet

NETGEAR

NETGEAR XAVN2001 datasheet

Little Labs STD Mercenary Edition Operator's manual

Little Labs

Little Labs STD Mercenary Edition Operator's manual

Rose electronics CrystalView DVI Mini Installation and operation manual

Rose electronics

Rose electronics CrystalView DVI Mini Installation and operation manual

ATEN VEO66 user guide

ATEN

ATEN VEO66 user guide

SC&T HE03L-4K user manual

SC&T

SC&T HE03L-4K user manual

manuals.online logo
manuals.online logoBrands
  • About & Mission
  • Contact us
  • Privacy Policy
  • Terms and Conditions

Copyright 2025 Manuals.Online. All Rights Reserved.