Juplink EC3-750 User manual

1

2
About This Manual .................................................................................................................... 3
Chapter 1 Get to Know About Your Wi-Fi Range Extender....................................................... 4
1.1. Product Overview........................................................................................................... 5
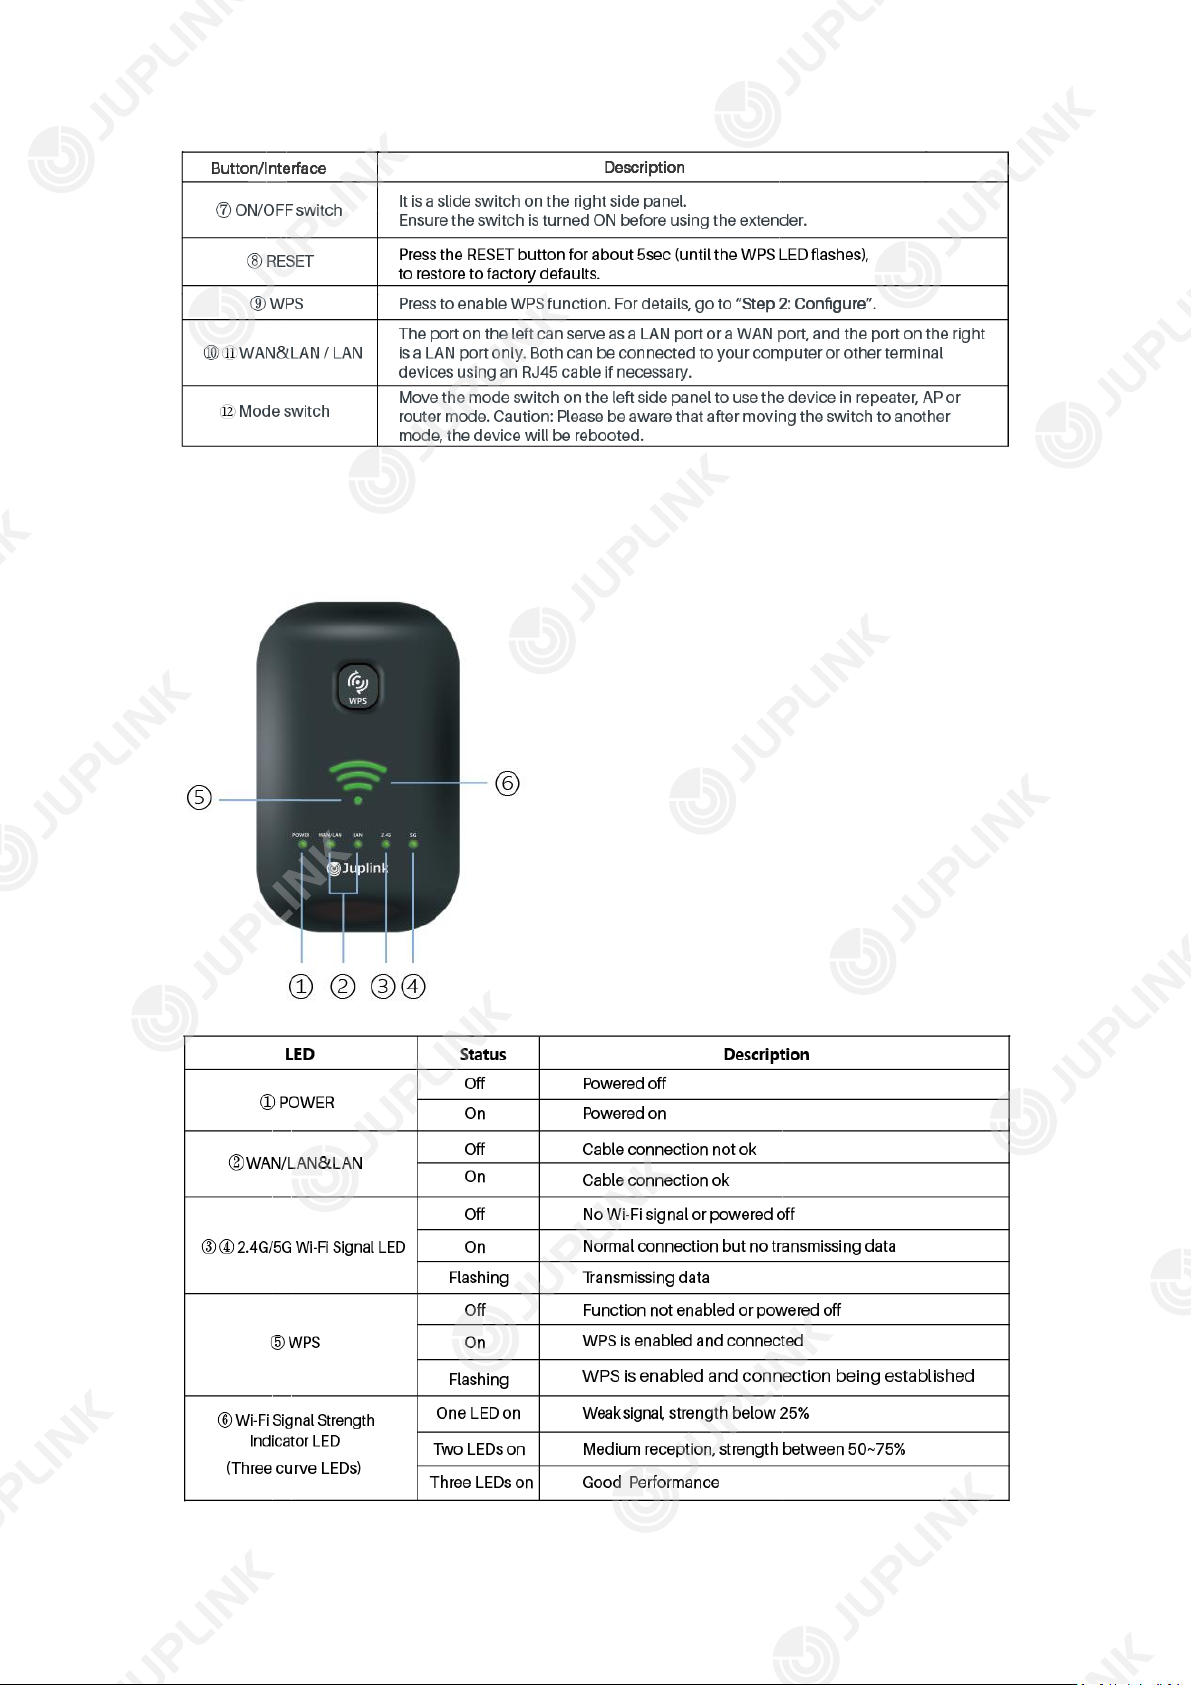
1.2. Panel Layout ................................................................................................................... 5
Chapter 2 Connect the Hardware.............................................................................................. 7
2.1. Connect Your Extender................................................................................................... 8
2.2. Position Your Extender................................................................................................... 9
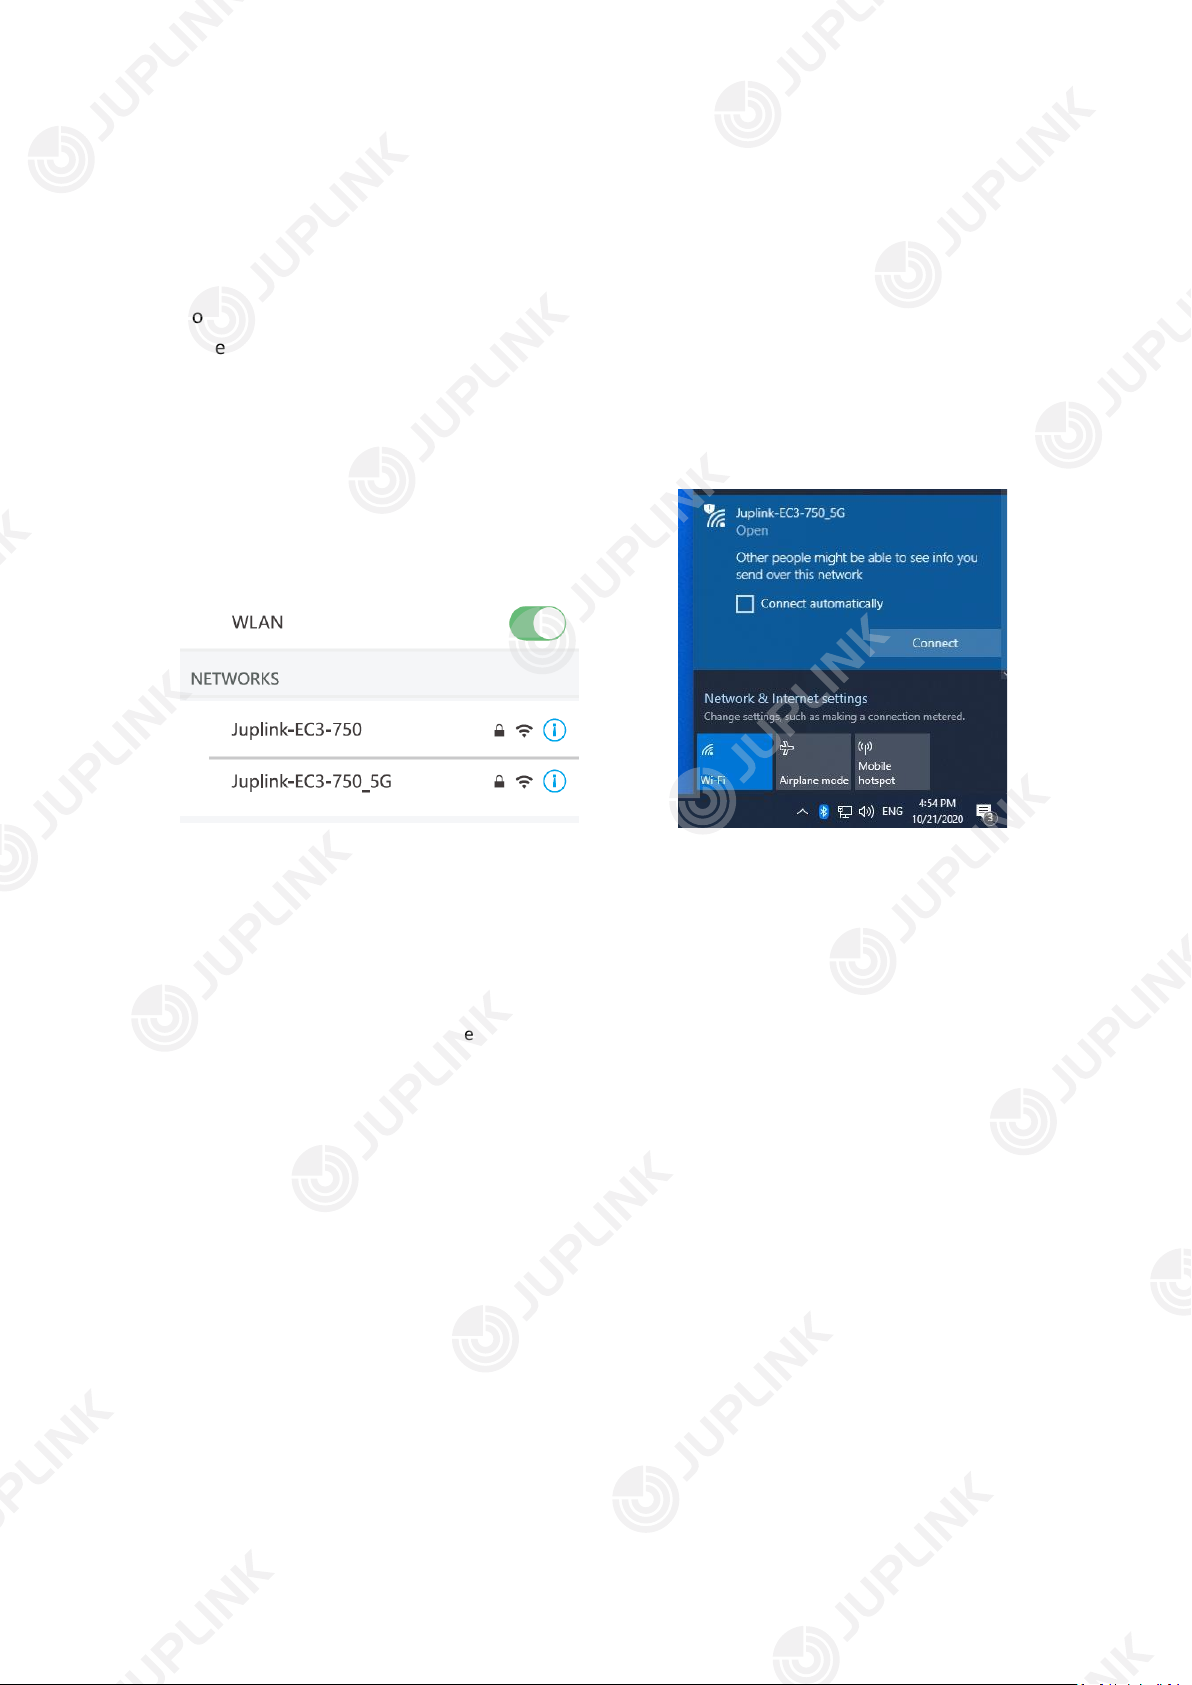
Chapter 3 Log In to Your Extender .......................................................................................... 10
Chapter 4 Set Up Internet Connection.................................................................................... 12
4.1. Set up the Extender as an Repeater/Client (default) ................................................... 13
4.2. Set up the Extender as an Access Point........................................................................ 15
4.3. Set up the Extender as a Router................................................................................... 17
Chapter 5 Maintaining the Extender....................................................................................... 20
5.1. Changing the User Name and Password of the Range Extender ................................. 21
5.2. Save/Import your settings............................................................................................ 21
5.3. Upgrade Firmware........................................................................................................ 22
5.4. Change LAN IP Address................................................................................................. 23
5.5. View connected devices............................................................................................... 23
FAQ.......................................................................................................................................... 24
FCC statement ......................................................................................................................... 28

3
About This Manual
This manual is a complement of Quick Start Guide. The Quick Start Guide instructs you on
quick internet setup, and this guide provides details of each function and shows you the way
to configure these functions appropriate to your needs.
When using this manual, please notice that features of the extender may vary slightly
depending on the model and software version you have, and on your location, language, and
internet service provider. All screenshots, images, parameters and descriptions documented
in this manual are used for demonstration only.
*Maximum wireless signal rates are the physical rates derived from IEEE Standard 802.11
specifications. Actual wireless data throughput and wireless coverage are not guaranteed
and will vary as a result of network conditions, client limitations, and environmental factors,
including building materials, obstacles, volume and density of traffic, and client location.
More Info
The latest software, management app and utility can be found at Download Center at
https://www.juplink.com/
The Quick Start Guide can be found where you find this manual or inside the package of the
Extender.
Specifications can be found on the product page at:
https://www.juplink.com/
Our Technical Support contact information:
+ 1-833-923-2468, EST 9:00-17:00 (Mon-Fri)

4
Chapter 1
Get to Know About Your Wi-Fi
Range Extender
This chapter introduces what the Extender can do and shows its appearance.
It contains the following sections:
- Product Overview
- Panel Layout

5
1.1. Product Overview
The Juplink EC3-750 Range Extender (hereinafter referred to as the “Extender”) is designed
to fully meet the need of Small Office/Home Office (SOHO) networks and users demanding
higher networking performance. Three powerful internal antennas ensure continuous Wi-Fi
signal to all your devices while boosting coverage throughout your home, and the built-in
Ethernet ports supply high-speed wired connection to your devices.
1.2. Panel Layout
1.2.1. Front View
1.2.2. Buttons & Interfaces

6
LED Indicators

7
Chapter 2
Connect the Hardware
This chapter contains the following sections:
- Connect Your Extender
- Position Your Extender

8
2.1. Connect Your Extender
Before you start, please ensure the Power ON/OFF switch is turned to “ON”.
How to connect to the Extender:
• Method 1: Wired
Connect your computer to the Extender’s LAN port with an Ethernet cable.
• Method 2: Wirelessly
1) Find the SSID (Wi-Fi network name) printed on the label on the rear housing of the
Extender.
2) Click the network icon (WLAN) of your smart device or go to Wi-Fi Settings of your smart
device, and then select the SSID to join the network.
• Method 3: Use the WPS button
Wireless devices that support WPS, including Android phones, tablets, and most USB
network adapters, can be connected to your Extender through this method.
Tap the WPS icon on the device. Then immediately press the WPS button on the Extender
for more than 5 seconds.
Note:
-WPS is not supported by iOS devices.
-The WPS function CANNOT be configured if the wireless function of your original router is disabled.
Also, the WPS function will be disabled if your wireless encryption is WEP. Please make sure the
wireless function is enabled and configured with an appropriate encryption before configuring the
WPS.
-Some ISP gateways disable the WPS function by default. If the WPS method fails, please use Method
1 or 2.

9
2.2. Position Your Extender
1. For better performance, plug the extender into an outlet about halfway between the
uplink router and the Wi-Fi dead zone.
The location you choose must be within the range of your existing Wi-Fi network.
2. Wait until the 2.4G or 5G signal LED turns solid green, or the Wi-Fi Signal Strength
Indicator shows at least Two LEDs on.
Note:
-Keep the Extender away from devices with strong electromagnetic interference, such as Bluetooth
devices, cordless phones and microwaves.

10
Chapter 3
Log In to Your Extender

11
With a web-based utility, it is easy to configure and manage the Extender. This utility can be
used on any Windows, Mac or UNIX OS with a web browser, such as Microsoft Internet
Explorer, Apple Safari or Mozilla Firefox.
Follow the steps below to log in to your Extender.
1) Set up the TCP/IP Protocol in Obtain an IP address automatically mode on your computer.
2) Open a browser and visit 192.168.3.1 or router.juplink.com
3) Enter the default username and password admin in the corresponding fields.
4) Click the Login button to enter the settings page.
Note: If the Login window does not appear, please refer to the FAQ Section.

12
Chapter 4
Set Up Internet Connection
This chapter introduces how to connect your Extender to the internet.
The Wi-Fi signal indicator can help quickly determine whether the setup is successful.
It contains the following sections:
- Set up the Extender as a Repeater/Client (default)
- Set up the Extender as an Access Point
- Set up the Extender as a Router

13
4.1. Set up the Extender as a Repeater/Client (default)
In this part, you can check your current internet connection settings, and modify the settings
according to the service information provided by your ISP.
Follow the steps below to check or modify your internet connection settings. You don't
know how to choose the way to connect, please check with your ISP for the internet access
method before setting.
① Connect your mobile device to the Extender with an Ethernet cable or wirelessly and log in to
the Extender.
Note: Before setting, make sure that the left Mode switch is in “Repeater”mode.
② Click Repeater Wizard.

14
③Select a Wi-Fi network to be extended in the pop-up box and enter the Wi-Fi password in
the Key field, and click Save to complete the settings.
Note: Default password is automatically copied from your original router’s Wi-Fi network. Default
SSID is [SSID of your original router] + suffix of [2. 4GEXT] or + suffix of [5GEXT], depending on the
band the Extender is connected to your router. You can also modify the SSID of the extended’s
network to the same as that of the existing network you choose to extend.

15
4.2. Set up the Extender as an Access Point
①Connect your mobile device to the Extender with an Ethernet cable or wirelessly and log
in to the Extender.
Note: Before setting, make sure that the left Mode switch is in AP mode.
Note: Before completing setting up as AP, do NOT connect an Ethernet cable to the Ethernet port
located at the bottom of the Extender; otherwise, you can only use router.juplink.com to log in to the
Extender’s settigs page, and will not be able to access using the default IP address 192.168.3.1 any
more.
Both Ethernet ports on the Extender are automatically adaptive in AP mode. You can use
either port to connect to your original router.
②Click AP Wizard.

16
③Set your 2.4G/5G Wi-Fi name in the WIFI SSID field, change the Encrypted mode and
enter your Wi-Fi password in the Key field. Then, click Save to complete the settings.
Note: It is recommended to keep the default channel settings. Do not change the Wi-Fi channels
unless you have relevant knowledge and think it necessary.

17
4.3. Set up the Extender as a Router
①Connect your mobile device to the Extender’s LAN port with an Ethernet cable or
wirelessly and log in to the Extender.
Note: Before setting, make sure that the left Mode switch is in “Router”mode.
Note: - Before setting, please use an Ethernet cable to connect the WAN port on the Extender and
LAN port of a modem.
- Select Fixed IP, (DHCP) or PPPoE according to the actual connection type you are using, which
you can check with your ISP.. Below is the detailed method of setting in Router mode.
- Click Intelligent detection. This will solve most of the problems you may meet when
connecting to the modem.
②Click Router Wizard.
③There are three different connection modes in Router mode.

18
4.3.1. Router Mode - DHCP
- Select DHCP in Connection Type.
- Set your Wi-Fi names in 2.4G WIFI SSID and 5G WIFI SSID fields.
- Select Encrypted from Encrypted drop-down list and set your Wi-Fi password in the Wi-Fi
key filed, then click Save to complete the settings.
4.3.2. Router Mode- DHCP
- Select PPPoE in Connection Type.
- Fill in the Username and Password fileds according to the information provided by your
ISP.
- Set your Wi-Fi name and password, then click Save to complete the settings.

19
4.3.3. Router Mode - Static IP
- Select Static IP in Connection Type.
- Fill in the IP Address, Subnet Mask, Gateway and DNS fields according to the information
provided by your ISP.
- Set your Wi-Fi name and password, then click Save to complete the settings.
Note:
- You can take a screenshot to keep the information for the next time or for others to use.
- After completing the settings, the Extender will reboot and you can reconnect to the extended
network in about 30 seconds.

20
Chapter 5
Maintaining the Extender
This chapter guides you how to configure common settings:
- Change User Name and Password of the Extender
- Save/Import Your Settings
- Upgrade Firmware
- Change LAN IP Address
- View Connected Devices
Other manuals for EC3-750
1
Table of contents
Other Juplink Extender manuals