JVC KD-G617 User manual

ENGLISH
РУCCKИЙ
CD RECEIVER
РЕСИВЕР С ПРОИГРЫВАТЕЛЕМ КОМПАКТ-ДИСКОВ
KD-G617
For installation and
connections, refer to the
separate manual.
Указания по установке и
выполнению соединений
приводятся в отдельной
инструкции.
INSTRUCTIONS
ИНСТРУКЦИИ ПО ЭКСПЛУАТАЦИИ
GET0270-001A
[EE]
В соответствии с Законом Российской Федерации “О защите прав
потребителей” срок службы (годности) данного товара “по истечении
которого он может представлять опасность для жизни, здоровья
потребителя, причинять вред его имуществу или окружающей среде”
составляет семь (7) лет со дня производства. Этот срок является
временем, в течение которого потребитель данного товара может
безопасно им пользоваться при условии соблюдения инструкции по
эксплуатации данного товара, проводя необходимое обслуживание,
включающее замену расходных материалов и/или соответствующее
ремонтное обеспечение в специализированном сервисном центре.
Дополнительные косметические материалы к данному товару,
поставляемые вместе с ним, могут храниться в течение двух (2) лет со
дня его производства.
Срок службы (годности), кроме срока хранения дополнительных
косметических материалов, упомянутых в предыдущих двух пунктах,
не затрагивает никаких других прав потребителя, в частности,
гарантийного свидетельства JVC, которое он может получить в
соответствии с законом о правах потребителя или других законов,
связанных с ним.
For canceling the display demonstration, see page 8.
Информацию об отмене демонстрации функций дисплея см. на стр. 8.
Cover_KD-G617[EE]f.indd 2Cover_KD-G617[EE]f.indd 2 1/11/05 5:26:26 PM1/11/05 5:26:26 PM

2
ENGLISH
How to forcibly eject a disc
If a disc cannot be recognized by the
receiver or cannot be ejected, ejects the disc
as follows.
“PLEASE” and “EJECT” appear alternately
on the display.
• If this does not work, reset your receiver.
• Be careful not to drop the disc when it
ejects.
Thank you for purchasing a JVC product.
Please read all instructions carefully before operation, to ensure your complete understanding and to
obtain the best possible performance from the unit.
IMPORTANT FOR LASER PRODUCTS
1. CLASS 1 LASER PRODUCT
2. CAUTION: Do not open the top cover. There are no user serviceable parts inside the unit; leave
all servicing to qualified service personnel.
3. CAUTION: Visible and invisible laser radiation when open and interlock failed or defeated.
Avoid direct exposure to beam.
4. REPRODUCTION OF LABEL: CAUTION LABEL, PLACED OUTSIDE THE UNIT.
Warning:
If you need to operate the receiver while
driving, be sure to look ahead carefully or
you may be involved in a traffic accident.
How to reset your unit
This will reset the microcomputer. Your
preset adjustments will also be erased.
EN02-05_G617[EE]f.indd 2EN02-05_G617[EE]f.indd 2 1/11/05 5:26:38 PM1/11/05 5:26:38 PM

3
ENGLISH
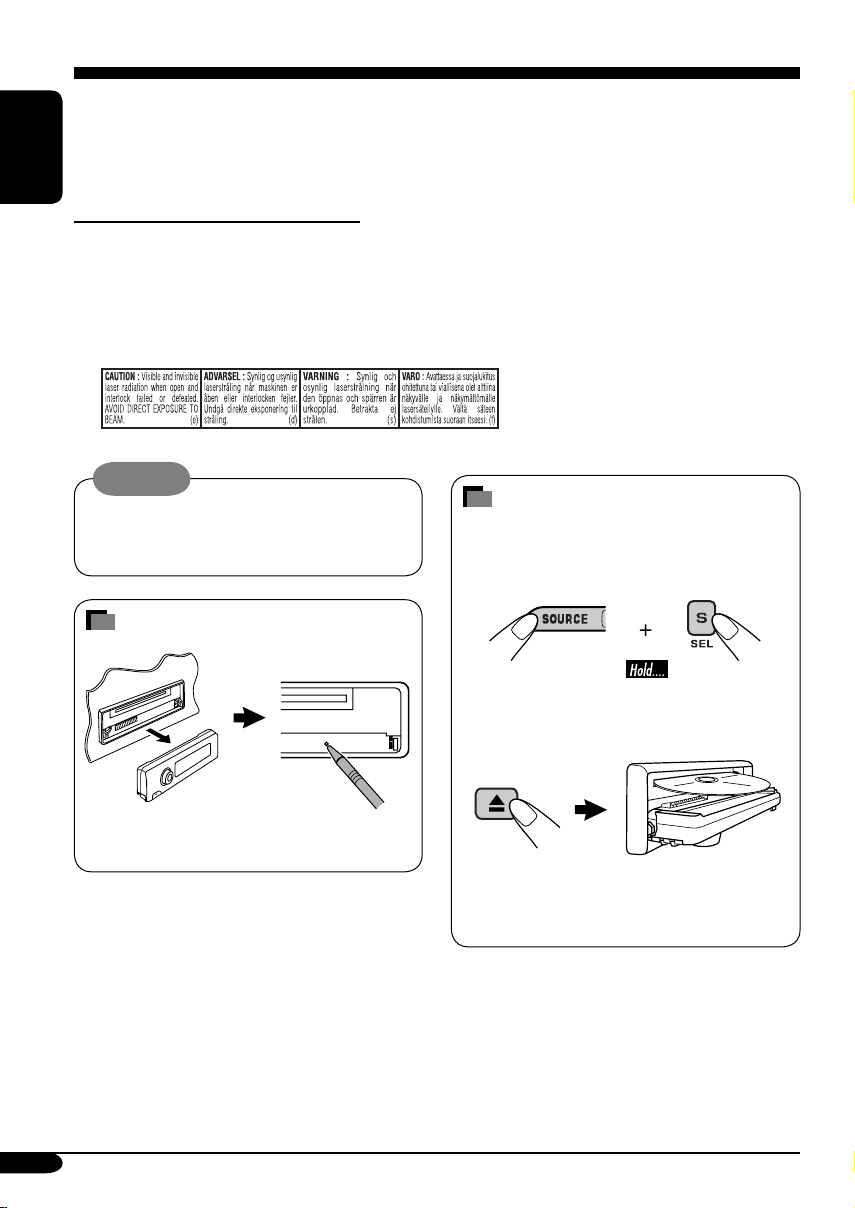
How to reset your unit ........................... 2
How to forcibly eject a disc................... 2
How to read this manual........................ 4
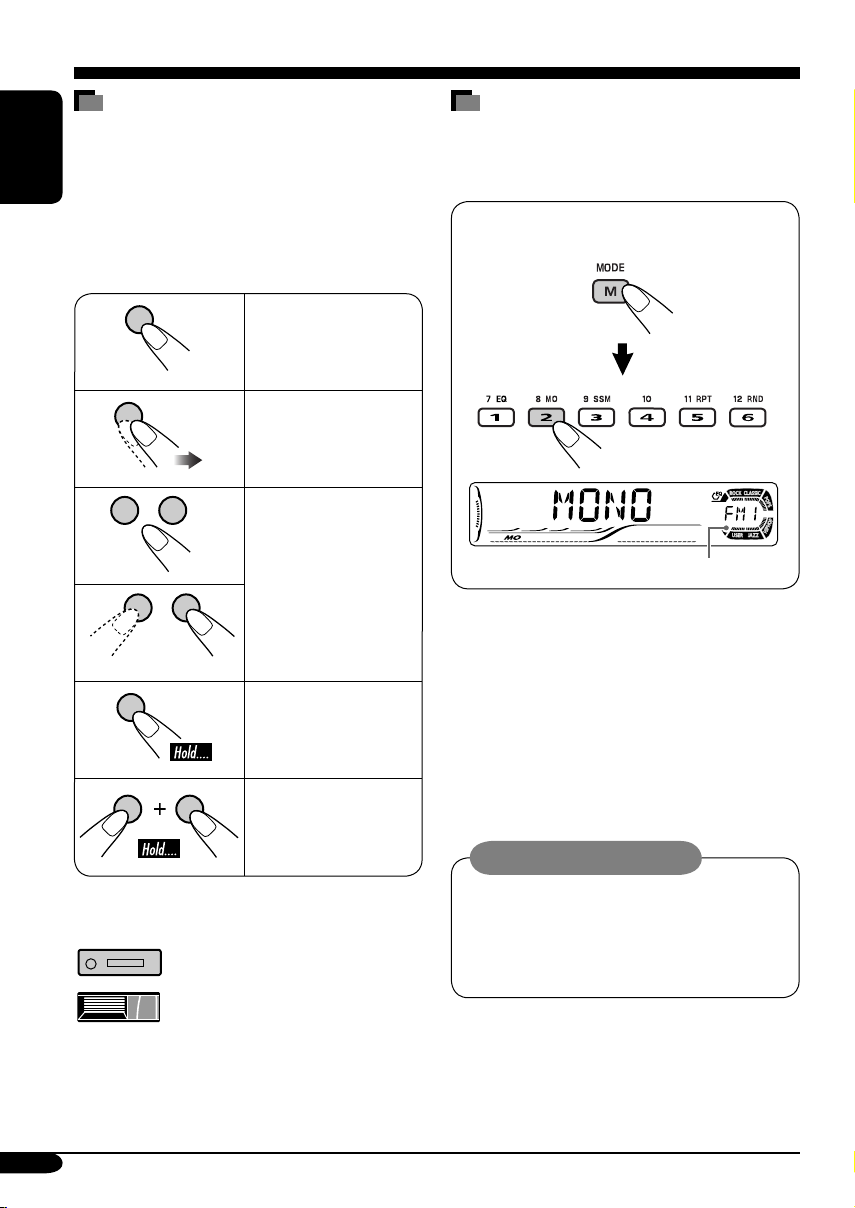
How to use the M MODE button........... 4
Control panel —
KD-G617
......... 5
Parts identification................................. 5
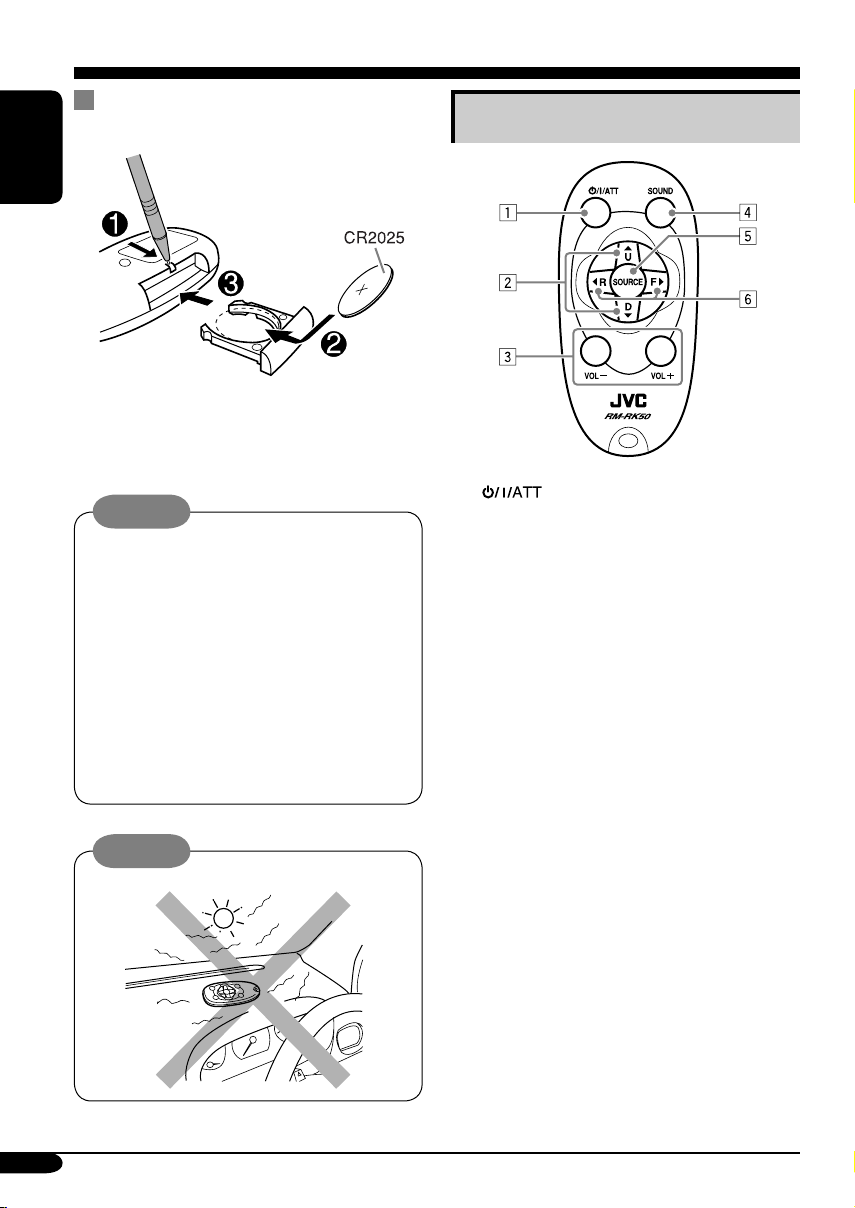
Remote controller —
RM-RK50
... 6
Main elements and features ................... 6
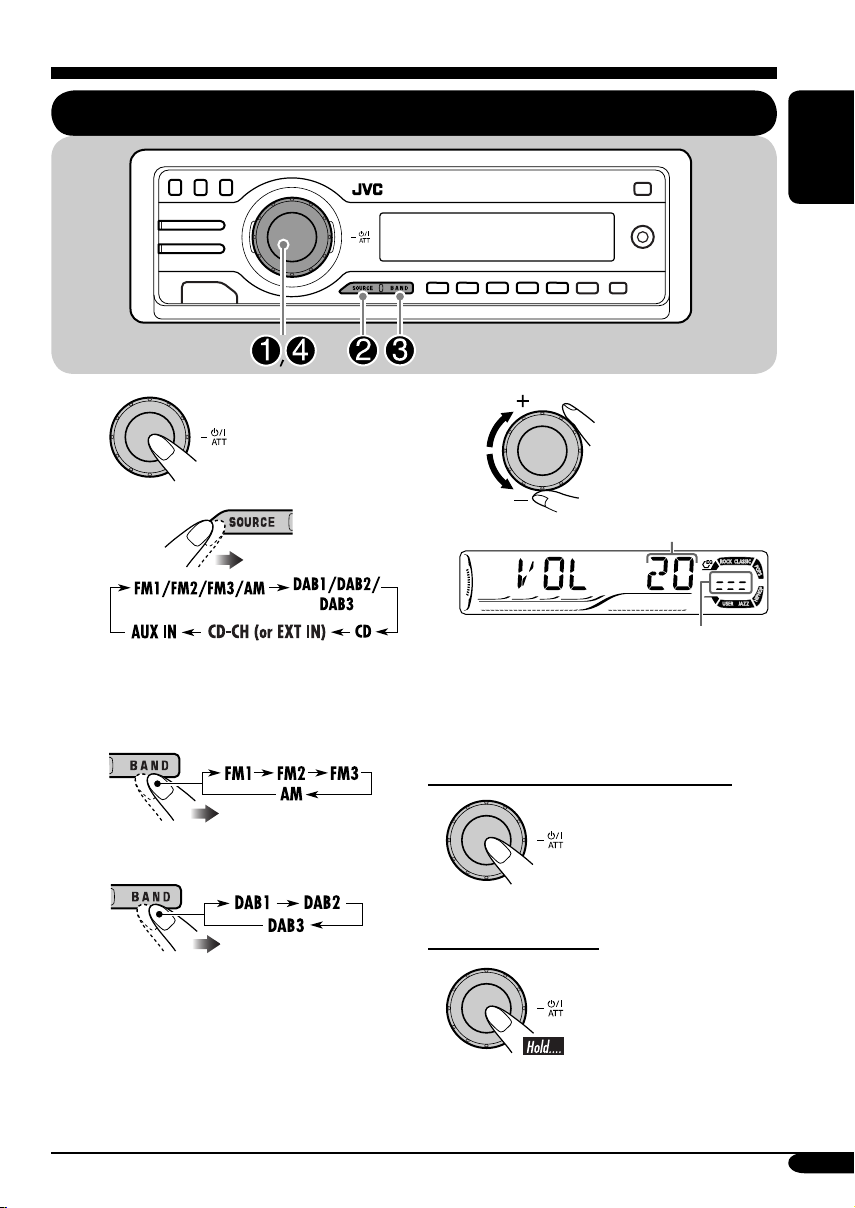
Getting started....................... 7
Basic operations.................................. 7
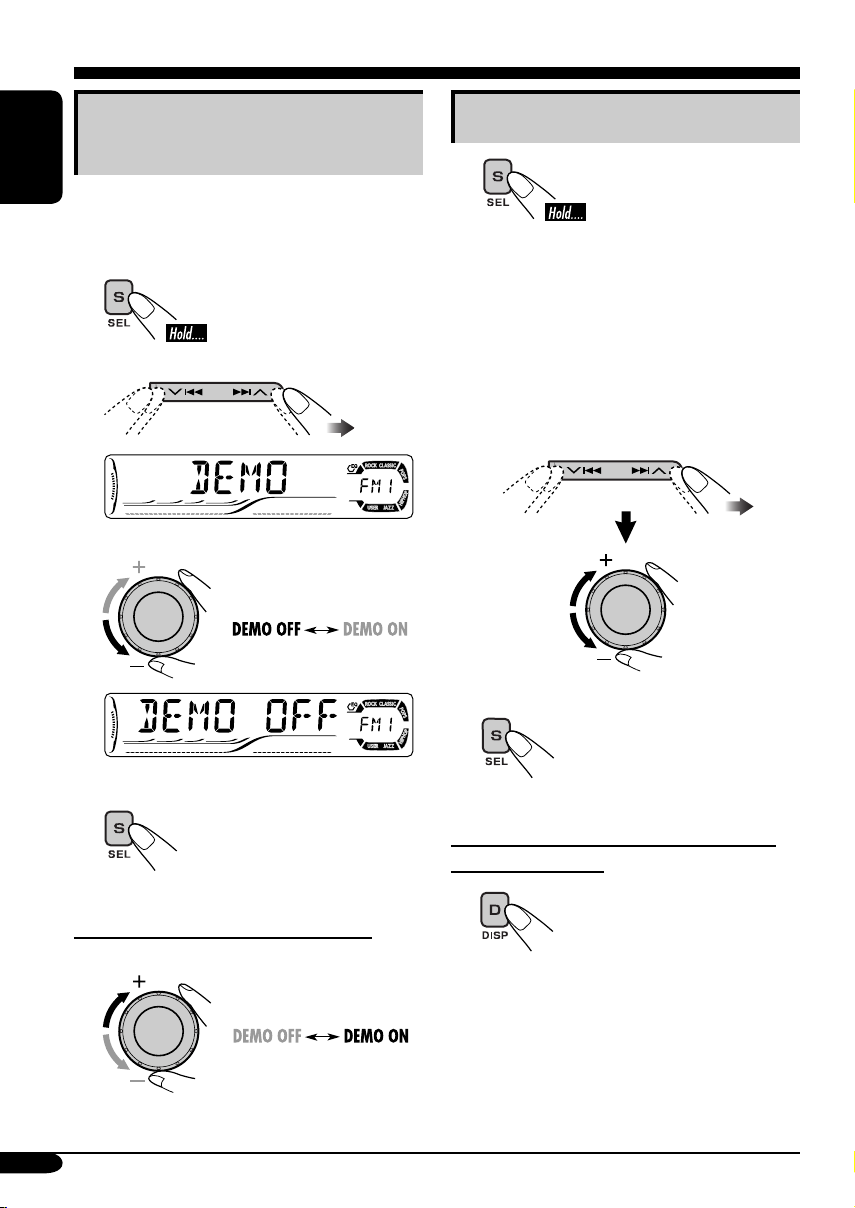
Canceling the display demonstrations ... 8
Setting the clock .................................... 8
Radio operations ................... 9
Listening to the radio........................... 9
Storing stations in memory.................... 10
Listening to a preset station ................... 10
FM RDS operations................. 11
Searching for your favorite FM RDS
programme
....................................... 11
Storing your favorite programmes......... 12
Using the standby receptions................. 12
Tracking the same programme
—Network-Tracking Reception ........ 13
Disc operations ...................... 14
Playing a disc in the receiver ............... 14
Playing discs in the CD changer ........... 15
Other main functions ............................. 17
Changing the display information ......... 18
Selecting the playback modes................ 19
Sound adjustments ................ 20
Selecting preset sound modes
(C-EQ: custom equalizer) .................. 20
Adjusting the sound ............................... 21
General settings — PSM ......... 22
Basic procedure ..................................... 22
Other main functions ............. 25
Assigning titles to the sources ............... 25
Detaching the control panel................... 26
External component operations
... 27
Playing an external component ............ 27
DAB tuner operations
................ 28
Listening to the DAB tuner ................... 28
Storing DAB services in memory.......... 29
Tuning in to a preset DAB service ........ 29
Tracing the same programme
—Alternative Reception .................... 29
Maintenance .......................... 30
More about this receiver ........ 31
Troubleshooting ..................... 34
Specifications ......................... 37
*Temperature inside the car....
If you have parked the car for a long time in
hot or cold weather, wait until the temperature
in the car becomes normal before operating the
unit.
Contents
*For safety....
• Do not raise the volume level too much, as
this will block outside sounds, making driving
dangerous.
• Stop the car before performing any
complicated operations.
EN02-05_G617[EE]f.indd 3EN02-05_G617[EE]f.indd 3 1/11/05 5:26:40 PM1/11/05 5:26:40 PM

4
ENGLISH
How to read this manual
The following methods are used to make the
explanations simple and easy-to-understand:
• Some related tips and notes are explained in
“More about this receiver” (see pages
31 – 33).
• Button operations are mainly explained with
the illustrations as follows:
Press briefly.
Press repeatedly.
Press either one.
Press and hold until
your desired response
begins.
Press and hold both
buttons at the same
time.
The following marks are used to indicate...
: Built-in CD player operations.
: External CD changer operations.
How to use the M MODE button
If you press M MODE, the receiver goes into
functions mode, then the number buttons and
5/∞buttons work as different function buttons.
Ex.: When number button 2 works as
MO (monaural) button.
Time countdown indicator
To use these buttons for original functions
again after pressing M MODE, wait for
5 seconds without pressing any of these buttons
until the functions mode is cleared.
• Pressing M MODE again also clears the
functions mode.
Caution on volume setting:
Discs produce very little noise compared
with other sources. Lower the volume
before playing a disc to avoid damaging
the speakers by the sudden increase of the
output level.
EN02-05_G617[EE]f.indd 4EN02-05_G617[EE]f.indd 4 1/11/05 5:26:40 PM1/11/05 5:26:40 PM

5
ENGLISH
Control panel — KD-G617
15(up) / ∞(down) buttons
2T/P TP/PTY (traffic programme/programme
type) button
3D DISP (display) button
4S SEL (select) button
5• Control dial
• (standby/on attenuator) button
6Display window
7Remote sensor
• DO NOT expose the remote sensor to
strong light (direct sunlight or artificial
lighting).
80(eject) button
94/¢buttons
p(control panel release) button
qSOURCE button
wBAND button
eNumber buttons
rEQ (equalizer) button
tMO (monaural) button
ySSM (Strong-station Sequential Memory)
button
uRPT (repeat) button
iRND (random) button
oM MODE button
;
AUX (auxiliary) input jack
• NOT compatible with digital signals.
Display window
aDisc information indicators—TAG (ID3
Tag), (folder), (track/file)
sMain display
dSource display / Volume level indicator
fEQ (equalizer) indicator
gSound mode (C-EQ: custom equalizer)
indicators—ROCK, CLASSIC, POPS,
HIP HOP, JAZZ, USER
• also works as the time countdown
indicator and level meter during play (see
page 23).
hDisc type indicators—WMA, MP3
jTuner reception indicators—ST (stereo),
MO (monaural)
kRDS indicators—TP, PTY, AF, REG
lPlayback source indicators—
CH: Lights up only when CD-CH is selected
as the playback source.
DISC: Lights up for the built-in CD player.
/Playback mode / item indicators—
RND (random), (disc), (folder),
RPT (repeat)
zLOUD (loudness) indicator
xTr (track) indicator
Parts identification
Display window
EN02-05_G617[EE]f.indd 5EN02-05_G617[EE]f.indd 5 1/11/05 5:26:40 PM1/11/05 5:26:40 PM

6
ENGLISH
Remote controller — RM-RK50
Main elements and features
1(standby/on/attenuator) button
• Turns on and off the power and also
attenuates the sound.
25U (up) / D (down) ∞buttons
• 5U: Changes the FM/AM/DAB bands.
• D ∞: Changes the preset stations (or
services).
• Changes the folder of the MP3/WMA
discs.
• While playing an MP3 disc on an
MP3-compatible CD changer:
– Changes the disc if pressed briefly.
– Changes the folder if pressed and held.
3VOL – / VOL + buttons
• Adjusts the volume level.
4SOUND button
• Selects the sound mode (C-EQ: custom
equalizer).
5SOURCE button
• Selects the source.
62R (reverse) / F (forward) 3buttons
• Searches for stations (or services) if
pressed briefly.
• Searches for ensembles if pressed and
held.
• Fast-forwards or reverses the track if
pressed and held.
• Changes the tracks of the disc.
Installing the lithium coin battery
(CR2025)
• When operating, aim the remote controller
directly at the remote sensor on the
receiver. Make sure there is no obstacle in
between.
Warning:
• Store the battery in a place where children
cannot reach to avoid risk of accident.
• To prevent the battery from over-heating,
cracking, or starting a fire:
– Do not recharge, short, disassemble, or
heat the battery or dispose of it in a fire.
– Do not leave the battery with other
metallic materials.
– Do not poke the battery with tweezers or
similar tools.
– Wrap the battery with tape and insulate
when throwing away or saving it.
Caution:
EN06-11_G617[EE]f.indd 6EN06-11_G617[EE]f.indd 6 1/11/05 5:26:52 PM1/11/05 5:26:52 PM

7
ENGLISH
~
Ÿ
You cannot select some sources if they
are not ready.
!• For FM/AM tuner only
• For DAB tuner only
⁄
Volume level appears.
Volume level indicator
@Adjust the sound as you want.
(See pages 20 and 21.)
To drop the volume in a moment (ATT)
To restore the sound,
press it again.
To turn off the power
Getting started
Basic operations
EN06-11_G617[EE]f.indd 7EN06-11_G617[EE]f.indd 7 1/11/05 5:26:53 PM1/11/05 5:26:53 PM

8
ENGLISH
Canceling the display
demonstrations
If no operations are done for about 20 seconds,
display demonstration starts.
[Initial: DEMO ON]—see page 22.
1
2
3
4Finish the procedure.
To activate the display demonstration
In step 3above...
Setting the clock
1
2Set the hour, minute, and clock
system.
1Select “CLOCK H” (hour), then
adjust the hour.
2Select “CLOCK M” (minute),
then adjust the minute.
3Select “24H/12H,” then select
“24H” (hour) or “12H” (hour).
3Finish the procedure.
To check the current clock time when the
power is turned off
EN06-11_G617[EE]f.indd 8EN06-11_G617[EE]f.indd 8 1/11/05 5:26:54 PM1/11/05 5:26:54 PM

9
ENGLISH
To tune in to a station manually
In step !on the left...
1
2Select the desired station frequencies.
When an FM stereo broadcast is hard to
receive
1
2
Lights up when monaural
mode is activated.
Reception improves, but stereo effect will
be lost.
To restore the stereo effect, repeat the same
procedure. “MONO OFF” appears and the MO
indicator goes off.
Radio operations
Listening to the radio
~
Ÿ
Selected band appears.
Lights up when receiving an FM stereo
broadcast with sufficient signal strength.
!Start searching for a station.
When a station is received, searching
stops.
To stop searching, press the same
button again.
Note:
FM1 and FM2: 87.5 MHz – 108.0 MHz
FM3: 65.00 MHz – 74.00 MHz
EN06-11_G617[EE]f.indd 9EN06-11_G617[EE]f.indd 9 1/11/05 5:26:54 PM1/11/05 5:26:54 PM

10
ENGLISH
2
3
4
Preset number flashes for a while.
Listening to a preset station
1
2
3Select the preset station (1 – 6) you
want.
To check the current clock time while
listening to an FM (non-RDS) or AM station
• For FM RDS stations, see page 13.
Storing stations in memory
You can preset six stations for each band.
FM station automatic presetting—
SSM (Strong-station Sequential
Memory)
1
2Select the FM band (FM1 – FM3)
you want to store into.
3
4
“SSM” flashes, then disappears when
automatic presetting is over.
Local FM stations with the strongest signals are
searched and stored automatically in the FM
band.
Manual presetting
Ex.: Storing FM station of 92.5 MHz into the
preset number 4 of the FM1 band.
1
EN06-11_G617[EE]f.indd 10EN06-11_G617[EE]f.indd 10 1/11/05 5:26:55 PM1/11/05 5:26:55 PM

11
ENGLISH
FM RDS operations
Searching for your favorite FM RDS programme
You can tune in to a station broadcasting your
favorite programme by searching for a PTY code.
•
To store your favorite programme, see page
12.
~
The last selected PTY code appears.
ŸSelect one of your favorite
programme type.
or
Select one of the twenty-nine PTY
codes.
Ex.: When “ROCK M” is selected
!Start searching for your favorite
programme.
If there is a station broadcasting a
programme of the same PTY code as
you have selected, that station is tuned
in.
PTY codes
NEWS, AFFAIRS, INFO, SPORT,
EDUCATE, DRAMA, CULTURE,
SCIENCE, VARIED, POP M (music),
ROCK M (music), EASY M (music),
LIGHT M (music), CLASSICS,
OTHER M (music), WEATHER,
FINANCE, CHILDREN, SOCIAL,
RELIGION, PHONE IN, TRAVEL,
LEISURE, JAZZ, COUNTRY,
NATION M (music), OLDIES,
FOLK M (music), DOCUMENT
EN06-11_G617[EE]f.indd 11EN06-11_G617[EE]f.indd 11 1/11/05 5:26:55 PM1/11/05 5:26:55 PM

12
ENGLISH
What you can do with RDS
RDS (Radio Data System) allows FM
stations to send an additional signal along
with their regular programme signals.
By receiving the RDS data, this receiver can
do the following:
•
Programme Type (PTY) Search (see page 11)
• Temporarily switches to Traffic
Announcement—TA Standby Reception.
(See the right column.)
•
Temporarily switches to your favorite
programme—PTY Standby Reception. (See
pages 13 and 23.)
•
Tracing the same programme automatically
—Network-Tracking Reception (see page 13)
• Programme Search (see page 23)
Storing your favorite programmes
You can store six favorite programme types.
Preset programme types in the number buttons
(1 to 6):
1Select a PTY code (see page 11).
2Select the preset number (1 – 6) you
want to store into.
Ex.: When “ROCK M” is selected
3Repeat steps 1and 2to store
other PTY codes into other preset
numbers.
4Finish the procedure.
Using the standby receptions
TA Standby Reception
TA Standby Reception allows the receiver to
switch temporarily to Traffic Announcement
(TA) from any source other than AM.
• The volume changes to the preset TA volume
level (see page 23).
To activate TA Standby Reception
The TP indicator either
lights up or flashes.
• If the TP indicator lights up, TA Standby
Reception is activated.
• If the TP indicator flashes, TA Standby
Reception is not yet activated. (This occurs
when you are listening to an FM station
without the RDS signals required for TA
Standby Reception.)
To activate TA Standby Reception, tune in to
another station providing these signals. The
TP indicator will stop flashing and remain lit.
To deactivate the TA Standby Reception
The TP indicator goes off.
EN12-17_G617[EE]f.indd 12EN12-17_G617[EE]f.indd 12 1/11/05 5:27:09 PM1/11/05 5:27:09 PM

13
ENGLISH
Tracking the same programme—
Network-Tracking Reception
When driving in an area where FM reception
is not sufficient enough, this receiver
automatically tunes in to another FM RDS
station of the same network, possibly
broadcasting the same programme with stronger
signals (see the illustration below).
When shipped from the factory, Network-
Tracking Reception is activated.
To change the Network-Tracking Reception
setting, see “AF-REG” on page 23.
Programme A broadcasting on different
frequency areas (01 – 05)
To check the current clock time while
listening to an FM RDS station
PTY Standby Reception
PTY Standby Reception allows the receiver
to switch temporarily to your favorite PTY
programme from any source other than AM.
To activate and select your favorite PTY
code for PTY Standby Reception, see page
23.
The PTY indicator either lights up or flashes.
• If the PTY indicator lights up, PTY Standby
Reception is activated.
• If the PTY indicator flashes, PTY Standby
Reception is not yet activated.
To activate PTY Standby Reception, tune in
to another station providing these signals. The
PTY indicator will stop flashing and remain
lit.
To deactivate the PTY Standby Reception,
select “OFF” for the PTY code (see page 23).
The PTY indicator goes off.
EN12-17_G617[EE]f.indd 13EN12-17_G617[EE]f.indd 13 1/11/05 5:27:10 PM1/11/05 5:27:10 PM

14
ENGLISH
Disc operations
Playing a disc in the receiver
About MP3 and WMA discs
MP3 and WMA (Windows Media®Audio)
“tracks” (words “file” and “track” are used
interchangeably) are recorded in “folders.”
• When inserting an MP3 or a WMA disc:
*Either the MP3 or WMA indicator lights up
depending on the detected file.
• When inserting an audio CD or a CD Text
disc:
To stop play and eject the disc
Total track
number
Total playing time
of the inserted disc
Total track number
of the inserted disc
Elapsed playing
time
Current track
number
All tracks will be played
repeatedly until you
change the source or eject
the disc.
Total folder
number
Disc information appears
automatically (see page 18).
CD Text: Disc title/performer =
Track title appears automatically
(see page 18).
Elapsed playing
time
Current track
number
Selected folder number
EN12-17_G617[EE]f.indd 14EN12-17_G617[EE]f.indd 14 1/11/05 5:27:10 PM1/11/05 5:27:10 PM

15
ENGLISH
~
*If you have changed “EXT IN” setting
to “EXT IN” (see page 24), you
cannot select the CD changer.
ŸSelect a disc.
For disc number from 01 – 06:
For disc number from 07 – 12:
Playing discs in the CD changer
About the CD changer
It is recommended to use the JVC MP3-
compatible CD changer with your receiver.
• You can also connect other CH-X series
CD changers (except CH-X99 and
CH-X100). However, they are not
compatible with MP3 discs, so you cannot
play back MP3 discs.
• You cannot use the KD-MK series CD
changers with this receiver.
• Disc text information recorded in the CD
Text can be displayed when a JVC CD
Text compatible CD changer is connected.
Before operating your CD changer:
• Refer also to the Instructions supplied
with your CD changer.
• You cannot control and play any WMA
disc in the CD changer.
All tracks of the inserted discs in the magazine
will be played repeatedly until you change
the source or eject the magazine from the CD
changer.
Selected disc number
EN12-17_G617[EE]f.indd 15EN12-17_G617[EE]f.indd 15 1/11/05 5:27:11 PM1/11/05 5:27:11 PM

16
ENGLISH
To fast-forward or reverse the track
Fast-forwards.
Reverses.
To go to the next or previous tracks
To the following tracks.
To the beginning of the current track, then the
previous tracks.
To go to the next or previous folders (only
for MP3 or WMA discs)
For MP3 discs:
For WMA discs:
To next folders.
To previous folders.
• When the current disc is an MP3 disc:
* “ROOT” appears if no folder is included in
the disc.
• When the current disc is an audio CD or a
CD Text disc:
Elapsed playing
time
Current track
number
Folder name*
Selected folder number
Elapsed playing
time
Current track
number
Disc information appears
automatically (see page 18).
CD Text: Disc title/performer =
Track title appears automatically
(see page 18).
EN12-17_G617[EE]f.indd 16EN12-17_G617[EE]f.indd 16 1/11/05 5:27:11 PM1/11/05 5:27:11 PM

17
ENGLISH
To locate a particular track (for CD) or
folder (for MP3 or WMA discs) directly
To select a number from 01 – 06:
To select a number from 07 – 12:
• To use folder search on MP3/WMA discs, it
is required that folders are assigned with
2-digit numbers at the beginning of their
folder names—01, 02, 03, and so on.
• To select a particular track in a folder
(for MP3 or WMA disc) after selecting a
folder:
Other main functions
Skipping a track quickly during play
• For MP3 or WMA disc, you can skip a track
within the same folder.
Ex.: To select track 32 while playing track 6
1
2
First time you press +10 or –10 button, the
track skips to the nearest higher or lower
track with a track number of multiple ten
(ex. 10th, 20th, 30th).
Then each time you press the button, you
can skip 10 tracks.
• After the last track, the first track will be
selected and vice versa.
3
Prohibiting disc ejection
You can lock a disc in the loading slot.
To cancel the prohibition, repeat the same
procedure.
EN12-17_G617[EE]f.indd 17EN12-17_G617[EE]f.indd 17 1/11/05 5:27:11 PM1/11/05 5:27:11 PM

18
ENGLISH
Changing the display information
While playing an audio CD or a CD Text ( / )
*1 If no title is assigned to an audio CD, “NO NAME” appears. To assign a title to an audio
CD, see page 25.
While playing an MP3 ( / ) or WMA ( ) disc
• When “TAG DISP” is set to “TAG ON” (see page 24)
*2If an MP3/WMA file does not have ID3 tags, folder name and file name appear. In this
case, the TAG indicator will not light up.
• When “TAG DISP” is set to “TAG OFF”
EN18-23_G617[EE]f.indd 18EN18-23_G617[EE]f.indd 18 1/11/05 5:27:28 PM1/11/05 5:27:28 PM

19
ENGLISH
Selecting the playback modes
You can use only one of the following playback modes at a time.
1
2Select your desired playback mode.
Repeat play
Ex.: When “TRK RPT” is selected while
playing an MP3 disc in the receiver
Mode Plays repeatedly
TRK RPT : The current track.
• RPT lights up.
FLDR RPT*1 :All tracks of the current folder.
• and RPT light up.
DISC RPT*2 :All tracks of the current disc.
• and RPT light up.
RPT OFF : Cancels.
Random play
Ex.: When “DISC RND” is selected while
playing an MP3 disc in the receiver
Mode Plays at random
FLDR RND*1 :All tracks of the current folder,
then tracks of the next folder
and so on.
• RND and light up.
DISC RND : All tracks of the current disc.
• RND and light up.
MAG RND*2 :All tracks of the inserted discs.
• RND lights up.
RND OFF : Cancels.
*1Only while playing an MP3 ( / ) or WMA ( ) disc.
*2Only while playing discs in the CD changer ( ).
EN18-23_G617[EE]f.indd 19EN18-23_G617[EE]f.indd 19 1/11/05 5:27:29 PM1/11/05 5:27:29 PM

20
ENGLISH
Sound adjustments
Selecting preset sound modes (C-EQ: custom equalizer)
You can select a preset sound mode suitable to
the music genre.
~
Ÿ
Ex.: When “ROCK” is selected
Indication pattern for each sound mode:
Indication For: Preset values
BAS*1TRE*2
LOUD
*3
USER (Flat sound) 00 00 OFF
ROCK Rock or
disco music
+03 +01 ON
CLASSIC Classical
music
+01 –02 OFF
POPS Light music +04 +01 OFF
HIP HOP Funk or rap
music
+02 00 ON
JAZZ Jazz music +02 +03 OFF
*1BAS: Bass
*2TRE: Treble
*3LOUD: Loudness
EN18-23_G617[EE]f.indd 20EN18-23_G617[EE]f.indd 20 1/11/05 5:27:30 PM1/11/05 5:27:30 PM
Table of contents
Languages:
Other JVC Car Receiver manuals
Popular Car Receiver manuals by other brands

Kenwood
Kenwood KDC-2006 instruction manual

Blaupunkt
Blaupunkt ORLANDO CM127 owner's manual

Boss Audio Systems
Boss Audio Systems MP3-4600R user manual

Pioneer
Pioneer FH-P6600R Operation manual

DELPHI GRUNDIG
DELPHI GRUNDIG CL 210 MP3 instruction manual

Sony
Sony MEX-BT38UW - Bt Slot Usb 1wire Installation/connections