JVC KD-X560BT User manual

• Updated information (the latest Instruction Manual, etc.) is available from
<http://www.jvc.net/cs/car/>.
KD-X560BT
MONITOR WITH RECEIVER
INSTRUCTION MANUAL
B5A-2953-00 (K)© 2019 JVC KENWOOD Corporation

2
Before use
Before use................................................................................ 2
How to read this manual.................................................................................. 2
Precautions ...............................................................................................................2
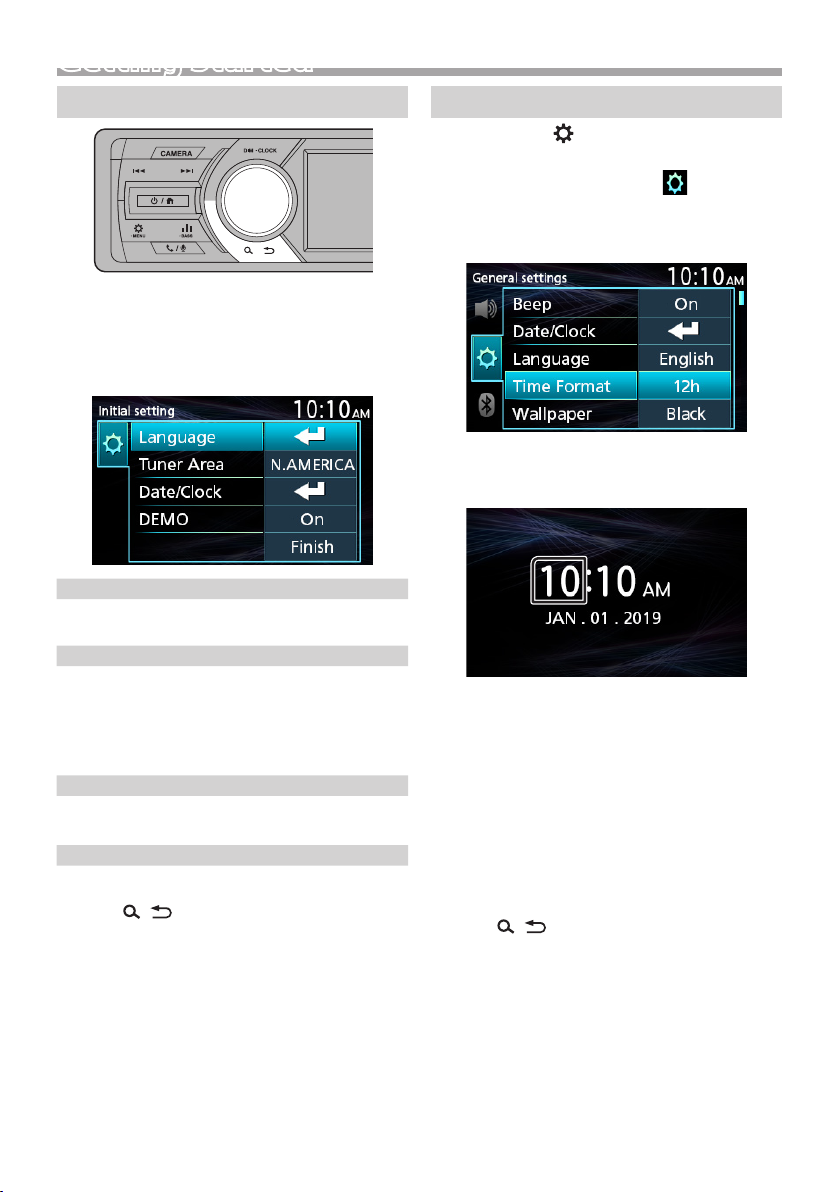
Getting Started...................................................................... 3
Initial Settings.......................................................................................................... 3
Clock settings..........................................................................................................3
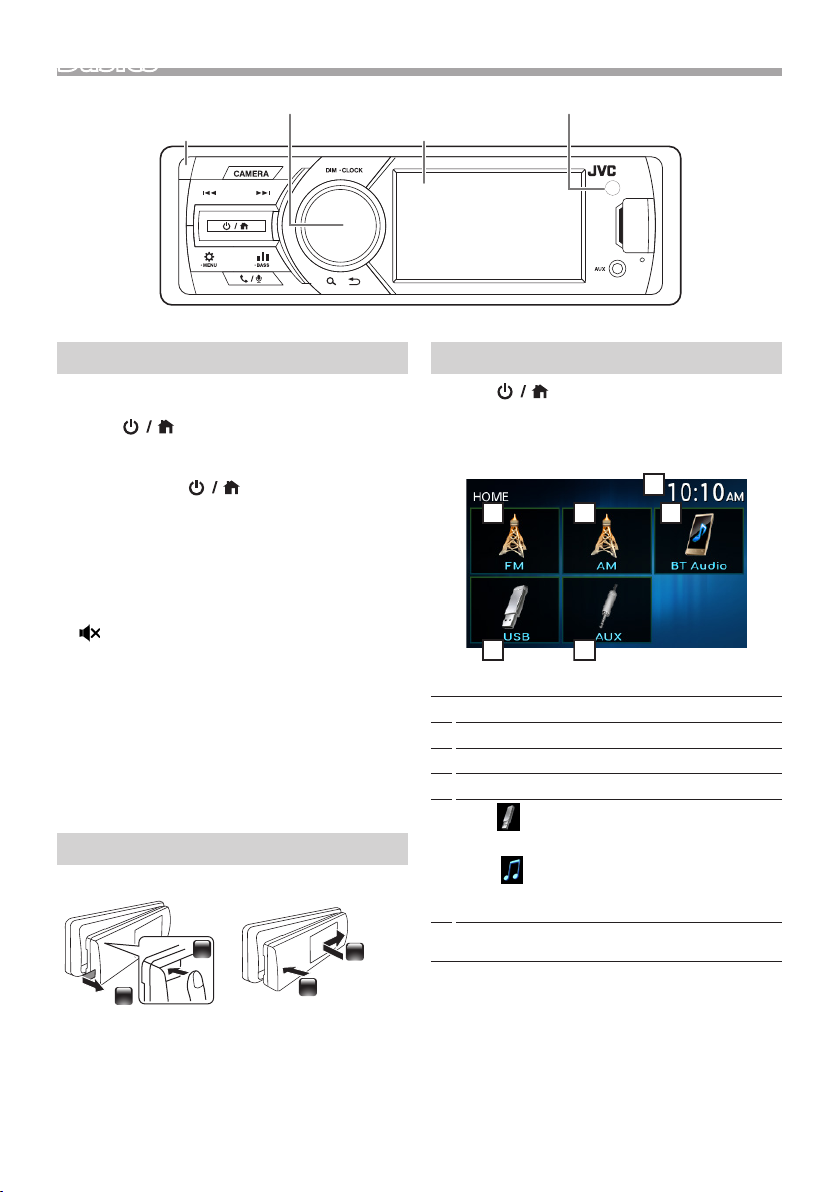
Basics ......................................................................................... 4
Common operations..........................................................................................4
How to attach/detach the faceplate........................................................4
Select a source........................................................................................................4
USB ............................................................................................. 5
Preparation................................................................................................................5
Playback operations............................................................................................ 5
Function settings..................................................................................................6
iPod/iPhone ............................................................................ 7
Preparation................................................................................................................7
Playback operations............................................................................................ 7
Function settings..................................................................................................7
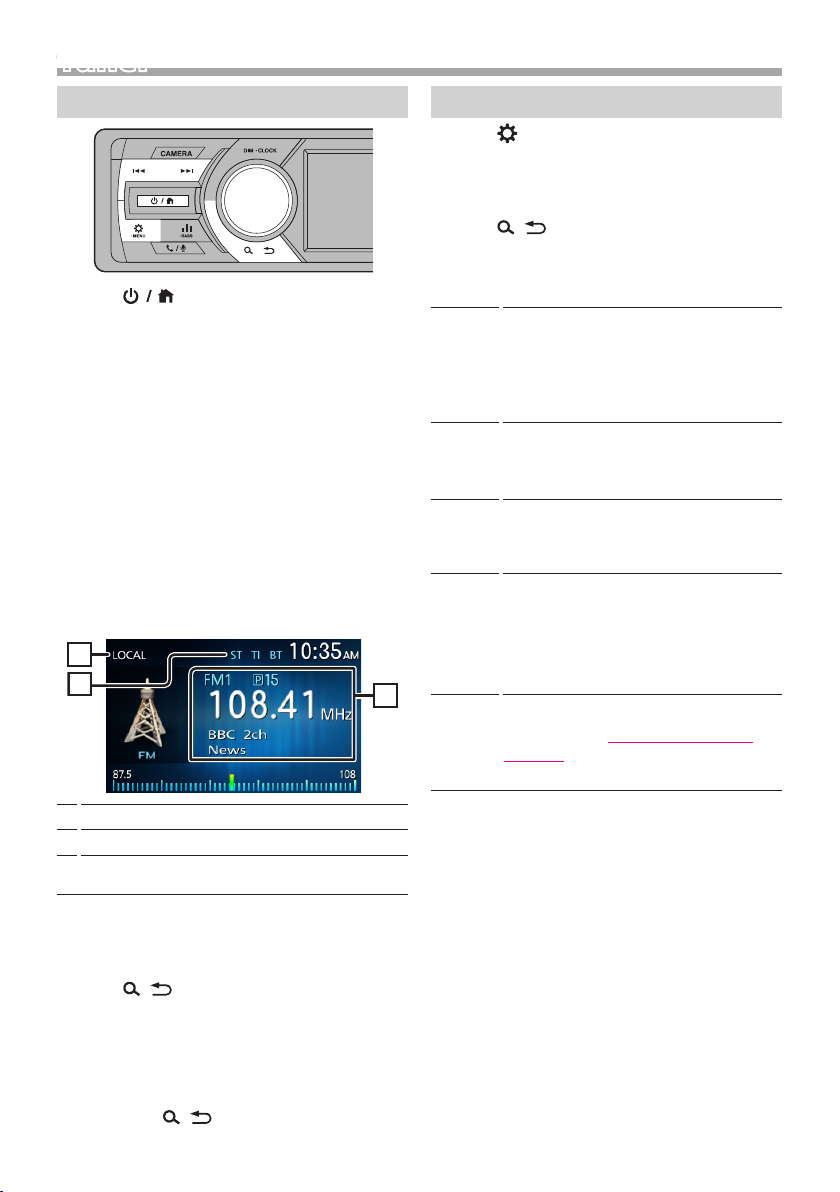
Tuner .......................................................................................... 8
Tuner Basic Operation........................................................................................ 8
Tuner function settings ....................................................................................8
External Components......................................................... 9
Using external audio players......................................................................... 9
Rear view camera..................................................................................................9
Bluetooth smartphone.....................................................10
Register your smartphone to the unit ..................................................10
Receive a phone call.........................................................................................10
Make a phone call...............................................................................................11
Playing Bluetooth Audio Device...............................................................11
Function settings................................................................................................12
Setup........................................................................................ 12
Settings......................................................................................................................12
Sound settings......................................................................................................13
Remote control....................................................................14
Functions of the Remote control Buttons..........................................14
Installation.............................................................................15
Before Installation...............................................................................................15
Installing the unit................................................................................................16
About this Unit.....................................................................20
Maintenance ......................................................................................................... 20
More information............................................................................................... 20
Troubleshooting................................................................................................. 20
Copyrights ...............................................................................................................21
Specifications ....................................................................................................... 22
Precautions
#WARNING
Ñ To prevent injury or re, take the
following precautions:
• To prevent a short circuit, never put or leave any
metallic objects (such as coins or metal tools)
inside the unit.
• Do not watch or fix your eyes on the unit’s display
when you are driving for any extended period.
• If you experience problems during installation,
consult your JVC dealer.
Ñ Precautions on using this unit
• When you purchase optional accessories, check
with your JVC dealer to make sure that they work
with your model and in your area.
• The Radio Data System or Radio Broadcast Data
System feature won’t work where the service is
not supported by any broadcasting station.
Ñ Protecting the monitor
• To protect the monitor from damage, do not
operate the monitor using a ballpoint pen or
similar tool with the sharp tip.
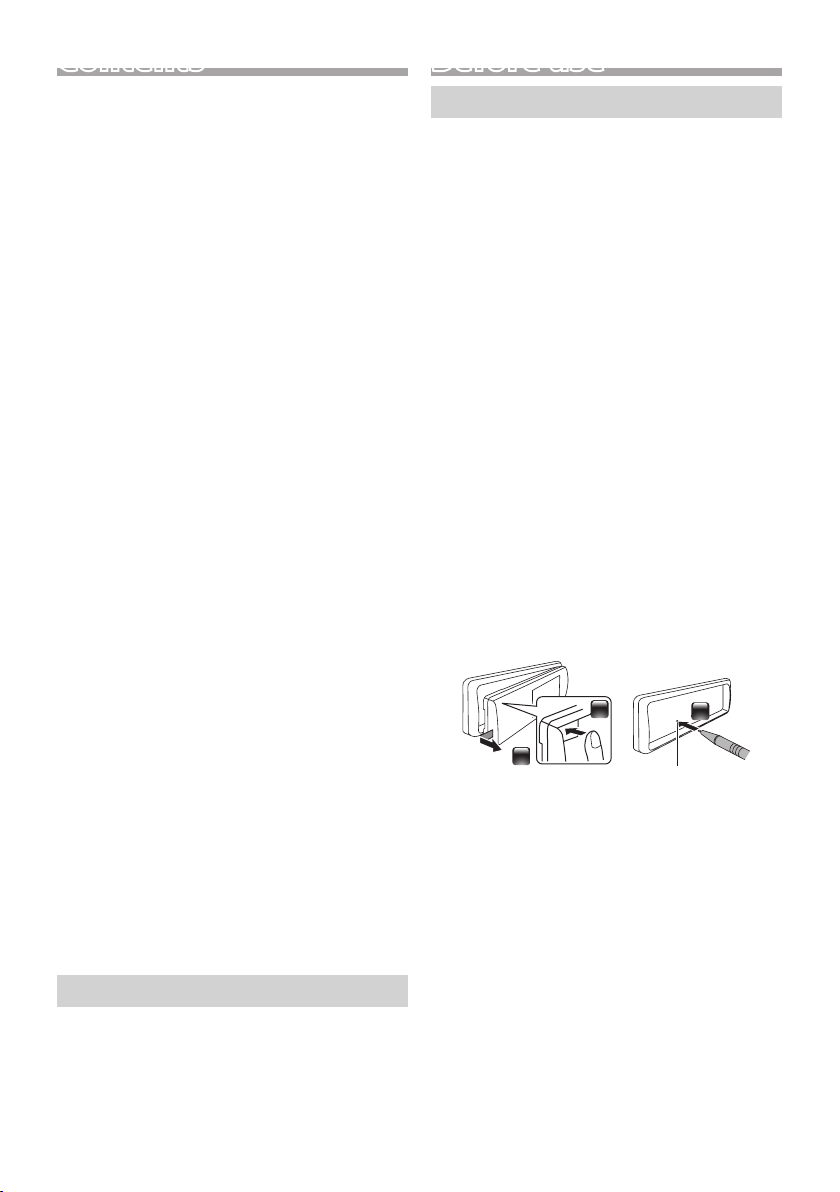
Ñ How to reset your unit
If the unit or the connected unit fails to operate
properly, reset the unit.
1
2
3
Reset button
Contents
How to read this manual
• The panels shown in this guide are examples used to
provide clear explanations of the operations. For this
reason, they may be different from the actual panels.
• In operation procedures, bracket shape indicates the
item you should control.
[ ]: indicates the selected items or menu.
< >: indicates the name of panel buttons.

3
English |
Getting Started
Initial Settings
1 Turn the ignition key of your car to ACC.
The unit is turned on.
2 Turn the volume knob to select the item to set
(see the table below), then press the knob to
make a selection.
Language
Select the language used for the control screen and
setting items. Default is “English”.
Tuner Area
N.AMERICA (Default): For North America, AM/FM
intervals: 10 kHz/200 kHz
S.AMERICA: For Central/South America, AM/FM
intervals: 10 kHz/200 kHz
EUROPE: For Europe, AM/FM intervals: 9 kHz/50 kHz.
Date/Clock
Adjust the date, then adjust the time.
Hour / Minute / Month / Day / Year
DEMO
Set the demonstration mode. Default is “ON”.
3 Press < > to exit.
Clock settings
1 Press an hold < > to display the general
setting.
2 Press <E>/<F> to select [ ].
3 Turn the volume knob to select [Time Format],
then press the knob to select the time format
([12h] or [24h]).
4 Turn the volume knob to select [Date/Clock],
then press the knob.
Clock screen appears.
5 Turn the volume knob to adjust the hour, then
press the knob.
6 Turn the volume knob to adjust the minute,
then press the knob.
7 Turn the volume knob to adjust the month,
then press the knob.
8 Turn the volume knob to adjust the day, then
press the knob.
9 Turn the volume knob to adjust the
year, then press the knob.
10
Press < >.

4
BasicsBasics
Common operations
Ñ Turning on the power
1 Press < >.
Ñ Turning o the power
1 Press and hold < >.
Ñ Adjusting the volume
1 Turn the volume knob.
Ñ Mutes the sound
1 Press and hold the volume knob.
appears when the mute function is active.
To restore the sound, press and hold again, or
adjust the volume.
Ñ Display the clock
1 Press and hold the <DIM> button.
Ñ Select dimmer mode
1 Press the <DIM> button.
Dim 1, Dim 2, Not dim
How to attach/detach the faceplate
1
2
1
2
AttachDetach
Select a source
1 Press < > to display the HOME screen.
HOME screen appears.
2 Turn the volume knob to select the source, then
press the knob.
2
5
3
6
4
1
1Clock display
2Switches to the FM tuner broadcast. (P.8)
3Switches to the AM tuner broadcast. (P.8)
4Plays a Bluetooth audio player. (P.11)
5[USB]
Plays files on a USB device. (P.5)
[iPod]
Plays an iPod/iPhone. (P.7)
• When iPod/iPhone is connected.
6Switches to an external component connected to
the AV-IN input terminal. (P.9)
✎NOTE
• If no operation is done for about 10 seconds, the
operation will be canceled.
Volume knob (turn/press)
MonitorDetach button
Remote sensor

5
English |
USBUSB
Preparation
Ñ Connecting a USB device
1 Open the front port cover.
2 Connect the USB device with the USB cable.
The unit reads the device and playback starts.
• USB maximum power supply current :
DC 5 V = 1 A
Ñ To disconnect the USB device:
1 Press < > to display the HOME screen.
2 Turn the volume knob to select other than
[USB], then press the knob.
3 Detach the USB device.
Ñ Usable USB device
This unit can play MPEG1/ MPEG2/ MPEG4/ MP3/
WMA/ AAC/ JPEG/ BMP les stored in a USB mass
storage class device. (P.20)
• File system: FAT16/ FAT32
• This unit can recognize a total of 9 999 files and
320 folders (a maximum of 9 999 files per folder).
• The maximum number of characters:
– Folder names : 24 characters
– File names : 24 characters
– Tag : 30 characters
✎NOTE
• When the USB device is connected to this unit, it can
be charged through the USB cable.
• Install the USB device in the place where it will not
affect safe driving.
• You cannot connect a USB device via a USB hub and
Multi Card Reader.
• Take backups of the audio files used with this unit.
The files may be erased depending on the operating
conditions of the USB device.
We shall have no compensation for any damage
arising from any erased data.
• No USB device comes with this unit. You need to
purchase a commercially available USB device.
• Cap the USB terminal whenever not using.
Playback operations
Audio les/Video les
To Do this
Play/pause Press the volume knob.
Select a le Press <E>/<F> repeatedly.
Fast-backward/
Fast-forward
Press and hold <E>/<F>.
• Video files: Each time you press
the button, the search speed
changes.
Picture les
To Do this
Rotates the
image
Turn the volume knob.
Zoom Press the volume knob.
x2, x3, x4, x1/2, x1/3, x1/4, x1
• Turn the volume knob to move the
position up and down.
• Press <E>/<F> to move the
position left and right.
Ñ Source screen (Audio les)
1
2
1Playback status/Playing time/Total playing time
Play time bar : For confirmation of current playing
position
: Repeat playback mode indicator
: Random playback mode indicator
2Displays the information of the current file.
Only a file name is displayed if there is no tag
information.

6
USB
Ñ Selecting a track in a list (Searches le)
1 Press < > to display the LIST screen.
2 Press <E>/<F> to select whether you
search by audio files [ ], video files [ ] or
picture files [ ].
3 Turn the volume knob to select the desired
folder, then press the knob.
• When you select a folder its contents are
displayed.
• To return to the previous layer, press < >.
4 Turn the volume knob to select the desired
item, then press the knob.
Playback starts.
Function settings
1 Press < > to display the function menu.
2 Turn the volume knob to select the item to set
(see the table below), then press the knob to
make a selection.
3 Press < > to exit.
✎NOTE
• If no operation is done for about 10 seconds, the
operation will be canceled.
Audio les (MP3/WMA/AAC)
Repeat All: Repeats all files.
(indicator lights up.)
One: Repeats current file.
(indicator lights up.)
Folder: Repeats all files in the current
folder. ( indicator lights up.)
Random OFF: Normal playback.
ON: Randomly plays all files.
(indicator lights up.)
Video les (MPEG1/ MPEG2/ MPEG4)
Screen
Ratio
Auto/Full/16:9/4:3 : Selects the aspect
ratio.
Repeat All: Repeats all files.
One: Repeats current file.
Video
Settings
Brightness/Contrast/Color/Tint (0 to
8 : Default 4) : You can adjust image
quality.
Reset: To clear the adjustment.
Picture les (JPEG/ BMP)
Sideshow Auto/Full/16:9/4:3 : Selects the aspect
ratio.
Video
Settings
Brightness/Contrast/Color/Tint (0 to
8 : Default 4) : You can adjust image
quality.
Reset: To clear the adjustment.
✎NOTE
• If no operation is done for about 10 seconds, the
operation will be canceled.

7
English |
iPod/iPhone
iPod/iPhone
Preparation
Ñ Connecting iPod/iPhone
1 Open the front port cover.
2 Connect the iPod/iPhone using the KS-U62
(optional accessory).
The unit reads the device and playback starts.
• USB maximum power supply current :
DC 5 V = 1 A
Ñ To disconnect the iPod/iPhone
1 Press < > to display the HOME screen.
2 Turn the volume knob to select other than
[iPod], then press the knob.
3 Detach the iPod/iPhone.
Ñ Connectable iPod/iPhone
The following models can be connected to this unit.
Made for
• iPhone X
• iPhone 8 Plus
• iPhone 8
• iPhone 7 Plus
•iPhone 7
•iPhone SE
• iPhone 6s Plus
• iPhone 6s
•
•iPhone 5s
•
•
•iPod touch (6th
generation)
✎NOTE
• If you start playback after connecting the iPod, the
music that has been played by the iPod is played
first.
•Cap the USB terminal whenever not using.
Playback operations
To Do this
Play/pause Press the volume knob.
Select a le Press <E>/<F> repeatedly.
Fast-backward/
Fast-forward
Press and hold <E>/<F>.
Ñ Source screen
1
2
1Playback status/Playing time/Total playing time
Play time bar : For confirmation of current playing
position
: Repeat playback mode indicator
: Random playback mode indicator
2Displays the information of the current file.
Ñ Selecting a content in a list
1 Press < > to display the LIST screen.
2 Turn the volume knob to select category, then
press the knob.
• To return to the previous layer, press < >.
3 Turn the volume knob to select the desired
item, then press the knob.
Function settings
1 Press < > to display the function menu.
2 Turn the volume knob to select the item to set
(see the table below), then press the knob to
make a selection.
3 Press < >.
✎NOTE
• If no operation is done for about 10 seconds, the
operation will be canceled.
Repeat All: Repeats all files.
(indicator lights up.)
One: Repeats current file.
(indicator lights up.)
Random OFF: Normal playback.
Songs: Functions the same as “Shuffle
Songs”. ( indicator lights up.)
Audiobook Normal/Slow/Fast: Selects the speed
of audiobooks.
•
•
•iPhone 6 Plus
• iPhone 6

8
Tuner
Tuner
Tuner Basic Operation
1 Press < > to display the HOME screen.
2 Turn the volume knob to select [FM] or [AM],
then press the knob.
3 Press <E>/<F> to search for a station
automatically.
“Auto Seek” appears.
(or)
Press and hold <E>/<F> repeatedly to
search for a station manually.
“Manual Seek” appears.
✎NOTE
• The ST indicator lights up when receiving an FM
stereo broadcast with sufficient signal strength.
• To store stations, perform [Manual Store] or [Auto
Store].
Ñ Source screen
1
3
2
1LOCAL indicator
2ST (Stereo) indicator
3Displays the information of the current station:
PS name, Frequency, PTY Genre, Indicator Items
Ñ Select a stored station
You can preset 15 stations for FM and 15 stations
for AM.
1 Press < > to display the LIST screen.
2 Turn the volume knob to select a preset
number, then press the knob.
✎NOTE
• If no operation is done for about 10 seconds, the
operation will be canceled.
• To exit, press < >.
Tuner function settings
1 Press < > to display the function menu.
2 Turn the volume knob to select the item to set
(see the table below), then press the knob to
make a selection.
3 Press < >.
✎NOTE
• If no operation is done for about 10 seconds, the
operation will be canceled.
Manual
Store
Stores a station manually.
While listening to a station you want to
store, turn the volume knob to select a
preset number, then press the knob.
• The preset number, band, and “Stored
OK!” appear.
Auto
Store
Automatically searches and stores the 6
stations with the strongest signals for the
selected band.
• “Auto Store” appears.
Local
Seek
Tunes in only to the stations with sufficient
signal strength. (LOCAL indicator lights
up.)
“ON”, “OFF” (Default)
Area N.AMERICA (Default): For North America,
AM/FM intervals: 10 kHz/200 kHz
S.AMERICA: For Central/South America,
AM/FM intervals: 10 kHz/200 kHz
EUROPE: For Europe, AM/FM intervals: 9
kHz/50 kHz.
Mono *1Determines whether to receive stereo
broadcasts in the stereo mode or
monaural mode (the MONO indicator
lights up).
“ON” (Default), “OFF”
*1 FM only

9
English |
External Components
Using external audio players
1
2
13.5 mm stereo mini plug (Sold separately)
Use a 3-core plug head stereo mini plug for
optimum audio output.
2Portable audio player (Sold separately)
Ñ Starting playback
1 Connect an external component to the AUX
input terminal.
2 Press < > to display the HOME screen.
3 Turn the volume knob to select [AUX], then
press the knob.
4 Turn on the connected component and start
playing the source.
Rear view camera
To use a rear view camera, the REVERSE lead
connection is required. For connecting a rear view
camera. (P.18)
Ñ Displaying the picture from the rear
view camera
The rear view screen is displayed when you shift the
gear to the reverse (R) position.
• To erase the caution message, touch the screen.
Ñ To display the picture from the rear view
camera manually
1 Press <CAMERA>.

10
Bluetooth smartphoneBluetooth smartphone
Ñ About the Bluetooth smartphone and
Bluetooth audio player
This unit conforms to the following Bluetooth
specications:
Version
Bluetooth Ver.4.2
Prole
Smartphone/ Cell-phone:
HFP (Hands Free Profile)
PBAP (Phonebook Access Profile)
Audio player:
A2DP (Advanced Audio Distribution Profile)
AVRCP (Audio/Video Remote Control Profile)
Sound codec
SBC
Ñ About mobile phones compatible with
Phone book Access Prole (PBAP)
If your mobile phone supports PBAP, you can
display the following items on the touch panel
screen when the mobile phone is connected.
• Phone book (up to 1000 entries)
• Dialed calls, received calls, and missed calls (up to 20
entries in total)
Register your smartphone to the
unit
You can use your Bluetooth smartphone when
paired to this unit.
• You can pair the device and the unit using SSP
(Secure Simple Pairing) which only requires
confirmation.
• One device can be connected at a time.
• When you register a new Bluetooth device,
disconnect the Bluetooth device currently
connected and then register the new device.
1 Turn on the Bluetooth function on your
smartphone/cell-phone.
2 Search the unit (“KD-X56*”) from your
smartphone/cell-phone.
If a PIN code is required, enter the PIN code
(“0000”).
Ñ Disconnecting the device
• Turn off the Bluetooth function from your
smartphone/cell-phone.
• Turn off the ignition switch.
Receive a phone call
To Do this
Answer a call Press < >.
Ñ Operations during a call
To Do this
End a call Press < >.
Adjust the phone
volume
Turn the volume knob.
Switching between
hands-free mode and
phone mode
Press < >.
Each time you press the
button, “Transfer!” appears
and talking method is
switched between hands-
free mode and phone mode.

11
English |
Bluetooth smartphone
Make a phone call
1 Press < > to enter Bluetooth mode.
2 Press <E>/<F> to select a method to make
a call ([ ]: from the calls history/[ ]: from
the phone book).
3 Turn the volume knob to select the target, then
press the knob to make a call.
✎NOTE
• Calls history icon: (Incoming Calls), (Outgoing
Calls), (Missed Calls).
Ñ Call by voice
1 Press and hold < > to display the voice
dialing screen.
You can also display the voice dialing screen by
selecting [ ] as the method to make a call on the
phone screen.
2 Press the volume knob to activate voice
recognition function.
“Please speak after the beep” appears and the
beep sounds.
3 Say the name of the person you want to call.
Playing Bluetooth Audio Device
1 Press < > to display the HOME screen.
2 Turn the volume knob to select [BT Audio], then
press the knob.
To Do this
Play/pause Press the volume knob.
Select a le Press <E>/<F> repeatedly.
Fast-backward/
Fast-forward
Press and hold <E>/<F>.
Ñ Source screen
1
2
1Playback status/Playing time/Total playing time
Play time bar : For confirmation of current playing
position
: Repeat playback mode indicator
: Random playback mode indicator
3Displays the information of the current file.
✎NOTE
• Operations and display indications may differ
according to their availability on the connected
device.
Ñ Selecting a content in a list
1 Press < > to display the LIST screen.
2 Turn the volume knob to select an item, then
press the knob.
• To return to the previous layer, press < >.

12
Setup
Function settings
1 Press < > to display the function menu.
2 Turn the volume knob to select the item to set
(see the table below), then press the knob to
make a selection.
3 Press < > to exit.
✎NOTE
• If no operation is done for about 10 seconds, the
operation will be canceled.
Repeat All: Repeats all files.
(indicator lights up.)
One: Repeats current file.
(indicator lights up.)
Random OFF: Normal playback.
ON: Randomly plays all files.
(indicator lights up.)
Setup
Settings
1 Press an hold < > to display the general
setting.
2 Press <E>/<F> to select the category.
3 Turn the volume knob to select an item (see the
following table), then press the knob.
4 Repeat step 3 until the desired item is selected/
activated or follow the instructions stated on
the selected item.
5 Press < >.
Audio Settings
Fader R12 — F12 (00): Adjusts the front and
rear speaker output balance.
Balance L12 — R12 (00): Adjusts the left and
right speaker output balance.
General Settings
Beep ON/OFF: Activates or deactivates the
keypress tone.
Date/Clock Adjusts the date and clock. (P.3)
Language Selects the text language used for on-
screen information.
Time
Format
12h/24h: Selects time format.
Wallpaper BLACK/BLUE: Selects the wallpaper
image.
Demo Set the demonstration mode. Default
is “ON”.
Initialize Select [Initialize] and then select [Yes] to
set all the settings to the initial default
settings.

13
English |
Setup
Bluetooth Settings
Sync
Phonebook
ON/OFF: Activates or deactivates the
synchronization of the phonebook
in the connected mobile phone with
the unit.
BT
Information
Displays the information about the
connected Bluetooth device (device
name, phone name, Bluetooth version,
and mac address).
Sound settings
1 Press < > to display the sound setting.
2 Turn the volume knob to select an item (see the
following table), then press the knob.
3 Repeat step 2 until the desired item is selected/
activated or follow the instructions stated on
the selected item.
4 Press < >.
Graphic
Equalizer
Selects a preset equalizer suitable to the
music genre.
CLASSIC / Flat / DRVN2 / HARD / hiphop
/ Jazz / pop/ R&B / User
Select [User] to use the settings made
1) Press the volume knob to select the
frequency.
2) Turn the volume knob to adjust the
level.
3) Press < >.
Loudness Sets the amounts of boost of low and
high tones.
“ON”, “OFF” (Default)
X’over 1) Press <E>/<F> to select the
speaker.
2) Press the volume knob to select the
item.
3) Turn the volume knob to adjust the
value.
4) Press < >.
Delay 1) Press <E>/<F> to select the
speaker.
2) Turn the volume knob to adjust the
value.
3) Press < >.

14
Remote control
This unit can be operated using the remote control.
The remote control RM-RK258 (optional accessory)
can be used.
! WARNING
• Do not ingest the battery, Chemical Burn Hazard
The remote control supplied with this product
contains a coin / button cell battery. If the coin/
button cell battery is swallowed, it can cause severe
internal burns in just 2 hours and can lead to death.
Keep new and used batteries away from children.
If the battery compartment does not close securely,
stop using the product and keep it away from
children.
If you think batteries might have been swallowed or
placed inside any part of the body, seek immediate
medical attention.
! CAUTION
• Put the remote control in a place where it will
not move during braking or other operations. A
dangerous situation could result, if the remote
control falls down and gets wedged under the
pedals while driving.
• Do not leave the battery near fire or under direct
sunlight. A fire, explosion or excessive heat
generation may result.
• Do not recharge, short, break up or heat the battery
or place it in an open fire. Such actions may cause
the battery to leak fluid. If spilled fluid comes in
contact with your eyes or on clothing, immediately
rinse with water and consult a physician.
Ñ Removing the battery sheet
Pull the battery sheet out from the remote
controller to activate the battery.
Ñ Changing the battery of the remote
controller
CR2025 (+side)
• Use a commercially available button battery
(CR2025).
• Insert the battery with the + and – poles aligned
properly.
–If the effectiveness of the remote controller
decreases, replace the battery.
Functions of the Remote control
Buttons
• Aim the remote control directly at the remote sensor
on the faceplate.
• DO NOT expose the remote sensor to bright light
(direct sunlight or artificial lighting).
SRC Switches to the source to be played.
VOL + – Adjusts the volume.
ATT Mutes/restores the sound
DISP Not used.
FM/R
AM/S
Selects the folder to be played.
During tuner source, select FM/ AM band
to be received.
E 2
F 3
Selects the track or file to be played.
During tuner source, switches to
broadcast stations received by the unit.
ANGLE Not used.
ÛWhen a call comes in, answers the call.
DIRECT Not used.
ASPECT Not used.
Numeric
Keypad
Not used.
CLR Not used.
ENT Not used.

15
English |
InstallationInstallation
Before Installation
Before installation of this unit, please note the
following precautions.
#WARNINGS
• If you connect the ignition wire (red) and the battery
wire (yellow) to the car chassis (ground), you may
cause a short circuit, that in turn may start a fire.
Always connect those wires to the power source
running through the fuse box.
• Do not cut out the fuse from the ignition wire (red)
and the battery wire (yellow). The power supply
must be connected to the wires via the fuse.
#CAUTION
• Install this unit in the console of your vehicle.
Do not touch the metal part of this unit during and
shortly after the use of the unit. Metal part such as
the heat sink and enclosure become hot.
✎NOTE
• Mounting and wiring this product requires skills and
experience. For best safety, leave the mounting and
wiring work to professionals.
• Make sure to ground the unit to a negative 12V DC
power supply.
• Do not install the unit in a spot exposed to direct
sunlight or excessive heat or humidity. Also avoid
places with too much dust or the possibility of water
splashing.
• Do not use your own screws. Use only the screws
provided. If you use the wrong screws, you could
damage the unit.
• If the power is not turned ON (“There is an error in
the speaker wiring. Please check the connections.”
is displayed), the speaker wire may have a short-
circuit or touched the chassis of the vehicle and
the protection function may have been activated.
Therefore, the speaker wire should be checked.
• If your car’s ignition does not have an ACC position,
connect the ignition wires to a power source that
can be turned on and off with the ignition key. If you
connect the ignition wire to a power source with a
constant voltage supply, such as with battery wires,
the battery may be drained.
• If the console has a lid, make sure to install the unit
so that the front panel will not hit the lid when
closing and opening.
• If the fuse blows, first make sure the wires aren’t
touching to cause a short circuit, then replace the
old fuse with one with the same rating.
• Insulate unconnected wires with vinyl tape or other
similar material. To prevent a short circuit, do not
remove the caps on the ends of the unconnected
wires or the terminals.
• Secure the wires with cable clamps and wrap vinyl
tape around the wires that comes into contact with
metal parts to protect the wires and to prevent short
circuit.
• Connect the speaker wires correctly to the terminals
to which they correspond. The unit may be
damaged or fail to work if you share the ¤wires or
ground them to any metal part in the car.
• When only two speakers are being connected to
the system, connect the connectors either to both
the front output terminals or to both the rear output
terminals (do not mix front and rear). For example,
if you connect the ¢connector of the left speaker
to a front output terminal, do not connect the ¤
connector to a rear output terminal.
• After the unit is installed, check whether the brake
lamps, blinkers, wipers, etc. on the car are working
properly.
• Mount the unit so that the mounting angle is 30°
or less.
• Do not press hard on the panel surface when installing
the unit to the vehicle. Otherwise scars, damage, or
failure may result.
• Reception may drop if there are metal objects near
the Bluetooth antenna.
Bluetooth antenna unit
Ñ Supplied accessories for installation
1
x1
2
x1
3
x2
4
x1
5(3 m)
x1
6
x1
7
x1
8
(M5 × 6 mm) x4
9
(M5 × 7 mm) x4

16
Installation
Ñ Installation procedure
1) To prevent a short circuit, remove the key from
the ignition and disconnect the ¤terminal of the
battery.
2) Make the proper input and output wire
connections for each unit.
3) Connect the wire on the wiring harness.
4) Take Connector B on the wiring harness and
connect it to the speaker connector in your vehicle.
5) Take Connector A on the wiring harness and
connect it to the external power connector on your
vehicle.
6) Connect the wiring harness connector to the unit.
7) Install the unit in your car.
8) Reconnect the ¤terminal of the battery.
9) Press the reset button.
Installing the unit
Ñ Non-Japanese cars
Bend the tabs of the
mounting sleeve with a
screwdriver or similar utensil
and attach it in place.
2
✎NOTE
• Make sure that the unit is installed securely in place.
If the unit is unstable, it may malfunction (eg, the
sound may skip).
Ñ Japanese cars (North America, South
America sales area only)
8or 9
Car Bracket
Pocket
Ñ Trim plate
1) Attach accessory 1to the unit.
1
Ñ Microphone unit
1) Check the installation position of the microphone
(accessory 5).
2) Clean the installation surface.
3) Remove the separator of the microphone
(accessory 5), and stick the microphone to the
place shown below.
4) Wire the microphone cable up to the unit with it
secured at several positions using tape or other
desired method.
5) Adjust the direction of the microphone (accessory
5) to the driver.
5
Fix a cable with a commercial item of tape.
✎NOTE
• Use the clips if necessary.

17
English |
Installation
Ñ Removing the trim plate
1) Use the extraction key (accessory 4) to lever out
the four tabs (two on the left part, two on the right
part).
4
2) Pull the trim plate forward.
Ñ Removing the unit
1) Remove the trim plate by referring to step 1 in
“Removing the trim plate”.
2) Insert the two extraction key (accessory 3) deeply
into the slots on each side, as shown.
3
3) Pull out the unit halfway.
✎NOTE
• Be careful to avoid injury from the catch pins on
the extraction key.
4) Pull the unit all the way out with your hands, being
careful not to drop it.

18
Installation
15A
PRK SW
REVERSE
GEAR
SIGNAL
STEERING
WHEEL
REMOTE
CONTROL
2 4 6 8
1 3 5 7
2 4 6 8
1 3 5 7
Connect to the
vehicle’s parking brake
detection switch
harness.
For best safety, be sure to connect the parking
sensor.
Light Green (Parking sensor wire)
Purple/White (Reverse sensor wire)
Accessory 5:
Bluetooth Microphone
To steering remote
To use the steering wheel remote control feature, you need an exclusive
remote adapter (not supplied) matched to your car.
Connect to vehicle’s reverse lamp harness when using the
optional rear view camera.
Light Blue/Yellow (Steering remote control wire)
Fuse (15A)
Ñ Connecting wires to terminals
FM/AM antenna input
FM/AM antenna
Connector A Connector B
ISO Connector
Rear Audio Preout
(Left; White, Right; Red)
Front Audio Preout
(Left; White, Right; Red)
Subwoofer Preout (Blue)
Rear view camera input (Yellow)

19
English |
Installation
15A
2 4 6 8
1 3 5 7
2 4 6 8
1 3 5 7
P.CONT
ANT.CONT
Accessory 7
Accessory 6
Blue/White
(Power control/ Antenna control wire)
Connect either to the power
control terminal when using
the optional power amplifier, or
to the power terminal for the booster
amplifier of the film-type or short pole
type antenna. (Max. 300mA, 12V)
*1 If no connections are made, do not
let the cable come out from the tab.
White/Black
Gray/Black
Green/Black
Purple/Black
Speaker impedance: 4-8 Ω
Purple
Green
Gray
White
To front left speaker
To front right speaker
To rear left speaker
To rear right speaker
*1
Red (Ignition wire)
Black (Ground wire) ¤
(To car chassis)
Yellow (Battery wire)
Ignition key switch
Car fuse box
ACC
B+
Battery

20
About this Unit
Maintenance
Ñ Cleaning the Unit
If the front panel of this unit is stained, wipe it with
a dry soft cloth such as a silicon cloth. If the front
panel is stained badly, wipe the stain off with a
cloth moistened with neutral cleaner, then wipe it
again with a clean soft dry cloth.
! CAUTION
• Applaying spray cleaner directly to the unit may
affect its mechanical parts. Wiping the front panel
with a hard cloth or using a volatile liquid such as
thinner or alcohol may scratch the surface or erase
screened print.
Ñ Cleaning the connector
Detach the faceplate and clean the connector
gently with a cotton swab. Be careful not to
damage the connector.
Connector (on the reverse side of the faceplate)
More information
Ñ Playable Audio les
Audio
format
Bit rate Sampling frequency
MP3 (.mp3) 16 – 320kbps,
VBR
16 – 48 kHz
WMA (.wma) 16 – 320kbps 16 – 48 kHz
AAC-LC (.m4a) 16 – 320kbps 16 – 48 kHz
• This unit can show ID3 Tag Version 1.0/1.1/2.2/2.3/2.4
(for MP3).
• The maximum number of characters:
–Tag : 30 characters
✎NOTE
• WMA and AAC of which is covered with DRM cannot
be played.
• Although the audio files are complied with the
standards listed above, the play may be impossible
depending on the types or conditions of media or
device.
Ñ Acceptable Video les
Video
format
Video codec Audio codec
MPEG-1
(.mpg, .mpeg)
MPEG-1 MPEG Audio Layer 2
MPEG-2
(.mpg, .mpeg)
MPEG-2 MPEG Audio Layer 2
MPEG-4
(.mp4, .avi)
MPEG-4 MP3, AAC-LC (2ch)
Ñ Acceptable Picture les
• JPEG (.jpg)
32 x 32 to 8,192 x 7,680 resolution
– It may take time to display the file.
– Progressive JPEG files or lossless JPEG files cannot
be played.
• BMP (.bmp)
32 x 32 to 8,192 x 7,680 resolution
– It may take time to display the file.
Troubleshooting
What appears to be trouble is not always serious.
Check the following points before calling a service
center.
• For operations with the external components, refer
also to the instructions supplied with the adapters
used for the connections (as well as the instructions
supplied with the external components).
Ñ General
No sound comes out of the speakers.
• Adjust the volume to the optimum level.
• Check the cords and connections.
The unit does not work at all.
• Reset the unit. (P.2)
The remote controller does not work.
• Replace the battery.
Ñ USB
While playing a track, sound is sometimes
interrupted.
• The tracks are not properly copied into the USB
device. Copy the tracks again, and try again.
About this Unit
Other manuals for KD-X560BT
2
Table of contents
Other JVC Car Receiver manuals

JVC
JVC EXAD KD-AVX44 Guide

JVC
JVC KD NX5000 - Navigation System With HDD User manual

JVC
JVC KD-AVX2 - DVD Player With LCD Monitor Guide

JVC
JVC KD-G240J Administrator Guide

JVC
JVC KS-FX490 - Radio / Cassette Player User manual

JVC
JVC KD-X161 User manual

JVC
JVC KD-DV7401E User manual

JVC
JVC KD-S70R User manual

JVC
JVC KD-S675 User manual

JVC
JVC KD-R960BTS User manual