manuals.online logo
Brands
  1. Home
  2. •
  3. Brands
  4. •
  5. JVC
  6. •
  7. HDTV
  8. •
  9. JVC LT-48K780 User manual

JVC LT-48K780 User manual

• Do not connect the TV to the mains supply until you have completed all the connections.
• Always disconnect the TV from the mains socket when not in use for a long period of time.
• The button on the remote control is only used for switching the TV into standby, it does not disconnect the TV from the mains power.
To completely disconnect the mains power, please remove the mains plug from the mains socket.
The LCD display is very fragile, and must be protected at all times when installing and removing the base stand. Be sure that no hard or sharp object,
or anything that could scratch or damage the LCD display, comes into contact with it. DO NOT exert pressure on the front of the TV at any time because
the screen could crack.
Please inspect your TV for damage after unpacking. If you do notice any damage please consult your dealer.
Remove all packaging from the unit. Retain the packaging. If you dispose of it please do so according to any local regulations.
TV
TV Feet (Left and Right)
Screws x 6
Remote Control/
AAA Batteries x2
FAV Cable
Instruction Manual
Quick Start Guide
Unpacking
1
1. Connect one end of the RF coaxial cable
to the aerial socket on the wall and the
other end of the cable to the ANT socket
on the back of your TV.
2. Plug the TV into a mains socket and
switch on at the mains.
3. In standby mode, press the button on
the remote control to turn the TV on. The
LED indicator will flash for a few seconds
then the TV will switch on.
Connecting the Aerial and Turning on the TV
4
Installing the Stand
3
1. Slide open the battery compartment on the back of the remote control.
Operating Your Remote Control
2
Thank you for purchasing your new JVC TV.
Your new TV incorporates the latest technology to enhance your viewing
experience. We would suggest that you allow about 20 mins for initial setup.
Please follow this guide for a successful rst time installation.
The latest eco-friendly power-saving technology will switch o the TV if
it is left on and idle for 4 hours. Please refer to “Auto Standby” under the
“Time Settings”section of the instruction manual for more detail.
Quick Start Guide
48" LED Smart HD TV
LT-48K780
2. Insert two AAA size batteries. Make sure to match the (+) and ( - )
ends of the batteries with the (+) and ( - ) ends indicated in the battery
compartment.
3. Slide the battery compartment cover back into place. Make sure it clicks
into place.
Optional
If you want to connect to the internet via a wired connection then
connect your ethernet cable to the LAN socket.
Fitting the Feet
1. Ensure the TV is switched off and not
connected to the mains power supply.
2. Lay the TV down on a flat surface ideally
on the edge of a table so the base of the
TV slightly overhangs the edge of the table,
with the back side facing up. Please make
sure a soft cushioned material (such as a dry
bath towel or thick piece of foam) is placed
beneath the screen.
3. Position the each foot onto the back of the
stand. They are marked Left and Right on the
back of each foot. Make sure you slide the lug
under the recess.
4. Using 3 of the supplied screws, to screw each
foot onto the TV.
Table
Cushioned
material
Right footLeft foot
RF coaxial cable
(not included)
SCART
SPDIF
Optic.OUT
VGA
ANT.
HDMI1(ARC)
HDMI2
HDMI3
LAN LNB
300mAMax.
13Vdc/18V dc
RF coaxial cable
with ‘F Type’ connector
(not included)
JVC 48' LED Smart HD TV LT-48K780 Quick Start.indd 1 08/02/2018 11:45
Well done, your new TV is now ready to use. You will nd that there are many exciting features available. To get to know all these features, please take
some time to read the instruction manual provided with your TV.
(QSG-LT-48K780-180208V1)
Need More Help!
If you need more help setting up your TV then please call:
210 289 9999
Lines are open Monday – Friday: 9:00-21:00 and Saturday: 9:00-20:00
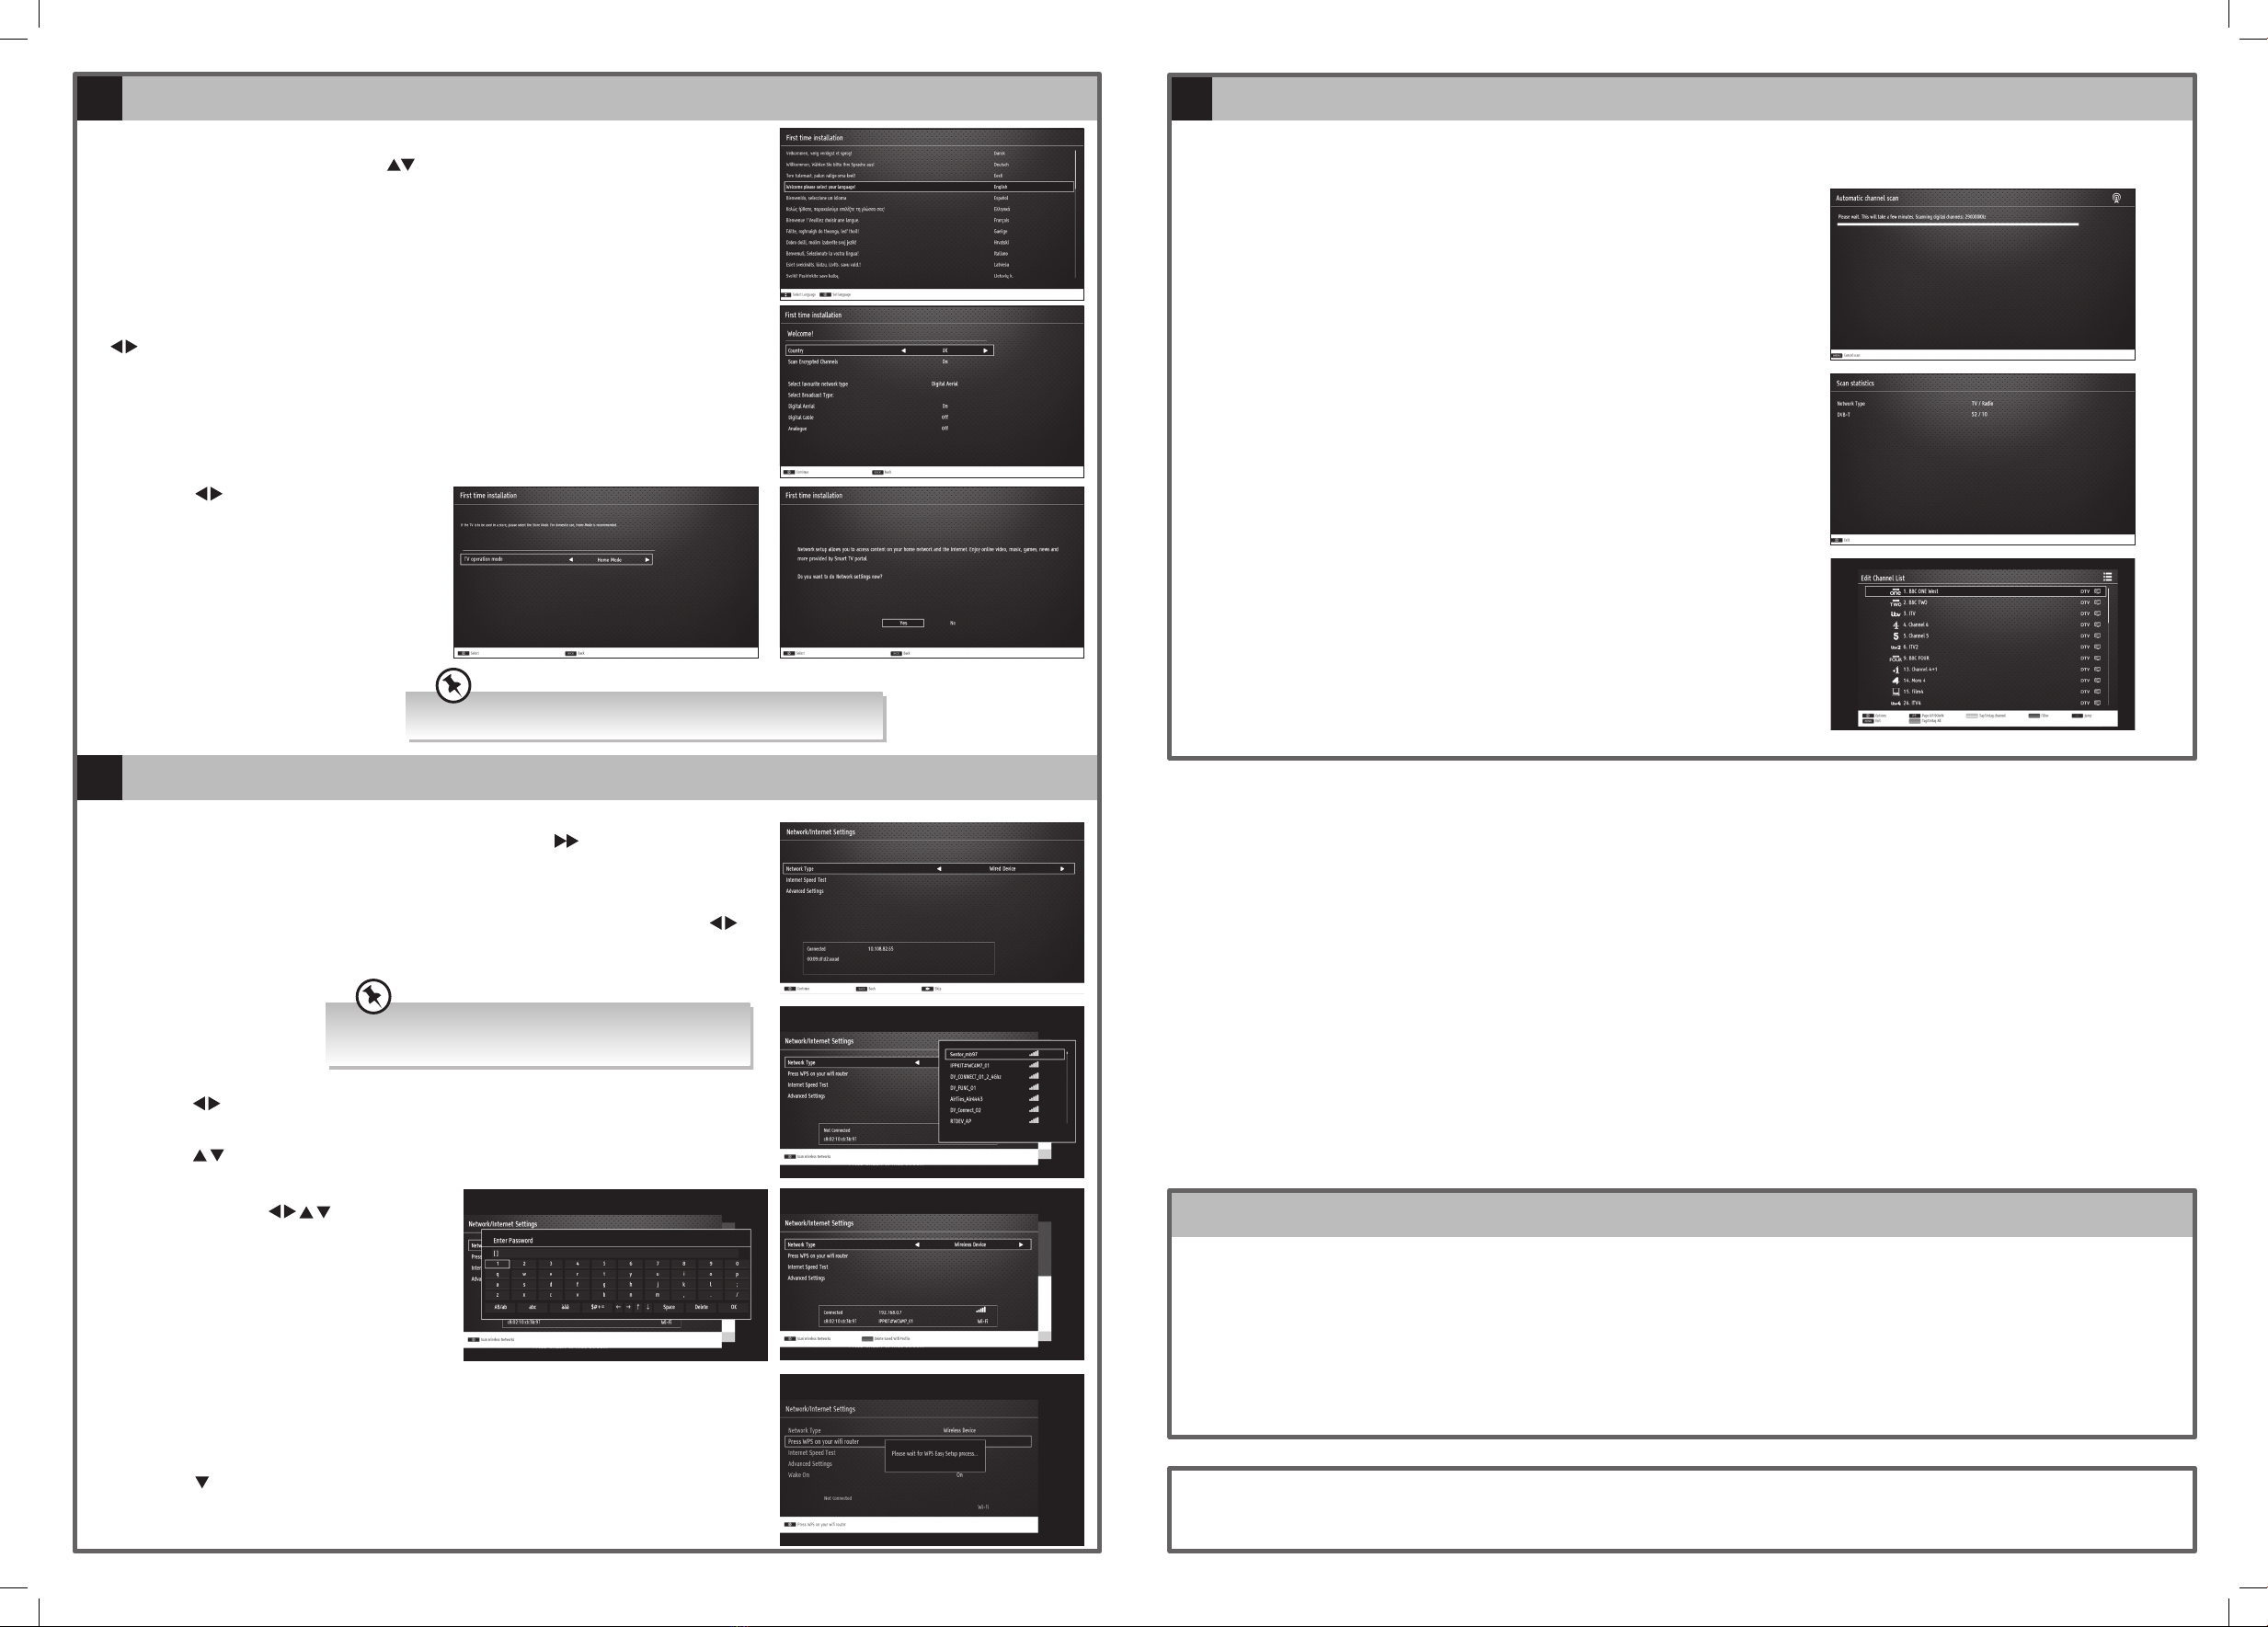
Tuning in Your TV
7
2. The Scan statistics screen will appear, showing you the amount of TV and radio
stations that have been tuned in. Press OK to exit this screen.
3. The Edit Channel list will appear, press the EXIT button to remove this. Your TV is
now fully tuned in and ready to use.
1. Your TV will now start automatic channel scan. It will tune in all available TV
channels.
1. The first time you turn the TV on, it will go straight into the First Time Installation menu. Please
ensure the aerial is plugged in. Press the buttons to highlight your language then press OK.
Getting Started
Connecting to the Internet - Wired, Wireless or using the WPS button
5
6
All of the setting on 'First time installations' menu are pre set for the majority of customers in the UK, if
you wish you can change the setting by selecting each setting and pressing the
buttons.
If you View TV Through a Set Top Box
If you have attached a Set top box such as Sky/Virgin or BT via a HDMI cable select Digital Aerial to NO.
This will mean your TV will not try to tune any channels in. To view your set top box press
the SOURCE button and select the HDMI socket you have attached your set top box to.
2. Confirm these settings by pressing OK.
3. Press the buttons to highlight
Home Mode then press OK.
4. To access all the features of your
Smart TV you must be connected to
the internet. If you do not wish to
set up your network connection you
can skip this section by selecting NO,
however we recommend you set up
your network connection now.
5. Select Yes and Press OK.
To access all the features of your Smart TV you must be connected to the internet. If you do not wish
to set up your network connection you can skip this section by pressing , however we recommend
you set up your network connection now.
WIRED Connection
•If you have connected your ethernet cable to the LAN socket on the back of your TV press the
buttons to select WIRED DEVICE. When Network says CONNECTED press OK.
WIRELESS Connection
You can connect using a wireless
connection via your router.
1. Press the buttons to select WIRELESS DEVICE. Wait a few seconds and a list of all wireless
networks will be displayed.
2. Press the buttons to select your wireless network then press OK.
3. You now need to enter your password, a keyboard
will appear. Press the buttons to select a
letter/number/symbol and press OK to enter each
one. Once you have typed your password highlight
OK and press OK. The network will now show
Connected.
4. Press the OK button to continue.
WPS Connection
Rather than having to enter your Wireless password, you can select the WPS option. This will allow you
to connect to your router without a password once the WPS button is pressed on your router.
1. Select WIRELESS DEVICE, when you see list of wireless networks press the BACK button.
2. Press the button to select 'Press WPS on your wifi router' then press OK. Now press the WPS
button on your router and your TV will connect to your router, without the use of a password.
To enjoy Freeview Play your TV must be connected to the internet.
Make sure your TV is as close to your router as possible, within
5m and its recommended its in the same room as the TV.
JVC 48' LED Smart HD TV LT-48K780 Quick Start.indd 2 08/02/2018 11:45

Other JVC HDTV manuals

JVC EM40NF5 User manual

JVC

JVC EM40NF5 User manual

JVC LT-32C790 User manual

JVC

JVC LT-32C790 User manual

JVC LT-40C750 User manual

JVC

JVC LT-40C750 User manual

JVC LT-32C670 User manual

JVC

JVC LT-32C670 User manual

JVC LT-32C660 User manual

JVC

JVC LT-32C660 User manual

JVC BlackSapphire SP55M-C Owner's manual

JVC

JVC BlackSapphire SP55M-C Owner's manual

JVC LT-24C655 User manual

JVC

JVC LT-24C655 User manual

JVC BlackCrystal JLE47BC3500 User manual

JVC

JVC BlackCrystal JLE47BC3500 User manual

JVC HDTV User manual

JVC

JVC HDTV User manual

JVC LT-32C790 User manual

JVC

JVC LT-32C790 User manual

JVC BlackCrystal BC50R User manual

JVC

JVC BlackCrystal BC50R User manual

JVC LT-40C880 User manual

JVC

JVC LT-40C880 User manual

JVC LT-49C770 User manual

JVC

JVC LT-49C770 User manual

JVC LT-39C770 User manual

JVC

JVC LT-39C770 User manual

JVC BlackSapphire SP50M-C User manual

JVC

JVC BlackSapphire SP50M-C User manual

JVC LT-24C655C User manual

JVC

JVC LT-24C655C User manual

JVC EM39T User manual

JVC

JVC EM39T User manual

JVC LT-43C860 User manual

JVC

JVC LT-43C860 User manual

JVC EM39T User manual

JVC

JVC EM39T User manual

JVC LT-55C860 User manual

JVC

JVC LT-55C860 User manual

JVC LT-32C655A User manual

JVC

JVC LT-32C655A User manual

JVC LT-49C760 User manual

JVC

JVC LT-49C760 User manual

JVC LT-48C570 User manual

JVC

JVC LT-48C570 User manual

JVC LT-55C860A User manual

JVC

JVC LT-55C860A User manual

Popular HDTV manuals by other brands

Vizio M320NV user manual

Vizio

Vizio M320NV user manual

Westinghouse SK-32H540S - 32" LCD TV user manual

Westinghouse

Westinghouse SK-32H540S - 32" LCD TV user manual

Vizio E401i-A2 quick start guide

Vizio

Vizio E401i-A2 quick start guide

Vizio VA320E - 32" 720p LCD HDTV user manual

Vizio

Vizio VA320E - 32" 720p LCD HDTV user manual

Vizio E320i-A0 user manual

Vizio

Vizio E320i-A0 user manual

Vizio M601d-A3 user manual

Vizio

Vizio M601d-A3 user manual

RCA HD52W66 Technical specifications

RCA

RCA HD52W66 Technical specifications

RCA Scenium user guide

RCA

RCA Scenium user guide

AOC LE32W034 datasheet

AOC

AOC LE32W034 datasheet

Vizio E500i-A1 quick start guide

Vizio

Vizio E500i-A1 quick start guide

oCOSMO CE4701 manual

oCOSMO

oCOSMO CE4701 manual

Vizio VF551XVT - 55" LCD TV quick start guide

Vizio

Vizio VF551XVT - 55" LCD TV quick start guide

Vizio VA22L quick start guide

Vizio

Vizio VA22L quick start guide

Vizio E601i-A3 user manual

Vizio

Vizio E601i-A3 user manual

RCA SCENIUM L37WD14 Specifications

RCA

RCA SCENIUM L37WD14 Specifications

Linsar LS58UHDGTV user manual

Linsar

Linsar LS58UHDGTV user manual

Toshiba 47L7200U Brochure & specs

Toshiba

Toshiba 47L7200U Brochure & specs

SBS TTCABLETELMHL user manual

SBS

SBS TTCABLETELMHL user manual

manuals.online logo
manuals.online logoBrands
  • About & Mission
  • Contact us
  • Privacy Policy
  • Terms and Conditions

Copyright 2025 Manuals.Online. All Rights Reserved.