JVC RD-HA3B User manual

CD PORTABLE SYSTEM
RD-HA3B/RD-HA3W
INSTRUCTIONS
LVT1684-006A
[A]
RD-HA3[A].book Page 1 Friday, June 1, 2007 5:37 PM

G-1
Warnings, Cautions and Others
CAUTION—(Standby/On) button!
Disconnect the mains plug to shut the power off completely
(all lamps and indications go off). When installing the
apparatus, ensure that the plug is easily accessible. The
(Standby/On) button in any position does not disconnect the
mains line.
• When the unit is on standby, the STANDBY lamp lights red.
• When the unit is turned on, the STANDBY lamp goes off.
The power can be remote controlled.
CAUTION
To reduce the risk of electrical shocks, fire, etc.:
1. Do not remove screws, covers or cabinet.
2. Do not expose this appliance to rain or moisture.
CAUTION:
The supplied AC adaptor is for use with JVC model
RD-HA3B/RD-HA3W.
To avoid risk of fire, and to prevent damage.
• Do not use AC adaptors except the supplied AC adaptor.
• Do not use the supplied AC adaptor for other equipment.
IMPORTANT FOR LASER PRODUCTS
1. CLASS 1 LASER PRODUCT
2. CAUTION: Do not open the top cover or cabinet. There
are no user serviceable parts inside the unit; leave all
servicing to qualified service personnel.
3. CAUTION: Visible and/or invisible class 1M laser radiation
when open. Do not view directly with optical instruments.
4. REPRODUCTION OF LABEL: CAUTION LABEL,
PLACED INSIDE THE UNIT.
CAUTION:
Excessive sound pressure from earphones or
headphones can cause hearing loss.
CAUTION
• Do not block the ventilation openings or holes.(If the
ventilation openings or holes are blocked by a
newspaper or cloth, etc., the heat may not be able to get
out.)
• Do not place any naked flame sources, such as lighted
candles, on the apparatus.
• When discarding batteries, environmental problems
must be considered and local rules or laws governing
the disposal of these batteries must be followed strictly.
• Do not expose this apparatus to rain, moisture, dripping
or splashing and that no objects filled with liquids, such
as vases, shall be placed on the apparatus.
RD-HA3[A].book Page 1 Friday, June 1, 2007 5:37 PM

G-2
Caution: Proper Ventilation
To avoid risk of electric shock and fire, and to prevent damage, locate the apparatus as follows:
1. Front: No obstructions and open spacing.
2. Sides/Top/ Back: No obstructions should be placed in the areas shown by the dimensions below.
3. Bottom: Place on the level surface. Maintain an adequate air path for ventilation by placing on a stand with a height of
10 cm or more.
Front view Side view
15 cm 15 cm
15 cm 15 cm
15 cm
10 cm
[European Union Only]
RD-HA3[A].book Page 2 Friday, June 1, 2007 5:37 PM

1
Introduction
Introduction
Thank you for purchasing a JVC product.
Please read all instructions carefully before operation, to ensure your complete understanding and to obtain the best possible
performance from the unit.
Contents
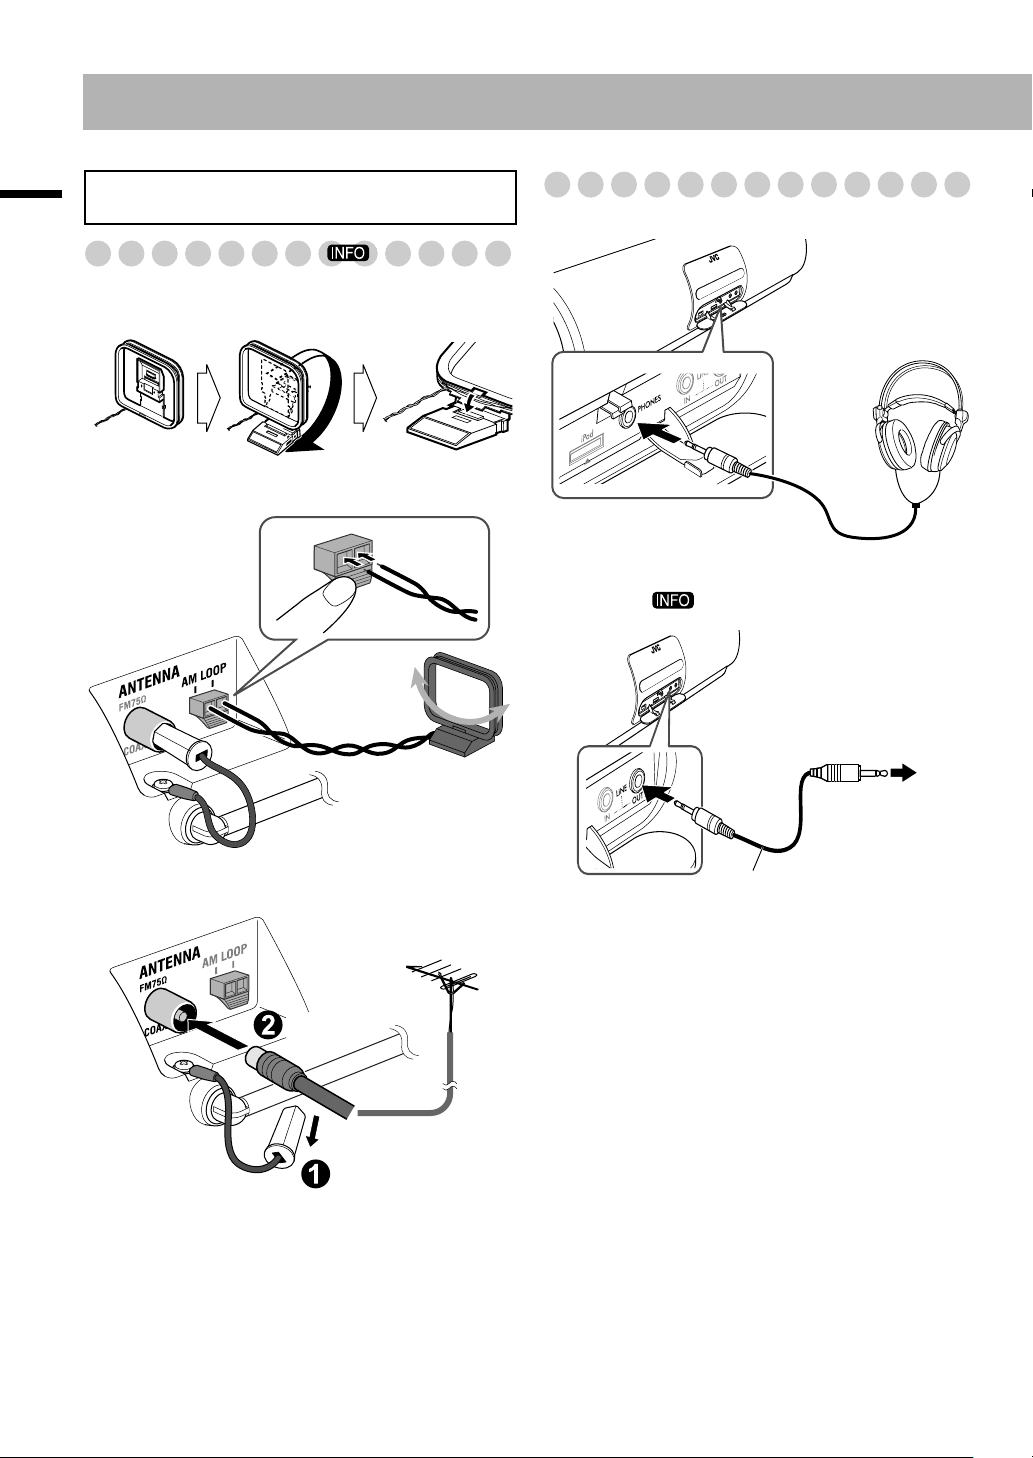
Connections................................................... 3
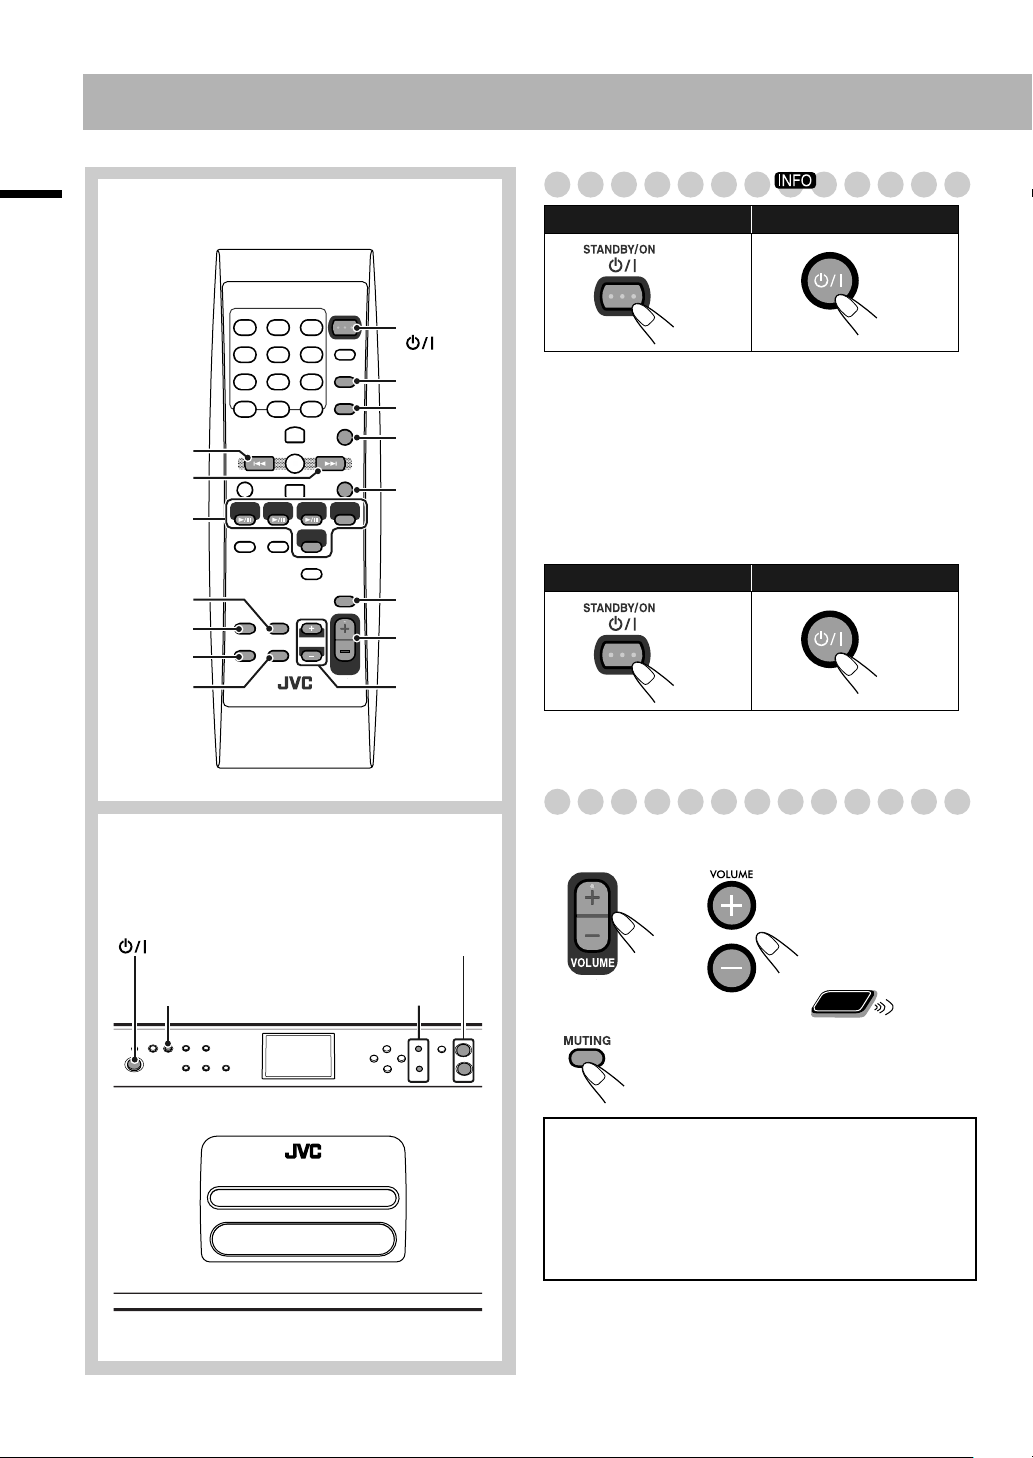
Basic Operations........................................... 5
Turning on the System .................................................5
Adjusting the Volume ..................................................5
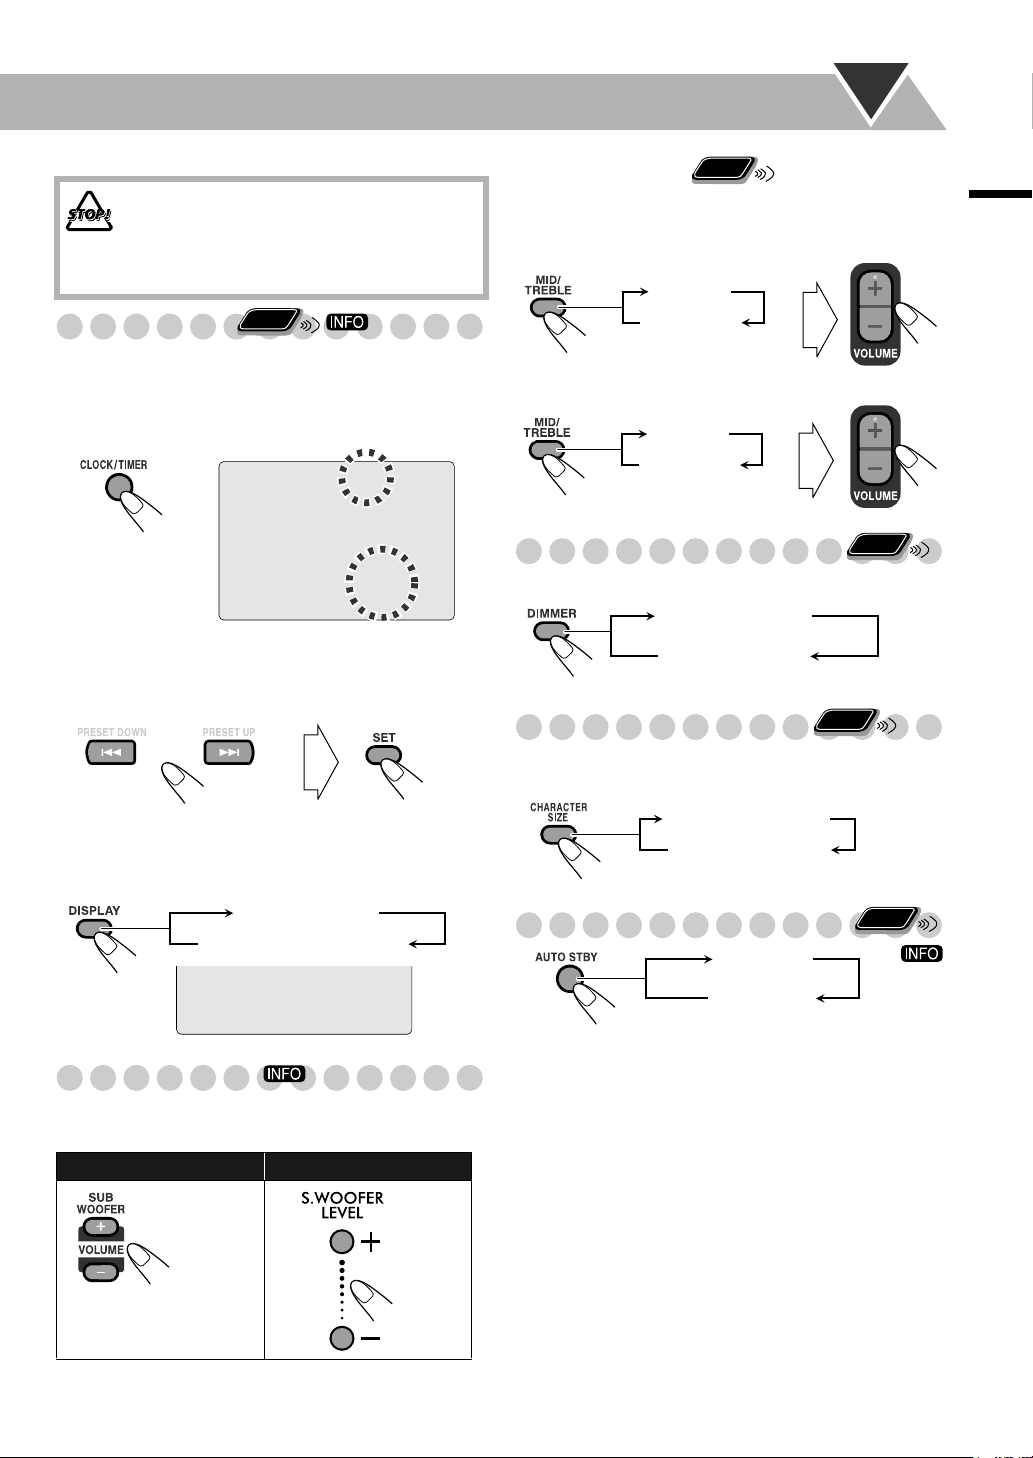
Setting the Clock ..........................................................6
Adjusting the Sound.....................................................6
Changing the Display Brightness.................................6
Changing the Character Size........................................6
Turning Off the Power Automatically .........................6
Listening to the Radio .................................. 7
Listening to the Radio ..................................................7
Using Preset Tuning.....................................................8
Playing Back Discs/USB Devices................. 9
Playing Back a Disc/a USB Device .............................9
Programming the Playing Order—Program Play ......11
Playing at Random—Random Play ...........................12
Playing Repeatedly.....................................................12
Prohibiting Disc Ejection ...........................................12
Listening to an iPod.................................... 13
Connecting the iPod ...................................................14
Playing the iPod .........................................................14
Listening to External Components ........... 15
Connecting a Portable Audio Device.........................15
Playing Back a Portable Audio Device......................15
Adjusting the Audio Input Level................................16
Switching to LINE Automatically—QP Link............16
Changing the QP Link Sensitivity..............................16
Timer Operations ....................................... 17
Using Sleep Timer......................................................17
Using Daily Timer......................................................17
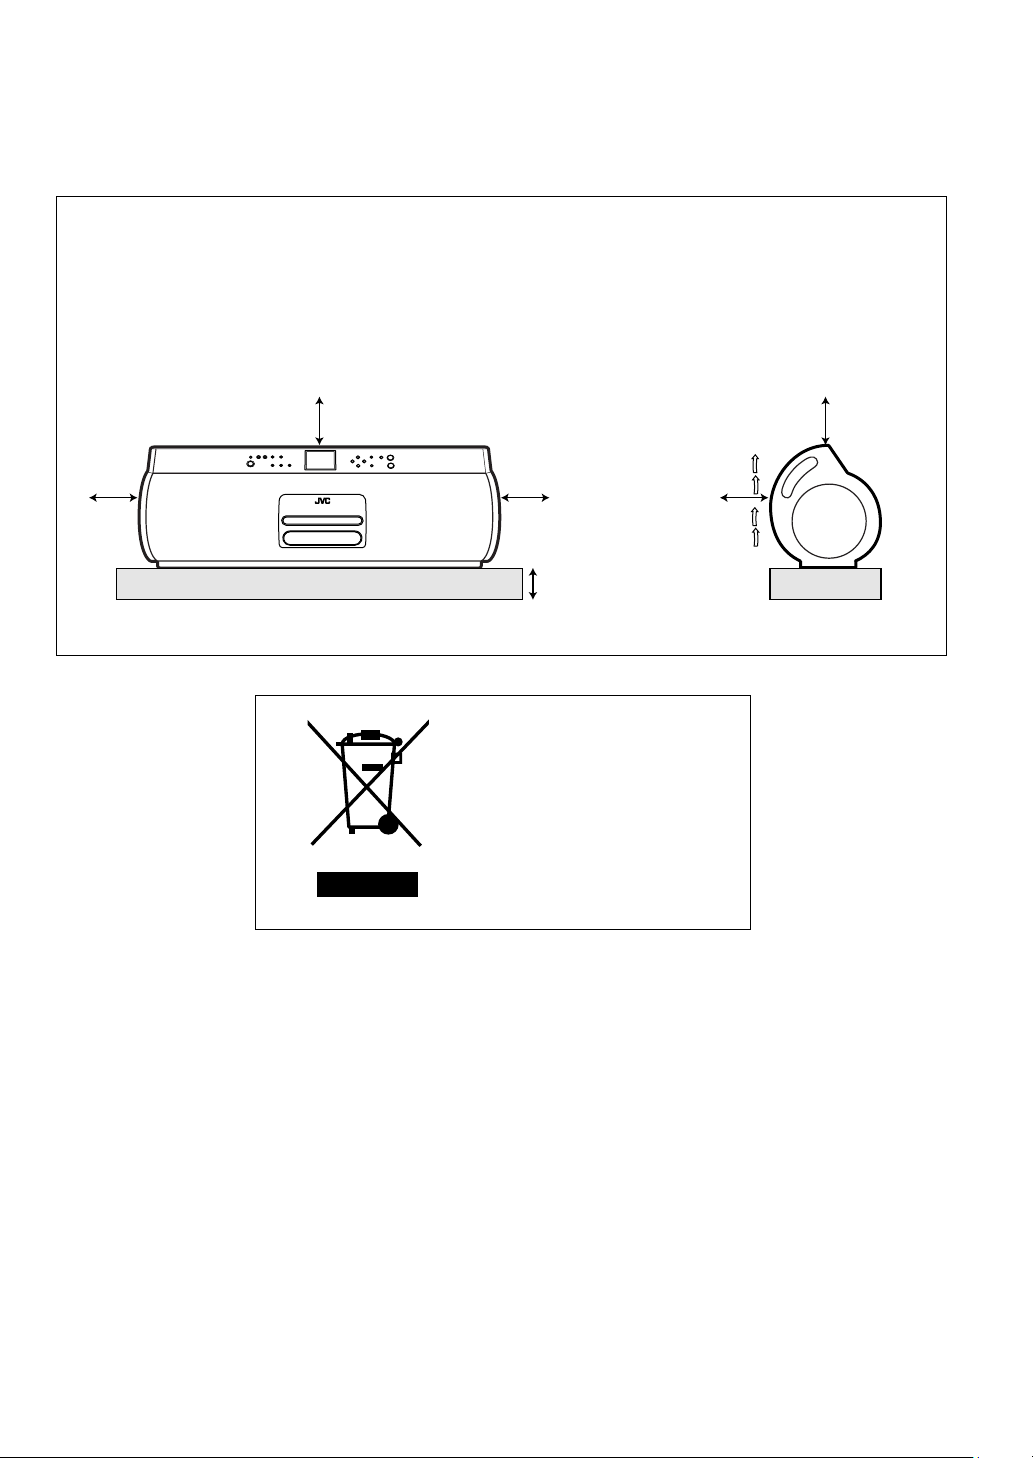
Notes on Handling ...................................... 18
Notes on Operation..................................... 19
Playable Disc/File Types............................................19
Learning More about This System.............................19
Troubleshooting .........................................................21
Specifications .............................................. 22
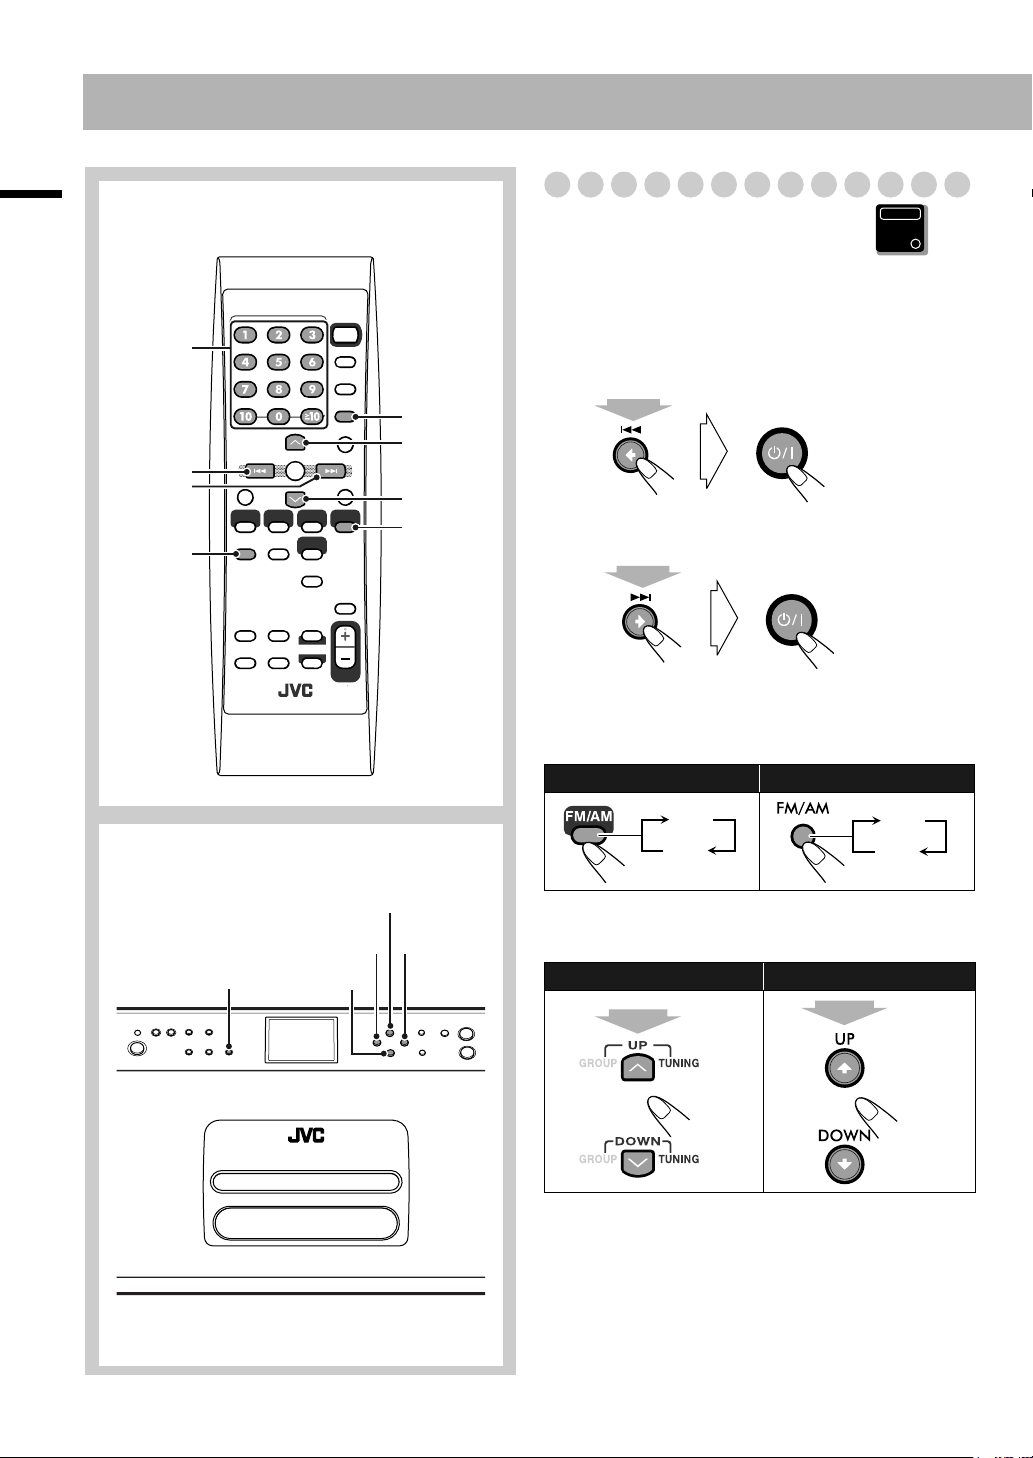
How to Read This Manual
• Button and control operations are explained in the table
below.
•
Some related tips and notes are explained later in the
sections “Notes on Handling” and “Notes on Operation,”
but not in the same section explaining the operations
( indicates that the content has some information).
• In this manual, “file” and “track” are interchangeably used
for MP3/WMA/WAV operations.
In this manual, operations using the remote control
are mainly explained; however, you can use the
buttons and controls on the main unit if they have the
same (or similar) name and marks.
Indicates that you press the button
briefly
.
Indicates that you press the button
briefly and repeatedly
until an option
you want is selected.
Indicates that you press one of the
buttons.
Indicates that you
press and hold
the
button for a specified period.
Indicates that this operation is only
possible using the remote control.
Indicates that this operation is only
possible using the main unit.
2 sec.
Remote
ONLY
Main Unit
ONLY
RD-HA3[A].book Page 1 Friday, June 1, 2007 5:37 PM

2
Introduction
Parts Description
The numbers refer to the pages in which the parts are explained.
Remote Control
To insert batteries into the remote control
• Insert the batteries from the – (minus) end to prevent short-
circuit.
• If the range or effectiveness of the remote control
decreases, replace both batteries.
When using the remote control
Point the top of the remote control toward the remote sensor
as directly as possible. If you operate it from a diagonal
position, the operating range (approx. 5 m) may be shorter.
GROUP PRGM RANDOM RESUME
ALL WAV WMA MP3 QP LINK
STEREO MONO
SLEEP
CLOCK
A.STANDBY
10, 12, 13 6
7, 8, 10, 11, 14
7, 10
5, 7, 17
10 14
10
10 14
9, 12
3
65, 14, 15
315
15 7, 8
686
12 11 1612 10
Remote sensor
17
10
17
STANDBY lamp
8, 10
6, 8, 10, 11,
14, 17
6
6
6, 17
5, 6,
14, 15
6
6
6
12
8, 11, 12
14
10
7, 10
5, 17
17
6, 11, 17
6, 8, 16, 17
6
10
15
16
5
7, 8
10, 12
10, 12
Do not expose batteries to heat or flame.
R6 (SUM-3)/AA (15F)
(supplied)
RD-HA3[A].book Page 2 Friday, June 1, 2007 5:37 PM

3
Connections
Connections
Connecting the antenna
AM/FM antenna
To assemble the AM loop antenna
To connect the AM antenna
For better FM reception
• Connect to an outdoor FM antenna using a 75 Ωwire with
coaxial type connector (IEC or DIN45325).
Connecting to the Front Panel Terminals
Headphones
To record the playback sound on an external
component
• You cannot record playback sound from the component
connected to the LINE IN jack.
Do not connect the AC power cord until all other
connections have been made.
AM loop antenna
(supplied)
FM outdoor antenna
(not supplied)
Disconnect
Connect
Headphones
(not supplied)
To the external
component
Audio cord with stereo mini plugs
(not supplied)
RD-HA3[A].book Page 3 Friday, June 1, 2007 5:37 PM

4
Connections
Connecting the Power Cable
AC adaptor
Plug in the System only after all connections are
complete.
• Only use the JVC power cord provided for this System to
avoid malfunction or damage to the System.
• Be sure to unplug the power cord from the outlet when
going out or when the System is not in use for an extended
period of time.
• To use the System on a car battery, use a DC/AC converter
(not supplied).
Carrying the System
• To prevent the System from rolling off, make sure to place
the bottom on the floor or the installation place when
putting the System down.
• Be sure to disconnect the AC adaptor and connection
cables to external components before carrying the System.
Inserting Batteries
Memory backup batteries
Install the memory backup batteries to avoid the preset
stations or clock setting being erased in case of a power
failure or unplugging of the power cord.
• Match the polarity (+ and –) on the batteries with the + and
– markings in the battery compartment.
To operate the System on batteries
• Match the polarity (+ and –) on the batteries with the + and
– markings in the battery compartment.
Do not carry the System with one hand;
otherwise, you may drop it.
To a wall outlet
Power cord (supplied)
AC adaptor
(supplied)
R6 (SUM-3)/AA (15F)
(not supplied)
R20/D (13F)
(not supplied)
RD-HA3[A].book Page 4 Friday, June 1, 2007 5:37 PM

5
Basic Operations
Basic Operations
Turning on the System
The STANDBY lamp on the main unit turns off.
• When the power is supplied from an AC outlet...
– The System also turns on by pressing one of the source
buttons.
– While QP Link is activated, the System turns on and sets
the source to LINE by starting playback on the external
device connected to the LINE IN terminal. (See page 16
for details.)
To turn off (on standby) the System
The STANDBY lamp on the main unit lights in red.
• A small amount of power is always consumed even while
on standby.
Adjusting the Volume
You can adjust the volume level from level 0 (VOLUME 0)
to level 35 (VOLUME 35).
To drop the volume in a moment
Remote control
Main unit
SET
AUTO
STBY
MUTING
SUBWOOFER
VOLUME
+, –
CHARACTER
SIZE
DISPLAY
DIMMER
MID/
TREBLE
VOLUME
+, –
CLOCK/
TIMER
x
4
CANCEL
STANDBY/ON
SUBWOOFER
LEVEL +, –
VOLUME +, –
DISPLAY
Source
buttons
Remote control: Main unit:
To restore the volume,
press again, or
adjust the volume level.
For private listening
Connect a pair of headphones to the PHONES jack on the
main unit. The sound will no longer come out of the
speakers. Be sure to turn down the volume before
connecting or putting on the headphones.
• Disconnecting the headphones will activate the
speakers again.
Remote
ONLY
RD-HA3[A].book Page 5 Friday, June 1, 2007 5:37 PM

6
Basic Operations
Setting the Clock
• To return to the previous step, press [CANCEL].
• To cancel the setting during the process, press [CLOCK/
TIMER].
1Activate the clock setting mode.
• If you have already adjusted the clock before, press the
button repeatedly until the clock setting mode is selected.
2Set the time.
• Adjust the hour, then the minute.
• You can also use the number buttons to adjust the hour
and minute.
Now the built-in clock starts working.
To check the current clock time during play
Adjusting the Sound
To adjust the subwoofer volume
You can adjust the subwoofer volume from 1 to 6.
To adjust the tone
You can adjust the middle range and treble level from –5 to
+5.
To adjust the middle range
To adjust the treble
Changing the Display Brightness
You can dim the display window.
Changing the Character Size
For some indications, you can change the character size on
the display.
Turning Off the Power Automatically
When Auto Standby is in use, the A.STANDBY indicator
lights up on the display.
Auto Standby starts working (the A.STANDBY indicator
starts flashing) in the following cases:
• CD: Playback stops or no disc is inserted.
• USB MEMORY: Playback stops or USB mass storage
class device is disconnected.
• iPod: The iPod is disconnected.
• LINE: Playback stops or no component is connected.
If no operation is done or no signal comes in for about 3
minutes after the indicator starts flashing, the System turns
off (on standby) automatically.
DO NOT turn off (on standby) the System with
the volume set to an extremely high level;
otherwise, the sudden blast of sound may damage
your hearing, speakers and/or headphones when
you turn on the System or start playback.
Remote control: Main unit:
Remote
ONLY
CLOCK
0:00
10:46
Source information
Clock
Remote
ONLY
MIDDLE
TREBLE
MIDDLE
TREBLE
Remote
ONLY
DIMMER OFF
DIMMER ON
Normal
Dimmed
Remote
ONLY
Large character
Normal character
Remote
ONLY
SET
CANCEL
Canceled
On
RD-HA3[A].book Page 6 Friday, June 1, 2007 5:37 PM

7
Listening to the Radio
To set the AM tuner interval spacing
Before operating the tuner, it is required to select the
appropriate AM space interval used for your area.
• Change the source to AM before the operation.
• AC power supply is required to do the operation while the
System is turned off.
To select 9 kHz interval
To select 10 kHz interval
To select the band (FM or AM)
To tune in to a station
While FM or AM is selected...
The frequency starts changing on the display.
When a station (frequency) with sufficient signal strength is
tuned in, the frequency stops changing.
• When you repeatedly press the button, the frequency
changes step by step.
To stop searching manually,
press either button.
Remote control
SET
Number
buttons
PRESET
UP
PRESET
DOWN
TUNING
DOWN
TUNING
UP
FM/AM
FM MODE
FM/AM DOWN
UP
x4
Main unit
Remote control: Main unit:
Main Unit
ONLY
(while holding...)
(while holding...)
FM
AM
FM
AM
RD-HA3[A].book Page 7 Friday, June 1, 2007 5:37 PM

8
Listening to the Radio
If the FM station has poor reception
The MONO indicator lights up on the display. Reception
will improve though the stereo effect is lost—Monaural
reception.
To restore the stereo effect,
press the button again (the
MONO indicator disappears).
Using Preset Tuning
To preset the stations
You can preset 30 FM and 15 AM stations.
1Tune in to the station you want to preset.
• You can also store the monaural reception mode for FM
preset stations if selected.
2Activate the preset number entry mode.
• Finish the following process while the indication on the
display is flashing.
3Select a preset number for the station you store.
• You can also use [PRESET UP] and [PRESET
DOWN].
4Store the station.
To tune in to a preset station
7Using the number buttons
1Select the band (FM or AM).
2Select the preset number for the station you stored.
7Using [PRESET UP] [PRESET DOWN] buttons
1Select the band (FM or AM).
2Select a preset station.
Examples:
To select preset number 5, press
[5].
To select preset number 10, press
[10].
To select preset number 25, press
[ 10], [2], then [5].
Remote
ONLY
MONO
Remote
ONLY
FM 1 97.00
STORED
Examples:
To select preset number 5, press
[5].
To select preset number 10, press
[10].
To select preset number 25, press
[ 10], [2], then [5].
Remote
ONLY
FM
AM
FM
AM
RD-HA3[A].book Page 8 Friday, June 1, 2007 5:37 PM

9
Playing Back Discs/USB Devices
Playing Back a Disc/a USB Device
To insert a disc
• When using an 8 cm disc, place it on the inner circle of the
disc tray.
To close the disc tray,
press [EJECT0] again.
• If you press [CD 6], the disc tray closes automatically
and playback starts.
To connect a USB mass storage class device
You can connect a USB mass storage class device such as a
USB flash memory device, hard disk drive, multimedia card
reader etc. to this System.
• Do not connect an iPod to the USB MEMORY terminal
of the System.
• To disconnect the USB mass storage class device safely,
disconnect it after turning the System off.
• You cannot connect a computer to the USB MEMORY
terminal of the System.
Remote control
Main unit
Number
buttons
x
4
CD6
USB MEMORY
6
7
GROUP
DOWN
GROUP UP
PLAY MODE
REPEAT
CANCEL
GROUP
x
4
CD6
USB MEMORY
6DOWN
UP EJECT 0
STOP 7
Main Unit
ONLY
Flash memory
device, portable
audio player or other
USB mass storage
class device (not
supplied)
RD-HA3[A].book Page 9 Friday, June 1, 2007 5:37 PM

10
Playing Back Discs/USB Devices
To play back a disc/a USB device
•
While playing a disc/file:
This System can store the stop
point, and when you start playback again by pressing [CD
6] or [USB MEMORY 6] (even while on standby),
it starts from the position where you have stopped—
Resume Play. (The RESUME indicator lights up on the
display while playback is stopped.)
To stop completely while Resume is activated,
press 7
twice. (Resume Play does not work for Audio CDs.)
Audio CD
Music files
To select a track
To locate a particular portion—Search Play
While playing...
To return to the normal playback, release the button.
To select a track directly
You can select a track directly and start playback.
To select a group
To select a group directly
You can select a group directly and start playback.
To start/pause: To stop:
• While playing, press
4twice quickly to
skip to the beginning
of the previous track.
• You can scan tracks
in fast-forward/fast-
reverse while holding
the button.
CD USB
CD 18
50:46
Total track number
Total playback time
MP3
USB G 1 1
Current group number
File type indicator
Current track number
Examples:
To select number 5, press [5].
To select number 10, press [10].
To select number 25, press
[ 10], [2], then [5].
To select number 136, press
[ 10], [ 10], [1], [3], then [6].
• Group name appears for MP3/
WMA/WAV playback.
• For the numbering system of
groups and files, see “Data
Hierarchy” on page 19.
Remote
ONLY
Remote
ONLY
RD-HA3[A].book Page 10 Friday, June 1, 2007 5:37 PM

11
Playing Back Discs/USB Devices
Programming the Playing Order
—Program Play
You can arrange the playing order of tracks (up to 99) before
you start playback.
• Program Play cannot be used for files on a USB mass
storage class device.
• Resume does not work for Program Play.
1While playback is stopped, activate Program Play.
2Select the tracks you want for Program Play.
• For music files:
1Select a group number.
2Select a track number.
3Repeat steps 1and 2.
• For Audio CD:
1Select track numbers.
3Start playback.
To check the programmed contents
While playback is stopped...
To modify the program
While playback is stopped...
To exit from Program Play
While playback is stopped...
• The program contents will remain.
To enter numbers:
Examples:
To enter number 5, press [5].
To enter number 10, press
[10].
To enter number 25, press
[ 10], [2], then [5].
To enter number 136, press
[ 10], [ 10], [1], [3], then
[6].
Playback starts in the order you have
programmed.
To skip:
To pause/restart: To stop:
Remote
ONLY
PRGM
CD PROGRAM
To erase the last track:
To erase the entire
program:
To add another track to
the program:
• Opening the disc tray will
also erase the program.
Repeat step 2on page 11.
In the programmed order.
In the reverse order.
2 sec
PRGM RANDOM
Canceled
RD-HA3[A].book Page 11 Friday, June 1, 2007 5:37 PM

12
Playing Back Discs/USB Devices
Playing at Random
—Random Play
You can play all the tracks at random.
• Random Play cannot be used for files on a USB mass
storage class device.
1While playback is stopped, activate Random Play.
2Start playback.
To exit from Random Play
While playback is stopped...
Playing Repeatedly
You can repeat playback.
While playing or before playback...
Prohibiting Disc Ejection
You can lock the disc tray so that no one can eject the loaded
disc.
• Change the source to CD before the operation.
• AC power supply is required to do the operation while the
System is turned off.
To cancel the prohibition,
repeat the same procedure.
“UNLOCKED” appears on the display.
Playback starts in random order. Random
Play ends when the entire disc has been
played.
To skip to
another track:
To pause/restart: To stop:
Remote
ONLY
RANDOM
CD RANDOM
PRGM RANDOM
Canceled
Repeats the current track.
GROUP Repeats the current group (only for music
files).
ALL Repeats all the tracks on the disc/USB
mass storage class device.
Remote
ONLY
Canceled ALL
GROUP
Main Unit
ONLY
LOCKED
(at the same time)
RD-HA3[A].book Page 12 Friday, June 1, 2007 5:37 PM

13
Listening to an iPod
You can operate an iPod through the System.
• You can also operate the iPod directly even while it is
connected to the System. For details on the operations,
refer to the instructions of your iPod.
• Before connecting your iPod to the System, check its type
and software version.
Compatible iPod types:
• iPod is a trademark of Apple Inc., registered in the U.S. and
other countries.
• If the iPod does not play correctly, update your iPod
software to the latest version.
– For details about updating your iPod, check on the Apple
web site <http://www.apple.com>.
• The battery in the iPod is charged while the System is on
standby or while iPod is selected as the source. (When
operating the System on batteries, the battery in the iPod is
charged only while the System is turned on and iPod is
selected as the source.)
– Refer to the instructions supplied with your iPod for the
recharge time.
NOTE
If an iPod which is not on the compatible iPod types list
above is connected, the iPod may not be operated from the
System. In this case, deactivate the iPod battery charge
function so that the iPod may be operated, but the iPod
cannot be charged through the System.
To activate/deactivate the battery charge function
While “iPod” is selected as the source...
Remote control
Main unit
iPod 6
VOLUME
+, –
x
4
iPod 6
VOLUME +, –
x4
STOP 7
iPod nano 1G/2G/4G
iPod nano (2nd Generation) 2G/4G/8G
iPod mini 4G/6G
iPod (4th Generation) 20G/40G
iPod photo (4th Generation) 20G/30G/40G/60G
iPod video (5th Generation) 30G/60G/80G
Main Unit
ONLY
iPod CHARGE
ON
ON
OFF
2 sec
RD-HA3[A].book Page 13 Friday, June 1, 2007 5:37 PM

14
Listening to an iPod
Connecting the iPod
Playing the iPod
1Set the volume level to the minimum.
2Start playing the iPod.
The iPod is turned on and starts playing.
3Adjust the volume to the desired listening level.
To pause/restart
To select a track
To locate a particular portion—Search Play
While playing...
To return to the normal playback, release the button.
To turn off the iPod (sleep mode)
• Turning off the System* or changing “iPod” to another
source also turns off the iPod.
* Turning off the System may not turn off the iPod
depending on the current source.
Insert the plug into the iPod terminal on the System
with
the arrow mark side down
and align the arrow mark with
5mark on the front panel.
• Do not insert the plug forcibly into the iPod terminal
with the arrow mark side up; otherwise, the plug and/or
the terminal may be damaged or broken.
iPod
(not supplied)
Connecting cable
for iPod (supplied)
Stand for iPod
(supplied)
5mark arrow mark
•Press4twice
quickly to skip to the
beginning of the
previous track.
• You can scan tracks
in fast-forward/fast-
reverse while holding
the button.
2 sec.
RD-HA3[A].book Page 14 Friday, June 1, 2007 5:37 PM

15
Listening to External Components
Connecting a Portable Audio Device
Playing Back a Portable Audio Device
1Set the volume level to the minimum.
2Select LINE as the source.
3Start playing the auxiliary equipment.
• Refer also to the instructions of the connected device.
4Adjust the volume to the desired listening level.
Remote control
Main unit
VOLUME +, –
LINE VOLUME +, –
QP LINK
LINE
SET
You cannot record playback sound from the component
connected to the LINE IN jack. (No audio signals are
emitted from the LINE OUT jack while “LINE” is
selected as the source.)
Audio cord with stereo
mini plugs (not supplied)
To the headphone
jack
RD-HA3[A].book Page 15 Friday, June 1, 2007 5:37 PM

16
Listening to External Components
Adjusting the Audio Input Level
If the sound from the component connected to the LINE IN
jack is too loud or is too quiet when changing from another
source to “LINE,” you can change the audio input level
through the LINE IN jack (without changing the volume
level).
While LINE is selected as the source...
Switching to LINE Automatically
—QP Link
Quick Portable Link (QP Link) automatically switches the
source to LINE as the auxiliary equipment connected to the
LINE IN jack starts playback.
• Make sure to set the volume of your portable audio device
loud enough so that the System can detect the sound signal.
• QP Link does not work when the System is operating on
batteries.
To activate QP Link
When QP Link is activated, connecting a portable device to
the LINE IN jack and starting playback performs the
following:
• While listening to another source...
Changes the source to LINE automatically. (If you change
from LINE to another source, QP Link will be canceled.)
• While the System is on standby...
Turns on the System and changes the source to LINE
automatically (not applicable when the display is turned
off).
To deactivate QP Link
Changing the QP Link Sensitivity
You can change the LINE IN jack sensitivity if QP Link
malfunctions by detecting non-playback signals such as
switching noises from the auxiliary equipment.
While LINE is selected as the source...
LEVEL 1 Select this when the sound is too loud with
“LEVEL 2” selected. This setting is
recommended when connecting an audio
device other than a portable audio device
to the LINE IN jack.
LEVEL 2 Select this when the sound is too loud with
“LEVEL 3” selected.
LEVEL 3 Select this when listening to a portable
audio device (initial setting).
Remote
ONLY
LEVEL 1
LEVEL 3 LEVEL 2
2 sec
Remote
ONLY
QP LINK
QP LINK ON
“QP LINK OFF” appears on the
display and the QP LINK indicator
disappears.
QP: LEVEL1 Normally select this. (Initial setting)
QP: LEVEL2 Select this when QP Link works
mistakenly.
Remote
ONLY
QP: LEVEL1
QP: LEVEL2
2 sec
RD-HA3[A].book Page 16 Friday, June 1, 2007 5:37 PM

17
Timer Operations
Timer Operations
Using Sleep Timer
You can set the shut-off time so that you can go to bed
without turning off the System yourself.
1Specify the time (in minutes).
2Wait until the set time disappears.
The SLEEP indicator lights up on the display and the
display dims.
To check the time remaining until the shut-off time, press
[SLEEP].
• If you press the button repeatedly, you can change the shut-
off time.
Using Daily Timer
Using Daily Timer, you can wake up with your favorite
music.
• You need to set the built-in clock before using the Daily
Timer (see page 6).
• To exit from the timer settings, press [CLOCK/TIMER] as
required.
• To correct a mis-entry during the process, press
[CANCEL]. You can go back to the previous step.
• When using an iPod as the playback source, activate the
iPod battery charge function (see page 13).
1Enter the timer setting mode.
• When the clock has not been set, pressing [CLOCK/
TIMER] makes the System enter the clock setting mode
(see page 6).
2Set the timer as you like.
Repeat the procedure for the following settings until
finished—
1
Set the hour then the minute for the on-time.
*1
2
Set the hour then the minute for the off-time.
*1
3
Select the playback source—“FM,” “AM,” “CD,”
“USB MEMORY,” or “iPod.”
4
Select the volume level (from “0” to “35” and
“VOL – –”
*2
).
*1You can also use the number buttons to adjust the
hour and minute.
*2If you select “VOL – –,” the volume is set to the
same level as when the System was last turned off.
Once the settings are completed, the Timer setting
information appears in sequence.
3Prepare the source selected in step 2.
• FM, AM: Select the desired station/channel.
• CD: Set a disc.
• iPod, USB MEMORY: Connect the component.
4Turn off the System (on standby).
To cancel or reactivate the Timer
Remote control
SET
CLOCK/
TIMER
x
4
CANCEL
SLEEP
STANDBY/ON
Remote
ONLY
10 20 30 60
120
90
150180
Canceled
Remote
ONLY
0:00- 0:00
6:00
TIMER SET
OFF? CANCEL
To reactivate the Timer
To cancel the Timer
RD-HA3[A].book Page 17 Friday, June 1, 2007 5:37 PM
This manual suits for next models
1
Table of contents
Other JVC Stereo System manuals