JVC 50052496 User manual

50052496
VICTOR COMPANYOF JAPAN, LIMITED
0504-JVC
©2004 VICTOR COMPANY OF JAPAN, LIMITED
COLOUR TELEVISION
ENGLISH
INSTRUCTIONS
AV-20RM4SE
AV-21RM4SE
POLSKI
ÈESKY
MAGYAR
ÁÚËÃAPCKÈ
ROMANIAN
BAREVNY TELEVIZOR PØ ÍRUÈKA K OBSLUZE
KOLOROWY ODBIORNIK TELEWIZYJNY INSTRUKCJA OBSLUGI
TELEVIZOR COLOR INSTRUCÞIUNI
ÖBETEH TEËEBÈÇOP PÚKOBOÄCTBO ÇA PAÁOTA
SZÍNES TELEVÍZIÓ HASZNÁLATI UTASÍTÁSA
D:\Aldus Page Maker Onemli\IB-NEW\JVC\2004 Models\AK-30\Mono\20&2134 (AV-21RM4S)\EE-DK Models\EE-DK-JVC-COVER-MONO-AK30-AV-20&21RM4SE-50052496.cdr
29 Nisan 2004 Per embe 11:14:31
Color profile: Disabled
Composite Default screen

ENGLISH - 1-
SafetyPrecautions
1. Power Source
The receiver should be operated only from a 220-240V AC,
50 Hz. outlet. Ensure you select the correct voltage setting
for your convenience.
2. Power Cord
The power supply cord should be placed so that they are not
likely to be walked on or pinched by items placed upon them
or against them. Pay particular attention to cord where they
enter the plug, power outlet, and the point where they exit
from thereceiver.
3. Moisture and Water
Do not use this equipment in a humid and damp place (avoid
the bathroom, the sink in the kitchen, and near the washing
machine). Do not expose this equipment to rain or water and
do not place objects filled with liquids on it as this may be
dangerous.
4. Cleaning
Before cleaning, unplug the receiver from the main supply
outlet. Do not use liquid or aerosol cleaners. Use with soft
and drycloth.
5. Ventilation
Theslots andopenings on thereceiver are intendedfor venti-
lationand to ensurereliableoperation.Toprevent overheating,
these openings must not beblocked or coveredinanyway.
6. Lightning
In case of storm andlightning or when going onholiday, dis-
connect the power cordfrom the wall outlet.
7. Replacement Part
When replacement parts are required, be sure the service
technician has used replacement parts which are specified
by the manufacturer or have the same specifications as the
originalone. Unauthorized substitutions may result in fire,
electrical shock, or other hazards.
8. Servicing
Please refer all servicing to qualified personnel. Do not re-
movecover as this mayresult inelectric shock.
9. Flame sources
Donot placenaked flamesources on the apparatus.
10.Stand-By
DonotleaveyourTVstand-byoroperatingconditionwhenyou
leaveyourhouse.
Warning!
Anyintervention contraryto regulations,inparticular,any
modification of high voltage or areplacement of the picture
tube may lead to an increased concentration of x-rays. Any
television modified inthis way no longer complies with license
and must not be operated.
Instructionsforwastedisposal:
Packaging and packaging aids are recyclable and should
principallybe recycled.Packaging materials, suchasfoil
bag, must bekept away fromchildren.
Contents
SafetyPrecautions..................................................1
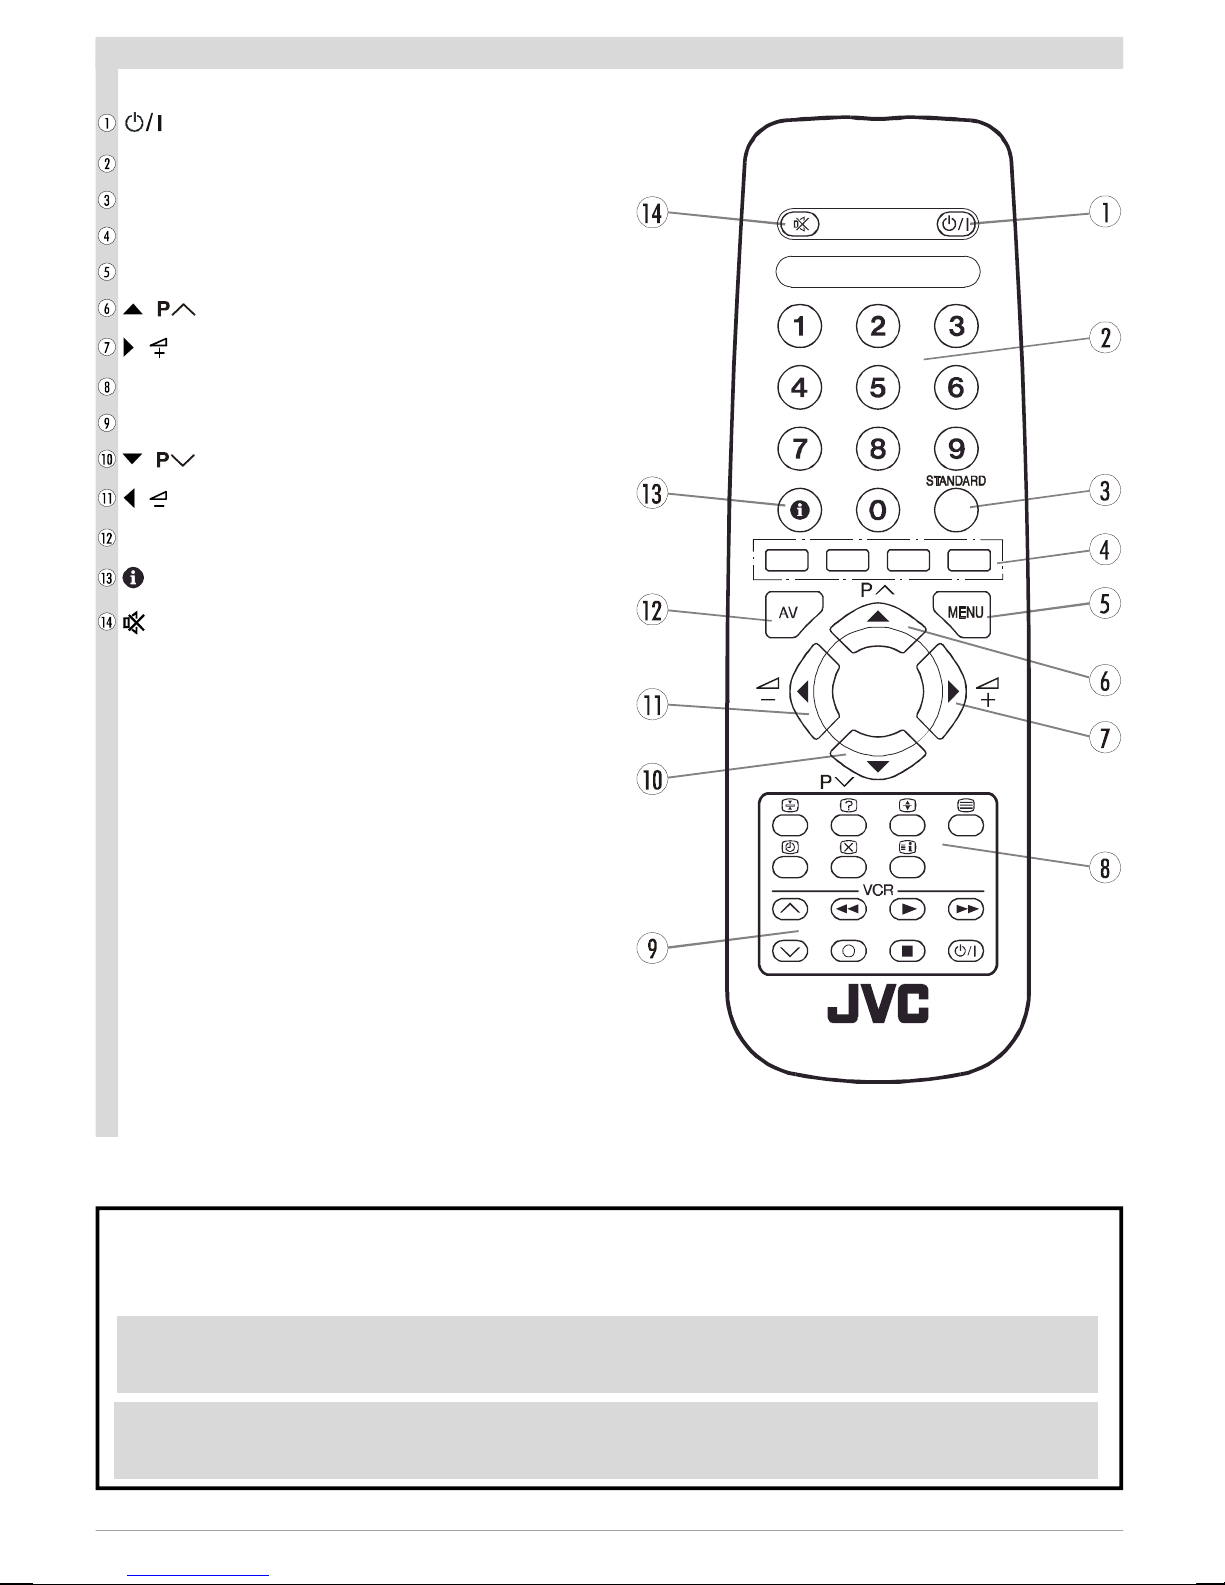
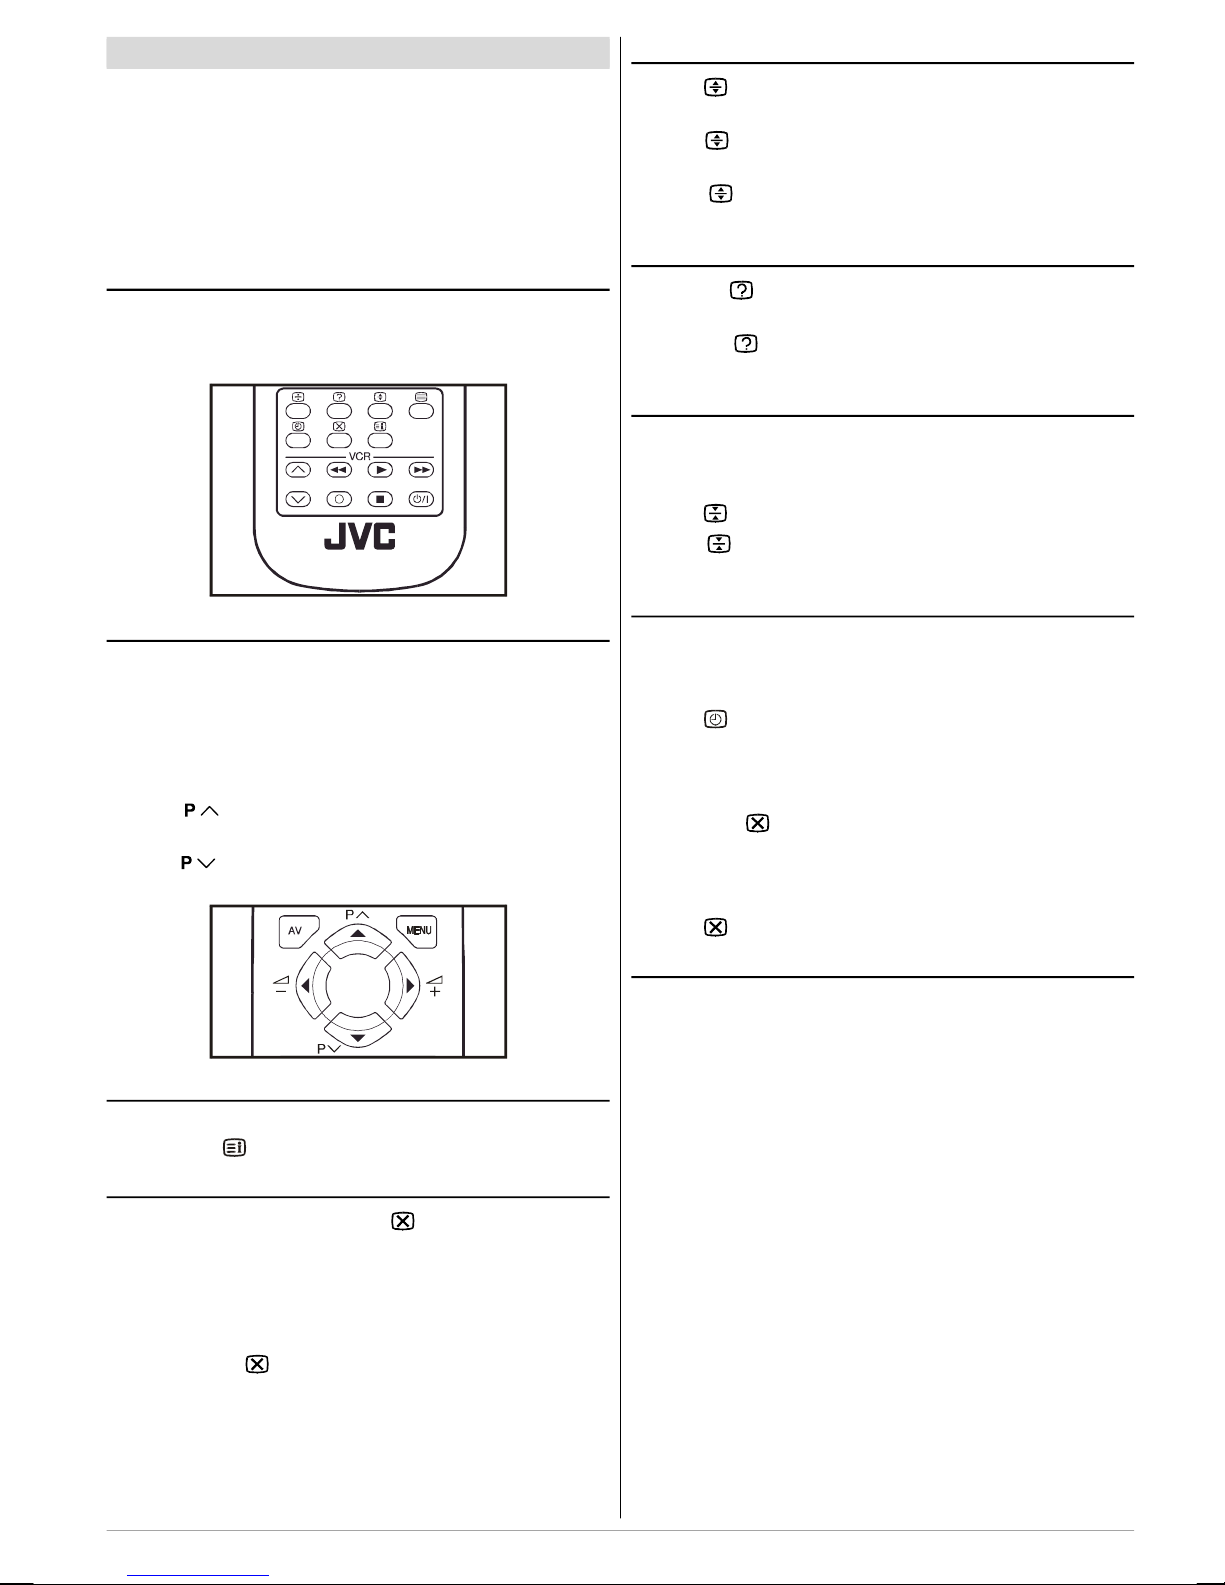
Remote Control Buttons.........................................2
Control Panel Buttons............................................3
Antenna Connections.............................................3
Preparation..............................................................4
Features...........................................................................4
Before Switching on your TV.................................4
Powerconnection.............................................................4
AerialConnections...........................................................4
How toconnect the external equipments..........................4
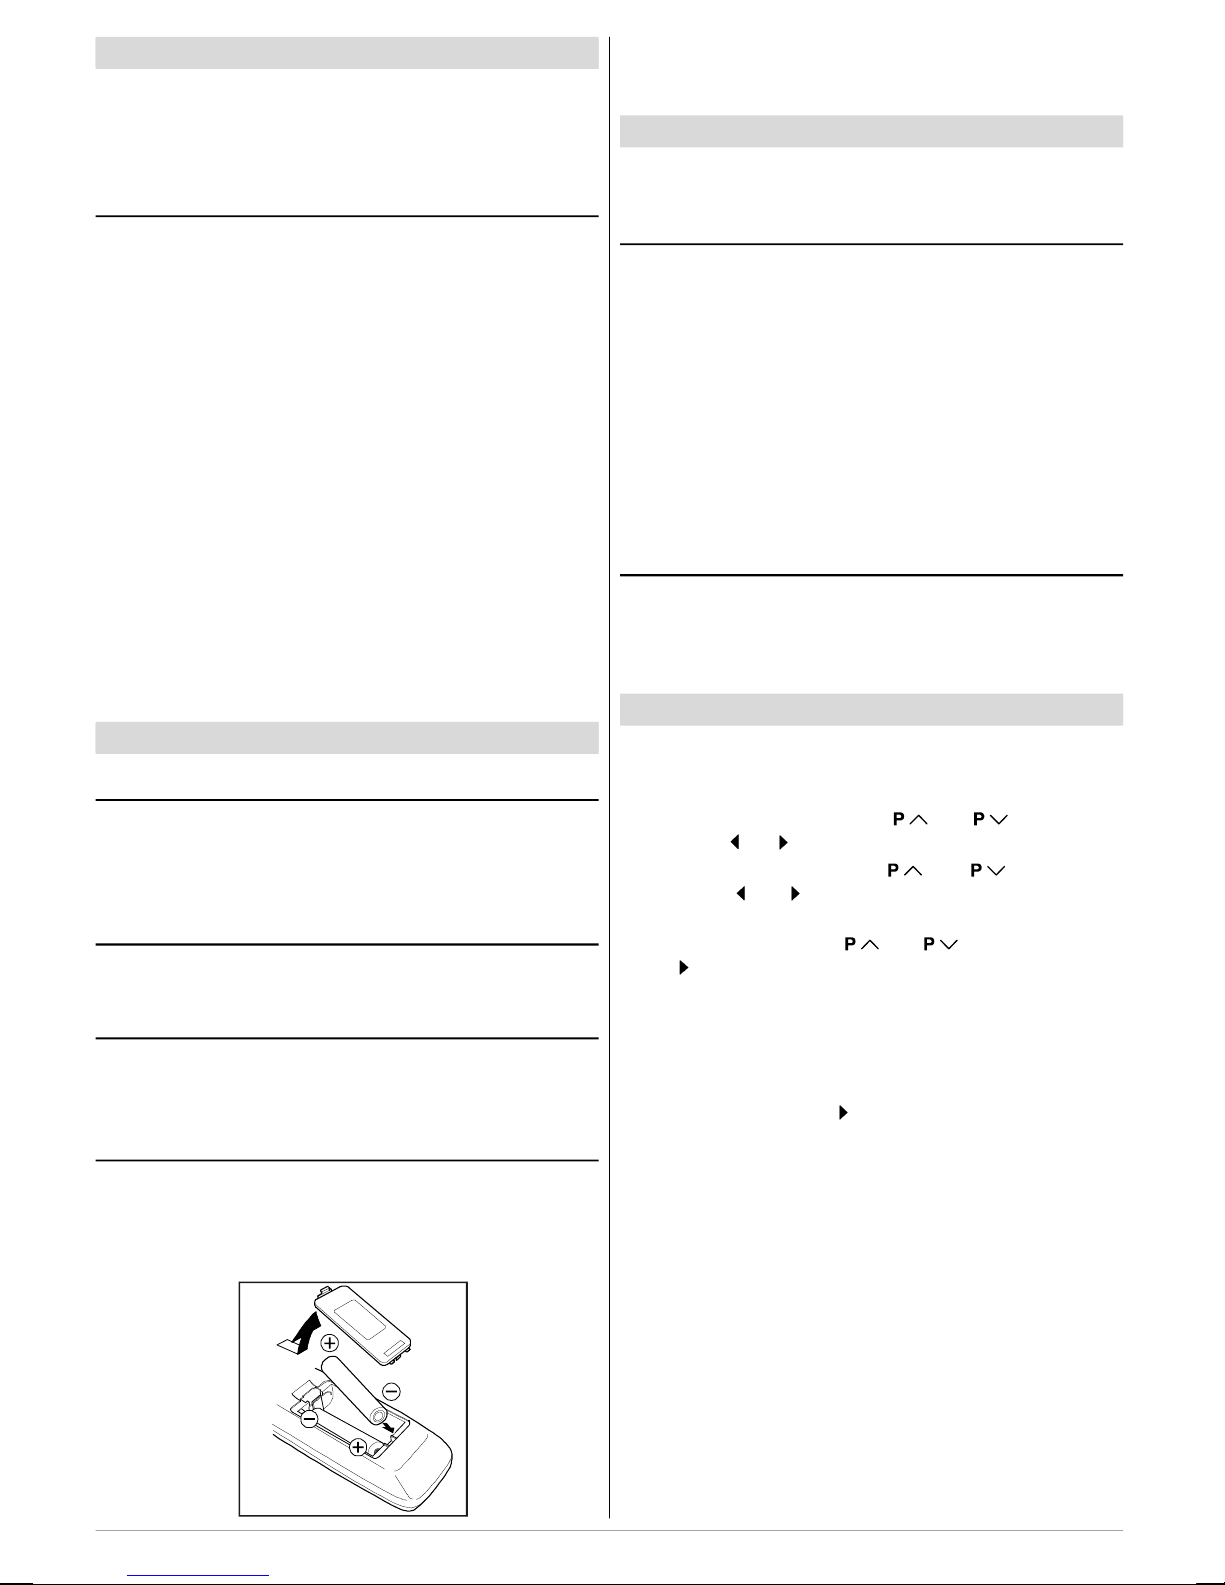
Insertingbatteriesin theremote controlhandset...............4
Switching the TV ON/OFF.......................................4
Toswitch the TV on..........................................................4
Toswitch theTV off..........................................................4
Initial Settings..........................................................4
Operatingwith theonset buttons......................................5
OperatingwithRemoteControl.........................................5
Menu System...........................................................5
PictureMenu....................................................................5
FeatureMenu...................................................................6
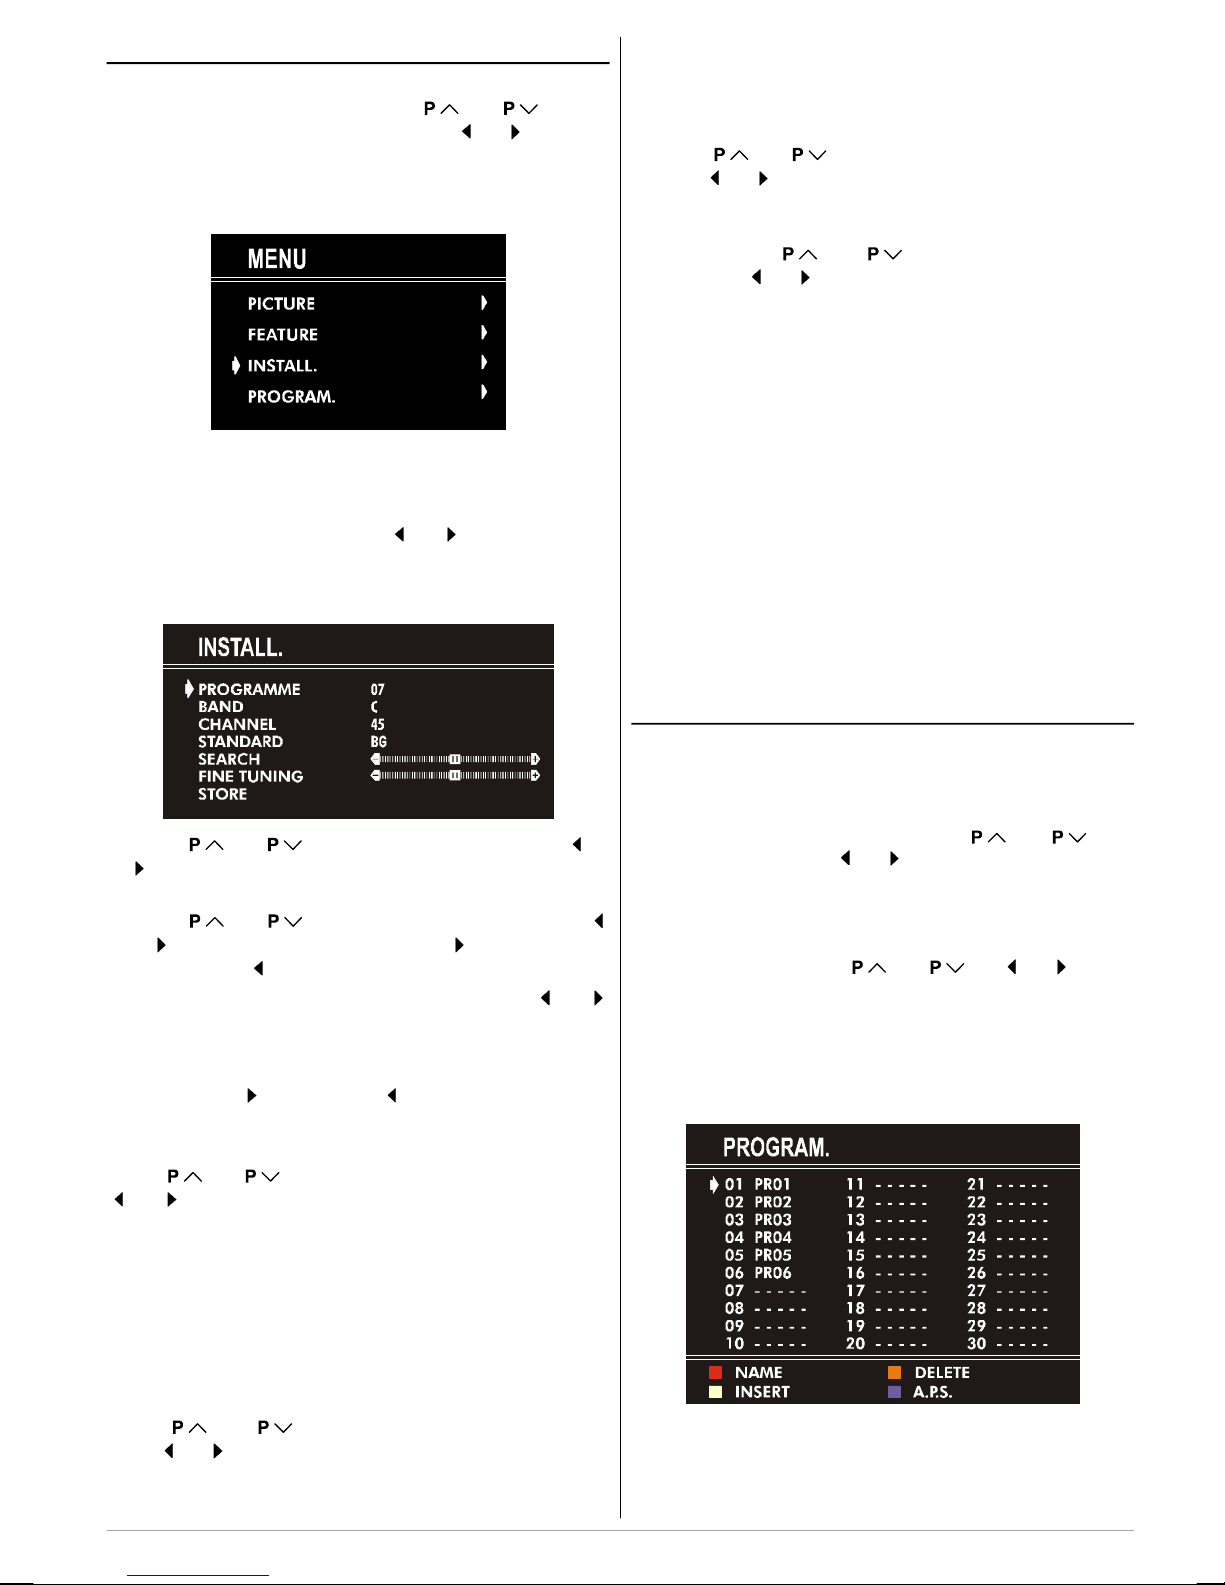
Install.Menu....................................................................7
Program.(Programming)Menu.........................................7
Other Features........................................................8
SoundMute......................................................................8
InformationonScreen.......................................................8
ToDisplay theTime..........................................................8
Standard...........................................................................8
VCRControlButtons........................................................8
Teletext....................................................................9
TooperateTeletext...........................................................9
Toselect apage of Teletext..............................................9
ToSelect IndexPage.......................................................9
Searchingfor ateletextpagewhile watchingTV...............9
ToSelectDouble Height Text............................................9
ToReveal“concealed”Information.....................................9
ToStopAutomaticPage Change......................................9
ToSelect aSubcode Page...............................................9
To exit Teletext.................................................................9
Connect the External Equipments.......................10
ViatheEuroconnector....................................................11
AV-1 SMode..................................................................11
Via the RCA jacks..........................................................11
ViatheANT(aerial) socket.............................................11
TVandVideoRecoder(VCR).........................................11
NTSCPlayback..............................................................11
ConnectingHeadphones.................................................11
Tips.........................................................................11
Specifications........................................................12
01-ENG&DK-AK30-AV-20&21RM4SE-50052496.p6522.09.2004, 08:321

ENGLISH - 2-
= Stand By / Power
0-9 =Direct Program
Standard Button(PICTURE defaultsettings)
Colour Buttons
MENU =Menu Button
( )=CursorUp /Programme Up
( ) = Cursor Right/ Volume +
TeletextControl Buttons
VCR Control Buttons
( )=CursorDown /ProgrammeDown
( ) = Cursor Left / Volume -
AV =AVButton
=Information Button
=Mute
RemoteControl Buttons
CAUTION
RISK OF ELECTRIC SHOCK
Thelightningflash witharrowheadsymbol,withinanequilateraltriangle, is intendedtoalert theuser to the presenceof
uninsulated"dangerous voltage" within theproduct's enclosure that may be of sufficientmagnitudeto constitutearisk
of electric shock of persons.
Theexclamation pointwithin an equilateraltriangle isintended to alertthe userto thepresence of importantoperating
andmaintenance(servicing) instructions intheliteratureaccompanying the appliance.
01-ENG&DK-AK30-AV-20&21RM4SE-50052496.p6522.09.2004, 08:322

ENGLISH - 3-
ControlPanelButtons
Antenna Connections
AudioInput
Terminal
Video Input
Terminal
Headphone
Menu
Power - Program +
- Volume +
FRONTAV
POWER
P/CHMENU
POWER
P/CHMENU
01-ENG&DK-AK30-AV-20&21RM4SE-50052496.p6522.09.2004, 08:323

ENGLISH - 4-
Preparation
PlaceTVon asolid surface.
For ventilation, leave aspaceof at least 10 cmfreeall around
theset. Toprevent any fault andunsafe situations, pleasedo
not placeanyobjects ontop of the set.
Features
•It is aremote controlled colour television.
•100 programmes from VHF,UHF bands or cable channels
canbe preset.
• It can tune cable channels.
•ControllingtheTV is very easyby its menudriven system.
•It has an Euroconnector socket for external devices (such
as video recorder, video games, audioset, etc.)
•FrontAVInput available.
•Teletext.
• It is possibleto connect headphone.
• Direct channel access.
•APS (Automatic Programming System).
•All programmes canbenamed.
•Forwardor backwardautomatic tuning.
• Sleep timer.
•Automatic soundmutewhenno transmission.
•5minutesafter thebroadcasting(closedown),the TV
switches itself automatically to stand-bymode.
Before Switching on your TV
Power connection
Important: The TV set is designed to operate on 220-240 V
AC, 50 Hz.
•After unpacking, allow theTV set toreachtheambient room
temperature before you connect the set to the mains.
Aerial Connections
• Connect the aerial plug to the aerial input socket located at
the back of theTV.
How to connect the external equipments
See“Connect the External Equipments” on page 10.
•See the instruction manuals provided with the external de-
vices too.
Inserting batteries in the remote controlhandset
• Remove the battery cover located on the back of the hand-
set by gentlypulling upwards from theindicatedpart.
•Insert two AA (R6) or equivalent type batteries inside.
•Replace the batterycover.
NOTE: Removebatteriesfromremotecontrolhandsetwhen itis
not to beused for along period. Otherwise it can be damaged
due to any leakage of batteries.
Switching the TV ON/OFF
You can operate your TV either using the remote control
handset ordirectlyusingthe TVonset buttons.
To switch the TV on
Your TV will switch on in two steps:
1- Press the power button located on the front of the TV.Then
the TV switches itself to standby mode and the RED LED
located belowthe TV turns on.
2- Toswitchonthe TVfrom stand-by modeeither:
Press a digit button on the remote control sothat a program-
menumber is selected,
or,
Press Standby /Power Button or Programme Up and Down
buttons on the front of the TV or on the remote control re-
spectively, so the TV will switch on and the RED Led will turn
GREEN.
To switch the TV off
• Press the stand-by button on the remote control, so the TV
will switch to stand-by mode and the GREEN LED will be-
come RED, or,
•Press the power button located onthe front of theTV.
Initial Settings
The message "PLEASE CHECK ANTENNACABLE AUTO.
PROGRAMMING SYSTEM" will be displayed when you turn
on your TVfor the first time.
1- Select LANGUAGE with the “ “or “ ”button, then
press the “ ” or “ ” button toselect amenu language.
2- Select COUNTRY with the “ “or “ ”button, then
press the “ ”or “ ”button to select the country you are
now located.
3- Select START with the “ “ or “ ” button, then press
the“ ” button tostart APS.
APS (Automatic Programming System) automaticallypro-
grammesthe received channelsinyourTV’s programme
numbers. During APS, "A.P.S. IS RUNNING"will be dis-
played. After APS is finalized, the “PROGRAM.”menu ap-
pears.
Tocancel APS, press the “ ” button.
You can deletea channel, insert a channel into aprogramme
number, or re-start APS with the “PROGRAM.” menu.
For details, see “Program. (Programming) Menu”on page
7.
4- Press the "STANDARD"button to complete the initial set-
tings.
After the initial settings are complete, you can change a pro-
gramme number or to name aprogramme number or to pro-
grammenewchannel manually.For details,see
“Install. Menu” on page 7.
If themessage "PLEASE CHECK ANTENNACABLE AUTO.
PROGRAMMING SYSTEM"does not appear,follow the de-
scription “Program. (Programming)Menu”on page 7 to
select amenu language and the country where you are now
located, and to use A.P.S..
01-ENG&DK-AK30-AV-20&21RM4SE-50052496.p6522.09.2004, 08:324

ENGLISH - 5-
Operating with the onsetbuttons
Volume settingand programme selection canbe made using
thebuttons on thefront panel.
Volume Setting
• Press “- ” button to decrease volume or “ +” buttonto
increase volume, so avolume level scale will be displayed
on the screen.
Programme Selecting
• Press “P/CH+”button to select nextprogramme or “-P/CH”
button to select the previous programme.
Entering Main Menu
•Press “MENU”button toentermainmenu.Inthe main
menu select submenu using “P/CH+” or “-P/CH” button and
enter the submenu using “ +”or “- ”button. Tolearn
the usage of the menus, refer to “Menu System”on page
5.
Operatingwith Remote Control
Theremote control handset of your TVis designed tocontrol
all thefunctions of the model youselected. The functions will
be described in accordance with the menu system of your
TV.
Functions which you can use out of menu system are de-
scribed below.
Volume Setting
Press “ ” buttontoincreasevolume.
Press “ ” button to decreasevolume.
Programme Selecting (Previous or next programme)
•Press “ ” button toselect the previous programme.
• Press “ “ button to select the next programme.
Programme Selecting (direct access):
Press digit buttons on the remote control handset to select
programmes between 0 and 9. TV will switch to the selected
program after ashort delay.
Whenyou press first digit, second digit will be displayed with
‘-’ symbol for 3seconds. Toselect programmes between 10
and 99 press corresponding digit buttons consecutively be-
fore ‘-’ symbol on the second digit disappears. (e.g. for pro-
gramme 27, first press 2and then 7while program number
displayedas ‘2-’ )
Menu System
Your TV has been designed with amenu system. Display
“MENU” (main menu) and enter one of four menus (PIC-
TURE, FEATURE, INSTALL.and PROGRAM.).
1- Press “MENU” button to display “MENU” (main menu).
Themenu titles will be displayedin themain menu.
2- Press “ “or “ ”button to select amenu title, then
press “ ” or “ ” button toenter the menu.
•Toexit amenu, press “STANDARD” button.
•Togo tothe previous menu, press“MENU” button.
Picture Menu
Tochangepicture settings:
•Press “MENU”button, now you are in main menu. In the
main menu, select PICTURE using “ “or “ ”button,
thenenter the picture menu pressing “ ” or “ ” button.
or,
•Enter the Picture Menu directly,pressing the GREEN but-
ton.
SettingBrightness:
•As you enter the picture menu, BRIGHTNESS will be the
first selectedoption.
•Press “ ” button toincreaseBRIGHTNESS.
•Press “ ” button todecreaseBRIGHTNESS.
Setting Contrast:
•Using “ “ or “ ” button select CONTRAST..
•Press “ ” button toincreaseCONTRAST level.
•Press “ ” button todecreaseCONTRAST level.
Setting Colour:
•Using “ “ or “ ” button select COLOUR.
•Press “ ” button toincreaseCOLOUR level.
01-ENG&DK-AK30-AV-20&21RM4SE-50052496.p6522.09.2004, 08:325

ENGLISH - 6-
•Press “ ” button todecreaseCOLOUR level.
Setting Sharpness:
• Using “ “ or “ ” button select SHARPNESS.
•Press “ ” buttonto increaseSHARPNESS level.
•Press “ ” buttontodecrease SHARPNESS level.
Setting Hue (In AVmode only):
•Using “ “or “ ”button selectHUE.
•Press“ ”button to increase HUE level.
•Press “ ” button todecreaseHUE level.
HUE adjust is functional only when NTSC 3.58/4.43 is ap-
plied in AVmode. It does not appear when other colour sys-
tems used.
Mode:
This option is used to change the picture size according to
the coming transmission.
•If AUTO function is selected, then the picture size will be
automaticallychanged according to the transmission.
• Selecting 4 : 3 modeforces picture ratiosizeto 4 : 3.
• Selecting 16: 9 modeforces pictureratio size to16 : 9.
Every program has its own picture mode setting. When you
store the picture mode for aprogram other programs keep
their picturemode setting unaffected.
Feature Menu
•Press “MENU”button, now you are in main menu. In the
main menu, select FEATURE, using“ “ or “ ” button.
Then enter the featuremenu pressing “ ” or “ ” button.
or,
•Enterthe FeatureMenu directly,pressing the YELLOW
button.
SleepTimer:
•As you enter the feature menu, SLEEPTIMER will be the
first selectedoption.
• Use “ ” or “ ” button to change the value of the sleep timer
between OFF, 0:15:00, 0:30:00, 0:45:00, 1:00:00, 1:15:00,
1:30:00, 1:45:00 and 2:00:00.hours. Your TV will get into
standby mode when the period you selected passes after
youmake the selection.
It is displayed on the upper right of the screen. If sleep timer
is activated it is displayed with the TVstatus and erased with
it after 3 seconds.
During the last minute of the count down, the timer is dis-
played on the upperrightofthe screen.When the timer
reaches zero,TVgoes tostand-by.
Child Lock:
InFeatureMenu,press“ “or“ ”button toselect
CHILD LOCK.Using “ ” or “ ”button turn CHILD LOCK On
or Off.
When Off is selected, there will beno difference intheopera-
tion of your TV.When On is selected, the TV can only be
controlled by the remote control handset. In this case, the
front panel buttons (except theSwitch On/Off button) will not
work.
Language:
Menu Languagecanbe selectedby pressing“ ” or “ ” button
on LANGUAGE item.
01-ENG&DK-AK30-AV-20&21RM4SE-50052496.p6522.09.2004, 08:326

ENGLISH - 7-
Install.Menu
•Press “MENU”button, now you are in main menu. In the
main menu, select INSTALL. using “ “or “ ”button,
thenenter the Installation menu pressing “ ” or “ ” button.
or
• Enter the Installation Menudirectly, pressingtheBLUE but-
ton.
Toprogramme a channel ina TV’s programme
number manually:
1. PROGRAMME will be the first selected item as you enter
the INSTALL. menu. Pressing “ ”or “ ”button select the
programme number where you want to the tuned channel
to be stored. (You may also type the programme number
using thedigit buttons.)
2. Press “ “ or “ ” button to select BAND. Using“ ” or
“ ” button toselect the band in whichyou want tosearcha
channel.
3. Press “ “ or “ ”button to select SEARCH. Press “ ”
or “ ” button to start searching. (Press “ ” button tosearch
forward.Press “ ” button tosearchbackwards.)
If the found channel is not the desired one, press “ ”or “ ”
button tostart searchingagain.
Tostop searching before achannel is found, press the re-
verse direction button. For example, when the TV is search-
ing forwardwith “ ” button, press “ ” button tostop searching.
If you know the channel number which you want to find, you
canfind thechannel directly.
Press “ “ or “ ” button toselect CHANNEL, then press
“ ” or “ ”button to select the channel number,or enter the
number with the digit buttons.
(Follow the step 5to select the correct standard before you
select a channel number.)
4. If you wanttoname thenew programme,follow the instruc-
tions under "Tochange thenameofaprogramme"on
page 7.
5. If the sound or picture is abnormal, change the standard
(broadcastingsystem) of new channel.
Press“ “or“ ”button toselect STANDARD,then
press “ ” or “ ” button tochange thecorrect one.
The indicated channelnumberwill be changed when you
change the standard.
B/G : C02-C73/ S01-S41 / S75-S79
D/K : C01-C69 / S01-S41
K1 : C04-C09
6. Ifthe channelreception is poor,fine-tune the channel.
Press “ “ or “ ” button to select FINE TUNING,then
press “ ” or “ ” tofine-tune the channel.
7. After the all settingsarecompleted, storethe new
channel’s setting to the programme number which you se-
lected. Press“ “or“ ”button toselect STORE,
then press “ ” or “ ” to store it.
If you want to modify the current programme number’s
setting (for example, changing fine tuning, etc.) :
1. Select the programme number you want to modify the
settings whilenomenu appears.
2. Display the INSTALL. menu.
3. Follow “To programme a channel ina TV’s program-
menumber manually:” on page 7 and change theset-
tings of the current programme number.
If you want to name the new programme, follow the in-
structions under "To change the name of aprogramme"
onpage 7.
Note:
Do not use Programme itemin the INSTALL. menu to select
the programme number. If youselect theprogramme number
with Programmeitemand storethe settings,the selected
programmenumber’s current settings arecancelled.
Program. (Programming) Menu
PROGRAM.(Programming) menu isused to display the
programme names and numbers. You can use this menu to
delete achannel, to insert achannel and to autostore the
programmes.
Select the PROGRAM. menu pressing “ “or “ ”but-
tonand open it pressing“ ” or “ ” button. Whenyou enter the
programme menu, all the programme numbers and names
will bedisplayed onthescreen. The programmenumber and
name of the tuned channel will be shown by the cyan color.
All the other channel numbers will be white. You can move
the number in cyan using “ “ or “ ” or “ ” or “ ” button.
Also, it's possible to use digit buttons to select programme
numbers. As you pass through the programme numbers this
way, toreachtheprogrammenumber you want, the channels
corresponding to the programme numbers you pass through
willbe tuned and the selected programme number willbe
shown incyan.
To change the name of aprogramme:
•Move to the channel you want to rename or use the digits
so that theselected programmenumber is in cyancolor.
01-ENG&DK-AK30-AV-20&21RM4SE-50052496.p6522.09.2004, 08:327

ENGLISH - 8-
•Press the RED button. Use “ ”or “ ”button to select the
position andpress “ “ or “ ” buttontoselect aletter..
Now, press the RED buttonagain to store or BLUE button to
cancel NAME.
To delete achannel from aprogramme number:
• Move to the channel you want to delete or use the digits so
that the selectedprogramme number is incyan color.
•Press the YELLOW button. Now thecorresponding channel
will be deleted and all the other channels below this pro-
grammenumberwillbe movedoneprogramme number up.
Now, press the YELLOW buttonagainto deleteorBLUE but-
ton tocancel DELETE.
To insert achannel into aprogramme number:
• Move to the channel to be inserted or use the digits so that
theselected programmenumber is incyan color.
• Press the GREEN button. Now using“ “ or “ ” or “ ”
or “ ” buttons, move tothe programme number..
Now, press theGREEN buttonagaintoinsert orBLUE button
tocancel INSERT.
A.P.S.
If youenter the A.P.S. menu, youcan automatically program-
methe received channels inyourTV’s programmes with
A.P.S. ( Automatic programme system ).
1. After displaying the PROGRAM. menu, press the BLUE
button toenter the A.P.S. menu.
2. Select LANGUAGE with the “ “or “ ”button, then
press the “ ” or “ ” buttonto select amenu language.
3. Select COUNTRY with the “ “or “ ”button, then
press the “ ”or “ ”button to select the country you are
now located.
4. If you want to start programming, select START with the
““or“ ”button,then press the “ ”button.The
message “A.P.S. IS RUNNING”appears and A.P.S. auto-
matically programmes the received channels in your TV’s
programme numbers. Afrer A.P.S. is finalized, the PRO-
GRAM. menu appears again.
To cancel A.P.S., press the“ ” button.
OtherFeatures
SoundMute
Tocut off the sound of the TV,press “ ”button. The sound
will be cut off. Tocancel mute, press “ ”or “ ”or “ ”but-
ton. The volume level will be the same as the level before
mutewhen you cancel mute.
Information on Screen
Firstpressing the “ ”button displaysthe currentstatus
“Programme number”and “Station name”.
Pressing this button againdisplays the current time.
Pressing this button once more remove the on-screen dis-
play.
ToDisplay the Time
• While watching a TV programme with Teletext transmission
press “ “button twice. The current time information, cap-
turedfromTeletext will bedisplayedon thescreen.
•If the programme being watched does not have Teletext
transmission, only a box will be displayed at the same loca-
tion.
• The time information will disappear after pressing “ “ but-
ton again.
When time information is displayed on screen, entering an-
other menu will remove it.
Standard
You can re-set the current PICTURE menu settings (except
PictureModesetting) tothe default settings.
•Press “STANDARD” button when nomenu appears.
VCR ControlButtons
Thebuttonscanbeusedto operateaJVCbrandVCR.
Pressing the button having the same appearanceas the origi-
nal remotecontrol buttonof adevice makes thefunction work
in the samewayas the original remotecontrol.
Press theVCRControl Buttonto control your VCR.
Note:
• If your device is not made by JVC, these buttons cannot be
used.
• Even if your device is made by JVC, some of these buttons
or any one of the buttons may not work, depending on the
device.
•You can use the / buttons to choose aTV channel
whichthe VCR will receive.
01-ENG&DK-AK30-AV-20&21RM4SE-50052496.p6522.09.2004, 08:328

ENGLISH - 9-
Teletext
Teletextis an information system that displays texton your
TV screen. Using the Teletextinformation system you can
view apage of information on asubject that is available in the
list of contents (index).
No on screen display will be availableintext mode.
No contrast, brightness or colour control, but volume control
is availablein text mode.
To operate Teletext
• Select a TV station onwhich Teletext is being transmitted.
• Press (TELETEXT) “ ” button. Usually the list of contents
(index) is displayed onthescreen.
Toselect a page ofTeletext
• Press the appropriate digit buttons for the required Teletext
page number.
The selected page number is displayed at the top left corner
of the screen. The Teletextpage counter searches until the
selected page number is located, so that the desired page is
displayedon the screen.
•Press “ “button to move the Teletextscreen forward
onepage at a time.
• Press “ ”button to move the Teletextscreen backward
onepage at a time.
ToSelect Index Page
•Toselectthe page numberof the index(generallypage
100), press “ “ button.
Searching forateletext pagewhile watching TV
•In the Teletextmode pressing “ “button will switch the
screen to the TV mode. In the TV mode enter apage num-
ber using digit keys. As you enter last digit of page number,
“”sign will replace the page number and flash until the
entered page number is found. Then the page number will
replace “ ”sign again. Now you can display this teletext
page pressing “ “ button.
To Select DoubleHeight Text
• Press “ “ button for the tophalf of theinformation pageto
bedisplayed in double height text.
•Press “ “button again for the bottom half of the informa-
tionpage to bedisplayed indoubleheight text.
•Press “ “button once more for the full page of normal
height text.
ToReveal “concealed” Information
•Pressing “ “button once will reveal answers on aquiz or
games page.
•Pressing “ “button again will conceal the revealed an-
swers.
To Stop Automatic Page Change
The teletext page you haveselected may contain more infor-
mation thanwhat is on the screen; therest of the information
will be displayed after aperiodof time.
• Press “ “ buttontostop theautomatic pagechange.
•Press “ “button again to allow the nextpage to be dis-
played.
To Select a Subcode Page
Subcode pages are subsections of long Teletextpages that
can onlybe displayed on thescreen onesection at a time.
• Select the requiredTeletext page.
• Press “ “ button.
• Select the required subcode page number by pressing four
digit buttons (e.g. 0001).
•Ifthe selected subcode page is not displayed in ashort
time, press “ “ button. TV programme will bedisplayed on
thescreen.
•Teletext page number will bedisplayed onthe upper left cor-
ner of the screen when the selected page is found.
• Press “ “ button to display the selected Teletext page.
To exit Teletext
• Press “ ” button. Thescreen will switch toTV mode.
01-ENG&DK-AK30-AV-20&21RM4SE-50052496.p6522.09.2004, 08:329

ENGLISH - 10 -
ConnecttheExternal Equipments
Beforeconnectinganything
• Switchoff all equipments includingtheTV.
•Read the manuals provided withthe equipments.
To selectan AVmode
Pressing “AV” button onthe remotecontrol selects oneof the threeAV modes(AV- 1, AV-1 S and F-AV).
•Toreturntothe TV mode, repeatedly press “AV” button or press “ “ or “ ” button.
AV-1(EXT.I) terminal:Euroconnector (21-pin, SCART)
•Video input, Audioinput and RGB inputs areavailable.
• TV broadcast outputs (Video andAudio) are available.
AV-1S(EXT.I) terminal: Euroconnector (21-pin, SCART)
•Video input, S-VIDEO(Y/C) input and Audio input areavailable.
•Video andAudiooutputs areavailable.
F-AV (FrontAV) terminal: RCAconnectors x2
•Video input andAudioinput areavailable.
FRONTAV
F-AV
01-ENG&DK-AK30-AV-20&21RM4SE-50052496.p6522.09.2004, 08:3210

ENGLISH - 11 -
Via the Euroconnector
YourTV sethasan Euroconnector socket.Ifyou want to
connect equipments (e.g. videorecorder, decoder, etc.) which
have Euroconnectors, toyourTV,use the AV-1 (EXT.I) or
AV-1S(EXT.I) terminals.
AV-1 S Mode
If the equipment connected to your TV set supports S-Video
(Y/C) output from Euroconnector,you can have abetter pic-
ture quality by selecting AV-1 S mode and connecting your
equipment tothe AV-1S(EXT.I) terminal of TV.See your
equipment's booklet tocheck if your equipment has suchfea-
ture.
Via the RCAjacks
If you have an equipment (such as aCamcorder) which has
the RCAjacks, connect it to the F-AV (Front AV) terminal
withthe video and audiocables.
Via theANT(aerial)socket
If your equipment does not have an Euroconnecter or RCA
jacks, connect it to the TV with an aerial cable. For details,
see the manual provided withthe equipment.
•To storethetest signal that comes fromtheequipment, see
"Install. Menu"on page 7 and store it to the programme
number 0. You can watch images from that equipment to
select the programmenumberwhich you stored the test
signal.
TV and Video Recoder (VCR)
•Connect the Video Recorderto the ANT(antenna input)
socket of theTV with the aerial cable.
• Connect the Video Recorder to the AV-1 or AV-1 S terminal
with the SCART cable, or connect it to the F-AV (Front AV)
terminal withthe audioand video cables.
NTSCPlayback
Connect aNTSC video recorder to aterminal. Then press
“AV“ buttontoselect thecorrespondingAVmode.
NTSC 3.58/4.43 system is detectedautomatically inAV
mode.
Connecting Headphones
Usethe headphone socketofyourTV,toconnect head-
phones.
Tips
Care of the Screen:
Clean the screen with aslightly damp, soft cloth. Do not use
abrasive solvents as they may damage the TV screen coating
layer.
Poor Picture:
Have you selected the correct TV system? Is your TV set or
houseaeriallocated too closetothe loudspeakers, non-
earthed audioequipment or neon lights, etc. ?
Mountainsorhigh buildingscan cause double pictures or
ghost images. Sometimes you can improve the picture quali-
ty bychanging the directionof the aerial.
The picture quality may degrade when two peripherals are
connected to the TV at the same time. In such acase, dis-
connect one of the peripherals.
No Picture:
Is the aerial connected properly? Are the plugsconnected
tightlyto the aerial socket? Is the aerial cable damaged? Are
suitableplugs used to connect the aerial?If youare in doubt,
consult your dealer.
No Picture means that your TV is not receiving any trans-
mission. Have you pressed the correct keys on the remote
control?Tryonce more.
Remote Control:
Your TV no longer responds to the remote control. Press the
“STANDARD”button on the remote control once more. Per-
haps the batteries are exhausted. If so you can still use the
local buttons at thefront of yourTV.
Have you selected the wrong menu? Press “STANDARD” but-
ton to return to TV mode or press “MENU” buttonto returnto
theprevious menu.
No solution:
Switch your TV set off and on. If this does not work, call the
servicepersonnel; never attempt torepair it yourself.
01-ENG&DK-AK30-AV-20&21RM4SE-50052496.p6522.09.2004, 08:3211

ENGLISH - 12 -
Specifications
TV BROADCASTING........................................... PAL SECAM B/GD/K K1
RECEIVING CHANNELS.....................................VHF (BAND I/III)
UHF (BAND U)
HYPERBAND
CABLETV(B/G : S01-S41 / S75-S79; D/K: S01-S41)
NUMBER OF PRESET CHANNELS....................100
CHANNELINDICATOR........................................On Screen Display
RFAERIALINPUT...............................................75Ohm(unbalanced)
OPERATING VOLTAGE....................................... 220-240V AC, 50Hz.
SOUND-MULTIPLEX SYSTEMS..........................Mono
AUDIO OUTPUT POWER
(WRMS.) (%1 THD)....................................5,5
POWER CONSUMPTION(W)(max.)..................85
PICTURE TUBE.................................................. 20”21”
DIMENSIONS (mm).................................... AV-20RM4SE AV-21RM4SE
D........................................................................490470
L........................................................................606606
H........................................................................475475
Weight (Kg.)........................................................1821
01-ENG&DK-AK30-AV-20&21RM4SE-50052496.p6522.09.2004, 08:3212

50052501
VICTOR COMPANYOF JAPAN, LIMITED
0504-JVC
©2004 VICTOR COMPANY OF JAPAN, LIMITED
COLOUR TELEVISION INSTRUCTIONS
AV-21RM4SN ENGLISH
DEUTSCH
FRANÇAIS
PORTUGUÊS
NEDERLANDS
DANSK
SUOMI
CASTELLANO
NORSK
SVENSKA
FARBFERNSEHGERÄT
TELEVISOR A CORES
BEDIENUNGSANLEITUNG
INSTRUÇÕES
TELEVISEUR COULEUR MANUEL D'INSTRUCTIONS
KLEURENTELEVISIE
FARGEFJERNSYN
GEBRUIKSAANWIJZING
BRUKSANVISNING
TELEVISOR A COLOR
FÄRG- TV
VÄRITELEVISIO
MANUAL DE INSTRUCCIONES
BRUKSANVISNING
KÄYTTÖOHJE
FARVEFJERNSYN INSTRUKTIONSBOG
ITALIANO
TELEVISORE A COLORI ISTRUZIONI
D:\Aldus Page Maker Onemli\IB-NEW\JVC\2004 Models\AK-30\Mono\20&2134 (AV-21RM4S)\EN-BG Models\EN-BG-COVER-MONO-AK30-AV-21RM4SN-50052501.cdr
29 Nisan 2004 Per embe 11:14:53
Color profile: Disabled
Composite Default screen

ENGLISH - 1 -
Safety Precautions
1. Power Source
The receiver should be operated only from a 220-240V AC,
50 Hz. outlet. Ensure you select the correct voltage setting
for your convenience.
2. Power Cord
The power supply cord should be placed so that they are not
likely to be walked on or pinched by items placed upon them
or against them. Pay particular attention to cord where they
enter the plug, power outlet, and the point where they exit
from the receiver.
3. Moisture and Water
o not use this equipment in a humid and damp place (avoid
the bathroom, the sink in the kitchen, and near the washing
machine). o not expose this equipment to rain or water and
do not place objects filled with liquids on it as this may be
dangerous.
4. Cleaning
Before cleaning, unplug the receiver from the main supply
outlet. o not use liquid or aerosol cleaners. Use with soft
and dry cloth.
5. Ventilation
The slots and openings on the receiver are intended for venti-
lation and to ensure reliable operation. To prevent overheating,
these openings must not be blocked or covered in anyway.
6. Lightning
In case of storm and lightning or when going on holiday, dis-
connect the power cord from the wall outlet.
7. eplacement Part
When replacement parts are required, be sure the service
technician has used replacement parts which are specified
by the manufacturer or have the same specifications as the
original one. Unauthorized substitutions may result in fire,
electrical shock, or other hazards.
8. Servicing
Please refer all servicing to qualified personnel. o not re-
move cover as this may result in electric shock.
9. Flame sources
o not place naked flame sources on the apparatus.
10. Stand-By
o not leave your TV stand-by or operating condition when you
leave your house.
Warning!
Any intervention contrary to regulations, in particular, any
modification of high voltage or a replacement of the picture
tube may lead to an increased concentration of x-rays. Any
television modified in this way no longer complies with license
and must not be operated.
Instructions for waste disposal:
Packaging and packaging aids are recyclable and should
principally be recycled. Packaging materials, such as foil
bag, must be kept away from children.
Contents
Safety Precautions ...................................................1
Remote Control Buttons .......................................... 2
Control Panel Buttons.............................................. 3
Antenna Connections ...............................................3
Preparation ................................................................ 4
Features .......................................................................... 4
Before Switching on your T ..................................4
Power connection ............................................................. 4
Aerial Connections ........................................................... 4
How to connect the external equipments .......................... 4
Inserting batteries in the remote control handset .............. 4
Switching the T ON/OFF ........................................ 4
To switch the TV on .......................................................... 4
To switch the TV off .......................................................... 4
Initial Settings ...........................................................4
Operating with the onset buttons ...................................... 5
Operating with Remote Control ......................................... 5
Menu System ............................................................. 5
Picture Menu ................................................................... 5
Feature Menu ................................................................... 6
Install. Menu .................................................................... 7
Program. (Programming) Menu ........................................ 7
Other Features.......................................................... 8
Sound Mute ..................................................................... 8
Information on Screen ...................................................... 8
To isplay the Time.......................................................... 8
Standard .......................................................................... 8
VCR Control Buttons ........................................................ 8
Teletext ...................................................................... 9
To operate Teletext ........................................................... 9
To select a page of Teletext .............................................. 9
To Select Index Page ....................................................... 9
Searching for a teletext page while watching TV ............... 9
To Select ouble Height Text ........................................... 9
To Reveal concealed Information .................................... 9
To Stop Automatic Page Change ...................................... 9
To Select a Subcode Page ............................................... 9
To exit Teletext ................................................................. 9
Connect the External Equipments ........................ 10
Via the Euroconnector ..................................................... 11
AV-1 S Mode ................................................................... 11
Via the RCA jacks ........................................................... 11
Via the ANT (aerial) socket.............................................. 11
TV and Video Recoder (VCR) .......................................... 11
NTSC Playback .............................................................. 11
Connecting Headphones ................................................. 11
Tips........................................................................... 11
Specifications .......................................................... 12
01-ENG&BG-AK30-AV-21RM4SN-50052501.p65 22.09.2004, 08:391

ENGLISH - 2 -
= Stand By / Power
0 - 9 = irect Program
Standard Button (PICTURE default settings)
Colour Buttons
MENU = Menu Button
( ) = Cursor Up / Programme Up
( ) = Cursor Right / Volume +
Teletext Control Buttons
VCR Control Buttons
( ) = Cursor own / Programme own
( ) = Cursor Left / Volume -
AV = AV Button
= Information Button
= Mute
Remote Control Buttons
CAUTION
RISK OF ELECTRIC SHOCK
The lightning flash with arrowhead symbol, within an equilateral triangle, is intended to alert the user to the presence of
uninsulated "dangerous voltage" within the product's enclosure that may be of sufficient magnitude to constitute a risk
of electric shock of persons.
The exclamation point within an equilateral triangle is intended to alert the user to the presence of important operating
and maintenance (servicing) instructions in the literature accompanying the appliance.
01-ENG&BG-AK30-AV-21RM4SN-50052501.p65 22.09.2004, 08:392

ENGLISH - 3 -
Control Panel Buttons
Antenna Connections
$XGLR,QSXW
7HUPLQDO 9LGHR,QSXW
7HUPLQDO
+HDGSKRQH
0HQX
3RZHU 3URJUDP
9ROXPH
)5217$9
32:(5
3&+ 0(18
32:(5
3&+ 0(18
01-ENG&BG-AK30-AV-21RM4SN-50052501.p65 22.09.2004, 08:393

ENGLISH - 4 -
Preparation
Place TV on a solid surface.
For ventilation, leave a space of at least 10 cm free all around
the set. To prevent any fault and unsafe situations, please do
not place any objects on top of the set.
Features
It is a remote controlled colour television.
100 programmes from VHF, UHF bands or cable channels
can be preset.
It can tune cable channels.
Controlling the TV is very easy by its menu driven system.
It has an Euroconnector socket for external devices (such
as video recorder, video games, audio set, etc.)
Front AV Input available.
Teletext.
It is possible to connect headphone.
irect channel access.
APS (Automatic Programming System).
All programmes can be named.
Forward or backward automatic tuning.
Sleep timer.
Automatic sound mute when no transmission.
5 minutes after the broadcasting (closedown), the TV
switches itself automatically to stand-by mode.
Before Switching on your TV
Power connection
Impor an : The TV set is designed to operate on 220-240 V
AC, 50 Hz.
After unpacking, allow the TV set to reach the ambient room
temperature before you connect the set to the mains.
Aerial Connections
Connect the aerial plug to the aerial input socket located at
the back of the TV.
How to connect the external equipments
See Connec he Ex ernal Equipmen s on page 10.
See the instruction manuals provided with the external de-
vices too.
Inserting batteries in the remote control handset
Remove the battery cover located on the back of the hand-
set by gently pulling upwards from the indicated part.
Insert two AA (R6) or equivalent type batteries inside.
Replace the battery cover.
NOTE: Remove batteries from remote control handset when it is
not to be used for a long period. Otherwise it can be damaged
due to any leakage of batteries.
Switching the TV ON OFF
You can operate your TV either using the remote control
handset or directly using the TV onset buttons.
To switch the TV on
Your TV will switch on in two steps:
1- Press the power button located on the front of the TV. Then
the TV switches itself to standby mode and the RED LED
located below the TV turns on.
2- To switch on the TV from stand-by mode either:
Press a digit button on the remote control so that a program-
me number is selected,
or,
Press Standby / Power Button or Programme Up and own
buttons on the front of the TV or on the remote control re-
spectively, so the TV will switch on and the RED Led will turn
GREEN.
To switch the TV off
Press the stand-by button on the remote control, so the TV
will switch to stand-by mode and the GREEN LED will be-
come RED, or,
Press the power button located on the front of the TV.
Initial Settings
The message "PLEASE CHECK ANTENNA CABLE AUTO.
PROGRAMMING SYSTEM" will be displayed when you turn
on your TV for the first time.
1- Select LANGUAGE with the or button, then
press the or button to select a menu language.
2- Select COUNTRY with the or button, then
press the or button to select the country you are
now located.
3- Select START with the or button, then press
the button to start APS.
APS (Automatic Programming System) automatically pro-
grammes the received channels in your TVs programme
numbers. uring APS, "A. P. S. IS RUNNING" will be dis-
played. After APS is finalized, the PROGRAM. menu ap-
pears.
To cancel APS, press the button.
You can delete a channel, insert a channel into a programme
number, or re-start APS with the PROGRAM. menu.
For details, see Program. (Programming) Menu on page
7.
4- Press the "STANDARD" button to complete the initial set-
tings.
After the initial settings are complete, you can change a pro-
gramme number or to name a programme number or to pro-
gramme new channel manually. For details, see
Ins all. Menu on page 7.
If the message "PLEASE CHECK ANTENNA CABLE AUTO.
PROGRAMMING SYSTEM" does not appear, follow the de-
scription Program. (Programming) Menu on page 7 to
select a menu language and the country where you are now
located, and to use A.P.S..
01-ENG&BG-AK30-AV-21RM4SN-50052501.p65 22.09.2004, 08:394

ENGLISH - 5 -
Operating with the onset buttons
Volume setting and programme selection can be made using
the buttons on the front panel.
Volume Se ing
Press - button to decrease volume or + button to
increase volume, so a volume level scale will be displayed
on the screen.
Programme Selec ing
Press P/CH+ button to select next programme or -P/CH
button to select the previous programme.
En ering Main Menu
Press MENU button to enter main menu. In the main
menu select submenu using P/CH+ or -P/CH button and
enter the submenu using + or - button. To learn
the usage of the menus, refer to Menu Sys em on page
5.
Operating with emote Control
The remote control handset of your TV is designed to control
all the functions of the model you selected. The functions will
be described in accordance with the menu system of your
TV.
Functions which you can use out of menu system are de-
scribed below.
Volume Se ing
Press button to increase volume.
Press button to decrease volume.
Programme Selec ing (Previous or nex programme)
Press button to select the previous programme.
Press button to select the next programme.
Programme Selec ing (direc access):
Press digit buttons on the remote control handset to select
programmes between 0 and 9. TV will switch to the selected
program after a short delay.
When you press first digit, second digit will be displayed with
- symbol for 3 seconds. To select programmes between 10
and 99 press corresponding digit buttons consecutively be-
fore - symbol on the second digit disappears. (e.g. for pro-
gramme 27, first press 2 and then 7 while program number
displayed as 2- )
Menu System
Your TV has been designed with a menu system. isplay
MENU (main menu) and enter one of four menus (PIC-
TURE, FEATURE, INSTALL. and PROGRAM.).
1- Press MENU button to display MENU (main menu).
The menu titles will be displayed in the main menu.
2- Press or button to select a menu title, then
press or button to enter the menu.
To exit a menu, press STANDARD button.
To go to the previous menu, press MENU button.
Picture Menu
To change picture settings:
Press MENU button, now you are in main menu. In the
main menu, select PICTURE using or button,
then enter the picture menu pressing or button.
or,
Enter the Picture Menu directly, pressing the GREEN but-
ton.
Setting Brightness:
As you enter the picture menu, BRIGHTNESS will be the
first selected option.
Press button to increase BRIGHTNESS.
Press button to decrease BRIGHTNESS.
Setting Contrast:
Using or button select CONTRAST.
Press button to increase CONTRAST level.
Press button to decrease CONTRAST level.
Setting Colour:
Using or button select COLOUR.
Press button to increase COLOUR level.
01-ENG&BG-AK30-AV-21RM4SN-50052501.p65 22.09.2004, 08:395

ENGLISH - 6 -
Press button to decrease COLOUR level.
Setting Sharpness:
Using or button select SHARPNESS.
Press button to increase SHARPNESS level.
Press button to decrease SHARPNESS level.
Setting Hue (In A mode only) :
Using or button select HUE.
Press button to increase HUE level.
Press button to decrease HUE level.
HUE adjust is functional only when NTSC 3.58/4.43 is ap-
plied in AV mode. It does not appear when other colour sys-
tems used.
Mode:
This option is used to change the picture size according to
the coming transmission.
If AUTO function is selected, then the picture size will be
automatically changed according to the transmission.
Selecting 4 : 3 mode forces picture ratio size to 4 : 3.
Selecting 16 : 9 mode forces picture ratio size to 16 : 9.
Every program has its own picture mode setting. When you
store the picture mode for a program other programs keep
their picture mode setting unaffected.
Feature Menu
Press MENU button, now you are in main menu. In the
main menu, select FEATURE, using or button.
Then enter the feature menu pressing or button.
or,
Enter the Feature Menu directly, pressing the YELLOW
button.
Sleep Timer:
As you enter the feature menu, SLEEP TIMER will be the
first selected option.
Use or button to change the value of the sleep timer
between OFF, 0:15:00, 0:30:00, 0:45:00, 1:00:00, 1:15:00,
1:30:00, 1:45:00 and 2:00:00. hours. Your TV will get into
standby mode when the period you selected passes after
you make the selection.
It is displayed on the upper right of the screen. If sleep timer
is activated it is displayed with the TV status and erased with
it after 3 seconds.
uring the last minute of the count down, the timer is dis-
played on the upper right of the screen. When the timer
reaches zero, TV goes to stand-by.
Child Lock:
In Feature Menu, press or button to select
CHILD LOCK. Using or button turn CHILD LOCK On
or Off.
When Off is selected, there will be no difference in the opera-
tion of your TV. When On is selected, the TV can only be
controlled by the remote control handset. In this case, the
front panel buttons (except the Switch On/Off button) will not
work.
Language:
Menu Language can be selected by pressing or button
on LANGUAGE item.
01-ENG&BG-AK30-AV-21RM4SN-50052501.p65 22.09.2004, 08:396
This manual suits for next models
2
Table of contents
Other JVC TV manuals

JVC
JVC AV-27750 User manual

JVC
JVC RM-C326 User manual

JVC
JVC AV-36F802, AV-36F702, AV-32F802, AV-32F702, AV-27F802,... User manual

JVC
JVC AV-14F43, AV-20N43, AV-21D43 User manual

JVC
JVC AV-21TS2EK User manual

JVC
JVC AV-2106BE, AV-21B16/L, AV-21BMG6B User manual

JVC
JVC AV-28NH4SU User manual

JVC
JVC AV-21L91 User manual

JVC
JVC AV-21KM3BN User manual

JVC
JVC AV-14F71/VT User manual