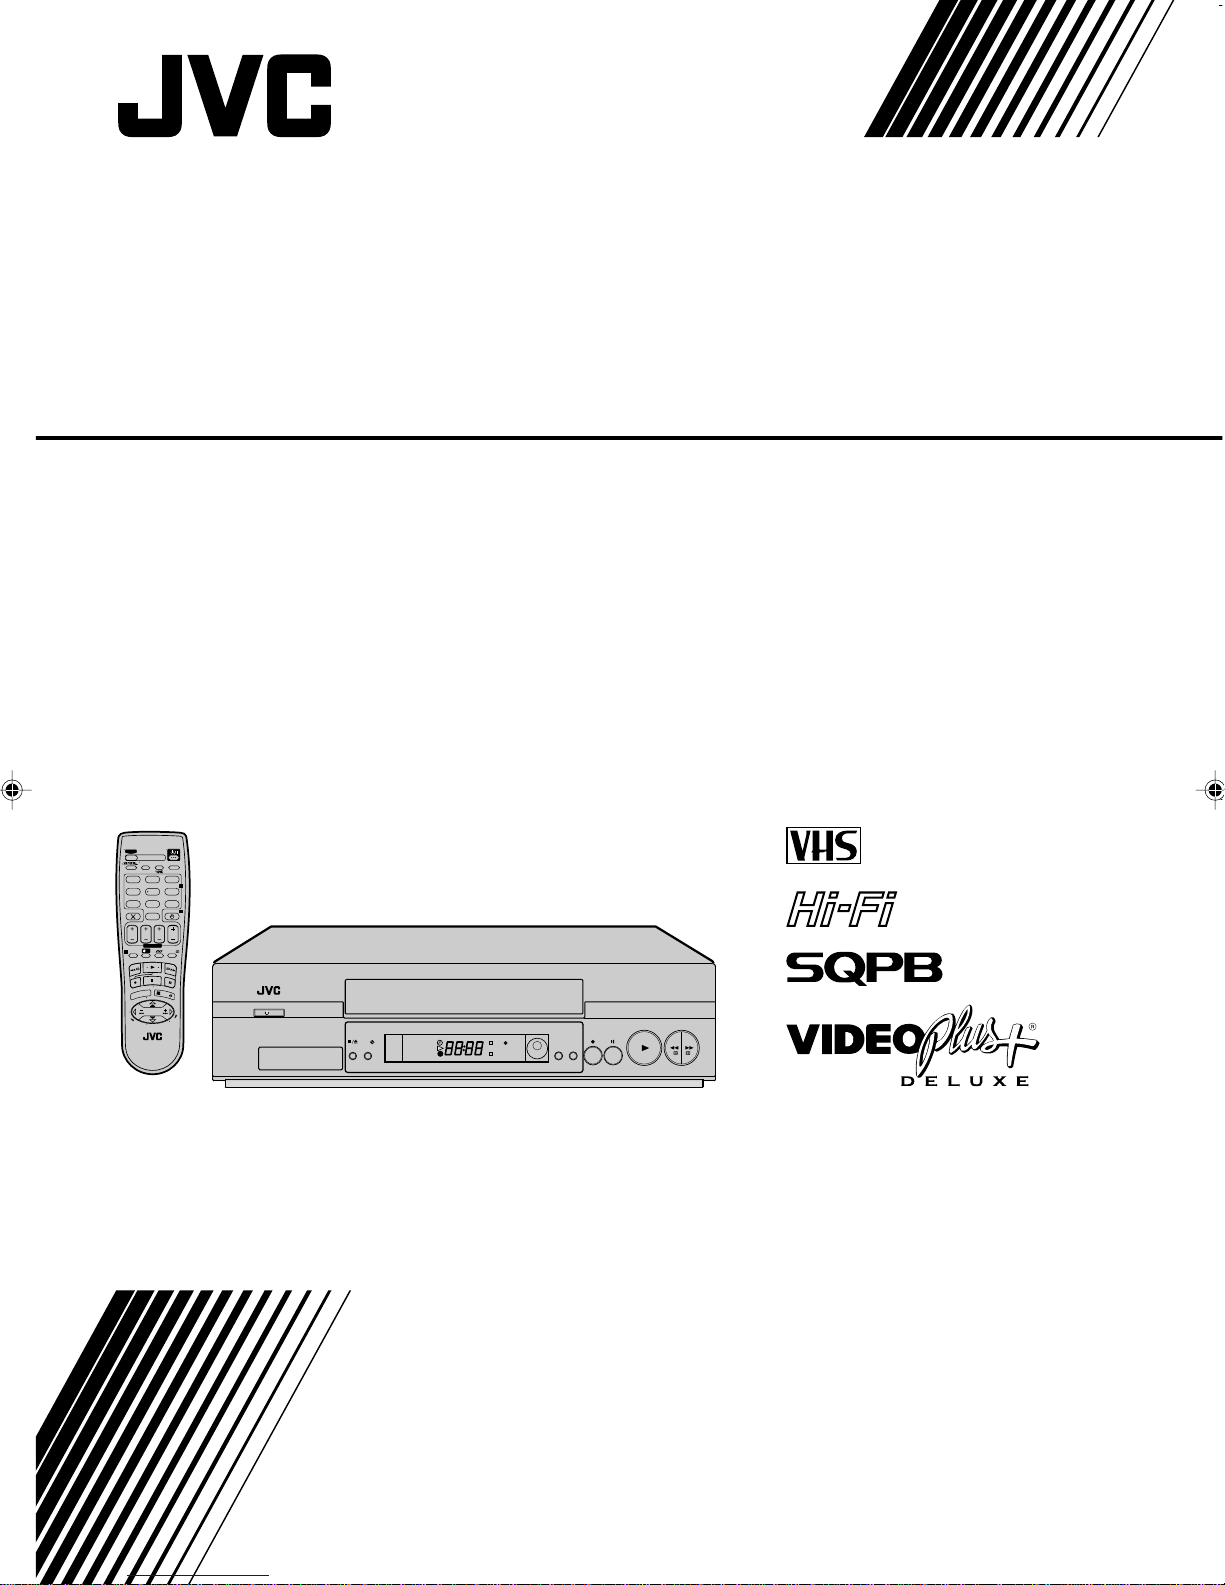
JVC HR-J695EK User manual

HR-J695EK
HR-J696EK
VIDEO CASSETTE RECORDER
INSTRUCTIONS
LPT0630-001A
PAL
T
V
P
R
+
T
V
P
R
–
T
V
–
T
V
+
0000
STOP
FIN
MENU
OK
TV/VCR
DAILY/QTDN.
VPS/PDC
AUX
WEEKLY/HEBDO
PROG 30 SEC
– –:– –
AUDIO
123
465
789
0
DATE
START
DEBUT
PR
4
1
3
E
N
T
E
R
/
E
N
T
R
E
E
EXPRESS
TV
?
2
/
LP00000-000
VCR/TV
/I
VCR
SAT
SAT
REVIEW
-
+
PR
Cover 5/28/02, 11:58 AM1

safety first2
Safety Precautions
The rating plate and the safety caution are on the rear of the unit.
WARNING: DANGEROUS VOLTAGE INSIDE
WARNING: TO PREVENT FIRE OR SHOCK HAZARD, DO NOT EXPOSE THIS UNIT TO RAIN
OR MOISTURE.
IMPORTANT
■Please read the various precautions on pages 2–4 of this instruction manual before installing or
operating the recorder.
■It should be noted that it may be unlawful to re-record pre-recorded tapes, records, or discs
without the consent of the owner of copyright in the sound or video recording, broadcast or cable
programme and in any literary, dramatic, musical, or artistic wor embodied therein.
IMPORTANT
Connect on to the ma ns supply n the Un ted K ngdom. DO NOT cut off the ma ns plug from
th s equ pment. If the plug fitted is not suitable for the power points in your home or the cable is
too short to reach a power point, then obtain a proper safety approved extension lead/adapter or
consult your dealer.
In the unl kely event of the plug fuse fa l ng be sure to replace the fuse only w th an dent cal
approved type, as or g nally f tted, and to replace the fuse cover. If the fuse fa ls aga n consult
your nearest JVC dealer.
If nonetheless the mains plug is cut off remove the fuse and dispose of the plug immediately, to
avoid a possible shoc hazard by inadvertent connection to the mains supply.
If this product is not supplied fitted with a mains plug then follow the instructions given below:
DO NOT ma e any connection to the Larger Terminal coded E or Green.
The wires in the mains lead are coloured in accordance with the following code:
Blue to N (Neutral) or Blac
Brown to L (Live) or Red
If these colours do not correspond with the terminal identifications of your plug, connect as
follows:
Blue wire to terminal coded N (Neutral) or coloured Blac .
Brown wire to terminal coded L (Live) or coloured Red.
If in doubt — consult a competent electrician.
CAUTION
■When you are not using the recorder for a long period of time, it is recommended that you
disconnect the power cord from the mains outlet.
■Dangerous voltage inside. Refer internal servicing to qualified service personnel. To prevent
electric shoc or fire hazard, remove the power cord from the mains outlet prior to connecting or
disconnecting any signal lead or aerial.
HR-J695/696EK-EN/p02-07 5/28/02, 11:02 AM2

safety first 3
The STANDBY/ON o button does not completely shut off mains power from the unit, but switches
operating current on and off. “y ” shows electrical power standby and “ z” shows ON.
Video tapes recorded with this video recorder in the LP (Long Play) mode cannot be played bac on
a single-speed video recorder.
When the equipment is installed in a cabinet or a shelf, ma e sure that it has sufficient space on all sides
to allow for ventilation (10 cm or more on both sides, on top and at the rear.)
When discarding batteries, environmental problems must be considered and the local rules or laws
governing the disposal of these batteries must be followed strictly.
Failure to heed the following precautions may result in damage to the recorder, remote control or video
cassette.
1. DO NOT place the recorder…
… in an environment prone to extreme temperatures or humidity.
… in direct sunlight.
… in a dusty environment.
… in an environment where strong magnetic fields are generated.
… on a surface that is unstable or subject to vibration.
2. DO NOT block the recorder’s vent lat on open ngs or holes.
(If the ventilation openings or holes are bloc ed by a newspaper or cloth, etc., the heat may not be
able to get out.)
3. DO NOT place heavy objects on the recorder or remote control.
4. DO NOT place anyth ng wh ch m ght sp ll on top of the recorder or remote control.
(If water or liquid is allowed to enter this equipment, fire or electric shoc may be caused.)
5. DO NOT expose the apparatus to dr pp ng or splash ng.
6. DO NOT use th s equ pment n a bathroom or places w th water. Also DO NOT place any con-
tainers filled with water or liquids (such as cosmetics or medicines, flower vases, potted plants,
cups, etc.) on top of this unit.
7. DO NOT place any naked flame sources, such as l ghted candles, on the apparatus.
8. AVOID v olent shocks to the recorder dur ng transport.
MOISTURE CONDENSATION
Moisture in the air will condense on the recorder when you move it from a cold place to a warm place,
or under extremely humid conditions—just as water droplets form in the surface of a glass filled with
cold liquid. Moisture condensation on the head drum will cause damage to the tape. In conditions
where condensation may occur, eep the recorder turned on for a few hours to let the moisture dry.
ATTENTION
TO MOBILE PHONE USERS:TO MOBILE PHONE USERS:
TO MOBILE PHONE USERS:
Using a mobile phone in the vicinity of the recorder may cause picture vibration on the TV screen or
change the screen to a blue bac display.
ON PLACING THE RECORDER:ON PLACING THE RECORDER:
ON PLACING THE RECORDER:
Some TVs or other appliances generate strong magnetic fields. Do not place this appliance on top of the
recorder as it may cause picture disturbance.
■Cassettes mar ed “VHS” (or “S-VHS”) can be used with this video cassette recorder. However, S-VHS
recording is not possible with this model.
■This model is equipped with SQPB (S-VHS QUASI PLAYBACK) that ma es it possible to play bac
S-VHS recordings in the SP mode with regular VHS resolution.
■HQ VHS is compatible with existing VHS equipment.
■VIDEO Plus+ and PlusCode are registered trademar s of Gemstar Development Corporation. The
VIDEO Plus+ system is manufactured under license from Gemstar Development Corporation.
HR-J695/696EK-EN/p02-07 5/28/02, 11:02 AM3

safety first4
Some Do’s And Don’ts
On The Safe Use Of Equipment
This equipment has been designed and manufactured to meet international safety standards but, li e
any electrical equipment, care must be ta en if you are to obtain the best results and safety is to be
assured.
DO read the operating instructions before you attempt to use the equipment.
DO ensure that all electrical connections (including the mains plug, extension leads and interconnec-
tions between pieces of equipment) are properly made and in accordance with the manufacturer’s
instructions. Switch off and withdraw the mains plug when ma ing or changing connections.
DO consult your dealer if you are ever in doubt about the installation, operation or safety of your
equipment.
DO be careful with glass panels or doors on equipment.
DON’T continue to operate the equipment if you are in any doubt about it wor ing normally, or if it is
damaged in any way — switch off, withdraw the mains plug and consult your dealer.
DON’T remove any fixed cover as this may expose dangerous voltages.
DON’T leave equipment switched on when it is unattended unless it is specifically stated that it is
designed for unattended operation or has a standby mode. Switch off using the switch on the
equipment and ma e sure that your family nows how to do this. Special arrangements may
need to be made for infirm or handicapped people.
DON’T use equipment such as personal stereos or radios so that you are distracted from the require-
ments of road safety. It is illegal to watch television whilst driving.
DON’T listen to headphones at high volume, as such use can permanently damage your hearing.
DON’T obstruct the ventilation of the equipment, for example with curtains or soft furnishings.
Overheating will cause damage and shorten the life of the equipment.
DON’T use ma eshift stands and NEVER fix legs with wood screws — to ensure complete safety
always fit the manufacturer’s approved stand or legs with the fixings provided according to the
instructions.
DON’T allow electrical equipment to be exposed to rain or moisture.
ABOVE ALL...
—NEVER let anyone especially children push anything into holes, slots or any other opening in
the case — this could result in a fatal electrical shoc ;
—NEVER guess or ta e chances with electrical equipment of any ind — it is better to be safe than
sorry!
HR-J695/696EK-EN/p02-07 5/28/02, 11:02 AM4

Contents
Diagrams of Equipment ................................ 6
Equipment Key .............................................
Welcome to JVC ............................................8
Three-Step Quick Start............................... 10
Basic Features ............................................ 13
Advanced Features .................................... 28
Subsidiary Information .............................. 54
List of Terms .............................................. 58
HR-J695/696EK-EN/p02-07 5/28/02, 11:02 AM5

diagrams of equipment6
front panel
isplay
rear panel
/I
SAT -+PR
1 2
3 4 5 6 7 8 9 10 11 12
VCRSAT
REVIEW
VCR
SAT
REVIEW
1
2
3
4 5
67
ENTREE
ANT. IN
ENTREE/DECODEUR
IN/DECODER
ENTREE/SORTIE
IN/OUT
SORTIE
RF OUT
ANTENNE
SORTIE
OUT
R
L
AUDIO
CONTROLEUR SAT
SAT CONTROL
L-1L-2
010
1
7
45
3
2
6
T
V
P
R
+
T
V
P
R
–
T
V
–
T
V
+
0000
STOP
FIN
MENU
OK
TV/VCR
DAILY/QTDN.
VPS/PDC
AUX
WEEKLY/HEBDO
PROG 30 SEC
– –:– –
AUDIO
123
465
789
0
DATE
START
DEBUT
PR
4
1
3
E
N
T
E
R
/
E
N
T
R
E
E
EXPRESS
TV
?
2
/
LP00000-000
VCR/TV
t
u
p
2
7
6
1
8
3
9
4
0
!
@
#
$
^
&
w
e
r
o
i
%Q
5
y
q
)
(
*
remote control
*DECODER function is not available in the UK.
HR-J695/696EK-EN/p02-07 5/28/02, 11:02 AM6

equipment key 7
FRONT PANEL
1STANDBY/ON o Button
turns VCR on/off (loading a
cassette also turns power on).
2Cassette Load ng Slot is
where cassette is inserted;
door closes.
3§ Button stops tape;
ejects tape during Stop ode.
4SATc Button enables/
disables the Auto Satellite
Progra e Recording ode.
5D splay Panel provides
clear view of various displays
and indicators.
6Infrared Beam Rece v ng
W ndow is where Re ote
Control should be ai ed when
in use.
7PR+/- Buttons select a
preset position.
8T Button starts regular
recording (press once), Instant
Ti er Recording (press twice);
sets duration of ITR.
9| Button stops tape
te porarily during recording;
stops tape te porarily during
playback; plays back fra e by
fra e with each additional
press.
10 . Button plays back tape;
cancels Pause, Still, Slow,
Search odes.
11 < Button rewinds
the tape; initiates high-speed
reverse search.
12 > Button fast-
forwards tape; initiates high-
speed forward search.
REAR PANEL
1Ma ns Power Cord
supplies power to VCR.
2SAT CONTROL Connector
enables connection of the
provided Satellite Controller
for ti er recording with a
satellite receiver.
3ANT. IN Connector enables
connection of aerial.
4L-2 IN/DECODER
Connector enables connection
of satellite receiver or second
recorder.
Diagram Key
* DECODER function is not available in the
UK.
REMOTE CONTROL
1TV Button enables Re ote
Control of your JVC TV.
2TV/VCR Button switches
connected TV’s ode between
TV and AV.
3rButton
‘reviews’ ti er-recorded
progra e.
4Number Keys are used in
preset position selection and
the VIDEO Plus+ Ti er
Progra ing.
5PDC Button enables/
disables PDC recording.
* VPS (Video Progra e
Syste ) recording is not currently
available in the U.K. and not
possible with this VCR.
6 x Button cancels ti er-
progra e.
0000 Button resets
counter on the on-screen
display to ‘0:00:00’.
7STOP +/– Button inputs
progra e Stop Ti e.
8START +/– Button
accesses Regular Progra
screen; inputs progra e
Start Ti e.
9PROG Button accesses
VIDEO Plus+ Progra screen.
10 C Button accesses
Progra screens/displays to
check the progra e that you
have progra ed (next
progra e’s infor ation
screen appears each ti e
button is pressed).
11 < Button — sa e as
button on VCR.
12 T Button — sa e as
button on VCR.
13 S Button stops tape.
14 m Button accesses
Menu screen.
17 AUDIO Button changes
output sound ode.
(TV Mut ng) Button
utes sound of connected JVC
TV.
18 b(D splay) Button
switches display between
clock ti e and Preset
Position* (or Mode).
* Preset Position (or Mode) is not
displayed during playback.
19 DAILY Button enables
ti er recording of daily
serials.
20 WEEKLY Button enables
ti er recording of weekly
serials.
21 AUX Button selects VCR’s
auxiliary input ode.
22 c Button engages ti er-
standby ode.
23 DATE +/– Button inputs
date of progra e for ti er
recording.
24 PR +/– Button selects a
preset position.
25 Auto Track ng Button
enables/disables auto
tracking ode during
playback.
/ Button selects tape
speed.
26 3 Button
initiates a 30-second period of
fast- otion playback.
27 . Button — sa e as
button on VCR.
28 > Button — sa e as
button on VCR.
29 | Button — sa e as
button on VCR.
30 Button enters
selections ade in on-screen
enus.
Button — Shows
current VCR status on the TV
screen if O.S.D is set to ON.
31 D E Buttons initiate
functions such as Index
Search, variable-speed search,
fra e by fra e playback.
TV +/– Buttons control
volu e of connected JVC TV.
5L-1 IN/OUT Connector
enables AV connection to TV
or second VCR.
6AUDIO OUT (L/R)
Connectors enable connection
of audio cassette recorder, TV
or second VCR for dubbing.
7RF. OUT Connector enables
connection to aerial ter inal
of TV receiver.
VCR DISPLAY PANEL
1c Ind cator lights when
the c button has been
pressed to engage Ti er
ode.
2Play Ind cator lights up
during playback; blinks during
Repeat Playback or when
using Next Function Me ory
for playback.
3Record Ind cator lights up
during recording; blinks
during Instant Ti er
Recording.
4Channel D splay shows
preset position where the
station currently being
received is stored.
Mode shows external input
ode selected (L-1 or L-2).
Clock D splay shows
current ti e.
Preset Position* (or Mode)
and Clock Display appear
alternately when b is
pressed.
* Preset Position (or Mode) is
not displayed during playback.
5REVIEW Ind cator blinks
after ti er-recording and
shows how any progra es
have been ti er-recorded.
6SATc Ind cator lights up
during Auto Satellite
Progra e Recording
standby ode; blinks when
Auto Satellite Progra e
Recording is in progress.
7VCR Ind cator lights when
the VCR is in the video ode.
At this point, the TV auto ati-
cally enters AV ode.
15 AB Buttons are
used for selection in on-screen
enus.
TV PR +/– Buttons selects
the connected JVC TV's
channel.
16 STANDBY/ON o Button
— sa e as button on VCR.
OK
3
/
HR-J695/696EK-EN/p02-07 5/28/02, 11:02 AM7

welcome to jvc8
before you start
Please read the SAFETY
FIRST on pages 2–4
it tells you about some
safety points
Refer to the diagrams on
pages 6–7 when reading
through these
instructions
Refer to the List of
Terms on page 58 if you
need an explanation for
any terms in this manual
Video Cassette Recorder
AA Batteries x 2
Welcome to JVC
Than you for choosing JVC.
We hope that you will get many hours of enjoy-
ment from your new unit.
In just three easy steps you will be ready to enjoy the exceptional perfor-
mance of your new VCR. More detailed instructions begin on page 0. They
will explain how to use the many sophisticated features this VCR boasts.
Getting Everything Ready
check the contents Unpack the box and place the VCR on a flat, stable surface.
Check that you have the items shown below.
/I
SAT
VCRSAT
REVIEW
-
+
PR
T
V
P
R
+
T
V
P
R
–
T
V
–
T
V
+
0000
STOP
FIN
MENU
OK
TV/VCR
DAILY/QTDN.
VPS/PDC
AUX
WEEKLY/HEBDO
PROG 30 SEC
– –:– –
AUDIO
123
465
789
0
DATE
START
DEBUT
PR
4
1
3
E
N
T
E
R
/
E
N
T
R
E
E
EXPRESS
TV
?
2
/
LP00000-000
VCR/TV
RF CableSatellite Controller
Infrared Remote
Control Unit
HR-J695/696EK-EN/p08-12 5/28/02, 11:03 AM8

welcome to jvc 9
GETTING EVERYTHING READY (continued)
connect cables Connect the cables as indicated in the diagram (below , using
the TV Aerial Cable, the RF Cable and the 2 -pin SCART Cable (not provided .
scart and rf
CART is a
recommended option
because its use
improves the quality of
the picture.
If connecting to a stereo
TV you will need a
CART cable.
There are several types
of CART cables, fully-
wired and others.
If you use a CART
cable, you must also
connect the RF cable. You are now ready to start the Three-Step Quick Start which begins on the next
page.
You have two ways for initial setup of your new VCR depending upon the
connection method and your TV.
If you have connected only the RF cable,
perform Auto Setup (墌 pg. 10).
If you have connected both the RF cable and the fully-
wired 2 -pin SCART cable, and if your TV does not offer
T-VLink, etc.*,
perform Auto Setup (墌 pg. 10).
If you have connected both the RF cable and the fully-
wired 2 -pin SCART cable, and if your TV offer T-VLink,
etc.*,
perform Preset Download (墌 pg. 11).
* Compatible with TVs offering T-VLink, EasyLink, Megalogic, SMARTLINK,
Q-Link, DATA LOGIC or NexTView Link via fully-wired 21-pin SCART cable.
The degree of compatibility and available functions may differ by system.
ENTREE
ANT. IN
ENTREE/DECODEUR
IN/DECODER
L-2
ENTREE/SORTIE
IN/OUT
SORTIE
RF OUT
ANTENNE
L-1
SORTIE
OUT
R
L
AUDIO
CONTROLEUR SAT
SAT CONTROL
010
RF Cable
(provided)
TV Aerial
Cable
(not
provided)
21-pin CART Cable
(not provided)
Mains Power
Cord
Mains Outlet
Back of VCR
*DECODER function is not available in the UK.
HR-J695/696EK-EN/p08-12 5/28/02, 11:03 AM9

three-step quick start1
before you start
Check that the VCR is
turned off and no
cassette is inserted
Load the batteries into
the Remote Control
Refer to the Remote
Control diagram
on pages 6–7
Unless indicated
otherwise, use the
buttons on the Remote
Control
Check that the
connection is completed
Turn on the TV
T
V
P
R
+
T
V
P
R
–
T
V
–
T
V
+
TV
0000
STOP
FIN
MENU
OK
TV/VCR
DAILY/QTDN.
VPS/PDC
AUX
?
WEEKLY/HEBDO
PROG 30 SEC
––:––
AUDIO
123
465
789
0
DATE
START
DEBUT
PR
2
4
1
3
E
N
T
E
R
/
E
N
T
R
E
E
EXPRESS
VCR
SAT
REVIEW
VCR
SAT
REVIEW
P
R
+
E
N
T
E
R
/
E
N
T
R
E
E
OK
3
/
––:––
O
TE PR
Three-Step Quic Start
For Step , be sure to perform either of the methods:
Auto Setup or Preset Download.
Auto Setup
START AUTO SETUP
Press the o button. If ‘Auto’ appears on the display panel, press
OK
3
/
(or E.
what will happen? The display panel on the front of the VCR will show the
word ‘Auto’. Do not press any button on the VCR or the Remote Control.
note If you have connected both the RF cable and the fully-wired 21-pin SCART
cable, and if your TV offers T-VLink, etc., and the TV is turned on, the VCR
automatically performs the Preset Download (墌 pg. 11 even if you select ‘Auto’
for Auto Setup function.
The VCR is automatically setting up the tuner
channels, clock, the VIDEO Plus+ assigned Guide
Program numbers and the video channel. This only
happens the first time that the VCR is turned on.
rf and scart connection If you have chosen to
connect the VCR to the TV with both the RF Cable
and a 21-pin SCART Cable (not provided and the
TV set is in its AV mode (see the TV manual , you
will see the following information displayed on
your TV screen:
SELECT THE VIDEO CHANNEL
When Auto Setup has finished, you will see the following display panel on your VCR:
rf cable only If you have only used the RF
Cable to connect the VCR to the TV, you will
see this display. The number is the channel on
the TV that the Auto Setup has chosen to be the
video channel. In the example, we have presumed that channel 36 is vacant and
have set the VCR to 36:
Now tune the TV set to channel 36 (refer to TV manual if
necessar ; you should see two vertical white bars appear
on the TV screen. If the bars do not appear or are not
clear, choose another vacant channel pressing PR button
on the Remote Control and try again. If you cannot obtain
the vertical white bars on any channel between 22 and 69,
consult your local JVC dealer.
rf and scart connection If you have chosen
to connect the VCR to the TV with both the RF
Cable and a 21-pin SCART Cable (not provided ,
you need to press the PR button on the Remote
Control until the figure reads ‘– –’. This is because you will use the TV in AV mode
to view video pictures and therefore do not need a dedicated video channel.
Auto Setup is running: don’t
touch any buttons
Your TV screen during Auto Setup if SCART is used
VCR
SAT
REVIEW
AUTO SET
PLEASE WAIT
[MENU]: EXIT
HR-J695/696EK-EN/p08-12 5/28/02, 11:03 AM10

three step quick start 11
T
V
P
R
+
T
V
P
R
–
T
V
–
T
V
+
TV
0000
STOP
FIN
MENU
OK
TV/VCR
DAILY/QTDN.
VPS/PDC
AUX
?
WEEKLY/HEBDO
PROG 30 SEC
––:––
AUDIO
123
465
789
0
DATE
START
DEBUT
PR
2
4
1
3
E
N
T
E
R
/
E
N
T
R
E
E
EXPRESS
P
R
+
E
N
T
E
R
/
E
N
T
R
E
E
OK
3
/
before you start
Check that the VCR is
turned off and no
cassette is inserted
Load the batteries into
the Remote Control
Refer to the Remote
Control diagram
on pages 6–7
Unless indicated
otherwise, use the
buttons on the Remote
Control
Check that the
connection is completed
Be sure to use the fully-
wired 21-pin CART cable
Turn on the TV whose
channels have already
been stored
Preset Download
START PRESET DOWNLOAD
Press the o button. The display panel on the
front of the VCR will show the word ‘Auto’.
Press the A or B buttons to select
‘CH – –’ and press
OK
3
/
(or E.
what will happen? The VCR is automati-
cally setting up the tuner channels by down-
loading from your TV, clock and the VIDEO
Plus+ system assigned Guide Program
numbers. During downloading, preset position
on the display panel increases from “CH1”.
rf and scart connection If the TV set is in its AV mode (see the TV
manual , you will see the following information displayed on your TV screen:
SET THE VIDEO CHANNEL TO OFF
When Preset Download has finished, ‘COM-
PLETED’ appears on the TV screen. Press o to
turn off the VCR. Press and hold down S on
the VCR until you will see the display on the
right. Press PR Button on the Remote Control until the figure reads ‘– –’.
FINISH PRESET DOWNLOAD
Press and move on to Step 2 to check the results.
oops! If there is a power cut or you accidentally press a button during Preset
Download, turn the VCR off and then on again. Re-perform Preset Download.
NOTES
• In areas where no TV station transmits the PDC signal, the VCR cannot setup
either the clock or Guide Program numbers.
• On this VCR, the characters available for station names (ID are A–Z, 0–9, –,
*, + and (space . The names of some downloaded stations may differ from
those on your TV.
Preset Download is running:
don’t touch any buttons
VCR
SAT
REVIEW
VCR
SAT
REVIEW
Your TV screen during Preset
Download
T-VLINK
PLEASE WAIT
[MENU]: EXIT
GUIDE PROG SET
PLEASE WAIT
[MENU]: EXIT
VCR
SAT
REVIEW
FINISH AUTO SETUP
Press and move on to Step 2 to check the results.
oops! If there is a power cut or you accidentally press a button during Auto
Setup, turn the VCR off and then on again. Re-perform Auto Setup.
––:––
O
OK
3
/
T
V
P
R
+
T
V
P
R
–
T
V
–
T
V
+
MENU
E
N
T
E
R
/
E
N
T
R
E
E
TE PR
OK
3
/
OK
3
/
HR-J695/696EK-EN/p08-12 5/28/02, 11:03 AM11

three-step quick start12
Check the Results
When Auto Setup or Preset Download finishes, you will see one of the three
following examples on the VCR display panel:
The Preset Positions and the Cloc have been set successfully
Go straight to Step 3 (20:00 used as example only .
The Preset Positions have been set successfully but the Cloc has not
Perform Clock Set on page 52.
Go to Step 3.
Neither the Preset Positions or the Cloc have been set successfully
Make sure the cables are connected properly to the VCR and turn
the VCR off and then on again. Try Auto Set Up or Preset Download
again.
Finish Off
Select the Video channel or AV mode, then make sure that all necessary stations
have been stored in the VCR’s memory by using the A and B buttons.
If station names (ID — 墌 pg.50 have also been stored in the VCR’s memory, the
station name will be displayed at the top left corner of the TV screen for about 5
seconds each time you select a different channel via the VCR.
The VCR is now set up. You can now use it to play and record.
IMPORTANT
•re-running setup Auto Setup or Preset Download may not behave as
described if it has already been run on the VCR. This is because some of the
information gathered on the first Auto Setup or Preset Download is retained in
memory and that part of the process may be skipped by the VCR.
•bad reception In certain reception conditions, station names may not be
stored correctly, and Guide Program Numbers may not be set properly. If this
happens, when you timer-record a TV programme using the VIDEO Plus+
system, the VCR will record a TV programme of a different station. When
programming the timer using the VIDEO Plus+ system, be sure to check that
the preset position corresponding to the broadcasting station you wish to
record has been selected (墌 pg.21, VIDEO Plus+ Timer Programming .
•duplicate stations You may be able to receive the same station from two
different transmitters in which case Auto Setup will detect and store both. It is
normal for one transmitter to give you a better quality picture than the other; to
delete those stations which have a poor picture 墌 Delete A Channel on page48.
•manual station setting If any of the above problems occur, refer to
pages48–49 to input station names (墌 Change Station Name . You can also
change station preset positions (墌 Change Station Preset Position .
•rf connections In certain reception conditions, the Video Channel may not
be set correctly and interference may appear in the TV picture while the VCR’s
power is on. Set your Video Channel manually. (墌 pg.45, Video Channel Set
IF YOU HAVE ANY DIFFICULTY WITH THE ABOVE PROCEDURES CALL THE JVC
CUSTOMER SERVICE HOT LINE ON 87 33 5
T
V
P
R
+
T
V
P
R
–
T
V
–
T
V
+
TV
0000
STOP
FIN
MENU
OK
TV/VCR
DAILY/QTDN.
VPS/PDC
AUX
?
WEEKLY/HEBDO
PROG 30 SEC
––:––
AUDIO
123
465
789
0
DATE
START
DEBUT
PR
2
4
1
3
E
N
T
E
R
/
E
N
T
R
E
E
EXPRESS
OK
3
/
T
V
P
R
+
T
V
P
R
–
T
V
–
T
V
+
MENU
E
N
T
E
R
/
E
N
T
R
E
E
HR-J695/696EK-EN/p08-12 5/28/02, 11:03 AM12

Basic
Features
Playback..................................................... 14
Playback Features ...................................... 16
Recording ................................................... 18
VIDEO Plus+ Timer Programming ............ 21
Express Timer Programming ...................... 24
HR-J695/696EK-EN/p13-20 5/28/02, 11:04 AM13

basic features14
before you start
Turn the TV on
Tune the TV to your
Video Channel or to its
AV mode
ntsc tapes
If an NTSC tape is
played, ‘NTSCaPAL’
appears on screen for
about seconds
Some TVs will shrink
the picture and place
black bars at the top and
bottom of the screen.
This is not a malfunction
but you may lose some
on-screen information
The picture may roll up
or down. Correct this by
adjusting the vertical
hold on the TV set
The counter and tape
remaining times will be
incorrect
The picture will be
distorted during search,
still or frame-by-frame
playback
Playback
Playback is the most basic operation possible with your VCR. Audio-visual
information recorded on a cassette will be played back on your V screen
just like a broadcast programme.
Load a Video Cassette
Make sure that the window side of the cassette is facing up and the spine label is
facing away from the VCR. Insert the cassette as shown in the diagram below;
don’t use too much force. If the VCR was turned off before you inserted the
cassette, the power will come on automatically.
he counter on the V screen will reset to read
‘0:00:00’. If the record safety tab on the video
cassette has been removed, playback begins
automatically.
Play
If the cassette that you inserted does not start playing automatically, press the .
button on the VCR or the Remote Control. ‘bESt’ appears blinking in the display
panel during automatic tracking (墌 pg.29).
Stop & Eject
stop Press the § button on the VCR or the S button on the Remote
Control once to stop playback.
eject Press the § button on the VCR a second time to eject the cassette
from the VCR. he cassette will take about 6 seconds to appear once the §
button has been pressed.
NO E: You can also eject the cassette while the VCR is turned off.
/I
SAT
VCRSAT
REVIEW
-
+
PR
HR-J695/696EK-EN/p13-20 5/28/02, 11:04 AM14

basic features 15
Rewind and Fast Forward
During Stop Mode:
rewind Press the < button on the VCR or the Remote Control.
fast forward Press the > button on the VCR or the Remote Control.
SQPB
his VCR is equipped with SQPB (S-VHS QUASI PLAYBACK) that lets you
watch tapes recorded in the S-VHS format and the SP mode, with regular VHS
resolution.
NOTES:
• SQPB does not deliver Super VHS resolution.
• S-VHS recording is not possible with this VCR.
• When you play back a tape recorded in S-VHS format and the SP mode, noise
may appear in the still, slow motion, or frame-by-frame playback mode.
• Depending on the tape, noise may appear during normal playback.
Video Heads Cleaning
he heads get dirty in the following cases:
• In an environment prone to extreme temperature or humidity.
• In a dusty environment.
• Flaw, dirt or mold on video tapes.
• Continuous usage for a long time.
Use a dry cleaning cassette — JVC CL-2 — in the following cases:
• Rough, poor picture appears while a tape is played back.
• he picture is unclear or no picture appears.
• ‘USE CLEANING CASSE E’ appears on the screen (only with ‘O.S.D.’ set to
‘ON’ (墌 pg.41)).
HR-J695/696EK-EN/p13-20 5/28/02, 11:04 AM15

basic features16
Playback Features
Pause During Playback
Press the | button on the VCR or the Remote Control.
• If the paused picture on the V screen jumps vertically, press the PR button
on the Remote Control until the picture is steady.
• Press . to resume playback.
Single Frame Movement
You can move backward or forward from the still picture in one of two ways:
method one Press the | button on the Remote Control. Each time the |
button is pressed, the frame will move forward one frame.
method two Press D or E on the Remote Control. Each time one of
these buttons is pressed, the frame will advance or move back one frame.
• Press . to resume playback.
HR-J695/696EK-EN/p13-20 5/28/02, 11:04 AM16

basic features 17
Slow Motion
his VCR will play your cassette forwards or backwards in slow motion. You can
make it do this in one of two ways:
method one During still picture, press and hold | on the Remote Control for
2 seconds, then release. Press and release | again to return to still picture.
method two During still picture, press and hold the D or E button on
the Remote Control. he picture will return to still when you release the button.
• If the slow motion picture on the V screen jumps vertically, press the PR
button on the Remote Control until the picture is steady.
• Press . to resume playback.
Variable Speed Search
During playback, press the D or E button on the Remote Control. he
more times that you press either button, the faster the rate of search. o decrease
the speed of search, press the button for the opposite direction.
• Press . to resume playback.
High Speed Search
You can perform a high speed search in either direction. During playback or still
picture, press the > on the Remote Control for forward high speed search,
or the < button for reverse high speed search. If either button is pressed
for more than 2 seconds, normal playback will resume the moment you release
the button.
• Press . to resume playback.
NOTES:
In the search, still, slow motion or frame-by-frame playback mode
• he picture will be distorted
• he noise bars will appear
• here will be a loss of colour with an LP-recorded tape.
T
V
P
R
+
T
V
P
R
–
T
V
–
T
V
+
TV
0000
STOP
FIN
MENU
OK
TV/VCR
DAILY/QTDN.
VPS/PDC
AUX
?
WEEKLY/HEBDO
PROG 30 SEC
– –:– –
AUDIO
123
465
789
0
DATE
START
DEBUT
PR
2
4
1
3
E
N
T
E
R
/
E
N
T
R
E
E
EXPRESS
T
V
P
R
+
MENU
OK
?
PROG 30 SEC
1
3
E
N
T
E
R
/
E
N
T
R
E
E
TE PR
OK
3
/
T
V
P
R
+
T
V
P
R
–
T
V
–
T
V
+
MENU
E
N
T
E
R
/
E
N
T
R
E
E
HR-J695/696EK-EN/p13-20 5/28/02, 11:04 AM17

basic features1
before you start
Turn the TV on
Tune the TV to your
Video Channel or to its
AV mode
Choose a blank
cassette which has the
record safety tab still in
place
Record
Safety Tab
Load the cassette into
the VCR (see page 14)
T
V
P
R
+
T
V
P
R
–
T
V
–
T
V
+
TV
0000
STOP
FIN
MENU
OK
TV/VCR
DAILY/QTDN.
VPS/PDC
AUX
?
WEEKLY/HEBDO
PROG 30 SEC
––:––
AUDIO
123
465
789
0
DATE
START
DEBUT
PR
2
4
1
3
E
N
T
E
R
/
E
N
T
R
E
E
EXPRESS
T
V
P
R
+
MENU
OK
?
PROG 30 SEC
1
3
E
N
T
E
R
/
E
N
T
R
E
E
TE PR
Recording
V signals being received by the recorder’s built in tuner can be recorded
onto a video tape. You can ‘capture’ a V programme using your VCR.
Choose a Programme
Press PR +/– or the number keys on the Remote Control or PR +/– on the VCR
to select the channel that you wish to record.
Set the ape Speed
Press / • he current setting for the tape speed appears on the on-screen
display or the VCR display panel for about 5 seconds. Press /again to
change the setting while tape speed is displayed. You can choose Standard Play
(SP) or Long Play (LP). he picture quality on LP recordings will not be as high
as on SP recordings, but the tape will last longer.
Start Recording
here are two ways to start recording:
method one Press and hold T and then press . on the Remote Control.
method two Press T on the VCR.
When “DIREC REC” is set to “ON” (墌pg. 33), if you press any button just
after pressing Ton the VCR (or Tand . on the Remote Control), the recorder
may not function properly.
Pause and Resume During Recording
On either the VCR or the Remote Control, press | to temporarily stop recording
and press . to resume. You cannot change the preset position on the VCR while
it is recording but you can while it is paused (see Choose a Programme at the top
of this page).
HR-J695/696EK-EN/p13-20 5/28/02, 11:04 AM18

basic features 19
Notes on Recording
When using both the RF and SCAR connections, you can switch between V
and VCR by pressing the V/VCR button on the Remote Control.
If the tape reaches its end during recording, the recording stops and “U” and
“,” on the display panel blink. Press S/0on the VCR to eject the tape or press
<to rewind the tape.
Display ape Remaining ime
Press the bbutton so that the tape remaining time is shown on the V
screen with ‘REMAIN’ indication. he on-screen information will disappear
after about 5 seconds.
non-standard tapes Sometimes, a tape will not conform to the standards
accepted by this VCR. In such cases the tape remaining time may not appear
immediately, be incorrect or simply show as ‘– – : – –’.
Change Display Information
By pressing the bbutton repeatedly, you can change the display on the VCR
between the clock time and the preset position. he preset position cannot be
shown during playback.
Resetting the Counter
Press the bbutton so that the counter display appears on the V screen.
While the display is shown, press the 0000 button. You can reset the counter to
‘0:00:00’ before starting playback or recording.
Record a Programme While Watching Another
Once you have started recording all you need to do is use the controls on your
V set to tune to a different programme. he programme set using the PR
button on the Remote Control is the one which will be recorded.
T
V
P
R
+
T
V
P
R
–
T
V
–
T
V
+
TV
0000
STOP
FIN
MENU
OK
TV/VCR
DAILY/QTDN.
VPS/PDC
AUX
?
WEEKLY/HEBDO
PROG 30 SEC
––:––
AUDIO
123
465
789
0
DATE
START
DEBUT
PR
2
4
1
3
E
N
T
E
R
/
E
N
T
R
E
E
EXPRESS
TV/VCR AU
2
––:––
O
3
0000
7
TE PR
HR-J695/696EK-EN/p13-20 5/28/02, 11:04 AM19

basic features20
Recording Resume Function
If there is a power cut during recording (or Instant imer Recording or timer
recording), the recording will resume automatically when power is restored to
the VCR unless the VCR’s memory backup has expired.
Instant imer Recording
his method allows you to quickly set the VCR to record in 30 minute incre-
ments.
start recording Press T on the VCR once. If left in this state, the VCR will
keep recording until the tape runs out.
engage instant timer recording Press T again and the display panel will
show a flashing Record indicator (U) and ‘0:30’. his means that the VCR will
record for 30 minutes on the programme already selected and then stop auto-
matically.
increase time Each time T is pressed, the time limit is increased by 30min-
utes to a maximum of 6 hours.
his function only works with the T button on the VCR, not the Remote
Control.
If the tape reaches its end during recording, the recording stops and “U” and
“,” on the display panel blink. Press S/0on the VCR to eject the tape or press
<to rewind the tape.
HR-J695/696EK-EN/p13-20 5/28/02, 11:04 AM20
Other manuals for HR-J695EK
1
This manual suits for next models
1
Table of contents
Other JVC VCR System manuals

JVC
JVC HR-VP636U User manual

JVC
JVC HR-S2901 User manual

JVC
JVC HR-V210EY User manual

JVC
JVC HR-S9850EU User manual

JVC
JVC HR-V510E User manual

JVC
JVC HR-VP470U User manual

JVC
JVC HR-S5965EK User manual

JVC
JVC HR-VP680U User manual

JVC
JVC HR-J648EH, HR-J648E, HR-J448E, User manual

JVC
JVC HR-S8006UM User manual

JVC
JVC HR-J474M User manual

JVC
JVC HR-S3902U User manual

JVC
JVC BR-DV6000E User manual

JVC
JVC HR-S9400EE User manual

JVC
JVC HR-J313EU User manual

JVC
JVC BR-DV600E - Professional Dv Recorder/player User manual

JVC
JVC BR-HD50E User manual

JVC
JVC HR-S9400EE User manual

JVC
JVC ShowView HR-J315EE User manual

JVC
JVC HR-S7965EF User manual