JVC HR-S9400EE User manual

VIDEO CASSETTE RECORDER
INSTRUCTIONS
LPT0002-0K7A
HR-S9400EE
625
S
C
E
N
E
F
I
N
D
E
R
P
R
O
G
C
H
E
C
K
T
V
V
O
L
C.MEMORY DISPLAY
DAILY
AUX
ADD TIME
C.RESET
CANCEL
DATESTOP
START
AUDIO MONITOR
(MONITOR)
TV/VCR TV SAT VCR
TIMER
WEEKLY
A
12
45
3
6
8
0
79
B
PUSH JOG
MULTI BRAND
REMOTE CONTROL UNIT
TV
PROG
P
R
O
G
/
M
E
N
U
O
K
EXPRESSPROGRAMMING
2
4
1
3
TIMER
STANDBY/ON
PULL-OPEN
8
S
L
O
W
S
L
O
W
REW FF
TV PROG/
JOG
SHUTTLE
SP/LP
+8
4
0
6
10
–20dB
NORM
LR
M
SP
LP
REMAIN
REVIEW
EN
CONTENTS
ENGLISH
SAFETY FIRST 2
Safety Precautions............................. 2
INSTALLING YOUR NEW RECORDER 4
Basic Connections ............................ 4
S-VIDEO Connection ........................ 6
INITIAL SETTINGS 8
Auto Set Up ...................................... 8
Language Set .................................... 9
Video Channel Set .......................... 10
Clock Set ........................................ 12
On-Screen Displays ........................ 13
PLAYBACK 14
Basic Playback ................................ 14
Playback Features ........................... 15
TimeScan ........................................ 20
RECORDING 22
Basic Recording .............................. 22
Recording Features ......................... 23
INFORM ATION ON SIGNAL
CONVERSION SYSTEM 26
TIMER RECORDING 28
SHOW VIEW Setup ............................. 28
S
HOW VIEW Timer Recording............ 30
Regular Timer Programming ........... 32
SPECIAL FEATURES 36
TV Multi-Brand Remote Control ..... 36
Satellite Tuner Multi-Brand
Remote Control .............................. 37
EDITING 38
Preparation For Editing ................... 38
Edit To Or From Another Video
Recorder ......................................... 40
Edit From A Camcorder .................. 42
Audio Dubbing ............................... 43
Insert Editing ................................... 44
Random Assemble Editing .............. 46
INFORM ATION ON J TERM INAL 49
SYSTEM CONNECTIONS 50
Connection to A Stereo System ......... 50
TUNER SET 51
TROUBLESHOOTING 56
QUESTIONS AND ANSWERS 59
INDEX 60
SPECIFICATIONS 63
Downloaded from: https://www.usersmanualguide.com/

2EN
SAFETY FIRST
Sa fety Preca utions
The rating plate and the safety caution are on the rear of the unit.
WARNIN G: DANGEROUS VOLTAGE IN SID E
WARNIN G: TO PREVEN T FIRE OR SHO CK H AZARD , D O NO T EXPO SE THIS U N IT
TO RAIN O R M O ISTU RE.
IM PO RTANT
nPlease read the various precautions on this
page before installing or operating the
recorder.
nIt should be noted that it may be unlawful to
re-record pre-recorded tapes, records, or
discs without the consent of the owner of
copyright in the sound or video recording,
broadcast or cable programme and in any
literary, dramatic, musical, or artistic work
embodied therein.
CAUTION
nWhen you are not using the recorder for a
long period of time, it is recommended that
you disconnect the power cord from the
mains outlet.
nDangerous voltage inside. Refer internal
servicing to qualified service personnel. To
prevent electric shock or fire hazard, remove
the power cord from the mains outlet prior to
connecting or disconnecting any signal lead
or aerial.
This recorder can also receive SECAM colour
television signals for recording and playback.
POW ER SYSTEM
This set operates on voltage of AC 220 – 240
V`(Rating), AC 180 – 260 V`(Operating),
50/60 Hz with automatic switching.
The STANDBY/ON button does not com-
pletely shut off mains power from the unit, but
switches operating current on and off. " "
shows electrical power standby and " " shows
ON.
Video tapes recorded with this video recorder
in the LP (Long Play) mode cannot be played
back on a single-speed video recorder.
nCassettes marked "S-VHS" and "VHS" can be used
with this video cassette recorder. However, S-VHS
recordings are possible only with cassettes marked
"S-VHS".
nCertain audio features of this product manufac-
tured under a license from Desper Products, Inc.
Spatializertis a trademark owned by Desper
Products, Inc.
nSHOWVIEW is a registered trademark of Gemstar
Development Corporation. The SHOW VIEW system
is manufactured under licence from Gemstar
Development Corporation.
625
Downloaded from: https://www.usersmanualguide.com/

EN 3
Failure to heed the following precautions may
result in damage to the recorder, remote
control or video cassette.
1. DO NO T place the recorder . . .
... in an environment prone to extreme
temperatures or humidity.
... in direct sunlight.
... in a dusty environment.
... in an environment where strong magnetic
fields are generated.
... on a surface that is unstable or subject to
vibration.
2. DO NO T block the recorder’s ventilation
openings.
3. DO NO T place heavy objects on the recorder
or remote control.
4. DO NO T place anything which might spill on
top of the
recorder or remote control.
5. AVOID violent shocks to the recorder during
transport.
M O ISTU RE CO ND EN SATIO N
Moisture in the air will condense on the recorder
when you move it from a cold place to a warm
place, or under extremely humid conditions—just
as water droplets form in the surface of a glass
filled with cold liquid. Moisture condensation on
the head drum will cause damage to the tape. In
conditions where condensation may occur, keep
the recorder turned on for a few hours to let the
moisture dry.
ABOU T H EAD CLEANIN G
Accumulation of dirt and other particles on the
video heads may cause the playback picture to
become blurred or interrupted. Be sure to contact
your nearest JVC dealer if such troubles occur.
Downloaded from: https://www.usersmanualguide.com/

4EN
IN STALLIN G YOUR NEW RECORDER
Ba sic Connections
CON N ECT RECO RDER TO
MAIN S
4
Plug the end of the mains power cord into a mains
outlet.
21-pin AV input connector (SCART)
Aerial connector
It's essential that your video recorder be properly connected.
Follow these steps carefully. THESE STEPS MUST BECOMPLETED
BEFOREANY VIDEO OPERATION CAN BEPERFORMED.
CHECK CON TEN TS
1
Make sure the package contains all of the accessories
listed in “ Specifications” (Zpg. 63).
SITUATE RECORDER
2
Place the recorder on a stable, flat surface.
CON N ECT RECORDER TO TV
3
The connection method you use depends on the type of
TV you have.
RF CO NN ECTION
●
To Connect To A TV With NO 21-pin AV input
connector (SCART) . . .
a– Disconnect the TV aerial cable from the TV.
b– Connect the TV aerial cable to the ANT. IN jack
on the rear panel of the recorder.
c– Connect the provided RF cable between the RF
OUT jack on the rear panel of the recorder and the
TV’s aerial connector.
Before operating the recorder, make sure the TV’s
channel is set to the VID EO channel (Zpg. 10).
AV CO N N ECTION
●
To Connect To A TV with 21-pin AV input connector
(SCART) . . .
a– Connect the aerial, recorder and TV as per “ RF
CONNECTIO N” .
b– Connect an optional SCART cable between the AV1
IN/OUT connector on the rear panel of the recorder
and the TV’s 21-pin AV input connector (SCART).
c– Choose the appropriate AV1 output signal (Z"AV1
OUTPUT SIGNAL SELECTION" on page 5).
S-VID EO CO NN ECTION
●
If you have a TV with S-VIDEO input connector, see
"S-VIDEO Connection" on page 6.
Mains Power
Cord
Back of TV
21-pin SCART Cable (not provided)
Mains outlet
After you plug the mains power cord into a mains outlet, the
Auto Set Up display appears on the TV screen and/or on the
recorder's front display panel when the button on the
recorder/remote control is pressed for the first time to power
on the recorder Zpg. 8.
RF Cable (provided)
Downloaded from: https://www.usersmanualguide.com/

EN 5
AV1 OUT
COMP.
Y/C
AV1 IN/OUT
RF OUT
AV2 IN
PAUSE/
R.A.EDIT
ANT.IN
RR
LL
AUDIO
IN OUT
S
IN OUT
Back of RecorderAV1 OUT Switch
To AV1 IN/OUT
connector
To AV-IN
terminals
Output cable adapter (not provided)
If TV has no 21-pin SCART connector:
Connect an optional AV cable between the TV' s AV-IN terminals and the AV1 IN/OUT connector on the rear panel of the
recorder via the optional output cable adapter as illustrated.
AV cable
(not provided)
TV
Recorder
AV1 O U TPU T SIGN AL SELECTIO N
The AV1 IN/OUT connector accepts only a composite signal (regular video signal), but can deliver either a composite video
signal or a Y/C signal (a signal in which the luminance and chrominance signals are separated) according to the setting of the
rear panel AV1 OUT switch.
●If your TV's 21-pin AV input connector (SCART) is compatible only with the regular video signal, set this switch to COMP.
●If your TV's 21-pin AV input connector (SCART) is compatible with the Y/C signal, set this switch to Y/C. You will better enjoy
high-quality S-VHS pictures.
IM PO RTAN T:
●Set your TV to the VIDEO (or AV), Y/C, or RGB mode according to the type of your TV's SCART connector.
●For switching the TV's mode, refer to the instruction manual of your television.
AV1 IN/OUT
TV Aerial Cable (not provided)
Downloaded from: https://www.usersmanualguide.com/

6EN
AV1 IN/OUT
RF OUT
AV2 IN
PAUSE/
R.A.EDIT
AV1 OUT
ANT.IN
COMP.
Y/C
RR
LL
AUDIO
S
IN
IN
OUT
OUT
IN STALLIN G YOUR NEW RECORDER (cont.)
CON N ECT RECO RDER TO
TV
1
a– Connect the aerial, recorder and TV as per "RF
Connection" (Zpg. 4).
b– Connect the recorder's S OUT terminal to the TV' s S-
VIDEO IN terminal.
c– Connect the recorder' s AUDIO OUT terminals to the
TV's AUDIO IN terminals.
CON N ECT RECO RDER TO
MAIN S
2
Plug the end of the mains power cord into a mains
outlet.
For TV sets with an S-VIDEO input terminal:
S-VIDEO Connection
IM PO RTAN T:
To operate the recorder with your TV using the S-VIDEO
connection, set your TV to the VIDEO (or AV mode).
AUDIO OUT
Mains outlet
Mains Power Cord
Audio cable (provided)
ANT.IN
RF OUT
S OUT
After you plug the mains power cord into a mains outlet, the
Auto Set Up display appears on the TV screen and/or on the
recorder's front display panel when the button on the
recorder/remote control is pressed for the first time to power
on the recorder. (Zpg. 8)
N OTE:
If your television is not stereo-capable, use the recorder's
AUDIO OUT connectors to connect to an audio amplifier for
Hi-Fi stereo sound reproduction. (
Z
pg. 50)
Downloaded from: https://www.usersmanualguide.com/

8EN
IN ITIAL SETTIN GS
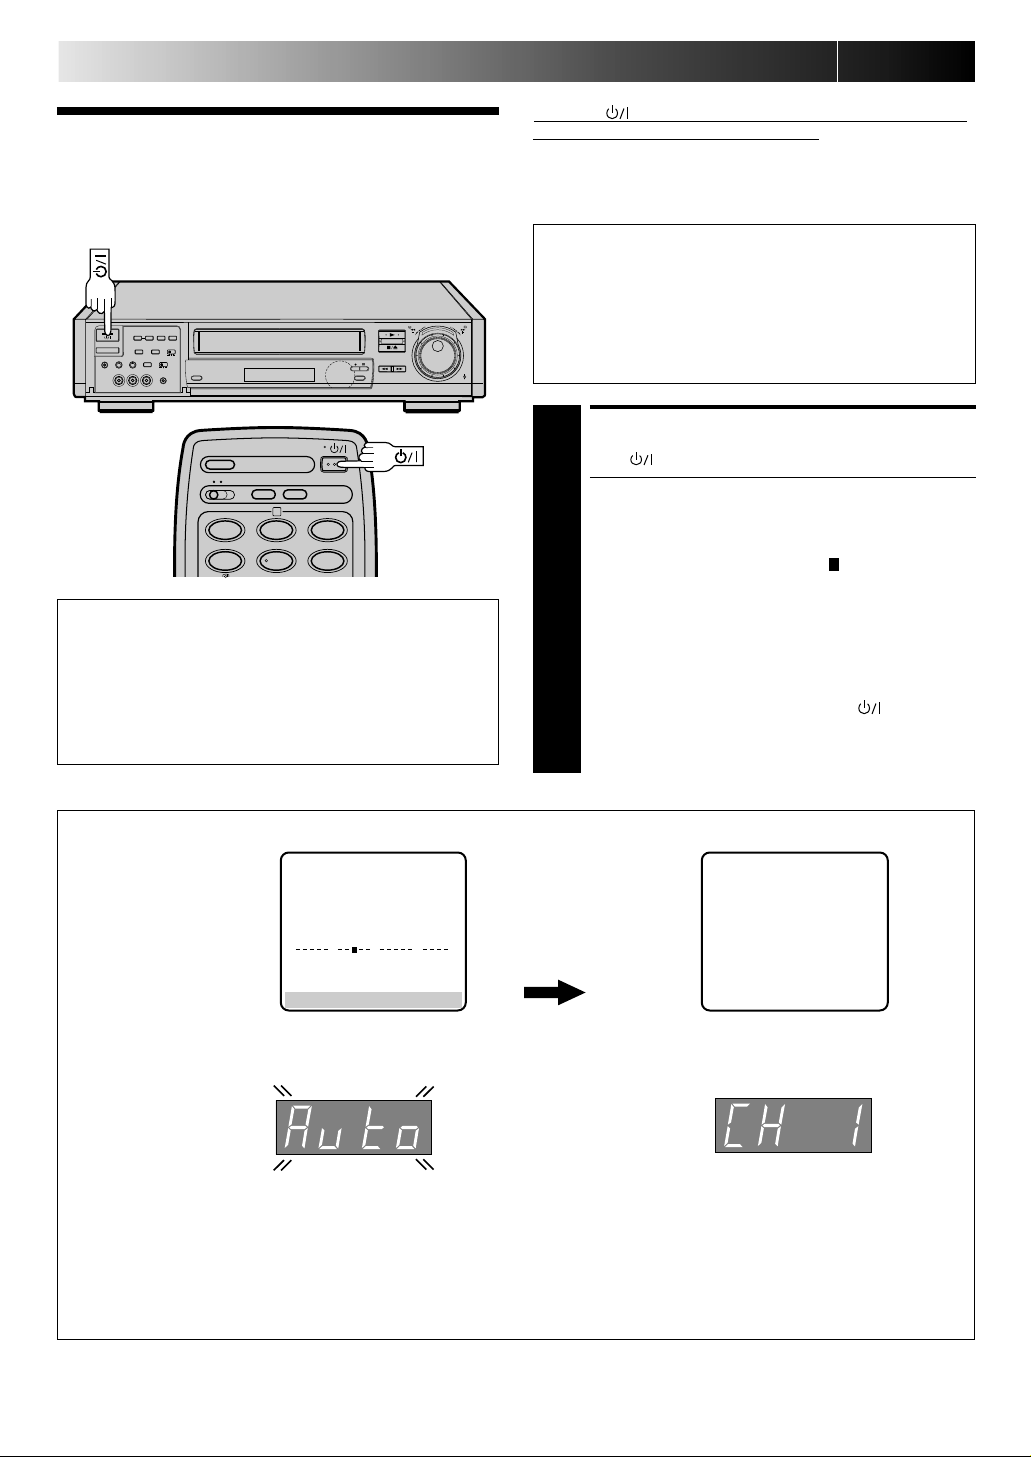
When the button on the recorder/remote control is pressed
for the first time to power on the recorder after you plug the
mains power cord into a mains outlet, the Auto Set Up function
sets the tuner channels automatically.
You can refer to the front display panel and/or the on-screen
display to perform this procedure.
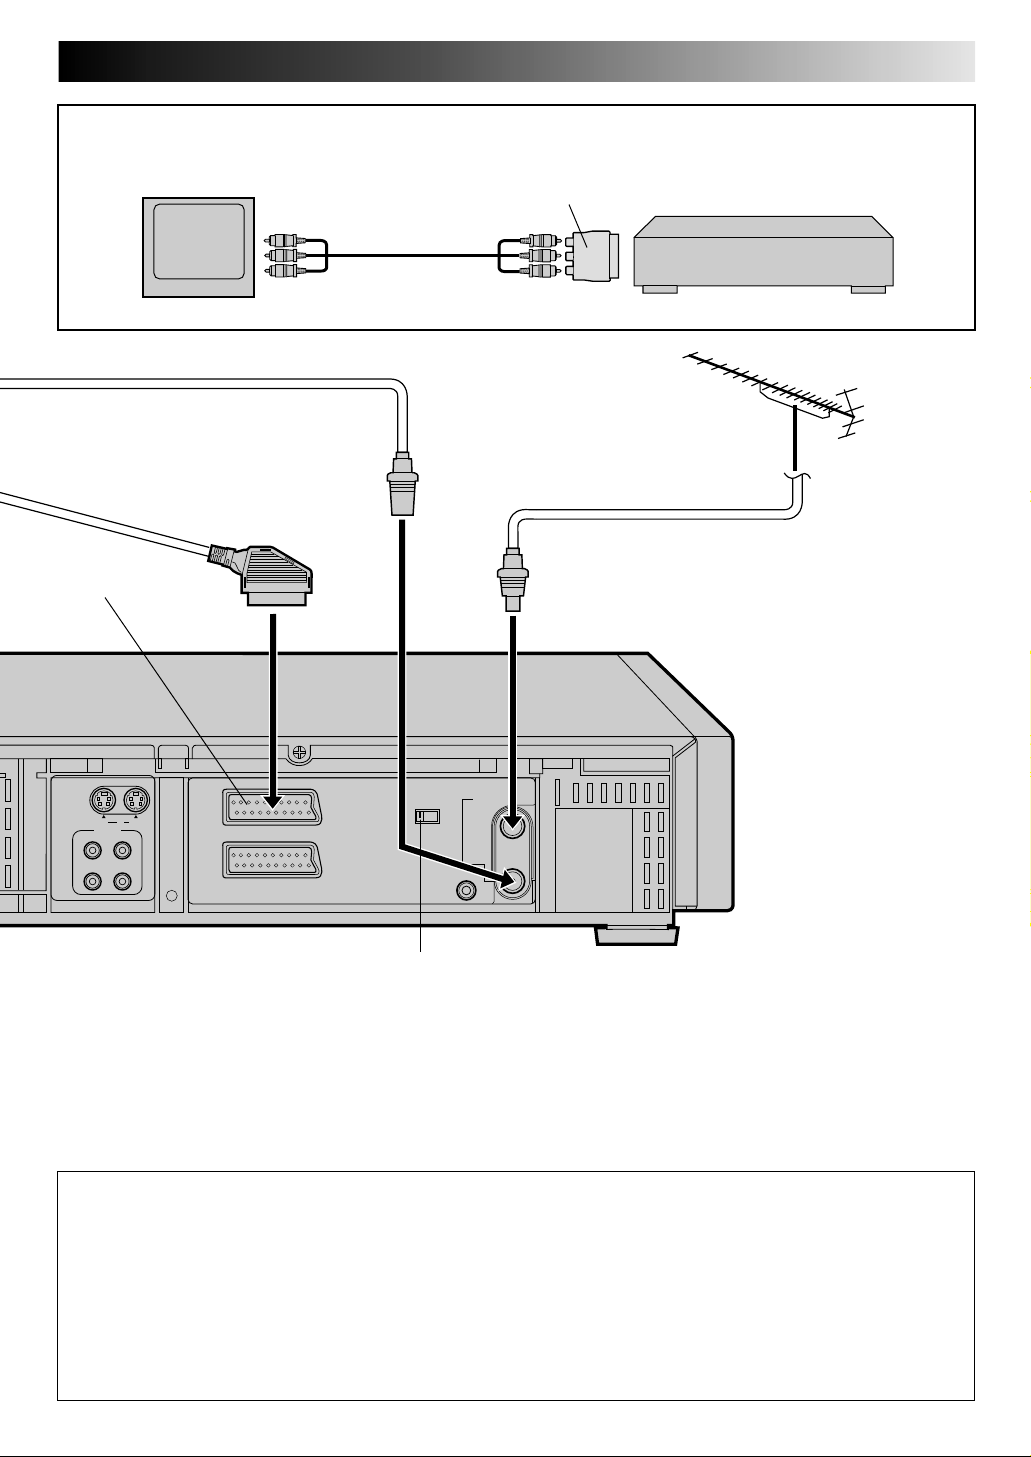
Before starting, make sure of the following:
●The TV aerial cable should be connected to the recorder.
●The recorder's mains power cord should be connected to
a mains outlet. (Zpg. 4)
●If you want to use the on-screen display, the TV should
be set to its AV mode (with AV or S-VIDEO connection
Zpg. 4 or 6) or UHF channel 36 (with RF connection
Zpg. 4).
Auto Set Up
Auto Cha nnel Set
12
45
3
6
2
ATTEN TION
Once you have performed Auto Set Up, even if the
recorder's memory backup has expired, all the stored
stations remain in the recorder's memory and the recorder
will not perform Auto Set Up again.
If you have moved to a different area or a new station starts
broadcasting in your area, perform tuner setting. (Zpg. 51)
On-Screen Display
DO N O T press any button on the recorder or remote control while Auto Set Up is in progress.
During Auto Set U p
"ПОЖАЛУЙСТА, ПОДОЖДИТЕ", blinks on the
screen and "Auto" blinks on the front display panel.
Front Display Panel
N OTES:
●
If you have connected your TV to the recorder with RF connection and the on-screen display appearing on UHF channel 36
looks distorted, refer to the front display panel.
●
If you want to set the tuner manually such as to add or skip channels, to swap channel positions, to fine-tune channels or to
set station names (ID –
Z
p. 55),
Z
pg. 52 – 55.
●
If no sound accompanies the picture on some channels that have been stored by Auto Set Up, the TV system setting for those
channels may be incorrect. Select the appropriate TV system for those channels.
Z
"TV System Selection – When you see the
picture but hear no audio" on page 53.
TV Screen
When Auto Set Up is completed, the lowest position
number will appear on the front display panel.
0
+++
+
АВТО УСТАНОВКА
ПОЖАЛУЙСТА, ПОДОЖДИТЕ
[MENU] :
ВЫХОД
8
••
•
•
••
••
••
•
••
•
•
••
••
••
•
START AUTO SET UP
1
Press .
●The Auto Set Up function scans all the channels that
are receivable by your recorder. It then automatically
assigns each receivable channels to the TV PROG
buttons. It skips non-receivable channels.
●As Auto Set Up progresses, the " " mark on the
screen moves from left to right.
●After you perform Auto Set Up, if the tuner channels
have not been set properly or if "CH – –" is displayed
on the front display panel, make sure that the aerial
cable is connected to the recorder properly and turn
off the recorder power once, and turn the power back
on to try Auto Set Up again.
●If there is a power cut, or if you press or M EN U
while Auto Set Up is in progress, Auto Set Up will be
interrupted; be sure to turn off the recorder power once
and try again.
Downloaded from: https://www.usersmanualguide.com/

EN 9
La ngua ge Set
This recorder offers you the choice to view on-screen messages
in English or Russian. Select the desired language using this
procedure. The default setting is Russian.
●Be sure to set your Video Channel before performing
Language setting (Z pg. 10).
●Turn on the TV and select the VIDEO channel (or AV mode).
12
45
3
6
8
0
79
2
4
1
3
PU SH JOG
M EN U OK
TURN ON THE RECORDER
1
Press .
ACCESS MAIN MEN U
2
Press M EN U twice.
ACCESS LAN GUAGE SET
SCREEN
3
Press PU SH JO G%fito
move the highlight bar
(pointer) to "ВЫБОР
ЯЗЫКА (LANGUAGE
SET)", then press O K.
SELECT LAN GUAGE
4
Press PU SH JO G%fito move the highlight bar (pointer)
to the language of your choice.
RETURN TO N O RMAL
SCREEN
5
Press M EN U .
ГЛАВНОЕ МЕНЮ
УСТАНОВКА РЕЖИМОВ
АВТОУСТАНОВКА КАНАЛОВ
РУЧНАЯ УСТ-КА КАНАЛОВ
УСТАНОВКА ГИД ПРОГ
УСТАНОВКА ЧАСОВ
ВЫБОР ЯЗЫКА
УСТАНОВКА JLIP ID
R. A.EDIT
[5∞] =
[MENU] : ВЫХОД
Downloaded from: https://www.usersmanualguide.com/

10 EN
Video
Cha nnel Set
IN ITIAL SETTIN GS (cont.)
Video Channel (RF Output Channel) is the channel on
which your TV receives picture and sound signals from the
video recorder through the RF cable.
8
••
•
•
••
••
••
•
••
•
•
••
••
••
•
12
45
3
6
8
0
79
2
4
1
3
OK
If you have connected the video recorder to your TV
via the provided RF cable only (RF connection) – Go to
"W ith RF Connection" below.
If you have connected the video recorder to your TV
via both the provided RF cable and a 21-pin SCART
cable or AV cable (AV connection) or via the provided
RF cable, the provided S-Video cable and the provided
audio cable (S-VID EO connection) – Go to "With AV or
S-VID EO Connection" on next page.
TV PRO G
TEST SIGN AL
The channel on which the screen to
the left appear clearly in step 2is
your Video Channel.
To view picture signals from the video recorder, set
your TV to the Video Channel.
ACCESS VIDEO CHAN N EL
SET MODE
1
Hold down STO P/ EJECT on the recorder until the
display panel shows the following.
SET VIDEO CHAN N EL
2
Set your TV to UHF channel 36.
●If the two vertical white bars appear clearly on the
screen as shown in the illustration at bottom left,
press O K and then go to step 3.
●If the two vertical white bars do not appear clearly,
press TV PRO G + or –to set the video recorder to a
vacant channel between 22 and 69 which is not
occupied by any local station in your area.
Then set your TV to UHF channel 50 and check if the
two vertical white bars appear clearly on the screen; if
so, press OK and then go to step 3. If not, re-set the
video recorder to another vacant channel and try again.
N OTES:
●
If you set the video recorder to a channel which is
occupied by a local station or has neighbouring
channels that are occupied by local stations, the
picture reception quality will be affected and some
interference noise will appear on the TV screen. Be
sure to select a vacant channel which has no
broadcast on neighbouring channels.
●
If you cannot obtain the two vertical white bars
clearly with any channel between 22 and 69, consult
your JVC dealer.
(Ex.) If channel 50 is available in your area
IM PO RTAN T:
Before performing the following steps, make sure the
recorder's power is off and there is no cassette inserted in
the recorder.
W ith RF Connection
STO P/ EJECT
Downloaded from: https://www.usersmanualguide.com/

EN 11
SELECT TV SYSTEM
3
Press TV PROG + or –to set appropriate TV system that
matches the system of TV being used (refer to the table
below).
EXIT VIDEO CHAN N EL SET
MODE
4
Press O K to finish the setting.
W ith AV or S-VIDEO
Connection
1 : B/G 2 : D/K
M ajor Countries TV System
Austria, Denmark, Finland, Holland,
Italy, Norway, Spain, Switzerland, B/G
Sweden, Germany, Egypt
China, Mongolia, Rumania, Bulgaria,
Czech Rep., Slovakia, Hungary, Poland, D/K
Russia
IM PO RTAN T:
Before performing the following steps, make sure the
recorder's power is off and there is no cassette inserted in
the recorder.
ACCESS VIDEO CHAN N EL
SET MODE
1
Hold down STO P/ EJECT on the recorder until the
display panel shows the following.
SET VIDEO CHAN N EL
2
Press TV PRO G – until the display panel shows
"–OUT– –".
●Now the video channel is set to off.
EXIT VIDEO CHAN N EL SET
MODE
3
Press O K twice to finish the setting.
To view picture signals from the video recorder, set
your TV to its AV mode.
Downloaded from: https://www.usersmanualguide.com/

12 EN
Clock Set
Turn on the TV and select the VIDEO channel (or AV mode).
12
45
3
6
8
0
79
2
4
1
3
PU SH JOG
OK
M EN U
TURN THE RECORDER ON
1
Press .
ACCESS MAIN MEN U
SCREEN
2
Press M EN U twice.
ACCESS CLOCK SET
SCREEN
3
Move the highlight bar (pointer) to "CLOCK SET" by
pressing PUSH JOG %fi, then press OK. The Clock Set
screen appears.
SET DATE AN D TIME
4
Press PU SH JO G%fi to set the hour, then press O K. The
“ minutes” display begins blinking. Repeat the proce-
dure to set the minutes, day, month and year.
START CLOCK OPERATION
5
Press M EN U .
MAIN MENU
MODE SET
AUTO CH SET
MANUAL CH SET
GUIDE PROG SET
CLOCK SET
LANGUAGE SET
JLIP ID NO. SET
R. A.EDIT
[5∞] =
[MENU] : EXIT
CLOCK SET
TIME DATE YEAR
0: 00 01 . 01 00
[5∞] =
[MENU] : EXIT
IN ITIAL SETTIN GS (cont.)
N OTES:
●
If the day and month data are invalid (such as 31st April), the
month digits are cleared automatically and the day digits
begin blinking. Input the correct data.
●
If, in step 4the year digits are automatically cleared and the
day digits begin blinking, it is possible that you have input
29th February for a non-leap year. Input the correct data.
Downloaded from: https://www.usersmanualguide.com/

EN 13
On-Screen
Displa ys
You can choose whether or not to have various operational
indicators appear on screen, by setting this function ON or OFF.
Messages appear in the selected language (Zpg. 9).
Turn on the TV and select the VIDEO channel (or AV mode).
TURN ON THE RECORDER
1
Press .
ACCESS MAIN MEN U
SCREEN
2
Press M EN U twice.
ACCESS MO DE SET
SCREEN
3
Move the highlight bar (pointer) to "MODE SET" by
pressing PUSH JOG %fi, then press OK.
EN ABLE/ DISABLE
O N -SCREEN DISPLAY
4
The default setting is
“ ON” , so if you w ant on-
screen displays, leave the
setting as it is and go to
step 5. If you don’t want
the displays to appear,
press PU SH JO G %fi to
move the highlight bar
(pointer) to "O.S.D." and
press PU SH JO G to set
“ O.S.D.” to “ OFF” .
RETURN TO N O RMAL
5
Press M EN U .
N OTES:
●
When you use this recorder as the player for editing, be sure
to set "O.S.D." to "OFF." before starting.
●
During playback, the operation mode indicators may be
disturbed depending on the type of tape being used.
1– Operation mode indicators
2– Channel position number and station name*/Aux. indicator
(AUX1, AUX2 or F-AUX)
* Displayed only if you have set manually (Zpg. 54)
3– Cassette loaded mark
4– Tape speed SP/LP
5– Clock display
6– Current day/month/year
7– SpatializerWindicator (Zpg. 18)
8– Tape direction
9– Tape position indicator (Zpg. 16)
10– Counter display (including Counter Memory indicator)
11– Audio mode display (Zpg. 18)
12– Tape remaining time indicator (Zpg. 23)
13– Timer warning display (Zpg. 35)
14– MESECAM Playback display (Zpg. 17)
q6
PR. 12 ABCD ]SP
21 : 00 MESECAM P. B. OFF
24. 12. 97 – WARNING–
TIMER RECORDING
TO START SOON
SPATIALIZER [CANCEL]
HI FI M –1 : 23 : 45
NORM REMAIN 1 : 00
0
+++
+
13
2
5
6
9
11
7
10
12
8
4
14
12
45
3
6
8
0
79
2
4
1
3
PU SH JOG
OK
M EN U
%
5
MODE SET
AUTO TIMER : OFF
O. S. D. : ON
S-VHS : AUTO
EDIT : OFF
TIME SCAN : ON
AUDIO
[5∞] =[ ] : ON/OFF
[MENU] : EXIT
The superimposed indication on the TV screen tells you what the recorder is doing.
13
Downloaded from: https://www.usersmanualguide.com/

14 EN
PLAYBACK
Ba sic
Pla yba ck
The easiest, most basic operation possible with your video
recorder is tape playback. Already-recorded signals on a video
tape are read by your video recorder and displayed on your TV
just like a TV programme.
LOAD A CASSETTE
1
Make sure the window side is up, the rear label side is
facing you and the arrow on the front of the cassette is
point toward the recorder. Don’t apply too much
pressure when inserting.
●The recorder power comes on automatically and the
counter is reset to 0:00:00.
●If the record safety tab has been removed, playback
begins automatically.
FIN D PRO GRAMME START
PO IN T
2
If the tape is advanced past the start point, press REW
or turn the TIM E SCAN SH U TTLE ring to the left.
To go forward, press FF or turn the TIM E SCAN
SH U TTLE ring to the right.
START PLAYBACK
3
PressPLAY.
STO P PLAYBACK
4
Press STOP on the remote or STO P/ EJECT on the
recorder’s front panel. Then press STO P/ EJECT to
remove the cassette.
Usable cassettes
●Compact VHS camcorder recordings can be played on
this video recorder. Simply place the recorded cassette
into a VHS Cassette Adapter and it can be used just like
any full-sized VHS cassette.
●This video recorder can record on regular VHS and
Super VHS cassettes. While only VHS signals can be
recorded on regular VHS cassettes, both VHS and Super
VHS signals can be recorded and played back using
Super VHS cassettes.
●Turn on the TV and select the VIDEO channel (or AV mode).
●Set the OU TPU T SYSTEM CO N VERTER switch to the
appropriate position. (Zpg. 26)
8
••
•
•
••
••
••
•
••
•
•
••
••
••
•
12
45
3
6
8
0
79
2
4
1
3
STO P
PLAY
FF
REW
REW
FF
PLAY
TIM E SCAN SH U TTLE
STO P/ EJECT
Downloaded from: https://www.usersmanualguide.com/

EN 15
Pla yba ck
Fea tures
8
••
•
•
••
••
••
•
••
•
•
••
••
••
•
Take advantage of special functions possible with the recorder’s
controls or the remote control.
0
4
1
3
Still Picture/ Fra m e-By-Fra m e
Pla yba ck
PAUSE DURIN G PLAYBACK
1
Press PAU SE. If there is vertical jitter, use the TV PRO G
buttons to correct the picture.
●During still picture, the sound from the previous
3 seconds (approx.) will be played back repeatedly
(provided there was at least 6 seconds of normal
playback prior to engaging the still picture mode).
However, the TIME SCAN indicator will not light.
●"TIME SCAN AUDIO" must be set to "ON", or the
sound will not be heard. (Zpg. 21)
ACTIVATE FRAME-BY-FRAME
PLAYBACK
2
Turn the JO G dial to the right for forward frame-by-
frame playback, or to the left for reverse frame-by-frame
playback.
OR
Press PAU SE.
OR
Press PU SH JO G or .
To resume normal playback, press PLAY.
Slow M otion
ACTIVATE SLOW -MOTION
PLAYBACK
1
Turn the TIM E SCAN SH U TTLE ring to the left or press
PU SH JOG during playback to decrease speed in the
forward direction. To play in reverse slow-motion (and
in reverse play mode), continue to turn the TIM E SCAN
SH U TTLE ring to the left or press PUSH JO G after
selecting all the forward direction slow-motion modes.
OR
During still picture, turn the TI M E SCAN SH U TTLE ring
to the right for forward slow motion, or to the left for
reverse slow motion.
OR
During still picture, press and hold PAUSE for 2
seconds, then release. Press and release again to return
to still picture.
OR
During still picture, press and hold PU SH JO G or .
Release to return to still picture.
To resume normal playback, press PLAY.
fi
fi
fi
fi
%
fi
JOG
TV PRO G
PAU SE
PLAY
REW
PU SH JOG
FF
PLAY
REW
FF
TIM E SCAN SH U TTLE
PAU SE
High-Speed Sea rch
ACTIVATE HIGH-SPEED
SEARCH
1
During playback or still picture, press FF for forward
high-speed search, or REW for reverse high-speed
search.
To resume normal playback, press PLAY.
N OTES:
●
For short searches during playback or still, press and hold FF
or REW for over 2 seconds. When released, normal playback
resumes.
●
Picture may not appear during search with an LP-recorded
tape.
●
In the search, still, or frame by frame playback mode, the
picture will be distorted, and there may be a loss of colour.
Downloaded from: https://www.usersmanualguide.com/

16 EN
PLAYBACK (cont.)
M a nua l Tra ck ing
Your video recorder is equipped with automatic tracking
control. During playback, you can override this and adjust the
tracking manually by pressing the TV PRO G buttons.
OVERRIDE AUTO MATIC
TRACKIN G
1
Press SP/ LP ( ) on the remote to engage manual
tracking.
ADJUST TRACKIN G
MAN UALLY
2
Press TV PRO G +or –to adjust tracking.
RETURN TO AUTO MATIC
TRACKIN G
3
Press SP/LP ( ) on the remote to re-engage auto-
matic tracking.
N OTE:
When a new tape is inserted, the recorder enters the automatic
tracking mode automatically.
8
••
•
•
••
••
••
•
••
•
•
••
••
••
•
12
45
3
6
8
0
79
2
4
1
3
REW
FF
TV PRO G
PLAY
REVIEW
PU SH JOG
Ta pe Position Indica tor
The tape position indicator
appears on screen when, from
the Stop mode, you press FF,
REW or perform an Index
Search. The position of “ 5” in
relation to “0” (beginning) or
“ +” (end) show s you where
you are on the tape.
” O.S.D.” (Zpg. 13) must be
set to “ ON” , or the indicator
will not appear.
N OTE:
Depending on the type of tape used, there may be times when
the indication is not correct.
3
1:23:45
REMAIN 2:35
0
+++
Beginning End
STO P
3 R Picture
Your video recorder is equipped with the 3R Picture System.
During playback, 3R(= Resolution and Response Recovery
technology) maximises sense of resolution and sharpens image
edges to make playback picture look better focused.
PLAY
REW
FF
REVIEW
M ESECAM PLAYBACK
STO P
Downloaded from: https://www.usersmanualguide.com/

EN 17
Index Sea rch
Your recorder automatically marks
index codes at the beginning of
each recording. This function gives
you quick access to any one of 9
index codes in either direction.
N OTE:
Before starting, make sure the
recorder is in the Stop mode.
ACTIVATE IN DEX SEARCH
1
Press PU SH JO G or (™or £) on the remote
control. “ ™1” or “ £1” is displayed on screen
and search begins in the corresponding direction.
●To access index codes 2 through 9, press PU SH JO G
or repeatedly until the correct index number is
displayed.
Ex.: To locate the beginning of B from the current
position, press PU SH JO G twice.
To locate the beginning of D from the current
position, press PU SH JO G once.
●When the specified index code is located, playback
begins automatically.
%
fi
fi
%
fi%
Current position
AB C D E F
–2 –1 1 2 3
%
%
Index number
Insta nt ReV iew
Simply by pressing a single button, the recorder power comes
on, rewinds, and begins playback of the last timer-recorded
programme. If you have several programmes recorded, you can
easily access any of them.
N OTE:
Before starting, make sure that the recorder is off and that the
Timer mode is disengaged.
ACTIVATE IN STAN T
REVIEW
1
Press REVIEW . The recorder power comes on and the
recorder searches for the index code indicating the start
of the last timer-recorded programme. Once it’s found,
playback begins automatically.
The front display panel tells you how many programmes
have been recorded. If you have, for example, 3
programmes, “ REVIEW ” and "3" appear and blink. To
watch the first of the 3 programmes, press REVIEW three
times. The recorder searches and begins playback
automatically. You can access a programme as far as 9
index codes away from the current tape position.
N OTE:
Instant ReView is not possible while the recorder is in the Timer
mode.
£2
M ESECAM Pla y ba ck
Your recorder is equipped with MESECAM circuitry that can
play back MESECAM tapes. MESECAM is the designation for
tapes with SECAM signals that have been recorded on a
MESECAM-compatible PAL video recorder.
LO AD A CASSETTE
1
Insert a cassette recorded in MESECAM.
EN GA GE MESECAM PLAYBACK
MODE
2
Press M ESECAM PLAY-
BACK; the current setting
will be displayed on the
screen for about 5 seconds.
Pressing M ESECAM
PLAYBACK while the
screen shows the display
changes the setting.
●The setting will remain
effective even though
you turn on/off the recorder or you insert/eject the
cassette.
●The setting cannot be changed during search, still,
frame-by-frame playback or slow motion mode.
START PLAYBACK
3
PressPLAY.
MESECAM P.B. ON
N OTES:
●
You can change the "MESECAM P.B." setting even though
"O.S.D." is set to "OFF".
●
When you play back a PAL or SECAM tape, be sure to set
"MESECAM P.B." to "OFF".
Repea t Pla yba ck
Your video recorder can
automatically play back
the whole tape 20 times
repeatedly.
START PLAYBACK
1
PressPLAY.
ACTIVATE REPEAT PLAYBACK
2
Press PLAY and hold for over 5 seconds, then release.
●The Play indicator ($) on the display panel blinks
slowly.
●The tape plays 20 times automatically, and then
stops.
STOP PLAYBACK
3
Press STOP at any time to stop playback.
N OTE:
Pressing PLAY, REW , FF or PAU SE also stops Repeat Playback.
Downloaded from: https://www.usersmanualguide.com/

18 EN
Spa tia lizerW
This feature expands sound field when you play back any stereo
source or view a stereo programme while recording it.
*SpatializerWhas no effect on recording quality.
PLAYBACK (cont.)
8
••
•
•
••
••
••
•
••
•
•
••
••
••
•
ACTIVATE SPATIALIZER
W
1
Press SPATIALIZER; the current setting will be displayed
on the screen for about 5 seconds. Pressing
SPATIALIZER while the screen shows the display
changes the setting.
●To view a stereo programme such as movies or
music, select "SPATIALIZER " to create more
spacious sound.
●To view a monaural programme, select
"SPATIALIZER[ST" which simulates a stereo effect.
●Select "SPATIALIZER OFF" to turn off SpatializerWif
the sound becomes unnatural with either
"SPATIALIZER " or "SPATIALIZER[ST" selected.
●If your TV is equipped with 3D-PHONIC and if you
use both SpatializerWand 3D-PHONIC at the same
time, the sound may become unnatural; set either
function to "OFF".
●The setting will remain effective even though you
turn on/off the recorder.
N OTES:
●
Spatializer
W
is effective only with a stereo TV.
●
You can change the Spatializer
W
setting even though "O.S.D."
is set to "OFF".
●
The setting cannot be changed during search, still, frame-by-
frame playback or slow motion mode.
●
When this recorder is used as the player for editing, the
recorded audio will correspond to the Spatializer
W
setting.
12
45
3
6
8
0
79
2
4
1
3
C.M EM O RY
A/ B COD E
FF
C.RESET
REW
AU D IO M O N I TO R
STO P
SCEN E FIN D ER
STO P/ EJECT
REW
FF
SPATIALIZER
Soundtra ck Selection
Your video recorder is capable of recording three soundtracks (HI-FI L, HI-FI R and NORM) and will play back the one you select.
During Playback
Pressing AU D IO M O N ITO R ( ) changes the soundtrack being played back as follows:
TRACK
Recorder's Front Panel On-Screen Display USE
L + R HI FI For Hi-Fi stereo tapes
LR
L HI FI For main audio of Bilingual tapes
L
R HI FI For sub audio of Bilingual tapes
R
NORM NORM For audio-dubbed tapes
L + R + NORM HI FI For audio-dubbed tapes
NORM
N OTES:
●
"L + R" should normally be selected. In
this mode, Hi-Fi stereo tapes are played
back in stereo, and the NORM track is
played back automatically for tapes
with only normal audio.
●
"O.S.D." must be set to "ON" or the
on-screen displays will not appear
(
Z
pg. 13).
Downloaded from: https://www.usersmanualguide.com/

EN 19
ACTIVATE SCEN E FIN DER
1
Press SCEN E FIND ER. The recorder starts forward high-
speed search for 5 seconds and then fast-forwards 10
minutes on the counter. This cycle is repeated until the
end of the tape is reached.
●To start Scene Finder in the reverse direction, press
SCEN E FIND ER and then press the REW button
within 2 seconds. This cycle is repeated until the
beginning of the tape.
●During Scene Finder, the following indications appear
on the display panel:
STO P SCEN E FIN DER
2
PressSTOP.
N OTES:
●
During Scene Finder high-speed search, you can also hear the
tape sound. During fast forward or rewind, you hear the
current TV sound instead.
●
During Scene Finder, the sound can be heard regardless of
"TIME SCAN AUD IO" setting.
Z
pg. 21.
●
Scene Finder does not function during Index Search.
This function helps you check contents of unlabeled recorded
tapes at the touch of a single button.
N OTE:
Scene Finder cannot be used when the recorder is in the Record
mode.
Scene Finder
10 minutes
on counter
FF REW FF REW FF REW
Search Search Search
5 seconds10 minutes
on counter
5 seconds 5 seconds
Remote A/ B Code Sw itching
The remote control is capable of controlling two JVC video
recorders independently; one set to respond to the remote
control’s A code control signals and another set to respond to B
code control signals. The remote control is preset to send A
code signals because your video recorder is initially set to
respond to A code signals. You can easily modify your video
recorder to respond to B code signals.
REMOVE POW ER SUPPLY
1
Unplug the mains power cord from the mains outlet.
SET A/ B CODE SW ITCH
2
Set to B.
RE-SUPPLY PO W ER
3
Plug the mains power cord back into the mains outlet.
TURN THE RECORDER ON
4
Press on the remote control. The recorder will now
only respond to B code signals.
N OTE:
Some TV sets may malfunction in response to the B mode. If
this happens, switch back to the A mode.
Counter M emory
Returns to the counter reading of “ 0:00:00” to conveniently find
a specific place on the tape automatically.
SET COUN TER MEMO RY
1
Press C. RESET during playback at a point you wish to
locate later. The counter reads “ 0:00:00” . Then press
C.M EM O RY, and “ M” appears in front of the counter
digits.
ACTIVATE CO UN TER
MEMO RY
2
When you wish to return to the designated point, press
STOP and then REW or FF.
●The tape rewinds or fast-forwards and stops at about
0:00:00 automatically.
●To cancel Counter Memory, press C.M EM O RY again.
N ex t Function M emory
You can set your recorder's power to go off automatically after
the tape is fully rewound. Before starting, make sure the
recorder is in the Stop mode.
For Automatic Power Off After Tape Rewind . . .
. . . press REW , then press within 2 seconds.
N OTE:
If you want the power to be turned off automatically when the
counter reads “0:00:00” (instead of at the beginning of the
tape), press C.M EM O RY so that the “ M” mark appears before
pressing REW .
Downloaded from: https://www.usersmanualguide.com/

20 EN
PLAYBACK (cont.)
TimeSca n
Your recorder is equipped with the TimeScan function. TimeScan
allows noise free pictures to be displayed on your TV screen in
the forward and reverse search modes. Audio will be played back
at normal speed during any of the TimeScan modes (Zpg. 21).
TimeScan allows you to view a program in search mode while
listening to the audio.
N OTES:
●
"TIME SCAN AUDIO" must be set to "ON", or the sound will
not be heard in TimeScan mode. (
Z
pg. 21)
●
The audio will not synchronize with the video in TimeScan
modes.
●
In Pause mode 3 seconds (approx.) of audio will be played
back repeatedly. (
Z
pg. 15)
●
In TimeScan search modes some of the audio information will
not be played so that the audio can keep up with the video.
12 3 4 5
Audio signal during TimeScan
Sound of 1, 3and 5is heard.
Sound of 2and 4is not heard.
Output audio signal is normal (monaural) sound.
Playback tape
ACTIVATE VARIABLE-SPEED
SEARCH
1
During playback or still, turn the recorder's TIM E SCAN
SH U TTLE ring. It remains at that position even after you
release it. Each time it passes a click position, the
playback speed changes.
(Refer to the chart on pg. 21 for playback speeds).
OR
During playback, press PU SH JO G or .
●The more times you press, the faster the playback
picture moves.
●To decrease speed, press the button for the opposite
direction.
(Refer to the chart on pg. 21 for playback speeds).
To resume normal playback, press PLAY.
Va ria ble-Speed Sea rch/
Reverse Pla y
%
%
8
••
•
•
••
••
••
•
••
•
•
••
••
••
•
12
45
3
6
8
0
79
2
4
1
3
PLAY
TIM E SCAN IN D ICATO R
PU SH JOG
OK
M EN U
TIM E SCAN SH U TTLE
PLAY
Downloaded from: https://www.usersmanualguide.com/
Other manuals for HR-S9400EE
2
Table of contents
Other JVC VCR System manuals

JVC
JVC HR-VP48U User manual

JVC
JVC HR-E539EE User manual

JVC
JVC HR-J435EA User manual

JVC
JVC HR-S9600EK User manual

JVC
JVC SR-TS1U - Super Vhs Et Player Recorder User manual

JVC
JVC SR-W5U - W-vhs Recorder/player User manual

JVC
JVC HR-J633U(C) User manual

JVC
JVC HR-S4500U User manual

JVC
JVC HR-A630EK User manual

JVC
JVC HR-VP658U User manual

JVC
JVC HR-J4404UM Setup guide

JVC
JVC HR-XVS44 User manual

JVC
JVC HR-S4600U User manual

JVC
JVC HR-XVC1UJ/M User manual

JVC
JVC LPT0679-001B User manual

JVC
JVC HR-J260EU User manual

JVC
JVC HR-J250E User manual

JVC
JVC HR-S7600AM User manual

JVC
JVC HR-A47U User manual

JVC
JVC BR-DV600E - Professional Dv Recorder/player User manual