König HAV-AC10 User manual

HAV-AC10
MANUAL (p. 2)
Alarm clock with red LED
ANLEITUNG (S. 5)
Wecker mit roter LED-Anzeige
MODE D’EMPLOI (p. 8)
Réveil à LED rouge
GEBRUIKSAANWIJZING (p. 11)
Alarmklok met rode LED
MANUALE (p. 14)
Sveglia con LED rosso
MANUAL DE USO (p. 17)
Reloj despertador con piloto LED rojo
HASZNÁLATI ÚTMUTATÓ (o. 20.)
Piros LED-es ébresztőóra
KÄYTTÖOHJE (s. 23)
Herätyskello punaisella LED-valolla
BRUKSANVISNING (s. 26)
Alarm klocka
NÁVOD K POUŽITÍ (s. 29)
Budík s červenými LED
MANUAL DE UTILIZARE (p. 32)
Ceas cu alarmăşi led roşu
ΕΓΧΕΙΡΙ∆ΙΟ XPHΣHΣ(σελ. 35)
Ρολόι αφύπνισης με κόκκινο LED
BRUGERVEJLEDNING (p. 38)
Vækkeur med rød LED
VEILEDNING (p. 41)
Alarmklokke med rød LED

2
ENGLISH
Alarm clock with red LED
Pleas read this before operating the unit.
1. ALARM INDICATOR
2. BATTERY COMPARTMENT
3. ALARM ON/OFF
4. SNOOZE BAR
5. HOUR SET
6. MINUTE SET
7. ALARM SET
8. TIME SET
87
5
6
3
2
4
1

3
Operation
Plug the cord into any 230 V AC home outlet. The entire display will flash, meaning the incorrect time is being
displayed. This is a normal condition and will stop when you set the time.
Setting the time
To set the time, press the TIME SET button (8), then press the HOUR SET button (5) and MINUTE SET button (6)
simultaneously. Release the buttons to confirm that the time is set.
Setting the alarm
To set the alarm, press the ALARM SET button (7), then press the HOUR SET button (5) and MINUTE SET button (6)
simultaneously. Release the buttons to confirm that the alarm is set.
To operate the alarm
Slide the ALARM ON/OFF button (3) to the “ON” position. The ALARM INDICATOR (1) will light up and the alarm will
sound at the preset alarm time. To swith the alarm off, slide the ALARM ON/OFF button (3) to the “OFF” position.
Snooze
When the alarm sounds, simply touch the SNOOZE BAR (4) to temporarily stop the alarm. The alarm will sound again
9 minutes later. This can be repeated as often you wish, for up to two hours.
Battery back-up (Battery not included)
In the event of a power failure, this unit will automatically switch to a battery standby circuit when a battery is installed.
Open the BATTERY COMPARTMENT at the bottom of the unit and install a 9 volt battery. Under battery operation, the
clock will keep the time running and the alarm will sound at the preset time. Only the clock display will not light up to
save battery power. If you have a long power failure you may need to make a slight adjustment to the clock time after
AC power returns. The clock uses an internal battery powered clock circuit that is less accurate than the power line
frequency. The alarm time will remain correct.
Specifications
Power source: 230 V ~ 50 Hz
DC battery: 9 V (1 x 9 V 6F22 / 6LR61 not included)
Power consumption: 2 W

4
Safety precautions:
To reduce risk of electric shock, this product should ONLY be opened by
an authorized technician when service is required. Disconnect the
product from mains and other equipment if a problem should occur. Do
not expose the product to water or moisture.
Maintenance:
Clean only with a dry cloth. Do not use cleaning solvents or abrasives.
Warranty:
No guarantee or liability can be accepted for any changes and modifications of the product or damage caused due to
incorrect use of this product.
General:
Designs and specifications are subject to change without notice.
All logos brands and product names are trademarks or registered trademarks of their respective holders and are
hereby recognized as such.
Keep this manual and packaging for future reference.
Attention:
This product is marked with this symbol. It means that used electrical and electronic products should not be
mixed with general household waste. There is a separate collections system for these products.

5
DEUTSCH
Wecker mit roter LED-Anzeige
Bitte lesen Sie das Folgende, bevor Sie das Gerät benutzen.
1. WECKANZEIGE
2. BATTERIEFACH
3. SCHALTER ALARM EIN/AUS
4. TASTE SCHLUMMER
5. TASTE STUNDEN EINSTELLEN
6. TASTE MINUTEN EINSTELLEN
7. TASTE WECKZEIT EINSTELLEN
8. TASTE ZEIT EINSTELLEN
87
5
6
3
2
4
1

6
BEDIENUNG
Stecken Sie das Netzkabel in eine 230V Netzsteckdose. Die gesamte Anzeige blinkt und eine falsche Uhrzeit wird
angezeigt. Dies ist ein normaler Zustand. Er wird beendet, wenn Sie die Zeit richtig einstellen.
EINSTELLEN DER ZEIT
Um die Zeit einzustellen, drücken Sie die Taste TIME (8) und gleichzeitig abwechselnd die Tasten HOUR (5) und
MINUTE (6). Lassen Sie zur Bestätigung der Zeiteinstellung die Tasten los.
STELLEN DER WECKZEIT
Um die Weckzeit einzustellen, drücken Sie die Taste ALARM (7) und gleichzeitig abwechselnd die Tasten HOUR (5)
und MINUTE (6). Lassen Sie zur Bestätigung der Weckzeit die Tasten los.
WECKFUNKTION AKTIVIEREN
Schieben Sie den Schalter ALARM ON/OFF (3 - Wecken an/aus) auf die Position „ON“. Die WECKANZEIGE (1)
leuchtet auf und zur eingestellten Weckzeit ertönt ein Weckton. Um die Weckfunktion abzuschalten, schieben Sie den
Schalter ALARM ON/OFF (3) auf die Position „OFF“, um den Weckton auszuschalten. Um den Alarm für den nächsten
Tag wieder einzuschalten, schieben Sie den Schalter ALARM ON/OFF (3) wieder auf die Position „ON“.
SCHLUMMERN
Wenn der Weckton ertönt drücken Sie die Taste SNOOZE (4 - SCHLUMMER), um vorübergehend den Weckton
abzustellen. Der Weckton wird 9 Minuten später wieder ertönen. Dies kann bis zu zwei Stunden lang beliebig oft
wiederholt werden.
NOTBATTERIE (Batterie nicht im Lieferumfang)
Bei einem Stromausfall wechselt das Gerät automatisch in einen Batterie-Standby-Modus, wenn eine Batterie
eingelegt ist. Öffnen Sie das Batteriefach an der Unterseite des Geräts und setzen Sie eine 9-Volt-Batterie ein.
Im Batteriebetrieb läuft die Uhr weiter und der Weckton ertönt zur eingestellten Zeit. Nur die Anzeige der Uhrzeit wird
nicht beleuchtet, um Strom zu sparen. Wenn der Stromausfall länger dauert, müssen Sie möglicherweise die Uhrzeit
etwas korrigieren, wenn die Stromzufuhr wieder hergestellt ist. Die Uhr verwendet einen internen batteriebetriebenen
Uhrenschaltkreis, welcher weniger genau als die Frequenz des Stromnetzes ist. Die Weckzeit bleibt richtig eingestellt.
TECHNISCHE DATEN
Stromversorgung: 230V ~ 50 Hz
Batterie: 9 V (1x 9 V 6F22 / 6LR61 nicht im Lieferumfang)
Leistungsaufnahme: 2 W

7
Sicherheitsvorkehrungen:
Um das Risiko eines elektrischen Schlags zu verringern, sollte dieses
Produkt AUSSCHLIESSLICH von einem autorisierten Techniker
geöffnet werden. Bei Problemen trennen Sie das Gerät bitte von der
Spannungsversorgung und von anderen Geräten ab. Stellen Sie sicher,
dass das Gerät nicht mit Wasser oder Feuchtigkeit in Berührung kommt.
Wartung:
Nur mit einem trockenen Tuch säubern. Keine Reinigungs- oder Scheuermittel verwenden.
Garantie:
Es kann keine Garantie oder Haftung für irgendwelche Änderungen oder Modifikationen des Produkts oder für
Schäden übernommen werden, die aufgrund einer nicht ordnungsgemäßen Anwendung des Produkts entstanden
sind.
Allgemeines:
Design und technische Daten können ohne vorherige Ankündigung geändert werden.
Alle Logos, Marken und Produktnamen sind Marken oder eingetragene Marken ihrer jeweiligen Eigentümer und
werden hiermit als solche anerkannt.
Bitte bewahren Sie Bedienungsanleitung und Verpackung für spätere Verwendung auf.
Achtung:
Dieses Produkt ist mit diesem Symbol gekennzeichnet. Es bedeutet, dass die ausgedienten elektrischen und
elektronischen Produkte nicht mit dem allgemeinen Haushaltsmüll entsorgt werden dürfen. Für diese Produkte
stehen gesonderte Sammelsysteme zur Verfügung.

8
FRANÇAIS
Réveil à LED rouge
Lisez entièrement cette notice avant d'utiliser votre appareil.
1. INDICATEUR DE LA FONCTION RÉVEIL
2. COMPARTIMENT A PILES
3. MARCHE/ARRÊT DE LA FONCTION RÉVEIL
4. BARRE DE RAPPEL (SNOOZE)
5. RÉGLAGE DES HEURES
6. RÉGLAGE DES MINUTES
7. RÉGLAGE DE L'HEURE DE RÉVEIL
8. RÉGLAGE DE L'HEURE DE L'HORLOGE
87
5
6
3
2
4
1

9
MISE EN ROUTE
Branchez le cordon d'alimentation sur une prise secteur 230 V CA. Les informations affichées sur l'écran clignotent
pour indiquer que l'heure affichée n'est pas l'heure actuelle. Cela est tout à fait normal et le clignotement cessera dès
lors que vous aurez réglé l'heure de l'horloge.
RÉGLAGE DE L'HEURE DE L'HORLOGE
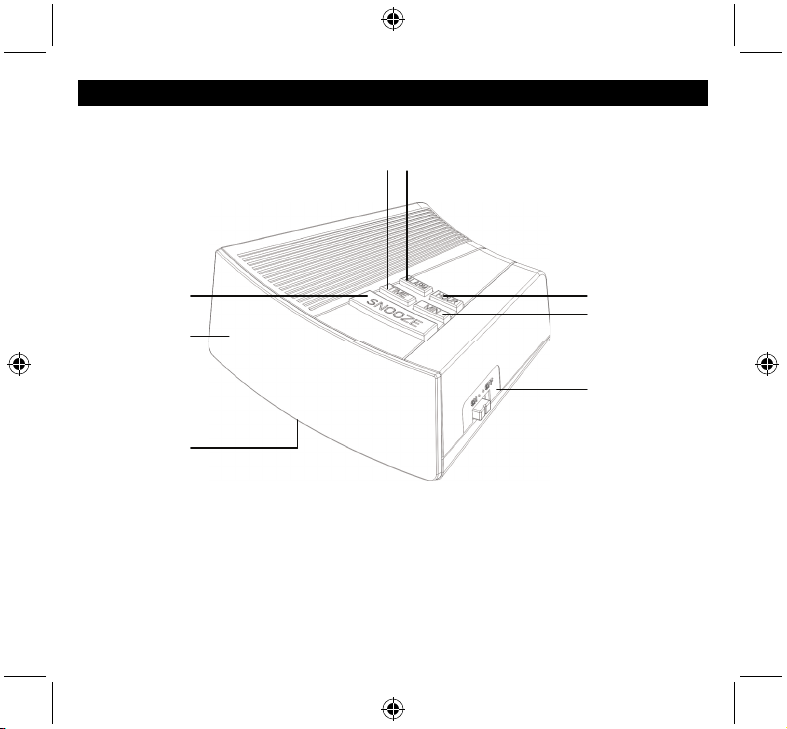
Pour régler l'heure de l'horloge, appuyez sur la touche TIME SET (8) puis réglez les heures à l'aide de la touche HOUR
SET (5) et les minutes à l'aide de la touche MINUTE SET (6). Relâchez les touches lorsque l'heure affichée est exacte.
RÉGLAGE DE L'HEURE DU RÉVEIL
Pour régler l'heure de réveil, appuyez sur la touche ALARM SET (7) puis réglez les heures à l'aide de la touche HOUR
SET (5) et les minutes à l'aide de la touche MINUTE SET (6). Relâchez les touches lorsque l'heure affichée est exacte.
ACTIVATION/DÉSACTIVATION DE LA FONCTION RÉVEIL
Poussez le commutateur de marche/arrêt de la fonction réveil (ALARM ON/OFF) (3) sur la position marche (ON).
L'INDICATEUR DE LA FONCTION RÉVEIL (1) s'allume sur l'écran. La sonnerie retentira à l'heure que vous avez
choisie. Pour arrêter la sonnerie, poussez le commutateur de marche/arrêt de la fonction réveil (ALARM ON/OFF) (3)
sur la position arrêt (OFF). Pour entendre la sonnerie le lendemain à la même heure, repoussez le commutateur de
marche/arrêt de la fonction réveil (ALARM ON/OFF) (3) sur la position marche (ON).
FONCTION RAPPEL (SNOOZE)
Lorsque la sonnerie retentit, appuyez sur la BARRE DE RAPPEL (SNOOZE) (4) pour dormir encore quelques minutes.
La sonnerie retentira de nouveau 9 minutes après. Vous pouvez retarder ainsi votre lever du lit jusqu'à deux heures.
ALIMENTATION DE SECOURS (non fournie)
En cas de panne de courant, votre appareil bascule automatiquement sur la pile d'alimentation de secours, si vous
avez installé une telle pile. Pour cela, ouvrez le COMPARTIMENT A PILES sous votre réveil et installez une pile 9 volts.
La pile suffit pour assurer le fonctionnement de la fonction horloge et de la fonction réveil, mais non celui de la fonction
affichage afin de ne pas épuiser trop vite la pile. En cas de panne prolongée du courant, vous aurez peut-être à ajuster
l'heure lors de la reprise de l'alimentation secteur. La fréquence produite par la pile est en effet moins précise que celle
produite par le courante électrique du secteur. Aucun ajustement n'est nécessaire pour l'heure de réveil.
SPÉCIFICATIONS
Alimentation électrique : 230V ~ 50Hz
Pile : 9 V (1 x 9V 6F22 / 6LR61, non fournie)
Consommation d’énergie : 2 W

10
Consignes de sécurité :
Pour réduire le risque de choc électrique, ce produit ne doit être ouvert
que par un technicien qualifié si une réparation s’impose. Débranchez
l’appareil et les autres équipements du secteur s’il y a un problème. Ne
pas exposer l’appareil à l’eau ni à l’humidité.
Entretien :
Ne nettoyez l’appareil qu’avec un chiffon sec. N’utilisez pas de solvants ou de produits abrasifs.
Garantie :
Aucune garantie ou responsabilité ne sera acceptée en cas de modification et/ou de transformation du produit ou en
cas de dommages provoqués par une utilisation incorrecte de l’appareil.
Généralités :
Le design et les caractéristiques techniques sont sujets à modification sans notification préalable.
Tous les logos de marques et noms de produits sont des marques déposées ou immatriculées dont leurs détenteurs
sont les propriétaires et sont donc reconnues comme telles dans ce documents.
Conservez ce manuel et l’emballage pour toute référence ultérieure.
Attention :
Ce symbole figure sur l’appareil. Il signifie que les produits électriques et électroniques ne doivent pas être
jetés avec les déchets domestiques. Le système de collecte est différent pour ce genre de produits.

11
NEDERLANDS
Alarmklok met rode LED
Lees dit voordat u het apparaat gebruikt.
1. Alarmindicator
2. Batterijvak
3. Alarm aan/uit
4. Sluimerbalk
5. Uur-instelling
6. Minuteninstelling)
7. Alarminstelling
8. Tijdsinstelling
87
5
6
3
2
4
1

12
Bediening
Steek de stekker van het netsnoer in een 230 V stopcontact. Het gehele scherm zal gaan knipperen, wat betekent dat
de verkeerde tijd wordt weergegeven. Dit is een normale conditie en zal stoppen wanneer u de tijd instelt.
De tijd instellen
Om de tijd in te stellen, druk op de “TIME”-toets (8) en druk vervolgens gelijktijdig op de “MINUTE”-toets (5) en de
HOUR-toets (6). Laat de knoppen los om te bevestigen dat de tijd is ingesteld.
De wekker instellen
Om het alarm in te stellen, druk op de “ALARM”-toets (7) en druk vervolgens gelijktijdig op de “MINUTE”-toets (5) en
de “HOUR”-toets (6). Laat de knoppen los om te bevestigen dat het alarm is ingesteld.
Bediening van het alarm
Schuif de “ALARM ON/OFF”-knop (3) naar de “ON”-positie (aan). De alarmindicator (1) zal oplichten en het alarm zal
afgaan op de ingestelde wektijd. Schuif de “ALARM ON/OFF”-knop (3) naar de “OFF”-positie om het alarm uit te
schakelen.
Snooze (Sluimeren)
Als het alarm afgaat, raakt u eenvoudig de SNOOZE-balk (4) aan om tijdelijk het alarm uit te zetten. Na 9 minuten zal
de wekker weer afgaan. Dit kan zo vaak u wilt worden herhaald, tot maximaal twee uur.
Back-up-batterij (batterij niet inbegrepen)
In het geval van een stroomstoring, zal dit toestel automatisch overschakelen naar batterij. Open het batterijvak aan
de onderkant van het apparaat en plaats een 9 volt batterij. Tijdens het werken op de batterij, zal de klok de tijd laten
doorlopen en het alarm zal afgaan op de ingestelde tijd. Het klokscherm zal niet oplichten om de batterij te sparen.
Bij een lange stroomstoring zult u de tijd van de klok een beetje moeten aanpassen nadat de netspanning terugkeert.
De klok maakt gebruik van een klokschakeling gevoed door een interne batterij, die minder nauwkeurig is dan het
lichtnetfrequentie. De alarmtijd zal correct blijven.
Specificaties
Voedingsbron: 230 V, 50 Hz
DC batterij: 9 V (1 x 9V 6F22 / 6LR61 niet inbegrepen)
Energieverbruik: 2 W

13
Veiligheidsvoorzorgsmaatregelen:
Om het risico op elektrische schokken te voorkomen mag dit product
ALLEEN worden geopend door een erkende technicus wanneer er
onderhoud nodig is. Koppel het product los van de elektrische voeding
en van andere apparatuur als zich problemen voordoen. Stel het
product niet bloot aan water of vocht.
Onderhoud:
Uitsluitend reinigen met een droge doek. Gebruik geen reinigingsmiddelen of schuurmiddelen.
Garantie:
Voor wijzigingen en veranderingen aan het product of schade veroorzaakt door een verkeerd gebruik van dit product,
kan geen aansprakelijkheid worden geaccepteerd. Tevens vervalt daardoor de garantie.
Algemeen:
Wijziging van ontwerp en specificaties zonder voorafgaande mededeling onder voorbehoud.
Alle logo’s, merken en productnamen zijn handelsmerken of geregistreerde handelsmerken van de respectievelijke
eigenaren en worden hierbij als zodanig erkend.
Bewaar deze gebruiksaanwijzing voor latere raadpleging.
Let op:
Dit product is voorzien van dit symbool. Dit symbool geeft aan dat afgedankte elektrische en elektronische
producten niet met het gewone huisafval verwijderd mogen worden. Voor dit soort producten zijn er speciale
inzamelingspunten.

14
ITALIANO
Sveglia con LED rosso
Vi preghiamo di leggere queste istruzioni prima di utilizzare l'unità.
1. INDICATORE SVEGLIA
2. COMPARTO BATTERIE
3. SVEGLIA ON/OFF
4. BARRA SNOOZE
5. IMPOSTA ORA
6. IMPOSTA MINUTI
7. IMPOSTA ALLARME
8. IMPOSTA ORARIO
87
5
6
3
2
4
1

15
OPERATIVITA':
Inserite il cavo nella presa di alimentazione AC da 230V L'intero display lampeggerà, non indicando l'ora non corretta.
Questa è una condizione normale e si interromperà quando avrete impostato l'ora.
IMPOSTARE L'ORA
Per impostare l'ora, premete il tasto IMPOSTA ORARIO (8), quindi premete contemporaneamente i tasti IMPOSTA
ORA (5) e IMPOSTA MINUTO (6). Rilasciate i tasti per confermare l'orario impostato.
IMPOSTARE L'ALLARME
Per impostare la SVEGLIA, premete il tasto IMPOSTA SVEGLIA (7), quindi premete contemporaneamente i tasti
IMPOSTA ORA (5) e IMPOSTA MINUTO (6). Rilasciate i tasti per confermare l'orario della sveglia.
PER UTILIZZARE L'ALLARME
Fate scorrere l'interruttore SVEGLIA ON/OFF (3) in posizione “ON” L'INDICATORE DELLA SVEGLIA (1) si illuminerà e
la sveglia suonerà all'orario prestabilito. Per interrompere la suoneria, fate scorrere l'interruttore SVEGLIA ON/OFF (3)
in posizione “OFF” e spegnete la sveglia. Per ripristinare la sveglia per il giorno dopo, fate di nuovo scorrere
l'interruttore SVEGLIA ON/OFF (3) in posizione “ON”.
SNOOZE
Quando suona la sveglia, toccate semplicemente la barra SNOOZE (4) per interrompere momentaneamente la
suoneria. La sveglia suonerà di nuovo 9 minuti dopo. Potrete farlo quanto vorrete, fino a due ore di fila.
BATTERIA DI BACK-UP (Batterie non incluse)
In caso di mancanza di corrente, quest'unità passera automaticamente all'alimentazione da batteria se questa è stata
installata. Aprite il COMPARTO BATTERIE sul fondo dell'unità ed installate una batteria da 9 V. Con l'alimentazione a
batteria, l'orologio manterrà l'orario e la sveglia suonerà all'ora prevista. Il display dell'orologio non si accenderà però
per risparmiare carica della batteria. Se avete un guasto alla rete elettrica prolungato, dovrete effettuare una leggera
regolazione dell'orologio dopo il ritorno dell'alimentazione AC. L'orologio utilizza un orologio alimentato da un circuito
dalla batteria interna che è meno accurato della frequenza della linea di alimentazione. L'orario di allarme rimarrà
quello corretto
SPECIFICHE
Alimentazione: 230V ~ 50Hz
Batteria DC: 9V (1 x 9V 6F22 / 6LR61 non incluse)
Consumo: 2W

16
Precauzioni di sicurezza:
Per ridurre il rischio di shock elettrico, questo prodotto dovrebbe essere
aperto SOLO da un tecnico autorizzato quando è necessario ripararlo.
Scollegare il prodotto dall’alimentazione e da altri apparecchi se
dovesse esserci un problema. Non esporre il prodotto ad acqua o
umidità.
Manutenzione:
Pulire solo con un panno asciutto. Non utilizzare solventi detergenti o abrasivi.
Garanzia:
Non sarà accettata alcuna garanzia o responsabilità in relazione a cambiamenti e modifiche del prodotto o a danni
determinati dall’uso non corretto del prodotto stesso.
Generalità:
Il design e le caratteristiche tecniche sono soggetti a modifica senza necessità di preavviso.
Tutti i marchi a logo e i nomi di prodotto sono marchi commerciali o registrati dei rispettivi titolari e sono riconosciuti
come tali in questo documento.
Tenere questo manuale e la confezione per riferimento futuro.
Attenzione:
Il prodotto è contrassegnato con questo simbolo, con il quale si indica che i prodotti elettrici ed elettronici non
devono essere gettati insieme ai rifiuti domestici. Per questi prodotti esiste un sistema di raccolta differenziata.

17
ESPAÑOL
Reloj despertador con piloto LED rojo
Por favor, lea esto antes de poner en funcionamiento el aparato.
1. INDICADOR DE ALARMA
2. COMPARTIMENTO PARA PILAS
3. ENCENDER/APAGAR LA ALARMA
4. BARRA SNOOZE
5. AJUSTAR HORA
6. AJUSTAR MINUTOS
7. AJUSTAR ALARMA
8. AJUSTAR LA HORA
87
5
6
3
2
4
1

18
FUNCIONAMIENTO
Conecte el cable a una toma de corriente CA de 230V. Parpadeará toda la pantalla, indicando que se muestra una
hora incorrecta. Es normal, se detendrá cuando ajuste la hora.
AJUSTAR LA HORA
Para ajustar la hora, pulse el botón AJUSTAR LA HORA (8), después pulse el botón AJUSTAR HORA (5) y el botón
AJUSTAR MINUTOS (6) simultáneamente. Suelte los botones para confirmar que está ajustada la hora.
AJUSTAR LA ALARMA
Para ajustar la alarma, pulse el botón AJUSTAR ALARMA (7), después pulse el botón AJUSTAR HORA (5) y el botón
AJUSTAR MINUTOS (6) simultáneamente. Suelte los botones para confirmar que está ajustada la alarma.
FUNCIONAMIENTO DE LA ALARMA
Desplace el botón ENCENDER/APAGAR ALARMA (3) a la posición “ON” (ENCENDIDO). El INDICADOR DE
ALARMA (1) se iluminará y la alarma sonará a la hora establecida. Para silenciar la alarma, desplace el botón
ENCENDER/APAGAR ALARMA (3) a la posición “OFF” (APAGADO) que desactivará la alarma. Para volver a activar
la alarma para el día siguiente, desplace de nuevo el botón ENCENDER/APAGAR ALARMA (3) a la posición “ON”
(ENCENDIDO).
SNOOZE
Cuando suene la alarma, toque simplemente la BARRA SNOOZE (4) para silenciar temporalmente la alarma.
La alarma volverá a sonar de nuevo tras 9 minutos. Esto puede repetirse tantas veces como desee, durante un
máximo de dos horas.
PILA DE RESERVA (Pila no incluida)
En el caso de un fallo en el suministro eléctrico, este aparato pasará automáticamente a un circuito de batería de
reserva, siempre que tenga la pila instalada. Abra el COMPARTIMENTO PARA PILAS (2), en la parte inferior del
aparato, e introduzca una pila de 9 voltios. Funcionando a pilas, el reloj mantendrá la hora y la alarma sonará a la hora
establecida. Simplemente dejará de encenderse la pantalla del reloj, para ahorrar energía de la pila. Si tiene un fallo
largo en el suministro eléctrico, es posible que necesite hacer un ligero ajuste de la hora del reloj tras la vuelta de la
corriente CA. El reloj utiliza una batería interna alimentada por un circuito- reloj, menos preciso que la frecuencia de la
línea de alimentación. La hora de la alarma se mantendrá correcta.
ESPECIFICACIONES
Alimentación: 230V ~ 50Hz
Pila CC: 9V (1 x 9V 6F22 / 6LR61 no incluidas)
Consumo de energía: 2W

19
Medidas de seguridad:
Para reducir el peligro de descarga eléctrica, este producto SÓLO lo
debería abrir un técnico autorizado cuando necesite reparación.
Desconecte el producto de la toma de corriente y de los otros equipos si
ocurriera algún problema. No exponga el producto al agua ni a la
humedad.
Mantenimiento:
Límpielo sólo con un paño seco. No utilice disolventes de limpieza ni productos abrasivos.
Garantía:
No se aceptará ninguna garantía o responsabilidad derivada de cualquier cambio o modificaciones realizadas al
producto o daños provocados por un uso incorrecto del producto.
General:
Las ilustraciones y las especificaciones podrán sufrir cambios sin previo aviso.
Todas las marcas de logotipos y nombres de productos constituyen patentes o marcas registradas a nombre de sus
titulares correspondientes, reconocidos como tal.
Conserve este manual y el embalaje en caso de futura necesidad.
Atención:
Este producto está señalizado con este símbolo. Esto significa que los productos eléctricos y electrónicos
usados no deberán mezclarse con los desechos domésticos generales. Existe un sistema de recogida
individual para este tipo de productos.

20
MAGYAR
Piros LED-es ébresztőóra
A készülék használata előtt kérjük, olvassa el az utasításokat.
1. ÉBRESZTÉSJELZŐ
2. ELEMTARTÓ REKESZ
3. ÉBRESZTÉS BE/KI
4. SZUNDI GOMB
5. ÓRA BEÁLLÍTÁSA
6. PERC BEÁLLÍTÁSA
7. ÉBRESZTÉS BEÁLLÍTÁSA
8. IDŐBEÁLLÍTÁSA
87
5
6
3
2
4
1
Table of contents
Languages:
Other König Alarm Clock manuals